Chocolate Peanut Butter Balls Recipe

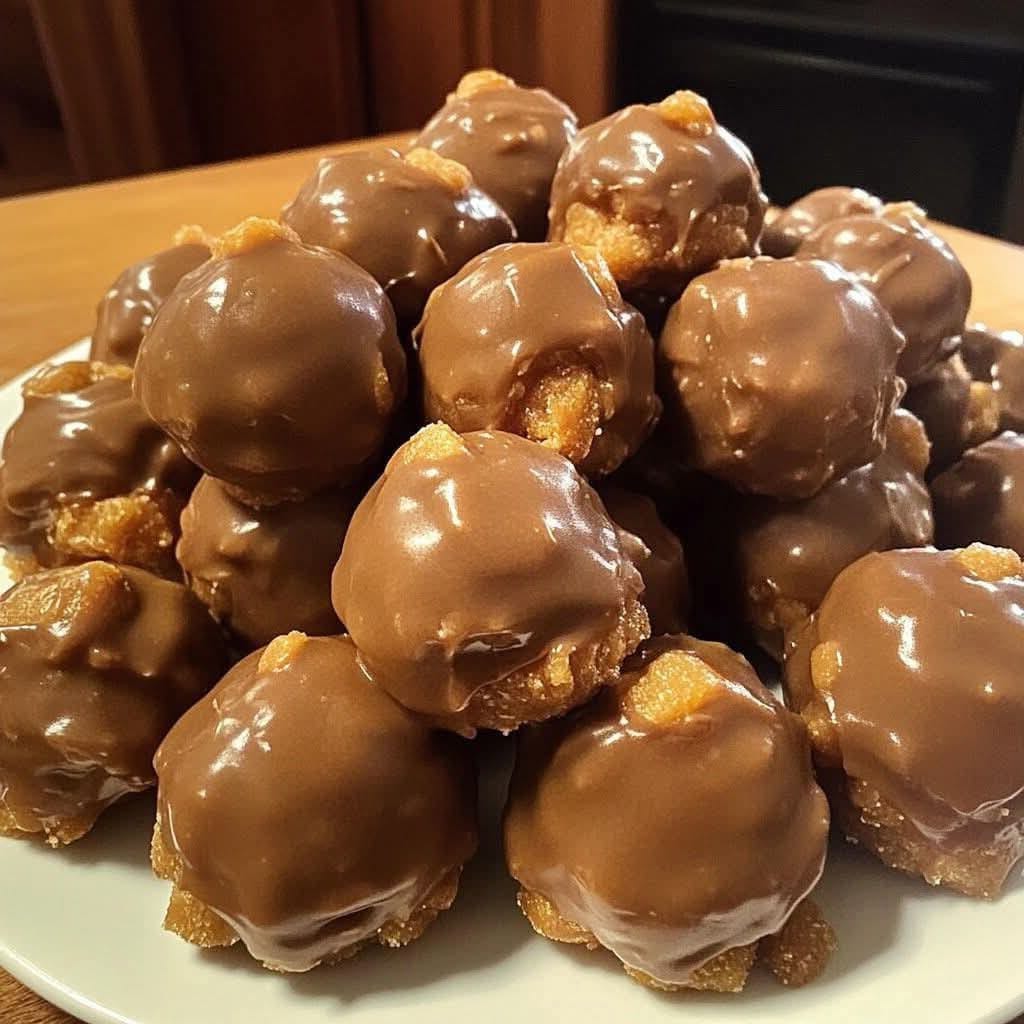
Few treats combine simplicity and decadence quite like chocolate peanut butter balls. These bite-sized confections are creamy, nutty, and satisfyingly sweet, making them a favorite at holiday gatherings, potlucks, or just as an indulgent homemade snack. With a few basic ingredients and minimal effort, you can make a batch that rivals anything from a candy shop.

Ingredients:

For the Peanut Butter Filling:

  • 1 cup creamy peanut butter (you can also use natural peanut butter, though the texture may vary slightly)

  • 1/2 cup unsalted butter, softened

  • 2 cups powdered sugar

  • 1 teaspoon pure vanilla extract

For the Chocolate Coating:

  • 2 cups semisweet chocolate chips (or milk chocolate if you prefer a sweeter coating)

  • 2 tablespoons shortening or coconut oil (optional, for smoother melting and glossy finish)

Optional Garnishes:

  • Chopped peanuts

  • Sprinkles

  • Drizzle of white chocolate

Instructions:

Step 1: Prepare the Peanut Butter Mixture

Start by combining the peanut butter and softened butter in a medium-sized mixing bowl. Using a hand mixer or wooden spoon, beat until the mixture is smooth and creamy. The butter not only softens the peanut butter but also adds richness to the center, making each bite melt-in-your-mouth perfect.

Next, gradually add the powdered sugar, about 1/2 cup at a time, mixing thoroughly after each addition. Powdered sugar ensures the filling has a firm texture that can hold its shape once dipped in chocolate. Once all the sugar is incorporated, stir in the vanilla extract. This tiny addition enhances the nutty flavor and balances the sweetness.

At this stage, taste the mixture. If you prefer a slightly sweeter or saltier filling, adjust by adding more powdered sugar or a pinch of salt, depending on your taste. Remember, the filling should be firm enough to roll into balls without being crumbly.

Step 2: Shape the Balls

Line a baking sheet with parchment paper or a silicone mat. Using a spoon or cookie scoop, portion out the peanut butter mixture and roll it between your palms to form smooth, uniform balls, roughly 1 inch in diameter. Consistency in size ensures even chocolate coverage and a professional appearance.

Place each ball on the prepared baking sheet. Once all the balls are shaped, chill them in the refrigerator for at least 30 minutes. Chilling firms the centers, making them easier to dip in chocolate without breaking apart.

Step 3: Melt the Chocolate

While the peanut butter balls are chilling, melt the chocolate for the coating. You can do this in a microwave-safe bowl or using a double boiler.

Microwave method: Place chocolate chips and shortening (if using) in a microwave-safe bowl. Heat on medium power in 30-second intervals, stirring after each interval until the chocolate is fully melted and smooth. The shortening or coconut oil adds a shiny finish and prevents the chocolate from seizing.

Double boiler method: Fill a saucepan with a few inches of water and bring it to a simmer. Place a heatproof bowl over the saucepan, ensuring it doesn’t touch the water. Add chocolate chips and shortening to the bowl and stir until melted and smooth.

Step 4: Dip the Peanut Butter Balls

Using a fork or a toothpick, carefully dip each chilled peanut butter ball into the melted chocolate, fully coating it. Allow any excess chocolate to drip back into the bowl. Place the coated balls back onto the parchment-lined baking sheet.

If desired, sprinkle chopped peanuts, colored sprinkles, or drizzle with melted white chocolate before the chocolate sets. This adds both texture and visual appeal, making the treats perfect for gifting or special occasions.

Step 5: Set the Chocolate

After dipping, refrigerate the peanut butter balls for at least 1 hour, or until the chocolate coating is firm. Proper chilling ensures that the chocolate has a crisp snap when bitten into while keeping the peanut butter center soft and creamy.

Once set, you can transfer the peanut butter balls to an airtight container. Store them in the refrigerator for up to two weeks or freeze for longer storage. Frozen, they make a convenient snack, and the chocolate doesn’t become brittle even after thawing.

Tips for Perfect Chocolate Peanut Butter Balls:

  1. Use room temperature butter: Cold butter can create a lumpy filling. Softened butter ensures a smooth texture.

  2. Avoid overmixing: Once the powdered sugar is added, mix just enough to combine. Overmixing can make the mixture too stiff.

  3. Work quickly with chocolate: Chocolate can seize if it cools too much during dipping. If it thickens, gently reheat in short intervals.

  4. Uniform balls: Using a cookie scoop helps maintain consistent size and makes the dipping process easier.

  5. Flavor variations: Add a pinch of salt, a teaspoon of instant coffee, or a splash of bourbon for a unique twist.

Serving Suggestions:

Chocolate peanut butter balls are versatile. Serve them as a dessert platter with other bite-sized sweets, pack them in decorative boxes for gifts, or enjoy them with a cold glass of milk or coffee. They also make a wonderful treat for holiday parties, birthdays, or just a simple midweek indulgence.

Cinnamon Rolls Recipe

Cinnamon rolls are the ultimate comfort food—soft, fluffy, and infused with the warm, aromatic scent of cinnamon and sugar. This recipe takes the classic cinnamon roll and gives it a little twist, making them extra indulgent, perfectly soft, and lightly caramelized on the edges. Whether it’s for breakfast, brunch, or an anytime treat, these cinnamon rolls will impress everyone at the table.

Ingredients

For the Dough:

  • 3 ½ cups all-purpose flour, plus extra for dusting

  • ¼ cup granulated sugar

  • 1 teaspoon salt

  • 2 ¼ teaspoons (1 packet) active dry yeast

  • ¾ cup warm milk (110°F/43°C)

  • ¼ cup unsalted butter, melted

  • 1 large egg

  • 1 teaspoon vanilla extract

For the Cinnamon Filling:

  • ½ cup unsalted butter, softened

  • ¾ cup brown sugar, packed

  • 2 tablespoons ground cinnamon

  • ½ teaspoon nutmeg (optional, for extra warmth)

For the Glaze:

  • 1 cup powdered sugar

  • 2–3 tablespoons milk or cream

  • ½ teaspoon vanilla extract

  • Pinch of salt

Instructions

Step 1: Prepare the Dough

  1. In a small bowl, combine the warm milk and sugar. Sprinkle the yeast on top and let it sit for 5–10 minutes until foamy. This ensures your yeast is active and will give your rolls a perfect rise.

  2. In a large mixing bowl, combine the flour and salt. Add the melted butter, egg, and vanilla extract.

  3. Pour the yeast mixture into the flour mixture. Mix until a sticky dough forms.

  4. Transfer the dough to a lightly floured surface and knead for 6–8 minutes until it becomes smooth and elastic. If you have a stand mixer with a dough hook, knead on medium speed for 5 minutes.

  5. Place the dough in a lightly greased bowl, cover it with a clean cloth, and let it rise in a warm place for 1–1.5 hours, or until it doubles in size.

Step 2: Prepare the Cinnamon Filling

  1. In a small bowl, combine the softened butter, brown sugar, cinnamon, and nutmeg (if using). Stir until it forms a smooth, spreadable paste. This mixture is the heart of your cinnamon rolls, so don’t skimp on the cinnamon—it makes all the difference.

Step 3: Roll Out the Dough

  1. Once the dough has doubled in size, punch it down gently to release the air.

  2. Transfer it to a floured surface and roll it into a rectangle about 16×12 inches. The thickness should be roughly ¼ inch.

  3. Spread the cinnamon-sugar filling evenly over the dough, leaving a small border (about ½ inch) around the edges to seal the rolls.

Step 4: Form the Rolls

  1. Starting from the long edge, roll the dough tightly into a log. Pinch the seam to seal.

  2. Using a sharp knife or dental floss, cut the log into 12 equal rolls. For extra flair, you can make them slightly larger or smaller depending on your preference.

  3. Arrange the rolls in a greased 9×13-inch baking dish, leaving a little space between them for expansion.

Step 5: Second Rise

  1. Cover the rolls with a clean kitchen towel and let them rise for another 30–40 minutes. They should puff up nicely and look soft and airy.

  2. Preheat your oven to 350°F (175°C).

Step 6: Bake the Cinnamon Rolls

  1. Bake the rolls in the preheated oven for 20–25 minutes, or until the tops are golden brown and slightly caramelized. Be careful not to overbake; you want them soft and tender, not dry.

  2. Remove from the oven and let them cool for 5–10 minutes before glazing.

Step 7: Prepare the Glaze

  1. In a small bowl, whisk together powdered sugar, milk, vanilla extract, and a pinch of salt until smooth. Adjust the milk to reach your desired consistency—thicker for drizzling, thinner for a light coating.

  2. Drizzle the glaze generously over the warm cinnamon rolls. The glaze will melt slightly into the crevices, making every bite decadently sweet.

Tips and Variations

  • Cheesy Twist: For a savory-sweet version, sprinkle a little cream cheese inside the filling before rolling. It adds a creamy, tangy contrast to the cinnamon.

  • Nutty Crunch: Add chopped pecans or walnuts to the filling for extra texture.

  • Fruit Flair: Dried fruits like raisins, cranberries, or chopped dates can be sprinkled inside for a fruity touch.

  • Make Ahead: Prepare the rolls up to Step 4, cover, and refrigerate overnight. Bake fresh in the morning for a warm, bakery-fresh treat.

  • Crispy Bottoms: For a slightly caramelized base, brush the baking dish with melted butter and a sprinkle of brown sugar before arranging the rolls.

Crispy Air Fryer Potato Slices

There’s something incredibly comforting about a plate of perfectly crispy potatoes — golden on the outside, tender on the inside, and seasoned just right. These Crispy Air Fryer Potato Slices take that comfort to a new level. Forget the greasy deep-fried versions — this recipe gives you the same satisfying crunch with just a fraction of the oil. Whether you serve them as a side dish, a snack, or the base for creative toppings, these air-fried potato slices are guaranteed to become a household favorite.

Why You’ll Love This Recipe

The magic of this recipe lies in its simplicity and versatility. You only need a few pantry staples, yet the result tastes like something from a gourmet bistro. The air fryer crisps each slice evenly, producing that irresistible golden crust without the fuss of flipping or frying in oil. They’re quick, healthier than traditional fries, and endlessly customizable with herbs, spices, and dipping sauces.

This dish pairs beautifully with grilled meats, burgers, or even breakfast platters — imagine them alongside scrambled eggs and bacon. You can enjoy them plain, topped with melted cheese and scallions, or sprinkled with smoked paprika for a rustic touch.

Ingredients You’ll Need

  • 3 medium russet potatoes (or Yukon Gold for a buttery flavor)

  • 1 ½ tablespoons olive oil (or avocado oil for a lighter finish)

  • ½ teaspoon garlic powder

  • ½ teaspoon onion powder

  • ½ teaspoon smoked paprika (optional, for color and depth)

  • ½ teaspoon sea salt

  • ¼ teaspoon black pepper

  • ½ teaspoon dried rosemary or thyme (optional for aroma)

  • 1 tablespoon grated Parmesan cheese (optional for extra crispiness)

Step-by-Step Instructions

Step 1: Slice the Potatoes

Begin by washing your potatoes thoroughly. You can peel them if you prefer a cleaner look, but leaving the skin on adds extra crisp texture and rustic charm.
Using a sharp knife or a mandoline slicer, cut the potatoes into ¼-inch thick slices — not too thin that they burn, but not too thick that they remain soft inside. Uniform thickness ensures even cooking in the air fryer.

Step 2: Soak the Slices

This step is key to getting that perfect crisp!
Place your potato slices in a large bowl of cold water and let them soak for at least 20–30 minutes. This removes excess starch, preventing them from sticking together and helping them crisp up beautifully.
After soaking, drain the water and pat the slices completely dry using a clean kitchen towel or paper towels. Any moisture left will cause them to steam instead of crisp.

Step 3: Season the Potatoes

Transfer the dried potato slices into a mixing bowl. Drizzle with olive oil and toss gently to coat every slice.
In a small bowl, combine your seasonings — garlic powder, onion powder, paprika, salt, pepper, and herbs. Sprinkle this mixture over the oiled potatoes and toss until evenly coated.
If you’re using Parmesan, add it now for a deliciously crisp and savory finish.

Step 4: Air Fry to Perfection

Preheat your air fryer to 375°F (190°C) for about 3 minutes. Lightly spray the air fryer basket with a touch of oil or non-stick spray.
Arrange the potato slices in a single layer, making sure they don’t overlap. Depending on the size of your air fryer, you may need to cook them in batches.

Air fry for 8–10 minutes, then flip each slice using tongs and cook for another 6–8 minutes, until golden brown and crisp around the edges.
Keep an eye on them near the end — every air fryer model cooks a bit differently, and you don’t want to over-brown them.

Step 5: Serve and Enjoy

Once cooked, transfer your crispy slices to a wire rack or paper towel to drain any residual oil. Sprinkle a little extra sea salt or grated Parmesan while they’re hot for that final gourmet touch.

Serve immediately for the best texture and flavor. These potato slices are incredible on their own, but you can also pair them with your favorite dips such as:

  • Garlic aioli

  • Spicy ketchup

  • Sour cream and chives

  • Ranch or honey mustard

  • Melted cheese sauce

Creative Variations

  • Loaded Potato Slices: After air frying, top the slices with shredded cheese, crispy bacon bits, and green onions. Return to the air fryer for 2 minutes to melt the cheese.

  • Herb & Lemon Zest Twist: Add finely chopped parsley and lemon zest after cooking for a fresh Mediterranean vibe.

  • Spicy Kick: Toss the potatoes with a pinch of cayenne or chili flakes before air frying.

  • Sweet & Savory Mix: Try this recipe with sweet potatoes and season with cinnamon and smoked salt for a unique twist.

Tips for the Perfect Crisp

  1. Soak and dry thoroughly: Skipping the soaking step can lead to soggy potatoes.

  2. Don’t overcrowd the basket: Air circulation is crucial — overlapping slices steam instead of crisping.

  3. Use just enough oil: A light coating goes a long way. Too much oil can make them heavy.

  4. Adjust timing: Thin slices cook faster, so check early to avoid burning.

  5. Serve fresh: Like fries, these slices are best eaten right after cooking for that ultimate crunch.

Healthier Than You Think

Compared to deep-fried potatoes, this air-fried version uses up to 80% less oil, making it a guilt-free snack. The air fryer locks in natural potato flavor while using hot air circulation to achieve that crispy texture. Plus, potatoes are rich in potassium, vitamin C, and fiber — so when prepared this way, they’re both nourishing and satisfying.

Final Thoughts

These Crispy Air Fryer Potato Slices are the perfect example of how simple ingredients can create extraordinary flavor. With minimal effort, you get that perfect balance of crunch and tenderness, all while skipping the mess and calories of deep-frying.

Heavenly Pineapple Cheeseball

If you’re looking for a crowd-pleasing appetizer that perfectly balances sweet, savory, and creamy flavors, this Heavenly Pineapple Cheeseball is your next go-to recipe. It’s a tropical-inspired twist on the traditional cheeseball — a smooth, rich blend of cream cheese, crushed pineapple, sharp cheddar, and green onions, all rolled in a crunchy layer of toasted pecans. The result? A beautiful ball of sunshine that tastes as good as it looks. Whether for a party, holiday gathering, or casual get-together, this cheeseball brings a burst of tropical joy to every table.

The Story Behind the Recipe

This recipe takes inspiration from the classic Southern pineapple cheeseball — a vintage party favorite that once graced every holiday buffet. But this version takes it up a notch. The “heavenly” twist comes from a few small upgrades: cream cheese whipped until luxuriously airy, a touch of honey for balance, and a hint of lime zest for brightness. The result is something creamy, zesty, and just a little bit sweet — a perfect harmony of flavors that’s irresistible spread over crackers, toasted crostini, or fresh fruit slices.

Ingredients You’ll Need

For the Cheeseball:

  • 2 packages (8 oz each) cream cheese, softened

  • 1 cup crushed pineapple, drained very well

  • 1 cup shredded sharp cheddar cheese

  • ½ cup finely chopped red bell pepper

  • ¼ cup finely chopped green onions

  • 2 tablespoons honey (optional but heavenly!)

  • ½ teaspoon garlic powder

  • ¼ teaspoon salt

  • ¼ teaspoon black pepper

  • ½ teaspoon lime zest (or lemon zest for a milder citrus tone)

For the Coating:

  • 1 cup chopped toasted pecans (or walnuts if you prefer)

  • 2 tablespoons shredded coconut (optional, for tropical flair)

For Serving:

  • Butter crackers, pita chips, or sliced baguette

  • Fresh pineapple chunks or apple slices for a refreshing side

Step-by-Step Instructions

Step 1: Prepare the Base

In a large mixing bowl, add the softened cream cheese. Using a hand mixer, whip until creamy and smooth. The secret to the “heavenly” texture lies in this step — the more air you incorporate, the fluffier and lighter the cheeseball becomes.

Step 2: Add the Flavor Components

Fold in the shredded cheddar cheese, drained pineapple, bell pepper, green onions, garlic powder, salt, black pepper, honey, and lime zest. Mix everything together with a spatula until well combined. The mixture should look colorful and creamy, with pops of pineapple and red pepper peeking through the cheese base.

Step 3: Chill for Shape

Scoop the mixture onto a large piece of plastic wrap. Gather the wrap around the mixture and gently shape it into a ball. Twist the wrap tightly and refrigerate for at least 2 hours, or until firm enough to hold its shape. This chilling time allows the flavors to meld beautifully.

Step 4: Prepare the Coating

While the cheeseball chills, toast the chopped pecans (and coconut, if using) in a dry skillet over medium heat for 2–3 minutes, stirring often. This step enhances the nutty aroma and gives the coating a satisfying crunch.

Step 5: Roll the Cheeseball

Remove the cheeseball from the fridge and unwrap it. Roll it gently in the toasted nut mixture until fully coated. Press the nuts lightly so they stick to the cheese evenly. If you’re going for presentation perfection, you can roll it again in a fresh layer of pecans just before serving for extra crunch.


Serving Ideas

Place the cheeseball on a platter and surround it with your favorite accompaniments — buttery crackers, toasted baguette slices, pretzel crisps, or even celery sticks. Add a small bowl of pineapple chunks or fresh strawberries nearby to complement the tropical notes.

For a creative touch, you can shape the cheeseball into a pineapple form: use whole pecans to mimic the pineapple’s texture and crown it with the leaves of a real pineapple top. It’s a show-stopping centerpiece that’ll have everyone reaching for their cameras before their crackers.

Tips for a Perfect Pineapple Cheeseball

  1. Drain the Pineapple Well: The biggest trick is removing excess moisture. Use a fine sieve or cheesecloth to squeeze out every bit of juice; otherwise, the cheeseball may become too soft.

  2. Use Freshly Shredded Cheese: Pre-shredded cheese can contain anti-caking agents that affect the creamy texture. Shred your cheddar fresh for the best melt and flavor.

  3. Customize Your Coating: For variety, mix pecans with crushed pretzels, dried cranberries, or even toasted sesame seeds.

  4. Make Ahead: This cheeseball tastes even better when made a day before serving — the flavors deepen overnight. Just keep it well wrapped and coat it with nuts right before serving for freshness.

  5. Add a Spicy Kick: If you like a hint of heat, toss in a finely minced jalapeño or a dash of cayenne pepper.

Flavor Profile and Texture

Every bite of this Heavenly Pineapple Cheeseball delivers a delightful contrast — the creamy tang of cheese, the brightness of pineapple, the savory crunch of nuts, and the sweet whisper of honey. The lime zest adds a refreshing spark that keeps the richness in balance, making it a perfect appetizer for both summer barbecues and holiday feasts.

Its tropical flair pairs wonderfully with cocktails like piña coladas, mojitos, or even sparkling water with lime. This dish proves that a cheeseball can be both comforting and elegant, classic and modern, familiar and exotic — all at once.

Final Thoughts

The Heavenly Pineapple Cheeseball isn’t just an appetizer — it’s an experience. Each bite tells a story of sweet sunshine, creamy indulgence, and nutty crunch. It embodies everything that makes gatherings special: simplicity, flavor, and a touch of fun.Serve it at your next celebration, and watch it disappear in minutes. One taste and you’ll see why it’s called heavenly — light, flavorful, and unforgettable.

Mediterranean Lemon Garlic Roasted Eggplant

If you’re craving something wholesome, light, and bursting with Mediterranean sunshine, this Lemon Garlic Roasted Eggplant is the perfect dish. It’s a simple yet elegant recipe that transforms humble eggplant into a golden, tender delight infused with the vibrant flavors of garlic, olive oil, lemon, and fresh herbs. Whether you serve it as a side, a topping for grain bowls, or a light vegetarian main course, every bite carries a taste of the Mediterranean coast — zesty, herby, and absolutely delicious.

Ingredients

For the Roasted Eggplant:

  • 2 large eggplants, cut into 1-inch cubes (skin on for texture and color)

  • 4 tablespoons extra virgin olive oil

  • 4 cloves garlic, finely minced

  • Zest of 1 large lemon

  • Juice of 1 ½ lemons (about 3 tablespoons)

  • 1 teaspoon sea salt

  • ½ teaspoon freshly ground black pepper

  • 1 teaspoon dried oregano

  • ½ teaspoon smoked paprika (optional for a subtle warmth)

  • ¼ teaspoon crushed red pepper flakes (optional for heat)

For Garnish and Serving:

  • 2 tablespoons chopped fresh parsley or cilantro

  • 1 tablespoon chopped fresh mint (optional but refreshing)

  • A drizzle of extra virgin olive oil

  • Lemon wedges, for serving

Instructions

Step 1: Prepare the Eggplant

Wash the eggplants thoroughly and pat them dry. Cut them into 1-inch cubes — not too small, as they’ll shrink during roasting. Place the cubes in a large bowl and sprinkle a little salt over them. Let them sit for 15–20 minutes to draw out some moisture and reduce bitterness. Afterward, pat them dry again using a clean towel or paper towels.

This step ensures your roasted eggplant turns out tender yet not soggy — perfectly caramelized on the outside and creamy inside.

Step 2: Make the Marinade

In a small mixing bowl, whisk together the olive oil, minced garlic, lemon zest, lemon juice, salt, pepper, oregano, paprika, and red pepper flakes. This zesty, garlicky mixture will coat the eggplant beautifully and infuse every bite with flavor.

The combination of olive oil and lemon is classic in Mediterranean cooking — the oil provides richness, while the citrus cuts through with brightness, making each piece of eggplant pop with flavor.

Step 3: Toss and Coat

Pour the marinade over the eggplant cubes and toss thoroughly to ensure every piece is coated evenly. You can use your hands or a spatula, but be gentle so the cubes don’t break apart.

Let the eggplant sit for about 10 minutes to absorb the flavors — think of it as a mini-marination time before roasting.

Step 4: Roast to Perfection

Preheat your oven to 425°F (220°C) and line a large baking sheet with parchment paper. Spread the marinated eggplant cubes evenly on the sheet, ensuring they’re not overcrowded. Overcrowding causes steaming instead of roasting, so give them room to crisp up.

Roast in the preheated oven for 25–30 minutes, flipping halfway through for even browning. The eggplant should turn golden brown, caramelized on the edges, and wonderfully soft inside.

The aroma at this point — lemon, garlic, and roasted olive oil — will fill your kitchen with Mediterranean magic.

Step 5: Add Freshness

Once roasted, transfer the eggplant to a serving platter while still warm. Drizzle a touch of fresh olive oil over the top, sprinkle with chopped parsley (and mint, if using), and give it one final squeeze of lemon juice. This finishing touch enhances the brightness and gives a fresh, aromatic note that balances the roasted richness.

Serving Suggestions

This Mediterranean Lemon Garlic Roasted Eggplant is incredibly versatile. Here are a few ways to enjoy it:

  • As a Side Dish: Pair it with grilled chicken, fish, or lamb. The citrus and garlic flavors balance the richness of meats perfectly.

  • Over Grains: Spoon it over fluffy couscous, quinoa, or herbed rice for a vibrant vegetarian meal.

  • In a Salad: Toss the roasted eggplant with cherry tomatoes, chickpeas, and feta for a light Mediterranean bowl.

  • As a Spread: Mash it slightly and serve with warm pita bread as a rustic appetizer — similar to baba ganoush but chunkier and zestier.

  • With Pasta: Mix it with linguine or penne, add a drizzle of olive oil, and sprinkle parmesan for a quick, hearty meal.

Tips for the Perfect Roast

  1. High Heat is Key: Roasting at a high temperature ensures caramelization without turning the eggplant mushy.

  2. Don’t Skimp on Olive Oil: Eggplants naturally absorb oil, so make sure there’s enough to coat evenly for proper roasting.

  3. Use Fresh Lemon Juice: Bottled juice won’t deliver the same brightness and aroma.

  4. Try Fresh Herbs: Adding parsley and mint at the end keeps the flavor vibrant and fresh.

  5. Experiment with Additions: You can toss in cherry tomatoes, red onions, or bell peppers for extra color and sweetness.

Why This Recipe Shines

What makes this dish truly special is its balance of flavors and textures. The roasted eggplant becomes buttery and tender, almost melting on your tongue. The lemon and garlic give it an irresistible zing, while olive oil and herbs layer it with a Mediterranean warmth. It’s a humble dish that feels gourmet — proof that simple ingredients, when combined thoughtfully, can create extraordinary results.

Each bite transports you to a sunny coastal village, where food is vibrant, fresh, and filled with love. Whether served warm or at room temperature, this roasted eggplant captures the soul of Mediterranean cuisine — rustic yet elegant, nourishing yet indulgent.

Final Touch

Finish your plate with a light drizzle of olive oil and a sprinkle of flaky sea salt right before serving. It elevates the dish, enhancing the flavors while giving it that restaurant-style shine.

Enjoy your Mediterranean Lemon Garlic Roasted Eggplant as a celebration of simplicity and flavor — a dish that proves you don’t need complicated ingredients to create something extraordinary. Every golden cube sings with the bright essence of the Mediterranean sun, a perfect harmony of freshness, aroma, and comfort.

Vanilla Custard Cream Squares

Vanilla Custard Cream Squares are the kind of dessert that feels like a warm hug on a cool day — silky, creamy custard sandwiched between flaky pastry layers and dusted with a whisper of powdered sugar. Every bite is a perfect balance of delicate textures and nostalgic sweetness. This dessert, often inspired by the famous “Mille-feuille” or “Napoleon,” brings together the magic of homemade vanilla custard and buttery puff pastry in a simple yet luxurious way. Whether you’re hosting a dinner party or just craving something comforting and elegant, these Vanilla Custard Cream Squares will always impress.

The Story Behind the Creamy Layers

Vanilla custard desserts have been cherished for centuries across Europe, particularly in France and England, where pastry and cream are celebrated culinary arts. This version simplifies the process while retaining all the elegance — rich egg-based custard infused with real vanilla and layered between sheets of crisp, golden puff pastry. When chilled and sliced into neat squares, the layers reveal a bakery-perfect dessert that’s both beautiful and irresistibly smooth.

Ingredients You’ll Need

For the pastry layers:

2 sheets puff pastry, thawed

1 egg, lightly beaten (for brushing)

For the vanilla custard filling:

3 cups whole milk

4 large egg yolks

½ cup granulated sugar

¼ cup cornstarch

2 tbsp unsalted butter

2 tsp pure vanilla extract (or 1 vanilla bean pod for richer flavor)

Pinch of salt

For topping:

Powdered sugar, for dusting

Optional: white chocolate drizzle or whipped cream

Step-by-Step Preparation
1. Prepare the puff pastry layers

Preheat your oven to 400°F (200°C). Line two baking trays with parchment paper. Lay each puff pastry sheet flat on a tray and prick the surface all over with a fork to prevent it from puffing too high. Brush lightly with beaten egg for a golden sheen.
Place another sheet of parchment on top and set a baking tray over it — this will weigh the pastry down slightly for even layers.
Bake for 15–18 minutes, or until golden brown and crisp.
Remove from oven, let cool completely, and trim the edges so both sheets are equal in size. Set aside.

2. Create the luscious vanilla custard

In a medium saucepan, heat 2½ cups of milk over medium heat until steaming but not boiling. If using a vanilla bean, split it, scrape the seeds, and add both seeds and pod to the milk.

Meanwhile, in a separate bowl, whisk together egg yolks, sugar, cornstarch, and remaining ½ cup of milk until smooth and pale. Slowly pour the hot milk into the egg mixture, whisking continuously to temper the eggs (this prevents curdling).

Return the mixture to the saucepan and cook over medium heat, stirring constantly until it thickens — about 5–7 minutes. The custard should coat the back of a spoon and hold soft peaks. Remove from heat, discard the vanilla pod (if used), and stir in butter and vanilla extract for a glossy finish.

Transfer the custard to a clean bowl, cover the surface with plastic wrap (to prevent a skin from forming), and chill for 30–40 minutes until cool and thick.

3. Assemble the dessert

Place one pastry sheet on a serving platter or in a square baking dish. Spread the cooled vanilla custard evenly over the top, using a spatula to smooth it into a thick, even layer.

Carefully place the second pastry sheet on top, pressing gently so it adheres to the custard. Cover and refrigerate for at least 2 hours (or overnight) to allow the custard to firm up and the flavors to meld beautifully.

4. Slice and serve

Once fully chilled, use a sharp knife dipped in hot water to cut into neat squares or rectangles. Wipe the knife clean between each slice for smooth edges. Dust the tops generously with powdered sugar, or drizzle with melted white chocolate for a touch of indulgence.

Serve chilled — each piece will reveal golden pastry, smooth custard, and an aroma of pure vanilla bliss.

Baker’s Tips for Perfection

Use real vanilla: The difference between extract and artificial flavoring is huge. Real vanilla adds depth and warmth to the custard.

Keep the custard smooth: Constant stirring is key — if it thickens too fast, remove it from heat for a moment and whisk vigorously.

Chill thoroughly: Patience is worth it. The dessert cuts cleanly and holds its shape beautifully when cold.

Add flair: For a café-style finish, alternate layers of puff pastry and custard twice for a triple-layer version, or top with a light caramel glaze.

Serving Ideas

Vanilla Custard Cream Squares pair beautifully with a hot espresso, black tea, or a chilled glass of dessert wine. You can elevate the presentation by garnishing with:

Fresh berries (strawberries, raspberries, or blueberries)

A drizzle of raspberry coulis

Shaved white or dark chocolate

A sprig of mint for contrast

These subtle additions turn a humble custard square into a show-stopping dessert for any occasion.

Storage and Make-Ahead Tips

These squares can be made a day ahead and stored in the refrigerator for up to 3 days. Keep them covered to prevent the pastry from softening too much. If you prefer the pastry extra crisp, assemble them just before serving by adding the chilled custard between freshly baked sheets.

A Taste of Nostalgia and Elegance

There’s something timeless about Vanilla Custard Cream Squares. They capture the spirit of homemade desserts — simple ingredients, classic technique, and results that taste like pure comfort. The creamy custard, infused with real vanilla, melts in your mouth, while the crisp pastry offers a satisfying crunch. It’s the kind of dessert that makes you slow down and savor every bite.

The Ultimate Creamy Strawberry Apple Punch

If you’re searching for a drink that captures the spirit of sunshine, sweetness, and sophistication in one glass, The Ultimate Creamy Strawberry Apple Punch is it. This luxurious beverage blends the bright tang of apples with the delicate sweetness of ripe strawberries, finished with a velvety creaminess that feels indulgent yet refreshing. Perfect for brunches, parties, or summer evenings, this punch takes ordinary fruit drinks to an entirely new level of flavor and texture.

A Taste Worth Celebrating

What makes this punch so special is its balance of fruity freshness and creamy smoothness. The strawberries give it that signature rosy hue and natural sweetness, while crisp apple juice adds a bright, slightly tart note. The creamy element—introduced through condensed milk and a touch of fresh cream—gives this drink its luxurious body and dessert-like finish. Every sip feels like a smooth transition from fruity to creamy, leaving behind a rich, dreamy aftertaste.

Unlike most fruit punches that rely heavily on soda or artificial syrups, this one uses real fruit purée, fresh juices, and natural sweeteners, making it as wholesome as it is delicious.

Ingredients

(Serves 4–6 glasses)

For the fruit base:

  • 2 cups fresh strawberries (hulled and halved)

  • 1 ½ cups apple juice (chilled)

  • 1 apple (peeled and chopped)

  • 2 tbsp honey or maple syrup (adjust to taste)

  • 1 tsp fresh lemon juice (balances sweetness)

For the creamy blend:

  • ½ cup sweetened condensed milk

  • ¾ cup cold full-fat milk

  • ½ cup heavy cream (chilled)

  • ½ tsp vanilla extract (optional for aroma)

For serving and garnish:

  • Crushed ice or ice cubes

  • Fresh strawberry slices

  • Thin apple wedges

  • Mint leaves for garnish

Step-by-Step Preparation

Step 1: Create the Strawberry-Apple Puree

Begin by placing the strawberries, chopped apple, honey, and lemon juice in a blender. Blend until the mixture becomes smooth and vibrant. If you prefer a lighter texture, you can strain the puree through a fine sieve to remove seeds, but leaving it as-is gives the drink more body and natural fiber. The goal here is to achieve a balanced fruit base—sweet yet slightly tangy, fragrant, and thick enough to hold up against the creamy mixture.

Step 2: Prepare the Creamy Layer

In a separate bowl or jug, whisk together condensed milk, cold milk, heavy cream, and vanilla extract. Mix until smooth and slightly frothy. The combination of these ingredients transforms the drink into something that feels both refreshing and rich, like a milkshake and punch hybrid. For a lighter version, you can use low-fat milk or substitute with coconut cream for a tropical twist.

Step 3: Combine and Chill

In a large pitcher, pour the strawberry-apple puree followed by the creamy mixture. Use a spoon to swirl them together gently—don’t fully mix it yet. You want a marbled effect that looks beautiful in the glass and gives a layered taste experience with every sip. Cover and refrigerate for at least 30 minutes to let the flavors meld and the punch chill completely.

Step 4: Serve the Ultimate Punch

When ready to serve, fill glasses halfway with crushed ice. Pour in the chilled creamy strawberry-apple punch, allowing the swirl of pink and cream to create a mesmerizing visual. Garnish each glass with a slice of fresh strawberry, a thin apple wedge on the rim, and a small sprig of mint.

For parties, you can serve this punch in a large glass bowl filled with fruit slices and floating mint leaves—it looks stunning and immediately becomes the centerpiece of your table.

Flavor Enhancements and Creative Twists

1. Tropical Cream Upgrade:
Add a splash of coconut milk or coconut cream for a smooth tropical undertone that pairs beautifully with strawberries and apples.

2. Sparkling Version:
For a fizzy variation, top each glass with sparkling water, club soda, or even a splash of ginger ale. It lightens the drink while keeping it creamy.

3. Frozen Delight:
Blend the entire mixture with crushed ice to create a Creamy Strawberry Apple Slush—perfect for summer heat.

4. Party Pitcher Mix:
You can double or triple the recipe for larger gatherings. Prepare the fruit base and creamy layer separately, then mix just before serving to preserve that dreamy marbled effect.

5. Kid-Friendly Dessert Punch:
Top with a scoop of vanilla ice cream or strawberry sorbet for a fun dessert-style drink kids will adore.

Tips for the Perfect Creamy Punch

  • Always use chilled ingredients to keep the punch cold and creamy without needing excess ice (which can dilute it).

  • Adjust the sweetness based on your fruit—ripe strawberries need less honey.

  • For a vegan version, replace condensed milk with coconut condensed milk, dairy milk with almond or oat milk, and heavy cream with coconut cream.

  • Blend the fruit mixture until silky smooth to avoid pulpy texture when combined with cream.

  • Add a few frozen strawberry slices before serving—they’ll keep the drink cold and add bursts of fruity flavor.

Why You’ll Love This Recipe

This punch is more than just a drink—it’s an experience. The first sip gives a cool, fruity hit of strawberries and apples, followed by a wave of creamy sweetness that feels almost like a dessert. It’s not overly heavy, but it’s satisfying enough to replace a milkshake or smoothie. It’s also incredibly versatile—great for kids, adults, and anyone looking to enjoy something fresh yet decadent.

Whether you’re hosting a brunch, celebrating a birthday, or simply want to treat yourself to a luxurious drink, The Ultimate Creamy Strawberry Apple Punch is the perfect showstopper. It’s a recipe that looks elegant, tastes divine, and brings together the very best of nature’s sweetness and creamy indulgence in one unforgettable sip.

Teriyaki Chicken and Pineapple Foil Packets

When it comes to easy, flavorful, and no-mess dinners, Teriyaki Chicken and Pineapple Foil Packets reign supreme. This recipe is a fusion of tender chicken, juicy pineapple, vibrant vegetables, and a glossy homemade teriyaki sauce—all sealed together in foil and baked (or grilled) to perfection. Every bite bursts with sweet, savory, and tangy flavors that make your taste buds dance. It’s the perfect meal for summer cookouts, cozy weeknight dinners, or even meal prep, as each packet is its own little bundle of joy.

Why This Recipe Works

The magic of this dish lies in the foil packet technique—it locks in moisture and flavor, essentially steaming the ingredients in their own juices. The chicken becomes tender and infused with teriyaki goodness, while the pineapple caramelizes slightly, adding natural sweetness that balances the salty soy sauce and umami notes. Plus, clean-up is practically nonexistent—just toss the foil and you’re done!

Ingredients You’ll Need

(Serves 4)

For the Teriyaki Sauce:

1/3 cup soy sauce (use low sodium if preferred)

1/4 cup pineapple juice (from the can)

3 tablespoons honey or brown sugar

1 tablespoon rice vinegar

1 tablespoon sesame oil

1 teaspoon grated fresh ginger

2 cloves garlic, minced

1 tablespoon cornstarch + 2 tablespoons water (for slurry)

For the Packets:

4 boneless, skinless chicken breasts (or thighs, if you prefer juicier meat)

2 cups fresh pineapple chunks (or canned, drained)

1 red bell pepper, sliced

1 yellow bell pepper, sliced

1 small red onion, sliced

1 cup snap peas or broccoli florets

2 tablespoons olive oil

Salt and black pepper, to taste

Cooked jasmine rice, for serving

Sesame seeds and chopped green onions, for garnish

Step-by-Step Instructions
1. Prepare the Teriyaki Sauce

In a small saucepan, combine soy sauce, pineapple juice, honey, rice vinegar, sesame oil, ginger, and garlic. Bring to a gentle simmer over medium heat. Stir occasionally until the mixture becomes fragrant and slightly thickened, about 5 minutes.

Whisk the cornstarch and water together in a small bowl to form a slurry. Slowly pour it into the sauce while stirring continuously. Let the sauce simmer for another 2–3 minutes, until it reaches a glossy, syrupy consistency. Remove from heat and set aside.

2. Assemble the Foil Packets

Preheat your oven to 400°F (200°C), or if you’re grilling, preheat to medium-high.

Cut four large pieces of heavy-duty aluminum foil (about 12×18 inches each). Lightly spray or brush the center of each with olive oil.

Place a chicken breast in the center of each foil sheet. Season both sides lightly with salt and pepper. Spoon about 2 tablespoons of teriyaki sauce over each chicken piece, coating evenly.

Distribute the bell peppers, red onion, pineapple chunks, and snap peas evenly over the chicken. Drizzle a bit of olive oil on top and add another spoonful of teriyaki sauce.

3. Seal and Cook

Fold the long sides of each foil piece together and roll to seal, then fold in the short sides, creating a tightly sealed packet. Make sure there’s some space inside for steam to circulate.

To Bake:
Place the foil packets on a baking sheet and bake for 25–30 minutes, or until the chicken is cooked through (internal temperature should reach 165°F / 74°C).

To Grill:
Place packets on the grill grates and cook for 20–25 minutes, flipping halfway through. The high heat will give the pineapple a beautiful caramelized flavor and lightly char the edges of the vegetables.

4. Unwrap the Magic

Carefully open each packet (watch out for steam!) and drizzle with any remaining teriyaki sauce. Garnish with sesame seeds and chopped green onions. Serve hot over a bed of jasmine rice or even noodles for a heartier meal.

Tips for the Perfect Foil Packets

Don’t Overcrowd: Keep ingredients in a single layer for even cooking.

Use Heavy-Duty Foil: This prevents tearing and holds up better on the grill.

Marinate Ahead: For deeper flavor, marinate the chicken in half of the teriyaki sauce for 1–2 hours before assembling.

Add a Kick: Stir a teaspoon of sriracha or chili flakes into the teriyaki sauce for a sweet-spicy twist.

Make it Tropical: Add chunks of mango or coconut flakes for a more island-inspired version.

Why You’ll Love It

Healthy and Balanced: Lean protein, colorful vegetables, and fruit—everything your body loves.

Versatile: Works great with shrimp, tofu, or even salmon instead of chicken.

No Cleanup: All the cooking happens inside the foil—no pans, no mess.

Meal Prep Friendly: Make multiple packets and store them uncooked in the fridge for up to 24 hours. Just bake when ready!

Flavor Profile

This dish hits all the right notes—sweet from pineapple and honey, salty from soy sauce, umami from sesame oil and garlic, and a touch of acidity from rice vinegar to keep it bright. The texture contrast between juicy chicken, crisp-tender vegetables, and caramelized pineapple creates a harmonious mouthfeel that makes every bite satisfying.

Serving Suggestions

Serve with steamed jasmine or coconut rice for a tropical flair.

Pair with a crisp cucumber salad or Asian slaw for extra crunch.

For a heartier feast, enjoy with garlic butter noodles or roasted sweet potatoes.

Final Thoughts

Teriyaki Chicken and Pineapple Foil Packets are the epitome of effortless gourmet—fresh, flavorful, and fun to eat. Whether baked in the oven or grilled outdoors, this recipe captures the essence of island-style comfort food wrapped in convenience. It’s a crowd-pleaser for family dinners, picnics, or camping trips—proof that sometimes, the best flavors come in shiny little packages.

Patty Melt with Secret Sauce

If there’s one sandwich that perfectly bridges the gap between a burger and a grilled cheese, it’s the iconic Patty Melt. Crispy, buttery bread hugging a juicy beef patty, melted cheese, and caramelized onions—it’s comfort food royalty. But what takes this recipe to the next level is a homemade secret sauce that drips with flavor, transforming a classic diner favorite into something extraordinary. This unique Patty Melt recipe blends nostalgia with gourmet flair, giving you a melt that’s both familiar and unforgettable.

Ingredients
For the Patty Melt

1 lb (450g) ground beef (80/20 blend recommended for juiciness)

1 small onion, thinly sliced

6 slices of rye bread (or sourdough for a twist)

6 slices of Swiss cheese (or a mix of Swiss and sharp cheddar)

2 tbsp butter (for toasting bread)

1 tbsp olive oil (for onions)

Salt and black pepper to taste

A dash of Worcestershire sauce (optional but adds deep flavor)

For the Secret Sauce

½ cup mayonnaise

2 tbsp ketchup

1 tbsp Dijon mustard

1 tbsp finely minced pickles or relish

1 tsp smoked paprika

½ tsp garlic powder

½ tsp onion powder

A dash of hot sauce (optional for heat)

1 tsp pickle juice (for tanginess)

Step 1: Crafting the Secret Sauce

This sauce is the soul of the sandwich—it ties everything together with its creamy, smoky, and tangy personality.

In a small bowl, combine the mayonnaise, ketchup, Dijon mustard, minced pickles, smoked paprika, garlic powder, onion powder, and pickle juice. Whisk until smooth and creamy. If you prefer a little kick, add a few drops of hot sauce. Let the sauce rest in the fridge for at least 15 minutes. The resting time allows the flavors to deepen, resulting in that unmistakable “secret” taste that makes this patty melt stand out.

Step 2: Caramelizing the Onions

Caramelized onions add sweetness and depth that perfectly balance the richness of the beef and cheese.

Heat olive oil in a skillet over medium-low heat. Add the thinly sliced onions and a pinch of salt. Stir occasionally for about 15–20 minutes until the onions turn golden brown and soft. If they start to stick, add a splash of water or beef broth. When finished, stir in a few drops of Worcestershire sauce to amplify the flavor. Set aside.

Step 3: Shaping and Cooking the Patties

Divide the ground beef into three equal portions and gently form into thin, wide patties roughly the size of your bread slices. Avoid overworking the meat—this keeps them tender. Season both sides generously with salt and pepper.

In the same skillet used for onions, cook the patties over medium-high heat for about 3–4 minutes per side, or until they’re nicely browned on the outside and cooked to your preferred doneness inside. The browned crust gives that satisfying diner-style flavor. Remove from heat and set aside.

Step 4: Assembling the Melt

Now comes the fun part—building the perfect stack.

Spread butter on one side of each slice of bread.

On the unbuttered side, spread a generous layer of the secret sauce.

Place one slice of cheese on top of the sauce, followed by a beef patty, caramelized onions, and another slice of cheese.

Top with another slice of bread, buttered side facing outward.

Repeat for all sandwiches.

Step 5: Grilling to Perfection

Heat a clean skillet or griddle over medium-low heat. Place the assembled patty melts in the pan and cook until the bread is golden brown and crispy, about 3–4 minutes per side. The key is to go slow and steady—low heat ensures the cheese melts beautifully without burning the bread.

If you want the cheese extra melty, cover the skillet with a lid for the last minute of cooking to trap in steam. Once both sides are golden and the cheese oozes slightly from the edges, your melt is ready to serve.

Step 6: Serve and Savor

Slice each patty melt diagonally to reveal the molten cheese and caramelized onions inside. Serve immediately with a side of crispy fries, onion rings, or a simple dill pickle spear for contrast. Don’t forget an extra dollop of the secret sauce on the side for dipping—it’s too good not to.

Tips for the Perfect Patty Melt

Bread Choice: Traditional rye gives a tangy note that balances the richness, but sourdough adds an artisanal crunch.

Cheese Swap: Experiment with provolone, Havarti, or pepper jack for a twist.

Sauce Upgrade: Mix in a teaspoon of horseradish for a sharp, gourmet edge.

Meat Options: You can swap beef for turkey, chicken, or even a plant-based patty without losing flavor.

Crisp Control: Press lightly with a spatula while grilling to ensure even browning and that signature diner-style crust.

Why This Recipe Works

The beauty of this Patty Melt lies in balance—crispy bread, gooey cheese, savory meat, and that creamy, tangy sauce. The caramelized onions add just enough sweetness to offset the beef, while the smoky paprika in the sauce adds warmth and depth. Every bite delivers a satisfying mix of textures and flavors, from the crunch of toasted bread to the smooth, velvety melt of cheese and sauce.

This isn’t just a sandwich—it’s a sensory experience. The aroma of sizzling butter and beef fills your kitchen, the crackle of the bread echoes as you cut through it, and the taste lingers long after the last bite. Whether served for lunch, dinner, or a late-night craving, this Patty Melt with Secret Sauce proves that comfort food can still feel gourmet when made with love and attention to detail.

Final Thought

A great patty melt is all about contrast—soft and crisp, rich and tangy, familiar yet new. With this recipe, you’ll master the art of that balance while adding your own signature twist with the secret sauce. Once you taste it, you’ll understand why this isn’t just another sandwich—it’s a masterpiece between two slices of bread.

Cabbage Omelette Rolls

If you’re looking for a creative breakfast or light lunch that combines crunch, color, and comfort, Cabbage Omelette Rolls are an absolute must-try. This dish takes the humble omelette and transforms it into a vibrant roll, layered with soft, spiced eggs, finely shredded cabbage, and aromatic seasonings. Whether you’re eating clean, trying to include more vegetables in your diet, or just craving something different, this recipe delivers both nutrition and indulgence in every bite.

The beauty of this dish lies in its simplicity—it requires only a handful of ingredients, yet the result feels gourmet. You can enjoy these cabbage omelette rolls as a grab-and-go breakfast, a lunchbox favorite, or even as a party appetizer when sliced into bite-sized rounds. It’s the kind of meal that tastes like comfort food but feels refreshingly light.

🥬 Ingredients You’ll Need

(Serves 2–3 people)

  • 4 large eggs

  • 1 ½ cups finely shredded cabbage (green or purple, or a mix for color)

  • 1 small carrot, grated (optional, for sweetness and color)

  • 2 tablespoons green onions or fresh coriander, chopped

  • 1 small onion, finely chopped

  • 1 green chili, finely chopped (optional, for heat)

  • ½ teaspoon black pepper

  • ½ teaspoon red chili flakes

  • ¼ teaspoon turmeric powder

  • Salt to taste

  • 2 tablespoons milk or cream (for a softer omelette texture)

  • 1 tablespoon soy sauce (optional, for a savory twist)

  • 1 tablespoon flour or cornstarch (helps bind the omelette for rolling)

  • 2 tablespoons cooking oil or butter

🍳 Preparation Steps

Step 1: Prepare the Vegetable Mixture

Start by finely shredding the cabbage. The thinner the slices, the better your rolls will form later. Add the grated carrot, chopped onion, green chili, and herbs into a mixing bowl. Sprinkle a little salt and let it sit for 5 minutes to slightly soften the cabbage. This helps it blend smoothly into the egg mixture.

Step 2: Whisk the Eggs

In a separate bowl, crack the eggs and whisk them well until frothy. Add milk (or cream) for a richer, more tender omelette. Stir in black pepper, red chili flakes, turmeric, soy sauce, and flour (or cornstarch). Mix until the batter is smooth.

Now pour the whisked eggs into the bowl of vegetables and stir to combine everything evenly. You should have a thick, colorful mixture that’s loaded with cabbage and bright flecks of carrot and herbs.

Step 3: Cook the Omelette

Heat a non-stick skillet (preferably rectangular or large round) on low-medium flame. Add a drizzle of oil or butter and swirl to coat. Pour half of the cabbage-egg mixture into the pan, spreading it evenly to form a thin layer.

Cover and cook for 2–3 minutes until the base sets. Gently flip it using a spatula and cook the other side for about 1 minute. The omelette should be soft but not runny. Remove from the pan and repeat with the remaining mixture.

🌀 Step 4: Rolling the Omelette

While the omelette is still warm, lay it flat on a clean surface or parchment paper. Starting from one edge, gently roll it up tightly like a Swiss roll. The cabbage inside will provide texture and volume, while the egg binds it together beautifully.

Allow it to rest for a minute before slicing—it helps the roll hold its shape. Cut into 1-inch thick rounds. Each slice reveals a stunning swirl of green cabbage, yellow egg, and orange carrot—a feast for the eyes as much as for the taste buds.

🌿 Optional Add-Ons

To customize your cabbage omelette rolls, here are a few creative twists:

  • Cheesy Rolls: Sprinkle shredded mozzarella or cheddar on the omelette before rolling for a gooey, melty surprise.

  • Spicy Asian Twist: Add a few drops of sriracha or chili garlic sauce to the egg mixture.

  • Protein Boost: Include diced chicken, tofu, or cooked shrimp for a heartier meal.

  • Low-Carb Wrap: Use the omelette roll as a wrap and fill with avocado slices or grilled veggies.

🥢 Serving Suggestions

These cabbage omelette rolls are versatile and can be served in many delicious ways:

  • Breakfast: Pair with toast or avocado for a light yet satisfying start to the day.

  • Lunchbox Snack: Slice them and pack with ketchup or a yogurt-based dip.

  • Appetizer: Serve as finger food at gatherings with a spicy mayo or chili dip.

  • Dinner Companion: Serve alongside rice or noodles for a balanced meal.

For dipping sauces, try:

  • Spicy mayo (mix mayonnaise with chili sauce and lime)

  • Sweet soy glaze

  • Mint yogurt dip

  • Garlic aioli

🧠 Why You’ll Love This Recipe

  1. Healthy & Low-Calorie: Cabbage is high in fiber, vitamins C and K, and low in calories—perfect for a guilt-free meal.

  2. Protein-Rich: Eggs offer complete protein, keeping you full for hours.

  3. Budget-Friendly: Made with simple, affordable ingredients found in every kitchen.

  4. Quick & Easy: From start to finish, it takes under 20 minutes.

  5. Visually Stunning: Those bright, colorful swirls make it look like a gourmet dish, even though it’s simple to prepare.

👩‍🍳 Pro Tips for Perfect Cabbage Omelette Rolls

  • Use a non-stick pan: It helps you flip and roll the omelette without tearing.

  • Don’t overcook: Keep the omelette soft so it rolls easily without cracking.

  • Fine shredding: Finely chopped cabbage blends better and gives an even texture.

  • Rest before cutting: Let the roll cool slightly to maintain its shape when sliced.

  • Flavor layer: Try brushing the inside with chili sauce or cream cheese before rolling for extra taste.

🧡 A Story of Simplicity and Innovation

The inspiration for cabbage omelette rolls likely stems from Asian street food and modern fusion breakfasts. In Japanese cuisine, for instance, “tamagoyaki” (rolled omelette) is a popular staple, often layered and rolled on bamboo mats. This recipe takes that concept and gives it a rustic, vegetable-packed twist using humble cabbage.

It’s a dish that brings together texture and flavor in every bite—the crispness of cabbage, the smoothness of egg, the warmth of spices, and the delicate satisfaction of biting into something rolled and beautiful. It’s creative home cooking at its best—resourceful, colorful, and deeply satisfying.

🌈 Conclusion

Cabbage Omelette Rolls are proof that healthy eating doesn’t have to be boring. They’re light yet flavorful, quick yet impressive, and simple yet sophisticated. The combination of fresh cabbage and fluffy eggs creates a dish that’s as nutritious as it is comforting. Whether you’re serving it for breakfast, lunch, or a fancy brunch spread, it’s bound to earn compliments.

So next time you have a few eggs and half a cabbage sitting in your fridge, skip the plain omelette—roll it up into something extraordinary. Once you try these Cabbage Omelette Rolls, you’ll find yourself coming back to them again and again for their taste, texture, and endless versatility.