High Protein Banana Pudding

Banana pudding is one of those desserts that feels like home — creamy, nostalgic, and soul-satisfying. But what if you could enjoy all that comforting sweetness while fueling your body with protein for muscle recovery, energy, and satiety? Enter the High-Protein Banana Pudding — a luscious, layered treat that’s both indulgent and nutritious. This unique recipe transforms a Southern classic into a fitness-friendly dessert, perfect for meal prep, post-workout recovery, or guilt-free snacking.

Unlike traditional banana pudding made with heavy cream, sugar, and processed pudding mixes, this version uses natural ingredients like Greek yogurt, protein powder, and ripe bananas to deliver creaminess without compromise. The best part? It’s quick to prepare, requires no baking, and tastes like a dream after chilling overnight.

🌟 Why You’ll Love This High-Protein Banana Pudding

This isn’t your average pudding — it’s an elevated, nutritious masterpiece. Here’s why this recipe stands out:

  • Protein-Packed: Each serving contains around 20–25 grams of protein, depending on your protein powder and yogurt choice.

  • No Refined Sugar: Naturally sweetened with ripe bananas and a touch of honey or maple syrup.

  • Creamy and Dreamy: You won’t believe how rich the texture is — thick, smooth, and decadent.

  • Meal-Prep Friendly: It keeps beautifully in the fridge for up to 4 days, making it a perfect make-ahead dessert.

  • Customizable: Gluten-free, can be made dairy-free or vegan with simple swaps.

🍌 Ingredients

This recipe yields 4–6 servings, depending on portion size.

Base Pudding Mixture:

  • 3 large ripe bananas (the riper, the better for sweetness and flavor)

  • 1 ½ cups plain Greek yogurt (2% or full-fat for creaminess)

  • 1 scoop (about 30g) vanilla or banana-flavored protein powder

  • 1 cup unsweetened almond milk (or milk of your choice)

  • 2 tablespoons honey or maple syrup (adjust to taste)

  • 1 teaspoon pure vanilla extract

  • 1 tablespoon chia seeds (optional, for extra thickness and fiber)

  • Pinch of sea salt

Layering and Toppings:

  • 8–10 vanilla protein cookies or high-protein graham crackers, crushed

  • 1–2 extra bananas, sliced

  • Whipped Greek yogurt topping or light whipped cream (optional but delicious)

  • Sprinkle of cinnamon or crushed nuts (for garnish)

🥣 Instructions

Step 1: Prepare the Creamy Protein Base

Start by adding your ripe bananas to a blender or food processor. Blend until smooth and creamy — this forms the natural sweet base. Next, add Greek yogurt, protein powder, almond milk, honey (or maple syrup), vanilla extract, chia seeds, and a pinch of salt. Blend again for about 30 seconds until fully smooth.

You’ll end up with a luscious, thick, pale golden mixture that smells like banana heaven. If it’s too thick, add an extra splash of milk; if too thin, let it rest for 10 minutes so the chia seeds can absorb excess liquid.

Pro Tip: Taste the pudding mixture now — this is your chance to adjust sweetness or add a pinch more protein powder if desired.

Step 2: Chill for the Perfect Texture

Transfer the blended mixture into a large bowl or container, cover, and refrigerate for at least 2 hours. This step is crucial — chilling helps the pudding set and the flavors to meld beautifully. If you added chia seeds, they’ll thicken the pudding further during this time, creating a rich and spoonable texture.

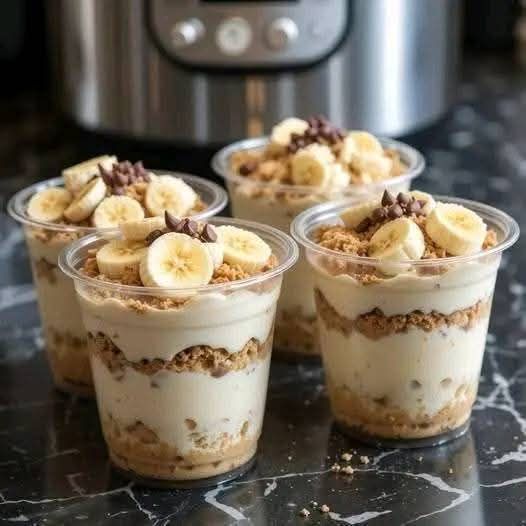
Step 3: Layer Like a Pro

When your pudding base is chilled and thickened, it’s time to assemble your layers — the hallmark of a true banana pudding.

  • Layer 1: Spoon a layer of the protein pudding into the bottom of a serving dish or individual jars.

  • Layer 2: Add a handful of crushed protein cookies or graham crackers.

  • Layer 3: Arrange a few banana slices evenly over the cookie layer.

  • Layer 4: Add another generous layer of pudding to cover.

Repeat the layers until you reach the top of the dish, ending with pudding on top. This creates a beautiful, dessert-like parfait effect that’s visually inviting and texturally satisfying.

Step 4: Optional Whipped Greek Yogurt Topping

For an elegant finish, whip ½ cup of Greek yogurt with 1 tablespoon of honey and a dash of vanilla until light and fluffy. Spread or pipe this over the top pudding layer. It mimics whipped cream but adds even more protein!

Dust with cinnamon or sprinkle with crushed nuts for a sophisticated touch.

Step 5: Chill Again and Serve Cold

Cover your layered pudding dish with plastic wrap or an airtight lid and refrigerate for another 2–3 hours (or overnight for best results). During this time, the banana flavors intensify, and the cookie layers soften slightly, creating that classic banana pudding texture everyone loves.

When ready to serve, dig in with a spoon and enjoy the layers of creamy, crunchy, and fruity goodness.

🍽️ Serving Ideas

  • Post-Workout Treat: Scoop a chilled portion into a small bowl for a perfect balance of protein and carbs after exercise.

  • Breakfast Parfait: Add a sprinkle of granola and a drizzle of almond butter for a morning energy boost.

  • Dessert Jar: Serve in mason jars with alternating layers for a fancy presentation at gatherings or parties.

  • Frozen Delight: Freeze portions in popsicle molds for protein-packed banana pudding pops.

🧠 Nutrition Benefits Breakdown

This recipe doesn’t just taste good — it feels good, too. Each element plays a nutritional role:

  • Greek Yogurt: The creamy base is rich in casein protein, which supports muscle repair and helps you feel full longer.

  • Protein Powder: Boosts overall protein intake, enhancing recovery and metabolism.

  • Bananas: Provide natural sweetness, potassium for muscle function, and dietary fiber for digestion.

  • Chia Seeds: Add omega-3s, antioxidants, and a pleasant thickening effect without added calories.

  • Almond Milk: A light, dairy-free alternative that keeps the texture silky smooth.

Together, these ingredients make a wholesome dessert that nourishes your body while satisfying your sweet tooth.

🧁 Variations & Flavor Twists

  • Peanut Butter Banana Protein Pudding: Add 2 tablespoons of natural peanut butter to the base before blending for a nutty, indulgent twist.

  • Chocolate Banana Protein Pudding: Use chocolate protein powder and top with dark chocolate shavings.

  • Vegan Option: Replace Greek yogurt with coconut yogurt and use a plant-based protein powder.

  • Mocha Banana Pudding: Add 1 teaspoon of instant espresso powder for a banana-coffee fusion.

💡 Tips for the Best Results

  1. Use Overripe Bananas: They add natural sweetness and enhance the flavor depth.

  2. Don’t Skip the Chill: Cooling is key for the pudding to thicken and set properly.

  3. Choose Quality Protein Powder: Opt for a whey isolate or a smooth plant-based blend that mixes well without a chalky texture.

  4. Layer Just Before Serving (Optional): If you prefer crunchy cookies, assemble layers closer to serving time.

  5. Store Properly: Keep covered in the fridge for up to 4 days; stir gently before eating if separation occurs.

🍯 Final Thoughts

This High-Protein Banana Pudding is proof that dessert can be both indulgent and functional. Each spoonful offers creamy banana bliss with a boost of wholesome protein — perfect for athletes, fitness enthusiasts, or anyone craving a nutritious twist on a timeless favorite. It’s easy to prepare, endlessly adaptable, and always satisfying.

In a world where most desserts weigh you down, this one lifts you up — fueling your body, pleasing your palate, and proving that healthy eating can be downright delicious.

Turkish-style bread

Turkish-style bread, known for its soft interior, slightly chewy crust, and irresistible aroma, is one of the most beloved staples in Middle Eastern and Mediterranean cuisine. Whether served warm with butter, dipped in olive oil, or used to scoop up flavorful stews and kebabs, this bread carries the heart and soul of Turkish culture. What makes Turkish bread special is its balance of airiness and chewiness, its golden blistered crust, and the hint of tang that develops through a patient rising process. Today, you’ll learn how to make authentic Turkish-style bread — simple, comforting, and full of flavor — using a method that combines tradition with modern baking ease.

Ingredients

For the dough:

  • 3 ½ cups all-purpose flour (plus extra for dusting)

  • 1 ¼ cups warm water (around 105°F or 40°C)

  • 2 ¼ teaspoons (1 packet) active dry yeast

  • 2 tablespoons olive oil (plus extra for brushing)

  • 1 ½ teaspoons salt

  • 1 teaspoon sugar

For the topping:

  • 1 egg yolk

  • 2 tablespoons plain yogurt

  • 1 tablespoon olive oil

  • 1 tablespoon sesame seeds

  • 1 tablespoon nigella seeds (optional, for authentic Turkish flavor)

Step 1: Activating the Yeast

Start by activating the yeast — a crucial step that ensures your bread will rise beautifully. In a small bowl, mix the warm water, sugar, and yeast. Let it sit for about 10 minutes until it becomes frothy and bubbly. This foam signals that your yeast is alive and ready to bring your dough to life. Turkish bakers often use a touch of sugar not for sweetness, but to feed the yeast and help it activate faster.

Step 2: Creating the Dough

In a large mixing bowl, combine the flour and salt. Make a well in the center and pour in the yeast mixture along with olive oil. Using a wooden spoon or your hands, gently combine until the dough starts to come together. The dough should be slightly sticky but not wet. If it’s too sticky, sprinkle in a bit more flour, one tablespoon at a time.

Turn the dough onto a lightly floured surface and knead for about 8 to 10 minutes. The goal is to achieve a smooth, elastic texture. As you knead, imagine you’re working in a small Turkish bakery — the rhythmic motion, the soft scent of olive oil and yeast filling the air, and the anticipation of the bread’s final rise.

Step 3: First Rise — Letting the Dough Rest

Once the dough feels supple and smooth, shape it into a ball and place it in a lightly oiled bowl. Cover it with a damp cloth or plastic wrap. Let it rest in a warm place for 1 to 1 ½ hours, or until doubled in size.

During this time, the yeast works its magic, producing carbon dioxide that creates those lovely air pockets inside the bread. Turkish bread is known for its light yet chewy crumb, which comes from this slow and gentle fermentation process.

Step 4: Shaping the Bread

After the dough has doubled, punch it down gently to release excess gas. Transfer it to a floured surface and divide it into two equal portions if you want smaller loaves, or leave it whole for one large loaf.

Shape each portion into a round or oval disc about 1 inch thick. Traditional Turkish bread, known as pide ekmeği, has a distinctive diamond or crisscross pattern on top. To achieve this, press your fingertips lightly into the dough to form the pattern — don’t cut through it, just indent the surface.

Place the shaped dough onto a parchment-lined baking sheet. Cover it again with a cloth and let it rest for another 30 to 40 minutes. This second rise ensures the bread becomes fluffy and soft inside.

Step 5: Preparing the Topping

While the dough is resting, prepare the topping that gives Turkish bread its signature golden crust. In a small bowl, whisk together the egg yolk, yogurt, and olive oil until smooth. This mixture not only enhances the bread’s color but also adds richness and a slight tang from the yogurt.

Once the dough has risen, gently brush the top with the yogurt mixture. Sprinkle sesame and nigella seeds generously across the surface. The sesame seeds add nuttiness, while the nigella seeds lend a distinctive earthy aroma that instantly evokes the flavors of Turkish bakeries.

Step 6: Baking to Perfection

Preheat your oven to 450°F (230°C). Place a small baking dish with water on the bottom rack — this creates steam, helping your bread develop a beautiful golden crust without drying out.

Bake the bread for 12 to 15 minutes, or until the top is golden brown and slightly blistered. The aroma that fills your kitchen will be heavenly — warm, slightly yeasty, and nutty from the toasted seeds.

Once baked, transfer the bread to a wire rack and brush lightly with olive oil for a glossy finish. Let it cool for at least 10 minutes before slicing.

Step 7: Serving Suggestions

Turkish-style bread is incredibly versatile. Serve it warm with butter or olive oil for a simple breakfast. Pair it with soups, stews, or lentil dishes. It’s also perfect for dipping in hummus, baba ganoush, or Turkish ezme salad. Many Turkish households use it as a base for quick pizzas or to accompany grilled meats like kebabs and shawarma.

You can even slice leftovers horizontally, toast them, and fill them with feta, cucumbers, and tomatoes for a refreshing Mediterranean-style sandwich.

Tips for Perfect Turkish Bread

  1. Use high-quality olive oil — It enhances both texture and flavor.

  2. Don’t skip the yogurt topping — It’s what gives the bread its signature crust and color.

  3. Steam is key — Placing a pan of water in the oven keeps the bread moist inside.

  4. Knead well — A well-kneaded dough develops gluten, which gives Turkish bread its characteristic chewiness.

  5. Let it cool slightly before slicing — Cutting hot bread releases steam, which can make the interior gummy.

The Heart of Turkish Baking

Turkish-style bread isn’t just food — it’s part of a centuries-old culinary heritage. In Turkey, bread is considered sacred and deeply tied to hospitality. Every village and neighborhood bakery takes pride in its loaves, baked fresh each morning. The simple act of breaking bread together symbolizes unity and generosity.

The combination of olive oil, yogurt, and seeds is uniquely Turkish — humble ingredients elevated through technique and care. Each loaf tells a story of patience, tradition, and love shared around family tables.

Final Thoughts

Making Turkish-style bread at home connects you to a timeless tradition. It’s a recipe that turns ordinary ingredients — flour, water, yeast, and salt — into something extraordinary through care and rhythm. The dough’s transformation, from sticky and shapeless to golden and fragrant, mirrors the beauty of slow, intentional cooking.

Once you master this recipe, you’ll find yourself baking it again and again. Whether served with a hearty stew or enjoyed warm with honey, each bite carries a taste of Turkey — comforting, soulful, and beautifully simple.

Cloud Cake Recipe

There’s something magical about a cake that feels as if it’s barely there — tender, airy, and melting on your tongue like a sweet whisper of vanilla. That’s exactly what the Cloud Cake offers. With a texture so soft it could be mistaken for a dream, this delicate confection is the perfect blend of sponge-like lightness and creamy richness. Whether served as a show-stopping dessert or enjoyed with a cup of tea, this cake embodies everything we imagine when we think of “heavenly.”

This unique recipe takes inspiration from Japanese chiffon cakes, French genoise, and a touch of modern pastry flair. The result? A cake that floats between these styles — moist, fluffy, and subtly flavored with vanilla and cream. Every bite truly feels like tasting a cloud.

🌤 Why It’s Called Cloud Cake

Unlike dense butter cakes or sugary frostings, the Cloud Cake is all about lightness. The batter is aerated with whipped egg whites, giving it structure and lift without heaviness. The cake rises beautifully, then cools to a soft, cloud-like consistency. Instead of being overly sweet, it balances gentle vanilla notes with a hint of cream.

It’s also incredibly versatile — you can serve it plain with powdered sugar, layer it with whipped cream and fruit, or even drizzle it with a silky glaze. But the base remains the same: airy perfection.

☁️ Ingredients for Cloud Cake

For the Cake Batter:

  • 1 cup (120g) cake flour (or all-purpose flour sifted 3 times)

  • 1 ½ teaspoons baking powder

  • ¼ teaspoon salt

  • 4 large eggs, separated

  • ¾ cup (150g) granulated sugar, divided

  • ¼ cup (60ml) neutral oil (like canola or sunflower)

  • ¼ cup (60ml) milk (room temperature)

  • 1 teaspoon pure vanilla extract

  • ¼ teaspoon cream of tartar (for stabilizing the egg whites)

For the Whipped Cream Filling:

  • 1 cup (240ml) heavy whipping cream, chilled

  • 2 tablespoons powdered sugar

  • ½ teaspoon vanilla extract

For Decoration (Optional but Lovely):

  • Powdered sugar, for dusting

  • Fresh berries (strawberries, raspberries, or blueberries)

  • White chocolate curls or edible flowers for an elegant touch

🌥 Step-by-Step Instructions

1. Prepare the Pan and Preheat

Preheat your oven to 325°F (160°C). Grease an 8-inch round cake pan lightly with oil and line the bottom with parchment paper. This ensures the cake lifts easily without sticking. Avoid nonstick sprays that could weigh down the batter — light greasing is key for proper rise.

2. Mix the Dry Ingredients

In a medium bowl, sift together flour, baking powder, and salt. Sifting isn’t just about removing lumps — it aerates the flour, making your cake even lighter. Set this aside.

3. Prepare the Egg Yolk Mixture

In a large bowl, whisk together the egg yolks and half the sugar (about ⅜ cup) until pale and creamy. Gradually add in oil, milk, and vanilla extract, whisking until smooth and glossy.
This mixture forms the rich base of the cake, but it will soon be lifted by the airy whites.

4. Beat the Egg Whites to Perfection

In a separate clean, dry bowl, use a hand or stand mixer to beat the egg whites on medium speed until frothy. Add the cream of tartar and continue beating. Gradually add the remaining sugar, one tablespoon at a time, until stiff, glossy peaks form.
You’ll know it’s perfect when you lift the beaters and the peaks stand tall without drooping — this air is what gives the Cloud Cake its floaty texture.

5. Combine Gently

Add one-third of the whipped whites to the yolk mixture and fold gently using a spatula — don’t stir vigorously or you’ll lose the precious air. Continue folding in the rest of the whites in two additions until no white streaks remain.
The batter should be pale, airy, and smooth like silk. Treat it like a cloud — gently but confidently.

6. Bake the Cake

Pour the batter into the prepared pan and smooth the top lightly. Tap the pan once on the counter to release any large air bubbles.
Bake for 35–40 minutes, or until the top is golden and springs back when lightly touched. A toothpick inserted in the center should come out clean.

Do not open the oven door in the first 25 minutes — the temperature drop can cause the cake to collapse.

7. Cool the Cake Properly

Once baked, remove the pan and immediately invert it onto a wire rack. Cooling it upside down (if using a chiffon-style pan) or resting it slightly elevated prevents it from shrinking.
Let it cool completely before removing from the pan. This step ensures your cake stays airy and tall.

8. Make the Whipped Cream Filling

In a chilled bowl, beat the heavy cream, powdered sugar, and vanilla until soft peaks form. Don’t overwhip — you want it smooth and cloudlike, not grainy.

If you want extra flavor, you can add a spoonful of mascarpone cheese for a creamy twist or a hint of lemon zest for brightness.

9. Assemble the Cloud Cake

Slice the cooled cake horizontally into two layers. Spread a generous amount of whipped cream over the bottom layer, add a few fresh berries if desired, and gently place the top layer back on.
Dust with powdered sugar or drizzle with a delicate glaze (a mix of powdered sugar and milk works perfectly).

For a pure look, keep the decoration minimal — think white-on-white elegance, like a soft snowcap.

☁️ Baker’s Secrets for the Perfect Cloud Cake

  1. Room Temperature Ingredients:
    Ensure your eggs and milk are at room temperature. Cold ingredients can deflate the batter and prevent even mixing.

  2. Don’t Rush the Folding:
    Overmixing the meringue into the yolk base will destroy the air bubbles. Gentle folding ensures a fluffy crumb.

  3. Avoid Moisture Traps:
    If serving the same day, refrigerate the cake only after fully cooling it. A warm cake can cause condensation, making it soggy.

  4. Flour Type Matters:
    Cake flour has lower protein than all-purpose flour, giving a finer texture. If you can’t find it, make your own: for every cup of all-purpose flour, remove 2 tablespoons and replace with cornstarch.

🌈 Flavor Variations

  • Lemon Cloud Cake: Add 1 tablespoon lemon zest and a touch of lemon extract to the batter. Pair with lemon whipped cream.

  • Chocolate Cloud Cake: Replace 2 tablespoons of flour with cocoa powder for a light chocolate version.

  • Coconut Cloud Cake: Substitute milk with coconut milk and sprinkle toasted coconut on top.

  • Berry Cloud Cake: Add a layer of strawberry or raspberry puree between the cake layers for a fruity lift.

☁️ Serving Suggestions

This cake is perfect for afternoon tea, birthday parties, or elegant dinners. Serve chilled for a melt-in-the-mouth experience. Pair with:

  • A drizzle of honey or condensed milk for sweetness.

  • A few edible rose petals for a dreamy presentation.

  • A cup of jasmine or chamomile tea for balance.

🌤 Storage Tips

Cloud Cake is best enjoyed fresh, but it can be stored:

  • In the refrigerator for up to 3 days (covered to prevent drying).

  • In the freezer (unfrosted) for up to 2 weeks. Thaw in the fridge overnight before serving.

💭Final Thoughts

The Cloud Cake isn’t just a dessert — it’s an experience. With its feather-light crumb, creamy filling, and simple yet elegant presentation, it captures the essence of delicate indulgence. Each bite feels like a soft sigh of sweetness, airy yet satisfying.

Air Fryer Teriyaki Chicken

There’s something irresistible about the combination of crispy, juicy chicken glazed with a glossy, sticky, sweet-and-savory teriyaki sauce. This Air Fryer Teriyaki Chicken brings all that magic to your kitchen with minimal effort and maximum flavor. Using the air fryer, the chicken turns out perfectly browned and tender without deep frying, while the homemade teriyaki glaze coats every bite with mouthwatering goodness. This version is unique because it combines a deeply flavorful marinade with a double-cooking technique that seals in the juices, caramelizes the sauce, and delivers restaurant-quality results right at home.

🌿 Why This Recipe Is Special

Most teriyaki chicken recipes rely on pan-searing or grilling, but this air fryer version offers a faster, healthier, and cleaner cooking process. The chicken is marinated first for deep umami flavor, then air-fried to achieve that slightly crisp, golden exterior. Finally, it’s tossed in a luscious, homemade teriyaki glaze infused with fresh garlic, ginger, and a touch of honey for depth and shine.

The balance of sweet, salty, and tangy elements gives this dish its unique appeal. The sauce caramelizes as it meets the hot air-fried chicken, creating a glossy coating that clings beautifully to each piece. Pair it with jasmine rice, noodles, or steamed veggies for a meal that feels gourmet yet easy enough for a weeknight.

🍗 Ingredients

For the Chicken:

  • 1 ½ pounds boneless, skinless chicken thighs (or chicken breast), cut into 1 ½-inch cubes

  • 1 tablespoon sesame oil

  • 2 tablespoons soy sauce (or tamari for gluten-free)

  • 1 tablespoon rice vinegar

  • 1 tablespoon honey

  • 2 cloves garlic, minced

  • 1 teaspoon fresh grated ginger

  • ½ teaspoon black pepper

For the Teriyaki Sauce:

  • ¼ cup soy sauce

  • 3 tablespoons honey or brown sugar

  • 1 tablespoon rice vinegar

  • 1 tablespoon mirin (optional but adds authentic depth)

  • 2 cloves garlic, finely minced

  • 1 teaspoon grated ginger

  • ½ tablespoon cornstarch mixed with 1 tablespoon water (for thickening)

  • ½ teaspoon toasted sesame oil

For Garnish:

  • Toasted sesame seeds

  • Chopped green onions

  • Steamed rice or noodles for serving

🔪 Step-by-Step Instructions

Step 1: Marinate the Chicken

In a medium bowl, whisk together sesame oil, soy sauce, rice vinegar, honey, garlic, ginger, and black pepper. Add the chicken pieces, tossing them to coat evenly. Cover and refrigerate for at least 30 minutes, or up to 2 hours for deeper flavor.

This marination is key—it infuses the chicken with soy’s saltiness, honey’s sweetness, and the aromatic warmth of ginger and garlic. It also tenderizes the meat so that it cooks juicy and flavorful inside the air fryer.

Step 2: Preheat the Air Fryer

Preheat your air fryer to 380°F (193°C) for 3 to 5 minutes. Preheating helps ensure that the chicken cooks evenly and develops that lightly crisped exterior without overcooking.

Step 3: Air Fry the Chicken

Lightly spray the air fryer basket with oil or use a parchment liner. Arrange the marinated chicken pieces in a single layer, making sure not to overcrowd the basket. (If you’re cooking a large batch, do it in two rounds.)

Air fry the chicken at 380°F (193°C) for 10 minutes, shaking or turning halfway through to ensure even cooking.

After 10 minutes, check the internal temperature—it should reach at least 165°F (74°C). The chicken should look golden-brown and slightly caramelized.

Step 4: Make the Teriyaki Sauce

While the chicken cooks, prepare the glaze.
In a small saucepan, combine soy sauce, honey (or brown sugar), rice vinegar, mirin, garlic, and ginger. Bring the mixture to a gentle simmer over medium heat. Stir occasionally until the sugar dissolves and the sauce slightly reduces, about 3–4 minutes.

Whisk the cornstarch and water mixture in a small bowl, then slowly pour it into the simmering sauce while stirring constantly. Within a minute, the sauce will thicken to a glossy consistency. Turn off the heat and add the sesame oil for a rich, nutty aroma.

Taste and adjust seasoning — add a splash more honey if you prefer it sweeter, or an extra dash of soy sauce if you want more saltiness.

Step 5: Combine Chicken and Sauce

Once the chicken is done air frying, transfer it to a large mixing bowl. Pour the warm teriyaki sauce over the chicken and toss gently until each piece is evenly coated and glistening.

For a deeper caramelized glaze, you can return the sauced chicken to the air fryer for another 2–3 minutes at 400°F. This quick finish thickens the sauce even more and locks in that sticky, irresistible texture.

Step 6: Serve and Garnish

Plate the teriyaki chicken over a bed of steamed jasmine or basmati rice. Drizzle any extra sauce from the bowl over the top. Sprinkle toasted sesame seeds and chopped green onions for color, crunch, and freshness.

If you want a complete meal, serve it with steamed broccoli, sautéed bell peppers, or snap peas. The sweetness of the teriyaki complements the earthy, crisp vegetables beautifully.

🍱 Tips for the Best Air Fryer Teriyaki Chicken

  1. Use Chicken Thighs for Maximum Juiciness:
    Thigh meat stays tender and flavorful even after air frying, while breast meat can dry out if overcooked.

  2. Don’t Skip the Marinade:
    The marinade not only seasons the chicken but also helps it caramelize better in the air fryer.

  3. Avoid Overcrowding:
    The air fryer works best when air can circulate freely. Cook in batches if needed for even browning.

  4. Glaze Twice for Extra Stickiness:
    Toss the chicken in sauce once, then air fry again briefly—this creates a gorgeous, lacquered finish.

  5. Add Heat if Desired:
    For a spicy kick, add a teaspoon of sriracha or crushed red pepper flakes to the sauce.🌸 Flavor Variations

  • Pineapple Teriyaki Chicken: Add fresh pineapple chunks to the sauce in the final minute of simmering for a tangy tropical twist.

  • Garlic-Lover’s Teriyaki: Double the garlic for bold, aromatic depth.

  • Ginger Honey Teriyaki: Add extra ginger and swap half the honey for maple syrup for a uniquely rich sweetness.

  • Low-Sodium Option: Use low-sodium soy sauce and reduce the honey slightly to balance the flavor.

🍶 Storage and Reheating

Store leftover teriyaki chicken in an airtight container in the refrigerator for up to 3 days. Reheat in the air fryer at 350°F (175°C) for 4–5 minutes or in a skillet with a splash of water to keep it moist. The sauce will thicken even more upon reheating, enhancing its stickiness.

If you want to freeze it, let the chicken cool completely, then store it in a freezer-safe bag for up to 2 months. Thaw overnight in the fridge before reheating.

🥢 Serving Suggestions

Serve this air fryer teriyaki chicken with:

  • Coconut rice or garlic fried rice for an exotic pairing.

  • Sesame noodles for a complete Asian-inspired meal.

  • Steamed vegetables like carrots, broccoli, and bok choy for a healthy balance.

  • Pickled cucumbers or kimchi for a tangy contrast.

❤️ Final Thoughts

This Air Fryer Teriyaki Chicken is the perfect blend of convenience and culinary artistry. It transforms simple ingredients into a glossy, flavorful masterpiece that’s ready in under 30 minutes once marinated. The air fryer not only cuts down on oil and mess but also intensifies the caramelization, giving every bite that irresistible sweet-savory umami punch.

Whether you’re meal-prepping, feeding your family, or craving a restaurant-style dinner without leaving home, this unique recipe proves that you don’t need a wok or hours of cooking to achieve authentic teriyaki perfection.

Each bite delivers tender chicken wrapped in a shiny, sticky glaze that feels indulgent yet wholesome—proof that fast food can still taste like a labor of love.

Gluten-Free Fluffy Pancakes

Pancakes are a universal breakfast comfort food, loved for their golden edges and soft, pillowy texture. But when gluten is off the table, finding that same tender, airy bite can be a challenge. This Gluten-Free Fluffy Pancakes recipe brings back the magic of classic diner-style pancakes—with a gluten-free twist so good, you’ll forget they’re wheat-free. The secret lies in a careful balance of flours, a touch of acid to activate lift, and just the right amount of moisture for the perfect bite. These pancakes rise tall, stay moist, and are packed with buttery flavor and a hint of vanilla warmth that makes every forkful irresistible.

The Secret to Gluten-Free Fluffiness

Creating gluten-free pancakes that rival traditional ones starts with understanding texture. Gluten provides structure and elasticity in regular pancakes, trapping air bubbles to create that soft fluff. When you remove it, you need a smart blend of ingredients that mimic its function.

Here’s what makes this recipe unique:

  • The flour blend: A mix of rice flour, tapioca starch, and a little almond flour creates a delicate yet hearty structure.

  • Buttermilk & lemon: These add acidity, which reacts with baking soda for a powerful rise.

  • Whipped eggs: Lightly beaten eggs add an extra lift, making the pancakes cloudlike.

  • Melted butter: Keeps the crumb tender while adding richness.

Ingredients

Dry Ingredients:

  • 1 cup gluten-free all-purpose flour blend (preferably with xanthan gum)

  • ¼ cup rice flour

  • 2 tablespoons almond flour

  • 2 tablespoons tapioca starch

  • 1 tablespoon granulated sugar

  • 2 teaspoons baking powder

  • ½ teaspoon baking soda

  • ¼ teaspoon fine sea salt

Wet Ingredients:

  • 1 cup buttermilk (or 1 cup milk + 1 tablespoon lemon juice, rested for 5 minutes)

  • 2 large eggs, separated

  • 3 tablespoons unsalted butter, melted and slightly cooled

  • 1 teaspoon pure vanilla extract

  • 1 tablespoon honey or maple syrup (optional, for subtle sweetness)

For Cooking:

  • Butter or coconut oil, for greasing the pan

Optional Toppings:

  • Fresh berries

  • Warm maple syrup

  • Whipped cream or Greek yogurt

  • Toasted nuts or a drizzle of nut butter

Step-by-Step Instructions

Step 1: Mix the Dry Base

In a large bowl, whisk together the gluten-free all-purpose flour, rice flour, almond flour, tapioca starch, sugar, baking powder, baking soda, and salt. The key here is to aerate the dry ingredients well. Sifting isn’t just for show—it helps incorporate air and prevents dense, gummy pancakes.

Step 2: Prepare the Buttermilk Mixture

In a medium bowl, combine buttermilk, egg yolks, melted butter, vanilla extract, and honey. Whisk gently until smooth. The melted butter should be warm—not hot—to avoid curdling the eggs.

This mixture gives the pancakes a buttery tang that balances perfectly with the sweetness of syrup or fruit toppings later on.

Step 3: Beat the Egg Whites

In a clean bowl, use a hand whisk or mixer to beat the egg whites until soft peaks form. This step is optional but transforms the texture dramatically. Folded into the batter later, the egg whites trap air bubbles, making the pancakes rise tall and stay feather-light.

Step 4: Combine Wet and Dry Ingredients

Create a well in the center of the dry mix and pour in the buttermilk mixture. Gently whisk until just combined. Do not overmix—lumps are perfectly fine and even desirable in pancake batter. Overmixing can break the air bubbles, leading to flat pancakes.

Now, carefully fold in the whipped egg whites with a spatula. Use a gentle motion to keep the batter airy. The final texture should be thick but pourable—similar to lightly whipped cream.

Step 5: Let the Batter Rest

Allow the batter to rest for 10 minutes. This gives the flours time to hydrate and the leavening agents time to start their gentle rise. The resting period ensures your pancakes will puff up beautifully when they hit the pan.

Step 6: Preheat and Grease the Pan

Heat a nonstick skillet or griddle over medium-low heat. Once hot, lightly grease it with butter or coconut oil. To test readiness, sprinkle a drop of water on the surface—it should sizzle gently and evaporate quickly.

Step 7: Cook the Pancakes

Pour ¼ cup of batter onto the skillet for each pancake. The batter will spread slowly; resist the urge to press it down. Cook for about 2–3 minutes, until small bubbles appear on the surface and the edges begin to look set.

Flip gently and cook another 1–2 minutes, until golden brown and cooked through. Gluten-free pancakes cook best at a lower temperature than regular ones—too high, and they’ll brown before cooking through.

Repeat with remaining batter, adding a touch more butter or oil to the pan as needed.

Step 8: Serve and Enjoy

Stack the pancakes high on a warm plate. Top with butter that melts into every crevice, drizzle generously with maple syrup, and finish with your favorite toppings.

Topping Ideas for Gourmet Flavor

  1. Berry Burst: Top with strawberries, raspberries, and blueberries, and a light dusting of powdered sugar.

  2. Banana Nut Crunch: Sliced bananas, toasted pecans, and a drizzle of honey or caramel.

  3. Chocolate Morning Bliss: Melted dark chocolate and whipped cream for a dessert-style breakfast.

  4. Citrus Sunrise: A dollop of Greek yogurt, orange zest, and a drizzle of agave syrup.

  5. Savory Twist: Skip the sugar in the batter, and serve with crispy bacon and a poached egg on top.

Tips for Pancake Perfection

  • Use a blend of flours: If you don’t have almond or rice flour, try sorghum or oat flour for a similar texture.

  • Don’t skip resting the batter: It’s essential for structure and tenderness.

  • Avoid over-flipping: Flip only once—too many flips make them tough.

  • Keep them warm: Place cooked pancakes on a parchment-lined baking sheet in a 200°F (93°C) oven while finishing the batch.

  • Add-ins at the right time: If you’re adding blueberries or chocolate chips, sprinkle them on the uncooked side after pouring the batter—this keeps them from sinking.

Storage & Reheating

Leftover pancakes can be stored in an airtight container in the refrigerator for up to 3 days or frozen for up to 2 months. To reheat, pop them in the toaster or warm them in a skillet over low heat—never microwave, as it can make them rubbery.

Why You’ll Love This Recipe

This recipe doesn’t just mimic traditional pancakes—it perfects them. Every bite offers a golden crisp edge followed by a soft, custard-like center. The blend of flours ensures a balanced flavor—nutty from almond, neutral from rice, and light from tapioca. The whipped egg whites elevate them to cloud status, while the buttery undertones make them indulgent yet wholesome.

They’re gluten-free, but more importantly, they’re joyfully delicious—the kind of pancakes that make mornings feel special. Whether you’re gluten-sensitive or simply looking for a lighter, fluffier breakfast treat, these pancakes promise to become your go-to weekend ritual.

Gluten-Free English Muffins

There’s something wonderfully nostalgic about English muffins—their golden tops, soft interiors, and those signature “nooks and crannies” that soak up butter and jam. But for those avoiding gluten, finding the perfect English muffin can be a real challenge. Store-bought gluten-free versions often miss the mark, being either too dense or too crumbly. This  gluten-free English muffin recipe changes that narrative. It delivers everything you love about a classic English muffin: a crisp exterior, tender inside, and just the right chew—all without gluten.

What makes this recipe special is its combination of flours, fermentation, and baking technique. By using a balanced blend of gluten-free grains and a touch of natural sweetness, you’ll get muffins that rise beautifully and taste as comforting as the traditional wheat version. Whether you toast them for breakfast or turn them into mini sandwich buns, these muffins are sure to become a new favorite.

Ingredients

Dry Ingredients:

  • 2 cups gluten-free all-purpose flour (with xanthan gum included, such as Bob’s Red Mill 1-to-1 or Cup4Cup)

  • ½ cup almond flour (for moisture and nutty flavor)

  • 1 tablespoon psyllium husk powder (for structure and elasticity)

  • 2 teaspoons baking powder

  • ½ teaspoon baking soda

  • ½ teaspoon sea salt

Wet Ingredients:

  • 1 ¼ cups warm milk (dairy or plant-based, around 105°F)

  • 1 tablespoon honey or maple syrup

  • 1 packet (2 ¼ teaspoons) active dry yeast

  • 1 large egg, room temperature

  • 2 tablespoons melted butter or olive oil

  • 1 teaspoon apple cider vinegar

For Cooking:

  • Cornmeal or gluten-free semolina for dusting

  • Butter or oil for greasing

Step 1: Activate the Yeast

Start by combining the warm milk, honey, and yeast in a small bowl. Stir gently and let it sit for 10 minutes, or until the mixture becomes foamy. This step is crucial—it ensures your yeast is active and ready to help your muffins rise. If the yeast doesn’t foam, it may be expired or the milk too hot or cold, so try again for best results.

Step 2: Mix the Dry Ingredients

In a large mixing bowl, whisk together the gluten-free all-purpose flour, almond flour, psyllium husk powder, baking powder, baking soda, and salt. The psyllium husk acts like gluten in this recipe—it binds the dough and gives it that stretchy, chewy texture you’d expect from traditional English muffins.

Step 3: Combine the Wet and Dry Ingredients

Pour the activated yeast mixture into the dry ingredients. Add the egg, melted butter (or oil), and apple cider vinegar. Mix with a wooden spoon or hand mixer until a thick, sticky dough forms. Unlike wheat dough, gluten-free dough will not be elastic—it will resemble a thick batter, somewhere between bread dough and cake batter.

If it feels too dry, add 1–2 tablespoons of warm milk. If too wet, sprinkle in a tablespoon of flour at a time until it reaches the right consistency.

Step 4: Let the Dough Rise

Cover the bowl with a clean towel or plastic wrap and let it rise in a warm spot for about 45–60 minutes. The dough should expand slightly and develop air bubbles. This first rise gives your muffins lightness and depth of flavor.

If you prefer a tangy, sourdough-like taste, you can let the dough ferment in the fridge overnight—this long, slow rise enhances the flavor and texture.

Step 5: Shape the Muffins

After rising, gently stir the dough to release some air. Lightly dust a clean surface with gluten-free flour and cornmeal. Scoop out portions of dough (about ⅓ cup each) and shape them into small rounds using your hands dusted with flour. Each muffin should be around 3 inches wide and 1 inch thick.

Place them on parchment paper lined with a dusting of cornmeal, then sprinkle a little more cornmeal on top. Cover and let them rest for 20 minutes. This resting period allows the dough to firm up slightly and ensures better texture during cooking.

Step 6: Cook on the Skillet

Traditional English muffins are cooked on a griddle before baking, and this gluten-free version follows the same tradition for that authentic texture.

Heat a nonstick skillet or griddle over medium-low heat and lightly grease it with butter or oil. Place 3–4 muffins on the skillet (depending on size) and cook for about 5–6 minutes per side. The muffins should develop a golden-brown crust but remain soft in the center.

Be patient—if the heat is too high, the outsides will brown before the inside cooks. Low and slow is key.

Step 7: Finish in the Oven

To ensure the centers are fully cooked, transfer the skillet-cooked muffins to a preheated oven at 350°F (175°C). Bake for 10–12 minutes. This final step helps set the crumb and gives your muffins that perfect texture—crisp outside, fluffy inside.

Once baked, place them on a wire rack to cool completely.

Step 8: Toast and Enjoy

To serve, use a fork to split the muffins open (never a knife—fork-splitting creates those signature rough surfaces that trap butter and jam). Toast until golden, then slather with butter, honey, or your favorite spread.

They’re also perfect for breakfast sandwiches—try them with eggs, cheese, and bacon, or go sweet with peanut butter and sliced bananas.

Storage Tips

  • Room Temperature: Store cooled muffins in an airtight container for up to 2 days.

  • Refrigerator: Keeps fresh for up to 5 days.

  • Freezer: Wrap individually and freeze for up to 2 months. Reheat directly from frozen in a toaster or oven.

Customization Ideas

  1. Whole-Grain Twist: Replace ¼ cup of the all-purpose flour with sorghum or brown rice flour for a hearty flavor.

  2. Sweet Muffins: Add 1 teaspoon of cinnamon and a tablespoon of sugar to the dough for a slightly sweet breakfast option.

  3. Savory Muffins: Mix in shredded cheese, garlic powder, or chopped herbs for a delicious twist on the traditional English muffin.

  4. Dairy-Free Version: Use plant-based milk and olive oil or vegan butter for a 100% dairy-free version that tastes just as rich.

What Makes This Recipe Unique

Most gluten-free English muffin recipes rely solely on a commercial flour blend and eggs, resulting in a texture that’s often too dense or dry. This version stands out because it uses a multi-layered approach to texture and flavor:

  • Psyllium husk powder acts as a natural gluten substitute, trapping air and giving elasticity.

  • Almond flour introduces moisture and richness that prevent dryness.

  • A two-stage cooking process (skillet + oven) ensures a golden crust while keeping the center soft and light.

  • Apple cider vinegar subtly reacts with baking soda, giving lift and a mild tang reminiscent of traditional sourdough English muffins.

Every bite delivers that classic chew and toasty aroma—proof that gluten-free doesn’t mean giving up on texture or taste.

Final Thoughts

These gluten-free English muffins are a testament to how creativity can turn a classic into something even better. They’re wholesome, satisfying, and versatile enough for any meal of the day. Whether topped with melted butter at breakfast, used as a base for Eggs Benedict, or turned into a mini pizza crust, they deliver homemade comfort in every bite.

With a little patience and the right blend of ingredients, you can enjoy the nostalgic pleasure of English muffins again—gluten-free, golden, and utterly delicious.