3 Ingredient Air fryer Scones.j

There’s something undeniably comforting about the smell of freshly baked scones — buttery, warm, and delicately crumbly. Traditionally, baking scones requires an oven, a handful of ingredients, and a good bit of patience. But what if you could whip up golden, fluffy scones with just three ingredients and an air fryer in under 15 minutes? That’s exactly what this recipe offers — simplicity, speed, and flavor in one magical bite. These 3-Ingredient Air Fryer Scones are perfect for beginners, busy mornings, or anyone craving a quick homemade treat without the fuss of traditional baking.

Why This Recipe Works

This recipe is built around the principle of minimal effort, maximum reward. By using only three everyday ingredients — self-rising flour, heavy cream (or thick yogurt), and a touch of sugar — you create a dough that’s rich, tender, and beautifully balanced. The air fryer does all the heavy lifting, transforming the simple mixture into golden scones with crisp tops and soft, fluffy centers.

It’s the kind of recipe that feels like a secret shortcut — so easy that you’ll wonder why you ever made scones any other way.

Ingredients You’ll Need

  1. 2 cups self-rising flour – This flour already includes baking powder and salt, which gives the scones their rise and tender crumb.

  2. 1 cup heavy cream – Provides richness and moisture. You can also substitute with thick Greek yogurt for a slightly tangy flavor and a denser texture.

  3. 2 tablespoons sugar – Just enough to balance the flavor and give a hint of sweetness.

(Optional for finishing: a little milk or cream to brush on top before air frying, and maybe a sprinkle of coarse sugar for extra texture.)

Step-by-Step Instructions

Step 1: Prepare Your Dough

In a large mixing bowl, combine self-rising flour and sugar. Stir lightly with a fork to ensure even distribution. Pour in the heavy cream slowly while mixing with a spoon or spatula.

The dough should start to come together — soft, slightly sticky, but not wet. If it feels too dry, add another tablespoon of cream. If too sticky, dust with a little extra flour.

The magic of this step is in its simplicity: you don’t need to knead vigorously. Overworking the dough will make the scones tough. Just bring it together gently until it forms a rough ball.

Step 2: Shape the Scones

Turn the dough out onto a lightly floured surface. Pat it down with your hands to about 1 inch thick. Use a round cutter (or the rim of a glass) to cut out scones.

If you don’t have a cutter, simply shape the dough into a disc and cut it into wedges — rustic, triangle-style scones that look as good as they taste.

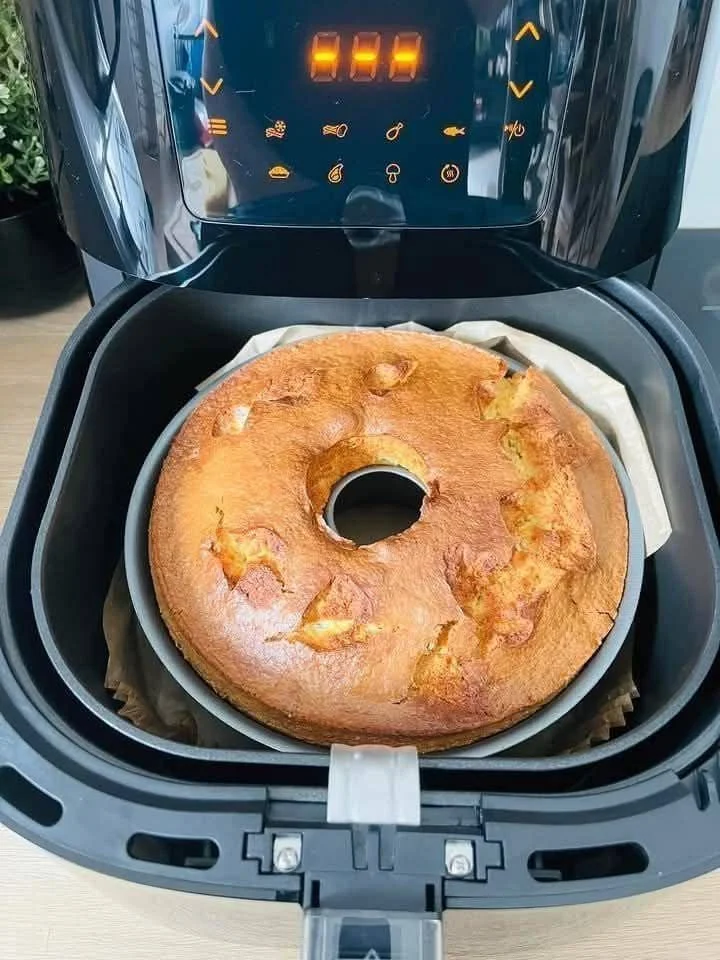
Step 3: Preheat Your Air Fryer

Preheat your air fryer to 350°F (175°C) for about 3 minutes. Preheating ensures even cooking and that delightful crisp top.

Line your air fryer basket with parchment paper or a light spray of oil to prevent sticking.

Step 4: Air Fry the Scones

Place the scones in the basket, leaving a bit of space between each one for airflow. Brush the tops lightly with cream or milk if you want a shiny golden crust.

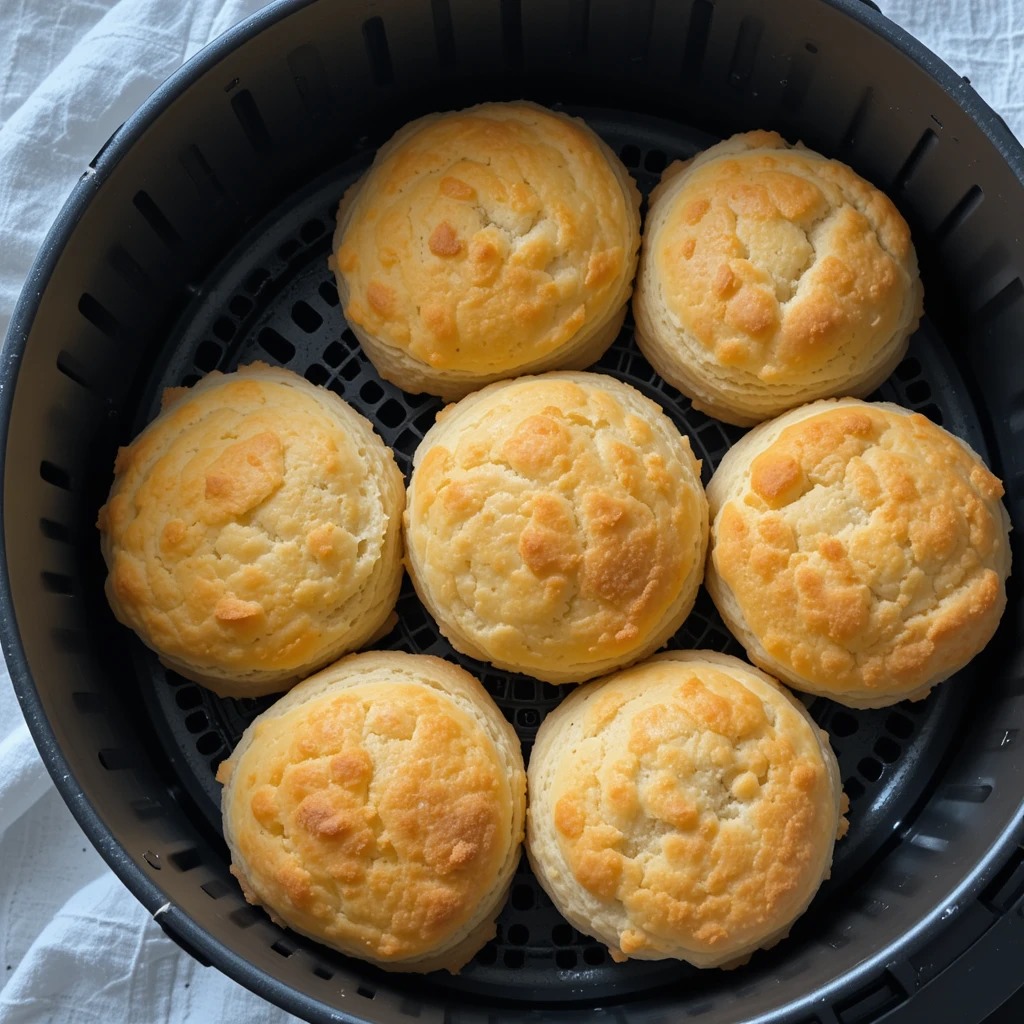
Air fry at 350°F (175°C) for 8–10 minutes, depending on size. Check around the 8-minute mark — when the tops are golden brown and a toothpick inserted in the center comes out clean, they’re done.

Step 5: Cool and Serve

Remove the scones carefully using tongs and let them cool for a few minutes on a rack. They’ll continue to firm up slightly as they cool.

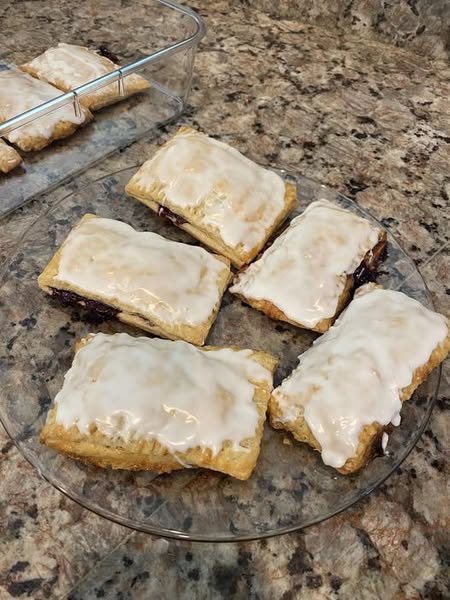
Serve them warm with a pat of butter, a dollop of whipped cream, or your favorite jam. If you’re feeling indulgent, drizzle a bit of honey or melted white chocolate over the top — it’s pure heaven.

Flavor Variations (Still Only 3 Ingredients!)

While this recipe thrives on simplicity, you can slightly adapt it without technically adding more “main” ingredients — just creative twists on the existing base.

  1. Yogurt Scones – Replace cream with Greek yogurt for a tangy flavor and extra protein. These pair beautifully with honey and fresh fruit.

  2. Cheese Scones – Use self-rising flour, shredded cheese, and cream for savory scones that go perfectly with soup or chili.

  3. Cream & Lemon Zest Scones – Stir a little lemon zest into the dough before shaping for a bright, fragrant touch.

  4. Sweet Glazed Scones – Dust the top with sugar before air frying for a delicate caramelized crust.

Why the Air Fryer Is Perfect for Scones

Air fryers mimic the high-heat environment of an oven but use convection to circulate hot air evenly. This means:

  • Your scones bake faster — no long preheating or waiting times.

  • They come out evenly browned and perfectly risen.

  • You save energy, and cleanup is a breeze.

Moreover, the air fryer’s compact heat circulation gives scones that signature contrast: crispy edges with a tender, cloud-like interior.

Troubleshooting Tips

  • Dry dough? Add a splash of extra cream — just enough to bring it together.

  • Sticky dough? Dust your hands and counter lightly with flour.

  • Scones too dense? Don’t overmix. Handle gently and keep the dough thick.

  • Uneven browning? Flip them halfway or lightly rotate the basket for even air flow.

Serving Ideas

These scones are incredibly versatile. Enjoy them:

  • Classic style – with butter and strawberry jam for breakfast.

  • Afternoon treat – split and filled with whipped cream and berries.

  • Savory snack – serve cheese versions with soup or a fresh salad.

  • Dessert delight – drizzle with chocolate sauce or caramel for a quick sweet fix.

You can even freeze them after shaping — just thaw and air fry straight from frozen at 350°F for 10–12 minutes for fresh scones anytime.

The Unique Magic of Minimalism

What makes this 3-ingredient air fryer scone recipe truly unique isn’t just its simplicity — it’s how it captures the essence of homemade comfort in minutes. You don’t need fancy tools, a mixer, or a long list of ingredients. Instead, you get to experience the joy of baking in its purest form: a handful of humble ingredients transformed by heat and air into something truly comforting.

In an age of complicated recipes and endless steps, this minimalist method reminds us that baking doesn’t have to be a chore — it can be quick, creative, and deeply satisfying. These scones are proof that less really is more.

Final Thoughts

From the first golden bite, you’ll taste the buttery warmth, the soft crumb, and that irresistible homemade texture that only freshly baked scones deliver. Whether you’re serving them at brunch, treating yourself on a lazy afternoon, or impressing guests with a quick dessert, these 3-Ingredient Air Fryer Scones are sure to become a go-to recipe.

No eggs, no butter, no fuss — just three simple ingredients and your air fryer. Easy, fast, and beautifully delicious — the way baking should be.

3-Ingredient Yogurt Cake

Sometimes, the most magical recipes are born from the fewest ingredients. This 3-ingredient yogurt cake is one such wonder—a dessert so simple, so effortlessly elegant, that it feels almost too good to be true. With just yogurt, eggs, and cornstarch, this cake transforms into a light, creamy creation that sits somewhere between a Japanese cheesecake and a custard flan. No flour, no butter, no baking powder—just pure, wholesome simplicity that delivers luxurious texture and flavor.

Let’s dive into this unique recipe and explore how you can turn these humble ingredients into a dessert masterpiece that’s soft, melt-in-your-mouth, and unforgettable.

The Beauty of Simplicity

In a world of overly complicated desserts, this yogurt cake is a refreshing reminder that less truly can be more. Each ingredient has a distinct role that, when combined, creates a perfect balance:

  • Yogurt brings creaminess, tang, and natural moisture.

  • Eggs provide structure, richness, and a custard-like smoothness.

  • Cornstarch gives the cake body and a delicate, tender crumb.

The result? A light, airy cake that’s mildly sweet and subtly tangy—perfect on its own or paired with fruit, honey, or a dusting of powdered sugar.

Ingredients (Serves 6–8)

  • 1 cup (250g) plain yogurt (Greek or regular, unsweetened or mildly sweetened)

  • 3 large eggs

  • 4 tablespoons (40g) cornstarch

Optional toppings (for flavor and garnish):

  • A drizzle of honey or maple syrup

  • Fresh berries, sliced peaches, or passion fruit

  • Powdered sugar or grated lemon zest

Step-by-Step Instructions

Step 1: Prepare the Base

Start by preheating your oven to 350°F (175°C). Grease a 6-inch round cake pan and line it with parchment paper—this ensures easy release later since the cake is quite delicate.

In a large bowl, add your plain yogurt. If using Greek yogurt, you’ll get a thicker, richer texture, while regular yogurt makes it softer and slightly jiggly, like pudding. Either way, you’re in for a treat.

Step 2: Add the Eggs

Crack the three eggs into the bowl with the yogurt. Whisk until the mixture becomes smooth and homogenous. You’ll notice the yogurt begins to lighten in color and consistency—this is the secret to the cake’s cloud-like texture.

If you want to add a flavor twist, now is the time. A teaspoon of vanilla extract, lemon zest, or even a touch of honey blends beautifully without compromising the simplicity of the recipe.

Step 3: Incorporate the Cornstarch

Gradually sift in the cornstarch, whisking continuously to avoid lumps. The cornstarch thickens the batter and ensures that the final texture is creamy yet firm enough to slice. You’ll know the batter is ready when it’s silky smooth and slightly thick but pourable.

Step 4: Bake It Low and Slow

Pour the batter into the prepared cake pan. To prevent cracks and keep the texture moist, bake the cake in a water bath. Place your cake pan inside a larger baking dish, then fill the outer dish with hot water until it reaches halfway up the sides of the cake pan.

Bake for 45–55 minutes, or until the cake is set and slightly golden on top. The center should jiggle just a little when shaken—like a cheesecake.

Once baked, turn off the oven and let the cake sit inside with the door slightly open for about 15 minutes. This gentle cooling helps prevent sinking or cracking.

Step 5: Chill and Serve

After removing it from the oven, allow the cake to cool completely at room temperature before transferring it to the refrigerator. Chill for at least 2–3 hours (or overnight if possible).

Once chilled, the cake firms up beautifully and takes on a creamy, cheesecake-like consistency. Gently remove it from the pan, peel off the parchment paper, and place it on a serving plate.

Dust lightly with powdered sugar or top with your favorite fruit before serving.

The Science Behind the Magic

What makes this 3-ingredient yogurt cake so remarkable is how it defies expectations. Here’s why it works:

  • Yogurt acts as both the fat and liquid component. Its acidity also helps tenderize the proteins in the eggs, resulting in a smooth, creamy texture.

  • Eggs are the backbone—they emulsify the mixture and provide lift as they bake, much like in a soufflé.

  • Cornstarch binds moisture, giving the cake stability and structure without needing flour or leavening agents.

It’s a minimalist symphony—each part essential, nothing in excess.

Variations for Creative Bakers

While the classic version is divine, you can experiment to give your yogurt cake a personal twist:

  1. Citrus Dream: Add lemon or orange zest to the batter and top with candied peel for a bright, refreshing flavor.

  2. Chocolate Swirl: Mix a tablespoon of cocoa powder with a bit of the batter and swirl it through before baking.

  3. Berry Bliss: Gently fold in blueberries, raspberries, or diced strawberries before pouring the batter into the pan.

  4. Vanilla Honey Delight: Drizzle warm honey and sprinkle crushed pistachios or almonds before serving.

  5. Coffee Lover’s Touch: Add a teaspoon of instant coffee granules dissolved in a tablespoon of water to the batter for a subtle mocha flavor.

These variations keep the cake’s spirit intact while adding layers of aroma and taste.

Tips for Perfect Results

  • Use room temperature ingredients. Cold eggs can cause the batter to curdle slightly.

  • Don’t overbake. The cake should remain pale and lightly golden. Overbaking makes it dry.

  • Let it rest. Chilling allows the texture to set and enhances the flavor.

  • Experiment with yogurts. Greek yogurt gives a denser bite, while plain yogurt offers a lighter, flan-like consistency.

Serving Ideas

This yogurt cake is wonderfully versatile. Serve it chilled with a spoonful of fruit compote, or warm it slightly and drizzle with caramel sauce. It pairs beautifully with hot tea, coffee, or even a dollop of whipped cream.

For a brunch table, slice it into delicate wedges and pair it with fresh figs or berries. For dessert, turn it into a plated masterpiece with a raspberry coulis and mint leaves.

A Dessert Worth Remembering

The 3-ingredient yogurt cake isn’t just a recipe—it’s a culinary revelation. It proves that you don’t need a pantry full of items or fancy techniques to create something extraordinary. It’s light yet satisfying, simple yet sophisticated, and perfect for any time of day.

Whether you’re a beginner baker or a seasoned cook, this cake invites you to rediscover the joy of minimalist baking. It’s the kind of dessert that whispers rather than shouts—gentle, pure, and irresistibly comforting.

So next time you open your fridge and find some yogurt and a few eggs, you’ll know that a little bit of kitchen alchemy awaits—a cake so delicate it melts in your mouth, yet so effortless it feels like magic.

No-Knead, No-Egg, No-Butter Rustic Artisan Bread

If you’ve ever wanted to bake bread that feels like it came straight from a countryside bakery — crusty on the outside, soft and airy within, with a hint of natural sweetness — this recipe is for you. What makes it truly magical is its simplicity: no kneading, no eggs, no butter, and no complicated techniques. Just mix, rest, and bake. It’s bread in its purest, most comforting form — minimalist, wholesome, and unbelievably good.

 Ingredients

  • 3 cups (360 g) all-purpose flour or bread flour

  • 1 ½ teaspoons salt

  • ½ teaspoon instant or active dry yeast

  • 1 ½ cups (360 ml) warm water (about 100°F / 38°C)

  • 1 teaspoon sugar or honey (optional, helps activate yeast)

  • 1 tablespoon olive oil (optional, for a slightly richer texture)

  • Extra flour for dusting

Equipment

  • Large mixing bowl

  • Wooden spoon or silicone spatula

  • Plastic wrap or kitchen towel

  • Dutch oven or heavy lidded oven-safe pot (you can also use a baking sheet and water pan)

  • Parchment paper (optional but helpful)

 Step-by-Step Directions

1. Mix the Dough (5 minutes)

In a large bowl, combine the flour, salt, and yeast. Stir with a spoon to evenly distribute the dry ingredients. Add warm water and, if using, sugar or honey. Mix until the dough comes together — it will look rough, sticky, and shaggy. That’s perfect! You’re not aiming for a smooth dough here.

Drizzle in the olive oil (if using) and give it one final stir. The dough should feel tacky and wet but not liquid. If it’s too dry, add a tablespoon of water; if too wet, sprinkle in a touch more flour.

Why it works:
The long resting period ahead allows the yeast to slowly ferment and develop gluten naturally — so no kneading is needed. Time does the hard work for you.

2. Rest and Rise (12 to 18 hours)

Cover the bowl tightly with plastic wrap or a damp towel. Let it rest at room temperature (ideally between 68–75°F / 20–24°C). Over the next 12 to 18 hours, the dough will double or even triple in size. You’ll see bubbles form on the surface — that’s the yeast creating flavor and structure.

Tip:
If your kitchen is cold, place the bowl inside an unheated oven with the light on for gentle warmth.

What’s happening:
The long fermentation gives this bread its signature flavor — mildly tangy, complex, and aromatic — much like artisan sourdough. It’s the secret to turning three humble ingredients into bakery-quality bread.

3. Shape the Dough (5 minutes)

After the rise, your dough will be soft, bubbly, and delicate. Lightly flour your hands and a clean surface. Gently scrape the dough out of the bowl — don’t punch it down or knead it! You want to preserve all that beautiful air inside.

Sprinkle a bit more flour over the top and fold the dough over itself a few times to form a loose round shape. Place it on parchment paper, seam side down. Cover again and let it rest for about 30–45 minutes while you preheat the oven.

4. Preheat the Oven (30 minutes)

Place your Dutch oven (or heavy pot with lid) inside the oven and preheat to 450°F (230°C) for at least 30 minutes. This ensures the pot is blazing hot — essential for a crisp, professional crust.

If you don’t have a Dutch oven, preheat a baking sheet and place an empty metal pan on the lower rack. You’ll add water to it later to create steam.

5. Bake to Perfection

When ready to bake, carefully remove the hot Dutch oven from the oven. Use the parchment paper to lift your dough and gently lower it into the pot. Cover with the lid and bake for 30 minutes.

After 30 minutes, remove the lid and bake for another 10–15 minutes, until the top is deeply golden brown with a rustic crackled crust.

If using a baking sheet instead: place the dough on the preheated sheet, then pour 1 cup of hot water into the lower pan and quickly close the oven door. The steam will give the bread a crisp crust.

6. Cool and Admire

Transfer the baked loaf to a cooling rack. Wait at least 30 minutes before slicing — yes, patience matters! Cutting too soon releases the steam and can make the bread gummy inside.

Once cooled, slice into it and admire the open crumb — soft, airy holes, surrounded by a crisp, fragrant crust.

Why This Bread Is So Special

This recipe proves that great bread doesn’t need eggs, butter, or kneading. Instead, it relies on time and hydration to work magic. The yeast slowly digests the flour, producing natural flavor and structure. The result? A loaf that tastes as though it came from a stone oven in a small European village.

It’s naturally vegan and can easily be made with whole wheat flour or gluten-free flour blends. You can also customize it:

  • Add-ins: rosemary, garlic, olives, seeds, or dried fruit.

  • Toppings: brush the crust with olive oil or sprinkle sesame or sea salt before baking.

  • Texture tweaks: use slightly less water for a denser loaf or more for a more open crumb.

 Bread Science: How It Works Without Kneading

Traditional bread recipes require kneading to develop gluten — the protein network that gives bread structure. But in this recipe, time replaces effort. The long fermentation allows enzymes to break down proteins, letting gluten form naturally. That’s why the dough transforms from shaggy to elastic overnight, all on its own.

Steam baking also plays a big role. The enclosed Dutch oven traps moisture, keeping the crust soft during the first half of baking so the loaf can expand fully. Once the lid is off, the crust hardens, creating that irresistible golden shell.

 Serving Ideas

This no-knead loaf pairs beautifully with nearly anything. Try it:

  • Warm with olive oil, balsamic vinegar, and cracked pepper

  • Toasted with avocado, sea salt, and chili flakes

  • Alongside hearty soups, stews, or pasta

  • Topped with jam or honey for a rustic breakfast

  • As the base for gourmet sandwiches — think tomato, mozzarella, and basil

You can even transform stale slices into garlic croutons or bread pudding.

 Storage Tips

  • Room Temperature: Store in a paper bag or wrapped in a clean kitchen towel for up to 2 days.

  • Longer Storage: Slice and freeze in a resealable bag for up to 2 months. Toast directly from frozen for fresh flavor.

  • Avoid plastic wrap for long storage — it traps moisture and softens the crust.

Final Thoughts

This no-knead, no-egg, no-butter bread isn’t just a recipe — it’s a reminder that the best food often comes from simplicity. With nothing more than flour, water, yeast, and salt, you can create something deeply satisfying, comforting, and timeless.

Whether you’re a beginner baker or a seasoned pro, this loaf invites you to slow down and trust the process. The result is a golden, crackly bread that fills your kitchen with warmth and your heart with pride — all without lifting a finger to knead.

Easy Strawberry Cloud Delight

When strawberries are at their sweetest and most fragrant, there’s nothing better than turning them into a dessert that captures their natural charm. This Easy Strawberry Cloud Delight is the kind of treat that feels like you’re eating a strawberry-infused dream — light, airy, and gently sweet with a velvety texture that melts on your tongue. It’s the perfect balance between freshness and indulgence.

This dessert is incredibly easy to make — no baking, no complicated steps, and only a few everyday ingredients. Think of it as a mix between a mousse, a cheesecake, and a trifle — layered with whipped cream, creamy strawberry filling, and buttery cookie crumbs. Whether you’re preparing it for a lazy weekend treat, a surprise for guests, or a refreshing summer dessert, this strawberry cloud is destined to be a hit.

 Ingredients

For the Base:

  • 1 ½ cups crushed digestive biscuits or graham crackers

  • 5 tablespoons melted butter

  • 1 tablespoon sugar (optional, for extra sweetness)

For the Strawberry Cloud Layer:

  • 2 cups fresh strawberries, hulled and sliced

  • ½ cup sugar

  • 1 tablespoon lemon juice

  • 1 tablespoon cornstarch

  • 1 cup heavy whipping cream, chilled

  • 1 cup cream cheese, softened

  • ½ cup powdered sugar

  • 1 teaspoon vanilla extract

For the Topping:

  • ½ cup whipped cream (for garnish)

  • A few sliced strawberries

  • Crushed biscuits or white chocolate shavings (optional)

 Step-by-Step Directions

Step 1: Make the Base

Start by preparing the base that gives the dessert its subtle crunch. In a mixing bowl, combine crushed biscuits with melted butter and sugar (if using). Mix until the crumbs are evenly coated and resemble wet sand.

Press this mixture into the bottom of serving glasses, jars, or a shallow dish. You can refrigerate it for about 10–15 minutes to set while you prepare the filling. This buttery foundation adds a beautiful contrast to the soft strawberry cream.

Step 2: Cook the Strawberry Compote

Now it’s time to create that vibrant strawberry layer bursting with flavor. In a small saucepan, add the sliced strawberries, sugar, lemon juice, and cornstarch. Cook over medium heat, stirring often, until the strawberries break down and the sauce thickens — about 6–8 minutes.

Once it’s thick and glossy, remove from the heat and let it cool completely. This homemade compote adds a natural fruitiness that balances perfectly with the creamy layers to come. If you prefer a smoother texture, you can blend it once cooled.

Step 3: Prepare the Strawberry Cream

In a large bowl, beat cream cheese with powdered sugar and vanilla extract until smooth and creamy. It’s important to use softened cream cheese so you don’t end up with lumps. Once that’s silky, gently fold in the cooled strawberry compote until you get a lovely pink color and fruity aroma.

In a separate chilled bowl, whip the heavy cream until it forms soft peaks. Carefully fold this whipped cream into the strawberry-cream cheese mixture. The result should be fluffy and airy — like a cloud. This is the heart of your dessert, combining the tang of strawberries with the richness of cream cheese and the lightness of whipped cream.

Step 4: Assemble the Layers

Take your chilled biscuit bases out of the fridge. Spoon or pipe the strawberry cloud mixture evenly over the crumb layer. Smooth the tops gently with a spatula or the back of a spoon. For an elegant look, alternate layers of the cream and a drizzle of extra strawberry compote if you like.

Once all your glasses or bowls are filled, refrigerate for at least 2–3 hours (or overnight if possible). Chilling helps the dessert set and enhances the flavor, making it cool and refreshing with every bite.

Step 5: Add the Finishing Touches

Before serving, top each glass with a dollop of whipped cream and garnish with fresh strawberry slices. For extra flair, sprinkle some crushed biscuits or white chocolate shavings on top. The combination of textures — creamy, crunchy, and fruity — is simply irresistible.


Tips for Perfect Results

  1. Use ripe strawberries: The sweeter your strawberries, the better your dessert will taste. If your berries are slightly tart, add an extra teaspoon of sugar to the compote.

  2. Don’t skip the chill time: This step ensures the dessert sets properly and gives it that light, mousse-like consistency.

  3. For a dairy-free version: Use coconut cream instead of heavy cream and vegan cream cheese — it’ll add a tropical note that complements the strawberries beautifully.

  4. Add a surprise layer: Try adding a thin layer of crushed meringue, vanilla sponge cake, or even strawberry jelly between layers for an interesting twist.

  5. Make it ahead: This dessert stores well in the fridge for up to 3 days, making it a wonderful make-ahead option for parties or busy weekends.


The Secret Behind the “Cloud” Texture

The name Strawberry Cloud Delight comes from the heavenly texture — not too dense like cheesecake and not too light like whipped cream. The secret lies in gently folding the whipped cream into the cream cheese and strawberry base. This technique traps air, creating a mousse-like consistency that’s both fluffy and rich.

When you take the first spoonful, you’ll notice how it melts in your mouth, leaving behind the gentle sweetness of strawberries and the creamy smoothness of cheese and cream — a combination that’s both indulgent and refreshing.

 Variations to Try

This recipe is endlessly customizable. Once you’ve mastered the basic version, try experimenting with these ideas:

  • Strawberry Lemon Dream: Add a teaspoon of lemon zest to the cream layer for a zesty twist.

  • Chocolate Strawberry Cloud: Add a drizzle of melted chocolate or a layer of chocolate cookie crumbs for a decadent flavor contrast.

  • Berry Medley: Mix in blueberries or raspberries with the strawberries for a colorful and tangy variation.

  • Mini Strawberry Parfaits: Layer the mixture in small shot glasses for a party-perfect dessert that guests can grab and go.

Why You’ll Love This Dessert

This dessert isn’t just about taste — it’s about experience. Every layer serves a purpose:

  • The crumbly biscuit base provides texture and buttery flavor.

  • The strawberry cream adds lightness and fruity aroma.

  • The whipped topping finishes it all with elegance and smoothness.

It’s the perfect dessert for any season, but especially wonderful during warmer months when you crave something chilled and fruity. It’s simple enough for everyday indulgence but special enough to serve at gatherings.

 Final Thoughts

The beauty of Easy Strawberry Cloud Delight lies in its simplicity and charm. It takes humble ingredients — strawberries, cream, biscuits — and transforms them into a visually stunning, melt-in-your-mouth creation. Every bite feels like a burst of strawberry sweetness balanced by silky creaminess and buttery crunch.

So, whether you’re craving something quick to satisfy your sweet tooth or want to impress guests without spending hours in the kitchen, this dessert is the perfect solution. It’s light, beautiful, and undeniably delicious — a strawberry lover’s dream in every spoonful.

Gluten-Free Pop-Tarts

Few things compare to the nostalgia of biting into a warm, flaky Pop-Tart straight from the toaster — the tender crust, the gooey filling, and the sweet glaze that glistens on top. But for anyone who’s gluten intolerant or simply prefers gluten-free baking, traditional Pop-Tarts are off the table. That’s where this unique gluten-free Pop-Tart recipe steps in — a handcrafted, bakery-quality version made entirely from scratch, with wholesome ingredients, rich flavors, and a flaky texture that rivals the real thing.

This recipe reimagines the classic breakfast pastry with a buttery gluten-free crust, customizable fillings, and a glossy vanilla glaze. Whether you’re craving strawberry, chocolate, or cinnamon brown sugar, this base recipe allows endless creativity while remaining 100% gluten-free.

The Secret to a Perfect Gluten-Free Pop-Tart

The key challenge in making gluten-free Pop-Tarts is recreating the signature flakiness of pastry dough without gluten — the protein that gives regular dough its structure and elasticity. The trick lies in using the right blend of gluten-free flours, combined with cold butter and a touch of xanthan gum for elasticity. The dough must stay cold and be handled gently to maintain its tender, flaky layers.

For the filling, you can use any jam, chocolate, or spiced mixture you love — the magic is in the balance between sweet, tart, and buttery. And to finish, a silky glaze poured over the cooled pastry creates that iconic Pop-Tart sheen.

Ingredients

For the Gluten-Free Pastry Dough:

  • 2 cups gluten-free all-purpose flour (with xanthan gum included; if not, add 1 tsp xanthan gum)

  • 1 tablespoon cornstarch (adds lightness)

  • ½ teaspoon salt

  • 1 tablespoon granulated sugar

  • ¾ cup unsalted butter, cold and cubed

  • 1 large egg

  • 3 tablespoons cold milk (dairy or non-dairy)

  • 1 teaspoon pure vanilla extract

For the Filling (Choose One or Mix & Match):

Strawberry Jam Filling:

  • ½ cup strawberry jam

  • 1 teaspoon cornstarch mixed with 1 teaspoon water (to thicken if jam is too runny)

Cinnamon Brown Sugar Filling:

  • ¼ cup brown sugar

  • 1 teaspoon ground cinnamon

  • 1 tablespoon gluten-free flour

  • 1 tablespoon softened butter

Chocolate Filling:

  • ¼ cup chocolate chips

  • 1 tablespoon heavy cream or coconut cream

For the Glaze:

  • 1 cup powdered sugar

  • 2–3 tablespoons milk (dairy or non-dairy)

  • ½ teaspoon vanilla extract

  • Optional: natural food coloring or sprinkles

Step-by-Step Instructions

1. Make the Dough

In a large mixing bowl, combine the gluten-free flour, cornstarch, salt, and sugar. Whisk until evenly blended. Add cold butter cubes, and using a pastry cutter or your fingertips, work the butter into the flour until the mixture resembles coarse crumbs. You should still see small pea-sized bits of butter — these are crucial for flakiness.

In a small bowl, whisk together the egg, milk, and vanilla. Pour the wet mixture into the flour mixture and gently stir with a fork until the dough begins to come together. If it feels too dry, add an extra teaspoon of milk at a time until it holds together but isn’t sticky.

Turn the dough onto a sheet of plastic wrap and form it into a rectangle. Wrap tightly and refrigerate for at least 30 minutes. Chilling helps firm up the butter and hydrate the flour for better rolling later.

2. Prepare the Filling

While the dough chills, prepare your filling.

For fruit jam: warm it slightly and mix with the cornstarch slurry to thicken if needed, then let cool.
For cinnamon sugar: stir together brown sugar, cinnamon, flour, and butter until a crumbly paste forms.
For chocolate: melt the chocolate chips and cream together in the microwave in 15-second intervals, stirring until smooth.

Let all fillings cool completely before using — this prevents the dough from becoming soggy.

3. Roll and Shape

Preheat your oven to 375°F (190°C) and line a baking sheet with parchment paper.

Remove the chilled dough from the fridge and divide it into two equal portions. Roll out one portion between two sheets of parchment paper until about ⅛ inch thick. Cut into equal rectangles (about 3×4 inches each). These will form the bottom halves of your Pop-Tarts.

Transfer the rectangles to your prepared baking sheet. Spoon about 1 tablespoon of your chosen filling into the center of each rectangle, leaving a small border around the edges.

Roll out the second portion of dough and cut matching rectangles for the tops. Gently place each top piece over the filling and press the edges with your fingertips. Use a fork to crimp the edges, sealing in the filling completely.

Prick the tops with a fork a few times to allow steam to escape during baking.

4. Bake to Golden Perfection

Brush the tops lightly with milk or beaten egg for a golden finish. Bake for 20–25 minutes, or until the Pop-Tarts turn light golden brown around the edges.

Remove from the oven and let them cool on the baking sheet for 5 minutes before transferring to a wire rack to cool completely. Cooling is essential before glazing — otherwise, the glaze will melt right off.

5. Glaze and Decorate

Whisk together powdered sugar, milk, and vanilla extract until smooth and glossy. Adjust consistency as needed — thicker for a bold icing, thinner for a glaze effect.

Spoon or drizzle the glaze over each Pop-Tart and, if desired, add colorful sprinkles, crushed freeze-dried fruit, or a drizzle of chocolate. Let the glaze set for about 15 minutes before serving.

Creative Variations

  1. Berry Bliss Pop-Tarts:
    Use mixed berry jam and top with a pale pink glaze made from powdered sugar and a drop of beet juice.

  2. Chocolate Hazelnut Dream:
    Fill with chocolate hazelnut spread and top with a cocoa glaze and crushed nuts.

  3. Apple Cinnamon Delight:
    Use apple butter or cooked apples with cinnamon filling for a warm fall flavor.

  4. Maple Pecan Pop-Tarts:
    Add crushed pecans and drizzle with maple icing for a breakfast-style treat.

  5. Lemon Blueberry Glow:
    Fill with blueberry jam and top with lemon icing — a tangy-sweet twist that tastes like summer.

Tips for Gluten-Free Success

  • Keep everything cold: Cold butter and minimal handling are key to a flaky crust.

  • Don’t skip chilling: Gluten-free dough needs time to firm up, making it easier to roll and shape.

  • Use parchment: It prevents sticking and ensures easy transfer to the baking sheet.

  • Avoid overfilling: Too much filling can cause leakage during baking.

  • Store properly: Once cooled, store in an airtight container for up to 3 days, or freeze for up to 2 months. Toast lightly before serving for that signature Pop-Tart warmth.

Why You’ll Love This Recipe

This gluten-free Pop-Tart recipe is a labor of love — one that brings together nostalgic flavors with a wholesome, from-scratch approach. Unlike store-bought versions filled with preservatives and artificial flavors, these pastries are tender, buttery, and endlessly customizable. Every bite offers a perfect balance: crisp edges, soft layers of dough, and a sweet, gooey center that melts in your mouth.

Whether you make them for breakfast, dessert, or a mid-afternoon snack, these homemade gluten-free Pop-Tarts capture the joy of childhood in a more natural, artisanal way. They’re proof that gluten-free baking doesn’t mean giving up indulgence — it means rediscovering it, one flaky, golden pastry at a time.

Crispy & Fluffy Air Fryer Flatbread

Flatbreads have been a staple in kitchens worldwide for centuries, celebrated for their versatility and simplicity. But today, we’re taking a modern spin on this classic by using an air fryer to achieve a perfectly crispy exterior while maintaining a soft, chewy interior. This method is quicker than traditional stovetop or oven baking, and it creates a distinct texture and flavor that will make your flatbread irresistible. Whether you’re serving it as a side for curries, wrapping it around vegetables and meats, or enjoying it with dips, this air fryer flatbread recipe is sure to become a favorite.

Ingredients

For this recipe, you’ll need simple pantry staples, but the secret lies in how they come together:

  • 2 cups all-purpose flour – For a gluten-free version, substitute with a cup of rice flour and a cup of tapioca flour.

  • 1 tsp salt – Enhances flavor without overpowering.

  • 1 tsp sugar – Feeds the yeast and adds a hint of sweetness.

  • 1 tsp baking powder – Gives a slight lift for softness.

  • 1 tbsp olive oil – Adds richness and helps the flatbread stay tender.

  • ¾ cup warm water – Warm, not hot, to activate the baking powder and help the dough form.

  • Optional flavorings: garlic powder, dried herbs (oregano, thyme), chili flakes, or sesame seeds.

Pro Tip: Using warm water rather than cold helps the dough become more pliable and easy to work with. The olive oil is key for a tender texture and subtle aroma.

Step 1: Making the Dough

  1. In a large mixing bowl, combine the flour, salt, sugar, and baking powder. Mix thoroughly so that the ingredients are evenly distributed.

  2. Gradually pour in the warm water while stirring with a spoon or your hand. Mix until the dough starts to form.

  3. Add the olive oil and knead gently for about 5 minutes. The dough should be smooth and slightly sticky. If it’s too dry, add water 1 tsp at a time; if too wet, sprinkle a little more flour.

  4. Once kneaded, cover the dough with a damp cloth or plastic wrap and let it rest for 20 minutes. Resting allows the gluten to relax, making the dough easier to roll and creating a softer flatbread.

Tip: For extra flavor, you can knead in finely chopped fresh herbs like rosemary or cilantro during this stage.

Step 2: Shaping the Flatbreads

  1. After resting, divide the dough into 6-8 equal portions depending on the size of flatbread you want.

  2. Lightly flour your countertop and rolling pin. Roll each portion into a thin circle or oval about ¼ inch thick. Thin flatbreads cook faster in the air fryer and develop a slightly crisp edge.

  3. If you want a decorative touch, sprinkle sesame seeds, nigella seeds, or a pinch of coarse salt on top and gently press them into the dough. This also adds an extra layer of flavor.

Pro Tip: Don’t worry if your flatbreads aren’t perfectly round. Their rustic, handmade shape adds charm and authenticity.

Step 3: Air Frying the Flatbreads

  1. Preheat your air fryer to 375°F (190°C) for 3-5 minutes. Preheating ensures even cooking.

  2. Place one flatbread in the air fryer basket. Do not overcrowd; cook one or two at a time depending on your air fryer’s capacity.

  3. Cook for 4-6 minutes, flipping halfway through. You want the flatbread to develop golden-brown spots on both sides.

  4. Remove the flatbread and immediately brush lightly with olive oil or melted butter for extra flavor and softness. Repeat with the remaining pieces.

Tip: For an ultra-chewy texture, sprinkle a few drops of water on the flatbread before air frying. This creates a steam effect inside the basket.

Step 4: Serving Suggestions

Air fryer flatbread is incredibly versatile. Here are some ideas to serve it:

  • As a wrap: Fill with grilled vegetables, chicken, or falafel. Add yogurt sauce or hummus for a Mediterranean twist.

  • With dips: Serve warm flatbreads with garlic yogurt, baba ganoush, or tzatziki.

  • As a pizza base: Top lightly with tomato sauce, cheese, and fresh herbs. Air fry for an additional 2-3 minutes until cheese melts.

  • Breakfast option: Spread avocado, sprinkle with seeds, and top with a poached egg for a hearty start to the day.

Pro Tip: Flatbreads are best enjoyed fresh, but you can store leftovers in an airtight container for up to 3 days. Reheat in the air fryer for 1-2 minutes to restore crispiness.

Flavor Variations

  1. Garlic & Herb Flatbread: Add 1 tsp garlic powder and 1 tsp mixed dried herbs to the flour mixture.

  2. Spicy Flatbread: Mix ½ tsp chili powder or cayenne into the dough and sprinkle crushed red pepper on top before air frying.

  3. Cheese-stuffed Flatbread: Roll out the dough, place shredded cheese in the center, fold, and seal the edges. Air fry as usual for a gooey surprise.

  4. Whole Wheat Version: Substitute half the flour with whole wheat flour for a nuttier flavor. Add 1 tsp honey to balance the earthiness.

Tips for Perfect Air Fryer Flatbread

  • Ensure the flatbread is evenly rolled for uniform cooking. Uneven thickness can cause one side to burn while the other remains undercooked.

  • Avoid stacking flatbreads in the air fryer; each needs airflow to crisp properly.

  • Brush with oil immediately after cooking to prevent the bread from drying out.

  • Experiment with toppings and seasonings to create your own signature flatbread.

Why Air Fryer Flatbread Is Unique

Using an air fryer for flatbread is not just a timesaver—it changes the texture and flavor profile. Unlike pan-fried flatbreads, air frying gives a light, almost puffy center with slightly crispy edges. This method also reduces oil usage, making the bread lighter and healthier while retaining its traditional chewiness. The air circulation inside the fryer ensures even browning and allows for experimenting with toppings that adhere beautifully during cooking.

Advanced Tips for Enthusiasts

  • Steam infusion: Keep a small bowl of water in the bottom of the air fryer while cooking to mimic a tandoor-like effect.

  • Multiple batches: Stack cooked flatbreads between a clean kitchen towel to keep them warm and soft while finishing the rest.

  • Freezing: Flatbreads freeze exceptionally well. Stack with parchment paper in between and defrost in the air fryer for 1-2 minutes before serving.

This air fryer flatbread recipe is not only quick and easy but also endlessly adaptable. Whether you stick to the basic classic, explore herb and garlic versions, or venture into cheese-stuffed flatbreads, the air fryer ensures a consistent, delectable result every time. With its crispy edges, soft interior, and rich aroma, this flatbread will elevate any meal, be it breakfast, lunch, dinner, or even a late-night snack.

Experiment with textures, flavors, and toppings, and soon you’ll have a repertoire of air fryer flatbreads that can rival any bakery or traditional method. Enjoy the process, savor the aroma, and relish every bite of your homemade creation!

Chocolate Lava Cake

If there’s one dessert that never fails to impress, it’s the Molten Chocolate Lava Cake. With its crisp outer layer and gooey, molten chocolate center that oozes out like warm silk, this dessert is the definition of indulgence. The beauty of lava cake lies in its contrast—firm yet delicate, rich yet light, simple yet sophisticated. Whether you’re planning a romantic dinner, celebrating a special occasion, or just craving something intensely chocolatey, this unique lava cake recipe will transform your kitchen into a five-star dessert haven.

Let’s dive deep into the world of molten magic, where every bite feels like a warm chocolate hug.

Why This Lava Cake is Unique

Unlike traditional lava cakes that rely solely on melted chocolate and butter, this recipe introduces a touch of espresso and brown butter for depth and aroma. The espresso enhances the chocolate’s richness without overpowering it, while the brown butter adds a nutty undertone that elevates every spoonful. Additionally, we use a mix of dark and semi-sweet chocolate for perfect balance—bitterness meeting sweetness in harmony.

This lava cake also features a hidden layer of chocolate truffle ganache in the center. As it bakes, the ganache melts into a molten core, ensuring consistent gooeyness every time. The texture is flawlessly silky, not runny or overbaked. Finally, a sprinkle of flaky sea salt on top brings a gourmet twist that balances the sweetness beautifully.

Ingredients

For the Cake Batter:

  • 1/2 cup (115g) unsalted butter

  • 4 oz (115g) dark chocolate (70% cocoa), chopped

  • 2 oz (60g) semi-sweet chocolate chips

  • 2 large eggs

  • 2 large egg yolks

  • 1/4 cup (50g) granulated sugar

  • 2 tablespoons brown sugar

  • 1 teaspoon espresso powder

  • 1/2 teaspoon pure vanilla extract

  • 1/4 cup (30g) all-purpose flour

  • Pinch of salt

For the Ganache Core:

  • 3 oz (85g) dark chocolate, finely chopped

  • 1/4 cup (60ml) heavy cream

For Serving:

  • Powdered sugar (for dusting)

  • Vanilla bean ice cream or whipped cream

  • Fresh raspberries or strawberries

  • Flaky sea salt (optional but highly recommended)

Step-by-Step Instructions

Step 1: Prepare the Chocolate Ganache Core

In a small saucepan, heat the heavy cream until it just begins to simmer—don’t let it boil. Pour the hot cream over the chopped dark chocolate in a heatproof bowl. Let it sit for 1 minute, then stir until smooth and glossy.
Refrigerate for 20 minutes until the ganache firms up slightly. Using a small spoon or melon baller, scoop 4 small balls (about 1 inch each) and place them on a parchment-lined plate. Freeze while preparing the cake batter.

This frozen ganache will later melt inside the cake, ensuring that irresistible molten center.

Step 2: Make the Brown Butter Chocolate Base

In a small saucepan, melt the butter over medium heat. Continue cooking until it starts to foam and gives off a nutty aroma, with golden-brown specks forming at the bottom. This is brown butter—deeply aromatic and perfect for adding warmth to the dessert.
Remove from heat, add the chopped dark and semi-sweet chocolates, and stir until fully melted and smooth. Let it cool slightly.

Step 3: Whip the Eggs and Sugar

In a medium mixing bowl, combine eggs, egg yolks, granulated sugar, and brown sugar. Using a hand mixer or whisk, beat for 3–4 minutes until the mixture becomes thick, pale, and slightly foamy. This step incorporates air, giving the cake its signature light yet rich texture.
Add espresso powder and vanilla extract, mixing just until combined.

Step 4: Combine the Batter

Pour the slightly cooled chocolate-butter mixture into the whipped eggs, stirring gently until smooth.
Sift in flour and salt, folding gently with a spatula. The batter should be thick and glossy—don’t overmix, or you’ll lose the airiness.

Step 5: Prepare the Ramekins

Preheat your oven to 425°F (220°C).
Grease four 6-ounce ramekins generously with butter, then dust lightly with cocoa powder to prevent sticking. Place them on a baking sheet.

Spoon a little batter into each ramekin (about halfway full), place one frozen ganache ball in the center, then cover with remaining batter until three-quarters full. Tap gently to release any air bubbles.

Step 6: Bake to Perfection

Bake for 12 to 14 minutes, depending on your oven. The edges should be firm and set, but the center should still jiggle slightly when touched.
Do not overbake—the key to lava cake lies in perfect timing. Every extra minute in the oven turns the molten center solid, so watch carefully.

Step 7: The Moment of Truth

Remove from the oven and let the cakes rest for 1 minute. Run a thin knife around the edges, then carefully invert each cake onto a dessert plate. The warm aroma of chocolate and butter will fill the room instantly.

Dust with powdered sugar, sprinkle a pinch of flaky sea salt on top, and serve immediately with a scoop of vanilla bean ice cream or a dollop of whipped cream. When you cut into it, the rich chocolate lava will flow beautifully—a sight as heavenly as the taste.

Tips for the Perfect Lava Cake

  1. Chocolate Quality Matters: Use high-quality dark chocolate with at least 60–70% cocoa. Cheap chocolate may not melt smoothly and can affect both flavor and texture.

  2. Timing is Everything: Each oven is different. Start checking at the 12-minute mark—edges firm, center slightly soft is ideal.

  3. Freezing the Ganache Core: This step guarantees a molten center. Skipping it can result in uneven gooeyness.

  4. Use Cocoa Instead of Flour for Dusting: It enhances the flavor and prevents a white flour residue on the edges.

  5. Serve Immediately: Lava cake is best eaten warm. Once cooled, the molten center will solidify.

Flavor Variations

  • Salted Caramel Lava Cake: Replace the ganache core with a spoonful of thick caramel sauce.

  • Peanut Butter Lava Cake: Add a swirl of creamy peanut butter in the center for a nutty surprise.

  • Matcha White Chocolate Lava Cake: Use white chocolate and a teaspoon of matcha powder in the batter for a unique twist.

  • Raspberry Lava Cake: Add a layer of raspberry jam beneath the batter for a fruity tang that complements the dark chocolate.

Why You’ll Love This Recipe

This lava cake isn’t just about chocolate—it’s about the experience. The soft exterior cracks open to reveal a river of molten chocolate that pools on the plate, blending with the ice cream in a dance of warmth and coolness. The balance of flavors—from nutty brown butter to aromatic espresso—creates an elegant dessert that feels both homey and luxurious.

Each bite tells a story of contrasts: crispy yet creamy, hot yet soothing, indulgent yet comforting. It’s the kind of dessert that ends dinner with a “wow” moment and leaves everyone asking for the recipe.

Conclusion

The Molten Chocolate Lava Cake is a timeless dessert that blends art and simplicity. It’s more than a recipe—it’s an experience of textures, aromas, and pure bliss. With this unique twist of espresso, brown butter, and a hidden ganache heart, you’ll create a dessert that not only melts in your mouth but also melts hearts around the table.

Dessert is foolproof perfect for the weekend

If you’ve been craving a dessert that’s indulgent yet unbelievably simple, this Creamy Chocolate Mousse Trifle is your weekend masterpiece. It’s rich but light, elegant but easy, and the kind of dessert that feels fancy enough for guests yet foolproof enough for beginners. Imagine layers of silky chocolate mousse, fluffy whipped cream, and crushed cookies or cake crumbs all coming together in one spoonful of creamy perfection. It’s a dessert that whispers luxury while requiring minimal effort.

The Story Behind the Dessert

Trifles have always been a comfort dessert — originating from English kitchens, where leftover cake and cream became the base for something extraordinary. My version transforms this classic into a no-bake, foolproof dessert perfect for the weekend. It combines a deeply chocolatey mousse with layers of texture and flavor that can be made ahead of time and assembled in minutes.

It’s not only visually stunning but customizable. Whether you love dark, milk, or white chocolate — or prefer to switch the base with brownies or cookies — this trifle adjusts to your weekend mood. It’s the kind of dessert that doesn’t judge you for taking shortcuts but rewards you with pure indulgence.

Ingredients

For the Chocolate Mousse:

  • 1 ½ cups heavy whipping cream (cold)

  • 1 cup semi-sweet chocolate chips (or chopped chocolate bar)

  • 2 tablespoons unsalted butter

  • 2 large egg yolks

  • 3 tablespoons granulated sugar

  • ½ teaspoon pure vanilla extract

  • Pinch of salt

For the Whipped Cream Layer:

  • 1 cup heavy whipping cream (cold)

  • 2 tablespoons powdered sugar

  • ½ teaspoon vanilla extract

For the Cookie or Cake Layer:

  • 10–12 chocolate sandwich cookies (like Oreos), crushed or

  • 2 cups chocolate or vanilla sponge cake cubes

Optional Garnishes:

  • Chocolate curls or shavings

  • Fresh berries (raspberries or strawberries)

  • Caramel drizzle or chocolate syrup

  • Mint leaves for freshness

Step-by-Step Directions

1. Prepare the Chocolate Mousse

This is where the magic begins. Place your chopped chocolate and butter in a heatproof bowl. Set it over a saucepan of simmering water (double boiler method), stirring until the chocolate and butter melt into a glossy, silky mixture. Remove from heat and let it cool slightly.

In a separate small bowl, whisk the egg yolks, sugar, and salt together until pale and creamy. Slowly pour this mixture into the slightly cooled chocolate, whisking continuously so the eggs don’t scramble.

Now, whip the heavy cream in a clean, cold bowl until soft peaks form. Gently fold the whipped cream into the chocolate mixture using a spatula. Work carefully here — you want to keep the mousse light and airy. Once combined, cover and refrigerate for at least 1 hour to let it firm up.

2. Make the Whipped Cream Layer

While the mousse chills, whip the remaining heavy cream with powdered sugar and vanilla until medium peaks form. This lightly sweetened cream will perfectly complement the rich chocolate mousse. Set aside in the fridge until assembly time.

3. Prepare the Crunch Layer

This part adds texture and contrast. You can go two ways:

  • Cookie base: Crush the cookies in a food processor or with a rolling pin until you get fine crumbs. For extra flavor, mix in a tablespoon of melted butter.

  • Cake base: Cube leftover sponge or pound cake into bite-sized pieces. You can lightly drizzle them with coffee or milk to make them extra moist.

4. Assemble the Trifle

This is the fun and creative part! Take a large glass trifle bowl or individual dessert cups. Start with a layer of cookie crumbs or cake cubes at the bottom. Spoon a generous layer of chocolate mousse over it. Add a layer of whipped cream, then repeat the process until you reach the top.

For a show-stopping finish, top with chocolate shavings, fresh berries, or a drizzle of caramel or chocolate syrup. The contrast of glossy mousse, airy cream, and crunchy base makes every bite irresistible.

Tips for Foolproof Success

  1. Chill Everything: Cold cream whips better and faster. Place your mixing bowl and beaters in the fridge for 15 minutes before whipping.

  2. Don’t Overmix: When folding mousse, use gentle strokes to maintain the fluffy texture.

  3. Customize Layers: Add nuts, a splash of liqueur (like Kahlúa or Baileys), or fruit preserves for your signature touch.

  4. Make Ahead: You can prepare this dessert up to 24 hours in advance. Store it covered in the fridge — the flavors only get richer with time.

  5. Texture Variety: For an extra indulgent bite, sprinkle crushed toffee or caramelized nuts between the layers.

Why This Dessert Works Every Time

  • No Baking Required: It’s ideal for busy weekends or hot days when you don’t want to turn on the oven.

  • Flexible Ingredients: Substitute with what’s in your pantry — any chocolate, cookies, or cream will work beautifully.

  • Crowd-Pleaser: The layered presentation makes it perfect for dinner parties, birthdays, or cozy nights in.

  • Perfect Balance: The richness of chocolate mousse meets the airiness of whipped cream and the crunch of cookies — every texture is represented.

Flavor Variations

Once you’ve mastered the base recipe, the possibilities are endless:

  • Mocha Dream: Add a teaspoon of instant espresso powder to the melted chocolate for a subtle coffee kick.

  • Salted Caramel Twist: Drizzle caramel sauce between layers and top with flaky sea salt.

  • Berry Bliss: Add layers of macerated strawberries or raspberries for a fruity balance to the chocolate.

  • White Chocolate Fantasy: Replace the semi-sweet chocolate with white chocolate and fold in lemon zest for a bright, creamy version.

Serving Suggestions

Serve the trifle chilled. If you’ve made it in a large bowl, use a deep spoon to scoop generous portions into dessert glasses. For an extra elegant touch, serve with chocolate-dipped strawberries or a sprig of mint on top. Pair it with espresso, hot chocolate, or a chilled glass of dessert wine for an unforgettable ending to your meal.

Storage

Cover any leftovers tightly with plastic wrap or transfer to airtight containers. Store in the refrigerator for up to 3 days. The mousse and cream will stay fluffy, while the cookie or cake layers soften into a pudding-like texture — making it even more delicious the next day.

Final Thoughts

This Creamy Chocolate Mousse Trifle proves that the best desserts don’t have to be complicated. With a few simple ingredients and a bit of layering magic, you get a dessert that’s rich, velvety, and visually stunning. It’s the perfect blend of elegance and ease — a true foolproof weekend dessert that never disappoints.

Whether you’re treating yourself after a long week or impressing friends at a dinner party, this trifle guarantees smiles and second servings. It’s comfort and sophistication in every spoonful — a dessert you’ll return to again and again.

Gluten-Free Tortillas

If you’ve ever tried making gluten-free tortillas at home, you know that getting the texture right can be tricky. They can turn out too dry, crumbly, or stiff—but not this recipe. This unique gluten-free tortilla recipe delivers soft, flexible, and flavorful tortillas that are perfect for tacos, wraps, burritos, and quesadillas. The secret lies in using a blend of flours that mimic the elasticity of traditional wheat tortillas, along with a special resting technique that locks in moisture. These tortillas are naturally gluten-free, dairy-free, and easy to make, yet they taste just as authentic as the ones you’d find at a Mexican taqueria.


 Why This Recipe Works

Traditional tortillas depend on gluten for structure and flexibility, but gluten-free cooking requires creativity. This recipe combines brown rice flour for structure, tapioca starch for stretchiness, and a touch of psyllium husk powder to bind everything together. Warm water and oil add softness, while a short rest after mixing allows the flours to hydrate fully—creating a dough that rolls out beautifully and cooks up perfectly pliable.

Ingredients

Here’s what you’ll need for about 10 medium tortillas:

  • 1 cup brown rice flour – Provides a mild flavor and sturdy base.

  • ½ cup tapioca starch (or arrowroot powder) – Adds chewiness and flexibility.

  • ¼ cup potato starch – Helps achieve that soft, tender bite.

  • 1 teaspoon psyllium husk powder – Natural binder that replaces gluten.

  • 1 teaspoon sea salt – Enhances flavor.

  • 1 tablespoon olive oil (or avocado oil) – Adds moisture and softness.

  • ¾ to 1 cup warm water – Adjust as needed to form a pliable dough.

  • (Optional) ½ teaspoon baking powder – For slightly puffier tortillas.

Step-by-Step Instructions

Step 1: Mix the Dry Ingredients

In a large mixing bowl, combine brown rice flour, tapioca starch, potato starch, psyllium husk powder, salt, and baking powder (if using). Whisk well to distribute the ingredients evenly. This helps prevent clumping and ensures that the binding agents work uniformly.

Step 2: Add the Wet Ingredients

Pour in the olive oil and about ¾ cup of warm water. Stir with a spoon until the dough begins to come together. Then, use your hands to knead it gently inside the bowl. Gluten-free doughs behave differently from wheat doughs—they’re softer and a bit sticky at first but should firm up as you knead.

If the dough feels dry or cracks easily, add a tablespoon of water at a time until it becomes smooth and pliable. It should feel soft, like playdough, without sticking to your hands.

Step 3: Rest the Dough

Cover the bowl with a damp kitchen towel and let the dough rest for 15–20 minutes. This step is crucial because the psyllium husk and starches need time to absorb the water and develop elasticity. After resting, the dough will feel more cohesive and easier to roll.

Step 4: Divide and Shape

Divide the dough into 10 equal portions and roll each piece into a smooth ball. Keep them covered with a damp towel while you work to prevent drying out.

Using a rolling pin, roll one dough ball between two pieces of parchment paper until it forms a thin circle (about 6–7 inches). If the edges crack slightly, just press them back together. Gluten-free doughs are forgiving when handled gently.

Step 5: Cook the Tortillas

Heat a non-stick skillet or cast-iron pan over medium-high heat. When hot, carefully peel off one piece of parchment and transfer the tortilla onto the skillet. Cook for 40–50 seconds on the first side, or until small bubbles appear and the underside has light golden spots.

Flip the tortilla and cook for another 30–40 seconds on the other side. Avoid overcooking—it can make them stiff. Transfer the cooked tortilla to a plate lined with a clean towel and cover it immediately to trap steam. This steam keeps them soft and flexible.

Repeat the process with the remaining dough balls.

Step 6: Keep Warm and Store

Stack the cooked tortillas under a towel to stay warm and tender while finishing the batch. Once cooled, you can refrigerate leftovers in an airtight bag for up to 5 days or freeze for up to 2 months. To reheat, wrap in a damp paper towel and microwave for 20–25 seconds or warm briefly in a dry skillet.

 Tips for Perfect Gluten-Free Tortillas

  1. Hydration is key: Gluten-free flours absorb water differently, so adjust gradually until the dough feels supple but not sticky.

  2. Use parchment paper for rolling: It prevents sticking and tearing—no extra flour needed.

  3. Don’t skip resting: This allows the psyllium husk and starches to fully activate, creating that classic tortilla elasticity.

  4. Cook quickly at high heat: This locks in moisture and gives your tortillas those irresistible light brown spots.

  5. Steam after cooking: Stacking them under a towel immediately after cooking helps them stay soft and bendable.

 Serving Suggestions

These gluten-free tortillas are incredibly versatile and pair beautifully with many dishes:

  • Tacos: Fill with grilled chicken, shrimp, or sautéed veggies.

  • Wraps: Add hummus, greens, and roasted vegetables for a wholesome lunch.

  • Quesadillas: Stuff with melted cheese and beans, then pan-toast until crispy.

  • Breakfast Burritos: Wrap scrambled eggs, spinach, and salsa for a hearty morning meal.

  • Mini Pizzas: Top with tomato sauce, cheese, and herbs—bake for a fun twist.

 Variations

Once you master the base recipe, you can play around with flavors and ingredients:

  • Herb Tortillas: Add a teaspoon of dried oregano, basil, or rosemary for aromatic flavor.

  • Spinach Tortillas: Blend ½ cup cooked spinach with the water before adding to the dough for a vibrant green hue and added nutrition.

  • Turmeric Tortillas: Add ½ teaspoon turmeric powder for a golden color and subtle earthy taste.

  • Coconut Flour Blend: Replace 2 tablespoons of rice flour with coconut flour for a touch of sweetness and extra softness.

 Troubleshooting Guide

  • Tortillas cracking: The dough may be too dry—add a little more warm water.

  • Too sticky: Add a tablespoon of rice flour or chill the dough briefly before rolling.

  • Hard or brittle tortillas: They were cooked too long or not covered to steam after cooking.

  • Uneven browning: Make sure the pan is evenly heated before cooking each tortilla.

 Why You’ll Love These Gluten-Free Tortillas

These tortillas are not just a gluten-free substitute—they stand on their own as a flavorful, wholesome flatbread. The combination of flours gives them a delicate chew, while the psyllium husk provides flexibility that rivals traditional wheat tortillas. They’re perfect for meal prep, family dinners, or even as a base for sweet fillings like honey and fruit.

Every bite has that comforting warmth and homemade touch that store-bought versions can’t match. Whether you’re gluten intolerant or simply exploring cleaner eating, this recipe ensures you’ll never miss the classic tortilla texture again.

 Final Thoughts

Making gluten-free tortillas from scratch might seem intimidating at first, but this recipe transforms the process into something simple, fun, and rewarding. With just a few wholesome ingredients and the right technique, you can create tortillas that are soft, pliable, and packed with flavor—ready to wrap around your favorite fillings.

Super Easy Gluten-Free Chocolate Chip Cookies

There’s something deeply comforting about a warm chocolate chip cookie — the gooey center, the crisp golden edges, and the sweet aroma that fills your kitchen. But for anyone avoiding gluten, the challenge has always been recreating that same texture and flavor in a gluten-free version. That’s where this Super Easy Gluten-Free Chocolate Chip Cookies recipe comes in — chewy, buttery, perfectly balanced, and so simple that anyone can make them at home. With the right blend of gluten-free flour, a touch of cornstarch for tenderness, and the perfect ratio of sugar and butter, you’ll never miss the gluten again.

This recipe not only tastes indulgent but also captures that nostalgic homemade cookie essence. Whether you’re baking for yourself, your family, or for a gluten-sensitive friend, these cookies will impress everyone — even those who don’t follow a gluten-free lifestyle.

🌾 Why You’ll Love This Recipe

  1. Naturally chewy and soft: A perfect texture — crisp around the edges and chewy in the middle.

  2. Simple ingredients: No complicated gluten-free flour blends required — just everyday pantry staples.

  3. Customizable: You can easily add nuts, coconut, or different types of chocolate.

  4. No chilling required: You can bake them right away for instant gratification.

  5. Completely foolproof: Designed for both beginners and experienced bakers alike.

🍪 Ingredients You’ll Need

Here’s everything required for this delicious gluten-free treat:

  • 1 cup (2 sticks) unsalted butter, softened

  • 3/4 cup light brown sugar, packed

  • 1/2 cup granulated sugar

  • 2 large eggs, room temperature

  • 2 teaspoons pure vanilla extract

  • 2 1/4 cups gluten-free all-purpose flour blend (with xanthan gum included)

  • 1 teaspoon baking soda

  • 1 teaspoon cornstarch (for softness and chewiness)

  • 1/2 teaspoon salt

  • 1 1/2 cups semisweet chocolate chips (or mix with dark chocolate chunks)

🧁 Step-by-Step Instructions

Step 1: Cream the butter and sugars

In a large mixing bowl, beat together the softened butter, brown sugar, and granulated sugar using an electric mixer for about 2–3 minutes until the mixture becomes light and fluffy. This step is crucial for aerating the dough, helping your cookies rise slightly and stay soft.

Step 2: Add the eggs and vanilla

Beat in the eggs one at a time, ensuring each is fully incorporated before adding the next. Mix in the vanilla extract. You’ll notice the dough turning creamy and smooth — this is the flavor foundation of your cookies.

Step 3: Combine dry ingredients

In a separate bowl, whisk together the gluten-free flour, baking soda, cornstarch, and salt. Make sure the dry ingredients are evenly distributed to avoid clumps of baking soda in your cookies.

Step 4: Mix wet and dry ingredients

Gradually add the dry mixture into the butter mixture. Mix on low speed or with a spatula until everything is just combined. Overmixing can make the cookies dense, so stop once the dough looks evenly blended.

Step 5: Fold in the chocolate chips

Using a spatula, fold in the chocolate chips (and nuts if desired). Make sure every spoonful of dough has a good balance of chips for even chocolatey bites.

Step 6: Scoop and shape

Use a cookie scoop or tablespoon to form dough balls, about 1 ½ tablespoons each. Place them on a baking sheet lined with parchment paper, leaving about 2 inches between each cookie to allow for spreading.

Step 7: Bake to perfection

Preheat your oven to 350°F (175°C) and bake the cookies for 9–11 minutes, or until the edges are golden brown and the centers still look slightly soft. Remember — cookies continue baking slightly after being removed from the oven.

Step 8: Cool and enjoy

Allow the cookies to rest on the baking sheet for 5 minutes before transferring them to a wire rack to cool completely. This short resting time helps them set without losing their chewy texture.

🍫 Tips for Perfect Gluten-Free Cookies Every Time

  1. Use a quality gluten-free flour blend: A good 1:1 blend with xanthan gum ensures the cookies hold their shape and stay soft.

  2. Don’t skip cornstarch: It’s the secret to that tender bakery-style chewiness.

  3. Avoid overbaking: Gluten-free cookies can dry out quickly. Pull them out when they’re just golden around the edges.

  4. Resting the dough (optional): For even deeper flavor, you can chill the dough for 30 minutes — it enhances the buttery, caramel-like taste.

  5. Mix up your chips: Try half milk chocolate and half dark chocolate for a richer flavor balance.

🥥 Fun Variations

  • Double Chocolate Chip: Replace ¼ cup of flour with cocoa powder and use white chocolate chips.

  • Peanut Butter Chocolate Chip: Add ½ cup creamy peanut butter to the dough and reduce butter by 2 tablespoons.

  • Oatmeal Chocolate Chip: Stir in ½ cup of certified gluten-free oats for a heartier texture.

  • Nutty Bliss: Mix in chopped walnuts, pecans, or almonds for extra crunch.

  • Sea Salt Finish: Sprinkle a tiny pinch of flaky sea salt on top of each cookie before baking for a gourmet twist.

Pairing Ideas

  • Enjoy these cookies warm with a glass of cold almond milk.

  • Crumble them over vanilla ice cream for a decadent dessert.

  • Serve with coffee or tea for an afternoon pick-me-up.

  • Sandwich marshmallow fluff between two cookies for a gluten-free “s’more” style treat.

🌟 Storage and Freezing

These cookies store beautifully, making them perfect for meal prep or last-minute cravings.

  • Room temperature: Keep in an airtight container for up to 5 days.

  • Freezer (unbaked): Freeze the dough balls on a tray, then transfer to a zip-top bag. Bake from frozen, adding 1–2 minutes to the bake time.

  • Freezer (baked): Store cooled cookies in an airtight container for up to 3 months. Reheat in the microwave for 10–15 seconds for that fresh-from-the-oven feel.

💬 Final Thoughts

These Super Easy Gluten-Free Chocolate Chip Cookies are more than just a gluten-free adaptation — they’re a cookie-lover’s dream that happens to be gluten-free. The combination of soft centers, golden crisp edges, and rich pools of melted chocolate creates a bakery-quality cookie that feels indulgent and homemade at the same time.

The beauty of this recipe lies in its simplicity — no odd ingredients or complicated steps, just pure cookie joy. Whether you’re baking them for your kids, sharing them with friends, or treating yourself after a long day, these cookies guarantee comfort and satisfaction in every bite.