Creamy Caramel Custard Pie

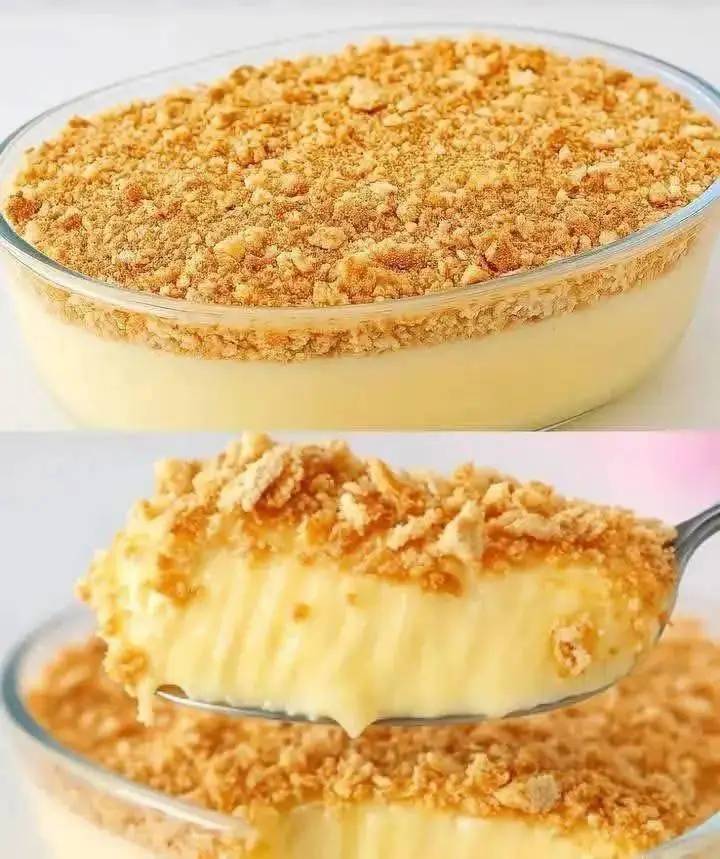
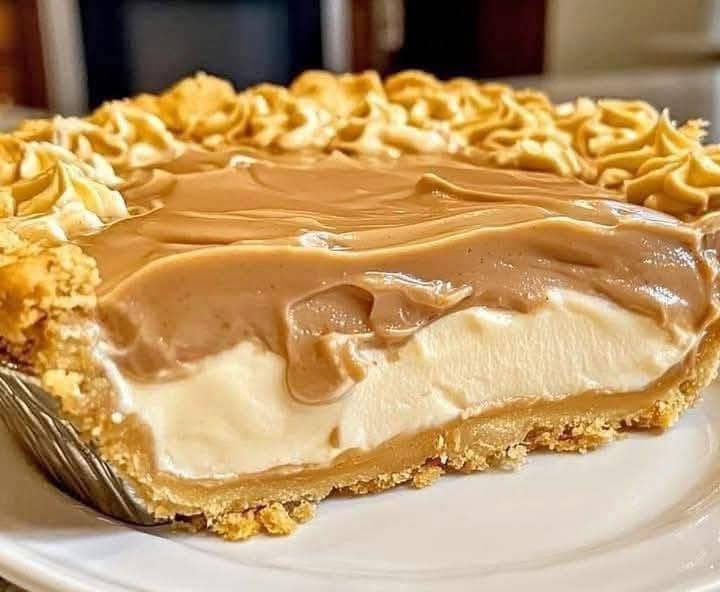
There are few desserts as indulgent, elegant, and comforting as a Creamy Caramel Custard Pie. Imagine a buttery, flaky crust cradling a velvety custard filling infused with the deep, rich flavor of homemade caramel — each bite melting on your tongue with perfect sweetness and smooth texture. This recipe takes the classic idea of custard pie and elevates it with layers of flavor: caramelized sugar, luscious cream, and a hint of vanilla warmth. Whether served chilled or slightly warm, this pie is a showstopper that blends simplicity with sophistication.

Below is a unique, foolproof recipe for creating the ultimate caramel custard pie from scratch. Every step has been refined to ensure you get a silky, glossy finish and an unforgettable flavor that tastes like something straight from a patisserie.

🥧 Ingredients

For the Crust:

  • 1 ½ cups all-purpose flour

  • ½ cup cold unsalted butter, cubed

  • 2 tablespoons granulated sugar

  • ¼ teaspoon salt

  • 3–4 tablespoons ice-cold water

For the Caramel Custard Filling:

  • 1 cup granulated sugar (for caramel)

  • 3 tablespoons water

  • 2 cups whole milk

  • 1 cup heavy cream

  • 4 large egg yolks

  • 2 large whole eggs

  • ½ cup brown sugar

  • 1 tablespoon cornstarch

  • 1 ½ teaspoons pure vanilla extract

  • Pinch of salt

For Topping (optional but heavenly):

  • Fresh whipped cream

  • Caramel drizzle

  • Sea salt flakes or crushed toffee pieces

🌟 Step 1: Prepare the Buttery Pie Crust

  1. Combine dry ingredients:
    In a large bowl, whisk together the flour, sugar, and salt.

  2. Add butter:
    Add cold, cubed butter and cut it into the flour using a pastry cutter or your fingertips until the mixture resembles coarse crumbs — small pea-sized bits of butter are perfect.

  3. Add cold water:
    Sprinkle the ice water one tablespoon at a time, gently mixing until the dough begins to come together. Avoid overmixing; you want a tender crust, not a tough one.

  4. Chill the dough:
    Shape it into a disk, wrap it in plastic, and refrigerate for at least 30 minutes. This rest allows the gluten to relax and the butter to firm up, giving you a flaky crust.

  5. Roll and bake:
    Roll the dough on a floured surface into a 12-inch circle. Transfer it into a 9-inch pie dish, trim excess edges, and crimp if desired.
    Prick the bottom with a fork, line with parchment paper, and fill with pie weights or beans.
    Bake at 375°F (190°C) for 15 minutes, remove weights, and bake another 8–10 minutes until golden. Cool completely before adding the filling.

🍯 Step 2: Make the Silky Caramel Base

  1. Melt sugar:
    In a heavy-bottomed saucepan, combine 1 cup sugar and 3 tablespoons of water. Heat on medium without stirring until the sugar dissolves and begins to turn golden amber. You can gently swirl the pan to even out the color.

  2. Watch carefully:
    Once the caramel reaches a rich amber color, immediately remove it from heat. Overcooked caramel becomes bitter, so timing is key here.

  3. Add milk and cream:
    Slowly (and carefully!) pour in the milk and cream while whisking. The caramel will bubble vigorously — keep whisking until smooth.
    Return to low heat and stir for 1–2 minutes until fully combined. Set aside to cool slightly.

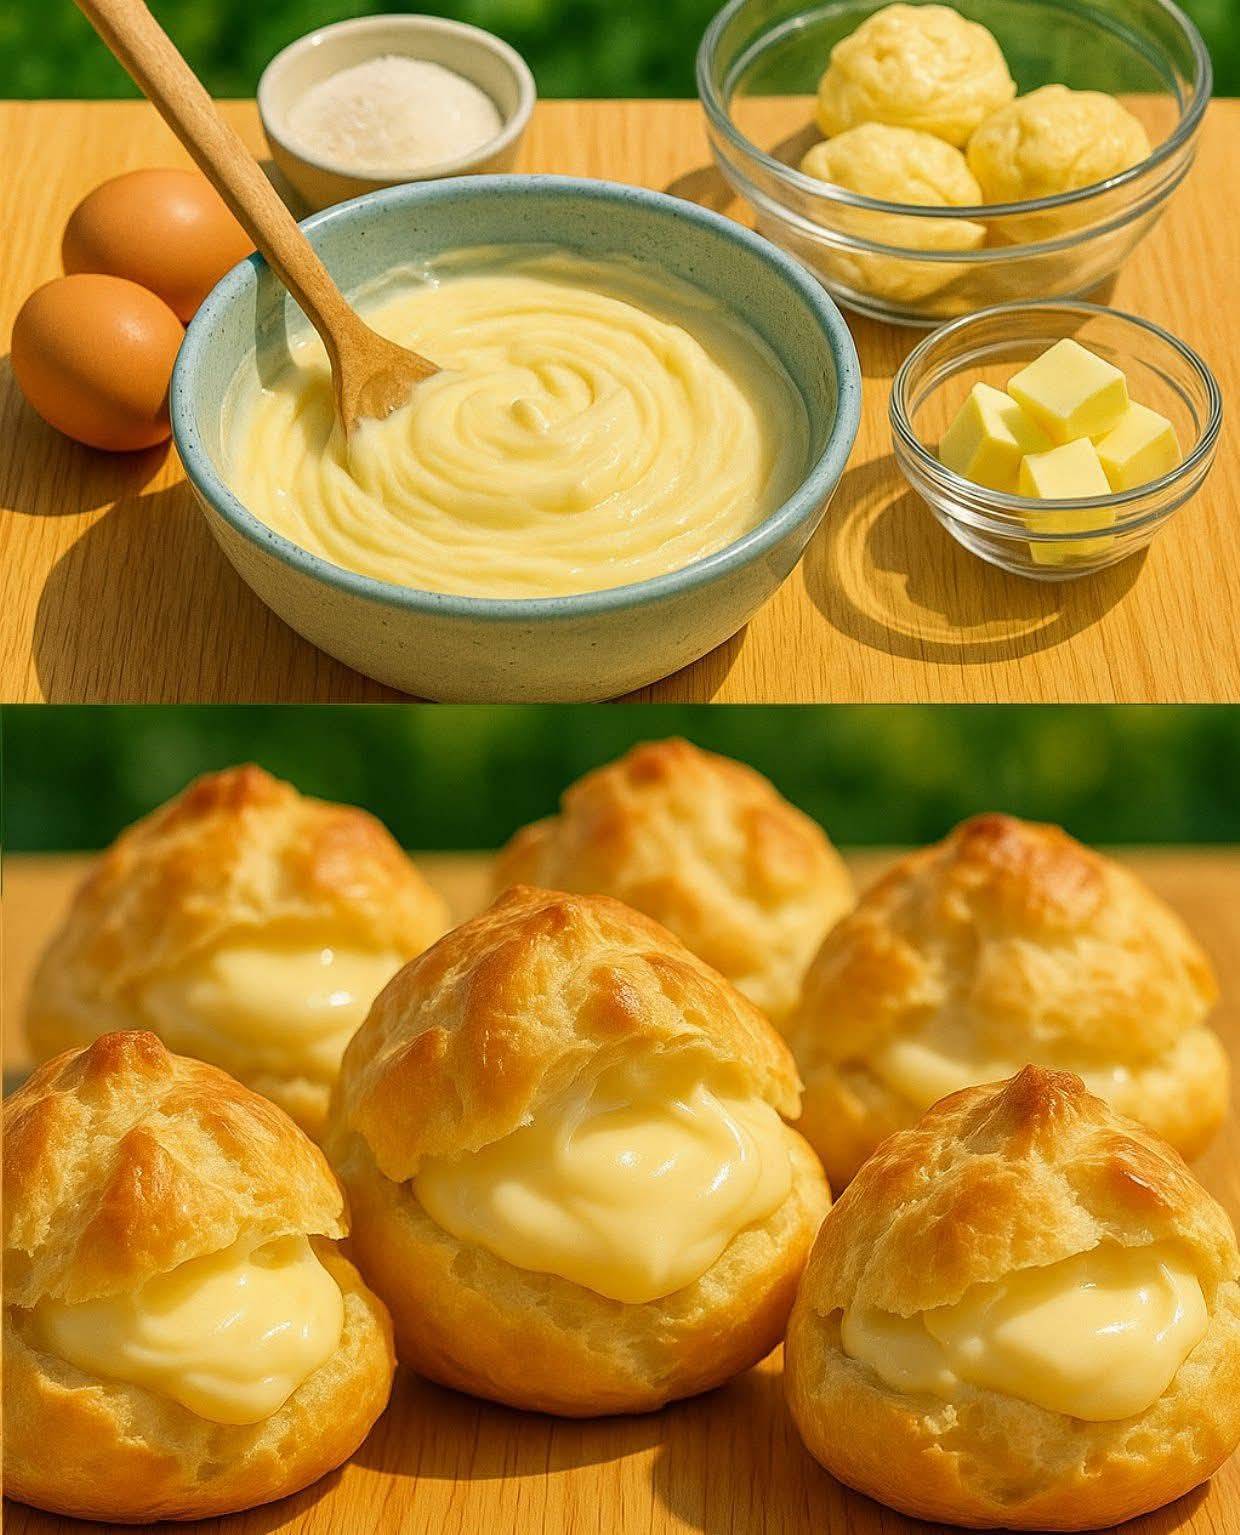
🍮 Step 3: Prepare the Custard

  1. Whisk eggs and sugars:
    In a large bowl, whisk together egg yolks, whole eggs, brown sugar, cornstarch, vanilla, and a pinch of salt until smooth and creamy.

  2. Temper the eggs:
    Slowly pour about ½ cup of the warm caramel mixture into the egg mixture while whisking constantly. This gentle step prevents the eggs from scrambling.
    Gradually add the remaining caramel milk, whisking until the custard is silky and well-blended.

  3. Strain for smoothness:
    Pour the mixture through a fine sieve to remove any lumps or cooked bits of egg. This ensures the final custard is luxuriously smooth.

🔥 Step 4: Bake the Pie

  1. Pour the filling:
    Pour the custard into the cooled pie crust. Tap gently to remove air bubbles.

  2. Bake gently:
    Place the pie dish on the middle rack of your oven preheated to 325°F (160°C). Bake for 40–45 minutes, or until the center is just set and slightly wobbly when shaken.

  3. Cool down:
    Remove from the oven and let it cool at room temperature for 1 hour, then refrigerate for at least 3–4 hours (overnight gives the best flavor and texture).

🍨 Step 5: Serve with Elegance

Before serving, whip up some fresh cream and pipe or spread it over the chilled pie. Drizzle homemade caramel sauce over the top and sprinkle with sea salt flakes or toffee crumbs for a gourmet touch. Slice into the creamy custard — the fork should glide through effortlessly, revealing a golden, glossy interior.

💡 Tips for Perfect Caramel Custard Pie

  • Use fresh eggs: They ensure a stable, rich custard that sets beautifully.

  • Don’t rush the caramel: Slow, steady heat gives it a deep amber flavor without bitterness.

  • Avoid overbaking: The custard will continue to set as it cools; overbaking causes cracks or a rubbery texture.

  • Chill time matters: The longer it chills, the creamier and silkier the texture becomes.

🕯️ Why This Recipe Is Unique

This recipe stands out because it balances three layers of texture and flavor — the flaky butter crust, the silky caramel-infused custard, and the creamy whipped topping. Most caramel custard pies either lean too sweet or lack depth, but this version uses brown sugar for complexity, a touch of salt for balance, and a precise baking technique that locks in moisture.

The homemade caramel adds that irresistible toffee note, turning a simple custard pie into something magical — like crème brûlée meets a butterscotch tart. And unlike traditional custard pies that can feel plain, this one bursts with caramelized aroma from the very first bite.

🍴 Serving Suggestions

  • Pair with a cup of espresso or black coffee for contrast.

  • Serve warm with vanilla ice cream for a comforting dessert.

  • Garnish with toasted nuts, banana slices, or a sprinkle of cinnamon for variation.

❤️ Final Thoughts

A Creamy Caramel Custard Pie is more than dessert — it’s a celebration of balance: buttery crust, silky custard, and that haunting caramel sweetness. Whether for a family dinner, festive occasion, or just a quiet indulgence, this pie always impresses. Every spoonful feels nostalgic, yet luxurious — reminding us why homemade desserts are pure joy.

Creamy 3-Ingredient Dessert

Sometimes the most irresistible desserts come from the simplest ingredients — and this Creamy 3-Ingredient Dessert proves that beautifully. With only three basic items and no complicated steps, you can create a velvety, melt-in-your-mouth treat that feels like it came straight out of a high-end patisserie. This dessert is rich, silky, and comforting — the kind that satisfies both your sweet tooth and your soul. It’s the perfect recipe for anyone who loves effortless indulgence. Whether you’re hosting a dinner, celebrating a cozy weekend, or simply craving something luxurious after a long day, this dessert delivers every time.

🌿 The Magic Trio: Only 3 Ingredients

What makes this recipe truly special is its simplicity. You only need three everyday ingredients, but when combined, they transform into something elegant and deeply satisfying. The secret lies in the technique — gentle heating, patient stirring, and the magic of setting just right.

Here’s what you’ll need:

  • 2 cups heavy cream (or full-fat cream): This forms the rich, velvety base of your dessert. It gives that luscious texture that feels like a soft mousse or a pudding.

  • ½ cup sweetened condensed milk: This adds sweetness and a creamy caramel note without the need for extra sugar.

  • 1 tablespoon cornstarch (or custard powder): This acts as a thickener, ensuring your dessert has that perfect smooth, spoonable consistency.

Optional but highly recommended for flavor depth: a splash of vanilla extract or a sprinkle of crushed biscuits, nuts, or chocolate shavings on top.

🍮 Step-by-Step Recipe

Step 1: Combine the Cream and Condensed Milk

In a medium-sized saucepan, pour in the heavy cream and sweetened condensed milk. Whisk gently to combine, making sure both blend evenly. The mixture should be silky and pale ivory in color. This combination already smells delicious — rich, creamy, and sweet.

Step 2: Dissolve the Thickener

In a small bowl, mix the cornstarch with 2 tablespoons of cold cream (from the mixture) or cold milk to make a smooth slurry. Stir until there are no lumps. This step ensures your dessert sets perfectly smooth without any gritty texture.

Step 3: Heat Gently

Place your saucepan over low to medium heat and slowly add the cornstarch mixture. Continue whisking as the cream begins to heat. The key here is patience — you don’t want the cream to boil too fast. Gentle stirring will prevent curdling and help the mixture thicken evenly.

Within 7–10 minutes, you’ll notice the texture changing — the mixture will become thicker and coat the back of your spoon beautifully. It should resemble a rich custard consistency.

Step 4: Pour and Chill

Once your creamy mixture reaches that silky, pudding-like texture, remove it from the heat. Pour it carefully into serving glasses, small bowls, or ramekins. Tap them lightly to remove air bubbles and create a smooth surface.

Allow the desserts to cool to room temperature, then cover them with plastic wrap and refrigerate for at least 2–3 hours (or overnight for a firmer set). The chilling time allows the dessert to firm up into a spoonable, creamy dream.

Step 5: Serve and Enjoy

Once chilled, your 3-ingredient creamy dessert is ready to serve! The texture should be luxuriously thick and glossy — somewhere between a panna cotta and a mousse. You can serve it plain for a minimalist beauty, or garnish it with a touch of creativity:

  • Dust with cocoa powder or cinnamon

  • Add fresh fruit slices like strawberries, raspberries, or mango

  • Top with crushed cookies, caramel drizzle, or chopped nuts

Each variation adds a unique touch while keeping the simplicity intact.

✨ The Secret Behind the Creaminess

What makes this dessert so indulgent is the balance between the fat content of the cream and the sweet condensed milk’s smooth texture. When gently heated, the proteins in the cream stabilize with the starch, forming a naturally thick custard-like base without the need for eggs or gelatin. The result is a soft, velvety mouthfeel that’s not overly sweet — just perfectly rich.

If you prefer a lighter version, you can substitute heavy cream with evaporated milk or half-and-half, but keep in mind that the consistency will be slightly softer. For a dairy-free twist, use coconut cream and coconut condensed milk — it will yield a tropical flavor reminiscent of Thai coconut pudding.

🍧 Serving Ideas & Variations

This 3-ingredient dessert is a blank canvas for your creativity. Here are a few variations to inspire you:

  1. Chocolate Lover’s Dream:
    Add 2 tablespoons of melted dark chocolate or cocoa powder into the warm mixture before chilling. The result? A silky, decadent chocolate pudding.

  2. Coffee Cream Bliss:
    Stir in 1 teaspoon of instant coffee or espresso powder for a mocha twist that pairs beautifully with whipped cream or grated chocolate.

  3. Coconut Paradise:
    Replace heavy cream with coconut cream and top with toasted coconut flakes. It’s refreshing and exotic — perfect for warm days.

  4. Citrus Kiss:
    Add a teaspoon of lemon or orange zest to the mixture before heating. The zesty aroma brightens the richness and adds a sophisticated touch.

  5. Layered Dessert Cups:
    Pour the creamy mixture over crushed biscuits or cake crumbs in a glass, chill, and top with fruit or chocolate for a parfait-style treat.

💡 Tips for Perfect Texture

  • Low heat is key: Too much heat can cause the mixture to curdle or separate. Gentle cooking gives it a perfectly creamy finish.

  • Stir constantly: Don’t walk away — continuous whisking prevents lumps and ensures even thickening.

  • Cool before chilling: Always allow the dessert to cool slightly before refrigerating. This avoids condensation and keeps the top layer smooth.

  • Serve chilled: This dessert tastes best cold; the texture becomes firmer and more luxurious after a few hours in the fridge.

🍴 Why You’ll Love This Recipe

What makes this Creamy 3-Ingredient Dessert truly unique is its combination of simplicity, versatility, and indulgence. It’s foolproof — no mixer, no baking, and no fancy tools. Every spoonful is silky, rich, and comforting, making it the kind of dessert that feels both nostalgic and modern.

It’s also perfect for last-minute entertaining or late-night cravings. You can prepare it in advance, store it in the fridge, and bring it out when you need a quick dessert that impresses without the fuss.

❤️ Final Thoughts

In a world full of complex recipes, this 3-Ingredient Creamy Dessert is a gentle reminder that beauty often lies in simplicity. With just cream, condensed milk, and a touch of cornstarch, you create something that feels utterly luxurious — smooth, velvety, and deeply satisfying. It’s the kind of dessert that doesn’t shout for attention but quietly wins your heart, one spoonful at a time.

Whether enjoyed alone with a quiet cup of coffee or served to guests as a fancy chilled pudding, it never disappoints. Simple, elegant, and endlessly customizable — this creamy creation is proof that minimal ingredients can still deliver maximum pleasure.

Mocha Layer Cake with Chocolate-Rum Cream Filling

If you’re searching for a dessert that combines the bold allure of coffee, the decadence of chocolate, and the warm sophistication of rum, this Mocha Layer Cake with Chocolate-Rum Cream Filling is the masterpiece you’ve been waiting for. This cake isn’t just a dessert—it’s an experience. Each bite blends silky coffee-infused sponge with a luscious chocolate-rum filling that melts like velvet on your tongue. Perfect for celebrations or cozy weekend indulgence, this cake promises a perfect balance of richness, aroma, and texture.

The Inspiration

Mocha and rum have always been a timeless pairing. The depth of coffee enhances chocolate’s natural bitterness, while rum adds a subtle warmth and aromatic sweetness that lingers beautifully. This cake was designed to feel luxurious but approachable—a dessert that feels like a patisserie delight yet can be baked right in your kitchen. Whether served as the centerpiece at a dinner party or as a special self-care treat, it’s a recipe worth savoring slowly.

Ingredients

For the Mocha Cake Layers:

  • 2 cups all-purpose flour

  • ¾ cup unsweetened cocoa powder (preferably Dutch-processed)

  • 2 tsp baking powder

  • 1 tsp baking soda

  • ½ tsp fine salt

  • 1 ¾ cups granulated sugar

  • ¾ cup vegetable oil (or melted butter for richer texture)

  • 3 large eggs, room temperature

  • 1 cup brewed strong coffee, cooled

  • ½ cup buttermilk, room temperature

  • 1 tsp pure vanilla extract

  • 1 tbsp instant espresso powder (optional, for deeper flavor)

For the Chocolate-Rum Cream Filling:

  • 1 ½ cups heavy cream

  • 8 oz dark chocolate (60–70%), chopped

  • 2 tbsp unsalted butter

  • 2 tbsp dark rum (or 1 tsp rum extract for non-alcoholic version)

  • ¼ cup powdered sugar (adjust to taste)

  • Pinch of salt

For the Mocha Buttercream Frosting:

  • 1 cup unsalted butter, softened

  • 3 cups powdered sugar, sifted

  • 3 tbsp cocoa powder

  • 2 tbsp brewed espresso or strong coffee

  • 1 tsp vanilla extract

  • 1–2 tbsp heavy cream (as needed for consistency)

Optional Garnishes:

  • Chocolate curls or shavings

  • Espresso beans (chocolate-covered, for flair)

  • A drizzle of rum-chocolate syrup or melted ganache

Step-by-Step Preparation

1. Prepare the Cake Batter

Begin by preheating your oven to 350°F (175°C). Grease and line three 8-inch round cake pans with parchment paper. This step ensures your layers release beautifully after baking.

In a large mixing bowl, sift together flour, cocoa powder, baking powder, baking soda, and salt. Set aside.

In another bowl, whisk together sugar, oil, and eggs until smooth and creamy. Pour in the cooled coffee, buttermilk, and vanilla extract, whisking until well combined. Slowly incorporate the dry ingredients into the wet mixture in two stages, mixing just until the batter is smooth and free of lumps.

If you want a bolder mocha kick, stir in a tablespoon of instant espresso powder—it will deepen both the flavor and aroma.

2. Bake the Cake Layers

Divide the batter evenly among your prepared pans. Tap the pans gently on the counter to remove air bubbles. Bake for 22–25 minutes, or until a toothpick inserted in the center comes out clean.

Once baked, let the cakes cool in their pans for 10 minutes, then transfer them to wire racks to cool completely. Patience is key here—cool layers make for easier assembly later.

3. Make the Chocolate-Rum Cream Filling

In a heatproof bowl, add the chopped dark chocolate and butter. In a small saucepan, heat the heavy cream just until it begins to simmer—do not boil. Pour the hot cream over the chocolate and let it sit for one minute. Stir slowly until smooth and glossy.

Once the ganache base is silky, whisk in rum and a pinch of salt. Chill the mixture in the refrigerator for 30–40 minutes, or until it thickens slightly but remains spreadable. Then, beat it with an electric mixer until fluffy and mousse-like. This is your Chocolate-Rum Cream Filling—a heavenly spread that tastes like truffles in cream form.

4. Prepare the Mocha Buttercream

In a large bowl, beat butter until creamy and pale. Add cocoa powder and powdered sugar, one cup at a time, mixing on low speed to prevent clouds of sugar. Gradually add the espresso and vanilla extract, then whip on high for 3–4 minutes until fluffy. If it’s too thick, add a tablespoon of heavy cream until it reaches your preferred consistency—smooth, spreadable, and velvety.

5. Assemble the Cake

Place one layer of cake on a serving stand or plate. Spread a generous amount of the Chocolate-Rum Cream Filling evenly across the surface. Add the second layer and repeat. Once the third layer is placed on top, use any remaining filling to lightly coat the sides for a rustic crumb layer. Chill the cake for 20 minutes to set.

Next, frost the cake with the Mocha Buttercream, spreading it evenly over the top and sides. Smooth with a spatula or give it textured swirls for a more artistic touch.

If desired, drizzle with a little warm chocolate ganache or sprinkle chocolate curls for that bakery-style finish.

6. Chill and Serve

Refrigerate the cake for at least one hour before slicing. This allows the flavors to meld beautifully and the filling to set perfectly. When ready to serve, let it sit at room temperature for about 15 minutes—this enhances the creaminess of both the frosting and filling.

Tips for Perfection

  • Coffee Strength Matters: The stronger your coffee, the bolder your mocha flavor. Use espresso for a deep, rich profile.

  • Rum Choice: Dark rum gives the best warmth and aroma. For a non-alcoholic option, use rum extract or omit entirely.

  • Texture Trick: Brush each cake layer lightly with brewed coffee or rum syrup for extra moistness and sophistication.

  • Decor Idea: Add chocolate shards or cocoa dust for a refined, café-style presentation.

Serving Suggestions

Serve this Mocha Layer Cake with a dollop of whipped cream or a scoop of vanilla gelato. It pairs beautifully with espresso, cappuccino, or a small glass of sweet dessert wine. The contrast of creamy, bitter, and boozy notes makes every bite unforgettable.

Storage

Keep leftovers covered in the refrigerator for up to five days. The flavors intensify over time, making it even more delicious on day two or three. You can also freeze individual slices—just wrap them tightly in plastic and foil for up to two months.

Final Thoughts

This Mocha Layer Cake with Chocolate-Rum Cream Filling is not just a dessert—it’s a celebration of flavor harmony. The mocha sponge, airy yet deeply flavored, provides the perfect base for the luscious, rum-kissed filling. Every forkful offers a balance of coffee, chocolate, and cream that feels indulgent yet comforting. Whether for a festive gathering or an elegant dinner finale, this cake is guaranteed to impress both the eyes and the taste buds.

Crispy Chicken Strips

There’s something truly irresistible about a plate of crispy chicken strips — that golden crunch, the tender juicy center, and the burst of flavor that makes every bite crave-worthy. Whether you’re serving them as a quick dinner, a party snack, or a meal for kids and adults alike, these chicken strips promise to outshine any fast-food version. This unique recipe delivers the perfect balance between a crispy, golden crust and succulent, well-seasoned meat inside. Let’s dive into the art of making the most delicious, homemade crispy chicken strips from scratch.

Why You’ll Love This Recipe

  • Crispy Outside, Juicy Inside: The double coating and seasoning ensure the strips stay crunchy yet moist.

  • Versatile Cooking Options: Can be deep-fried, air-fried, or oven-baked.

  • Better Than Takeout: You control the seasoning, oil, and quality of the chicken.

  • Perfect for Everyone: Pairs beautifully with a variety of sauces — honey mustard, ranch, spicy mayo, or barbecue.

Ingredients

For the Chicken Marinade:

  • 1 ½ lbs (700g) chicken tenders or boneless chicken breasts (cut into strips)

  • 1 cup buttermilk (or ¾ cup milk + 1 tbsp lemon juice, rested for 5 minutes)

  • 1 tsp garlic powder

  • 1 tsp onion powder

  • ½ tsp paprika

  • ½ tsp black pepper

  • ½ tsp salt

  • 1 tbsp hot sauce (optional, for extra flavor and color)

For the Coating:

  • 1 ½ cups all-purpose flour

  • ½ cup cornstarch (for extra crunch)

  • 2 tsp garlic powder

  • 2 tsp onion powder

  • 1 tsp paprika

  • ½ tsp cayenne pepper (optional for spice)

  • 1 tsp salt

  • ½ tsp black pepper

For the Egg Wash:

  • 2 large eggs

  • ¼ cup milk or water

For Frying:

  • Oil for deep frying (canola, vegetable, or peanut oil)

Step 1: Marinate the Chicken

Start by preparing the chicken. If using chicken breasts, slice them into even strips about 1 inch wide. Place them in a large bowl, then add buttermilk, garlic powder, onion powder, paprika, black pepper, salt, and hot sauce. Mix well, ensuring every piece is fully coated.

Cover the bowl and refrigerate for at least 1 hour, but if you have time, marinate overnight for the most tender and flavorful chicken. The buttermilk tenderizes the meat while infusing it with subtle spice and tang.

Step 2: Prepare the Coating

In a large, shallow dish, combine the flour, cornstarch, garlic powder, onion powder, paprika, cayenne, salt, and black pepper. Cornstarch is the secret to a crispier, lighter crust — it prevents the coating from becoming heavy or greasy.

In another bowl, whisk together the eggs and milk to make the egg wash.

Step 3: Dredge and Coat the Chicken

Remove the chicken from the marinade, letting excess liquid drip off.

Here’s how to achieve that extra-crispy coating:

  1. First Dip: Coat each piece in the seasoned flour mixture, pressing lightly so it sticks.

  2. Second Dip: Dip the floured chicken into the egg wash to moisten it.

  3. Final Dip: Return it to the flour mixture for a second coating. Gently press the flour onto the chicken — this double dredging creates an ultra-crunchy shell.

After coating all the strips, lay them on a tray and let them rest for 10 minutes. This helps the flour adhere better and prevents the coating from falling off during frying.

Step 4: Fry to Crispy Perfection

Heat about 2 inches of oil in a heavy skillet or deep fryer to 350°F (175°C). The oil should be hot enough to sizzle when a pinch of flour is dropped in but not smoking.

Fry the chicken strips in batches to avoid crowding the pan (which can lower the oil temperature and make them soggy).

  • Cook for 4–6 minutes per batch, turning once, until golden brown and cooked through.

  • The internal temperature of the chicken should reach 165°F (74°C).

Once done, transfer the strips to a wire rack or paper towel-lined plate to drain excess oil. Sprinkle lightly with salt immediately while still hot — this enhances the flavor and gives them that classic “restaurant finish.”

Step 5: Optional – Oven or Air Fryer Method

If you prefer a lighter version, these chicken strips crisp beautifully in an air fryer or oven.

Air Fryer Method:

  • Preheat to 375°F (190°C).

  • Lightly spray coated chicken with oil.

  • Air fry in batches for 10–12 minutes, flipping halfway through, until golden and crisp.

Oven Method:

  • Preheat to 400°F (200°C).

  • Arrange strips on a wire rack set over a baking sheet.

  • Lightly spray with cooking oil.

  • Bake for 18–22 minutes, flipping halfway, until crispy and fully cooked.

Step 6: Serve and Enjoy

Serve the crispy chicken strips hot with your favorite dipping sauces. Some top choices include:

  • Honey Mustard Sauce: Sweet, tangy, and creamy.

  • Garlic Parmesan Dip: Made with mayo, garlic, and grated Parmesan.

  • Buffalo Ranch: A spicy twist for heat lovers.

  • Classic Barbecue Sauce: Smoky and rich, perfect for family dinners.

Pair them with fries, coleslaw, or a simple salad for a satisfying meal that pleases everyone.

Tips for Success

  1. Use Buttermilk: It tenderizes the chicken and adds tangy flavor.

  2. Cornstarch Is Key: It makes the coating extra crisp and prevents sogginess.

  3. Double Dredge: Flour → Egg → Flour is your golden ticket to crunch.

  4. Maintain Oil Temperature: Keep it steady between 340°F–360°F for consistent results.

  5. Rest Before Frying: Helps the coating stick firmly.

Flavor Variations

This recipe is a perfect base for creativity — here are some delicious twists:

  • Spicy Cajun Strips: Add 1 tsp Cajun seasoning to the flour mixture.

  • Garlic Herb Strips: Mix dried thyme, parsley, and oregano into the coating.

  • Asian Fusion Strips: After frying, toss in a mixture of honey, soy sauce, and sesame oil.

  • Cheesy Crust: Add 2 tbsp grated Parmesan cheese to the flour for extra flavor.

Storing and Reheating

If you have leftovers (rare, but possible!), store them properly to keep their crispiness.

  • Refrigerator: Store in an airtight container for up to 3 days.

  • Freezer: Place cooled strips in a single layer on a tray, freeze for 1 hour, then store in freezer bags for up to 2 months.

  • Reheat: For best results, reheat in an oven or air fryer at 375°F for 8–10 minutes until hot and crispy again. Avoid microwaving, as it softens the coating.

Final Thoughts

These Crispy Chicken Strips combine simplicity and indulgence in every bite. The secret lies in the buttermilk marinade and the double-dredge coating that creates a crackling golden crust. Once you master this recipe, you’ll never reach for frozen or fast-food tenders again.

Low-Calorie Greek Yogurt Cake

If you’re searching for a dessert that’s delicious, moist, and satisfying but won’t sabotage your healthy eating goals, this Low-Calorie Greek Yogurt Cake is the perfect treat. This cake blends creamy Greek yogurt, light flour, and a touch of natural sweetness to create a dessert that tastes decadent yet feels wholesome. It’s soft, tender, slightly tangy, and full of flavor—proving that “low-calorie” doesn’t have to mean “low pleasure.”

This unique recipe highlights the versatility of Greek yogurt, which gives the cake its luscious texture while keeping the fat content in check. Each bite melts in your mouth, offering a refreshing lightness that pairs beautifully with a cup of coffee or fresh fruit.

🍰 Why This Cake Is Special

Unlike traditional cakes loaded with butter and sugar, this recipe replaces heavy ingredients with Greek yogurt and a small amount of olive oil. The yogurt adds moisture and protein while cutting down on calories. Olive oil brings a subtle richness that balances the tanginess of the yogurt. With the addition of lemon zest and vanilla, the cake gains a bright, aromatic flavor that feels indulgent without being heavy.

This cake can be enjoyed plain, dusted with powdered sugar, or topped with fresh berries and a drizzle of honey for a naturally sweet finish. It’s versatile enough for breakfast, afternoon tea, or dessert.

🧁 Ingredients

(Makes one 8-inch cake, serves 8–10 slices)

Dry Ingredients:

  • 1 ½ cups (180 g) all-purpose flour (or half whole-wheat for extra fiber)

  • 2 tsp baking powder

  • ¼ tsp baking soda

  • ¼ tsp salt

Wet Ingredients:

  • ¾ cup (180 g) plain non-fat Greek yogurt

  • ⅓ cup (80 ml) olive oil or melted coconut oil

  • ⅔ cup (130 g) granulated erythritol or coconut sugar (low-calorie option)

  • 2 large eggs

  • 2 tsp pure vanilla extract

  • Zest of 1 lemon (optional but highly recommended)

  • 2 tbsp fresh lemon juice

  • 2 tbsp unsweetened almond milk (or any milk of choice)

Optional Toppings:

  • 1 tbsp powdered sugar substitute for dusting

  • Fresh berries (blueberries, raspberries, or sliced strawberries)

  • A drizzle of honey or light glaze made with Greek yogurt and lemon juice

🥣 Instructions

Step 1: Prepare the Pan and Oven

Preheat your oven to 350°F (175°C). Grease an 8-inch round cake pan lightly with olive oil or non-stick spray, and line the bottom with parchment paper. This step ensures the cake releases easily and stays moist all around.

Step 2: Mix the Dry Ingredients

In a medium bowl, whisk together the flour, baking powder, baking soda, and salt. This step aerates the flour, ensuring your cake turns out soft and fluffy. If you’re using whole wheat flour for added nutrition, sift it twice to keep the texture light.

Step 3: Whip the Wet Ingredients

In a large mixing bowl, combine Greek yogurt, olive oil, and erythritol. Beat them together with a hand mixer or whisk until the mixture turns smooth and creamy. Add the eggs, vanilla extract, lemon zest, and lemon juice, and continue whisking until fully incorporated. The lemon adds a brightness that complements the creamy tang of yogurt beautifully.

Step 4: Combine Wet and Dry

Gradually add the dry ingredients to the wet mixture in three batches, gently folding with a spatula after each addition. Pour in almond milk to loosen the batter. The batter should be thick yet pourable—smooth enough to spread evenly in the pan.

Step 5: Bake the Cake

Pour the batter into your prepared pan and smooth the top with a spatula. Bake for 30–35 minutes, or until the top is golden and a toothpick inserted in the center comes out clean.

The scent of vanilla and lemon filling your kitchen will be irresistible—fresh, tangy, and cozy all at once.

Step 6: Cool and Serve

Allow the cake to cool in the pan for about 10 minutes, then transfer it to a wire rack to cool completely. Dust with powdered sugar or top with your favorite fruit before serving. For a fancier presentation, you can spread a thin layer of Greek yogurt “frosting” (Greek yogurt mixed with a little honey and vanilla) over the cooled cake.

🌿 Low-Calorie Tips and Variations

  • Sugar Swap: Use stevia, erythritol, or monk fruit sweetener instead of regular sugar to cut down on calories.

  • Flour Options: Replace part of the flour with almond flour or oat flour for extra nutrients and fiber.

  • Flavor Twists: Add ½ teaspoon of cinnamon or a handful of blueberries into the batter before baking for a fun variation.

  • Protein Boost: Stir in one scoop of unflavored or vanilla protein powder and reduce flour slightly for a high-protein dessert.

💡 Why Greek Yogurt Works So Well

Greek yogurt is the hero of this recipe. Its high protein content keeps the cake tender while making it more filling and nutritious. It replaces much of the butter or oil in typical cakes, cutting calories by nearly half. Additionally, its slight tang balances the sweetness, creating a sophisticated flavor that feels like a cross between a sponge cake and a cheesecake.

Yogurt also activates the baking soda, which gives this cake its gentle rise without needing heavy cream or excessive fat. The end result? A soft, light crumb with a moist interior that stays fresh even the next day.

🍋 Serving Suggestions

This cake is delightfully simple but elegant enough to serve to guests. Here are a few serving ideas:

  1. Breakfast Treat: Serve a slice with a dollop of Greek yogurt and fresh fruit for a wholesome morning boost.

  2. Tea-Time Delight: Pair it with green tea or black coffee—it’s not overly sweet, so it complements both hot and cold beverages perfectly.

  3. Light Dessert: Add a drizzle of warm honey and a few mint leaves for a naturally beautiful presentation.

If you’re entertaining, you can also serve small squares of this cake alongside a yogurt-based fruit dip—creating a low-calorie dessert platter that looks fancy but is easy to prepare.

🧡 Storage Tips

  • Store the cake in an airtight container at room temperature for up to 2 days, or in the refrigerator for up to 5 days.

  • For longer storage, wrap slices individually and freeze for up to a month. Thaw in the fridge overnight before enjoying.

The texture stays remarkably moist even after freezing, thanks to the Greek yogurt’s natural creaminess.

Nutritional Benefits (Per Slice, Approximate)

  • Calories: 145 kcal

  • Protein: 6 g

  • Fat: 6 g

  • Carbohydrates: 15 g

  • Sugar: 4 g

These numbers make this cake a balanced, guilt-free option for anyone watching their calorie intake but still craving something sweet and satisfying.

🌸 Final Thoughts

The Low-Calorie Greek Yogurt Cake proves that dessert doesn’t need to be off-limits when you’re eating mindfully. It’s light, luscious, and perfectly balanced—a harmony of tangy yogurt, subtle sweetness, and soft crumb. Each bite feels indulgent yet nourishing, offering comfort without compromise.

Whether you’re baking it for a weekend treat, a healthy snack, or a special brunch, this cake brings together everything you love about homemade baking: simplicity, flavor, and heart. With its elegant aroma and melt-in-your-mouth texture, this low-calorie wonder is sure to become one of your go-to recipes whenever you crave a slice of pure, healthy happiness.

FAMOUS CREAM PUFFS

There are few pastries in the world as timeless and irresistible as cream puffs — those golden, airy shells filled with a cloud of smooth, sweet cream. This famous cream puff recipe combines the elegance of French choux pastry with a touch of homemade comfort, creating a dessert that feels both classic and unique. Light as air on the outside and creamy on the inside, each bite is pure bliss. Whether you’re serving them for a celebration, afternoon tea, or a simple weekend treat, these cream puffs will become your new signature dessert.

The Charm of Cream Puffs

Cream puffs (or choux à la crème in French) are made using pâte à choux — a special dough that puffs up beautifully without any yeast or baking powder. The magic lies in the steam created inside the dough while baking, forming a hollow center perfect for luscious filling. This recipe elevates the traditional puff by using a silky vanilla custard filling with a hint of whipped cream for added lightness, and a glossy dusting of powdered sugar or drizzle of chocolate for the perfect finishing touch.

Ingredients

For the Choux Pastry (Pâte à Choux):

  • 1 cup (240 ml) water

  • ½ cup (115 g) unsalted butter

  • 1 tbsp sugar

  • ¼ tsp salt

  • 1 cup (125 g) all-purpose flour

  • 4 large eggs (room temperature)

For the Cream Filling:

  • 2 cups (480 ml) whole milk

  • ½ cup (100 g) granulated sugar

  • 4 large egg yolks

  • ¼ cup (30 g) cornstarch

  • 2 tbsp unsalted butter

  • 1 ½ tsp pure vanilla extract

  • ½ cup (120 ml) heavy whipping cream (cold)

Optional Toppings:

  • Powdered sugar, for dusting

  • Melted chocolate, for drizzling

  • Caramel sauce, for a gourmet touch

Step 1: Making the Perfect Choux Pastry

Start by preheating your oven to 400°F (200°C). Line a large baking sheet with parchment paper.

In a medium saucepan, combine water, butter, sugar, and salt. Place over medium heat until the butter melts completely and the mixture just begins to boil. Immediately add the flour all at once, stirring vigorously with a wooden spoon until the dough forms a smooth ball and pulls away from the sides of the pan. This process cooks the flour slightly, ensuring your pastry puffs properly later.

Remove from heat and allow the dough to cool for 5–7 minutes — you don’t want it hot enough to cook the eggs. Then, add the eggs one at a time, beating well after each addition until the dough is smooth, glossy, and slightly sticky. The perfect consistency is when it forms soft peaks and slowly drops off the spoon.

Transfer the dough into a piping bag fitted with a large round or star tip. Pipe small mounds (about 1½ inches wide) onto your prepared baking sheet, leaving space between each one to allow for expansion.

Lightly wet your finger and smooth any pointed tops to ensure even puffing. Bake at 400°F (200°C) for 10 minutes, then reduce the temperature to 350°F (175°C) and bake for another 20–25 minutes, or until golden brown and crisp.

Do not open the oven door early — the steam must stay inside for them to puff up properly. Once baked, pierce each puff with a toothpick to release steam and prevent sogginess. Let them cool completely on a wire rack.

Step 2: Preparing the Dreamy Cream Filling

In a saucepan, warm the milk over medium heat until it’s just about to simmer. In a separate bowl, whisk together egg yolks, sugar, and cornstarch until pale and thick.

Slowly pour the hot milk into the egg mixture while whisking continuously to temper the eggs (this prevents curdling). Pour the entire mixture back into the saucepan and cook over medium heat, stirring constantly, until it thickens into a silky custard. You’ll know it’s ready when it coats the back of a spoon.

Remove from heat and stir in butter and vanilla. Transfer the custard to a bowl, press plastic wrap directly onto its surface (to avoid a skin forming), and refrigerate until chilled.

Once the custard has cooled, whip the heavy cream to soft peaks and gently fold it into the custard. This combination creates a luxuriously smooth and light pastry cream — not too dense, not too airy, but absolutely perfect.

Step 3: Filling the Puffs

When the pastry shells have cooled, slice them in half horizontally or create a small hole at the bottom using a knife or piping tip. Spoon or pipe the prepared cream filling inside until generously filled.

If you want a café-style presentation, pipe a little cream above the top shell for that extra flourish. Dust lightly with powdered sugar or drizzle with melted chocolate for a bakery-worthy look.

Step 4: Presentation and Serving

These famous cream puffs are best served chilled or at room temperature. Arrange them on a platter and watch as they disappear in moments! The crisp outer shell paired with the creamy vanilla filling creates a texture contrast that’s impossible to resist.

For a special twist, try these flavor variations:

  • Chocolate Cream Puffs: Add cocoa powder to the pastry cream or drizzle with dark chocolate ganache.

  • Coffee Infusion: Add 1 tsp espresso powder to the cream filling for a sophisticated mocha flavor.

  • Berry Delight: Add fresh raspberries or strawberries inside before filling for a burst of fruity freshness.

  • Caramel Kiss: Drizzle caramel sauce over the top and sprinkle with sea salt for a gourmet touch.

Tips for Perfect Cream Puffs

  1. Don’t rush the dough cooling: Adding eggs to hot dough will scramble them — patience pays off.

  2. Use room-temperature eggs: They incorporate more smoothly and help achieve a better puff.

  3. No peeking while baking: Opening the oven door releases steam, which can deflate your puffs.

  4. Pierce after baking: This step ensures the interior stays crisp and hollow.

  5. Chill before serving: The flavors develop beautifully after 30 minutes in the fridge.

The Story Behind Their Fame

Cream puffs originated in France during the 16th century, later gaining popularity worldwide for their delicate yet indulgent nature. What makes this recipe unique is its balance — a sturdy yet light pastry with a cream filling that’s rich but not heavy. It’s the kind of dessert that feels nostalgic, refined, and comforting all at once.

You don’t need fancy bakery equipment or special ingredients — just simple kitchen basics and a little patience. The result is a dessert so impressive it looks like it came straight out of a Parisian patisserie, yet it’s easy enough for anyone to master at home.

Conclusion

These Famous Cream Puffs are not just a dessert — they’re an experience. Each puff embodies craftsmanship and elegance, combining the crunch of golden pastry with the dreaminess of vanilla cream. With their delicate look and unforgettable flavor, they never fail to steal the show at any table.

Whether you’re baking them for a loved one, a party, or simply to indulge your sweet tooth, this recipe guarantees perfection every single time. One bite and you’ll understand why cream puffs have remained a beloved classic for centuries — and why this version is destined to be your most famous creation yet.

Crispy Mozzarella Cheese Roll

If there’s one dish that can make anyone’s heart melt—quite literally—it’s the Crispy Mozzarella Cheese Roll. Picture this: stretchy molten mozzarella tucked inside a tender layer of seasoned dough or wrapper, then fried or baked to perfection until the exterior turns a shattering, golden brown. The result is a symphony of crunch and gooey cheese bliss, perfect for appetizers, parties, or late-night indulgence. This recipe goes beyond the classic mozzarella stick—it’s bigger, crispier, creamier, and bursting with rich flavor. Let’s dive into how you can make this irresistible treat right at home.

Why You’ll Love This Crispy Mozzarella Cheese Roll

This unique take on the traditional mozzarella snack combines textures in a way that’s deeply satisfying. Unlike plain fried sticks, this recipe wraps cheese in layers of spiced dough or pastry with a secret coating that ensures maximum crunch. Whether served with marinara, garlic aioli, or even a drizzle of honey chili sauce, each bite offers that unmistakable pull of gooey mozzarella encased in a flaky, crispy shell. It’s the ultimate comfort food that feels both familiar and excitingly new.

Ingredients

For the Dough or Wrapper:

  • 1 cup all-purpose flour

  • 2 tbsp cornstarch (for extra crispiness)

  • 1/2 tsp salt

  • 1/2 tsp garlic powder

  • 1/4 tsp paprika

  • 1 tbsp melted butter or oil

  • 1/3 cup warm water (adjust as needed)

For the Filling:

  • 8–10 mozzarella sticks (or cut a block of mozzarella into thick strips)

  • 1/4 cup shredded mozzarella (optional for extra melt)

  • 1/4 tsp oregano

  • A pinch of black pepper

For Coating:

  • 1/2 cup all-purpose flour

  • 2 eggs, beaten

  • 1 cup breadcrumbs (panko recommended for extra crunch)

  • 1/4 tsp Italian seasoning (optional)

For Frying:

  • Oil for deep frying (vegetable, sunflower, or canola oil)

Optional Dipping Sauces:

  • Marinara sauce

  • Spicy honey glaze

  • Garlic mayo or ranch

Step 1: Preparing the Dough

In a mixing bowl, combine flour, cornstarch, salt, garlic powder, and paprika. Mix well, then add melted butter and slowly pour in warm water. Knead gently until a soft, elastic dough forms. It shouldn’t stick to your hands, but it should feel supple and smooth. Cover with a damp towel and let it rest for 10–15 minutes.

This homemade dough gives the mozzarella rolls an artisanal texture—slightly chewy on the inside, perfectly crisp outside. You can also use ready-made spring roll wrappers or tortillas if you’re short on time, but making your own gives it that special touch.

Step 2: Preparing the Cheese Filling

Cut your mozzarella into 4–5 inch logs if using a block. Mix oregano and black pepper into the shredded cheese (if using). You can also sprinkle a bit of chili flakes if you love heat. The secret is to keep the cheese cold before wrapping; this prevents it from leaking during frying.

Pop the mozzarella pieces into the freezer for 10 minutes while you roll out your dough. This firming step makes them easier to handle and helps achieve that clean, molten center.

Step 3: Assembling the Rolls

Roll out small pieces of dough into thin rectangles—about 5×5 inches. Place one mozzarella stick in the center, and if you like, add a sprinkle of seasoned shredded cheese around it. Fold the sides inward, then roll tightly like a burrito, sealing the edges with a dab of water.

Make sure your rolls are completely sealed; even a small gap can let cheese escape during frying. For an extra crispy layer, you can double-wrap each roll—first in the dough, then in a thin sheet of spring roll wrapper. This technique creates a shatteringly crisp texture that stays crunchy even after cooling.

Step 4: Triple Coating for the Ultimate Crunch

Here’s where the magic happens. Set up three bowls for dredging:

  1. One with flour (seasoned lightly with salt and pepper),

  2. One with beaten eggs,

  3. One with breadcrumbs mixed with Italian seasoning.

First, dust each roll in flour to dry the surface. Then dip into the egg wash, letting the excess drip off. Finally, coat in breadcrumbs, pressing gently so they adhere evenly.

For extra crunch, repeat the egg-and-breadcrumb step once more. A double coating ensures the rolls fry up crisp and golden without absorbing excess oil. Place coated rolls on a tray and refrigerate for 15 minutes before frying—this helps the coating firm up and prevents bursting.

Step 5: Frying the Rolls to Golden Perfection

Heat oil in a deep pan over medium-high heat (about 350°F or 175°C). Test with a breadcrumb—it should sizzle immediately but not burn too quickly.

Gently slide the rolls into the oil, frying in batches to avoid crowding. Turn occasionally until they’re evenly golden brown, about 3–4 minutes per batch. Remove and drain on paper towels.

For a healthier version, you can air fry them at 380°F (190°C) for 8–10 minutes or bake in a preheated oven at 400°F (200°C) for 12–15 minutes, turning halfway through. Brush lightly with oil before baking for that signature crispness.

Step 6: Serve Hot and Gooey

Once fried, serve the mozzarella rolls immediately—timing is everything. Break one open and admire the molten cheese pull stretching between the crispy shell. Dip it into your favorite sauce—classic marinara gives Italian comfort vibes, while a drizzle of honey chili or garlic mayo adds a gourmet twist.

For a fancy presentation, sprinkle grated Parmesan and parsley on top and serve with a side of mixed greens or roasted tomato relish. These rolls pair beautifully with iced tea, lemonade, or even sparkling water for a refreshing contrast.

Chef’s Secrets and Variations

  • Spicy Jalapeño Twist: Add thin slices of jalapeño or chili flakes to the cheese before rolling for a spicy edge.

  • Herb-Infused Crunch: Mix dried basil, thyme, or crushed rosemary into the breadcrumbs for a fragrant crunch.

  • Korean Fusion Roll: Add a swipe of gochujang or kimchi paste before wrapping for a tangy, spicy kick.

  • Stuffed Surprise: Layer in a slice of turkey, ham, or pepperoni with the mozzarella for a cheesy deli-style roll.

  • Sweet Variant: For dessert lovers, replace mozzarella with cream cheese and Nutella, dusting the fried roll with powdered sugar.

Storage and Reheating Tips

Leftover rolls can be stored in an airtight container in the fridge for up to 2 days. Reheat in an oven or air fryer to restore crispness—avoid microwaving, as it softens the coating. You can also freeze uncooked coated rolls and fry them directly from frozen for a quick snack anytime.

Final Thoughts

The Crispy Mozzarella Cheese Roll is a masterpiece of texture and flavor—crispy outside, molten inside, and endlessly versatile. It captures everything we crave in comfort food: warmth, crunch, and indulgent cheese. Each bite brings a satisfying crackle followed by that irresistible cheese pull, reminding you why simple ingredients, when handled with care, can create magic.

Pudding Sponge Cake

If you’ve ever dreamed of a dessert that melts in your mouth with the silky smoothness of pudding and the airy texture of sponge cake, this Pudding Sponge Cake will make your wish come true. It’s not just a cake—it’s a luscious fusion of two beloved classics. This recipe combines the light, cloud-like crumb of a sponge cake with the creamy decadence of pudding baked right into it, creating a dessert that’s moist from within and delightfully tender on the outside. Perfect for any celebration or just to spoil yourself, this unique recipe will become one of your favorites the moment you taste it.

What Makes This Pudding Sponge Cake Unique

Unlike traditional sponge cakes that rely on butter or oil for moisture, this one gets its soft, custard-like texture from an infused pudding layer baked directly in the batter. As the cake bakes, the pudding layer seeps through the sponge, creating natural pockets of creaminess without any frosting required. It’s a dessert that balances simplicity and indulgence beautifully—no fancy fillings or frostings, just pure comfort in every bite.

Ingredients

For the Sponge Cake Layer:

  • 1 cup (120g) all-purpose flour, sifted

  • 4 large eggs, separated

  • ¾ cup (150g) granulated sugar

  • 2 tablespoons warm water

  • 1 teaspoon pure vanilla extract

  • ½ teaspoon baking powder

  • ¼ teaspoon salt

For the Pudding Layer:

  • 2 cups (480ml) whole milk

  • 3 tablespoons cornstarch

  • ½ cup (100g) sugar

  • 2 egg yolks

  • 2 tablespoons unsalted butter

  • 1 teaspoon vanilla extract

  • A pinch of salt

Optional Toppings:

  • Whipped cream

  • Fresh berries or fruit compote

  • Powdered sugar for dusting

Step-by-Step Preparation

1. Prepare the Pudding Base

Start by making the pudding so it has time to cool before mixing into the cake.
In a medium saucepan, whisk together sugar, cornstarch, and salt. Add the milk slowly, whisking constantly to avoid lumps. Place the saucepan over medium heat and cook until the mixture thickens, stirring continuously—this will take about 5–7 minutes. Once it begins to bubble gently, remove from the heat and quickly whisk in the egg yolks (temper them first by adding a small spoonful of hot mixture to the yolks before combining). Stir in butter and vanilla until smooth and glossy. Set aside to cool slightly while you prepare the sponge.

The pudding should be silky, not too thick—similar to pastry cream. This ensures it blends seamlessly with the cake layer later on.

2. Whip the Egg Whites

For the sponge cake, separate the eggs carefully. Place the egg whites in a clean bowl and whip with an electric mixer until foamy. Gradually add half of the sugar and beat until stiff, glossy peaks form. This is what gives the cake its airy rise without baking powder doing all the work.

3. Mix the Egg Yolks and Sugar

In another bowl, whisk together the egg yolks, remaining sugar, vanilla extract, and warm water until the mixture becomes pale and thick. The warm water helps dissolve the sugar and gives the yolks more volume.

4. Combine Dry Ingredients

In a separate bowl, sift the flour, baking powder, and salt together. Gradually fold the dry ingredients into the yolk mixture until just combined. Be gentle—you don’t want to lose the airy structure.

5. Fold in the Egg Whites

Now, carefully fold the beaten egg whites into the yolk-flour mixture using a spatula. Add them in three portions, mixing gently after each addition. This step ensures the cake remains fluffy and light. The batter should look smooth and airy—almost like a mousse.

6. Layer the Cake and Pudding

Preheat your oven to 325°F (160°C) and lightly grease a deep 8-inch square or round cake pan. Pour two-thirds of the sponge cake batter into the prepared pan, then spoon over the pudding layer gently, letting it settle naturally over the batter. Pour the remaining batter on top and use a knife or skewer to swirl the layers just once or twice—this creates a marbled pudding effect inside the cake.

7. Bake to Perfection

Bake the cake in the preheated oven for about 40–45 minutes, or until the top is golden brown and a toothpick inserted into the center comes out mostly clean (a little pudding residue is fine). The magic happens during baking—the pudding sinks slightly, creating a soft, creamy center while the sponge sets around it.

Once baked, remove the cake from the oven and let it cool in the pan for 10 minutes before transferring it to a wire rack. The cake will settle slightly as it cools, revealing its signature custardy texture.

8. Chill and Serve

You can serve the cake warm for a comforting pudding-like experience, or chill it for a few hours to enjoy it as a cool, creamy dessert. Dust the top with powdered sugar, or serve slices with a dollop of whipped cream and fresh berries.

Texture and Taste

Each bite of this pudding sponge cake is a delightful contrast—soft and spongy on top, velvety and custard-like in the middle, and tender underneath. The flavor is delicate, sweet without being overwhelming, with a hint of vanilla and butter that enhances the pudding’s creaminess. It’s the kind of dessert that doesn’t need any elaborate presentation; its texture and aroma speak for themselves.

Tips for the Perfect Pudding Sponge Cake

  1. Room Temperature Eggs: Always use room-temperature eggs—they whip up to a greater volume, creating a fluffier sponge.

  2. Don’t Overmix: Once the egg whites are added, fold gently to retain air bubbles.

  3. Temperature Control: Bake at a lower temperature for even cooking—too hot, and the sponge will set before the pudding layer integrates.

  4. Cooling Time: Let the cake rest before cutting to allow the pudding to firm slightly.

  5. Flavor Variations: Try chocolate pudding for a decadent version, or butterscotch for a caramel twist. You can even infuse the milk with coffee or lemon zest for added aroma.

Creative Variations

  • Chocolate Lovers’ Dream: Replace 2 tablespoons of flour with cocoa powder and use chocolate pudding instead of vanilla. Top with a light chocolate ganache for pure indulgence.

  • Tropical Bliss: Add shredded coconut and use coconut milk in the pudding layer. Top with mango slices for a sunny, tropical finish.

  • Caramel Surprise: Swirl caramel sauce through the batter before baking for ribbons of sweet, golden goodness.

  • Lemon Pudding Sponge Cake: Infuse the pudding with lemon zest and juice, and serve with a dusting of powdered sugar for a refreshing, citrusy twist.

Storage

This cake keeps beautifully for 3–4 days when refrigerated in an airtight container. The pudding keeps it moist, so it never dries out. In fact, the flavor deepens after a day as the pudding fully settles into the sponge. You can also freeze slices individually for up to one month—just thaw in the fridge overnight before serving.

Final Thoughts

This Pudding Sponge Cake is a testament to how two simple desserts can unite to create something extraordinary. It’s elegant enough for guests yet simple enough for a cozy family treat. The balance of airy sponge and creamy pudding makes it stand out from ordinary cakes—it’s comforting, refined, and impossible to resist.

Once you make it, don’t be surprised if it becomes a family favorite. Whether served warm with a drizzle of cream or cold from the fridge on a summer afternoon, every slice delivers a tender reminder of why baking is truly a joy.

Southern-Style Cheeseburger Pie

There’s something magical about Southern comfort food — it’s hearty, flavorful, and feels like a warm hug in every bite. When you combine that soulful Southern flair with the all-American cheeseburger, you get something truly extraordinary: Southern-Style Cheeseburger Pie. This unique dish transforms everything you love about a juicy cheeseburger into a savory, golden-baked pie that’s perfect for family dinners, potlucks, or a cozy weekend treat.

Unlike the typical burger, this recipe layers creamy cheese, spiced ground beef, and a buttery biscuit-style crust that’s kissed with buttermilk — all baked together into a rich, melt-in-your-mouth masterpiece. It’s simple to prepare, yet it delivers layers of flavor that make it unforgettable.

Why You’ll Love This Recipe

This isn’t your average cheeseburger casserole. It’s the Southern version — which means it’s big on comfort, bold in flavor, and loaded with texture. The crust has a tender biscuit-like bite, the filling is juicy with perfectly seasoned beef, and the topping has that signature golden cheddar melt. Think of it as a cheeseburger meets pot pie — with a buttery, homemade touch.

Plus, it’s budget-friendly, easily customizable, and makes for incredible leftovers (if there are any).

Ingredients

For the Crust:

  • 1 ½ cups all-purpose flour

  • 1 ½ tsp baking powder

  • ½ tsp baking soda

  • ½ tsp salt

  • 6 tbsp cold unsalted butter, cubed

  • ¾ cup buttermilk (or milk with a squeeze of lemon juice)

For the Cheeseburger Filling:

  • 1 lb ground beef (80/20 for best flavor)

  • 1 small onion, finely diced

  • 2 cloves garlic, minced

  • ½ tsp smoked paprika

  • ½ tsp chili powder

  • 1 tsp Worcestershire sauce

  • ½ tsp black pepper

  • Salt to taste

  • 1 tbsp yellow mustard

  • 2 tbsp ketchup

  • ¼ cup mayonnaise

  • 1 cup shredded cheddar cheese (sharp or extra-sharp)

  • ½ cup Monterey Jack or mozzarella cheese

  • 2 large eggs

  • ½ cup milk

Optional Southern Touches:

  • ¼ cup cooked crumbled bacon

  • 1 jalapeño, thinly sliced

  • ¼ cup chopped pickles or relish

  • A sprinkle of hot sauce (for that Southern kick!)

Step-by-Step Instructions

1. Prepare the Crust

Start by preheating your oven to 375°F (190°C) and lightly greasing a 9-inch pie dish or cast-iron skillet.

In a large mixing bowl, whisk together the flour, baking powder, baking soda, and salt. Add the cold butter cubes and use your fingers or a pastry cutter to work it into the flour until it looks like coarse crumbs. Slowly pour in the buttermilk, stirring until a soft dough forms.

Press the dough gently into the bottom and up the sides of your greased pie dish. You don’t need perfection here — a rustic, hand-pressed crust is part of the Southern charm. Set aside while you prepare the filling.

2. Make the Cheeseburger Filling

In a skillet over medium-high heat, add the ground beef and cook until browned, breaking it up as it cooks. Drain excess fat if needed. Add diced onion and minced garlic, cooking until softened and fragrant — about 3 minutes.

Season with smoked paprika, chili powder, Worcestershire sauce, salt, and pepper. Stir well to coat every bit of the beef in those rich Southern spices.

Next, add the mustard, ketchup, and mayonnaise. This trio creates a creamy, tangy base that mimics that “special burger sauce” flavor. Let it simmer for a minute, then remove from heat.

3. Layer and Assemble the Pie

Spread the beef mixture evenly over the biscuit crust. If you’re feeling adventurous, now’s the time to sprinkle on crumbled bacon, jalapeños, or a few diced pickles for that true Southern backyard BBQ flair.

In a small bowl, whisk together the eggs and milk, then pour this mixture evenly over the beef filling — it’ll help the pie hold together beautifully as it bakes.

Top generously with your blend of cheddar and Monterey Jack cheese. The cheddar adds sharpness while the Jack brings a smooth melt.

4. Bake to Golden Perfection

Place the pie in the oven and bake for 25–30 minutes, or until the crust is golden brown and the cheese on top is bubbling and slightly crisp around the edges.

You’ll know it’s ready when your kitchen smells like a Southern diner at lunchtime — buttery, cheesy, and absolutely mouthwatering.

Let the pie cool for about 10 minutes before slicing. This short rest helps the filling set so each piece holds together beautifully.

5. Serving Suggestions

This pie shines all on its own, but if you want to make it a full Southern meal, pair it with:

  • Buttermilk coleslaw – for a creamy crunch.

  • Sweet corn or fried okra – for a true Southern side.

  • Pickle slices and hot sauce – to brighten up the richness.

  • Sweet tea or lemonade – to wash down the comfort.

And don’t forget a drizzle of extra ketchup or a spoon of spicy mayo on top for an extra punch of flavor.

Flavor Notes and Tips

  • Crust: If you prefer something flakier, you can use a premade pie crust or puff pastry, but the homemade buttermilk biscuit base adds unbeatable texture and Southern authenticity.

  • Cheese Choices: Feel free to experiment — pepper jack adds spice, while gouda adds a smoky depth.

  • Meat Options: Substitute the beef with ground turkey, sausage, or even plant-based crumbles if desired.

  • Make-Ahead Magic: You can assemble the pie ahead of time and refrigerate it for up to 24 hours before baking.

The Southern Charm Behind the Dish

This pie captures the spirit of the South — where recipes aren’t just food but family stories passed through generations. The buttery crust represents homemade hospitality, while the hearty beef and cheese filling reflect the simplicity and generosity of Southern kitchens.

Every forkful gives you the essence of a backyard cookout wrapped in a warm, comforting crust. It’s rustic, flavorful, and downright addictive.

The recipe’s beauty lies in its versatility. You can serve it in wedges like a quiche, cut it into squares for parties, or pack it in lunchboxes for a hearty midday treat. And because it reheats wonderfully, it’s a fantastic make-ahead meal for busy weeks.

Final Thoughts

Southern-Style Cheeseburger Pie is the perfect balance between classic Americana and Southern comfort. It brings together the soul of a cheeseburger, the heart of a casserole, and the warmth of a biscuit in one irresistible dish.

Each bite tells a story — buttery crust, juicy beef, creamy sauce, and melted cheese that feels like Sunday supper at Grandma’s house. Whether you’re cooking for your family or trying to impress friends at a potluck, this pie promises to be the star of the table.

So grab your skillet, preheat that oven, and let your kitchen fill with the smell of comfort and home. This Southern-Style Cheeseburger Pie isn’t just food — it’s a slice of joy baked with love and a touch of Southern soul.

Gluten-Free Sandwich Bread

If you’ve ever tried to make gluten-free sandwich bread and ended up with a dense, dry brick instead of a soft, airy loaf, this recipe is about to change everything. This unique gluten-free sandwich bread combines a balanced blend of wholesome flours, a touch of natural starch for structure, and a few bakery-style secrets to create a soft, chewy crumb that’s perfect for sandwiches, toast, or even French toast. There’s no kneading, no complicated steps—just simple ingredients, patience, and a little magic from your kitchen.

The Secret Behind Perfect Gluten-Free Bread

Traditional bread relies on gluten to provide elasticity and structure, trapping air bubbles for a fluffy crumb. Without gluten, many recipes fall flat—literally. The trick is to mimic gluten’s role by combining the right mix of starches and binding agents. In this recipe, we use a trio of rice flour, tapioca starch, and sorghum flour, giving the bread a soft yet stable texture. Psyllium husk powder acts as the “gluten” replacement, providing stretch and moisture retention that keeps the loaf tender for days.

Unlike many gluten-free recipes that rely heavily on starch, this one balances nutrition and texture. Sorghum adds a nutty warmth, rice flour gives lightness, and tapioca contributes a pleasant chew—making each bite taste like real bread, not a substitute.

Ingredients

Dry Ingredients:

  • 1 ½ cups (180 g) white rice flour

  • 1 cup (120 g) sorghum flour

  • ¾ cup (90 g) tapioca starch

  • 2 tbsp psyllium husk powder (not whole husks)

  • 1 tbsp baking powder

  • 2 ½ tsp instant yeast

  • 1 tsp salt

  • 1 tbsp sugar (feeds the yeast and adds light sweetness)

Wet Ingredients:

  • 1 ½ cups (360 ml) warm water (about 100°F or 38°C)

  • 2 tbsp olive oil (adds richness and softness)

  • 1 tsp apple cider vinegar (enhances rise and flavor)

  • 2 large eggs, room temperature (for structure and moisture)

Optional for flavor:

  • 1 tbsp honey or maple syrup

  • 1 tsp chia seeds or flaxseed meal (for a rustic texture)

Step-by-Step Instructions

Step 1: Prepare the Yeast

In a small bowl, combine the warm water, sugar, and yeast. Stir gently and let it sit for about 5–7 minutes, until a foamy layer forms on top. This step is crucial—if the yeast doesn’t foam, it’s inactive and won’t make your bread rise.

Step 2: Mix the Dry Ingredients

In a large mixing bowl, whisk together rice flour, sorghum flour, tapioca starch, psyllium husk powder, baking powder, and salt. The psyllium husk will start to absorb moisture quickly once combined, so make sure it’s evenly mixed in now for consistent results later.

Step 3: Add the Wet Ingredients

Once the yeast mixture is ready, add it to the dry ingredients. Then, pour in olive oil, apple cider vinegar, and eggs. If you’re using honey, add it now. Mix with a hand mixer fitted with dough hooks or a sturdy spoon until the batter comes together.

Unlike wheat dough, this will be more like a thick batter than a firm dough—soft, sticky, and stretchy from the psyllium. That’s exactly what you want.

Step 4: Rest the Dough

Cover the bowl with a clean kitchen towel and let it rest for 10 minutes. During this time, the psyllium husk and flours fully hydrate, thickening the mixture and improving the final crumb structure.

Step 5: Shape and Rise

Line a 9×5-inch loaf pan with parchment paper. Spoon the dough into the pan and smooth the top with a wet spatula or your fingers. For a professional bakery look, make a shallow slit across the top using a sharp knife—this helps control the rise.

Cover loosely with plastic wrap or a damp cloth and let it rise in a warm place for 40–60 minutes, or until it has nearly doubled in size. Gluten-free dough doesn’t rise as high as wheat dough, but it should puff nicely.

Step 6: Bake the Bread

Preheat your oven to 375°F (190°C). Once preheated, place the pan in the center of the oven and bake for 45–50 minutes, or until the top is golden brown and firm. You can check for doneness by inserting a thermometer into the center—it should read about 200°F (93°C).

Step 7: Cool Completely

Remove the bread from the pan and let it cool completely on a wire rack. This step is non-negotiable! If you slice it too soon, the steam trapped inside will make the texture gummy. Once cool, slice with a serrated knife and enjoy the soft, fluffy slices.

Tips for Success

  1. Measure accurately. Use a kitchen scale for the flours—gluten-free baking is sensitive to small changes in ratio.

  2. Don’t skip the psyllium husk. It’s the secret to soft, flexible bread. Without it, the loaf will crumble.

  3. Warm environment matters. Letting the dough rise in a slightly warm place (like inside an off oven with the light on) ensures better lift.

  4. Store correctly. Wrap the loaf in plastic wrap or an airtight container. It stays fresh at room temperature for up to 3 days or freezes beautifully for up to a month.

  5. Toast before eating. Gluten-free bread shines when lightly toasted—it enhances the flavor and texture.

Why This Recipe Stands Out

What makes this gluten-free sandwich bread truly unique is its texture and flavor combination. Most gluten-free loaves lean on starch-heavy formulas that taste bland or artificial. Here, the blend of sorghum and rice flours introduces a mellow, almost nutty flavor, while the psyllium keeps it springy and moist.

The bread slices beautifully without crumbling and can handle sandwich fillings, spreads, or even a dunk in soup without falling apart. Whether you’re layering turkey and cheese, making peanut butter toast, or using it for French toast, it behaves like classic bread but feels lighter and easier to digest.

It’s also nutrient-balanced: sorghum flour offers protein and fiber, tapioca brings smoothness, and olive oil provides healthy fats. Together, they create a loaf that nourishes as it satisfies.

Variations to Try

  • Seeded Sandwich Bread: Mix in 2 tablespoons of sesame seeds, sunflower seeds, or pumpkin seeds for crunch.

  • Herbed Bread: Add 1 teaspoon of dried rosemary, thyme, or Italian seasoning for a savory twist.

  • Sweet Breakfast Loaf: Replace the vinegar with orange juice and stir in 2 tablespoons of honey and a handful of raisins.

  • Vegan Option: Swap the eggs for 2 flax “eggs” (2 tablespoons flaxseed meal + 6 tablespoons warm water). The texture will be slightly denser but still delicious.

Serving Ideas

  • Classic Sandwich: Stack ham, cheese, and mustard between two soft slices.

  • Avocado Toast: Top with smashed avocado, salt, and chili flakes.

  • French Toast: Dip slices in an egg mixture, fry, and drizzle with syrup.

  • Garlic Bread: Brush slices with butter and garlic powder, toast until golden.

Final Thoughts

This gluten-free sandwich bread isn’t just a replacement—it’s a recipe that stands proudly on its own. The soft interior, golden crust, and real bread flavor prove that gluten-free baking can be both wholesome and indulgent. Once you try this loaf, you may never go back to store-bought gluten-free bread again.

Whether you’re baking for health reasons or pure curiosity, this recipe gives you the satisfaction of pulling a warm, golden loaf from the oven—proof that with the right balance of science and soul, even gluten-free bread can be extraordinary.