The Dashboard Button Most Drivers Ignore And Why It Actually Matters

The Dashboard Button Most Drivers Ignore—And Why It Actually Matters

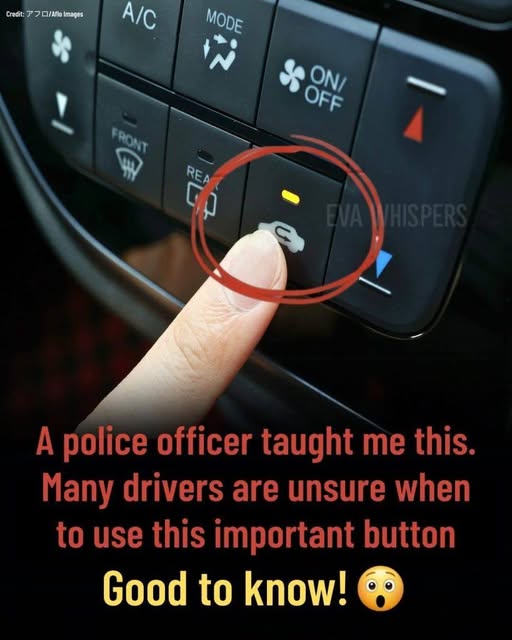
If you’ve ever glanced at your dashboard and noticed a button labeled “TCS,” “ESC,” “ESP,” or showing a small car with squiggly lines behind it, you’re not alone in wondering what it actually does. For many drivers, this is the most ignored button in the vehicle. Some assume it’s unimportant. Others believe it’s only for racing or off-road driving. In reality, this simple button can be the difference between maintaining control and losing it in a critical moment.

That button controls your vehicle’s traction control system—and in modern cars, it’s often linked to the electronic stability control system. Let’s break down what it does, when to use it, and why understanding it could make you a safer driver.


What Is Traction Control?

Traction control (often abbreviated as TCS) is a safety feature designed to prevent your wheels from spinning when they lose grip on the road. It works hand-in-hand with your car’s anti-lock braking system (ABS). When sensors detect that one wheel is spinning faster than the others—usually due to slippery conditions—the system automatically reduces engine power or applies braking to that specific wheel.

This helps restore traction and keeps your vehicle stable.

Electronic Stability Control (ESC), sometimes labeled ESP (Electronic Stability Program), goes a step further. It monitors your steering angle and vehicle direction. If your car starts to skid or slide sideways, ESC selectively brakes individual wheels to help guide the vehicle back on track.

In many modern vehicles, including brands like Toyota, Honda, Ford, and Hyundai, traction control and stability control are integrated into one system.


Why Most Drivers Ignore It

There are a few common reasons drivers overlook this button:

  1. They assume it should always stay on.

  2. They don’t understand when to turn it off.

  3. They’ve never experienced a situation where it mattered.

  4. The symbol isn’t clearly labeled.

In most cases, traction control is automatically activated when you start your car. Many drivers never touch the button because the system works quietly in the background. But knowing when to temporarily disable it can actually help you in certain conditions.


When Traction Control Helps the Most

1. Rainy Roads

Wet roads reduce tire grip significantly. If you accelerate too quickly, your wheels can spin. Traction control immediately detects this and reduces power to maintain grip.

2. Snow and Ice

In slippery winter conditions, traction control prevents dangerous wheel spin that can cause your vehicle to fishtail or slide.

3. Sharp Turns

If you enter a turn too fast and the car begins to skid, electronic stability control helps correct your direction.

4. Emergency Maneuvers

If you suddenly swerve to avoid an obstacle, stability control can prevent your car from spinning out.

In fact, studies from the National Highway Traffic Safety Administration (NHTSA) have shown that electronic stability control significantly reduces the risk of single-vehicle crashes and rollovers.


When You Might Actually Turn It Off

Here’s where many drivers get confused. There are specific situations where temporarily disabling traction control can help:

1. Stuck in Deep Snow or Sand

If your car is stuck, traction control may prevent the wheels from spinning enough to dig out. Turning it off allows controlled wheel spin, helping you rock the vehicle free.

2. Mud or Loose Gravel

In off-road situations, a little wheel spin can be helpful for gaining momentum.

3. Performance Driving (Closed Tracks Only)

On racetracks, experienced drivers sometimes disable traction control for maximum control over acceleration. This should never be done on public roads.

After freeing your vehicle, you should turn the system back on immediately for normal driving.


The Warning Light You Shouldn’t Ignore

If you see a flashing light of a car with squiggly lines while driving, that means the traction control system is actively working. That’s good—it’s protecting you.

However, if the light stays on continuously, it could indicate a system malfunction. In that case, it’s wise to have your vehicle checked by a professional.

Ignoring a malfunctioning traction control system can increase your risk in slippery conditions.


Why It Truly Matters

Many drivers believe safe driving is just about skill. While skill is important, modern safety systems act as backup protection when human reaction time isn’t fast enough.

Imagine hydroplaning during heavy rain. Even experienced drivers can lose control in seconds. Traction control and stability systems react faster than human reflexes, applying precise braking adjustments in milliseconds.

This technology has saved countless lives worldwide.

In countries with heavy monsoon seasons or winter snow, like parts of northern Pakistan or colder global regions, this feature becomes even more important. Road conditions can change suddenly, and having electronic assistance can mean avoiding a serious accident.


Common Myths About Traction Control

Myth 1: It reduces performance.
Reality: It only limits power when wheel slip is detected.

Myth 2: Good drivers don’t need it.
Reality: Even professional drivers rely on stability systems in unpredictable conditions.

Myth 3: It’s only for snow.
Reality: It works in rain, gravel, oil-slicked roads, and sudden swerves.


The Bottom Line

That small dashboard button with the skidding car icon is far more important than it looks. It’s not just another feature—it’s a powerful safety tool designed to keep you in control when the unexpected happens.

For everyday driving, keep traction control and stability control turned on. Only disable it briefly if you’re stuck in snow, sand, or mud—and turn it back on immediately afterward.

The next time you start your car, take a moment to notice that button. Understanding what it does might not seem exciting—but in a split-second emergency, it could make all the difference.

I seriously had no idea of this method

Sometimes the simplest cooking methods are the most surprising. You think you know how to cook chicken — oil in a pan, flip it a few times, hope for the best. But then you discover a technique so easy and effective that it completely changes your kitchen game. That’s exactly what happened when I learned this method for perfectly crispy, juicy pan-seared chicken thighs.

No flour. No breading. No complicated marinades. Just one simple trick that guarantees golden, crackling skin and tender meat every single time.

If you’ve ever struggled with rubbery skin, uneven browning, or dry chicken, this method will change everything.

Why This Method Works

The secret is simple: start the chicken in a cold pan.

Most people heat the pan first and then add the chicken. But when you start skin-side down in a cold, dry pan, the fat underneath the skin renders slowly. As it melts, it naturally crisps the skin in its own fat — no extra oil required.

The result? Ultra-crispy skin and juicy, flavorful meat.

Ingredients

  • 6 bone-in, skin-on chicken thighs

  • 1 ½ teaspoons salt

  • 1 teaspoon black pepper

  • 1 teaspoon garlic powder

  • 1 teaspoon paprika

  • Optional: fresh thyme or rosemary

That’s it. Simple pantry ingredients.

Step-by-Step Instructions

Step 1: Prep the Chicken

Pat the chicken thighs completely dry with paper towels. This is critical. Moisture is the enemy of crispiness. The drier the skin, the better the sear.

Season generously on both sides with salt, pepper, garlic powder, and paprika.

Let the chicken sit at room temperature for about 15–20 minutes while you prepare your pan.

Step 2: Start in a Cold Pan

Place the chicken thighs skin-side down in a large skillet — preferably cast iron — before turning on the heat.

Do not add oil. The chicken will release its own fat.

Make sure the thighs are not overlapping.

Step 3: Turn on Medium Heat

Now turn the burner to medium.

As the pan slowly heats up, the fat under the skin will begin to render. You’ll hear gentle sizzling after a few minutes.

Resist the urge to move the chicken. Let it cook undisturbed for 12–15 minutes.

The skin will gradually turn deep golden brown and become incredibly crisp.

Step 4: Flip and Finish

Once the skin is crispy and easily releases from the pan, flip the chicken.

Cook for another 8–10 minutes until the internal temperature reaches 165°F (75°C).

If your thighs are thick, you can transfer the pan to a 400°F (200°C) oven for 5–7 minutes to finish cooking.

Optional Flavor Boost

If you want to elevate the dish, add a couple of smashed garlic cloves and fresh thyme during the last few minutes of cooking. Spoon the hot rendered fat over the chicken as it finishes. This creates incredible aroma and flavor.

Why Bone-In, Skin-On Is Best

Boneless, skinless chicken cooks quickly but lacks the richness and crisp texture that makes this method special. The skin protects the meat from drying out and provides that irresistible crunch.

Plus, the rendered chicken fat left in the pan is liquid gold. Use it to sauté vegetables, roast potatoes, or cook rice for extra flavor.

What to Serve With It

This crispy chicken pairs beautifully with:

  • Creamy mashed potatoes

  • Garlic butter rice

  • Roasted carrots and green beans

  • Fresh cucumber and tomato salad

  • Buttery dinner rolls

It’s simple enough for a weeknight but impressive enough for guests.

Common Mistakes to Avoid

1. Moving the chicken too early
If it sticks, it’s not ready. Give it time.

2. Using high heat immediately
High heat will burn the skin before the fat renders.

3. Not drying the skin
Moisture prevents crisping.

4. Overcrowding the pan
Air circulation is key to browning.

The Science Behind It

When chicken skin heats gradually, the fat melts slowly and fries the skin from underneath. Starting in a hot pan causes the outer layer to contract too quickly, trapping fat and leading to chewy skin.

Slow rendering equals crispy perfection.

Storage & Reheating Tips

Store leftovers in an airtight container in the refrigerator for up to 4 days.

To reheat and keep the skin crispy:

  • Place in a 375°F oven for 10–12 minutes

  • Or reheat in an air fryer for 5–6 minutes

Avoid microwaving if possible — it softens the skin.

Final Thoughts

It’s funny how one small change can transform a basic recipe. Starting chicken in a cold pan feels almost wrong at first — but once you try it, you’ll never go back.

This method proves that you don’t need fancy ingredients or complicated steps to create something delicious. Just good technique and a little patience.

Shockingly Easy 3-Ingredient Cake (No Measuring Needed!)

Sometimes the best recipes are the ones you barely need to think about. This “shockingly easy” 3-ingredient cake is the kind of dessert you can make from memory after just one try. No fancy tools, no complicated steps, and no precise measuring required. It’s the perfect last-minute treat for busy weeknights, surprise guests, or those moments when you just want something sweet without the fuss.

This recipe is inspired by the famous soda cake popularized by brands like Betty Crocker, where a simple box of cake mix transforms into a fluffy, moist dessert with minimal effort. The magic lies in how the ingredients react together—creating a soft, tender crumb without needing oil, butter, or extra flavorings.

Let’s dive into this incredibly simple recipe that you’ll soon be making without even glancing at the instructions.

Why This Recipe Works

The beauty of this cake is in its simplicity. The cake mix already contains flour, sugar, baking powder, and flavoring. When combined with eggs and soda (or yogurt, depending on your variation), the carbonation and moisture activate the leavening agents. The result? A surprisingly light and fluffy cake with almost zero effort.

After making it a few times, you’ll find yourself eyeballing everything—and it still turns out perfect.

Ingredients (Just 3!)

  • 1 box cake mix (any flavor)

  • 3 large eggs

  • 1 can (about 330 ml) soda (any flavor)

That’s it. No oil. No butter. No milk.

How to Make It

Step 1: Preheat and Prepare

Preheat your oven to 180°C (350°F). Lightly grease a baking pan (8×8 or 9-inch round works well). You can also line it with parchment paper for easy removal.

Step 2: Mix the Batter

In a large mixing bowl, add the cake mix. Crack in the three eggs. Pour in the soda.

Using a whisk or hand mixer, mix everything together until smooth. The batter will look slightly bubbly—that’s the carbonation working its magic.

Don’t overmix. Just stir until combined and smooth.

Step 3: Bake

Pour the batter into your prepared pan. Tap it gently on the counter to remove large air bubbles.

Bake for 30–35 minutes, or until a toothpick inserted in the center comes out clean.

Step 4: Cool and Serve

Let the cake cool in the pan for 10–15 minutes before slicing. Serve plain, dusted with powdered sugar, or topped with whipped cream or fruit.

Flavor Variations

One of the best things about this recipe is how customizable it is.

  • Chocolate Cake + Cola = Rich, deep chocolate flavor

  • Vanilla Cake + Orange Soda = Bright, citrusy sweetness

  • Strawberry Cake + Lemon-Lime Soda = Fresh and fruity

  • Lemon Cake + Sprite = Light and refreshing

You can even experiment with spice cake and ginger ale for a warm, cozy flavor.

No-Soda Alternative (3 Ingredients Still!)

If you don’t want to use soda, here’s another 3-ingredient version:

  • 2 cups self-rising flour

  • 1 cup sweetened condensed milk

  • 1 cup milk

Mix everything until smooth and bake at 180°C (350°F) for 30–35 minutes.

This version creates a slightly denser but beautifully moist cake with a soft crumb.

Tips for Success

1. Don’t Add Extra Liquid
It may feel strange not adding oil or butter, but trust the process. The cake mix and soda are enough.

2. Watch the Baking Time
Ovens vary, so start checking at 28–30 minutes.

3. Use Room Temperature Eggs
They blend more easily and help create a smoother batter.

4. Add Mix-Ins (Optional)
While technically no longer “3 ingredients,” you can fold in chocolate chips, nuts, or shredded coconut for extra texture.

Why You’ll Love It

  • Perfect for beginners

  • Budget-friendly

  • Minimal cleanup

  • No measuring cups needed after a few tries

  • Great base for layered cakes or cupcakes

It’s the kind of recipe you’ll memorize quickly. After making it enough times, you’ll grab a bowl, toss everything in, stir, and bake—no second guessing.

Storage Tips

Store leftovers in an airtight container at room temperature for up to 3 days. If you prefer, refrigerate for up to 5 days. This cake also freezes beautifully—wrap slices tightly in plastic wrap and freeze for up to 2 months.

To reheat, microwave a slice for 10–15 seconds for that fresh-from-the-oven feel.

Serving Ideas

  • Top with chocolate ganache

  • Spread with cream cheese frosting

  • Serve with fresh berries and whipped cream

  • Drizzle with caramel sauce

  • Turn into cake pops

Or enjoy it plain with tea or coffee—it’s that good.

Final Thoughts

This 3-ingredient cake proves that baking doesn’t have to be complicated to be delicious. With just a box of cake mix, eggs, and soda, you can create a fluffy, flavorful dessert that tastes like you spent hours in the kitchen.

Did you know broccoli hides dirt

Did You Know Broccoli Hides Dirt? Here’s How to Clean It + A Delicious Garlic Broccoli Recipe

Many people don’t realize that broccoli can hide dirt, tiny insects, and even pesticide residue deep inside its tightly packed florets. Because of its tree-like structure, small particles easily get trapped between the buds. If you’ve ever rinsed broccoli quickly under running water and assumed it was clean, you might want to think again.

Broccoli grows close to the ground, which makes it more likely to collect soil. The dense crown acts like a sponge, holding onto debris. That’s why proper cleaning is essential before cooking. Not only does thorough washing improve food safety, but it also enhances flavor and texture.

Below, you’ll learn the best way to clean broccoli properly, followed by a simple and delicious garlic sautéed broccoli recipe that brings out its natural goodness.

How to Properly Clean Broccoli
Step 1: Cut the Florets

Start by trimming the thick stem and separating the broccoli into smaller florets. Cutting them apart exposes hidden areas where dirt may be trapped.

Step 2: Soak in Salt Water

Fill a large bowl with cold water and add 1–2 tablespoons of salt. Submerge the florets completely and let them soak for 15–20 minutes. The salt helps draw out hidden dirt and any tiny insects that might be lodged inside.

Step 3: Rinse Thoroughly

After soaking, rinse each floret under running water. Gently shake them to remove excess water.

Step 4: Dry Before Cooking

Pat dry with a clean towel or use a salad spinner. Dry broccoli roasts and sautés better because excess water can make it soggy.

Now that your broccoli is perfectly clean, let’s turn it into a flavorful dish.

Garlic Sautéed Broccoli Recipe (Serves 4)

This quick and healthy recipe highlights broccoli’s natural flavor while keeping it crisp and vibrant.

Ingredients:

2 large heads of broccoli, cleaned and cut into florets

3 tablespoons olive oil

4 cloves garlic, minced

½ teaspoon red pepper flakes (optional)

Salt to taste

Black pepper to taste

1 tablespoon fresh lemon juice

2 tablespoons grated Parmesan cheese (optional)

Instructions
1. Blanch the Broccoli (Optional but Recommended)

Bring a large pot of salted water to a boil. Add the broccoli florets and cook for 2–3 minutes until bright green and slightly tender. Immediately transfer them to a bowl of ice water to stop the cooking process. Drain well.

Blanching helps preserve the color and ensures even cooking during sautéing.

2. Heat the Oil

In a large skillet, heat olive oil over medium heat. Add the minced garlic and sauté for about 30 seconds until fragrant. Be careful not to burn it.

3. Sauté the Broccoli

Add the drained broccoli to the skillet. Toss well to coat with garlic and oil. Cook for 5–7 minutes, stirring occasionally, until tender but still crisp.

4. Season

Sprinkle with salt, black pepper, and red pepper flakes if using. Add lemon juice and toss again.

5. Finish and Serve

Remove from heat and sprinkle with Parmesan cheese if desired. Serve warm as a side dish with grilled chicken, fish, or pasta.

Why Broccoli Is Worth the Effort

Broccoli is packed with fiber, vitamin C, vitamin K, and powerful antioxidants. It supports immune health, digestion, and overall wellness. Proper cleaning ensures you enjoy all these benefits without unwanted grit.

The combination of garlic and lemon enhances broccoli’s slightly earthy flavor, while olive oil adds richness. This recipe takes less than 20 minutes from start to finish, making it perfect for busy weeknights.

Extra Tips

For roasting instead of sautéing, toss cleaned broccoli with olive oil, salt, and pepper, then roast at 400°F (200°C) for 20–25 minutes.

Add sliced almonds or sesame seeds for crunch.

Drizzle with balsamic glaze for a sweet and tangy twist.

Use the peeled stem too! Slice it thinly and cook along with the florets.

I don’t buy bread anymore the easiest bread recipe without kneading or eggs

I Don’t Buy Bread Anymore – The Easiest No-Knead, No-Egg Bread Recipe

There’s something deeply satisfying about pulling a golden, crusty loaf of bread out of your own oven. The aroma fills the kitchen, the crust crackles as it cools, and the inside is soft, airy, and perfect for slicing. The best part? You don’t need eggs, a mixer, or even kneading skills. This is truly the easiest bread recipe you’ll ever make.

If you’ve been buying bread every week, this simple homemade version might just change your routine forever. It requires only four basic ingredients, minimal effort, and delivers bakery-quality results every time.


Why You’ll Love This Recipe

  • No kneading required

  • No eggs

  • Only 4 simple pantry ingredients

  • Minimal hands-on time

  • Crispy crust with a soft, fluffy interior

  • Budget-friendly and preservative-free

This bread is perfect for sandwiches, toast, dipping in soup, or enjoying warm with butter and jam.


Ingredients

  • 3 cups all-purpose flour (or bread flour)

  • 1 ½ teaspoons salt

  • ½ teaspoon instant yeast (or active dry yeast)

  • 1 ½ cups warm water (not hot)

That’s it. No sugar, no oil, no eggs.


Step-by-Step Instructions

1. Mix the Dough

In a large mixing bowl, combine the flour, salt, and yeast. Stir gently to distribute everything evenly.

Slowly pour in the warm water while mixing with a spoon or spatula. The dough will look shaggy, sticky, and slightly messy — that’s completely normal. You do not need to knead it.

Once all the flour is incorporated, cover the bowl tightly with plastic wrap or a clean kitchen towel.


2. Let It Rise (The Magic Happens Here)

Leave the dough at room temperature for 8 to 12 hours, or overnight. During this time, the yeast works slowly, developing flavor and structure without kneading.

When ready, the dough should be bubbly, doubled in size, and soft.


3. Shape the Dough

Lightly flour your work surface. Gently scrape the dough out of the bowl. It will be sticky — sprinkle a little flour on top and fold it over itself a few times to form a rough ball.

Do not overwork it. The less you handle it, the better the texture will be.

Place the dough onto parchment paper and let it rest for about 30–45 minutes while you preheat the oven.


4. Preheat the Oven

Place a Dutch oven (or any heavy oven-safe pot with a lid) inside your oven. Preheat to 230°C (450°F) for at least 30 minutes.

A hot pot is essential for creating steam, which gives the bread its crispy crust.


5. Bake

Carefully remove the hot pot from the oven. Lift the dough using the parchment paper and place it inside the pot. Cover with the lid.

Bake covered for 30 minutes.
Then remove the lid and bake for another 10–15 minutes until the crust is deep golden brown.


6. Cool Before Slicing

Remove the bread and place it on a wire rack. Let it cool for at least 30 minutes before slicing. Cutting too early can make the inside gummy.


Tips for Perfect Bread

1. Use warm, not hot water.
Hot water can kill the yeast. Aim for slightly warm to the touch.

2. Be patient with rising time.
Long fermentation improves flavor and texture.

3. No Dutch oven?
You can bake on a tray, but place a small pan of water in the oven to create steam.

4. Want whole wheat?
Replace up to 1 cup of white flour with whole wheat flour.


Flavor Variations

Once you master the basic recipe, you can customize it:

  • Add 1 teaspoon dried rosemary or thyme

  • Mix in minced garlic

  • Add shredded cheese

  • Stir in seeds like sunflower, sesame, or flax

Keep additions minimal to maintain structure.


Storage

  • Store at room temperature in a paper bag or wrapped in a clean towel for up to 3 days.

  • Freeze slices in an airtight bag for up to 2 months.

Avoid storing in plastic at room temperature, as it softens the crust.


Why This Recipe Works

This bread uses a slow fermentation method. Even with a tiny amount of yeast, the long resting time allows gluten to develop naturally. That means no kneading is required.

The covered baking method traps steam, creating that classic artisan crust — crisp outside, airy inside.

It’s simple science, but the result feels magical.


Cost Comparison

Homemade bread is incredibly economical. With just flour, salt, yeast, and water, you can make a large loaf for a fraction of store-bought artisan bread prices. Plus, you control the ingredients — no preservatives or additives.


Perfect Pairings

This bread is delicious with:

  • Butter and honey

  • Homemade jam

  • Olive oil and balsamic vinegar

  • Soup or stew

  • Toasted with avocado

  • Grilled into sandwiches


Final Thoughts

Once you try this recipe, you may never buy bread again. It’s beginner-friendly, forgiving, and delivers professional-looking results with almost no effort.

The crust is beautifully golden and crisp. The inside is soft, airy, and slightly chewy. Every slice feels fresh, wholesome, and made with care.

All it takes is a few minutes of mixing, some patience while it rises, and a hot oven. No kneading. No eggs. No complicated techniques.

Just simple, honest bread made at home.

If you’ve been hesitant to bake bread, this is your sign to start. Your kitchen will smell incredible, and your table will always have something warm and comforting on it.

Slow Cooker 5-Ingredient Beef Stew

There’s nothing more comforting than a warm, hearty bowl of beef stew simmered slowly until tender and rich. This Slow Cooker 5-Ingredient Beef Stew is the ultimate easy family dinner — minimal prep, simple ingredients, and maximum flavor. It’s perfect for busy weekdays when you want something homemade without spending hours in the kitchen. Just toss everything into the slow cooker, let it work its magic, and come home to a meal that tastes like it’s been lovingly tended all day.

This recipe proves that you don’t need a long list of ingredients to create deep, satisfying flavor. With just five main components, you’ll get fork-tender beef, perfectly cooked vegetables, and a savory broth that warms you from the inside out.

Why You’ll Love This Recipe

  • Only 5 main ingredients

  • Minimal prep time (10–15 minutes)

  • Budget-friendly

  • Family-approved comfort food

  • Perfect for meal prep and leftovers

The slow cooking process allows the beef to become incredibly tender while the vegetables absorb all the rich flavors of the broth. It’s simple, wholesome, and satisfying.

Ingredients (Serves 6)

  1. 2 pounds beef stew meat (chuck roast, cut into chunks)

  2. 4 medium potatoes, peeled and diced

  3. 3 carrots, sliced

  4. 1 packet onion soup mix

  5. 4 cups beef broth

Optional (not counted in the 5 ingredients):
Salt and pepper to taste

Instructions

Step 1: Prepare the Ingredients

Cut the beef into bite-sized chunks if not already prepared. Peel and dice the potatoes into evenly sized pieces so they cook evenly. Slice the carrots into thick rounds.

Step 2: Layer in the Slow Cooker

Place the beef stew meat at the bottom of the slow cooker. Add the potatoes and carrots on top.

Step 3: Add Flavor

Sprinkle the onion soup mix evenly over the ingredients. Pour the beef broth over everything, ensuring the meat and vegetables are mostly submerged.

Step 4: Slow Cook

Cover and cook on:

  • Low for 8 hours (recommended for best tenderness)
    OR

  • High for 4–5 hours

Avoid lifting the lid during cooking, as this releases heat and extends cooking time.

Step 5: Serve

Once done, stir gently. Taste and adjust seasoning with salt and pepper if needed. Serve hot with crusty bread or over rice.

Tips for the Best Beef Stew

Choose the Right Cut:
Chuck roast works best because it becomes tender and flavorful during slow cooking.

Don’t Skip the Layering:
Keeping the beef at the bottom allows it to cook evenly and soak up flavor.

Want a Thicker Stew?
If you prefer a thicker consistency, mix 1 tablespoon cornstarch with 2 tablespoons cold water and stir it in during the last 30 minutes of cooking.

Add Extra Flavor (Optional):
Though this is a 5-ingredient recipe, you can enhance it with garlic, thyme, or a splash of Worcestershire sauce.

Storage & Reheating

Refrigerator: Store leftovers in an airtight container for up to 4 days.
Freezer: Freeze for up to 3 months.
Reheating: Warm on the stovetop over medium heat or microwave in 1-minute intervals until heated through.

This stew actually tastes even better the next day as the flavors continue to develop.

Why Slow Cooking Makes a Difference

Slow cooking allows connective tissues in tougher cuts of beef to break down gradually. This creates that melt-in-your-mouth texture that makes stew so comforting. The long, gentle heat also allows the vegetables to absorb the rich, savory broth.

Unlike stovetop stews that require constant monitoring, this recipe is truly hands-off. It’s ideal for working parents, busy schedules, or anyone who simply wants dinner ready without stress.

Perfect Pairings

  • Fresh baked bread

  • Buttery dinner rolls

  • Steamed white rice

  • Simple green salad

Final Thoughts

This Slow Cooker 5-Ingredient Beef Stew is proof that simple food can still be deeply satisfying. It’s hearty enough for cold winter nights yet easy enough to make year-round. With just a handful of pantry staples and minimal effort, you can create a comforting, filling meal your entire family will request again and again.

Cooked this salmon and weird white stuff exploded out of it

When you cook salmon and see a strange white substance bubbling or “exploding” out of the flesh, don’t panic. It’s completely normal, and it happens to home cooks all the time. That white stuff is called albumin — a protein naturally found in salmon. As the fish cooks, the muscle fibers contract and squeeze out moisture along with dissolved proteins. When that protein hits the heat, it coagulates and turns white.

If you’ve ever cooked eggs and watched the clear whites turn opaque, you’ve seen the same process at work. Salmon simply releases albumin more visibly, especially when cooked at high temperatures.

Let’s break down why it happens and then I’ll share a foolproof, tender baked salmon recipe that helps minimize that white protein.

Why Does the White Stuff Come Out?

Salmon contains liquid protein (albumin) inside its muscle tissue. When exposed to heat:

• The muscle fibers tighten
• Moisture is pushed to the surface
• Albumin solidifies and turns white

This happens more when:
• The salmon is overcooked
• The heat is too high
• The fish wasn’t rested at room temperature before cooking

It’s totally safe to eat — just not the prettiest thing on your plate.

How to Prevent Excess Albumin

  1. Cook at Lower Temperatures
    Gentle heat keeps proteins from contracting too quickly.

  2. Brine the Salmon
    A quick salt brine (10 minutes in salted water) helps the fish retain moisture.

  3. Don’t Overcook
    Salmon is done at 125–130°F (52–54°C) for medium and will continue cooking slightly after removal from heat.

  4. Let It Rest
    Take salmon out of the fridge 15–20 minutes before cooking.

Now let’s make perfectly tender baked salmon that stays juicy and minimizes that white protein.

Perfect Juicy Baked Salmon Recipe

This simple method delivers moist, flaky salmon every time.

Ingredients:

• 4 salmon fillets (about 6 ounces each)
• 1 tablespoon olive oil
• 2 tablespoons melted butter
• 3 cloves garlic, minced
• Juice of 1 lemon
• Salt and black pepper to taste
• Fresh parsley, chopped (optional)

Optional quick brine (recommended):
• 4 cups water
• 4 tablespoons salt

Instructions:

Step 1: Optional Brine
Stir salt into water until dissolved. Submerge salmon for 10 minutes. Remove and pat completely dry.

Step 2: Preheat Oven
Preheat oven to 275°F (135°C). Low and slow is key for tender salmon.

Step 3: Season
Place salmon on a lined baking sheet. Brush with olive oil and melted butter. Sprinkle with salt and pepper. Mix garlic and lemon juice and spoon over the top.

Step 4: Bake Gently
Bake for 15–20 minutes depending on thickness. Salmon should be slightly translucent in the center and flake easily with a fork.

Step 5: Rest
Let it rest 5 minutes before serving. Garnish with parsley and extra lemon if desired.

Internal Temperature Guide:

Rare: 120°F
Medium: 125–130°F
Well Done: 140°F (more albumin likely)

Pro Tip: If you see a small amount of white protein forming on the surface, you can gently blot it with a paper towel before serving.

Flavor Variations

Honey Garlic Glaze:
Add 1 tablespoon honey and 1 teaspoon soy sauce to the butter mixture.

Spicy Cajun Style:
Rub with Cajun seasoning and a drizzle of melted butter.

Herb Crusted:
Top with a mix of breadcrumbs, parmesan, and chopped herbs before baking.

Is It Safe to Eat?

Yes — albumin is completely safe. It’s just cooked protein. Many chefs simply wipe it away for presentation purposes.

Final Thoughts

Seeing white stuff “explode” out of your salmon can look alarming, but it’s actually a sign the fish is cooking. The key is temperature control. Lower heat equals juicier salmon and less visible albumin.

Since you enjoy flavorful, satisfying dishes like garlic butter shrimp and steak skillet meals, this gentle baked salmon method will fit right into your rotation — rich, buttery, and perfectly tender without that dramatic white eruption.

Old Doctors Warn: Even 2 Dates a Day Can Trigger an Irreversible Body Reaction

For centuries, dates have been considered one of the most nourishing natural foods on earth. From the deserts of the Middle East to South Asia, they have symbolized vitality, endurance, and healing. In many traditional systems of medicine, including practices referenced by scholars like Ibn Sina, dates were praised for their strengthening properties.

But recently, sensational headlines have claimed: “Even 2 dates a day can trigger an irreversible body reaction.”

Is that true? Let’s explore the science calmly and responsibly — and then I’ll share a safe, balanced recipe you can enjoy without worry.

What Happens When You Eat Dates?

Dates are naturally rich in:

  • Natural sugars (glucose, fructose)

  • Fiber

  • Potassium

  • Magnesium

  • Antioxidants

Two medium dates contain around 30–35 grams of carbohydrates, mostly natural sugar. For healthy individuals, this amount is generally safe and provides quick energy.

The “Irreversible Reaction” Claim

There is no scientific evidence that eating two dates per day causes an irreversible body reaction in healthy individuals.

However, there are situations where caution is important:

1. Blood Sugar Spikes

Dates have a moderate to high glycemic impact depending on variety. People with diabetes or insulin resistance may experience a rise in blood sugar.

This is not “irreversible,” but repeated uncontrolled spikes over time may contribute to metabolic problems.

2. Weight Gain (If Overconsumed)

Because they are calorie-dense, excessive intake can contribute to weight gain.

Two dates? Usually harmless.
Ten to fifteen daily without balancing calories? That may be problematic.

3. Digestive Sensitivity

Some people experience bloating if they are sensitive to high-fiber or high-fructose foods.

Again, this is temporary — not irreversible.

When Dates Are Actually Beneficial

Research consistently shows moderate date consumption may:

  • Support digestive health due to fiber

  • Provide antioxidants that reduce oxidative stress

  • Support heart health through potassium

  • Provide natural energy without processed sugar

In many cultures, dates are traditionally eaten during Ramadan to gently restore blood sugar after fasting — and have been for centuries without evidence of dangerous effects.

The Safe Way to Eat Dates: Balance Is Everything

If you enjoy sweet flavors (and based on your interest in desserts like lemon velvet cake and banana pudding cheesecake, I know you appreciate natural sweetness 😉), dates can be used in a smarter way — paired with protein and healthy fats to reduce sugar spikes.

Here’s a balanced recipe you’ll love.

Creamy Walnut-Stuffed Dates with Yogurt Drizzle

Why This Recipe Works

Pairing dates with protein (yogurt) and healthy fat (walnuts) slows sugar absorption and prevents sharp blood glucose spikes.

Ingredients

  • 8 large Medjool dates (pitted)

  • ½ cup Greek yogurt (unsweetened)

  • ¼ cup crushed walnuts

  • 1 tablespoon chia seeds

  • ½ teaspoon cinnamon

  • 1 teaspoon honey (optional)

  • Pinch of sea salt

Instructions

Step 1: Prepare the Dates

Slice each date lengthwise and remove the pit.

Step 2: Add the Filling

Mix crushed walnuts with a pinch of cinnamon and stuff each date generously.

Step 3: Yogurt Drizzle

In a small bowl, combine Greek yogurt, chia seeds, and honey (if using). Stir well.

Step 4: Assemble

Place stuffed dates on a plate and drizzle yogurt mixture over the top.

Step 5: Chill (Optional)

Refrigerate for 20 minutes for a firmer texture.

Nutritional Balance

Each serving (2 stuffed dates) contains:

  • Fiber

  • Protein

  • Healthy fats

  • Controlled sugar release

This prevents the rapid glucose spike people fear.

Who Should Limit Dates?

You may want to monitor intake if you:

  • Have diabetes

  • Are on a low-carb diet

  • Have fructose intolerance

  • Are managing weight loss strictly

If you are diabetic, pair dates with protein and monitor your blood sugar response individually.

The Real “Irreversible Reaction”

Here’s the honest truth:

The only irreversible reaction that happens from eating two dates daily is forming a habit of enjoying natural sweetness instead of processed sugar.

When consumed in moderation, dates are not dangerous. Fear-based nutrition headlines often exaggerate small metabolic responses.

The real risk comes from:

  • Ultra-processed foods

  • Chronic overeating

  • Sedentary lifestyle

  • Excess refined sugar

Not from two whole dates.

Final Thoughts

Old traditional physicians valued balance — not fear. Even historical scholars like Ibn Sina emphasized moderation in all foods.

3 apples, 3 eggs, a glass of milk and it melts in your mouth!

If you love soft, comforting desserts like your classic butter cakes and cheesecakes, this simple apple cake will become one of your favorites. With just 3 apples, 3 eggs, and a glass of milk, you can create a light, fluffy, melt-in-your-mouth cake that tastes like it came straight from a cozy bakery. It’s easy, budget-friendly, and perfect for breakfast, tea time, or dessert.

This recipe is beautifully simple but delivers incredible flavor. The apples add natural sweetness and moisture, the eggs provide structure and richness, and the milk keeps everything soft and tender. Let’s make it step by step.

Why This Recipe Works

This cake is all about balance:

  • Apples keep the cake moist and naturally sweet.

  • Eggs create a soft, airy structure.

  • Milk ensures a tender crumb.

  • A small amount of sugar enhances the apple flavor without overpowering it.

The result? A cake so soft and delicate, it literally melts in your mouth.

Ingredients

  • 3 medium apples (peeled and thinly sliced)

  • 3 large eggs (room temperature)

  • 1 cup granulated sugar

  • 1 glass milk (about 240 ml / 1 cup)

  • ½ cup vegetable oil or melted butter

  • 2 cups all-purpose flour

  • 1 tablespoon baking powder

  • 1 teaspoon vanilla extract

  • ½ teaspoon cinnamon (optional but recommended)

  • Pinch of salt

  • Powdered sugar for dusting (optional)

Step-by-Step Instructions

Step 1: Prepare the Apples

Peel and core the apples. Slice them thinly so they soften beautifully while baking. If you like extra flavor, toss them gently with cinnamon and a tablespoon of sugar. Set aside.

Step 2: Prepare the Batter

In a large mixing bowl, crack the 3 eggs. Add the sugar and whisk for 3–4 minutes until the mixture becomes pale and slightly fluffy. This step helps create a light texture.

Add the milk, oil (or melted butter), and vanilla extract. Mix until smooth and well combined.

Step 3: Add Dry Ingredients

In a separate bowl, sift together flour, baking powder, salt, and cinnamon. Gradually add the dry ingredients to the wet mixture. Stir gently until just combined. Do not overmix; this keeps the cake soft.

Step 4: Fold in Apples

Gently fold the sliced apples into the batter. Make sure they are evenly distributed.

Step 5: Bake

Preheat your oven to 350°F (180°C). Grease and line a 9-inch baking pan with parchment paper.

Pour the batter into the pan and smooth the top. Bake for 40–50 minutes or until a toothpick inserted into the center comes out clean.

Step 6: Cool and Serve

Allow the cake to cool for 10–15 minutes before removing from the pan. Dust with powdered sugar before serving.

Texture and Flavor

This cake is incredibly moist thanks to the apples and milk. The top becomes slightly golden and delicate, while the inside remains soft and tender. The aroma while baking is warm, sweet, and comforting.

Each bite is light yet rich — not overly sweet, just perfectly balanced.

Tips for the Perfect Melt-in-Your-Mouth Cake

  • Use sweet apples like Fuji or Gala for the best flavor.

  • Beat the eggs and sugar well for extra fluffiness.

  • Don’t overbake; check at 40 minutes.

  • Let it rest before slicing so it holds its shape beautifully.

Delicious Variations

If you enjoy experimenting (like with your cheesecake and butter cake recipes), try these ideas:

1. Apple Custard Twist

Pour half the batter, add a thin layer of vanilla custard, then top with remaining batter before baking.

2. Nutty Apple Cake

Add ½ cup chopped walnuts or almonds for crunch.

3. Caramel Apple Version

Drizzle caramel sauce over the top before serving.

4. Raisin & Cinnamon Style

Mix in a handful of raisins for extra sweetness.

Serving Suggestions

  • Serve warm with a scoop of vanilla ice cream.

  • Pair with tea or coffee for breakfast.

  • Add a dollop of whipped cream for dessert.

  • Enjoy chilled the next day — it becomes even more flavorful!

Storage Tips

  • Store at room temperature for up to 2 days in an airtight container.

  • Refrigerate for up to 5 days.

  • Freeze slices individually for up to 2 months.

Nutritional Benefits

  • Apples provide fiber and antioxidants.

  • Eggs supply protein and richness.

  • Milk adds calcium and softness.

  • Moderate sugar keeps it balanced.

Final Thoughts

Sometimes the simplest recipes are the most magical. With just 3 apples, 3 eggs, and a glass of milk, you can create a dessert that feels special yet comforting. It’s soft, moist, and beautifully tender — the kind of cake that brings everyone back for seconds.

Thanks to this trick your house will never stop smelling: 2 ingredients are enough

If you love a home that smells warm, welcoming, and comforting all day long, this simple two-ingredient trick will completely change the atmosphere in your space. Just like baking a fresh batch of Amish White Bread or simmering a pot of homemade apple butter, this natural scent method fills your home with a cozy aroma that feels inviting and clean. The best part? You only need two basic ingredients, and you probably already have them in your kitchen.

This old-fashioned stovetop fragrance trick has been used for generations. It’s natural, affordable, and free from the artificial chemicals found in many commercial air fresheners. Once you try it, you may never go back to store-bought sprays again.

Let’s dive into this simple yet powerful home fragrance recipe.

Why This Trick Works

When gently heated, natural ingredients release essential oils into the air. Steam carries those aromatic compounds throughout your home, creating a long-lasting, comforting scent. Unlike plug-ins or sprays, this method smells soft and natural, never overpowering.

It’s especially perfect during cooler months when windows are closed and indoor air can feel stale. But honestly, it works beautifully year-round.

The Two Magic Ingredients

  1. Cinnamon Sticks

  2. Whole Cloves

That’s it. Just two pantry staples create a warm, slightly sweet, and spicy aroma that makes your house smell like a bakery and a holiday market combined.

Cinnamon provides warmth and sweetness, while cloves add depth and a slightly spicy, rich undertone. Together, they create a scent that feels clean, comforting, and luxurious.

Ingredients

• 3–4 cinnamon sticks
• 1 tablespoon whole cloves
• 4–5 cups water

Optional additions (if you want to customize the scent later): orange slices, lemon peel, vanilla extract, or star anise.

Instructions

Step 1: Prepare the Pot
Fill a small saucepan with 4–5 cups of water.

Step 2: Add the Ingredients
Add the cinnamon sticks and whole cloves directly into the water.

Step 3: Bring to a Gentle Boil
Place the pot on the stove and bring it to a light boil.

Step 4: Reduce to Simmer
Once boiling, reduce the heat to low and let it gently simmer. Within minutes, your home will begin to fill with a warm, inviting fragrance.

Step 5: Monitor the Water
Check the pot occasionally and add more water as needed. Never let it boil dry.

How Long Does It Last?

You can let this simmer for several hours as long as you keep an eye on the water level. Many people refresh the water and reuse the same cinnamon sticks and cloves throughout the day.

For even stronger fragrance, lightly crush the cloves before adding them. This releases more of their natural oils.

Why This Is Better Than Store-Bought Air Fresheners

Many commercial air fresheners contain synthetic fragrances and chemicals that may trigger headaches or allergies. This natural method is:

• Budget-friendly
• Chemical-free
• Safe for most households
• Customizable
• Warm and authentic-smelling

It creates the kind of scent that reminds people of comfort food, baking days, and cozy evenings.

Extra Tip: Slow Cooker Version

If you don’t want to use your stovetop, simply add the ingredients to a small slow cooker. Set it on low and let it gently warm all day. This method is perfect when hosting guests or during holidays.

Seasonal Variations

Fall & Winter Blend
Add orange slices and a splash of vanilla extract for a festive scent.

Spring Fresh Version
Swap cloves for fresh lemon peel to create a brighter aroma.

Holiday Special
Add star anise and a small piece of fresh ginger for a deeper, spiced fragrance.

This method pairs beautifully with baking desserts like apple cake, cinnamon rolls, or even classic butter cake. If you already enjoy filling your home with the smell of fresh bread or homemade cheesecake, this trick will enhance that cozy feeling even more.

Is It Safe?

Yes, as long as you never leave it unattended for long periods and always monitor the water level. Treat it like cooking on the stove. If you prefer extra safety, use a slow cooker.

How Often Can You Use It?

As often as you like! Many people use this trick daily, especially during cooler months. It’s also perfect before guests arrive. Start simmering about 30 minutes before company comes over and your home will smell incredibly welcoming.

Final Thoughts

Sometimes the simplest tricks are the most powerful. With just cinnamon sticks and whole cloves, you can transform your home into a warm, inviting sanctuary. It costs almost nothing, takes only minutes to prepare, and delivers hours of beautiful fragrance.