Creamy Beef and Shells

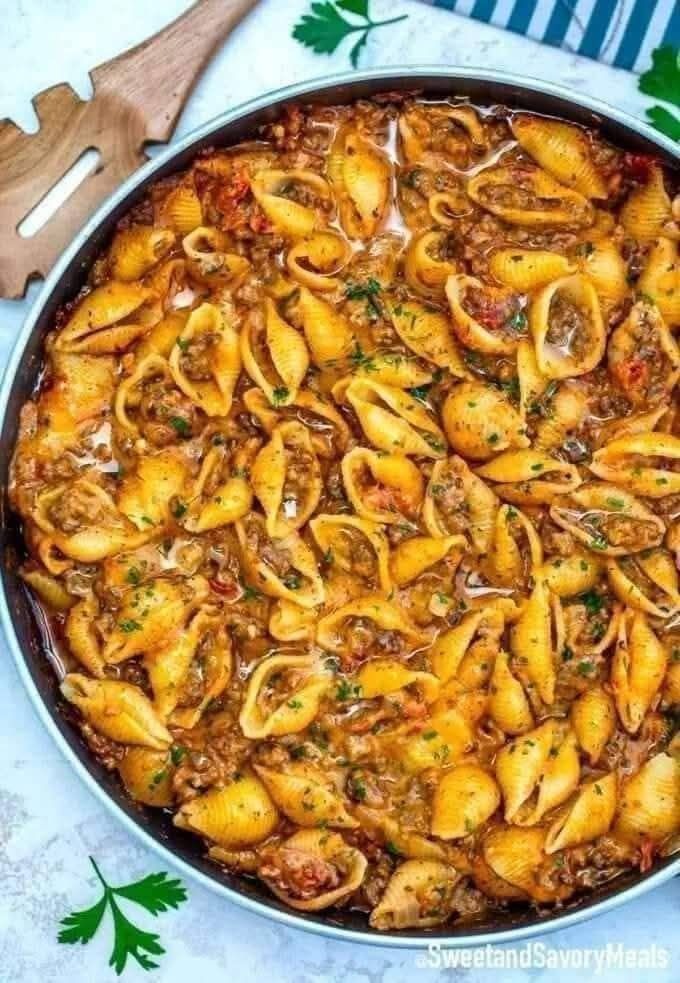
Creamy Beef and Shells is a soul-warming, family-style dish that brings together tender pasta shells, juicy ground beef, and a velvety, cheesy cream sauce. This recipe is perfect for weeknight dinners when you want something quick, hearty, and irresistibly comforting. Every bite is loaded with rich flavor and satisfying texture — the creaminess of the sauce perfectly coats the pasta, while the beef adds savory depth that will make everyone come back for seconds.

Ingredients

For the Pasta and Beef Mixture:

  • 1 lb (450 g) medium pasta shells

  • 1 lb (450 g) ground beef (80/20 for rich flavor)

  • 1 tablespoon olive oil

  • 1 small onion, finely chopped

  • 3 cloves garlic, minced

  • 1 teaspoon smoked paprika

  • ½ teaspoon crushed red pepper flakes (optional for a kick)

  • Salt and black pepper to taste

For the Creamy Sauce:

  • 2 tablespoons unsalted butter

  • 2 tablespoons all-purpose flour

  • 2 cups beef broth

  • 1 cup heavy cream (or half-and-half for lighter texture)

  • 1 teaspoon Italian seasoning

  • ½ teaspoon dried basil

  • ½ teaspoon mustard powder (adds subtle tang)

  • 1 ½ cups shredded cheddar cheese

  • ½ cup grated Parmesan cheese

  • Fresh parsley, chopped for garnish

Step-by-Step Instructions

1. Cook the Pasta

Start by boiling a large pot of salted water. Add the medium pasta shells and cook them according to package directions, but aim for al dente — tender yet slightly firm. Drain and set aside, tossing lightly with a drizzle of olive oil to prevent sticking.

2. Brown the Beef

In a deep skillet or large sauté pan, heat olive oil over medium-high heat. Add the ground beef and cook, breaking it apart with a wooden spoon until browned and no longer pink, about 5–7 minutes. Season lightly with salt and pepper during cooking. Once done, transfer the beef to a plate and drain excess fat, leaving about a tablespoon in the pan for flavor.

3. Sauté the Aromatics

In the same skillet, add the chopped onion. Sauté for 3–4 minutes until translucent and fragrant. Add the minced garlic, paprika, and red pepper flakes, stirring constantly for about 30 seconds until the garlic releases its aroma. This step builds the foundation of deep, savory flavor that makes the dish shine.

4. Make the Roux

Add the butter to the pan and let it melt into the aromatics. Sprinkle in the flour and stir continuously for about 1 minute to form a roux — this mixture will help thicken the sauce. The key here is to cook the flour long enough to remove its raw taste without burning it.

5. Build the Sauce

Gradually whisk in the beef broth, ensuring there are no lumps. Let the mixture simmer gently for about 2 minutes until it starts to thicken. Then pour in the heavy cream, Italian seasoning, basil, and mustard powder. Stir and bring the sauce to a smooth consistency.

6. Add the Cheese

Lower the heat and stir in the shredded cheddar and Parmesan cheeses. Continue stirring until the cheeses melt completely, creating a rich, velvety sauce. Taste and adjust the seasoning with salt and pepper.

7. Combine Everything

Return the cooked beef to the pan and mix it well with the sauce. Add the drained pasta shells and stir gently until every shell is generously coated in creamy, cheesy goodness. Allow it to simmer together for another 3–5 minutes so the flavors can fully meld.

8. Garnish and Serve

Turn off the heat and let the dish rest for a couple of minutes to thicken slightly. Garnish with chopped parsley and an extra sprinkle of Parmesan before serving.

Tips for the Best Creamy Beef and Shells

  • Choose the right beef: Use 80/20 ground beef for a richer, juicier flavor. Lean beef can make the dish drier.

  • Don’t overcook the pasta: The shells continue cooking slightly when mixed with the hot sauce, so aim for al dente.

  • Cheese matters: Freshly shredded cheese melts more smoothly and prevents the sauce from becoming grainy.

  • Customize the spice level: Adjust paprika and red pepper flakes based on your heat preference.

  • Make it ahead: This dish reheats beautifully — perfect for meal prep or next-day leftovers.

Serving Suggestions

Creamy Beef and Shells is a complete meal on its own, but it pairs beautifully with a few sides:

  • Garlic Bread: The buttery crunch complements the creamy texture perfectly.

  • Simple Green Salad: A light vinaigrette helps balance the richness of the sauce.

  • Steamed Broccoli or Green Beans: Adds a refreshing crunch and color contrast.

You can also sprinkle crushed crackers or breadcrumbs on top and bake it for 10 minutes to create a golden crust — turning it into a baked pasta casserole version.

Why This Recipe Works

What makes this Creamy Beef and Shells recipe unique is its balance — the combination of classic comfort food elements with refined flavors. The smoky paprika and mustard powder add layers of depth that elevate it beyond a basic pasta dish. The creamy sauce is thick enough to cling to each shell, ensuring every bite carries the perfect amount of flavor. It’s hearty but not heavy, and comforting without being overly rich.

Unlike jarred sauces or boxed pasta meals, this homemade version delivers freshness in every component — from the fragrant garlic and onion base to the melt-in-your-mouth cheese sauce that doesn’t rely on shortcuts. It’s a dish that tastes like it’s been simmering for hours, yet it comes together in under 40 minutes.

Storage and Reheating

  • Refrigerate: Store leftovers in an airtight container for up to 3 days.

  • Freeze: Freeze portions for up to 2 months. Thaw overnight in the refrigerator before reheating.

  • Reheat: Warm on the stove over low heat with a splash of milk or cream to restore creaminess.

Final Thoughts

Creamy Beef and Shells is the ultimate comfort meal — warm, flavorful, and deeply satisfying. It captures everything we love about home cooking: simplicity, heartiness, and the kind of flavor that fills the kitchen with a mouthwatering aroma. Whether you’re feeding a crowd, prepping for the week, or simply craving something indulgent, this dish delivers every time.

Crispy Roasted Cauliflower Recipe

Cauliflower is one of those vegetables that can completely transform with a little heat, oil, and the right seasoning. When roasted to golden perfection, its edges turn irresistibly crispy while the inside remains tender and flavorful. This Crispy Roasted Cauliflower recipe brings out the best of this humble cruciferous vegetable, turning it into a dish worthy of any dinner table — whether as a side, snack, or even a main course for plant-based eaters. The secret lies in the perfect balance of heat, spices, and texture.

Ingredients

  • 1 large head of cauliflower, cut into florets

  • 3 tablespoons olive oil (or avocado oil for extra crispness)

  • 1 teaspoon smoked paprika

  • 1 teaspoon garlic powder

  • ½ teaspoon onion powder

  • ½ teaspoon ground cumin

  • ½ teaspoon turmeric (optional, for color and warmth)

  • ½ teaspoon black pepper

  • ¾ teaspoon sea salt (or to taste)

  • 2 tablespoons grated Parmesan cheese (optional, for extra crunch)

  • Fresh parsley or cilantro, chopped (for garnish)

  • Lemon wedges, for serving

Instructions

Step 1: Prepare the Cauliflower

Start by preheating your oven to 425°F (220°C) — a high roasting temperature ensures a crispy finish. Line a large baking sheet with parchment paper or lightly grease it with oil.

Wash the cauliflower head and pat it completely dry. Moisture is the enemy of crispiness, so make sure there’s no water left on the florets. Cut the cauliflower into evenly sized florets to ensure they roast uniformly.

Step 2: Season Generously

In a large mixing bowl, combine the olive oil, smoked paprika, garlic powder, onion powder, cumin, turmeric, salt, and pepper. Add the cauliflower florets to the bowl and toss thoroughly to coat every piece.

If you like a cheesy, savory note, sprinkle in the Parmesan cheese at this stage. It will melt and crisp up beautifully in the oven, adding an umami crunch to each bite.

Step 3: Arrange for Maximum Crispiness

Spread the seasoned cauliflower out in a single layer on the baking sheet. Make sure the florets aren’t crowded — if they touch too closely, they’ll steam instead of roast. For the crispiest results, place the flat sides of the florets down against the hot pan surface.

If you’re making a large batch, use two baking sheets and rotate them halfway through roasting.

Step 4: Roast to Perfection

Place the baking sheet in the preheated oven and roast for 25–30 minutes, flipping the florets halfway through. You’ll know they’re done when the edges are dark golden brown and crisp, and the centers are tender when pierced with a fork.

For extra crunch, switch the oven to broil for the last 2–3 minutes, keeping a close eye to prevent burning.

Step 5: Garnish and Serve

Once roasted, transfer the crispy cauliflower to a serving dish. Garnish with freshly chopped parsley or cilantro and a light squeeze of lemon juice. The citrus adds brightness and balances the richness of the roasted flavors.

Serve immediately while warm and crispy — the texture and flavor are at their peak straight from the oven.

Tips for Perfect Crispiness

  1. Dry the Cauliflower Thoroughly: After washing, use paper towels to remove excess water. Even a small amount of moisture can cause sogginess.

  2. Use High Heat: Roasting at 425°F gives you a golden, crisp exterior. Lower temperatures will make the cauliflower soft instead of crunchy.

  3. Don’t Overcrowd the Pan: Give the florets space to breathe. Air circulation is key to caramelization.

  4. Try Cornstarch or Parmesan: A light dusting of cornstarch before roasting can add an extra layer of crispness. Parmesan cheese works the same magic with added flavor.

  5. Toss Midway: Flipping halfway through roasting ensures even browning on all sides.

Flavor Variations

This crispy roasted cauliflower is incredibly versatile. Once you master the base, you can transform it into dozens of flavor combinations:

  • Spicy Buffalo Cauliflower: Toss the roasted florets in buffalo sauce and serve with ranch or blue cheese dip.

  • Garlic Parmesan: Add extra minced garlic and double the Parmesan for a rich, cheesy coating.

  • Curry Cauliflower: Mix curry powder and a touch of cayenne for a bold, aromatic twist.

  • Asian-Inspired: Drizzle with soy sauce, sesame oil, and a sprinkle of sesame seeds after roasting.

  • Lemon Herb: Combine lemon zest, thyme, and rosemary for a fresh Mediterranean flavor.

Serving Ideas

  • As a Side Dish: Perfect alongside grilled chicken, steak, or fish.

  • In Bowls: Add to rice or quinoa bowls with chickpeas, greens, and tahini dressing.

  • As a Snack: Enjoy plain or dipped in aioli, garlic yogurt, or spicy ketchup.

  • In Tacos or Wraps: Substitute it for meat in tacos or pita wraps with slaw and avocado.

Why This Recipe Works

Roasting cauliflower transforms it from a bland, pale vegetable into a nutty, caramelized treat. The high heat creates the Maillard reaction — the process that browns the natural sugars and proteins, giving that irresistible crispy texture and depth of flavor. Olive oil coats each floret, helping the spices adhere while promoting even browning. The blend of smoked paprika, garlic, and cumin adds a smoky warmth that perfectly complements the cauliflower’s mild taste.

Unlike frying, roasting doesn’t require heavy oil or batter, making it a healthier yet equally satisfying option. It’s also a fantastic way to encourage picky eaters or kids to fall in love with vegetables — one crispy bite at a time.

Storage and Reheating

If you happen to have leftovers (which is rare!), store them in an airtight container in the refrigerator for up to 3 days. To bring back the crispiness, reheat in a 400°F oven for 5–7 minutes or in an air fryer for 3–4 minutes. Avoid microwaving, as it will soften the texture.

Conclusion

This Crispy Roasted Cauliflower recipe proves that vegetables can be every bit as satisfying as your favorite comfort food. With its golden edges, bold spices, and tender interior, it’s a dish that celebrates simplicity and flavor. Whether you serve it as a healthy snack, a flavorful side, or the star of a vegetarian meal, this recipe will quickly become a household favorite. One bite and you’ll see — cauliflower has never tasted so good.

Lemon Butter Pan-Seared Cod Recipe

There’s something effortlessly elegant about a perfectly pan-seared piece of fish. The golden crust, the tender flake, and the bright pop of lemony butter sauce—each bite feels like dining at a fine coastal restaurant. This Lemon Butter Pan-Seared Cod recipe brings that luxury right to your kitchen, with minimal effort and maximum flavor. Whether you’re preparing a weeknight dinner or impressing guests, this dish balances simplicity and sophistication beautifully.

Why You’ll Love This Recipe

Cod is a mild, flaky white fish that absorbs flavor like a sponge, making it the perfect canvas for lemon and butter. The quick pan-searing method ensures a crispy, caramelized exterior while keeping the inside moist and delicate. Combined with a silky lemon butter sauce and a touch of garlic, this recipe delivers a restaurant-quality meal in under 30 minutes.

Ingredients

For the Cod:

  • 4 cod fillets (about 6 oz each), skinless and boneless

  • 2 tablespoons olive oil

  • 2 tablespoons unsalted butter

  • Salt and black pepper, to taste

  • ½ teaspoon paprika (optional, for color)

For the Lemon Butter Sauce:

  • 3 tablespoons unsalted butter

  • 3 cloves garlic, minced

  • Juice of 1 large lemon (about 3 tablespoons)

  • 1 teaspoon lemon zest

  • ¼ cup chicken or vegetable broth (or dry white wine)

  • 2 tablespoons chopped fresh parsley

  • Lemon slices, for garnish

Instructions

1. Prepare the Cod

Pat the cod fillets dry with paper towels—this step is crucial for achieving that perfect golden crust. Season both sides generously with salt, pepper, and a light dusting of paprika. The seasoning not only enhances flavor but also gives the fish a beautiful golden hue once seared.

2. Sear the Cod

In a large skillet (preferably nonstick or stainless steel), heat olive oil and 2 tablespoons of butter over medium-high heat. Once the butter starts foaming, carefully lay the cod fillets in the pan. Avoid crowding them—cook in batches if needed.

Let the cod sear undisturbed for 3–4 minutes, until the edges start turning opaque and the underside forms a crisp golden crust. Gently flip the fillets using a thin spatula and cook for another 2–3 minutes on the other side, or until the fish flakes easily with a fork. Remove the fillets from the pan and set aside on a plate, tented loosely with foil.

3. Make the Lemon Butter Sauce

In the same skillet, reduce heat to medium and add 3 tablespoons of butter. Once melted, add the minced garlic and sauté for 30 seconds until fragrant. Pour in the chicken broth (or wine) and deglaze the pan, scraping up any browned bits from the bottom—these little bits are packed with flavor.

Stir in the lemon juice and zest, allowing the sauce to simmer for 2 minutes until slightly thickened. Taste and adjust seasoning with salt and pepper as needed. Finally, stir in chopped parsley for a burst of color and freshness.

4. Combine and Serve

Return the seared cod fillets to the skillet, spooning the warm lemon butter sauce over the top to coat them evenly. Let them rest in the sauce for a minute so they absorb all that rich, citrusy flavor.

Transfer the cod to serving plates, drizzle with extra sauce, and garnish with fresh lemon slices and a sprinkle of parsley.

Serving Suggestions

This Lemon Butter Pan-Seared Cod pairs wonderfully with a range of sides. Try serving it with:

  • Garlic mashed potatoes or buttery rice pilaf for a comforting touch.

  • Steamed asparagus, green beans, or roasted broccoli for a light, fresh balance.

  • Couscous or quinoa salad for a Mediterranean-inspired twist.
    You can even spoon the sauce over pasta or zucchini noodles for a lemony seafood pasta dish.

  • Tips for Success

  1. Dry the Fish Well: Excess moisture prevents browning, so always pat the cod completely dry before seasoning.

  2. Use Medium-High Heat: This ensures a crisp crust without overcooking the interior.

  3. Don’t Overcrowd the Pan: Cook in batches if necessary to allow even searing.

  4. Handle with Care: Cod is a delicate fish, so flip it gently using a fish spatula.

  5. Use Fresh Lemon Juice: Bottled lemon juice lacks the bright acidity that makes this sauce shine.

Variations

  • Herb Butter Cod: Add thyme, dill, or tarragon to the sauce for a fresh herbal note.

  • Spicy Lemon Cod: Sprinkle crushed red pepper flakes into the sauce for a hint of heat.

  • Creamy Lemon Cod: Stir in a splash of heavy cream or a spoonful of Greek yogurt at the end for a silky, rich twist.

  • Garlic Parmesan Cod: Sprinkle grated Parmesan on top just before serving for extra flavor and texture.

Storage and Reheating

Store leftover cod in an airtight container in the refrigerator for up to 2 days. Reheat gently in a skillet over low heat with a splash of broth or water to keep it moist—avoid the microwave, which can make the fish rubbery. The lemon butter sauce can also be stored separately and reheated on the stove before serving.

Final Thoughts

This Lemon Butter Pan-Seared Cod is the perfect example of how simple ingredients can create extraordinary results. With golden, flaky fish bathed in a velvety, tangy sauce, every bite feels light yet deeply satisfying. It’s a dish that celebrates the balance of richness and freshness—the buttery comfort paired with the brightness of lemon. Whether you’re making it for a cozy dinner at home or a special occasion, this recipe will never fail to impress.

Gourmet Seafood Cassolette

A Seafood Cassolette is a French-inspired dish that transforms the treasures of the sea into a rich, creamy, and aromatic indulgence. Traditionally baked in small gratin dishes, this elegant meal is layered with tender seafood, bathed in a velvety wine-infused sauce, and topped with a golden crust of cheese or breadcrumbs. The word “cassolette” comes from “cassole,” meaning a small baking dish, and it perfectly captures the personal, comforting nature of this refined recipe. This gourmet version elevates simple seafood into a restaurant-worthy experience right in your kitchen.

Ingredients

For the seafood mix:

  • ½ lb (225 g) large shrimp, peeled and deveined

  • ½ lb (225 g) scallops, cleaned

  • ½ lb (225 g) firm white fish (such as cod or halibut), cubed

  • ½ lb (225 g) mussels or clams, cleaned and debearded

  • 2 tbsp butter

  • 1 tbsp olive oil

  • 2 cloves garlic, minced

  • 1 shallot, finely chopped

  • Salt and freshly ground black pepper, to taste

  • ¼ cup dry white wine

For the creamy sauce:

  • 3 tbsp unsalted butter

  • 3 tbsp all-purpose flour

  • 2 cups seafood stock (or fish broth)

  • ½ cup heavy cream

  • ½ cup dry white wine

  • 1 tsp Dijon mustard

  • ½ cup grated Gruyère or Parmesan cheese

  • 1 tbsp chopped fresh parsley

  • ½ tsp smoked paprika

  • A pinch of nutmeg

For the topping:

  • ¾ cup panko breadcrumbs

  • 2 tbsp melted butter

  • ¼ cup grated Parmesan cheese

  • Fresh herbs (parsley or chives) for garnish

Preparation Steps

1. Prepare the seafood base

Start by heating a large skillet over medium heat. Add 2 tablespoons of butter and 1 tablespoon of olive oil. Once the butter melts, sauté the chopped shallot and garlic until fragrant and translucent, about 2 minutes. Add the shrimp, scallops, and white fish, seasoning them lightly with salt and pepper. Cook for about 3–4 minutes, just until they begin to turn opaque. Pour in ¼ cup of white wine to deglaze the pan, scraping up the flavorful bits from the bottom. Add the mussels or clams, cover the skillet, and cook for 2–3 minutes until they open. Discard any that remain closed. Remove the seafood from the pan and set aside, reserving the liquid for later use.

2. Create the velvety sauce

In a medium saucepan, melt 3 tablespoons of butter over medium heat. Whisk in the flour to form a smooth roux, cooking it gently for about 2 minutes until it turns pale golden and nutty. Gradually whisk in the seafood stock and the reserved pan liquid, stirring constantly to prevent lumps. Add the wine, cream, and Dijon mustard, whisking until the sauce thickens to a luxurious, spoon-coating consistency. Season with salt, pepper, smoked paprika, and a pinch of nutmeg. Finally, stir in half of the grated Gruyère or Parmesan cheese until smooth and melted.

3. Combine seafood and sauce

Fold the cooked seafood gently into the sauce, ensuring each piece is well coated. Stir in the chopped parsley for a burst of freshness. Taste and adjust the seasoning—if you prefer a more robust flavor, a squeeze of lemon juice can add a subtle brightness that balances the richness of the cream and cheese.

4. Assemble the cassolette

Preheat your oven to 400°F (200°C). Lightly butter four to six small oven-safe ramekins or gratin dishes. Divide the seafood mixture evenly among them, filling each dish about three-quarters full.

In a small bowl, combine panko breadcrumbs, melted butter, and the remaining Parmesan cheese. Sprinkle this mixture generously over the top of each cassolette to create a crisp, golden crust.

5. Bake to perfection

Place the filled ramekins on a baking tray and bake for 12–15 minutes, or until the tops are bubbly and golden brown. If you want a deeper crust, switch the oven to broil mode for the last 2 minutes—watch closely to prevent burning.

6. Serve with flair

Remove the cassolettes from the oven and allow them to cool slightly before serving. Sprinkle with freshly chopped herbs and a light dusting of paprika for color. Serve warm with crusty baguette slices or buttery puff pastry twists to soak up the luscious sauce.

Tips for Perfection

  • Seafood balance: Aim for a mix of textures—shrimp and scallops for sweetness, firm fish for structure, and shellfish for depth.

  • Cheese choice: Gruyère offers a nutty richness, while Parmesan brings sharp umami flavor. You can even mix both for complexity.

  • Wine selection: A crisp, dry white wine like Sauvignon Blanc or Pinot Grigio complements the cream sauce beautifully.

  • Presentation: Serve each cassolette in its individual ramekin for an elegant, restaurant-style appearance.

Why This Recipe Works

The magic of a Gourmet Seafood Cassolette lies in its balance of flavors and textures. The seafood remains tender because it’s only lightly sautéed before being enveloped in a creamy, velvety sauce that infuses each bite with subtle layers of garlic, wine, and butter. The topping provides contrast—a crisp, golden crust that shatters delicately under the spoon, revealing the silky mixture beneath. Every mouthful feels luxurious, yet comforting—a marriage of French refinement and coastal simplicity.

Unlike many seafood bakes that rely heavily on cheese, this recipe keeps the focus on the natural sweetness of the ocean, enhanced rather than masked by the sauce. The Dijon mustard and wine lend acidity and brightness, while the nutmeg and paprika round out the creaminess with warmth and depth.

Serving Suggestions

Pair this dish with a side of buttered asparagus, garlic green beans, or a light mixed greens salad dressed in lemon vinaigrette. For drinks, a chilled glass of Chardonnay or Champagne makes a perfect match, highlighting the delicate richness of the seafood.

Final Thoughts

This Gourmet Seafood Cassolette is more than just a meal—it’s an experience. Each bite takes you on a journey to the French coast, where the air smells of salt and butter, and seafood is celebrated as art. Perfect for special occasions, date nights, or simply when you want to treat yourself to something extraordinary, this dish transforms your kitchen into a fine-dining haven. Whether served in rustic ramekins or elegant porcelain dishes, it promises comfort, sophistication, and the unforgettable taste of the sea.

Gluten-Free Baked Pumpkin Donuts

There’s something magical about the aroma of pumpkin and spices wafting through the kitchen on a cool morning. These Gluten-Free Baked Pumpkin Donuts capture that autumn warmth in every soft, tender bite. Lightly spiced, perfectly moist, and finished with a silky glaze or cinnamon sugar coating, they’re the perfect indulgence for anyone craving seasonal sweetness—without the gluten. Best of all, they’re baked, not fried, which means you can enjoy them guilt-free with your morning coffee or as a festive dessert.

Why You’ll Love This Recipe

These pumpkin donuts are a celebration of comfort and inclusivity. Made with gluten-free flour, they’re friendly for those with gluten sensitivities while maintaining the tender crumb of classic donuts. Pumpkin purée gives them natural moisture and a lovely golden hue, while spices like cinnamon, nutmeg, and cloves bring all the nostalgic fall flavor. Whether you serve them at brunch, bake them for Halloween, or make them just because, these donuts always feel special.

Ingredients

For the Donuts:

  • 1 ¾ cups gluten-free all-purpose flour (with xanthan gum included)

  • 1 teaspoon baking powder

  • ½ teaspoon baking soda

  • ½ teaspoon salt

  • 1 teaspoon ground cinnamon

  • ½ teaspoon ground nutmeg

  • ¼ teaspoon ground ginger

  • ¼ teaspoon ground cloves

  • ½ cup brown sugar, packed

  • ¼ cup granulated sugar

  • ¾ cup canned pumpkin purée (not pumpkin pie filling)

  • 2 large eggs, room temperature

  • ¼ cup unsalted butter, melted (or coconut oil for dairy-free option)

  • ¼ cup milk of choice (almond, oat, or dairy milk)

  • 1 teaspoon pure vanilla extract

For the Glaze (optional but highly recommended):

  • 1 cup powdered sugar

  • 2 tablespoons milk (more if needed for thinning)

  • ½ teaspoon vanilla extract

  • A pinch of cinnamon

For Cinnamon Sugar Coating (alternative):

  • ½ cup granulated sugar

  • 1 tablespoon ground cinnamon

  • 3 tablespoons melted butter for brushing

Instructions

1. Preheat and Prepare

Preheat your oven to 350°F (175°C). Grease a donut pan with a little butter or nonstick spray. If you don’t have a donut pan, use a muffin pan—just adjust the bake time slightly.

2. Mix Dry Ingredients

In a large mixing bowl, whisk together the gluten-free flour, baking powder, baking soda, salt, cinnamon, nutmeg, ginger, and cloves. These aromatic spices are the heart of the recipe, infusing the donuts with that cozy fall essence.

3. Combine Wet Ingredients

In another bowl, whisk together the brown sugar, granulated sugar, pumpkin purée, eggs, melted butter, milk, and vanilla extract until smooth. The pumpkin keeps the donuts moist and tender while adding natural sweetness and color.

4. Bring It Together

Pour the wet ingredients into the dry ingredients and gently stir until just combined. Avoid overmixing; gluten-free batter can toughen if stirred too long. The batter should be thick but spoonable—similar to a dense cake batter.

5. Fill the Pan

Spoon the batter into a piping bag (or use a zip-top bag with a corner snipped off) and pipe it into the donut pan wells, filling each about ¾ full. This ensures they puff up perfectly without overflowing.

6. Bake to Perfection

Place the pan in the preheated oven and bake for 12–15 minutes, or until a toothpick inserted in the center comes out clean. The donuts should be firm to the touch and slightly springy.

7. Cool Before Glazing

Let the donuts cool in the pan for 5 minutes, then carefully transfer them to a wire rack. Allow them to cool completely before glazing, as the glaze will melt on hot donuts.

8. Add the Finishing Touch

  • For Glazed Donuts: Whisk powdered sugar, milk, vanilla, and a pinch of cinnamon together until smooth. Dip each cooled donut into the glaze and let it drip off before placing it back on the rack to set.

  • For Cinnamon Sugar Donuts: Mix sugar and cinnamon in a small bowl. Brush each warm donut lightly with melted butter, then roll in the cinnamon sugar mixture until evenly coated.

Baking Tips for the Perfect Gluten-Free Donuts

  • Don’t skip the pumpkin purée: It provides natural moisture, replacing the richness that gluten sometimes contributes.

  • Room temperature ingredients: Help the batter mix evenly for a smooth, consistent texture.

  • Avoid overbaking: Gluten-free baked goods can dry out quickly. Keep a close eye on them during the final minutes.

  • Use quality gluten-free flour: A good blend with xanthan gum mimics traditional flour and gives that classic donut chew.

Flavor Variations

  • Maple Glaze: Replace the milk in the glaze with pure maple syrup for a deeper, richer sweetness.

  • Chocolate Drizzle: Melt dark chocolate and drizzle over glazed donuts for an indulgent twist.

  • Nutty Crunch: Sprinkle chopped pecans or walnuts over the glaze before it sets for a delightful texture.

  • Vegan Option: Substitute eggs with flax eggs (2 tablespoons flaxseed meal + 6 tablespoons water), butter with coconut oil, and dairy milk with almond or oat milk.

Serving Suggestions

These gluten-free baked pumpkin donuts are best enjoyed fresh, paired with a steaming cup of coffee, spiced chai, or hot apple cider. For an elegant presentation, dust them lightly with powdered sugar and serve on a rustic wooden platter. They also make a perfect addition to a brunch spread or holiday dessert table.

If you’re making them ahead for a cozy fall gathering, store them in an airtight container at room temperature for up to 2 days, or refrigerate for up to 5. Reheat slightly before serving to bring back that fresh-from-the-oven warmth.

A Cozy Autumn Treat for Everyone

There’s a certain comfort in baking that connects us to the season, and these Gluten-Free Baked Pumpkin Donuts embody that feeling completely. The golden hue, the tender crumb, and the sweet, spiced aroma make them irresistible. Whether you’re gluten-free or not, one bite will remind you why pumpkin season is so beloved.

Classic Baked Lasagna

There’s something timeless and comforting about a bubbling, golden pan of baked lasagna fresh from the oven. Layered with rich meat sauce, creamy béchamel or ricotta filling, and gooey melted cheese, it’s the kind of meal that feels like home. This Classic Baked Lasagna recipe brings together traditional Italian flavors in a hearty, satisfying dish that’s perfect for family dinners, celebrations, or simply indulging in a cozy night in. What makes this version unique is its balance—each layer carefully crafted to ensure harmony between sauce, pasta, and cheese.

Ingredients

For the Meat Sauce:

  • 2 tablespoons olive oil

  • 1 large onion, finely chopped

  • 4 cloves garlic, minced

  • 1 pound (450 g) ground beef

  • ½ pound (225 g) Italian sausage, removed from casing

  • 1 teaspoon salt

  • ½ teaspoon black pepper

  • 1 teaspoon dried basil

  • 1 teaspoon dried oregano

  • ½ teaspoon crushed red pepper flakes (optional for heat)

  • 1 (28-ounce) can crushed tomatoes

  • 1 (15-ounce) can tomato sauce

  • 2 tablespoons tomato paste

  • ½ teaspoon sugar

  • ¼ cup chopped fresh parsley

For the Cheese Filling:

  • 15 ounces (425 g) ricotta cheese

  • 1 large egg

  • 1 cup grated Parmesan cheese

  • 2 cups shredded mozzarella cheese (divided)

  • ¼ teaspoon nutmeg

  • 1 tablespoon chopped parsley

  • Salt and pepper to taste

For Assembly:

  • 12 lasagna noodles

  • 1 ½ cups shredded mozzarella (for topping)

  • Olive oil (for greasing)

Step 1: Preparing the Meat Sauce

Start by heating olive oil in a large skillet or saucepan over medium heat. Add the chopped onion and cook until translucent—about 5 minutes. Stir in minced garlic and cook for another minute until fragrant. Add the ground beef and Italian sausage, breaking them up with a wooden spoon as they brown. Season with salt, pepper, basil, oregano, and red pepper flakes for a subtle kick.

Once the meat is browned and crumbly, pour in the crushed tomatoes, tomato sauce, and tomato paste. Add sugar to balance the acidity of the tomatoes, then stir in the parsley. Reduce the heat to low and let the sauce simmer gently for 20–30 minutes, stirring occasionally. This allows the flavors to deepen and meld beautifully. The sauce should be thick but still spreadable—perfect for layering.

Step 2: Mixing the Cheese Filling

In a medium mixing bowl, combine the ricotta cheese, egg, grated Parmesan, 1 cup mozzarella, nutmeg, parsley, salt, and pepper. The egg acts as a binder, giving the cheese mixture a creamy, custard-like texture when baked. Nutmeg adds a hint of warmth that subtly enhances the ricotta’s flavor. Mix until smooth and creamy, then set aside.

Step 3: Cooking the Noodles

Bring a large pot of salted water to a boil. Add the lasagna noodles and cook them until just al dente—a minute or two less than the package directions. Overcooked noodles can fall apart during layering. Drain the noodles and lay them flat on a lightly oiled baking sheet to prevent sticking.

Tip: If you’re using oven-ready noodles, skip this step but ensure your sauce has a bit more liquid to help soften them while baking.

Step 4: Assembling the Lasagna

Preheat your oven to 375°F (190°C). Lightly grease a 9×13-inch baking dish with olive oil or nonstick spray.

  1. Layer One – Sauce: Spread a thin layer of meat sauce at the bottom of the dish. This prevents sticking and adds flavor from the very first bite.

  2. Layer Two – Noodles: Arrange 3–4 lasagna noodles evenly over the sauce.

  3. Layer Three – Cheese: Spread one-third of the ricotta mixture over the noodles, smoothing it out gently with a spatula.

  4. Layer Four – Sauce: Spoon a generous layer of meat sauce over the cheese, ensuring it covers all edges.

  5. Repeat the process until you have three layers of noodles, cheese, and sauce.

  6. Finish with a final layer of sauce and sprinkle the remaining mozzarella evenly across the top. Add an extra handful of Parmesan for extra richness if desired.

Step 5: Baking the Lasagna

Cover the baking dish with aluminum foil, tenting it slightly to prevent the cheese from sticking. Bake for 25 minutes, then remove the foil and bake for another 20 minutes or until the top is golden brown and bubbly. For a perfectly crisp top layer, switch to the broiler for 2–3 minutes at the end—just keep a close eye to avoid burning.

Once baked, remove the lasagna from the oven and let it rest for at least 15 minutes before slicing. This step is crucial—it allows the layers to set, making it easier to serve neat, beautiful squares.

Step 6: Serving & Garnishing

Garnish your lasagna with a sprinkle of fresh parsley or basil for a pop of color and freshness. Serve with warm garlic bread, a crisp green salad, or a glass of red wine like Chianti or Merlot to complete the experience.

Unique Touches & Tips

  • Depth of Flavor: Adding both ground beef and sausage creates a more complex, savory flavor profile that’s authentically Italian.

  • Creamy Contrast: A touch of nutmeg in the ricotta filling adds warmth and depth—an Italian chef’s secret trick.

  • Homemade Sauce: Simmering the sauce slowly helps it develop a rich, robust flavor that jarred sauces can’t replicate.

  • Resting Time: Always let your lasagna rest before cutting; this small patience pays off with perfect, structured slices.

Final Thoughts

This Classic Baked Lasagna isn’t just a recipe—it’s a tradition, a comfort, and a centerpiece for gatherings. Every forkful delivers a perfect balance of tender pasta, luscious cheese, and savory sauce that feels both indulgent and familiar. Whether made for Sunday dinner or a special celebration, this dish captures the essence of Italian comfort food in every layer. Once you try it, you’ll understand why lasagna remains one of the most beloved baked dishes in the world—a true culinary classic that never goes out of style.

Gluten-Free Pizza

There’s nothing quite like the aroma of a freshly baked pizza filling your kitchen — that intoxicating mix of bubbling cheese, tangy sauce, and golden crust. But for those who avoid gluten, finding a pizza that’s both satisfying and flavorful can feel like chasing an impossible dream. This Gluten-Free Pizza recipe changes everything. It’s not just a substitute for the real thing — it is the real thing: crisp on the outside, soft and chewy on the inside, and sturdy enough to hold all your favorite toppings without crumbling apart. Whether you’re gluten-intolerant, celiac, or just exploring better-for-you options, this recipe delivers that true pizzeria magic from your own oven.

Ingredients for the Perfect Gluten-Free Pizza Dough

Dry Ingredients:

  • 2 cups gluten-free all-purpose flour (with xanthan gum included)

  • 2 teaspoons baking powder

  • 1 teaspoon salt

  • 1 teaspoon sugar (helps activate the yeast and adds slight flavor)

Wet Ingredients:

  • 1 packet (2¼ teaspoons) active dry yeast

  • ¾ cup warm water (around 105°F/40°C)

  • 1 tablespoon olive oil

  • 1 teaspoon apple cider vinegar

Optional for Flavor:

  • ½ teaspoon garlic powder

  • ½ teaspoon dried oregano

  • ¼ teaspoon crushed red pepper flakes

For the Pizza Toppings:

  • ½ cup pizza sauce (homemade or store-bought)

  • 1½ cups shredded mozzarella cheese

  • Favorite toppings: pepperoni, mushrooms, bell peppers, onions, olives, or basil

Step 1: Activate the Yeast

In a small bowl, combine the warm water, sugar, and yeast. Stir gently and let it sit for about 10 minutes, or until it becomes frothy and bubbly. This step ensures that your yeast is alive and will give the dough a beautiful rise — even though gluten-free flour doesn’t have traditional elasticity, yeast helps create a light, airy texture.

Step 2: Mix the Dry Ingredients

In a large mixing bowl, whisk together the gluten-free flour, baking powder, salt, and any optional seasonings like garlic powder or oregano. The baking powder provides extra lift, while the herbs give the dough a subtle, savory note that makes the final crust taste more artisanal than store-bought.

Step 3: Bring the Dough Together

Make a well in the center of your dry ingredients. Pour in the yeast mixture, olive oil, and apple cider vinegar. Using a wooden spoon or stand mixer fitted with a paddle attachment, mix until a sticky, slightly tacky dough forms. Unlike regular pizza dough, gluten-free dough will feel more like thick batter than stretchy dough — and that’s perfectly normal.

If it seems too dry, add an extra tablespoon or two of warm water. If it’s too sticky, sprinkle a small amount of flour on top. The goal is a soft, pliable dough that can be pressed easily without cracking.

Step 4: Rest and Rise

Cover the bowl with a clean kitchen towel and let the dough rest in a warm place for about 30–45 minutes. During this time, the yeast activates and the dough puffs up slightly, developing structure and flavor.

This resting phase is essential for gluten-free baking — it allows the starches in the flour to hydrate properly, which helps the crust bake evenly and develop that chewy interior.

Step 5: Shape the Crust

Preheat your oven to 425°F (220°C) and place a pizza stone or baking sheet inside to heat. A hot surface gives the crust a crisp bottom.

Lay a piece of parchment paper on your counter and dust it lightly with gluten-free flour. Place the dough on top, then sprinkle more flour over it to prevent sticking. Gently press and flatten it into a circle about 12 inches in diameter and about ¼ inch thick.

For a rustic look, leave the edges uneven; for a more classic pizzeria finish, use your fingers to shape a slightly raised crust rim

Step 6: Pre-Bake the Crust

Slide the parchment and dough onto your hot baking sheet or stone. Bake for 8–10 minutes, until the crust begins to firm up and turns slightly golden around the edges. This step ensures your pizza won’t become soggy once you add toppings.

Step 7: Add Sauce and Toppings

Remove the partially baked crust from the oven. Spread a thin layer of pizza sauce over the surface, leaving about an inch border around the edge. Sprinkle generously with mozzarella cheese and arrange your favorite toppings.

For a simple Margherita, use fresh mozzarella slices, cherry tomatoes, and basil. If you’re in the mood for something bold, try a BBQ chicken combo or a veggie-loaded Mediterranean style with artichokes, olives, and feta.

Step 8: Bake to Perfection

Return the pizza to the oven and bake for another 10–12 minutes, or until the cheese is melted, bubbly, and lightly golden. If you like your crust extra crisp, bake for an additional 2–3 minutes.

When done, remove from the oven and let it rest for 5 minutes before slicing. This short cooling time helps the cheese set slightly, giving you clean, beautiful slices.

Step 9: Slice and Enjoy

Cut your pizza into wedges, sprinkle with fresh basil or crushed red pepper, and drizzle with a little olive oil if desired. The crust should be golden, slightly chewy, and strong enough to pick up without falling apart — exactly what every great pizza should be.

Chef’s Tips for Success

  1. Use a quality gluten-free flour blend – A mix with rice flour, tapioca starch, and potato starch gives the best texture.

  2. Don’t skip pre-baking – It prevents sogginess and ensures a crisp base.

  3. Add flavor to the dough – Herbs, garlic powder, or parmesan in the dough make it more savory and authentic.

  4. Hot oven = perfect crust – The high heat mimics a wood-fired effect at home.

Final Thoughts

This Gluten-Free Pizza recipe proves that you don’t need wheat to create a masterpiece. Each bite offers the perfect contrast — a crispy edge, a tender crumb, and a stretchy, cheesy topping that satisfies every craving. Whether you’re serving a family dinner, game night snack, or weekend treat, this pizza will have everyone asking for seconds — gluten-free or not.

Once you try this recipe, you’ll never look back at store-bought gluten-free crusts again. It’s simple, authentic, and absolutely unforgettable — the kind of pizza that brings people together around the table, one slice at a time.

Garlic Butter Steak & Crispy Potatoes

There’s something truly satisfying about a sizzling pan filled with tender steak bites coated in garlic butter and paired with golden, crispy potatoes. This Garlic Butter Steak & Crispy Potatoes recipe is an irresistible combination of juicy, melt-in-your-mouth beef and perfectly seasoned potatoes that are crisp on the outside and soft within. It’s a meal that embodies everything we love about comfort food—rich flavor, simple ingredients, and the kind of aroma that fills your kitchen with warmth and excitement.

Ingredients

For the Steak:

  • 1½ pounds sirloin steak (or ribeye, cut into bite-sized cubes)

  • 1 teaspoon salt

  • ½ teaspoon black pepper

  • 1 teaspoon smoked paprika

  • 2 tablespoons olive oil

  • 3 tablespoons unsalted butter

  • 4 cloves garlic, minced

  • 1 tablespoon fresh rosemary, chopped (or 1 teaspoon dried)

  • 1 tablespoon fresh parsley, chopped (for garnish)

For the Crispy Potatoes:

  • 1½ pounds baby potatoes (Yukon gold or red potatoes work best)

  • 2 tablespoons olive oil

  • 1 teaspoon garlic powder

  • ½ teaspoon paprika

  • ½ teaspoon salt

  • ½ teaspoon black pepper

  • 2 tablespoons butter

  • Fresh thyme or parsley for garnish

Instructions

Step 1: Prepare the Potatoes

Start by washing your potatoes thoroughly. If using baby potatoes, you can halve them; for larger ones, cut them into small cubes so they crisp evenly. Place them in a pot of salted water and boil for about 8–10 minutes, just until fork-tender. Drain and let them steam dry for a few minutes—this step helps them crisp up beautifully when cooked.

Heat 2 tablespoons olive oil in a large skillet over medium-high heat. Once the oil shimmers, add the potatoes in a single layer. Season with garlic powder, paprika, salt, and pepper, and let them cook undisturbed for about 4–5 minutes until a golden crust forms on one side. Flip them occasionally to ensure even browning. Once crisp and golden, add 2 tablespoons of butter and a sprinkle of thyme or parsley. Stir until the butter melts and coats the potatoes with a rich aroma. Transfer to a plate and keep warm.

Step 2: Cook the Steak

Pat the steak cubes dry with a paper towel—moisture prevents searing. Season generously with salt, pepper, and smoked paprika. In the same skillet (no need to wash it; those leftover potato bits add flavor), heat 2 tablespoons olive oil over medium-high heat. When it begins to shimmer, add the steak cubes in a single layer. Don’t overcrowd the pan; cook in batches if necessary.

Let the steak sear without stirring for 2–3 minutes, allowing a deep brown crust to form. Flip and cook another 2–3 minutes for medium doneness. Adjust cooking time based on your preference. When the steak is nearly done, reduce the heat to medium and add 3 tablespoons of butter, minced garlic, and rosemary. Stir gently as the butter melts, spooning the garlicky mixture over the steak to coat it completely.

The aroma at this stage is divine—rich butter mingling with sizzling garlic and herbs creates a restaurant-worthy scent that’s impossible to resist.

Step 3: Combine & Serve

Once the steak is perfectly coated in garlic butter, return the crispy potatoes to the skillet. Toss everything together for about a minute to let the flavors mingle. Garnish with fresh parsley and an extra drizzle of melted butter if desired.

Serve immediately, straight from the pan for a rustic presentation, or plate it elegantly with the potatoes forming a bed beneath the buttery steak bites.

Tips for the Best Results

  1. Choose the right cut: Sirloin offers the perfect balance of tenderness and flavor, but ribeye or New York strip works beautifully for a richer taste.

  2. Don’t overcrowd the pan: Overcrowding causes steaming instead of searing, which prevents that crispy, golden crust.

  3. Use fresh garlic and herbs: They elevate the flavor beyond comparison to dried alternatives.

  4. Rest before serving: Letting the steak rest for 5 minutes before serving helps redistribute its juices for a tender, flavorful bite.

Creamy Milk Cake

If you’re looking for a dessert that feels like pure indulgence, Creamy Milk Cake is your answer. This luscious, milky treat—often inspired by classic tres leches and South Asian milk cakes—combines the richness of cream, the sweetness of condensed milk, and the softness of a perfectly baked sponge cake. Every bite delivers a velvety, melt-in-the-mouth experience, making it an irresistible dessert for any occasion, from family gatherings to festive dinners.

Ingredients

For the Cake:

  • 1 cup all-purpose flour

  • 1 ½ teaspoons baking powder

  • ¼ teaspoon salt

  • 5 large eggs, separated

  • ¾ cup granulated sugar (divided)

  • 1 teaspoon pure vanilla extract

  • ¼ cup whole milk

For the Milk Soak (Cream Mixture):

  • 1 cup evaporated milk

  • 1 cup sweetened condensed milk

  • 1 cup heavy cream or whole milk

For the Cream Topping:

  • 1 ½ cups heavy whipping cream

  • 3 tablespoons powdered sugar

  • 1 teaspoon vanilla extract

Optional Garnish:

  • Toasted almond flakes or crushed pistachios

  • Drizzle of caramel or dulce de leche

  • Fresh fruit like strawberries or mango slices

Step 1: Preparing the Sponge Cake

Start by preheating your oven to 350°F (175°C). Grease a 9×13-inch baking dish with butter or line it with parchment paper.

In a small bowl, sift together the flour, baking powder, and salt. This ensures an even, airy texture in the cake. In a separate large bowl, beat the egg yolks with ½ cup sugar until the mixture becomes pale and creamy. Add the vanilla extract and milk, and continue beating until fully combined.

In another clean bowl, whisk the egg whites until soft peaks form. Gradually add the remaining ¼ cup of sugar while continuing to whisk, until stiff peaks develop. This step gives the cake its signature light and fluffy texture.

Gently fold the whipped egg whites into the yolk mixture using a spatula, alternating with the dry ingredients. Take care not to overmix—the goal is to keep the batter airy. Pour the batter into your prepared baking dish and bake for 25 to 30 minutes, or until a toothpick inserted into the center comes out clean.

Once baked, remove from the oven and allow the cake to cool for 10 minutes. Using a fork or skewer, poke small holes all over the surface—this will help the milk mixture seep deep into the sponge later.

Step 2: Making the Creamy Milk Soak

In a mixing bowl, combine the evaporated milk, sweetened condensed milk, and heavy cream. Whisk until smooth and fully blended. This tri-milk combination is what gives the cake its creamy, dreamy character.

When the cake is still slightly warm, pour the milk mixture slowly and evenly over the entire surface. Watch as it soaks in—this is the magical step that transforms a simple sponge into a luxurious milk cake. Let it rest for about 30 minutes at room temperature, then refrigerate it for at least 4 hours, or preferably overnight. The longer it chills, the creamier and richer it becomes.

Step 3: Whipping the Topping

Just before serving, prepare the whipped cream topping. In a chilled mixing bowl, beat the heavy cream with powdered sugar and vanilla extract until soft peaks form. Spread this whipped cream evenly over the chilled cake, creating a thick, luscious layer.

You can leave it simple and elegant, or elevate it with a sprinkle of crushed nuts, a drizzle of caramel, or slices of fresh fruit. Each topping adds its own charm and texture to this silky dessert.

Step 4: Serving and Storing

Cut the cake into squares or rectangles using a sharp knife, wiping between slices for neat edges. Each piece should be creamy and slightly moist, with the milk mixture glistening through the sponge.

Serve chilled for the best experience—every bite should feel cold, creamy, and decadently smooth. If you want an extra luxurious twist, drizzle a bit of cold milk or condensed milk on top before serving.

This cake stores beautifully in the refrigerator for up to three days. The flavors deepen as it sits, making it even more delightful the next day.

Tips for a Perfect Creamy Milk Cake

  1. Use room temperature eggs – This helps achieve maximum volume when whipping.

  2. Don’t overbake the cake – A slightly moist sponge absorbs milk better.

  3. Let it chill overnight – The flavor and texture improve with time.

  4. Balance the sweetness – If you prefer a lighter sweetness, reduce condensed milk slightly and replace with extra evaporated milk.

  5. Add a flavor twist – Infuse the milk mixture with cardamom, saffron, or rosewater for a South Asian flair.

Why This Cake Is So Special

What sets this Creamy Milk Cake apart from traditional milk-based desserts is the harmony of textures. The base is airy yet rich, the soaked layer is smooth and velvety, and the whipped cream adds a cloud-like finish. It’s not just a dessert—it’s an experience that melts on your tongue and leaves a lasting impression.

This cake embodies comfort and elegance in every slice. The simplicity of the ingredients hides the sophistication of its flavor. Whether served at a family dinner, birthday celebration, or festive holiday, it’s sure to steal the spotlight.

Final Thoughts

Creamy Milk Cake is proof that magic can happen when milk meets sponge. It’s a dessert that blends the best of home-style baking with the sophistication of patisserie elegance. With every forkful, you’ll taste the rich creaminess, the soft sweetness, and the light airiness that make this cake so memorable.


Creamy Garlic Butter Chicken & Linguine in Alfredo Sauce

If comfort had a flavor, it would taste exactly like this Creamy Garlic Butter Chicken & Linguine in Alfredo Sauce. Tender golden chicken breasts are bathed in a luscious garlic butter sauce, tossed with silky linguine, and coated in rich Alfredo cream that clings lovingly to every strand. This dish is indulgent, restaurant-worthy, and surprisingly simple to create at home. Perfect for date nights, family dinners, or when you simply crave something irresistibly creamy and garlicky.

Ingredients

For the Chicken:

  • 2 large chicken breasts, halved horizontally (to make 4 cutlets)

  • Salt and black pepper, to taste

  • 1 teaspoon garlic powder

  • ½ teaspoon paprika

  • 2 tablespoons olive oil

  • 2 tablespoons unsalted butter

For the Alfredo Sauce:

  • 3 tablespoons unsalted butter

  • 5 cloves garlic, finely minced

  • 1 ½ cups heavy cream

  • 1 cup freshly grated Parmesan cheese

  • ½ cup chicken broth

  • ½ teaspoon Italian seasoning

  • ¼ teaspoon crushed red pepper flakes (optional for a little heat)

  • Salt and pepper, to taste

For the Pasta:

  • 12 ounces linguine

  • 2 tablespoons butter (for tossing)

  • Fresh parsley and extra Parmesan, for garnish

Step-by-Step Instructions

Step 1: Prepare the Chicken

  1. Season generously.
    Pat the chicken breasts dry and season both sides with salt, pepper, garlic powder, and paprika. This creates a flavorful crust when seared.

  2. Sear to golden perfection.
    In a large skillet, heat olive oil and butter over medium-high heat. When hot and shimmering, add the chicken cutlets. Cook for 4–5 minutes per side, or until golden brown and cooked through. Remove from the skillet and set aside on a warm plate.

  3. Scrape up the flavor bits.
    Don’t clean the pan — the little browned bits at the bottom (called fond) are flavor gold. They’ll enrich the sauce beautifully.

Step 2: Create the Garlic Butter Alfredo Sauce

  1. Sauté the garlic.
    In the same pan, melt 3 tablespoons of butter over medium heat. Add minced garlic and sauté for about 30 seconds until fragrant. Be careful not to burn it — garlic turns bitter quickly.

  2. Add liquids.
    Pour in the chicken broth and heavy cream, stirring to combine. Use a wooden spoon to scrape up any browned bits from the pan for maximum flavor.

  3. Simmer and season.
    Add Italian seasoning, crushed red pepper flakes, and a pinch of salt and pepper. Let the sauce simmer gently for 4–5 minutes until slightly thickened.

  4. Add the cheese.
    Reduce the heat to low and gradually whisk in the Parmesan cheese until smooth and creamy. The sauce should coat the back of a spoon — rich, velvety, and full of garlic-butter aroma.

Step 3: Cook the Linguine

  1. Boil the pasta.
    While the sauce simmers, cook linguine in salted boiling water according to package instructions until al dente. Reserve ½ cup of the pasta water before draining.

  2. Toss with butter.
    Drain the linguine and toss immediately with 2 tablespoons of butter to prevent sticking and add extra flavor.

Step 4: Combine Everything

  1. Return chicken to the skillet.
    Slice the seared chicken into strips and add it back to the Alfredo sauce. Simmer for 2–3 minutes, allowing the flavors to mingle and the chicken to absorb the creamy sauce.

  2. Add the pasta.
    Gently toss the cooked linguine into the sauce until everything is well coated. If the sauce feels too thick, add a splash of the reserved pasta water until it reaches your desired consistency.

  3. Finish with flair.
    Sprinkle freshly chopped parsley and an extra dusting of Parmesan cheese on top for color and richness.

Chef’s Tips for Perfection

  • Use fresh Parmesan only. Pre-grated varieties often contain anti-caking agents that prevent smooth melting. Freshly grated Parmesan gives a velvety texture.

  • Don’t rush the sauce. Allowing the cream and cheese to meld slowly over low heat ensures a silky finish.

  • Balance the salt. Parmesan adds saltiness, so season gradually and taste as you go.

  • Add vegetables (optional). For variety, you can toss in sautéed spinach, sun-dried tomatoes, or mushrooms for extra flavor and texture.

Serving Suggestions

Serve this dish in wide, shallow bowls so the creamy sauce can pool around the pasta. Pair it with:

  • A side of garlic bread or warm sourdough baguette to soak up the extra sauce.

  • A crisp Caesar salad or roasted asparagus for a fresh contrast.

  • A glass of chilled white wine, like Chardonnay or Pinot Grigio, to complement the buttery richness.

Why This Recipe Works

What sets this recipe apart is its balance. The garlic butter adds a savory, nutty note that deepens the Alfredo’s creaminess. The seared chicken provides satisfying texture and protein, while linguine — with its smooth, flat shape — perfectly catches the sauce in every bite. Each component enhances the other, creating a harmony of flavors that’s both familiar and indulgently new.

It’s the kind of meal that makes you pause after the first bite — a comforting sigh, a smile, and the quiet realization that you’ve just made something truly special in your own kitchen.

Final Thoughts

Creamy Garlic Butter Chicken & Linguine in Alfredo Sauce is more than just dinner — it’s an experience of flavors that comfort and excite at the same time. Every bite is a blend of silky pasta, rich cream, and the warmth of garlic butter that lingers pleasantly on your palate. Whether you’re cooking to impress or to treat yourself, this recipe turns an ordinary evening into a gourmet affair