Cheesy chicken nuggets

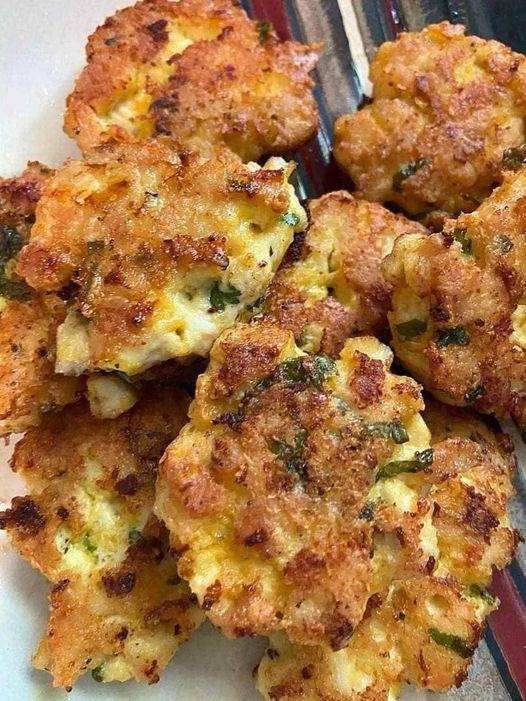
Cheesy Chicken Nuggets are the ultimate comfort food that combines the crunch of golden-brown breading with the creamy, gooey delight of melted cheese tucked inside tender, juicy chicken. Perfect for both kids and adults, these nuggets are an upgrade from your regular fast-food version—crisp on the outside, melty and flavorful on the inside, and incredibly easy to make at home. Whether you serve them as a quick snack, party appetizer, or fun weeknight dinner, these nuggets will disappear faster than you can fry them.

The Magic Behind Cheesy Chicken Nuggets

What makes these nuggets so irresistible is their balance of textures and flavors. The secret lies in combining finely ground chicken breast with shredded mozzarella or cheddar, binding it with seasonings and breadcrumbs, and then coating the mixture in a crispy crust that locks in all the cheesy goodness. When you bite into one, you get the satisfying crunch of the coating followed by the rich, savory melt of cheese and tender chicken—a combination that’s hard to resist.

Ingredients

For the Chicken Mixture:

  • 1 lb (450g) boneless, skinless chicken breasts

  • 1 cup shredded mozzarella or cheddar cheese (or a blend of both)

  • 1/2 teaspoon garlic powder

  • 1/2 teaspoon onion powder

  • 1/2 teaspoon paprika

  • 1/2 teaspoon salt

  • 1/4 teaspoon black pepper

  • 1 tablespoon mayonnaise or plain Greek yogurt (for moisture)

  • 1 tablespoon all-purpose flour or cornstarch

For the Coating:

  • 1/2 cup all-purpose flour

  • 2 large eggs, beaten

  • 1 cup seasoned breadcrumbs (panko or regular)

  • 1/4 cup grated Parmesan cheese (optional, for extra flavor)

For Frying or Baking:

  • Oil for deep or shallow frying (vegetable or canola oil works best)
    (If baking, use a drizzle of olive oil or cooking spray.)

Optional for Serving:

  • Honey mustard

  • Garlic aioli

  • Spicy ketchup or cheese dip

Step-by-Step Instructions

Step 1: Prepare the Chicken Mixture

Cut the chicken breasts into small cubes and place them in a food processor. Pulse until finely minced but not completely pureed—you want a bit of texture left. Transfer the minced chicken to a mixing bowl and add shredded cheese, garlic powder, onion powder, paprika, salt, pepper, mayonnaise, and a tablespoon of flour. Mix well until everything comes together into a slightly sticky dough-like mixture.

If the mixture feels too wet, add a tablespoon of breadcrumbs or flour to help it bind. If it feels dry, a touch more mayonnaise will fix it. This step ensures your nuggets hold their shape and remain juicy.

Step 2: Shape the Nuggets

Take small portions of the mixture (about a tablespoon each) and shape them into nugget-sized pieces—oval, round, or the classic rectangular shape. You can also stuff each nugget with a small cube of cheese in the center for a surprise molten core. Place the shaped nuggets on a parchment-lined tray and refrigerate for 20–30 minutes. Chilling helps firm them up, making them easier to coat and fry.

Step 3: Set Up the Coating Station

Prepare three shallow bowls:

  1. Flour – Season lightly with salt and pepper.

  2. Beaten eggs – Whisk until smooth.

  3. Breadcrumbs – Mix with Parmesan for extra crunch and flavor.

Dip each chilled nugget first in flour (shake off the excess), then into the beaten eggs, and finally coat generously with breadcrumbs. Press the breadcrumbs gently to ensure an even, crispy crust.

Step 4: Cook to Golden Perfection

For Frying:
Heat oil in a skillet or deep fryer to 350°F (175°C). Carefully add the nuggets in batches—avoid overcrowding. Fry each side for about 2–3 minutes until golden brown and crisp. Remove with a slotted spoon and drain on paper towels.

For Baking:
Preheat your oven to 400°F (200°C). Place the breaded nuggets on a greased or parchment-lined baking sheet. Drizzle lightly with olive oil or spray with cooking spray. Bake for 18–20 minutes, flipping halfway, until golden and fully cooked through.

For Air Frying:
Preheat the air fryer to 380°F (190°C). Arrange the nuggets in a single layer and air fry for 10–12 minutes, flipping halfway through. They’ll come out crisp without needing much oil.

Step 5: Serve and Enjoy

Serve your Cheesy Chicken Nuggets hot with your favorite dipping sauces. The cheese inside should be perfectly melted and stretchy, while the chicken stays juicy and flavorful. These nuggets pair beautifully with fries, coleslaw, or even a simple side salad.

Flavor Variations

  1. Spicy Kick: Add chili flakes, hot sauce, or cayenne pepper to the chicken mixture for a spicy version.

  2. Italian Style: Use mozzarella and Parmesan cheese with Italian seasoning and serve with marinara sauce.

  3. BBQ Twist: Add a tablespoon of BBQ sauce to the mixture and use smoked cheddar for a smoky flavor.

  4. Herb-Loaded: Mix in chopped parsley, basil, or chives for an herby, fresh taste.

Tips for the Perfect Nuggets

  • Don’t skip chilling: It helps the nuggets hold their shape during cooking.

  • Use a mix of cheeses: Combining mozzarella (for stretch) with cheddar (for sharp flavor) creates a richer filling.

  • Avoid overcooking: Fry or bake until just golden; overcooked nuggets may dry out.

  • Drain excess oil: Always use paper towels to keep the coating crisp and non-greasy.

Why Homemade Beats Store-Bought

Homemade Cheesy Chicken Nuggets are not just tastier—they’re healthier and customizable. You control the quality of ingredients, reduce unnecessary additives, and can experiment with your favorite flavors. Store-bought nuggets may be convenient, but nothing compares to the freshness of real chicken and melted cheese straight from your kitchen.

These nuggets also freeze beautifully—simply place cooked or uncooked nuggets on a tray, freeze until solid, and transfer to a zip-top bag. When ready to eat, bake or air fry directly from frozen for a quick and delicious snack anytime.

Conclusion

Cheesy Chicken Nuggets bring together everything we love in comfort food—crispiness, cheesiness, and pure satisfaction. They’re the kind of treat that makes everyone gather around the table with smiles, dipping sauces ready, and appetites roaring. Once you’ve made them from scratch, you’ll never go back to frozen ones again. Each bite offers that magical combination of crispy coating, melty cheese, and juicy chicken—making these homemade nuggets truly unforgettable.

White Chocolate Strawberry Cheesecake

If you’re searching for a dessert that perfectly blends elegance, indulgence, and the freshness of ripe strawberries, this White Chocolate Strawberry Cheesecake is pure perfection. It combines the creamy decadence of white chocolate, the luscious tang of cream cheese, and the bright sweetness of strawberries—all layered on a buttery graham cracker crust. This cheesecake is not only visually stunning but also irresistibly smooth and flavorful. Whether for a dinner party, a birthday celebration, or simply to treat yourself, this recipe promises to impress every sweet tooth at the table.

Ingredients

For the crust:

  • 1 ½ cups graham cracker crumbs

  • ¼ cup granulated sugar

  • ½ cup unsalted butter, melted

For the filling:

  • 12 ounces (340g) white chocolate, chopped

  • 24 ounces (680g) cream cheese, softened

  • ¾ cup granulated sugar

  • 3 large eggs, room temperature

  • 1 cup sour cream

  • 1 teaspoon vanilla extract

  • 1 tablespoon lemon juice (optional, for balance)

For the strawberry topping:

  • 2 cups fresh strawberries, sliced

  • ¼ cup granulated sugar

  • 1 tablespoon cornstarch

  • ¼ cup water

  • 1 teaspoon lemon juice

  • ½ teaspoon vanilla extract

Optional garnish:

  • White chocolate curls or shavings

  • Fresh whole strawberries

  • Whipped cream for serving

Step 1: Make the Crust

Begin by preheating your oven to 325°F (160°C). In a mixing bowl, combine graham cracker crumbs, sugar, and melted butter. Stir until the mixture resembles wet sand. Press the mixture firmly into the bottom of a 9-inch springform pan, using the back of a spoon to create an even layer. Bake the crust for 10 minutes, then set it aside to cool while you prepare the filling.

This simple crust adds a delicate crunch that perfectly balances the creamy texture of the cheesecake. If you prefer a slightly nutty flavor, you can mix in a few crushed almonds or pecans.

Step 2: Melt the White Chocolate

Place the chopped white chocolate in a heatproof bowl set over a pot of gently simmering water (double boiler method). Stir until smooth and fully melted. Remove from heat and let it cool slightly.

White chocolate can be temperamental—it burns easily, so take care to melt it slowly. This silky component adds a luxurious sweetness to the cheesecake without overpowering the tang of the cream cheese.

Step 3: Prepare the Cheesecake Filling

In a large mixing bowl, beat the softened cream cheese with an electric mixer on medium speed until smooth and creamy, about 2–3 minutes. Gradually add the sugar and continue beating until fully incorporated.

Add the eggs, one at a time, mixing on low speed after each addition. Next, beat in the sour cream, vanilla extract, and lemon juice. Finally, gently fold in the melted white chocolate until fully combined.

The key here is not to overmix—too much air in the batter can cause cracks during baking. The mixture should be silky and thick, with the white chocolate giving it a beautiful glossy sheen.

Step 4: Bake the Cheesecake

Pour the filling over the cooled crust and smooth the top with a spatula. Wrap the outside of the springform pan with aluminum foil to prevent water from seeping in. Place the pan into a larger roasting pan and fill the roasting pan with about an inch of hot water—this creates a gentle water bath that ensures an even bake and prevents cracks.

Bake for 60–70 minutes, or until the edges are set but the center still has a slight wobble. Turn off the oven and crack the door open slightly, allowing the cheesecake to cool inside for about an hour.

Afterward, remove it from the oven, take off the foil, and let it cool completely at room temperature. Then cover and refrigerate for at least 6 hours, or overnight for best results.

Step 5: Make the Strawberry Topping

While the cheesecake chills, prepare the strawberry topping. In a small saucepan, combine sliced strawberries, sugar, cornstarch, water, lemon juice, and vanilla extract. Stir over medium heat until the strawberries release their juices and the mixture thickens into a glossy sauce, about 5–7 minutes.

Remove from heat and let it cool completely before spooning over the chilled cheesecake. This vibrant strawberry layer adds a burst of freshness and color that beautifully complements the richness of the white chocolate base.

Step 6: Assemble and Garnish

Once the cheesecake is fully chilled and set, carefully remove it from the springform pan. Spoon the cooled strawberry topping evenly over the surface, letting a few drips cascade down the sides for a rustic, irresistible look.

For an elegant finish, top with white chocolate curls, a swirl of whipped cream, and fresh whole strawberries. The red-and-white contrast makes this dessert visually stunning—a showpiece worthy of any occasion.

Tips for Success

  1. Use full-fat cream cheese and sour cream for the best creamy texture.

  2. Avoid overbaking—a slightly jiggly center means the cheesecake will be perfectly smooth once chilled.

  3. Chill overnight to allow the flavors to meld and the texture to firm up beautifully.

  4. Slice cleanly by dipping a knife in hot water and wiping it dry between each cut.

Serving Suggestions

Serve chilled slices with a dollop of whipped cream or a drizzle of melted white chocolate for extra decadence. Pair with a cup of coffee, hot tea, or even a glass of sparkling rosé for a delightful dessert experience.

This White Chocolate Strawberry Cheesecake makes a perfect centerpiece for celebrations like Valentine’s Day, Mother’s Day, or anniversaries. Its luxurious flavor profile—creamy, fruity, and slightly tangy—ensures it appeals to every palate.

Final Thoughts

This White Chocolate Strawberry Cheesecake is more than just a dessert—it’s an experience. Each bite offers a beautiful contrast: the velvety smoothness of the cheesecake filling, the rich sweetness of white chocolate, and the refreshing tang of strawberries. The buttery crust ties everything together, giving structure and balance.

Easy Hamburger Potato Casserole

There’s something undeniably nostalgic about the combination of beef, potatoes, and cheese baked together until bubbling and golden. This Easy Hamburger Potato Casserole brings all those comforting flavors to your dinner table with minimal effort and maximum satisfaction. Perfect for weeknights or when you just want a cozy, filling meal, this casserole transforms humble ingredients into something special — a warm, hearty dish that tastes like home.

This recipe blends seasoned ground beef, tender slices of potatoes, and a creamy, cheesy sauce that ties everything together. It’s versatile, affordable, and guaranteed to please even the pickiest eaters. Let’s dive into how to make this deliciously simple dish and discover the secret to its perfect flavor balance.

Ingredients

For the casserole:

  • 1 lb (450g) ground beef

  • 1 small onion, finely chopped

  • 3 cloves garlic, minced

  • 4 medium russet potatoes, peeled and thinly sliced

  • 1 can (10.5 oz) cream of mushroom soup (or cream of chicken)

  • ½ cup sour cream

  • ½ cup milk

  • 2 cups shredded cheddar cheese (divided)

  • 1 teaspoon salt

  • ½ teaspoon black pepper

  • 1 teaspoon paprika

  • ½ teaspoon dried thyme or Italian seasoning (optional)

  • 2 tablespoons butter

  • 1 tablespoon olive oil

Optional garnish:

  • Chopped parsley or green onions for serving

Step-by-Step Instructions

1. Prepare the Beef Mixture

Start by heating a large skillet over medium heat. Add the olive oil and sauté the chopped onion until translucent, about 3 minutes. Then add the garlic and cook for another 30 seconds until fragrant.

Add the ground beef and cook until browned, breaking it apart with a spoon as it cooks. Drain any excess fat for a cleaner, lighter flavor. Season with salt, pepper, paprika, and thyme (if using). The paprika adds a beautiful depth of color and smoky undertone, while thyme brings a subtle herb note that elevates the dish.

Once the beef is cooked and fragrant, set it aside while you prepare the sauce and potatoes.

2. Make the Creamy Sauce

In a mixing bowl, whisk together the cream of mushroom soup, sour cream, and milk until smooth. Add a small pinch of salt and pepper to taste. This sauce will be the glue that binds the beef and potatoes together while keeping the casserole moist and flavorful during baking.

If you prefer a slightly tangy taste, you can add a teaspoon of Dijon mustard or a dash of Worcestershire sauce — both work wonderfully with ground beef.

3. Layer the Ingredients

Preheat your oven to 375°F (190°C) and grease a 9×13-inch baking dish with butter or nonstick spray.

Begin layering:

  • Start with a thin layer of the creamy sauce on the bottom to prevent sticking.

  • Add half of the sliced potatoes, spreading them evenly across the dish.

  • Spoon half of the cooked beef mixture over the potatoes.

  • Pour half of the sauce over the beef and spread it out gently.

  • Sprinkle one cup of shredded cheddar cheese over the top.

Repeat the layers: potatoes, beef, sauce, and finish with the remaining cup of cheese on top.

The layering helps the flavors blend beautifully as the casserole bakes, with each slice offering a little bit of everything — tender potatoes, savory beef, and creamy, cheesy goodness.

4. Bake to Perfection

Cover the casserole tightly with aluminum foil and bake for 45 minutes. The foil traps steam inside, ensuring the potatoes become tender without drying out.

After 45 minutes, remove the foil and continue baking for another 20 minutes, or until the cheese is bubbly and golden brown. To achieve that irresistible crust, switch your oven to broil for 2–3 minutes at the end — but watch carefully so it doesn’t burn!

Once done, let the casserole rest for about 10 minutes before serving. This short cooling time allows the layers to set, making it easier to slice and serve.

Serving Suggestions

This Easy Hamburger Potato Casserole is a meal on its own, but it pairs wonderfully with a few sides:

  • Fresh green salad: A crisp, lightly dressed salad balances the richness of the casserole.

  • Steamed green beans or broccoli: Simple vegetables make a perfect companion.

  • Garlic bread or dinner rolls: For extra indulgence, serve it with warm bread to soak up every bit of sauce.

Top each serving with a sprinkle of chopped parsley or green onions for a pop of color and freshness.

Tips & Variations

  • Add vegetables: To make it more wholesome, add a layer of frozen mixed veggies, corn, or peas between the potatoes and beef.

  • Make it spicy: Stir in a pinch of crushed red pepper or a few dashes of hot sauce into the sauce mixture.

  • Use different cheeses: Try mozzarella for gooeyness or pepper jack for a kick.

  • Swap proteins: Ground turkey, chicken, or even sausage can be used instead of beef for a twist.

  • Make it ahead: Assemble the casserole the night before, refrigerate it, and bake the next day — perfect for busy weeknights.

Storage and Reheating

Leftovers store beautifully! Allow the casserole to cool completely, then cover and refrigerate for up to 4 days. Reheat individual portions in the microwave, or warm the entire dish in a 350°F (175°C) oven for 15–20 minutes until hot.

You can also freeze it for up to 2 months. To do so, wrap the cooled casserole tightly in plastic wrap and foil. When ready to eat, thaw in the refrigerator overnight and reheat as usual.

Why You’ll Love This Recipe

What makes this Easy Hamburger Potato Casserole truly stand out is its simplicity and versatility. With just a few basic ingredients, you can create a hearty, crowd-pleasing meal that tastes like it took hours to make. It’s budget-friendly, satisfying, and endlessly customizable.

Every bite is a harmony of textures — tender slices of potatoes, savory seasoned beef, and that creamy, melted cheese that ties it all together. Whether you’re cooking for a family dinner, meal prepping for the week, or simply craving comfort food, this casserole delivers in every way.

It’s the kind of dish that fills your home with delicious aromas and makes everyone gather around the table for seconds.

In short:
This Easy Hamburger Potato Casserole is the perfect combination of creamy, cheesy, and hearty — the kind of meal that warms your soul and keeps you coming back for more. With its easy preparation and irresistible flavor, it’s sure to become a regular favorite in your kitchen rotation.

Famous Crab Bombs

Bright, crunchy, and explosively flavorful — these Famous Crab Bombs are small, golden parcels of crab-stuffed happiness. They’re equal parts snack-table showstopper and weeknight comfort food: soft, seasoned crab mixed with creamy cheese, wrapped in a thin shell, and fried until they pop with steam and flavor when bitten. Below is a unique recipe that yields about 18–20 bombs and includes make-ahead tips, a dipping sauce, and a few clever twists.

Ingredients (yields 18–20)

Filling

  • 12 oz (340 g) lump crab meat, checked for shells

  • 4 oz (115 g) cream cheese, softened

  • 1/2 cup (60 g) shredded sharp cheddar

  • 2 tablespoons mayonnaise

  • 2 green onions, thinly sliced (white + green)

  • 1 small red bell pepper, finely diced

  • 1 garlic clove, minced

  • 1 teaspoon Dijon mustard

  • 1/2 teaspoon smoked paprika

  • 1/4 teaspoon cayenne (adjust to taste)

  • 1 tablespoon freshly chopped parsley

  • Salt and black pepper to taste

  • Juice of 1/2 lemon

Assembly + Frying

  • 18–20 wonton wrappers (square) or spring roll wrappers cut into 4” squares

  • 1 large egg, beaten (for egg wash)

  • 1 cup (120 g) panko breadcrumbs (optional — for extra crunch)

  • Neutral oil for frying (canola, vegetable, or peanut) — ~2–3 cups depending on pan

Quick dipping sauce

  • 1/2 cup sour cream or Greek yogurt

  • 2 tablespoons sweet chili sauce

  • 1 teaspoon sriracha (optional)

  • 1 teaspoon lime juice

  • Pinch of salt

Prep (15 minutes) + Cook (10 minutes)

  • Total active time: ~25–30 minutes (plus chilling if you like)

Method

  1. Make the filling. In a medium bowl, gently fold together the crab meat, softened cream cheese, shredded cheddar, mayonnaise, green onions, diced red pepper, minced garlic, Dijon, smoked paprika, cayenne, parsley, lemon juice, and a pinch each of salt and pepper. Taste and adjust seasoning — it should be bright, slightly tangy, and noticeably savory. The mixture should hold together but still be soft.

  2. Chill briefly. Pop the filling into the fridge for 10–15 minutes if time allows; chilling firms it a bit and makes assembly neater.

  3. Assemble the bombs. Lay a wonton wrapper on a clean surface. Brush the edges lightly with beaten egg. Place about 1 heaping teaspoon (roughly 12–15 g) of filling in the center — don’t overfill or they’ll burst. Fold into a tight parcel: bring two opposite corners together and press, then bring the other two corners and pinch to seal into a small pouch. For a neat finish, twist the top slightly or fold edges underneath. Repeat until all filling is used. (If using panko: set up a dredging station — egg wash in one bowl, panko in another — and dip each sealed bomb in egg then panko for extra crunch.)

  4. Heat the oil. In a heavy-bottomed pot or deep skillet, heat oil to 350°F (175°C). If you don’t have a thermometer, test with a small piece of wrapper — it should sizzle and brown within ~30-40 seconds without smoking.

  5. Fry. Fry bombs in batches, careful not to overcrowd, for about 2–3 minutes per batch until golden and crisp. Turn as needed so they brown evenly. Remove with a slotted spoon and drain on a rack or paper towel-lined tray.

  6. Make the dipping sauce. Whisk together sour cream (or yogurt), sweet chili sauce, sriracha, lime juice, and a pinch of salt. Adjust heat and sweetness to taste.

  7. Serve hot. Crab Bombs are best served warm so the center is creamy and the exterior is crispy. Plate them with the dipping sauce and a squeeze of fresh lemon.

Tips & Variations

  • Baked option: Place assembled bombs on a parchment-lined tray, lightly brush with oil, and bake at 400°F (200°C) for 12–15 minutes, flipping once, until golden. Texture will be slightly different — still delicious.

  • Air-fryer: Preheat to 375°F (190°C); spray bombs with oil and air-fry 8–10 minutes, turning halfway.

  • Low-carb version: Use large blanched collard leaves or thinly sliced eggplant as wrappers; pan-sear instead of deep-frying.

  • Flavor swaps: Replace cheddar with Gruyère for nuttiness, add a teaspoon of Old Bay seasoning for classic seafood vibes, or fold in a tablespoon of chopped cooked bacon for smoky crunch.

  • Make-ahead: Prepare filling up to 2 days ahead. Assemble bombs and freeze on a sheet tray, then transfer to a freezer bag. Fry from frozen — just add an extra minute or two to the cook time.

Storage

Leftover Crab Bombs keep in the fridge for 1–2 days (reheat in a 375°F oven for 6–8 minutes). Frozen assembled bombs will keep up to 2 months.

Final note

These Famous Crab Bombs balance creaminess, a touch of heat, and a satisfying crunch — perfect as an appetizer for a party or a decadent weeknight treat. Bite carefully (they’re hot inside!), and enjoy that steamy pop of crab-and-cheese goodness.

Best Ever Easy Vegetable Beef Soup

here’s nothing quite as comforting as a steaming bowl of hearty vegetable beef soup. This “Best Ever Easy Vegetable Beef Soup” is the perfect blend of tender beef, garden-fresh vegetables, and savory broth — a wholesome, soul-warming dish that tastes like it simmered all day, even though it’s simple enough for a busy weeknight. It’s the kind of recipe that brings everyone to the table, filling your kitchen with rich aromas and your heart with cozy satisfaction. Whether you’re cooking for a family dinner, prepping for the week ahead, or craving something warm on a chilly day, this soup delivers every time.

Ingredients

For the Soup Base:

  • 1 lb (450 g) lean ground beef or stew meat, cubed

  • 1 tablespoon olive oil or butter

  • 1 medium onion, diced

  • 2 cloves garlic, minced

  • 4 cups beef broth (or more for desired consistency)

  • 1 (15 oz) can diced tomatoes

  • 2 tablespoons tomato paste

  • 1 (15 oz) can tomato sauce

  • 1 teaspoon Worcestershire sauce

  • 1 teaspoon smoked paprika

  • 1 teaspoon dried thyme

  • 1 teaspoon dried basil

  • Salt and black pepper, to taste

For the Vegetables:

  • 2 medium carrots, peeled and sliced

  • 2 stalks celery, chopped

  • 2 medium potatoes, diced

  • 1 cup frozen corn

  • 1 cup frozen green beans

  • 1 cup frozen peas

  • Optional: 1 zucchini or yellow squash, diced

  • Fresh parsley, chopped (for garnish)

Instructions

1. Brown the Beef

Begin by heating the olive oil or butter in a large heavy-bottomed pot or Dutch oven over medium heat. Add the beef and cook until browned on all sides, breaking it apart if using ground beef. This step builds deep flavor — those caramelized bits at the bottom of the pan will enrich your soup later. Once browned, remove any excess fat if needed.

2. Sauté the Aromatics

Add the diced onion and minced garlic to the pot with the beef. Sauté for 3–4 minutes, or until the onion becomes soft and translucent. This releases their natural sweetness, creating a flavor base that complements the beef perfectly.

3. Build the Broth

Stir in the tomato paste and cook for one minute to deepen the tomato flavor. Add the diced tomatoes, tomato sauce, and beef broth. Scrape the bottom of the pot with a wooden spoon to lift up any browned bits — that’s pure flavor gold.

Add Worcestershire sauce, smoked paprika, thyme, and basil. Stir everything well and bring to a gentle simmer.

4. Add the Vegetables

Toss in the carrots, celery, and potatoes first since they take the longest to cook. Simmer uncovered for about 20 minutes, or until the potatoes are tender but not mushy.

Next, add the frozen vegetables — corn, green beans, and peas. Continue cooking for another 10–12 minutes until everything is heated through and perfectly tender. If you’re using zucchini or squash, add them during the last 5 minutes so they don’t overcook.

5. Season and Serve

Taste and adjust the seasoning with salt and pepper. If the soup is too thick, stir in a bit more broth or water to reach your preferred consistency.

Ladle the soup into bowls and sprinkle fresh parsley over the top for a bright, fresh finish. Serve with crusty bread, cornbread, or crackers for the ultimate comfort meal.

Tips for the Best Flavor

  • Use quality beef broth: A good broth adds depth and richness to the soup. If using store-bought, choose a low-sodium version so you can control the salt level.

  • Don’t skip browning: Browning the beef adds complex, meaty flavor that makes this soup taste like it simmered for hours.

  • Add a splash of acid: A teaspoon of apple cider vinegar or lemon juice at the end brightens the flavors.

  • Customize your veggies: You can toss in any seasonal vegetables you have on hand — bell peppers, mushrooms, or even cabbage make great additions.

  • Make it ahead: This soup tastes even better the next day as the flavors continue to meld. It also freezes beautifully for up to three months.

Why This Soup Is Special

What makes this vegetable beef soup the “best ever” isn’t just the flavor — it’s the perfect balance of ease, nutrition, and heartiness. The savory beef broth pairs beautifully with sweet carrots, earthy potatoes, and the freshness of garden vegetables. It’s a complete meal in one pot, providing protein, fiber, and vitamins with every spoonful.

Another standout quality is its adaptability. You can make it with ground beef for a quick dinner, or with stew meat for a slow-simmered Sunday supper. You can even substitute ground turkey or chicken if you’re looking for a lighter version. Every variation holds its own charm while keeping the comforting essence of the original recipe.

This soup is also a wonderful way to use up leftover vegetables in your fridge — a sustainable, budget-friendly choice that doesn’t sacrifice taste. It’s truly the kind of recipe that feels homemade, wholesome, and timeless.

Serving Suggestions

  • With bread: Serve alongside a slice of buttered cornbread, a warm dinner roll, or sourdough toast.

  • As a meal prep favorite: Store individual portions in jars or containers for quick lunches during the week.

  • With a salad: Pair with a crisp green salad or coleslaw for a complete, balanced meal.

  • With toppings: Sprinkle shredded cheese or crushed crackers on top for extra texture and flavor.

Storing and Reheating

  • Refrigerate: Store leftovers in an airtight container in the fridge for up to 4 days.

  • Freeze: Let the soup cool completely, then portion it into freezer-safe containers. It keeps well for up to 3 months.

  • Reheat: Warm on the stovetop over medium heat or in the microwave, adding a splash of broth or water if needed.

Final Thoughts

This Best Ever Easy Vegetable Beef Soup is more than just a recipe — it’s a bowl full of comfort, nourishment, and simplicity. Every bite captures the warmth of home-cooked meals shared with family. It’s hearty enough to fill you up, yet wholesome enough to leave you feeling good. Whether you’re seeking a quick dinner or a cozy weekend meal, this recipe never fails to deliver.

Gluten-Free Churros

There’s nothing quite like the aroma of freshly fried churros — that heavenly blend of cinnamon, sugar, and crisp dough that instantly transports you to a Spanish street fair or your favorite dessert café. For those avoiding gluten, traditional churros may seem off-limits, but with this Gluten-Free Churros recipe, you can enjoy all the magic of this classic treat without compromising flavor or texture. These churros are crispy on the outside, soft and tender inside, and rolled in a cinnamon-sugar coating that melts in your mouth. Whether served with silky chocolate sauce, caramel, or simply on their own, these churros are guaranteed to be a hit.

Why You’ll Love This Recipe

This isn’t just a gluten-free version of a classic — it’s a recipe that celebrates the balance of crunch and fluff. The secret lies in the combination of gluten-free flour and tapioca starch, which mimic the chewiness of traditional churros while keeping them light and airy. You don’t need any fancy ingredients or equipment, just a sturdy piping bag, a star-shaped tip, and a few pantry staples. Plus, this recipe works for anyone following a gluten-free diet or simply looking to try something new and delicious.

Ingredients

For the Churro Dough:

  • 1 cup (240 ml) water

  • 2 tablespoons unsalted butter

  • 2 tablespoons granulated sugar

  • ¼ teaspoon salt

  • 1 teaspoon pure vanilla extract

  • ¾ cup (90 g) gluten-free all-purpose flour blend (with xanthan gum)

  • ¼ cup (30 g) tapioca starch or cornstarch

  • 2 large eggs

  • Vegetable oil, for frying

For the Cinnamon-Sugar Coating:

  • ½ cup (100 g) granulated sugar

  • 1½ teaspoons ground cinnamon

Optional for Dipping:

  • Chocolate Sauce: Melt ½ cup dark chocolate chips with ¼ cup heavy cream.

  • Caramel Dip: Warm store-bought or homemade caramel sauce for a buttery finish.

Step-by-Step Instructions

1. Prepare the Dough

In a medium saucepan, combine water, butter, sugar, and salt. Bring the mixture to a gentle boil over medium heat, stirring occasionally until the butter melts completely. Once the mixture starts bubbling, reduce the heat to low and add in the gluten-free flour blend and tapioca starch all at once. Stir vigorously with a wooden spoon until the mixture forms a smooth dough that pulls away from the sides of the pan — this takes about 2 minutes.

Remove the pan from heat and let the dough cool for about 5 minutes. You want it to be warm but not hot before adding the eggs.

2. Incorporate the Eggs

Once the dough has cooled slightly, add the vanilla extract. Then beat in the eggs one at a time, mixing thoroughly after each addition. The dough will look separated at first, but keep stirring — it will come together into a smooth, sticky batter with a consistency similar to thick mashed potatoes.

If the dough feels too thick to pipe, you can add a tablespoon of warm water to loosen it slightly.

. Heat the Oil

Pour vegetable oil into a deep pot or heavy skillet to a depth of about 2 inches. Heat the oil over medium heat until it reaches 360°F (182°C). You can test the temperature by dropping a small piece of dough into the oil — if it sizzles and rises to the top slowly, it’s ready.

4. Pipe the Churros

Spoon the dough into a piping bag fitted with a large star tip (a Wilton 1M or Ateco 829 works perfectly). Carefully pipe 5–6-inch strips of dough directly into the hot oil, using scissors or a knife to cut the dough from the piping bag. Fry 3–4 churros at a time, making sure not to overcrowd the pan.

5. Fry to Golden Perfection

Fry each batch for about 2–3 minutes per side, turning occasionally until the churros are golden brown and crisp. Transfer the churros to a paper towel-lined plate to drain any excess oil.

6. Coat in Cinnamon Sugar

While the churros are still warm, roll them in the cinnamon-sugar mixture until evenly coated. The warmth helps the sugar stick perfectly and gives that signature sparkle.

7. Serve and Enjoy

Serve your gluten-free churros immediately with warm chocolate sauce or caramel dip. They’re best enjoyed fresh, but if you have leftovers, you can reheat them in a 350°F (175°C) oven for about 5 minutes to regain their crispness.

Tips for Perfect Gluten-Free Churros

  • Flour Blend Matters: Not all gluten-free flours behave the same way. Use a high-quality blend with xanthan gum to help bind the dough and provide elasticity.

  • Consistent Oil Temperature: Keep an eye on the oil temperature. If it’s too hot, the churros will brown quickly but remain doughy inside. Too cool, and they’ll absorb excess oil.

  • Don’t Skip the Tapioca: This starch helps give the churros that essential chewy interior — a crucial element for texture.

  • Make Ahead Tip: You can pipe the dough onto parchment paper strips and freeze them. Fry straight from frozen, adding an extra minute to the cook time.

Flavor Variations

  • Chocolate Churros: Add 2 tablespoons of cocoa powder to the flour mixture for a rich, chocolatey version.

  • Pumpkin Spice Churros: Mix ½ teaspoon pumpkin pie spice into the cinnamon-sugar coating for a fall-inspired twist.

  • Filled Churros: Use a pastry bag with a narrow tip to pipe Nutella, dulce de leche, or pastry cream into the center of each churro after frying.

Serving Ideas

Pair your churros with classic Spanish hot chocolate — thick, rich, and made for dipping. For a festive dessert board, serve alongside fresh strawberries, whipped cream, and caramel drizzle. These gluten-free churros also make an unforgettable addition to birthday parties, brunch spreads, or cozy movie nights.

Storage and Reheating

Store cooled churros in an airtight container at room temperature for up to 2 days. Reheat them in the oven or air fryer to restore their crunch. Avoid microwaving, as it can make them soggy. You can also freeze fried churros for up to a month; just reheat directly from frozen.

Final Thoughts

These Gluten-Free Churros are proof that going gluten-free doesn’t mean giving up indulgence. Every bite is light, crispy, and irresistibly sweet — just like the classic version you know and love. Whether you’re making them for a special occasion or a simple weekend treat, these churros promise the perfect balance of tradition and innovation. Dip them, share them, or savor them solo — however you enjoy them, one thing’s certain: once you make these at home, you’ll never go back to store-bought again.

Fajita Chicken Casserole

If you love sizzling fajitas loaded with tender chicken, vibrant peppers, and melty cheese, then this Fajita Chicken Casserole is your new go-to comfort dish. This recipe brings all the bold, smoky flavors of traditional fajitas into one creamy, cheesy baked casserole—perfect for weeknights or meal prep. It’s easy to make, deeply satisfying, and delivers that Tex-Mex flair everyone craves without needing a skillet or tortillas.

Ingredients

For the Chicken Marinade:

  • 1 ½ lbs boneless, skinless chicken breasts (thinly sliced or cubed)

  • 1 tablespoon olive oil

  • 1 teaspoon chili powder

  • 1 teaspoon smoked paprika

  • 1 teaspoon cumin

  • ½ teaspoon garlic powder

  • ½ teaspoon onion powder

  • ½ teaspoon salt

  • ¼ teaspoon black pepper

  • Juice of 1 lime

For the Casserole:

  • 2 tablespoons olive oil or butter

  • 1 large onion, sliced

  • 1 red bell pepper, sliced

  • 1 green bell pepper, sliced

  • 1 yellow bell pepper, sliced

  • 1 teaspoon minced garlic

  • 1 cup sour cream (or Greek yogurt for a lighter version)

  • 1 (10 oz) can Rotel diced tomatoes with green chilies (drained)

  • 1 cup shredded Monterey Jack cheese

  • 1 cup shredded cheddar cheese

  • ½ teaspoon salt (adjust to taste)

  • ¼ teaspoon crushed red pepper flakes (optional for spice)

  • ¼ cup chopped cilantro (for garnish)

  • Fresh lime wedges (for serving)

Step-by-Step Instructions

Step 1: Marinate the Chicken
In a large bowl, combine olive oil, chili powder, smoked paprika, cumin, garlic powder, onion powder, salt, pepper, and lime juice. Add the chicken pieces and toss until fully coated. Let the chicken marinate for at least 20 minutes—or refrigerate it for up to 4 hours for more depth of flavor.

Step 2: Cook the Chicken
Heat a skillet over medium-high heat and drizzle with olive oil. Add the marinated chicken and cook for about 5–6 minutes per side until it’s golden brown and fully cooked through. Remove from heat and set aside.

Step 3: Sauté the Vegetables
In the same skillet, add a bit more oil if needed, then toss in the sliced onion and bell peppers. Sauté for 5–6 minutes until they soften and get slightly charred around the edges—this mimics the sizzling fajita flavor. Stir in minced garlic and cook for another minute until fragrant.

Step 4: Prepare the Creamy Mixture
In a large mixing bowl, stir together sour cream, Rotel tomatoes, and half of each cheese (½ cup Monterey Jack and ½ cup cheddar). Add a pinch of salt and red pepper flakes for extra kick. Mix well until smooth and creamy.

Step 5: Assemble the Casserole
Preheat your oven to 375°F (190°C). Lightly grease a 9×13-inch baking dish with butter or non-stick spray.
Layer as follows:

  1. Spread half of the sautéed peppers and onions at the bottom.

  2. Add the cooked chicken evenly over the veggies.

  3. Pour the creamy mixture on top, spreading it out evenly.

  4. Add the remaining peppers and onions.

  5. Sprinkle the rest of the shredded cheese over the top.

Step 6: Bake to Perfection
Cover the casserole with foil and bake for 20 minutes. Remove the foil and continue baking for another 10–15 minutes, until the cheese is melted, bubbly, and golden brown around the edges.

Step 7: Garnish and Serve
Once baked, let the casserole cool for 5 minutes. Garnish with freshly chopped cilantro and squeeze over some lime juice for a burst of freshness. Serve warm with your favorite toppings—such as avocado slices, jalapeños, or a dollop of sour cream.

Serving Suggestions

This casserole can stand alone as a complete meal or be paired with simple sides. Try serving it with:

  • Cilantro-lime rice or Spanish rice

  • Tortilla chips for a crunchy contrast

  • Guacamole or salsa on the side

  • Warm flour or corn tortillas for wrapping up spoonfuls of the casserole fajita-style

If you’re watching carbs, it’s equally delicious served over cauliflower rice or alongside a crisp green salad.

Variations & Add-Ins

  • Keto Version: Swap sour cream for full-fat cream cheese and use low-carb veggies like zucchini and mushrooms.

  • Spicy Twist: Add jalapeños or a drizzle of chipotle sauce before baking.

  • Loaded Style: Add black beans or corn for extra texture and heartiness.

  • Cheese Lovers: Mix in pepper jack for a spicy kick or top with a blend of mozzarella and cheddar for ultra creaminess.

  • Vegetarian Version: Replace chicken with sautéed portobello mushrooms, black beans, or tofu seasoned with fajita spices.

Storage and Reheating Tips

To Store: Let the casserole cool completely, then cover tightly or transfer portions into airtight containers. It will keep in the refrigerator for up to 4 days.

To Freeze: Wrap the entire dish in foil and freeze for up to 2 months. When ready to enjoy, thaw overnight in the refrigerator, then reheat in a 350°F oven until warmed through.

To Reheat: Microwave individual servings for 1–2 minutes, or reheat in the oven to restore that freshly baked texture.

Why This Recipe Works

This Fajita Chicken Casserole stands out because it layers textures and flavors in perfect harmony. The tender marinated chicken provides the smoky backbone, while the trio of peppers and onions add freshness and color. The creamy cheese mixture ties everything together, creating a luscious melt that coats every bite. The final sprinkle of cilantro and lime brings brightness, keeping the dish light and vibrant despite its hearty nature.

Creamy Crockpot Chicken Spaghetti

There’s something irresistibly comforting about a bowl of creamy, cheesy chicken spaghetti — especially when it’s slow-cooked to perfection in the crockpot. This Creamy Crockpot Chicken Spaghetti recipe takes all the familiar flavors of classic comfort food and transforms them into a hands-off, melt-in-your-mouth experience that’s rich, flavorful, and unbelievably easy to make. With tender shredded chicken, velvety cheese sauce, and spaghetti that absorbs every bit of savory goodness, this dish is the ultimate family-friendly meal that feels indulgent yet effortless.

Why You’ll Love This Recipe

This slow cooker recipe is the epitome of comfort and convenience. Imagine tender chicken that falls apart with a fork, creamy melted cheese, and perfectly cooked pasta all blended in a luscious sauce infused with garlic, onion, and a hint of spice. The crockpot does most of the work, allowing you to enjoy a stress-free dinner prep while your home fills with an irresistible aroma. It’s ideal for busy weeknights, potlucks, or cozy weekends when you crave something creamy and hearty without spending hours in the kitchen.

Ingredients

For the Chicken Base:

  • 2 large boneless, skinless chicken breasts

  • 1 medium onion, finely chopped

  • 3 cloves garlic, minced

  • 1 (10.5 oz) can cream of chicken soup

  • 1 (10.5 oz) can cream of mushroom soup

  • 1 (10 oz) can diced tomatoes with green chilies (Rotel-style)

  • 1 cup chicken broth

  • 1 teaspoon salt

  • ½ teaspoon black pepper

  • ½ teaspoon paprika

  • ½ teaspoon crushed red pepper flakes (optional, for a mild kick)

  • ½ teaspoon Italian seasoning

For the Creamy Sauce:

  • 8 oz cream cheese, cubed and softened

  • 2 cups shredded sharp cheddar cheese

  • 1 cup shredded mozzarella cheese

For the Pasta:

  • 12 oz uncooked spaghetti noodles

  • 2 tablespoons butter (for tossing cooked pasta)

Optional Garnish:

  • Fresh parsley, chopped

  • Extra shredded cheese or Parmesan

Step-by-Step Instructions

Step 1: Prepare the Chicken Mixture

Start by placing the chicken breasts at the bottom of your crockpot. Scatter the chopped onion and minced garlic over the chicken. Add both cans of cream soup — chicken and mushroom — for that signature creamy base. Next, pour in the diced tomatoes with green chilies, chicken broth, and all the seasonings: salt, pepper, paprika, crushed red pepper flakes, and Italian herbs.

Use a spoon to gently mix the top layer so the seasonings and soups are evenly distributed. The chicken will absorb all this flavor as it slow-cooks, becoming tender and flavorful.

Step 2: Slow Cook to Perfection

Cover your crockpot and cook on LOW for 5–6 hours or HIGH for 3 hours. During this time, the chicken will cook through and become fork-tender. The mixture will transform into a bubbling base of savory creaminess, and your kitchen will start smelling divine.

After cooking, use two forks to shred the chicken directly in the crockpot. The sauce will thicken and coat the meat beautifully.

Step 3: Make It Creamy

Once the chicken is shredded, add in the cream cheese cubes, stirring gently until they start melting into the sauce. Then add cheddar and mozzarella cheese, stirring again until everything is fully combined and luxuriously creamy.

If the sauce seems too thick, you can add a splash of warm chicken broth or milk to loosen it to your desired consistency. The goal is a velvety sauce that clings perfectly to the pasta without being soupy.

Step 4: Cook the Spaghetti

While the cheese melts in the crockpot, bring a large pot of salted water to a boil. Cook the spaghetti noodles 1–2 minutes less than package instructions, as they’ll continue to absorb sauce later. Drain the pasta, toss it with 2 tablespoons of butter, and then gently fold it into the crockpot mixture.

Stir everything together until the spaghetti is evenly coated with the creamy chicken sauce. Let it cook on LOW for another 15–20 minutes to let the flavors fully marry and the pasta finish absorbing all that rich goodness.

Step 5: Serve and Garnish

Once the dish is ready, sprinkle additional shredded cheese on top and let it melt for a few minutes with the lid on. Garnish with freshly chopped parsley or a dusting of Parmesan cheese for a beautiful finish.

Serve warm, and get ready for compliments — because this dish is pure comfort in a bowl.

Tips for Success

  • Don’t overcook the pasta: Slightly undercooking it before adding to the crockpot ensures it doesn’t get mushy.

  • Add vegetables: For a twist, toss in some diced bell peppers, mushrooms, or spinach during the last hour of cooking.

  • Make it spicy: Add more crushed red pepper flakes or a diced jalapeño for a creamy yet fiery version.

  • Use rotisserie chicken: If you’re short on time, use pre-cooked shredded chicken and reduce the crockpot time to 2 hours on low.

Storage and Reheating

  • Refrigerate: Store leftovers in an airtight container for up to 3 days.

  • Freeze: This dish freezes surprisingly well! Place portions in freezer-safe containers for up to 2 months. Thaw overnight before reheating.

  • Reheat: Warm gently in a skillet or microwave with a splash of milk or broth to restore its creamy consistency.

Why This Recipe Works

What makes Creamy Crockpot Chicken Spaghetti truly stand out is its balance of texture and flavor. The chicken slowly soaks up layers of creamy, savory sauce, while the blend of cheddar and mozzarella delivers the perfect combination of sharpness and stretchiness. The cream cheese rounds everything out with a silky finish that’s indulgent yet comforting.

Unlike stovetop versions, this slow cooker method deepens every flavor — the garlic becomes sweet and mellow, the tomatoes infuse the sauce with gentle tang, and the chicken practically melts into the spaghetti. Each bite offers a cozy blend of nostalgia and gourmet satisfaction.

Serving Suggestions

Serve this dish with a side of garlic bread or a crisp green salad for balance. It also pairs wonderfully with roasted vegetables or steamed broccoli. For a family dinner, top it with extra cheese and bake it briefly for a bubbly casserole-style finish.

In Conclusion
Creamy Crockpot Chicken Spaghetti is the definition of slow-cooked comfort. It’s the kind of dish that brings everyone to the table, promising warmth, flavor, and satisfaction in every forkful. Whether it’s a chilly evening or a busy weekday, this recipe proves that homemade comfort food doesn’t have to mean hard work — just a slow cooker, a few simple ingredients, and a love for creamy, cheesy goodness.

Gluten Free Cheddar Bay Biscuits

If you’ve ever sat down at a seafood restaurant and been served a warm basket of buttery, cheesy biscuits, you know how irresistible they can be. Soft, golden, and full of sharp cheddar flavor with a hint of garlic and herbs — it’s a comfort food dream come true. This Gluten-Free Cheddar Bay Biscuits recipe brings that same restaurant-style experience right to your kitchen, but without the gluten. These biscuits are tender on the inside, slightly crisp on the outside, and bursting with cheesy, garlicky goodness that will make even non-gluten-free eaters swoon.

A Bit of Biscuit Bliss

Traditional Cheddar Bay Biscuits rely on wheat flour for structure, but this gluten-free version is made with a custom blend of gluten-free flours that perfectly mimic the texture of classic biscuits. The secret lies in balancing moisture, fat, and leavening — ensuring every bite is fluffy yet flavorful. Whether you’re serving them with seafood, soup, or simply as a snack, these biscuits are a showstopper. The aroma of melted butter, garlic, and cheddar wafting through your kitchen is enough to make everyone gather around before they even hit the table.

Ingredients

For the Biscuits:

  • 2 cups gluten-free all-purpose flour blend (with xanthan gum included)

  • 1 tablespoon baking powder

  • 1 teaspoon garlic powder

  • ½ teaspoon onion powder

  • ½ teaspoon salt

  • ¼ teaspoon smoked paprika (optional, for depth of flavor)

  • ½ cup cold unsalted butter, cubed

  • 1 cup shredded sharp cheddar cheese

  • ¾ cup cold buttermilk (or ¾ cup milk + 1 teaspoon lemon juice)

  • 1 large egg, lightly beaten

For the Garlic Butter Topping:

  • 3 tablespoons melted butter

  • ½ teaspoon garlic powder

  • ½ teaspoon dried parsley (or fresh parsley, finely chopped)

  • Pinch of sea salt

Instructions

Step 1: Preheat and Prepare.
Preheat your oven to 425°F (220°C) and line a baking sheet with parchment paper. A hot oven is key to achieving that crisp golden edge while keeping the inside soft and tender.

Step 2: Mix Dry Ingredients.
In a large mixing bowl, combine the gluten-free flour blend, baking powder, garlic powder, onion powder, salt, and smoked paprika. Whisk them together until evenly distributed. This dry base creates a perfect canvas for the butter and cheese to work their magic.

Step 3: Cut in the Butter.
Add the cold cubed butter to the flour mixture. Using a pastry cutter, fork, or your fingertips, work the butter into the flour until the mixture resembles coarse crumbs. The key here is to keep the butter cold — those little bits of butter will create steam pockets during baking, leading to light, flaky layers.

Step 4: Add the Cheese.
Stir in the shredded cheddar cheese, tossing it lightly to coat the shreds in the flour mixture. The cheese adds not just flavor, but also moisture and richness.

Step 5: Bring It Together.
Pour in the cold buttermilk and beaten egg. Mix gently with a wooden spoon or spatula until just combined. Do not overmix — the dough should be soft, slightly sticky, and a little lumpy. If it feels too dry, add a tablespoon of milk at a time until it holds together.

Step 6: Form the Biscuits.
Using a spoon or ice cream scoop, drop 8–10 mounds of dough onto the prepared baking sheet, spacing them about 2 inches apart. You don’t need to shape them perfectly — their rustic appearance adds charm.

Step 7: Bake.
Place the tray in the preheated oven and bake for 14–17 minutes, or until the tops are golden brown and the biscuits are puffed up beautifully.

Step 8: Make the Garlic Butter.
While the biscuits are baking, melt the butter in a small saucepan or microwave-safe bowl. Stir in garlic powder, parsley, and a pinch of salt. This fragrant butter topping is what makes these biscuits truly addictive.

Step 9: Brush and Serve.
As soon as the biscuits come out of the oven, brush them generously with the garlic butter mixture. The warmth of the biscuits will help the butter soak in, infusing every bite with flavor. Serve immediately for the best experience — warm, soft, and aromatic.

Tips for Perfect Gluten-Free Biscuits

  1. Use a Quality Gluten-Free Flour Blend: Look for a mix that contains xanthan gum or guar gum for structure. If your blend doesn’t, add 1 teaspoon of xanthan gum to the dry ingredients.

  2. Keep Ingredients Cold: Cold butter and cold buttermilk help produce light, flaky layers instead of dense, heavy biscuits.

  3. Don’t Overmix: Gluten-free dough doesn’t require kneading — too much mixing can make your biscuits tough.

  4. Add Flavor Variations: Try adding chopped chives, jalapeños, or even crumbled bacon for a twist on the classic.

  5. Storage: Store leftover biscuits in an airtight container at room temperature for up to two days or refrigerate for up to a week. Reheat in the oven for a few minutes to restore their crispness.

Serving Ideas

These gluten-free Cheddar Bay Biscuits are incredibly versatile. Serve them alongside seafood favorites like shrimp scampi, crab legs, or creamy clam chowder for a restaurant-worthy meal. They also pair wonderfully with soups, stews, or salads. For breakfast, slice one open and spread it with scrambled eggs and a slice of bacon for a cheesy biscuit sandwich. Or enjoy them simply with a pat of butter and a drizzle of honey for a sweet-savory snack.

Why You’ll Love This Recipe

What makes these biscuits truly special is how effortlessly they come together — no kneading, no rolling, just simple ingredients and big flavor. Each bite offers a balance of buttery richness, sharp cheddar tang, and that unmistakable hint of garlic that keeps you reaching for another. The gluten-free version is so fluffy and flavorful that you’d never guess it doesn’t contain wheat.

These biscuits bring comfort and indulgence to any table, reminding you that gluten-free baking doesn’t have to mean compromise. It can mean golden, cheesy perfection in every bite — the kind that disappears before you know it.

Garlic Butter Steak Bites & Creamy Parmesan Shells

There’s something undeniably satisfying about the combination of tender, buttery steak and creamy, cheesy pasta. This Garlic Butter Steak Bites & Creamy Parmesan Shells recipe is the perfect marriage of indulgence and comfort, delivering restaurant-quality flavor in a meal that’s surprisingly easy to prepare. Each juicy morsel of steak is seared to perfection and bathed in a rich garlic butter sauce, then paired with pasta shells smothered in a luscious Parmesan cream. Together, they create a hearty and elegant dinner that’s as fitting for a cozy night in as it is for impressing guests.

Ingredients

For the Garlic Butter Steak Bites:

  • 1 ½ lbs sirloin steak (or ribeye), cut into bite-sized cubes

  • 1 tablespoon olive oil

  • Salt and freshly cracked black pepper, to taste

  • 4 tablespoons unsalted butter, divided

  • 5 cloves garlic, finely minced

  • 1 teaspoon Worcestershire sauce

  • 1 teaspoon crushed red pepper flakes (optional)

  • 1 tablespoon fresh parsley, chopped (for garnish)

For the Creamy Parmesan Shells:

  • 8 ounces medium pasta shells

  • 2 tablespoons unsalted butter

  • 2 cloves garlic, minced

  • 1 cup heavy cream

  • ½ cup whole milk

  • ¾ cup freshly grated Parmesan cheese

  • Salt and pepper to taste

  • ¼ teaspoon nutmeg (optional, for depth)

  • 1 tablespoon fresh parsley, chopped

Instructions

1. Prepare the Steak Bites

Begin by patting the steak cubes dry with paper towels—this ensures a beautiful, even sear. Season generously with salt and pepper on all sides. Heat a large skillet over medium-high heat and drizzle in the olive oil. Once the pan is hot and shimmering, carefully add the steak pieces in a single layer, being sure not to overcrowd the pan.

Sear the steak for about 2 minutes per side, turning just once until golden-brown and crusty on the outside, yet tender and juicy within. Depending on your steak cut and personal preference, adjust the cook time slightly for desired doneness. Remove the steak bites from the skillet and set them aside on a warm plate.

2. Make the Garlic Butter Sauce

Reduce the heat to medium-low and melt 2 tablespoons of butter in the same skillet. Add the minced garlic and sauté until fragrant—about 30 seconds. Be careful not to burn it. Stir in the remaining 2 tablespoons of butter and the Worcestershire sauce, scraping up all the delicious browned bits from the pan (that’s where the flavor hides!). Return the steak bites to the skillet, tossing them in the garlic butter sauce until well coated. Sprinkle with parsley and a touch of red pepper flakes for a subtle heat and vibrant finish.

Set aside and keep warm while you prepare the pasta.

3. Cook the Pasta Shells

Bring a large pot of salted water to a rolling boil. Add the pasta shells and cook according to package directions until al dente. Drain and reserve ½ cup of the pasta water before setting aside.

4. Prepare the Creamy Parmesan Sauce

In a medium saucepan, melt butter over medium heat. Add minced garlic and sauté just until aromatic—about 1 minute. Pour in the heavy cream and milk, stirring to combine. Let the mixture gently simmer (don’t boil), then reduce the heat and whisk in the grated Parmesan cheese gradually until smooth and velvety.

If the sauce feels too thick, stir in a splash of the reserved pasta water to loosen it to your desired consistency. Season with salt, pepper, and a pinch of nutmeg for a subtle warmth that enhances the creaminess.

Once the sauce is silky and rich, toss in the cooked pasta shells and stir until every piece is coated with the Parmesan goodness. Sprinkle with fresh parsley and a dusting of extra cheese if you wish.

5. Combine & Serve

To serve, spoon a generous portion of creamy Parmesan shells onto a plate or shallow bowl. Top with a heap of glistening garlic butter steak bites, allowing the buttery sauce to mingle with the pasta. For extra flair, drizzle a bit of the leftover garlic butter over the top and finish with a light sprinkle of Parmesan and parsley.

Cooking Tips for the Perfect Bite

  • High Heat for Searing: Always start with a hot skillet—this locks in the steak’s juices and creates a mouthwatering crust.

  • Don’t Overcrowd the Pan: Work in batches if necessary to ensure each piece gets a proper sear instead of steaming.

  • Use Fresh Parmesan: Pre-grated cheese won’t melt as smoothly and can make your sauce grainy.

  • Balance the Sauce: A touch of nutmeg or black pepper adds complexity and rounds out the cream’s richness.

Why This Recipe Works

This dish captures the essence of indulgent comfort food. The garlic butter steak bites are flavorful and aromatic, thanks to the perfect balance of fat and seasoning, while the creamy Parmesan shells provide a dreamy, cheesy canvas that complements the savory steak beautifully. Each forkful offers a symphony of textures—from the tender chew of beef to the creamy, pillowy pasta.

It’s also a flexible recipe. Swap the pasta shells for fettuccine, penne, or even cauliflower gnocchi for a twist. Add mushrooms, spinach, or sun-dried tomatoes to the sauce for extra depth. And if you’re feeling luxurious, a splash of white wine in the garlic butter sauce will take this meal to a whole new level of elegance.

Serving Ideas

Serve this dish with a side of roasted asparagus or a crisp Caesar salad to cut through the richness. A slice of crusty garlic bread is also perfect for soaking up every last drop of the buttery sauce. For drinks, pair with a glass of Cabernet Sauvignon, Pinot Noir, or a crisp Chardonnay—each complements the creamy and savory notes beautifully.

Final Thoughts

This Garlic Butter Steak Bites & Creamy Parmesan Shells recipe is more than just dinner—it’s a full sensory experience. The sizzling sound of steak hitting the pan, the aroma of garlic melting into butter, and the first creamy, cheesy forkful all combine to create pure culinary satisfaction. It’s a dish that feels indulgent yet comforting, sophisticated yet simple—proving that sometimes, the best meals are made from everyday ingredients, elevated with just a little care and flavor.