Slow Cooker Cheesy Ranch Chicken Casserole

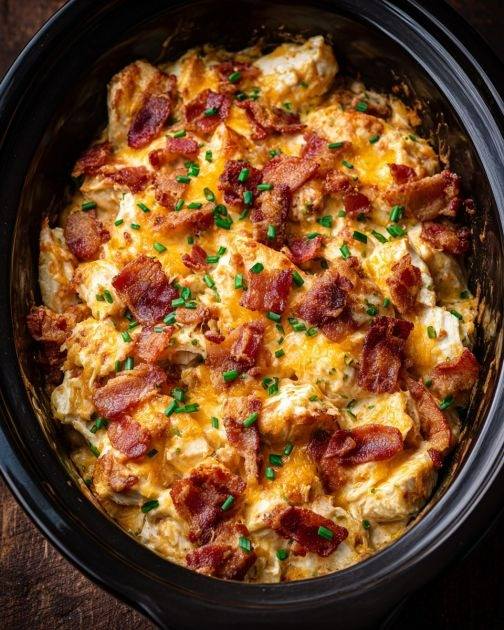
There’s something incredibly comforting about a slow cooker meal that fills your home with rich, savory aromas while you go about your day. This Slow Cooker Cheesy Ranch Chicken Casserole is one of those dishes that feels like a warm hug—creamy, cheesy, hearty, and bursting with flavor. It’s the kind of recipe that becomes a family favorite after just one bite, especially on busy weekdays or chilly evenings when you want something satisfying without standing over the stove.

What makes this casserole special is its perfect balance of tender chicken, creamy ranch-seasoned sauce, and layers of melted cheese that pull everything together. The slow cooker does all the heavy lifting, gently cooking the chicken until it’s fall-apart tender while allowing the flavors to blend beautifully. Whether you’re feeding a hungry family, meal-prepping for the week, or bringing a dish to a potluck, this casserole delivers comfort and convenience in every spoonful.

Why You’ll Love This Recipe

This dish is incredibly versatile and forgiving. You don’t need fancy ingredients or advanced cooking skills—just a few pantry staples and a slow cooker. Ranch seasoning adds a bold, tangy flavor that pairs perfectly with chicken and cheese, while potatoes or pasta (depending on your preference) make it filling enough to stand on its own. Best of all, it’s customizable, so you can easily adapt it to what you have on hand.

Ingredients

To make this slow cooker cheesy ranch chicken casserole, you’ll need:

  • 2 pounds boneless, skinless chicken breasts or thighs

  • 1 packet ranch seasoning mix

  • 1 can (10.5 oz) cream of chicken soup

  • 1 cup sour cream

  • 2 cups shredded cheddar cheese

  • 1 cup shredded mozzarella cheese

  • 1½ pounds baby potatoes, diced (or cooked pasta if preferred)

  • ½ cup chicken broth

  • 1 teaspoon garlic powder

  • ½ teaspoon black pepper

  • 1 cup cooked and crumbled turkey bacon or beef bacon (optional)

  • ½ cup chopped green onions or parsley for garnish

Instructions

Start by lightly greasing the inside of your slow cooker to prevent sticking. Place the diced potatoes evenly in the bottom of the slow cooker. If you’re using pasta instead, cook it separately and add it later during the final step.

Lay the chicken breasts directly on top of the potatoes. Sprinkle the ranch seasoning mix evenly over the chicken, followed by garlic powder and black pepper. Pour the chicken broth around the sides to help create steam and keep everything moist during cooking.

In a separate bowl, mix the cream of chicken soup and sour cream until smooth. Spread this mixture evenly over the chicken, making sure it covers as much surface area as possible. This creamy layer is what gives the casserole its rich, comforting texture.

Cover the slow cooker with the lid and cook on low for 6–7 hours or high for 3–4 hours, until the chicken is fully cooked and tender. Once the cooking time is up, use two forks to gently shred the chicken directly in the slow cooker, mixing it into the creamy sauce and potatoes.

Now comes the best part—cheese. Stir in half of the cheddar and mozzarella cheeses, along with the cooked bacon if using. Sprinkle the remaining cheese evenly over the top. Cover again and let it cook for another 20–30 minutes, just until the cheese is fully melted and bubbly.

If you’re using cooked pasta instead of potatoes, gently fold it in at this stage before adding the final layer of cheese.

Serving Suggestions

Once the cheese has melted, your casserole is ready to serve. Garnish with chopped green onions or fresh parsley for a pop of color and freshness. This dish is hearty enough to enjoy on its own, but it also pairs wonderfully with a simple green salad or steamed vegetables to balance the richness.

Tips for the Best Results

For extra flavor, you can lightly sear the chicken before adding it to the slow cooker, though this step is optional. If you prefer a thicker casserole, leave the lid off for the last 15 minutes of cooking to allow excess moisture to evaporate. You can also swap cheddar for Colby-Jack or pepper jack if you like a little heat.

Leftovers store beautifully and taste even better the next day as the flavors continue to develop. Simply refrigerate in an airtight container for up to three days and reheat gently.

Final Thoughts

This Slow Cooker Cheesy Ranch Chicken Casserole is proof that comfort food doesn’t have to be complicated. With minimal prep and maximum flavor, it’s a recipe you’ll come back to again and again. Creamy, cheesy, and deeply satisfying, it’s the kind of meal that brings everyone to the table—and keeps them coming back for seconds.

You’re Doing It All Wrong: Here’s How to Drink 8 Glasses of Water Each Day

For decades, we’ve heard the same advice repeated everywhere: drink eight glasses of water a day. It sounds simple, yet millions of people still struggle to stay properly hydrated. The truth is, it’s not that you can’t drink enough water—it’s that most people are doing it the wrong way. Hydration isn’t about forcing yourself to gulp down plain water all at once; it’s about timing, balance, and making water work with your body, not against it.

Let’s break the myth, fix the mistakes, and show you a smarter, more effective way to drink eight glasses of water each day.

Why the “8 Glasses Rule” Often Fails

Most people imagine eight full glasses chugged randomly throughout the day. This approach leads to common problems: bloating, frequent bathroom trips, and the feeling that water just “passes through” without any benefit. When water is consumed incorrectly, your body can’t absorb it efficiently.

Hydration is not just about quantity—it’s about absorption. Your cells need water slowly and consistently, supported by minerals and proper timing.

The Biggest Mistakes People Make

Before learning the right method, it’s important to understand what not to do:

  • Drinking large amounts all at once

  • Waiting until you feel thirsty

  • Consuming ice-cold water frequently

  • Drinking most of your water late at night

  • Ignoring electrolytes and minerals

Each of these habits reduces hydration efficiency and puts stress on your kidneys and digestive system.

The Smart Way to Drink 8 Glasses of Water

Instead of forcing eight glasses randomly, think of hydration as a daily ritual, spread evenly and intentionally.

Glass 1: Morning Wake-Up Water

Drink one glass of lukewarm water within 10 minutes of waking up. This jumpstarts digestion, flushes toxins, and gently rehydrates your body after sleep. Adding a few drops of lemon can support digestion, but plain water works just as well.

Glass 2: Before Breakfast

About 20–30 minutes before breakfast, drink your second glass. This prepares your stomach for food and helps prevent overeating.

Glass 3: Mid-Morning Hydration

Sip one glass between breakfast and lunch. This helps maintain energy levels and prevents fatigue that is often mistaken for hunger.

Glass 4: Before Lunch

Drink one glass 20 minutes before lunch. This supports digestion and helps regulate appetite naturally.

Glass 5: Mid-Afternoon Recharge

This is when many people reach for coffee or sugar. Instead, drink a glass of water to fight dehydration-related tiredness and brain fog.

Glass 6: Before Dinner

Another glass 20–30 minutes before dinner supports digestion and prevents heavy evening eating.

Glass 7: Early Evening

Sip slowly, not all at once. This helps your body stay hydrated without disrupting sleep.

Glass 8: Optional Night Glass

Only if you’re truly thirsty, take a few sips—not a full glass—about one hour before bed.

Temperature Matters More Than You Think

Room-temperature or slightly warm water is absorbed better than ice-cold water. Cold water can shock your digestive system, slow absorption, and cause bloating. Warm water encourages circulation and smoother digestion.

Add Minerals for Better Hydration

Water alone isn’t always enough. Your body needs electrolytes—especially sodium, potassium, and magnesium—to absorb water properly.

A simple hydration booster:

  • A pinch of natural sea salt

  • A splash of lemon juice

  • Optional: a teaspoon of honey

This turns plain water into a mineral-rich hydration drink that actually nourishes your cells.

Drink Before Thirst, Not After

Thirst is a late signal of dehydration. By the time you feel thirsty, your body is already lacking fluids. Following a structured hydration schedule keeps your levels stable throughout the day.

Signs You’re Finally Hydrating Correctly

When you drink water the right way, you’ll notice:

  • Improved energy levels

  • Better digestion

  • Clearer skin

  • Fewer headaches

  • Reduced cravings

  • Light-colored urine

These are signs your body is absorbing and using water efficiently.

Quality Over Quantity

Eight glasses is a general guideline, not a strict rule. Your needs vary based on climate, activity level, and body size. The goal is consistent, mindful hydration, not obsession.

Final Thoughts

Drinking eight glasses of water doesn’t have to feel like a chore. When done correctly—at the right time, in the right amount, and with the right support—hydration becomes effortless and deeply beneficial. Stop forcing water and start working with your body. Once you adopt this smarter approach, staying hydrated will feel natural, refreshing, and surprisingly easy.

Lemon Garlic Butter Shrimp

Lemon Garlic Butter Shrimp is one of those timeless dishes that feels both indulgent and refreshingly light at the same time. With tender, juicy shrimp coated in a silky butter sauce infused with fresh garlic and vibrant lemon, this recipe delivers bold flavor in every bite—yet it comes together in less than 20 minutes. Whether served over pasta, spooned onto crusty bread, or paired with steamed vegetables, this dish proves that simple ingredients can create restaurant-quality results at home.

What makes this version unique is the balance: rich butter softened by citrus, garlic gently sautéed to avoid bitterness, and a finishing touch that enhances the shrimp’s natural sweetness without overpowering it. It’s elegant enough for guests and easy enough for a weeknight dinner.

Why Lemon and Garlic Are a Perfect Match for Shrimp

Shrimp has a naturally sweet, briny flavor that pairs beautifully with acidity. Lemon brightens the dish, cutting through the richness of butter, while garlic adds depth and warmth. Butter acts as the luxurious base, carrying all the flavors together into a glossy sauce that clings perfectly to the shrimp.

Unlike heavy cream sauces, this lemon garlic butter sauce feels light and fresh, making it ideal for any season. It’s comforting in winter and refreshing in summer—a true all-year favorite.

Ingredients You’ll Need

To make Lemon Garlic Butter Shrimp, choose the freshest ingredients you can for maximum flavor.

Main Ingredients

  • 1 lb (450 g) large shrimp, peeled and deveined

  • 4 tablespoons unsalted butter

  • 1 tablespoon olive oil

  • 5–6 cloves garlic, finely minced

  • Juice of 1 large lemon (about 3 tablespoons)

  • Zest of ½ lemon

  • Salt, to taste

  • Freshly ground black pepper

Flavor Enhancers

  • ½ teaspoon red chili flakes (optional)

  • 1 teaspoon honey or sugar (optional, balances acidity)

  • 1 tablespoon fresh parsley, finely chopped

Step-by-Step Instructions

1. Prepare the Shrimp

Pat the shrimp dry using paper towels. This step is essential—dry shrimp sear better and develop more flavor. Season lightly with salt and black pepper on both sides and set aside.

2. Heat the Pan

Place a large skillet over medium heat. Add the olive oil and 1 tablespoon of butter. The olive oil prevents the butter from burning while still allowing it to melt smoothly.

3. Sauté the Garlic

Once the butter has melted and begins to foam slightly, add the minced garlic. Stir continuously for 30–40 seconds until fragrant. Be careful not to brown the garlic, as it can become bitter.

4. Cook the Shrimp

Increase the heat slightly to medium-high. Add the shrimp in a single layer. Cook for about 2 minutes on the first side until they turn pink and slightly golden. Flip and cook for another 1–2 minutes. Shrimp cook quickly, so avoid overcooking to keep them tender and juicy.

5. Build the Sauce

Reduce the heat to medium. Add the remaining butter, lemon juice, lemon zest, and red chili flakes if using. Stir gently as the butter melts into the pan juices, creating a glossy sauce.

6. Balance the Flavor

Taste the sauce and adjust seasoning. Add a small amount of honey or sugar if the lemon is too sharp. This subtle sweetness enhances the shrimp without making the dish sweet.

7. Finish and Garnish

Sprinkle fresh parsley over the shrimp, give everything one final toss, and remove from heat immediately.

Serving Suggestions

Lemon Garlic Butter Shrimp is incredibly versatile:

  • Over Pasta: Toss with linguine or spaghetti for a quick seafood pasta.

  • With Rice: Serve over fluffy white rice or lemon-infused basmati.

  • Low-Carb Option: Pair with sautéed zucchini noodles or cauliflower rice.

  • Appetizer Style: Serve with toasted bread to soak up the buttery sauce.

Tips for the Best Shrimp

  • Use large or jumbo shrimp for the juiciest texture.

  • Fresh lemon juice is essential—avoid bottled juice.

  • Don’t overcrowd the pan; cook in batches if needed.

  • Remove shrimp as soon as they curl into a “C” shape—this indicates perfect doneness.

Final Thoughts

Lemon Garlic Butter Shrimp is proof that great cooking doesn’t require complicated techniques or long ingredient lists. This dish highlights the beauty of simplicity, allowing each ingredient to shine while working in perfect harmony. Bright, buttery, garlicky, and deeply satisfying, it’s a recipe you’ll return to again and again—whether you’re cooking for family, friends, or just yourself.

Health Experts Issue New Warning About Magnesium Supplements — Especially for These Two High-Risk Groups

Magnesium is often praised as a “miracle mineral.” It supports muscle function, nerve signaling, blood sugar control, heart rhythm, bone health, and even sleep quality. Because of these benefits, magnesium supplements have become extremely popular, especially among people dealing with stress, muscle cramps, fatigue, or poor sleep.

However, health experts are now issuing a renewed warning: magnesium supplements are not safe for everyone. While magnesium from food is generally harmless, supplemental magnesium—especially in high doses—can pose serious risks for certain individuals. Doctors are urging caution, particularly for two high-risk groups who may unknowingly put their health in danger.

Why Magnesium Supplements Are So Popular

Magnesium deficiency is relatively common due to modern diets low in whole grains, leafy greens, nuts, and seeds. Supplements are marketed as solutions for:

  • Muscle cramps and spasms

  • Anxiety and stress

  • Insomnia

  • Constipation

  • Migraines

  • Heart health support

Because magnesium is available over the counter and often labeled as “natural,” many people assume it is completely safe. Unfortunately, this assumption can be misleading.

The Difference Between Dietary Magnesium and Supplements

Magnesium obtained from food is absorbed slowly and regulated efficiently by the body. Excess magnesium from food is usually excreted without issue.

Supplemental magnesium is different. Pills, powders, and liquids can deliver large doses quickly, overwhelming the body’s ability to regulate levels—especially in people with underlying health conditions.

This can lead to a condition known as hypermagnesemia, or dangerously high magnesium levels in the blood.

High-Risk Group #1: People with Kidney Disease

Health experts agree that people with kidney problems face the greatest risk when taking magnesium supplements.

Why the kidneys matter

Your kidneys are responsible for filtering excess magnesium from the blood and excreting it through urine. When kidney function is impaired—even mildly—magnesium can build up to toxic levels.

Potential dangers

In people with kidney disease, magnesium supplements can cause:

  • Nausea and vomiting

  • Severe diarrhea

  • Muscle weakness

  • Low blood pressure

  • Irregular heartbeat

  • Confusion or lethargy

  • In extreme cases, cardiac arrest

Many patients with early-stage kidney disease don’t even realize they have reduced kidney function, making the risk even greater.

Medical guidance: If you have kidney disease, a history of kidney stones, or reduced kidney function, magnesium supplements should only be taken under direct medical supervision.

High-Risk Group #2: People Taking Certain Medications

The second major high-risk group includes individuals who take specific prescription or over-the-counter medications that interact with magnesium.

Common problematic interactions include:

  • Heart medications (such as calcium channel blockers or drugs affecting heart rhythm)

  • Diuretics (which alter mineral balance)

  • Antibiotics (magnesium can reduce absorption)

  • Osteoporosis medications

  • Proton pump inhibitors (PPIs) used for acid reflux

Magnesium can either reduce the effectiveness of these medications or increase the risk of side effects, including dangerously low blood pressure or abnormal heart rhythms.

Older adults are especially vulnerable because they are more likely to be on multiple medications and may already have reduced kidney efficiency.

Signs You May Be Taking Too Much Magnesium

Even healthy individuals can experience side effects if they exceed recommended doses. Warning signs include:

  • Persistent diarrhea

  • Abdominal cramping

  • Nausea

  • Dizziness

  • Fatigue

  • Weak or slow heartbeat

Severe toxicity can cause breathing difficulties and loss of consciousness, though this is rare and usually linked to excessive supplementation or kidney disease.

How Much Magnesium Is Actually Safe?

For most adults, the tolerable upper intake level from supplements is about 350 mg per day, not including magnesium from food. Many supplements exceed this amount, especially powders and “relaxation” blends.

More is not better when it comes to magnesium.

Safer Alternatives to Supplements

Health experts increasingly recommend meeting magnesium needs through diet first, which carries far fewer risks.

Magnesium-rich foods include:

  • Spinach and leafy greens

  • Almonds and cashews

  • Pumpkin seeds

  • Whole grains

  • Legumes

  • Dark chocolate (in moderation)

These foods provide magnesium along with fiber, antioxidants, and other essential nutrients.

When Supplements May Be Appropriate

Magnesium supplements can still be useful in certain situations, such as medically diagnosed deficiency, migraines, or specific digestive conditions—but only when:

  • Dosage is carefully controlled

  • Kidney function is normal

  • A healthcare professional is involved

Final Takeaway

Magnesium is essential for good health, but supplements are not risk-free. Health experts warn that people with kidney disease and those taking certain medications face significantly higher risks from magnesium supplementation.

Ginger Water: The Healthiest Drink to Burn Fat Naturally

Ginger water has earned its place as one of the simplest yet most powerful natural drinks for overall wellness and gentle fat burning. Used for centuries in traditional medicine, ginger is prized for its warming nature, digestive benefits, and metabolism-supporting properties. When infused into water, it becomes a refreshing, low-calorie drink that fits easily into daily routines and supports a healthier lifestyle without extreme dieting or expensive supplements.

What makes ginger water special is its ability to work with your body, not against it. Instead of promising overnight miracles, it supports the natural processes that help your body burn fat more efficiently, reduce bloating, and improve digestion. Combined with balanced meals and regular movement, ginger water can be a valuable addition to your wellness habits.

Why Ginger Water Helps Burn Fat

Ginger contains active compounds called gingerols and shogaols, which are responsible for its spicy flavor and many of its health benefits. These compounds gently stimulate thermogenesis, a process in which the body produces heat and burns calories. This mild increase in calorie burning may support weight management over time.

Another key benefit is improved digestion. Poor digestion can slow metabolism and lead to bloating and discomfort. Ginger helps stimulate digestive enzymes, allowing your body to break down food more efficiently and absorb nutrients better. When digestion improves, the body is less likely to store excess energy as fat.

Ginger water may also help regulate appetite. Drinking it before meals can promote a feeling of fullness, making it easier to control portion sizes without feeling deprived. Additionally, ginger is known to support balanced blood sugar levels, which can reduce sudden cravings for sugary or high-calorie foods.

Additional Health Benefits of Ginger Water

Beyond fat burning, ginger water offers a wide range of wellness benefits:

  • Reduces bloating and water retention, helping you feel lighter

  • Supports immune health with natural antioxidant properties

  • Eases inflammation, which may benefit joints and muscles

  • Improves circulation, supporting overall energy levels

  • Soothes nausea and stomach discomfort, especially in the morning

These benefits make ginger water a daily drink that supports the whole body, not just weight goals.

Ginger Water Recipe (Simple & Effective)

This recipe is easy to prepare, budget-friendly, and can be enjoyed warm or cold.

Ingredients:

  • 1 medium fresh ginger root

  • 4–5 cups water

  • Optional add-ins: lemon slices, a pinch of cinnamon, or a teaspoon of raw honey

Instructions:

  1. Wash the ginger root thoroughly and peel it lightly.

  2. Slice or grate the ginger into thin pieces.

  3. Bring the water to a boil in a saucepan.

  4. Add the ginger to the boiling water.

  5. Reduce heat and let it simmer for 10–15 minutes.

  6. Remove from heat and allow it to cool slightly.

  7. Strain the ginger pieces if desired.

  8. Add lemon, cinnamon, or honey for flavor if you like.

  9. Drink warm or refrigerate and enjoy chilled.

How and When to Drink Ginger Water

For best results, consistency matters more than quantity. One to two cups per day is sufficient.

  • Morning (on an empty stomach): Helps kick-start metabolism and digestion

  • Before meals: May support appetite control

  • After meals: Aids digestion and reduces bloating

Avoid drinking large amounts late at night if ginger feels too stimulating for you.

Tips to Maximize Fat-Burning Results

  • Pair ginger water with a balanced diet rich in vegetables, lean proteins, and whole foods

  • Stay well hydrated throughout the day

  • Include regular physical activity, even light walking

  • Get adequate sleep, as poor sleep can slow metabolism

Ginger water works best as part of a healthy routine, not as a standalone solution.

Important Notes

While ginger water is safe for most people, those with sensitive stomachs should start with smaller amounts. If you are pregnant, have gallstones, or take blood-thinning medications, consult a healthcare professional before making it a daily habit.

Final Thoughts

Ginger water is a natural, refreshing, and affordable drink that supports fat burning and overall health in a gentle, sustainable way. It doesn’t rely on extreme claims or harsh ingredients—just the natural power of ginger and water working together. By making ginger water a daily habit, you’re choosing a simple step toward better digestion, improved metabolism, and long-term wellness.

Tortilla Wraps with Ground Beef

Tortilla wraps with ground beef are one of those comforting, go-to meals that never disappoint. They are quick to prepare, endlessly customizable, and packed with bold flavors that appeal to both kids and adults. Whether you’re planning a casual family dinner, a game-night snack, or an easy lunch that reheats beautifully, these beef tortilla wraps check all the boxes. With seasoned ground beef, warm tortillas, fresh toppings, and a creamy sauce, every bite delivers satisfaction.

What makes this recipe special is its balance of simplicity and richness. Using everyday ingredients, you can create a wrap that tastes like it came from your favorite restaurant. The beef is juicy and well-seasoned, the tortillas are soft and warm, and the toppings add freshness and texture. Best of all, you can adapt this recipe to suit your taste—spicy, cheesy, or loaded with veggies.

Ingredients for Tortilla Wraps with Ground Beef

For the ground beef filling:

  • 500 grams ground beef (80/20 for best flavor)

  • 1 tablespoon olive oil

  • 1 medium onion, finely chopped

  • 3 cloves garlic, minced

  • 1 teaspoon salt

  • 1 teaspoon black pepper

  • 1 teaspoon paprika

  • 1 teaspoon cumin powder

  • ½ teaspoon chili powder (adjust to taste)

  • 2 tablespoons tomato paste or tomato sauce

  • ¼ cup water or beef broth

For the wraps:

  • 6 to 8 large flour tortillas

  • 1 cup shredded cheddar or mozzarella cheese

  • 1 cup shredded lettuce

  • 1 medium tomato, diced

  • ½ cup sliced bell peppers or onions (optional)

For the creamy sauce (optional but recommended):

  • ½ cup mayonnaise or plain yogurt

  • 1 tablespoon lemon juice

  • ½ teaspoon garlic powder

  • Salt to taste

Step-by-Step Preparation

1. Cook the Ground Beef

Heat olive oil in a large skillet over medium heat. Add the chopped onion and sauté for 2–3 minutes until soft and translucent. Stir in the minced garlic and cook for another 30 seconds until fragrant.

Add the ground beef to the skillet, breaking it apart with a spoon. Cook until browned and fully cooked, about 6–8 minutes. Drain excess fat if necessary.

2. Season the Beef

Once the beef is cooked, add salt, black pepper, paprika, cumin, and chili powder. Stir well to evenly coat the meat with spices. Add tomato paste and water or broth, then simmer for 3–4 minutes until the mixture thickens and becomes juicy but not watery. Taste and adjust seasoning if needed. Remove from heat.

3. Prepare the Sauce

In a small bowl, mix mayonnaise (or yogurt), lemon juice, garlic powder, and salt. Stir until smooth and creamy. Refrigerate until ready to use for a refreshing contrast to the warm beef.

4. Warm the Tortillas

Heat tortillas in a dry pan for about 20 seconds per side or wrap them in foil and warm in the oven. Warm tortillas are flexible and prevent tearing while wrapping.

Assembling the Tortilla Wraps

Lay a warm tortilla flat on a clean surface. Spoon a generous amount of ground beef filling into the center. Sprinkle shredded cheese over the beef so it slightly melts from the heat. Add lettuce, tomatoes, and any extra vegetables you like. Drizzle with the creamy sauce.

Fold in the sides of the tortilla, then roll it tightly from the bottom to form a wrap. Repeat with the remaining tortillas.

For an extra crispy finish, place the wrapped tortillas seam-side down in a hot pan and lightly toast for 1–2 minutes per side until golden.

Serving Suggestions

Tortilla wraps with ground beef are delicious on their own, but they also pair well with sides like fries, coleslaw, potato wedges, or a fresh cucumber salad. Serve them with extra sauce, salsa, or sour cream on the side for dipping.

These wraps are perfect for lunch boxes, casual dinners, or even parties when cut in half and served as handheld bites.

Tips for the Best Beef Tortilla Wraps

  • Use freshly ground beef for the juiciest texture.

  • Don’t overcook the beef; keep it moist with a little broth or sauce.

  • Warm tortillas before wrapping to avoid cracking.

  • Customize spices based on your heat preference.

  • Add corn, olives, or jalapeños for extra flavor.

Why This Recipe Works

This tortilla wrap recipe succeeds because it balances protein, carbs, and fresh ingredients in one satisfying meal. The seasoned beef provides richness, the vegetables add crunch and freshness, and the sauce ties everything together. It’s quick enough for busy weekdays yet tasty enough to serve guests.

Natural Morning Drink to Relieve Pain and Improve Overall Health

Starting your day with the right drink can set the tone for how your body feels and functions all day long. Instead of reaching for sugary beverages or relying on caffeine alone, many people are turning to natural morning drinks that gently support the body, reduce inflammation, and promote overall well-being. One simple yet powerful combination of natural ingredients can help ease joint discomfort, support digestion, boost immunity, and improve energy levels—without harsh chemicals or side effects.

This natural morning drink is inspired by traditional wellness practices and backed by modern nutritional understanding. While it is not a replacement for medical treatment, it can be a valuable addition to a healthy lifestyle.

Why a Morning Drink Matters

After several hours of sleep, your body wakes up slightly dehydrated. Organs such as the liver, kidneys, and digestive system need hydration to function efficiently. A well-chosen morning drink helps:

  • Rehydrate the body

  • Activate digestion

  • Reduce morning stiffness

  • Support circulation

  • Provide gentle detox support

  • Improve mental clarity

When combined with anti-inflammatory and antioxidant-rich ingredients, a morning drink can also help reduce everyday aches and pains, especially those caused by inflammation, poor circulation, or oxidative stress.

The Natural Pain-Relief Morning Drink (Unique Recipe)

Ingredients:

  • 1 cup warm water (not boiling)

  • 1 tablespoon fresh lemon juice

  • 1 teaspoon raw honey

  • ½ teaspoon turmeric powder

  • A pinch of black pepper

  • ½ teaspoon grated fresh ginger (or ginger powder)

  • Optional: 1 teaspoon apple cider vinegar

How to Prepare It

  1. Warm the water until it is comfortably hot, not boiling.

  2. Add turmeric and ginger, stirring well.

  3. Add lemon juice and honey.

  4. Sprinkle in a pinch of black pepper.

  5. Add apple cider vinegar if using.

  6. Stir thoroughly and drink slowly on an empty stomach.

For best results, consume this drink every morning, at least 20–30 minutes before breakfast.

How This Drink Helps Relieve Pain

1. Turmeric: Nature’s Anti-Inflammatory Powerhouse

Turmeric contains curcumin, a compound known for its natural anti-inflammatory properties. Inflammation is a major contributor to joint pain, muscle soreness, and stiffness. When consumed regularly, turmeric may help the body manage inflammation more effectively. Black pepper enhances curcumin absorption, making the combination much more powerful.

2. Ginger: Supports Joints and Muscles

Ginger has been traditionally used to ease muscle discomfort and joint stiffness. It helps improve blood circulation, which allows nutrients to reach tissues more efficiently and supports the removal of waste products that contribute to pain.

3. Lemon: Flushes Toxins and Supports Circulation

Lemon juice is rich in vitamin C and antioxidants. It supports collagen production for joints and helps neutralize harmful free radicals that can worsen inflammation. Lemon also supports liver function, helping the body naturally detoxify.

Overall Health Benefits of This Morning Drink

Improves Digestion

Warm water, ginger, and lemon stimulate digestive enzymes, helping reduce bloating, gas, and sluggish digestion. A healthy gut is essential for nutrient absorption and immune strength.

Boosts Immunity

Honey, lemon, and turmeric all have immune-supporting properties. This drink provides antioxidants that help protect the body from infections and daily stressors.

Supports Heart Health

Ginger and lemon may help promote healthy circulation, while turmeric supports balanced inflammatory responses that are important for heart health.

Enhances Energy Levels

Instead of a sudden caffeine spike, this drink provides steady, natural energy by supporting metabolic processes and hydration.

Promotes Joint Flexibility

Regular use may help reduce morning stiffness and support better mobility over time, especially when combined with light stretching or walking.

Who Can Benefit Most

  • People with joint or muscle stiffness

  • Adults experiencing general body aches

  • Those with sedentary lifestyles

  • Individuals seeking natural wellness routines

  • Anyone wanting a gentle morning detox

Tips for Best Results

  • Be consistent—natural remedies work best over time

  • Pair with a balanced diet rich in fruits and vegetables

  • Stay hydrated throughout the day

  • Include light physical activity

  • Avoid excessive sugar and processed foods

Important Note

This drink is a supportive wellness remedy, not a cure or medical treatment. If you have chronic pain, medical conditions, or are pregnant, consult a healthcare professional before adding new remedies to your routine.

Final Thoughts

Small habits can make a big difference. This natural morning drink is easy to prepare, affordable, and gentle on the body. By nourishing your system from the inside out, you may notice reduced discomfort, better digestion, improved energy, and an overall sense of balance. Sometimes, the most powerful changes begin with a single cup in the morning.

garlic and cloves an unsung duo with unexpected benefits

Garlic and cloves are two humble kitchen staples that have quietly earned a place in traditional medicine systems for centuries. While each ingredient shines on its own, combining garlic and cloves creates a powerful natural duo with surprising benefits for overall wellness, immunity, digestion, and daily vitality. Often overlooked in favor of trendier superfoods, this simple pairing deserves recognition for its versatility, affordability, and time-tested value.

Why Garlic and Cloves Work So Well Together

Garlic is rich in sulfur compounds, especially allicin, which gives it its strong aroma and many of its protective properties. Cloves, on the other hand, are packed with eugenol, a potent plant compound known for its warming and soothing effects. When used together, these two ingredients complement each other beautifully—garlic offers deep internal support, while cloves add balance, warmth, and enhanced absorption.

Traditional cultures have long paired garlic and cloves in home remedies, teas, and infused drinks, not only for flavor but also for their combined effects on the body.

Key Benefits of the Garlic and Cloves Duo

1. Supports Natural Immunity
Garlic has long been associated with immune support, especially during seasonal changes. Cloves add antioxidant compounds that help protect cells from daily stress. Together, they create a simple but effective way to support the body’s natural defenses.

2. Aids Digestion and Gut Comfort
Cloves are known for soothing the digestive tract, reducing bloating, and supporting enzyme activity. Garlic helps stimulate digestive juices and supports healthy gut bacteria. Taken together, they may help improve digestion after heavy or oily meals.

3. Promotes Circulation and Warmth
Both garlic and cloves are warming ingredients. In traditional practices, they are often used to support circulation and help the body feel more energized, especially during colder months or periods of fatigue.

4. Freshens Breath and Oral Health
While garlic alone can leave a strong smell, cloves are famous for their ability to freshen breath. Chewing a clove after garlic consumption has been an old household trick for balancing odor while also supporting oral hygiene.

5. Rich in Antioxidants
Cloves are among the highest antioxidant-containing spices in the world. Garlic adds additional protective plant compounds, making this duo especially supportive against everyday oxidative stress.

UNIE Recipe: Garlic and Clove Wellness Infusion

This simple infusion is easy to prepare at home and can be enjoyed a few times per week as part of a balanced routine.

Ingredients:

  • 2 fresh garlic cloves

  • 4 whole cloves (the spice)

  • 1½ cups water

  • Optional: honey or lemon for taste

Instructions:

  1. Lightly crush the garlic cloves to activate their natural compounds.

  2. Add water to a small pot and bring to a gentle boil.

  3. Add crushed garlic and whole cloves.

  4. Reduce heat and simmer for 8–10 minutes.

  5. Remove from heat, strain, and let it cool slightly.

  6. Add a small amount of honey or lemon if desired.

  7. Drink warm.

How and When to Use It

  • Best consumed in the morning or early evening

  • Limit to one cup per day

  • Use consistently for a few weeks for best results

This infusion is not meant to replace meals or medical treatment but can be a comforting addition to a healthy lifestyle.

Culinary Uses Beyond the Infusion

Garlic and cloves aren’t just for wellness drinks—they are also culinary powerhouses.

  • Savory Dishes: Add whole cloves to soups, stews, or rice dishes alongside garlic for depth and warmth.

  • Infused Oils: Gently warm garlic and cloves in olive oil (do not overheat) to create a fragrant cooking oil.

  • Spice Blends: Ground cloves in tiny amounts enhance garlic-based marinades and sauces.

Tips for Best Results

  • Always use fresh garlic for maximum potency

  • Whole cloves are preferable to pre-ground for freshness

  • Start with small amounts if you are new to this combination

  • Avoid overheating garlic to preserve its beneficial compounds

A Simple Tradition Worth Rediscovering

In a world filled with expensive supplements and complex wellness trends, garlic and cloves remind us that some of the most effective solutions are already in our kitchens. This unsung duo offers a blend of tradition, flavor, and gentle support that fits easily into everyday life.

the best pineapple bake

If there’s one dessert that effortlessly balances tropical brightness with warm, home-baked comfort, it’s a pineapple bake. This dish is soft, buttery, lightly tangy, and finished with a golden top that melts in your mouth. Whether served after a family dinner, at a potluck, or as a cozy weekend treat, this pineapple bake delivers big flavor with simple ingredients. What makes this version special is its perfect texture—not too cakey, not too pudding-like—plus a rich depth that keeps people coming back for seconds.

This recipe has been carefully crafted to highlight pineapple’s natural sweetness while adding just enough richness to feel indulgent without being heavy. Let’s dive into why this truly is the best pineapple bake you’ll ever make.

Why This Pineapple Bake Works So Well

Pineapple is naturally juicy and acidic, which means it pairs beautifully with butter, eggs, and a touch of vanilla. The key is balance. Too much flour makes it dry. Too much liquid turns it soggy. This recipe strikes the sweet spot, creating a soft, custard-like center with a lightly crisp top.

Unlike overly sugary pineapple desserts, this bake lets the fruit shine. The sweetness is gentle, the texture is smooth, and the aroma while baking is irresistible—warm butter, caramelized pineapple, and vanilla filling the kitchen.

Ingredients You’ll Need

  • 2 cups crushed pineapple (with juice, not drained)

  • ¾ cup granulated sugar

  • ½ cup unsalted butter, melted

  • 2 large eggs, room temperature

  • 1 teaspoon vanilla extract

  • ½ cup all-purpose flour

  • ¼ teaspoon salt

  • ½ teaspoon baking powder

  • Optional: ¼ cup shredded coconut or chopped pecans for topping

Step-by-Step Instructions

1. Prepare the Baking Dish

Preheat your oven to 350°F (175°C). Grease an 8×8-inch baking dish with butter or non-stick spray. This ensures easy serving and a beautifully browned edge.

2. Mix the Wet Ingredients

In a large bowl, whisk together the eggs and sugar until the mixture looks pale and slightly thickened. Slowly pour in the melted butter while whisking continuously. Add the vanilla extract and crushed pineapple with all its juice. This moisture is essential for the dessert’s signature texture.

3. Add the Dry Ingredients

Sprinkle in the flour, baking powder, and salt. Gently fold everything together until just combined. Avoid overmixing—this keeps the bake tender rather than dense.

4. Pour and Level

Pour the batter into the prepared baking dish and smooth the top with a spatula. If using coconut or pecans, sprinkle them evenly over the surface for extra flavor and crunch.

5. Bake to Golden Perfection

Bake uncovered for 40–45 minutes, or until the top is lightly golden and the center is set but still soft. A toothpick inserted should come out mostly clean with a few moist crumbs.

6. Cool Slightly Before Serving

Allow the pineapple bake to cool for at least 10–15 minutes. This helps it firm up just enough for clean slices while staying wonderfully moist inside.

Serving Suggestions

This pineapple bake is incredibly versatile. Serve it warm with a scoop of vanilla ice cream for a classic dessert. For a lighter option, pair it with whipped cream or a dollop of Greek yogurt. It’s also delicious served chilled the next day, when the flavors have deepened and the texture becomes even more luscious.

It can even double as a sweet brunch dish—serve alongside coffee or tea, and watch it disappear.

Tips for the Best Results

  • Use canned crushed pineapple in juice, not syrup, for balanced sweetness.

  • Room-temperature eggs blend more smoothly into the batter.

  • Do not overbake—pineapple desserts should stay moist.

  • For a richer version, replace 2 tablespoons of butter with cream cheese.

Easy Variations to Try

  • Tropical Pineapple Bake: Add mango chunks or banana slices.

  • Spiced Version: Mix in a pinch of cinnamon or nutmeg.

  • Lemon Pineapple Bake: Add 1 teaspoon lemon zest for extra brightness.

  • Gluten-Free Option: Substitute all-purpose flour with a 1:1 gluten-free blend.

Final Thoughts

This pineapple bake is proof that simple ingredients can create something truly special. It’s comforting, bright, and endlessly adaptable—perfect for any season and any occasion. Once you try it, it’s likely to become a staple in your dessert rotation.

A Surprising Solution for Persistent Stovetop Grease: Harness the Power of Vaseline

Stubborn stovetop grease is one of those kitchen problems that never seems to go away. No matter how often you wipe, splattered oil hardens, turns sticky, and clings to burners, knobs, and metal surfaces. Many people reach for harsh degreasers, but these can be expensive, abrasive, and unpleasant to use. Surprisingly, a simple product you probably already have at home—Vaseline (petroleum jelly)—can help loosen and remove persistent stovetop grease with minimal effort.

This guide explores why Vaseline works, how to use it safely and effectively, and a step-by-step “unique recipe” cleaning method that makes greasy stovetops shine again.

Why Grease Is So Hard to Remove

Cooking grease is made of fats and oils. When heated repeatedly, these fats oxidize and polymerize, forming a sticky film that bonds tightly to surfaces—especially stainless steel and enamel. Over time, dust and food particles stick to this layer, creating a stubborn mess that resists soap and water.

Traditional degreasers work by breaking down fats chemically, but petroleum jelly works differently—by bonding with grease instead of fighting it.

Why Vaseline Works on Grease

Vaseline is a semi-solid mixture of hydrocarbons, which makes it oil-based. The principle behind its effectiveness is simple chemistry:

Like dissolves like.

Because Vaseline is oil-based, it bonds with and softens hardened grease. Instead of scrubbing aggressively, Vaseline penetrates the grease layer, loosening it so it can be wiped away easily. This makes it especially useful for:

  • Burned-on stovetop grease

  • Sticky residue around knobs

  • Grease splatter on stainless steel surfaces

As a bonus, Vaseline also leaves behind a light protective layer that helps repel future grease buildup.

The Vaseline Stovetop Degreasing Recipe

What You’ll Need

  • 1 tablespoon Vaseline (petroleum jelly)

  • 1 teaspoon baking soda

  • A soft microfiber cloth

  • Paper towels

  • Warm soapy water

Step-by-Step Cleaning Method

Step 1: Prepare the Surface

Make sure the stovetop is completely cool. Wipe away loose crumbs or debris using a dry cloth. This prevents spreading dirt during cleaning.

Step 2: Create the Grease-Lifting Paste

In a small bowl, mix:

  • 1 tablespoon Vaseline

  • 1 teaspoon baking soda

The baking soda adds mild abrasiveness, while Vaseline softens and lifts the grease.

Step 3: Apply to Greasy Areas

Using your finger or a cloth, apply a thin layer of the mixture directly onto greasy spots—especially around burners, edges, and knobs. Don’t overuse; a little goes a long way.

Step 4: Let It Sit

Allow the mixture to sit for 5–10 minutes. This resting time lets the Vaseline penetrate hardened grease, breaking its grip on the surface.

Step 5: Wipe Away the Grease

Using a microfiber cloth, gently wipe the area in circular motions. You’ll notice grease lifting off effortlessly instead of smearing.

For tight areas, such as burner crevices, wrap the cloth around a finger or use a cotton swab.

Step 6: Final Rinse

Dampen a cloth with warm soapy water and wipe the surface again to remove residue. Dry with paper towels for a streak-free finish.

Extra Benefits of Using Vaseline

1. Protective Barrier

After cleaning, a barely visible film of Vaseline can help repel grease and fingerprints. This makes future cleanups easier.

2. Gentle on Surfaces

Unlike harsh chemical cleaners, Vaseline won’t scratch enamel, stainless steel, or glass stovetops when used properly.

3. Cost-Effective

A single jar lasts for years and serves multiple household purposes—cleaning, polishing, lubricating, and more.

Where NOT to Use Vaseline

While Vaseline is surprisingly versatile, avoid using it on:

  • Gas burner ports (can clog them)

  • Electric coil connections

  • Glass cooktops in large amounts (can leave streaks if not wiped thoroughly)

Always wipe away excess thoroughly to prevent slippery surfaces.

Maintenance Tip: Keep Grease Away Longer

Once your stovetop is clean:

  • Wipe spills immediately after cooking (once cooled)

  • Use splatter guards while frying

  • Do a light Vaseline wipe-down once a month for maintenance

These habits prevent grease from hardening again.

Final Thoughts

Using Vaseline to tackle stubborn stovetop grease might sound unconventional, but it’s a simple, effective, and budget-friendly solution rooted in basic chemistry. Instead of scrubbing endlessly or inhaling harsh fumes, this method works smarter—not harder.