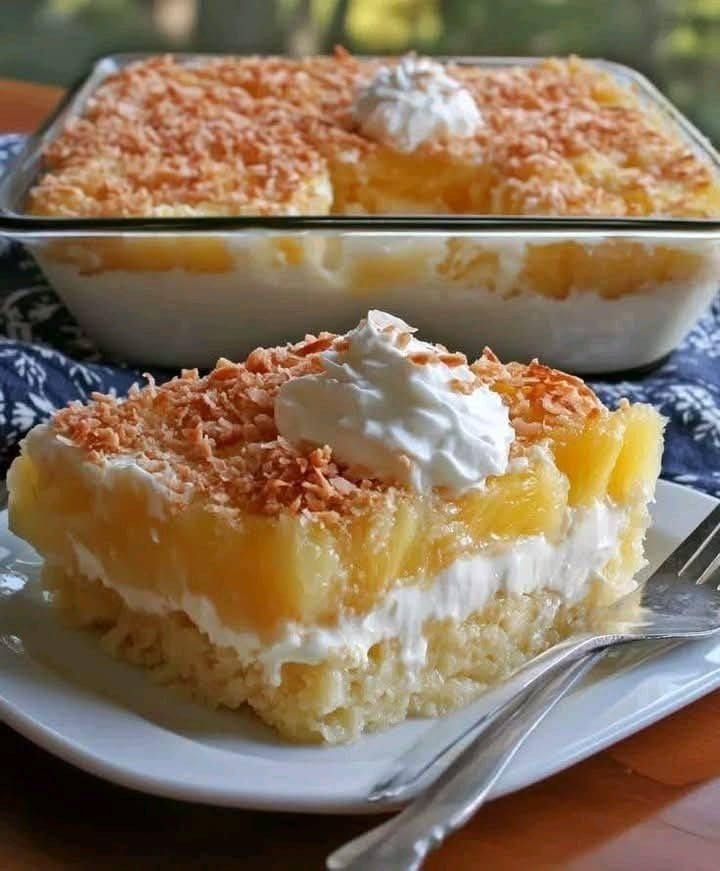
Pineapple Coconut Delight

If you’ve ever dreamed of escaping to a tropical paradise filled with sweet breezes, golden sunshine, and the scent of coconut in the air, then this Pineapple Coconut Delight is the dessert that will take you there with every bite. Combining the lush sweetness of pineapple, the creamy richness of coconut, and a buttery vanilla crust, this dessert is the perfect balance of light, creamy, and refreshing. Whether served chilled on a warm day or as a show-stopping finish to a dinner party, this recipe is sure to win hearts.

Ingredients

For the Crust:

  • 2 cups crushed graham crackers (about 16 whole crackers)

  • ½ cup unsalted butter, melted

  • ¼ cup granulated sugar

For the Filling:

  • 1 (8 oz) package cream cheese, softened

  • ½ cup powdered sugar

  • 1 (8 oz) container whipped topping (Cool Whip), thawed

  • 1 teaspoon pure vanilla extract

For the Pineapple Layer:

  • 1 (20 oz) can crushed pineapple, drained (reserve 2 tablespoons of juice)

  • 1 (3.4 oz) box instant vanilla pudding mix

  • 1 cup cold milk

  • ½ cup sweetened shredded coconut

For the Topping:

  • 1 cup whipped topping (for garnish)

  • ½ cup toasted coconut flakes

  • Maraschino cherries or pineapple wedges (optional, for garnish)

Instructions

Step 1: Prepare the Crust

Begin with the foundation of your tropical dessert – a golden, buttery graham cracker crust. In a medium bowl, combine the crushed graham crackers, melted butter, and granulated sugar. Mix until the texture resembles wet sand. Press the mixture firmly into the bottom of a 9×13-inch baking dish, making sure it’s evenly spread and compacted.
Bake in a preheated oven at 350°F (175°C) for about 8–10 minutes, or until lightly golden. Remove from the oven and let it cool completely before adding any layers.

Step 2: Make the Cream Cheese Layer

In a large bowl, beat the softened cream cheese and powdered sugar together using an electric mixer until smooth and fluffy. Add in the vanilla extract and continue mixing until well blended.
Fold in the whipped topping gently using a spatula until the mixture becomes airy and creamy. Spread this luscious layer evenly over the cooled graham cracker crust. This creamy filling forms a delightful contrast to the tropical layers above it.

Step 3: Prepare the Pineapple Coconut Layer

In a clean bowl, whisk together the cold milk and instant vanilla pudding mix for about 2 minutes, or until it begins to thicken. Stir in the drained crushed pineapple, reserved pineapple juice, and shredded coconut. The pudding mixture will take on a light tropical flavor that ties the dessert together.
Spread this pineapple-coconut mixture over the cream cheese layer, making sure it’s evenly distributed.

Step 4: Add the Final Whipped Topping

Top the entire dessert with a smooth, generous layer of whipped topping. Use a spatula to create soft peaks or swirls on the surface for a decorative finish.

Step 5: Garnish and Chill

For that irresistible finishing touch, sprinkle toasted coconut evenly over the top. You can toast the coconut in a dry skillet over medium heat for about 3–5 minutes until golden brown and fragrant. Optionally, add a few maraschino cherries or pineapple wedges as a garnish.
Refrigerate the dessert for at least 4 hours, or overnight, allowing the layers to set and the flavors to meld together beautifully.

Serving Suggestions

When ready to serve, cut into neat squares or slices using a sharp knife. The dessert is best enjoyed chilled, with the creamy layers firm yet soft enough to melt on your tongue. Pair it with a refreshing glass of pineapple juice or coconut milk for a complete tropical experience.

For an elegant twist, serve individual portions in glass dessert cups, layering the crust, cream cheese filling, and pineapple mixture for a parfait-style presentation. This not only looks stunning but adds a touch of sophistication to any occasion.

Tips for Success

  1. Drain the Pineapple Well: Excess liquid can make the dessert soggy. Press the crushed pineapple through a sieve to remove extra juice before mixing it into the pudding.

  2. Use Fresh Whipped Cream (Optional): If you prefer homemade whipped cream instead of store-bought topping, beat 1½ cups heavy cream with 2 tablespoons powdered sugar until soft peaks form.

  3. Make Ahead: This dessert can be made a day in advance. In fact, it tastes even better the next day when the flavors have fully combined.

  4. Coconut Variation: For a stronger coconut flavor, replace half of the milk in the pudding layer with coconut milk.

  5. Nutty Crunch Option: Sprinkle chopped macadamia nuts or pecans between layers for added texture
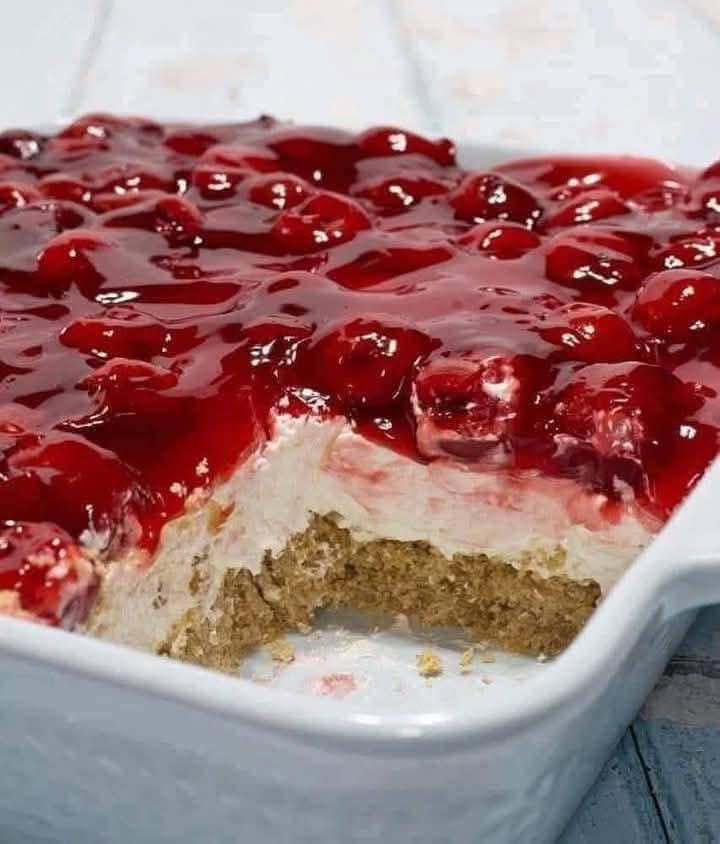
Classic Cherry Delight

If there’s one dessert that perfectly blends creamy indulgence, buttery crunch, and fruity brightness, it’s the Classic Cherry Delight. This beloved no-bake treat has been passed through generations as a family favorite for holidays, potlucks, and Sunday dinners. It’s simple yet elegant, sweet but balanced — the kind of dessert that never fails to bring a smile with every bite. The contrast of a crumbly graham cracker crust, smooth and luscious cream cheese filling, and the glossy ruby-red cherry topping makes it both visually stunning and irresistibly delicious.

What makes this recipe truly unique is the delicate balance of homemade components — from the buttery crust to the whipped cream cheese layer that’s light as air. Unlike overly sweet commercial versions, this one lets the tanginess of cream cheese and the freshness of cherries shine through naturally. The best part? It requires no oven — making it a refreshing and easy dessert to prepare any time of year.

Ingredients

For the Crust:

  • 2 cups graham cracker crumbs (about 14 full crackers)

  • ½ cup unsalted butter, melted

  • ¼ cup granulated sugar

  • 1 teaspoon pure vanilla extract

For the Cream Layer:

  • 8 oz (1 block) cream cheese, softened

  • 1 cup powdered sugar

  • 1 teaspoon lemon juice (for brightness)

  • 1 teaspoon vanilla extract

  • 1 ½ cups heavy whipping cream (or whipped topping)

For the Cherry Topping:

  • 1 can (21 oz) cherry pie filling or 2 cups homemade cherry compote

  • Optional: fresh cherries or shaved white chocolate for garnish

Step-by-Step Instructions

1. Prepare the Crust

Start by combining the graham cracker crumbs, melted butter, sugar, and vanilla in a medium bowl. Stir until the crumbs are evenly coated and the texture resembles wet sand. This mixture should hold together when pressed between your fingers — that’s how you know it’s perfect.
Press the mixture firmly into the bottom of a 9×9-inch baking dish, using the back of a spoon or the bottom of a glass to compact it evenly. Chill the crust in the refrigerator for about 30 minutes while you prepare the creamy layer. This helps the crust set beautifully and prevents it from crumbling when sliced.

2. Make the Cream Cheese Filling

In a large mixing bowl, beat the softened cream cheese with an electric mixer until it’s completely smooth and fluffy — no lumps allowed. Add the powdered sugar, lemon juice, and vanilla extract, and continue to beat until creamy and light.
In a separate chilled bowl, whip the heavy cream to stiff peaks. Fold the whipped cream gently into the cream cheese mixture using a spatula. The key is to fold, not stir — this keeps the mixture airy and mousse-like. The final texture should be luxuriously smooth, with a light and creamy consistency that melts on your tongue.

3. Assemble the Layers

Spread the cream cheese filling evenly over the chilled graham cracker crust. Use an offset spatula to create a smooth surface. This is your velvety middle layer — cool, creamy, and slightly tangy.
Next, spoon the cherry pie filling (or homemade cherry compote) over the top. Spread it gently to cover every corner. The deep red cherries glisten like jewels, making this dessert as beautiful as it is delicious.

4. Chill and Serve

Refrigerate the assembled dessert for at least 4 hours, or preferably overnight. The chilling time allows the flavors to meld and the texture to firm up into that perfect, sliceable consistency.
Before serving, you can garnish the top with a few fresh cherries, a sprinkle of crushed graham crackers, or delicate curls of white chocolate for a touch of elegance.

Homemade Cherry Compote (Optional but Exceptional!)

If you prefer to make your own cherry topping, simply combine 2 cups of pitted cherries (fresh or frozen), ¼ cup sugar, 1 tablespoon cornstarch, 1 teaspoon lemon juice, and a splash of water in a small saucepan. Simmer over medium heat until thickened and glossy. Allow it to cool completely before layering over your dessert. The result is a topping that’s fresher, fruitier, and not overly sweet — a perfect balance to the rich cream layer.

Tips for Perfection

  • Room Temperature Cream Cheese: Always start with softened cream cheese to avoid lumps.

  • Chill Thoroughly: Patience is key! The longer it chills, the cleaner your slices will be.

  • Crust Variations: Try substituting graham crackers with crushed vanilla wafers, digestive biscuits, or even chocolate cookies for a fun twist.

  • Flavor Boosts: Add a hint of almond extract to the cherry topping — it enhances the flavor beautifully.

Why This Recipe Stands Out

While Cherry Delight recipes abound, this version captures the nostalgic flavor of the original with a few modern improvements. The lemon juice brightens the cream cheese filling, balancing its richness. The homemade crust, with a dash of vanilla, deepens the buttery flavor and enhances the aroma. Most importantly, the whipped cream adds volume and silkiness, giving it that melt-in-your-mouth finish that’s lighter than traditional versions made with Cool Whip alone.

Serving Suggestions

Serve each square chilled with a dollop of whipped cream or a drizzle of melted white chocolate. For a festive twist, you can make it in individual dessert cups — perfect for parties or holiday gatherings. It pairs wonderfully with coffee or a glass of cold milk, making it suitable for both fancy dinners and casual treats.

A Dessert That Never Goes Out of Style

The Classic Cherry Delight is more than just a dessert — it’s a memory. It’s the dish you remember from your grandmother’s table, the one that shows up at every family gathering, gleaming red and impossibly inviting. Its simplicity is its strength — minimal ingredients, no baking, and flavors that sing in harmony. Every bite offers a balance of crunch, cream, and fruit that’s as comforting as it is indulgent.

Whether you’re making it for a special occasion or just because you deserve a sweet reward, this Classic Cherry Delight is a timeless treasure that brings joy to every spoonful. One taste, and you’ll understand why this dessert has stood the test of time — sweet, tangy, creamy perfection that truly delights.

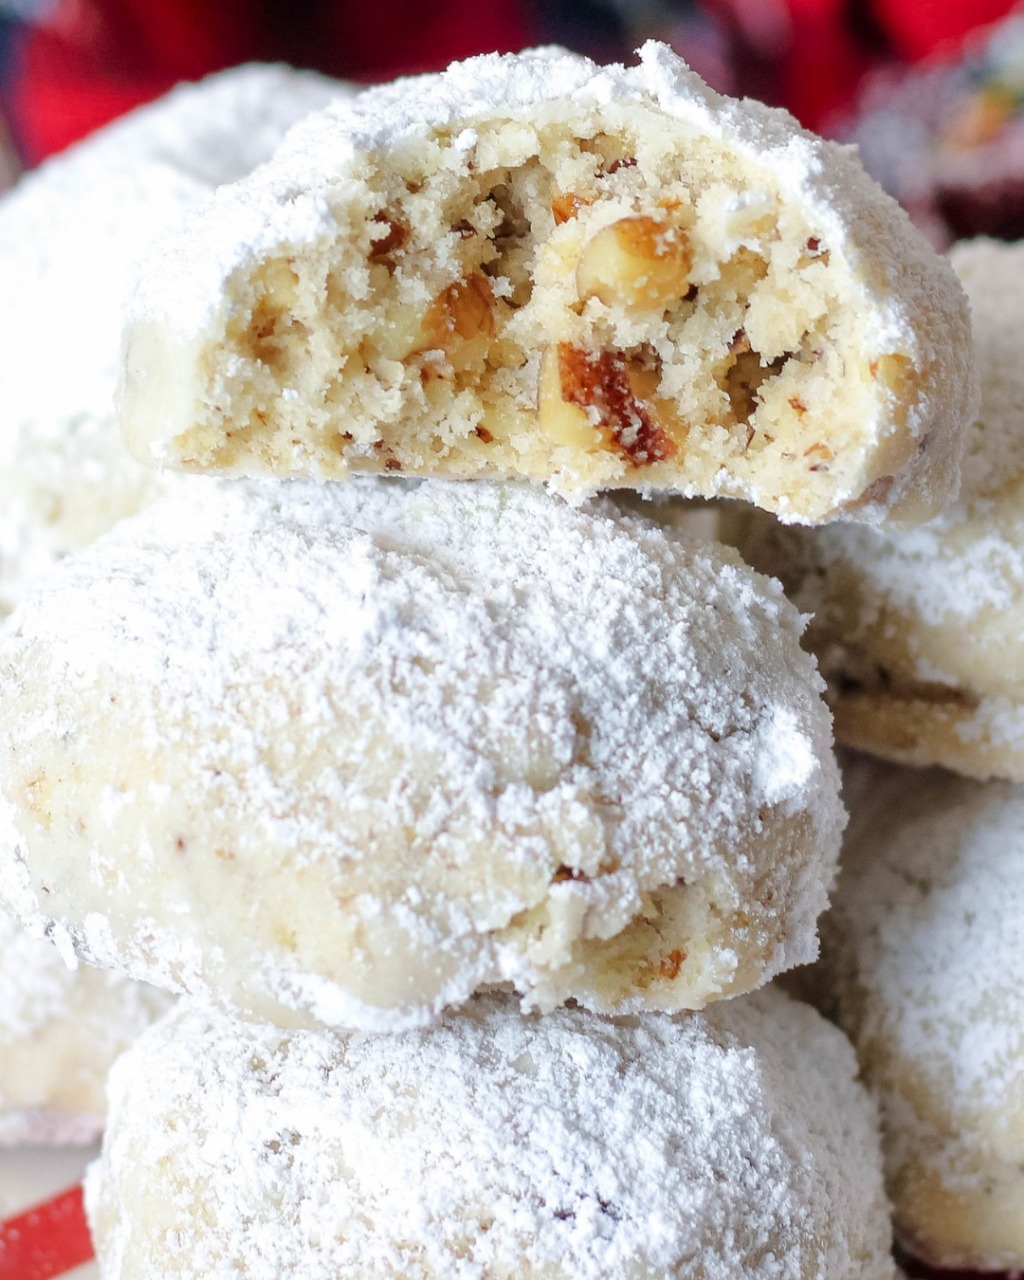
Russian Tea Balls

Russian Tea Balls, also known as Snowball Cookies or Mexican Wedding Cookies, are the epitome of delicate simplicity — buttery, nutty, and dusted in clouds of powdered sugar. These little bites of bliss crumble gently with each nibble, filling your mouth with a melt-in-your-tongue sweetness that makes them irresistible during holidays, tea times, or any day that calls for something cozy and nostalgic. This unique version combines traditional flavor with a hint of vanilla and toasted nuts, creating a rich and aromatic cookie that captures the warmth of a Russian winter in every bite.

Ingredients You’ll Need

(Makes about 30–35 cookies)

  • 1 cup (230g) unsalted butter, softened to room temperature

  • ½ cup (60g) powdered sugar, sifted

  • 1 teaspoon pure vanilla extract

  • 2¼ cups (280g) all-purpose flour, sifted

  • ¼ teaspoon salt

  • ¾ cup (90g) finely chopped toasted walnuts or pecans

  • 1 cup (120g) powdered sugar, for rolling and coating

Why These Ingredients Matter

Each component of this recipe plays a vital role in achieving the perfect texture and taste:

  • Butter: The soul of Russian Tea Balls. It creates a tender, crumbly texture that melts in your mouth. Always use real unsalted butter — it’s what gives these cookies their luxurious richness.

  • Powdered sugar: Unlike granulated sugar, powdered sugar blends seamlessly into the dough, ensuring a smooth, melt-away crumb.

  • Vanilla extract: Adds warmth and depth to the buttery base. You can also try almond extract for a slightly different twist.

  • Flour and salt: Balance the richness of the butter and create structure while maintaining softness.

  • Toasted nuts: Provide a nutty crunch and rich aroma. Toasting enhances their natural oils and flavor, making every bite heavenly.

Step-by-Step Preparation

Step 1: Toast the Nuts

Place your chopped walnuts or pecans on a baking sheet and toast them in a preheated oven at 350°F (175°C) for 6–8 minutes, stirring once halfway through. This step elevates the flavor dramatically — the aroma of toasted nuts mingled with butter later creates the signature “tea ball” essence. Let them cool completely before mixing into the dough.

Step 2: Cream the Butter and Sugar

In a large mixing bowl, beat the softened butter and ½ cup powdered sugar together using an electric mixer on medium speed for 2–3 minutes until light and creamy. This step incorporates air into the mixture, which ensures a tender and airy cookie texture. Add in the vanilla extract and beat for another 30 seconds.

Step 3: Add the Dry Ingredients

In a separate bowl, whisk together the flour and salt. Gradually add the dry mixture to the butter-sugar mixture, blending on low speed until just combined. Avoid overmixing — you want a dough that holds together without becoming tough.

Step 4: Incorporate the Nuts

Gently fold in the cooled, chopped nuts with a spatula or wooden spoon. The dough will be soft but not sticky. If it feels too soft, refrigerate for 20–30 minutes to firm it up slightly — this helps the cookies hold their shape during baking.

Step 5: Shape the Cookies

Preheat your oven to 350°F (175°C) and line a baking sheet with parchment paper. Scoop about 1 tablespoon of dough and roll it into a smooth ball between your palms. Arrange the balls about 1 inch apart on the baking sheet — these cookies don’t spread much, so you can fit quite a few on one tray.

Step 6: Bake to Perfection

Bake for 12–14 minutes, or until the bottoms are lightly golden but the tops remain pale. Be careful not to overbake — the magic lies in their delicate texture. Let the cookies cool on the baking sheet for 5 minutes before transferring them to a wire rack.

Step 7: The Powdered Sugar Snowfall

While the cookies are still slightly warm, roll them gently in a bowl of powdered sugar to coat them completely. Place them back on the rack to cool fully. Once cooled, give them a second coating of powdered sugar for that beautiful, snow-dusted finish. This double layer not only looks enchanting but adds a lovely sweetness to balance the nutty flavor.

Serving and Storage

Serve your Russian Tea Balls with a cup of hot tea, spiced chai, or black coffee. They also make wonderful gifts — tuck them into a decorative tin or glass jar lined with parchment paper and tie with a ribbon for a classic, homemade touch.

To store, keep them in an airtight container at room temperature for up to 10 days. For longer storage, freeze them (without the powdered sugar coating) for up to 2 months. When ready to enjoy, let them thaw and then dust freshly with powdered sugar.

Tips for the Perfect Russian Tea Balls

  1. Use cold hands: Warm hands can soften the dough too much while rolling; rinse your hands under cool water if necessary.

  2. Sift your powdered sugar: This ensures a silky coating with no clumps.

  3. Change up the nuts: Try hazelnuts, pistachios, or almonds for different flavors.

  4. Flavor variations: Add a hint of cinnamon, nutmeg, or lemon zest for a festive twist.

  5. For extra flavor depth: Brown the butter first, cool it, and use it in place of plain butter — the nutty aroma will make these cookies unforgettable.

A Bit of History

Russian Tea Balls are beloved around the world under many names — Mexican Wedding Cookies, Italian Butterballs, and Viennese Crescents, to name a few. Their origins are traced back to medieval Europe, where buttery nut cookies were a symbol of celebration and hospitality. The name “Russian Tea Balls” became popular in America during the mid-20th century, likely due to their association with elegant tea service and old-world charm.

Conclusion

Russian Tea Balls are the embodiment of simple elegance — no fancy frosting, no complicated steps, just pure buttery goodness encased in a snowy sugar coat. They’re a timeless treat that brings warmth to chilly days and sweetness to any gathering. Whether you’re baking them for Christmas, gifting them to loved ones, or simply indulging in a cozy afternoon tea, these delicate cookies promise to melt hearts just as easily as they melt in your mouth.

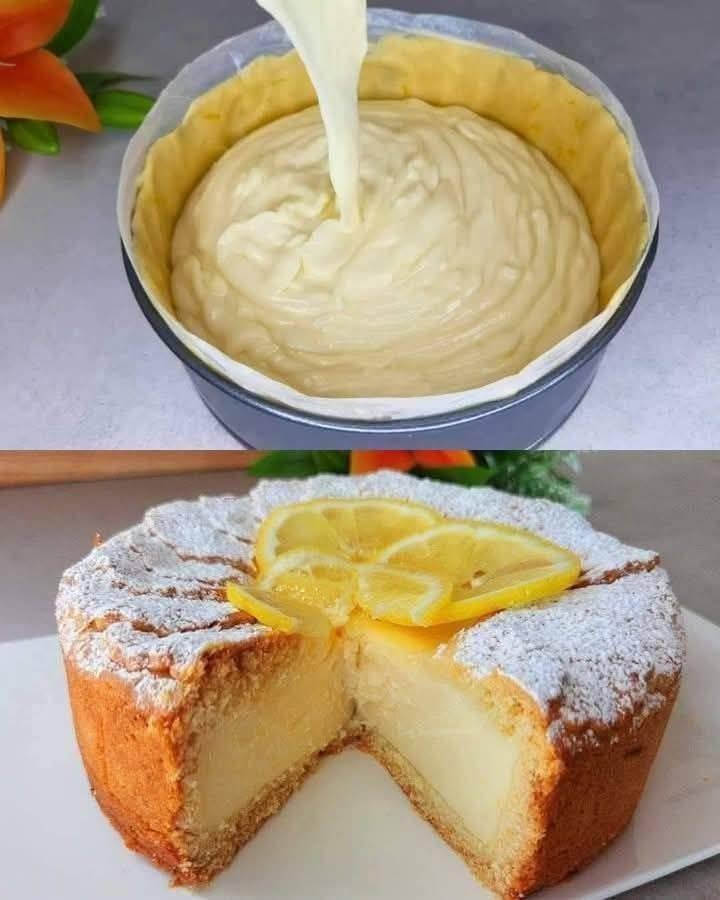
Italian Lemon Magic Cake

Italian Lemon Magic Cake is a dessert that truly lives up to its enchanting name. This delightful treat, light as a cloud and bursting with zesty lemon flavor, seems to perform culinary sorcery in the oven—transforming a single batter into three distinct layers: a dense, custard-like base, a silky lemon cream center, and a fluffy sponge cake top. The magic happens from the precise balance of eggs, milk, butter, sugar, and lemon, creating a dessert that’s elegant enough for a dinner party yet comforting enough for an afternoon tea. The Italian touch lies in the use of fresh lemons (preferably Amalfi or Sicilian lemons) and a subtle hint of vanilla that complements their vibrant acidity.

Ingredients

For the Magic Cake Batter:

  • 4 large eggs, room temperature, separated

  • ¾ cup granulated sugar

  • 1 tablespoon lemon zest (from 2 large lemons)

  • ½ cup unsalted butter, melted and cooled

  • ¾ cup all-purpose flour, sifted

  • 1 ¾ cups whole milk, lukewarm

  • ¼ cup freshly squeezed lemon juice

  • 1 teaspoon pure vanilla extract

  • Pinch of salt

For Finishing:

  • Powdered sugar, for dusting

  • Thin lemon slices or zest curls, for garnish

Step-by-Step Instructions

1. Prepare the Pan and Ingredients

Preheat your oven to 325°F (160°C) and lightly grease an 8×8-inch baking dish. Line the bottom with parchment paper to make removal easy once the cake cools. Separate the eggs carefully—any trace of yolk will prevent your whites from whipping correctly. Set aside.

2. Whip the Egg Whites

In a clean, dry bowl, beat the egg whites with a pinch of salt until they form firm peaks. This step is crucial; these airy whites will later help create the top sponge layer. Once whipped, set them aside in the refrigerator while preparing the rest of the batter.

3. Beat the Yolks, Sugar, and Lemon

In a large mixing bowl, whisk together the egg yolks and granulated sugar until the mixture becomes pale, thick, and creamy—about 3 minutes. Add in the lemon zest, lemon juice, and vanilla extract, stirring until well combined. The aroma will already hint at the cake’s bright, citrusy character.

4. Add Melted Butter

Pour in the melted butter gradually, mixing gently to create a smooth consistency. The butter gives the cake richness while enhancing the lemon flavor. Avoid overmixing; the goal is a silky texture, not a frothy one.

5. Incorporate the Flour

Sift in the flour in two parts, stirring gently with a spatula or whisk after each addition. At this stage, the batter may seem thick, but that’s perfect for the next transformation.

6. Add the Milk Slowly

Slowly pour in the lukewarm milk while whisking continuously. The mixture will appear very thin—almost like a pancake batter—but don’t worry. This fluid consistency is key to creating the cake’s signature three-layer structure once baked.

7. Fold in the Egg Whites

Take the whipped egg whites and gently fold them into the lemon batter in three batches. Use a spatula to incorporate them without deflating the air completely. The batter will look slightly lumpy or uneven, which is normal. These pockets of egg white will rise and separate during baking, forming the airy top layer.

8. Bake the Cake

Pour the batter into the prepared pan and smooth the top. Bake for 50–55 minutes, or until the top is golden and slightly firm to the touch. The center should still have a delicate jiggle, similar to a custard. If it browns too quickly, cover it loosely with foil.

9. Cool and Set

Allow the cake to cool completely in the pan for at least 1 hour. Then, refrigerate it for another 2–3 hours to help the layers fully set. This chilling step intensifies the flavors and creates that clean, beautiful separation between sponge, cream, and custard.

10. Serve

Once chilled, carefully lift the cake from the pan using the parchment paper. Dust the top generously with powdered sugar and garnish with a few lemon zest curls or thin slices. Cut into neat squares and admire the three distinct layers—a buttery custard base, a creamy lemon middle, and a golden sponge top.

Tips for Perfection

  • Use fresh lemons. Bottled juice cannot replicate the aromatic oils from fresh zest and juice.

  • Room-temperature eggs help the batter emulsify smoothly.

  • Don’t skip chilling time—it’s what perfects the layers.

  • For a more intense flavor, substitute ¼ cup milk with heavy cream.

  • A dash of Limoncello (Italian lemon liqueur) can be added for an adult twist.

Gluten-Free Perogies

There’s nothing quite like a plate of warm, buttery perogies — tender dough pockets filled with creamy mashed potatoes, cheese, or savory meats. For those who avoid gluten, this beloved Eastern European comfort food can feel off-limits, but with the right ingredients and technique, you can enjoy authentic gluten-free perogies that taste just as good as traditional ones. This unique recipe captures all the flavors and textures of classic homemade perogies, featuring a soft, pliable gluten-free dough and a rich, cheesy potato filling that melts in your mouth.

Ingredients

For the Gluten-Free Dough:

  • 2 cups gluten-free all-purpose flour blend (with xanthan gum)

  • 1 teaspoon salt

  • 1 large egg

  • ½ cup sour cream (or Greek yogurt for a tangier flavor)

  • 2 tablespoons melted butter

  • 2–4 tablespoons warm water (as needed for consistency)

For the Filling:

  • 3 large russet potatoes, peeled and cubed

  • 1 cup shredded sharp cheddar cheese

  • 2 tablespoons butter

  • ¼ cup sour cream

  • Salt and pepper to taste

  • Optional: ½ cup finely sautéed onions or crumbled cooked bacon for extra flavor

For Serving:

  • Butter for frying

  • Chopped onions or green onions

  • Sour cream for dipping

Step 1: Prepare the Filling

Start by making the filling so it has time to cool before assembling the perogies.

  1. Boil the potatoes: Place cubed potatoes into a large pot, cover with salted water, and bring to a boil. Cook until fork-tender, about 12–15 minutes.

  2. Mash and flavor: Drain the potatoes well, then mash them with butter, sour cream, and shredded cheese until smooth and creamy. Season generously with salt and pepper.

  3. Enhance the flavor (optional): Stir in sautéed onions or crispy bacon for a heartier filling. Set aside to cool completely — a cooled filling makes it easier to shape and seal the perogies later.

Step 2: Make the Gluten-Free Dough

Creating gluten-free dough that’s elastic and workable can be tricky, but sour cream and egg help achieve that tender, supple texture.

  1. Mix the dry ingredients: In a large bowl, whisk together the gluten-free flour and salt.

  2. Add wet ingredients: Create a well in the center and add the egg, sour cream, and melted butter. Mix gently with a fork or spatula until the dough starts to come together.

  3. Adjust the moisture: Add warm water, one tablespoon at a time, until you achieve a soft but not sticky dough.

  4. Knead lightly: Transfer the dough onto a floured surface and knead just until smooth. Gluten-free dough doesn’t require much kneading — overworking can make it crumbly.

  5. Rest: Wrap the dough in plastic wrap and let it rest for 15–20 minutes. This allows the flour to hydrate fully, improving elasticity and ease of rolling.

Step 3: Shape and Fill the Perogies

  1. Roll the dough: Lightly dust a clean surface and rolling pin with gluten-free flour. Roll the dough out to about ⅛-inch thickness.

  2. Cut circles: Use a round cookie cutter or drinking glass (about 3 inches wide) to cut out circles from the dough.

  3. Fill them: Place a teaspoon-sized scoop of the cooled potato filling in the center of each circle.

  4. Seal the edges: Fold the dough over the filling to form a half-moon shape. Press the edges together tightly, then crimp with a fork to ensure a firm seal. If the dough seems dry, moisten the edges with a little water before sealing.

Tip: If the dough cracks, patch it gently with a small piece of extra dough — gluten-free dough can be delicate but is very forgiving when handled carefully.

Step 4: Cook the Perogies

There are two delicious ways to enjoy your gluten-free perogies — boiled and butter-fried.

To boil:

  1. Bring a large pot of salted water to a gentle boil.

  2. Drop in the perogies, a few at a time, to avoid overcrowding.

  3. Cook for 3–4 minutes, or until they float to the surface.

  4. Remove with a slotted spoon and place on a plate lightly brushed with butter to prevent sticking.

To fry:
For a golden, crispy finish, pan-fry the boiled perogies in a skillet with butter until both sides are beautifully browned. Add onions to the pan and cook until caramelized for extra flavor.

Step 5: Serve and Enjoy

Serve your gluten-free perogies hot, topped with caramelized onions, a dollop of sour cream, and a sprinkle of green onions or herbs. They pair perfectly with a side of applesauce, roasted vegetables, or a fresh cucumber salad.

For variation, try different fillings:

  • Savory Mushroom & Onion: Sautéed mushrooms with cream cheese.

  • Spinach & Feta: A Mediterranean twist on the classic.

  • Sweet Cottage Cheese: Add sugar and vanilla for a dessert version.

Tips for Perfect Gluten-Free Perogies

  • Use the right flour blend: Choose a gluten-free flour that includes xanthan gum or guar gum for elasticity. Without it, the dough will tear easily.

  • Don’t overboil: Gluten-free dough can turn mushy if overcooked. Boil just until they float.

  • Freeze for later: Arrange uncooked perogies on a baking sheet and freeze until solid. Then transfer them to a freezer bag. Cook directly from frozen — no need to thaw.

  • Keep dough covered: Gluten-free dough dries quickly, so cover it with a damp towel when working in batches.

Why This Recipe Works

Traditional perogies rely on gluten for that chewy texture and flexible dough. This gluten-free version achieves a similar consistency through the magic of sour cream and butter, which add moisture and tenderness, while the egg provides structure. The filling combines classic comfort — creamy potatoes and melted cheese — with the versatility to adapt to your taste. Whether you fry them for a crispy exterior or enjoy them soft and pillowy right from the pot, these gluten-free perogies deliver everything you love about the original — warmth, nostalgia, and irresistible flavor.

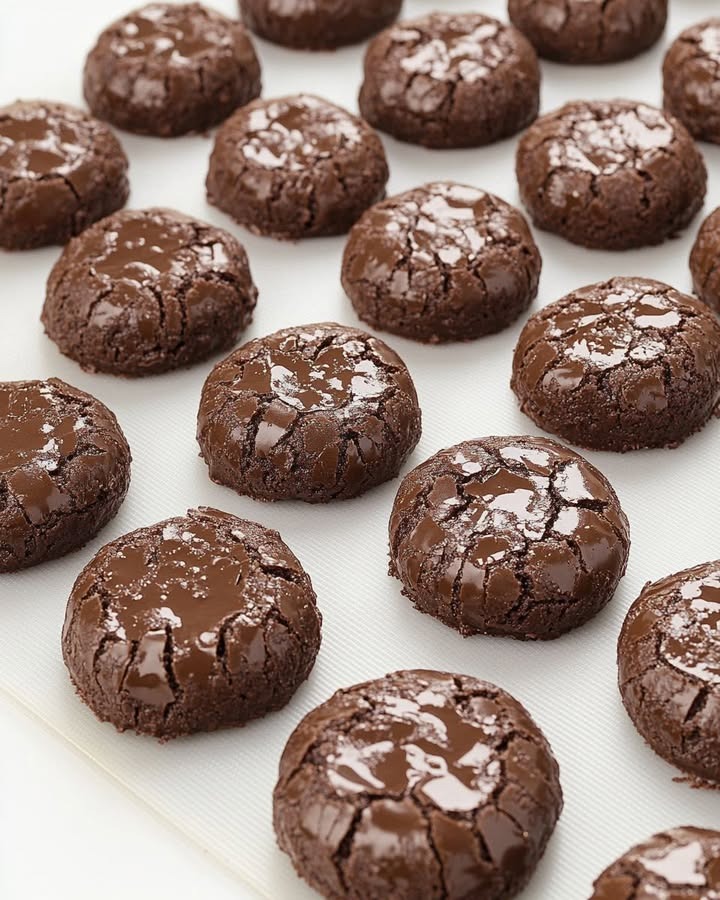
Chocolate Crinkle Cookies

Chocolate Crinkle Cookies are one of those timeless treats that blend the rich flavor of brownies with the soft, chewy texture of cookies. Their signature crinkled appearance, dusted with a snowy coat of powdered sugar, makes them as beautiful as they are delicious. These cookies strike the perfect balance between fudgy and fluffy — ideal for holidays, family gatherings, or simply when you crave a little chocolate magic. This unique recipe takes the classic version a step further with a touch of espresso and melted dark chocolate for deeper, more luxurious flavor.

Ingredients

For the Cookie Dough:

  • 1 cup (120g) all-purpose flour

  • ½ cup (60g) unsweetened cocoa powder

  • 1 teaspoon baking powder

  • ¼ teaspoon salt

  • 1 cup (200g) granulated sugar

  • ¼ cup (60ml) vegetable oil

  • 2 large eggs, room temperature

  • 1 teaspoon pure vanilla extract

  • 1 teaspoon espresso powder (optional but enhances chocolate flavor)

  • 3 ounces (85g) dark chocolate, melted and slightly cooled

For Rolling:

  • ½ cup granulated sugar

  • ¾ cup powdered sugar

Step-by-Step Instructions

Step 1: Prepare the Chocolate Mixture

In a heatproof bowl, melt the dark chocolate either in the microwave in 20-second intervals or over a double boiler. Allow it to cool slightly — it should be smooth and glossy but not hot. The melted chocolate adds richness and moisture, giving these cookies their irresistible fudgy interior.

Step 2: Mix the Wet Ingredients

In a large mixing bowl, whisk together granulated sugar, oil, and eggs until the mixture becomes thick, pale, and glossy — about 2 minutes. Add vanilla extract and espresso powder, whisking until combined. The espresso brings out the deep cocoa notes, creating an indulgent depth that elevates this recipe from ordinary to extraordinary.

Step 3: Incorporate the Chocolate

Stir the cooled melted chocolate into the wet ingredients. Mix gently until the batter is smooth and fully combined. The aroma at this stage is intensely chocolatey, promising a cookie that tastes like a brownie dream come true.

Step 4: Combine Dry Ingredients

In another bowl, sift together flour, cocoa powder, baking powder, and salt. Slowly fold the dry mixture into the wet mixture using a spatula or wooden spoon. Stir until no streaks of flour remain — the dough should be dense and sticky, similar to brownie batter. Avoid overmixing, as that can make the cookies tough instead of tender.

Step 5: Chill the Dough

Cover the bowl with plastic wrap and refrigerate for at least 3–4 hours, or preferably overnight. This chilling step is crucial. It allows the dough to firm up, making it easier to handle, and it also enhances the flavor. When cold, the dough holds its shape better during baking, which helps achieve the signature crinkle pattern.

Step 6: Preheat the Oven

When ready to bake, preheat your oven to 350°F (175°C) and line two baking sheets with parchment paper or silicone baking mats. Prepare your rolling sugars in two separate bowls — one with granulated sugar and another with powdered sugar.

Step 7: Shape the Cookies

Using a tablespoon or small cookie scoop, portion out balls of dough about 1 inch in diameter. Roll each ball first in granulated sugar (this helps the powdered sugar stick better and promotes the crackly surface), then generously coat in powdered sugar. Place the coated dough balls about 2 inches apart on the baking sheet.

Step 8: Bake to Perfection

Bake in the preheated oven for 10–12 minutes, or until the cookies have puffed up, cracked beautifully, and the edges are just set. The centers should still look slightly soft — they’ll continue to firm up as they cool. Overbaking can dry out the cookies, so watch them closely near the end.

Step 9: Cool and Enjoy

Let the cookies cool on the baking sheet for 5 minutes before transferring them to a wire rack to cool completely. Once cooled, the exterior will have a delicate crispness while the inside remains moist, chewy, and intensely chocolatey.

Baking Tips for Perfect Chocolate Crinkle Cookies

  1. Use Quality Cocoa Powder: A rich Dutch-processed cocoa makes a huge difference. It gives a darker color and deeper chocolate flavor.

  2. Chill Thoroughly: Don’t skip the chilling step — it’s what gives you thick, crackly cookies instead of flat ones.

  3. Double Sugar Coating: Rolling in both granulated and powdered sugar ensures the crinkles stay defined and powdery white after baking.

  4. Avoid Overbaking: The cookies might look underdone in the center when you take them out, but that’s perfect — they’ll firm up as they cool, leaving you with the ultimate fudgy bite.

  5. Flavor Variations: Add orange zest for a citrus twist, or a pinch of cinnamon and cayenne for a Mexican chocolate vibe.

Storage and Serving

Store your Chocolate Crinkle Cookies in an airtight container at room temperature for up to 5 days. For longer storage, freeze the unbaked dough balls for up to 2 months — simply thaw slightly and roll in sugars before baking.

Serve them with a glass of cold milk, a warm mug of coffee, or a scoop of vanilla ice cream for a luxurious dessert experience. Their elegant crinkled look also makes them a festive addition to cookie trays, holiday parties, or gift boxes.

Why This Recipe Is Unique

What makes this version of Chocolate Crinkle Cookies special is its rich combination of melted dark chocolate and espresso — two ingredients that deepen and enhance the flavor far beyond the traditional cocoa-only version. The extra granulated sugar coating helps create a glossy, crackled shell that contrasts beautifully with the soft, brownie-like interior. The balance of textures — crisp on the outside, molten and chewy inside — makes every bite pure chocolate heaven.

These cookies capture everything we love about homemade baking: the aroma that fills the kitchen, the joy of watching them crack open in the oven, and that first melt-in-your-mouth bite of cocoa bliss. Whether you bake them for a celebration or as a cozy treat on a rainy afternoon, this recipe guarantees a cookie that’s as stunning as it is unforgettable.

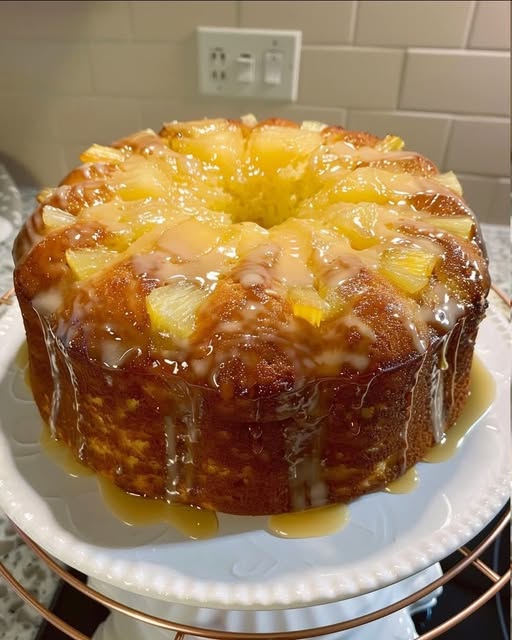
Pineapple Pound Cake

If you crave a dessert that’s buttery, rich, and infused with a sunny tropical twist, look no further than this Pineapple Pound Cake. This cake beautifully combines the dense, velvety texture of a traditional pound cake with the juicy sweetness of crushed pineapple, creating a dessert that’s perfect for any season. Each slice bursts with a golden, fruity aroma, delivering a taste that feels like a slice of paradise. Whether served as a teatime treat, a brunch centerpiece, or a special dessert after dinner, this pineapple pound cake stands out for its flavor, texture, and irresistible glaze.

Why You’ll Love This Recipe

This isn’t just any pound cake — it’s a tropical reinvention. The crushed pineapple doesn’t just add flavor; it keeps the crumb incredibly moist while infusing every bite with subtle tang and sweetness. A touch of vanilla rounds out the flavor, while a buttery glaze with pineapple juice enhances the overall richness. Plus, it’s a one-bowl wonder, meaning you can whip it up with minimal fuss. The result? A soft, fragrant cake that tastes like sunshine and comfort in one bite.

Ingredients

For the Cake:

  • 1 cup (2 sticks) unsalted butter, softened

  • 2 cups granulated sugar

  • 4 large eggs, room temperature

  • 1 teaspoon pure vanilla extract

  • 3 cups all-purpose flour

  • 2 teaspoons baking powder

  • ½ teaspoon salt

  • 1 cup sour cream or full-fat yogurt

  • 1 (20-ounce) can crushed pineapple (with juice, not drained)

For the Pineapple Glaze:

  • 1 cup powdered sugar

  • 2 tablespoons pineapple juice (from the canned pineapple)

  • 1 teaspoon melted butter

  • Optional: ½ teaspoon vanilla or rum extract for extra flavor

Instructions

Step 1: Prepare the Pan

Preheat your oven to 325°F (160°C). Grease and flour a 10-inch bundt pan or a loaf pan thoroughly, ensuring every crevice is coated to prevent sticking. You can also line the bottom with parchment paper for easier removal.

Step 2: Cream Butter and Sugar

In a large mixing bowl, beat the softened butter and sugar together until light and fluffy — this step is key for achieving that signature pound cake texture. Use an electric mixer on medium speed for about 3–4 minutes, scraping the sides as needed.

Step 3: Add Eggs and Vanilla

Add the eggs one at a time, mixing well after each addition. Stir in the vanilla extract. This builds the rich, custard-like base that defines classic pound cakes.

Step 4: Combine Dry Ingredients

In a separate bowl, whisk together the flour, baking powder, and salt. Gradually add the dry mixture to the butter mixture, alternating with the sour cream. Begin and end with the flour mixture. Mix gently until just combined — do not overmix.

Step 5: Fold in Pineapple

Fold in the crushed pineapple along with its juice using a spatula. The batter will be thick but smooth and speckled with bits of golden pineapple.

Step 6: Bake the Cake

Pour the batter evenly into your prepared pan and smooth the top. Bake in the preheated oven for 60–70 minutes, or until a toothpick inserted into the center comes out clean. The top should be golden brown, and the kitchen will fill with the heavenly aroma of pineapple and butter.

Step 7: Cool Completely

Allow the cake to cool in the pan for about 15 minutes before gently inverting it onto a wire rack. Let it cool completely before adding the glaze.

Step 8: Make the Glaze

In a small bowl, whisk together powdered sugar, pineapple juice, melted butter, and optional extract until smooth. Adjust consistency by adding a few drops more juice if needed — it should be pourable but not runny.

Step 9: Glaze and Serve

Drizzle the glaze generously over the cooled cake, letting it drip down the sides. Garnish with small pineapple chunks or toasted coconut flakes for a tropical finish. Slice and serve slightly warm or at room temperature.

Tips for Success

  1. Use Room-Temperature Ingredients: Butter, eggs, and sour cream blend more easily when they’re not cold, ensuring a smoother, lighter batter.

  2. Don’t Drain the Pineapple: The juice adds moisture and flavor that make this cake extra soft and delicious.

  3. Avoid Overmixing: Once the flour is added, mix only until incorporated. Overmixing can lead to a dense or dry texture.

  4. Perfect Baking Time: Check the cake at the 60-minute mark — ovens vary. If the top browns too quickly, loosely cover with foil.

  5. Enhance the Flavor: A teaspoon of rum or coconut extract adds a deeper tropical note that complements the pineapple beautifully.

Serving Suggestions

This pineapple pound cake is wonderfully versatile. Enjoy it plain, or elevate it with toppings:

  • Serve with a dollop of whipped cream and fresh pineapple chunks.

  • Add a scoop of vanilla or coconut ice cream for a dessert that feels like a tropical getaway.

  • Toast leftover slices and serve with butter and honey for a decadent breakfast.

You can also transform it into a show-stopping trifle by layering cubes of the cake with whipped cream, crushed pineapple, and shredded coconut.

Storage and Make-Ahead Tips

  • Room Temperature: Store covered for up to 3 days in an airtight container.

  • Refrigerator: Keeps fresh for up to 6 days; bring to room temperature before serving.

  • Freezer: Wrap tightly in plastic wrap and foil; freeze for up to 2 months. Thaw overnight in the fridge before glazing.

Final Thoughts

This Pineapple Pound Cake captures the heart of home baking — it’s simple, rich, and packed with comforting sweetness. Each slice tells a story of buttery nostalgia, made exotic with pineapple’s bright tang. Whether baked for family gatherings, picnics, or quiet evenings with tea, it never fails to impress. From its golden crust to its tender crumb and tropical glaze,

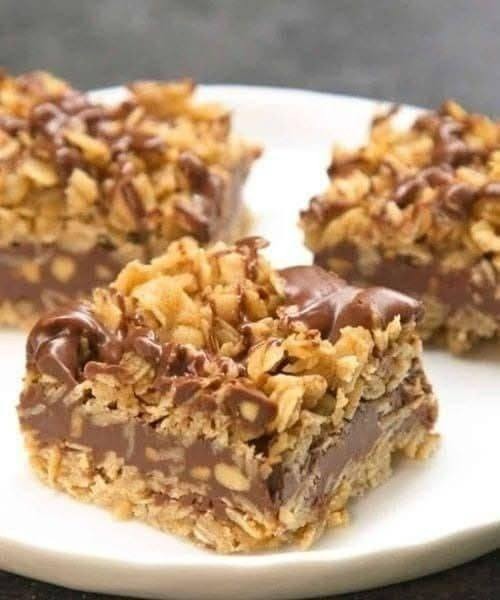
Oatmeal Peanut Butter Chocolate Bars

There’s something irresistibly heartwarming about the combination of oats, creamy peanut butter, and rich chocolate. It’s a trio that balances nutty, sweet, and hearty flavors into one comforting dessert. This Oatmeal Peanut Butter Chocolate Bar recipe takes those familiar pantry ingredients and turns them into a chewy, gooey, and slightly crisp masterpiece that feels both indulgent and nourishing. Whether you’re baking for a family treat, meal prep snack, or something to pair with your morning coffee, these bars hit the perfect balance between wholesome and decadent.

Ingredients

For the Oatmeal Layer:

  • 1 cup (2 sticks) unsalted butter, melted

  • 1 cup packed brown sugar

  • ½ cup granulated sugar

  • 2 teaspoons pure vanilla extract

  • 2 large eggs

  • 2 ½ cups old-fashioned rolled oats

  • 2 cups all-purpose flour

  • 1 teaspoon baking soda

  • ½ teaspoon salt

For the Peanut Butter Chocolate Filling:

  • 1 ½ cups creamy peanut butter

  • 1 ½ cups semi-sweet chocolate chips

  • ½ cup sweetened condensed milk

  • 1 teaspoon vanilla extract

  • Pinch of salt

Optional toppings:

  • ¼ cup chopped peanuts or mini chocolate chips

  • A drizzle of melted peanut butter or caramel

Directions

Step 1: Preheat and Prepare

Preheat your oven to 350°F (175°C) and line a 9×13-inch baking pan with parchment paper, leaving a little overhang for easy removal. Lightly grease the paper with butter or nonstick spray.

This recipe begins like any good comfort dessert — with butter and sugar. The melted butter adds moisture and richness, while the brown sugar lends a caramel undertone that pairs beautifully with oats and peanut butter.

Step 2: Make the Oatmeal Base

In a large mixing bowl, whisk together the melted butter, brown sugar, and granulated sugar until smooth and glossy. Beat in the eggs one at a time, followed by the vanilla extract.

In a separate bowl, combine the flour, rolled oats, baking soda, and salt. Slowly add the dry mixture into the wet ingredients, stirring just until combined. The batter should be thick, slightly sticky, and aromatic — a preview of the chewy layers to come.

Press about two-thirds of this oatmeal mixture evenly into the bottom of your prepared pan. Use the back of a spatula or your fingers to smooth it into an even layer.

Step 3: Prepare the Peanut Butter Chocolate Filling

In a medium saucepan, combine peanut butter, chocolate chips, and sweetened condensed milk over low heat. Stir continuously until the mixture melts into a silky, luscious sauce. Add in vanilla extract and a pinch of salt to enhance the flavors.

This filling is what transforms the bars from ordinary to extraordinary. It’s creamy, slightly salty, and luxuriously chocolatey — a perfect contrast to the hearty oat base. Pour the warm mixture over the oatmeal layer in your pan, spreading it evenly to the corners.

Step 4: Add the Topping

Crumble the remaining oatmeal mixture evenly over the peanut butter chocolate filling. It doesn’t need to be perfect — those rustic pockets of oat clusters will bake into golden, crispy bites that beautifully contrast the gooey filling beneath.

If desired, sprinkle chopped peanuts or mini chocolate chips on top for extra texture and flavor.

Step 5: Bake to Perfection

Bake for 25–30 minutes, or until the top turns golden brown and the edges start to crisp. The filling will still appear slightly soft, but it will firm up as it cools.

Remove from the oven and let the bars cool completely in the pan on a wire rack. Once cool, use the parchment paper to lift them out and cut into neat squares or rectangles.

Tips for the Perfect Bars

  1. Oats Matter: Use old-fashioned rolled oats, not quick oats. They hold their texture better and give a more satisfying chew.

  2. Peanut Butter Choice: Creamy peanut butter melts smoothly, but you can use crunchy if you want a nutty texture. Avoid natural peanut butters that separate easily, as they may alter the consistency.

  3. Don’t Overbake: The bars should be slightly soft when you remove them from the oven. Overbaking can make them dry instead of chewy.

  4. Cooling Is Key: Give the bars at least one hour to cool before slicing; the filling sets during this time, making for cleaner cuts.

  5. Storage: Store in an airtight container at room temperature for up to 5 days, or refrigerate for a firmer texture. They also freeze beautifully for up to 3 months.

Serving Ideas

  • For Breakfast Energy: Enjoy a square with a glass of milk or coffee — the oats and peanut butter make it a surprisingly filling start.

  • Dessert Delight: Warm slightly and serve with a scoop of vanilla ice cream for an indulgent treat.

  • Lunchbox Treats: Wrap individual squares in parchment for easy grab-and-go snacks.

Why This Recipe Works

This unique recipe blends nostalgic flavors with modern texture and balance. The buttery oat crust adds structure and chewiness, the peanut butter chocolate layer delivers creaminess and depth, and the crumbly top provides that golden crisp bite. The sweetness isn’t overwhelming — instead, it’s comfortingly balanced with a hint of salt and nuttiness.

Unlike classic oatmeal cookies, these bars are thicker, heartier, and more layered in flavor. The sweetened condensed milk in the filling ensures every bite stays moist while enhancing the chocolate’s richness. It’s a simple technique that makes the bars taste as though they came straight from a bakery.

Final Thoughts

The Oatmeal Peanut Butter Chocolate Bars are a masterpiece of texture and taste — chewy, fudgy, and perfectly balanced. Each layer tells its own story: the wholesome oats remind you of homey breakfasts, the peanut butter adds a nostalgic creaminess, and the chocolate ties everything together with its smooth sweetness.

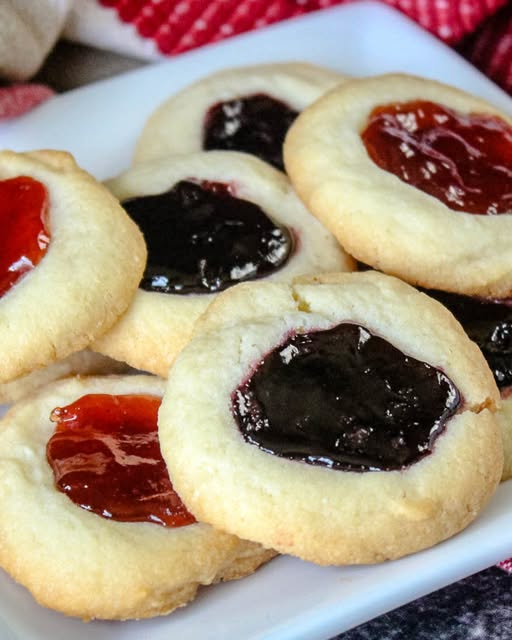
Homemade Thumbprint Cookies Recipe

There’s something undeniably nostalgic about thumbprint cookies — those tender, buttery delights crowned with a jewel of jam or chocolate in the center. This cookie is a perfect balance between elegance and simplicity, buttery richness and fruity sweetness. Whether you’re baking for the holidays, a tea party, or just craving something heartwarming, these cookies never disappoint. The recipe below brings a unique twist: a buttery almond dough that melts in your mouth, paired with vibrant jam fillings that add color and flavor.

Ingredients

For the Cookies:

  • 1 cup (2 sticks) unsalted butter, softened

  • 2/3 cup granulated sugar

  • 1 large egg yolk

  • 1 ½ teaspoons pure vanilla extract

  • ¼ teaspoon almond extract (optional but recommended)

  • 2 ¼ cups all-purpose flour

  • ¼ teaspoon salt

For Rolling:

  • 1 large egg white (lightly beaten)

  • ½ cup finely chopped almonds or crushed pecans (optional for coating)

For the Filling:

  • ½ cup raspberry jam (or your choice: apricot, strawberry, lemon curd, or Nutella)

Optional Garnish:

  • Powdered sugar for dusting after baking

  • Melted white or dark chocolate drizzle

Step-by-Step Instructions

1. Prepare the Dough

In a large mixing bowl, cream together butter and sugar until light and fluffy — about 2 to 3 minutes using a hand or stand mixer. This step ensures air gets incorporated into the dough, resulting in soft, tender cookies.

Add in the egg yolk, vanilla extract, and almond extract, beating just until combined. The almond extract is optional but gives the cookies a subtle nutty depth that pairs beautifully with the jam filling.

In a separate bowl, whisk together flour and salt. Gradually add the dry ingredients to the butter mixture, mixing until a smooth dough forms. If the dough feels too sticky, add an extra tablespoon of flour; if too crumbly, a teaspoon of milk will bring it together.

2. Chill the Dough

Once the dough is mixed, shape it into a disk and wrap it tightly in plastic wrap. Chill for at least 45 minutes (or up to overnight). Chilling helps the butter firm up and prevents the cookies from spreading too much while baking.

3. Shape the Cookies

Preheat your oven to 350°F (175°C) and line a baking sheet with parchment paper.

Scoop out 1-inch portions of dough and roll them into smooth balls. If you want a crunchier exterior, dip each dough ball in the beaten egg white and then roll in crushed almonds or pecans before placing them on the baking sheet.

Using your thumb or the back of a teaspoon, press a small well in the center of each cookie. This will be the space for your jam filling. Be gentle — if the dough cracks around the edges, simply pinch it back together.

4. Fill and Bake

Spoon about ½ teaspoon of jam into the indentation of each cookie. Don’t overfill; the jam will bubble slightly during baking and can overflow if there’s too much.

Bake the cookies for 12–14 minutes, or until the edges are just lightly golden. The centers should remain pale and soft. Rotate the baking sheet halfway through to ensure even baking.

Remove from the oven and let the cookies cool on the baking sheet for 5 minutes before transferring them to a wire rack to cool completely.

5. Optional Finishing Touches

Once cooled, dust the tops lightly with powdered sugar for a snowy, festive look. Alternatively, drizzle with melted chocolate — white chocolate looks especially stunning over raspberry or strawberry jam.

For an even fancier version, mix two jams side by side in one cookie (like raspberry and apricot) for a marbled jewel effect that’s both beautiful and delicious.

Flavor Variations

One of the best things about thumbprint cookies is how adaptable they are. Here are a few creative twists you can try:

  1. Chocolate Lovers’ Delight:
    Replace jam with Nutella, chocolate ganache, or even salted caramel sauce. Sprinkle with sea salt for an elegant touch.

  2. Lemon Zest Dream:
    Add 1 tablespoon of lemon zest to the dough and fill with lemon curd for a tangy and bright version perfect for spring or tea parties.

  3. Coconut Paradise:
    Roll the dough balls in shredded sweetened coconut before baking, then fill the centers with pineapple or mango jam.

  4. Holiday Edition:
    Use red raspberry jam and green-tinted icing for a festive Christmas cookie platter.

  5. Gluten-Free Option:
    Substitute almond flour for half of the all-purpose flour for a naturally nutty and gluten-friendly texture.

Storage and Serving Tips

These cookies can be stored at room temperature for up to 5 days in an airtight container. For longer storage, refrigerate for up to 10 days or freeze for up to 3 months.

If freezing, place them in a single layer on a baking sheet until solid, then transfer to a freezer bag. Thaw at room temperature before serving. The jam centers remain vibrant and glossy even after thawing, making them a perfect make-ahead treat for holidays or gatherings.

Serve them with tea, coffee, or a glass of cold milk for a comforting experience that feels like home.

Why You’ll Love This Recipe

What makes this thumbprint cookie recipe unique is its combination of rich buttery flavor, almond undertone, and customizable fillings. The dough is soft and delicate but sturdy enough to hold its shape, and the jam filling adds a beautiful contrast of texture and color. Every bite delivers a perfect mix of buttery crumble and fruity sweetness.

Beyond the taste, these cookies are also visually stunning — the glossy jam centers gleam like jewels against the golden cookie base. They make wonderful edible gifts when packaged in a tin or cellophane bag with a ribbon.

Most importantly, this recipe captures the spirit of homemade baking: simple ingredients transformed into something that feels special and nostalgic.

Final Thoughts

Homemade thumbprint cookies are proof that the most delightful desserts don’t have to be complicated. With just a few pantry staples, a spoonful of jam, and a little love, you can create a treat that’s elegant enough for parties and comforting enough for everyday enjoyment.

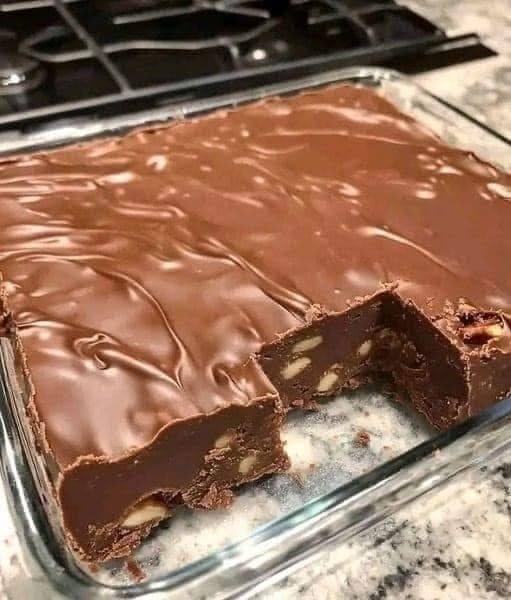
Paula Deen’s 5-Minute Fudge

If there’s one dessert that captures the spirit of Southern comfort and nostalgia, it’s Paula Deen’s 5-Minute Fudge. This recipe embodies the simplicity and warmth that Paula Deen is famous for — creamy, chocolatey, rich, and made with love. What makes this fudge so special isn’t just how delicious it tastes but how unbelievably quick and easy it is to make. With only a handful of ingredients and five minutes of cooking time, you can have a tray of decadent fudge ready to cool and cut — perfect for holidays, potlucks, or just to satisfy your sweet cravings.

A Sweet Southern Tradition

Fudge has long been a cherished treat across American kitchens, but Paula Deen’s version stands out for its old-fashioned charm and no-fuss preparation. Traditional fudge recipes can be intimidating — requiring candy thermometers, precise temperatures, and constant stirring. But Paula’s recipe brings that same silky-smooth texture with none of the stress. It’s the perfect introduction to homemade candy making, even for beginners.

The secret lies in a smart combination of sweetened condensed milk, chocolate chips, butter, and marshmallows, which work together to create a luscious, melt-in-your-mouth texture without needing to boil sugar to the softball stage. In just minutes, these humble ingredients transform into something magical — soft, rich, and delightfully sweet fudge that tastes like it took hours to make.

Ingredients You’ll Need

Here’s what you’ll need to make Paula Deen’s famous 5-minute fudge:

  • 1 ⅔ cups granulated sugar

  • 2/3 cup evaporated milk

  • 2 tablespoons unsalted butter

  • 1/2 teaspoon salt

  • 1 (6-ounce) package of semisweet chocolate chips

  • 16 large marshmallows (or about 2 cups mini marshmallows)

  • 1 teaspoon pure vanilla extract

  • 1/2 cup chopped pecans or walnuts (optional)

This combination creates a fudge that’s perfectly balanced — not too dense, not too soft, with a deep chocolate flavor that pairs beautifully with crunchy nuts. You can swap the semisweet chips for milk chocolate or even white chocolate for a fun twist.

Step-by-Step Instructions

Step 1: Prepare Your Pan
Line an 8×8-inch baking dish with parchment paper or foil, leaving a little overhang on the sides for easy removal later. Lightly grease it with butter or nonstick spray.

Step 2: Combine the Base Ingredients
In a medium saucepan, add the sugar, evaporated milk, butter, and salt. Place the saucepan over medium heat and bring the mixture to a rolling boil while stirring constantly. Once it begins to boil, continue stirring for about 4–5 minutes. This helps the sugar dissolve completely and gives the fudge its smooth texture.

Step 3: Add the Chocolate and Marshmallows
Remove the pan from heat and quickly stir in the chocolate chips and marshmallows. The residual heat will melt them beautifully. Stir until the mixture becomes thick, glossy, and completely smooth — this should take about a minute or two.

Step 4: Flavor and Fold in the Nuts
Once everything is melted and combined, stir in the vanilla extract for a warm, aromatic finish. If you’re adding pecans or walnuts, fold them in gently. The nuts give the fudge a classic Southern flair and a pleasant crunch that balances the creamy texture.

Step 5: Pour and Set
Quickly pour the fudge mixture into your prepared baking dish and spread it evenly with a spatula. It will start to set fast, so work efficiently. Let it cool at room temperature for about 1–2 hours, or refrigerate it for about 45 minutes if you’re in a hurry. Once firm, lift it out of the pan using the parchment overhang and cut into small squares.

Tips for Perfect 5-Minute Fudge

  1. Don’t Overcook – Boil the milk and sugar mixture only for about 5 minutes. Overcooking can make the fudge grainy.

  2. Stir Constantly – Keep the spoon moving to prevent sticking or scorching.

  3. Use Quality Chocolate – High-quality chocolate chips make all the difference in flavor and texture.

  4. Mix-Ins – Get creative! Try adding crushed candy canes, peanut butter swirls, toffee bits, or dried cranberries for a fun twist.

  5. Storage – Store the fudge in an airtight container at room temperature for up to a week, or refrigerate it for longer freshness.

Why This Recipe Works

Paula Deen’s genius lies in her ability to simplify classic recipes without sacrificing flavor. By using marshmallows, she eliminates the need for corn syrup or complex candy-making steps — they melt into the fudge, ensuring a creamy, velvety finish. The evaporated milk adds richness, and the butter lends that unmistakable Southern decadence.

The result? A perfect bite of fudge that’s sweet but not cloying, chocolatey but balanced, and soft enough to melt in your mouth yet firm enough to hold its shape. It’s the kind of recipe that brings smiles to faces and warmth to hearts, no matter the occasion.

Serving Suggestions

This 5-minute fudge is incredibly versatile. Serve it:

  • During the holidays – wrapped in wax paper and tied with ribbon as a homemade gift.

  • At parties – arranged on a dessert tray alongside cookies and brownies.

  • With coffee – for an indulgent afternoon treat.

  • Crumbled over ice cream – for a decadent sundae topping.

You can even drizzle melted white chocolate over the top or sprinkle with sea salt for a gourmet touch.

The Sweet Story Behind the Recipe

Legend has it that Paula Deen first made this fudge as a last-minute holiday treat when guests arrived unexpectedly. Without time to make traditional candy, she whipped up this 5-minute version using pantry staples — and it became an instant hit. Over time, fans across the country adopted it as their go-to quick dessert, proving that sometimes the best recipes are born out of simplicity and creativity.

Final Thoughts

Paula Deen’s 5-Minute Fudge is more than just a dessert; it’s a celebration of homemade joy and timeless Southern charm. It shows that you don’t need fancy equipment or hours in the kitchen to create something special. In just five minutes, you can have a tray full of glossy, melt-in-your-mouth chocolate fudge that’s guaranteed to impress anyone who tastes it.

So, the next time you’re craving something sweet or need a quick dessert for a gathering, skip the store-bought candy and whip up this classic Paula Deen treat. It’s simple, foolproof, and utterly irresistible — the kind of fudge that turns ordinary moments into something extraordinary.