Gluten-Free Naan Bread

There’s just something comforting about warm, pillowy naan fresh off the skillet—soft in the center, lightly blistered on the outside, and perfect for scooping up curries, soups, dips, or simply enjoying with butter. However, if you’re gluten-free, traditional naan simply doesn’t cooperate. Wheat flour gives naan its signature stretch and chew, which can be tricky to replicate. That’s exactly why this recipe is special: it’s designed from the ground up to achieve that same tender texture using gluten-free ingredients—without being dense, gummy, or dry.

The secret is a thoughtful combination of gluten-free flour, yogurt, and a touch of psyllium husk, which mimics elasticity. This recipe is not only simple, but it produces naan that is soft, flexible, and unbelievably good. You’ll forget it’s gluten-free.

Ingredients

For the Dough:

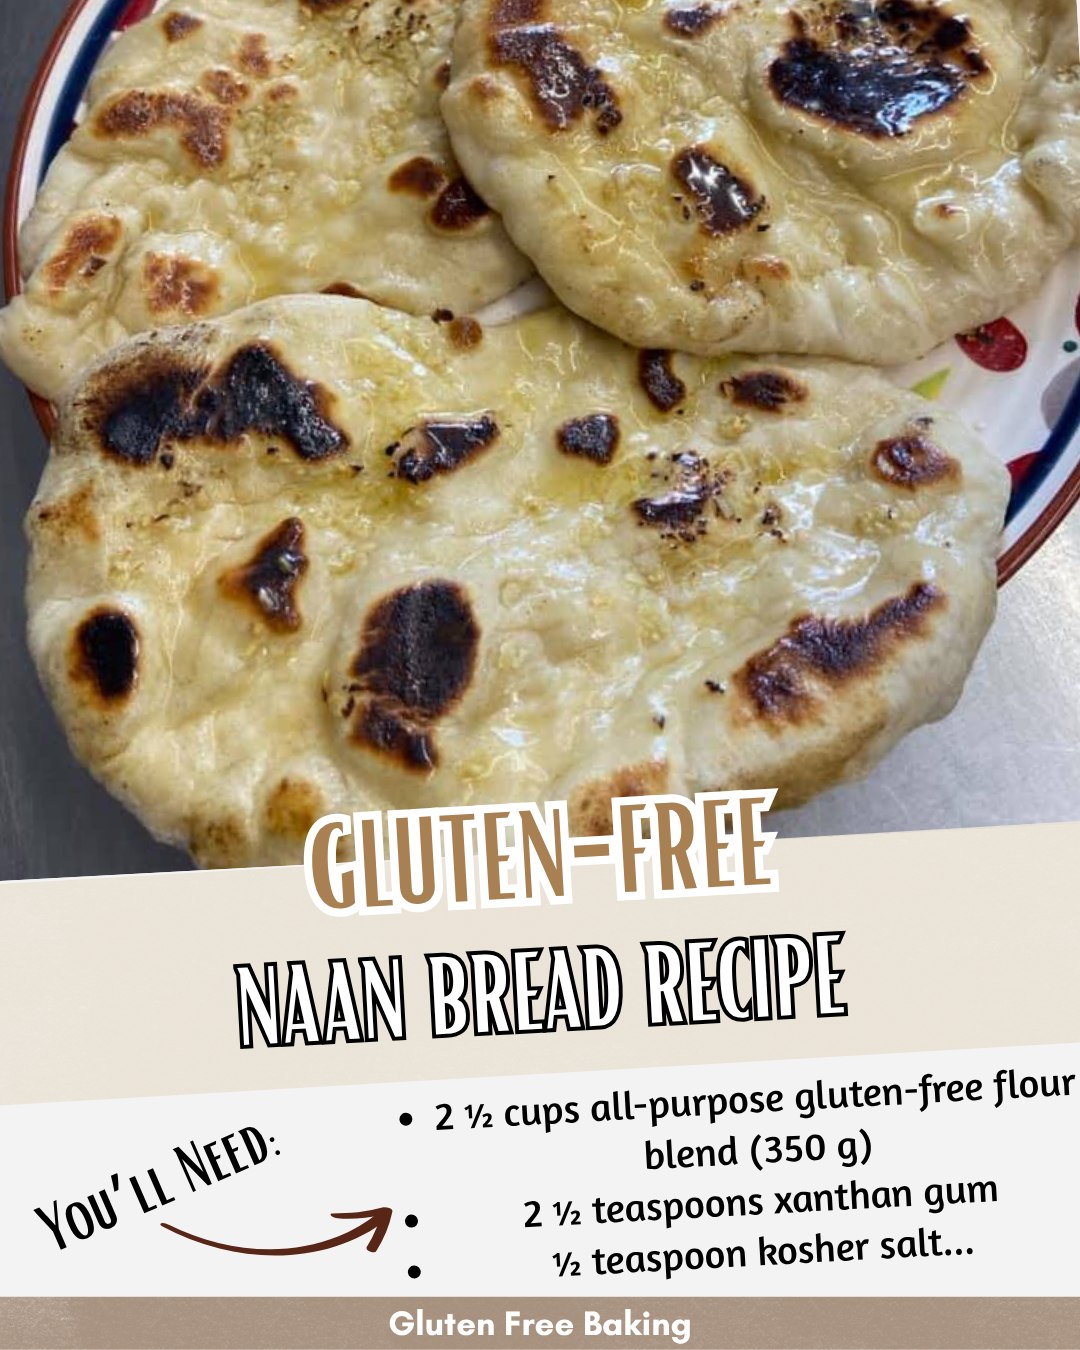
  • 1 ½ cups gluten-free all-purpose flour (with xanthan gum included)

  • 2 tablespoons psyllium husk powder (not whole husks)

  • 1 teaspoon baking powder

  • ½ teaspoon baking soda

  • ¾ teaspoon fine salt

  • 1 teaspoon sugar or honey

  • ¾ cup full-fat plain yogurt (Greek yogurt works best)

  • ¼ cup warm water (plus a little extra if needed)

  • 2 tablespoons olive oil or melted ghee

For Cooking & Finishing:

  • Butter or ghee, for brushing

  • Optional: minced garlic, fresh cilantro, sesame seeds

Why This Recipe Works

Many gluten-free bread doughs turn out sticky and frustrating. This one avoids that. The psyllium husk hydrates and forms a flexible gel, helping the dough hold shape and stretch like real wheat-based dough. Yogurt adds moisture and tenderness while the baking powder and soda give the bread a gentle lift. The result? Soft, bendable naan that tears beautifully and tastes rich and satisfying.

Step-by-Step Instructions

Step 1: Hydrate the Psyllium
In a small bowl, whisk together the warm water and psyllium husk. Let it sit for about 1 minute—it will thicken into a gel. This step is crucial for achieving the right elasticity in the dough.

Step 2: Mix Dry Ingredients
In a medium mixing bowl, combine the gluten-free flour, baking powder, baking soda, salt, and sugar. Stir well so everything is evenly distributed.

Step 3: Form the Dough
Add yogurt and the psyllium gel to the dry ingredients. Stir with a spoon or your hands until a dough begins to form. Add olive oil or ghee and knead lightly until smooth. If the dough feels too dry, add 1 teaspoon of water at a time. The dough should be soft—not sticky and not crumbly.

Step 4: Rest the Dough
Cover the bowl and let it rest for 15 minutes. Resting allows the psyllium to fully hydrate and the dough to relax, making rolling easier.

Step 5: Shape the Naan
Divide the dough into 4–6 pieces. Dust your surface lightly with gluten-free flour. Gently roll each piece into a teardrop or round shape, about ¼ inch thick. Don’t roll too thin; you want softness, not crisp crackers.

Step 6: Cook the Naan
Heat a skillet or cast-iron pan over medium-high heat until hot. Place one naan on the skillet. Cook for 2–3 minutes until bubbles form and the bottom develops golden spots. Flip and cook another 1–2 minutes. If desired, place briefly over an open flame for slight charring (optional but delicious).

Step 7: Brush & Serve
Brush warm naan with melted butter or ghee. Sprinkle with garlic or cilantro if desired.

Serve immediately while warm and soft.

Flavor Variations

You can transform this gluten-free naan into something even more exciting:

  • Garlic Naan: Mix minced garlic into melted butter and brush after cooking.

  • Herb Naan: Fold chopped cilantro, parsley, or oregano into the dough.

  • Cheese-Stuffed Naan: Add a spoonful of mozzarella or paneer inside before rolling.

  • Everything Bagel Naan: Sprinkle with seeds before cooking.

Tips for Success

  • Make sure your gluten-free flour blend includes xanthan gum. If it doesn’t, add ¾ teaspoon separately.

  • Psyllium husk powder is essential—do not skip or substitute.

  • Do not over-flour your rolling surface; too much flour can make naan stiff.

  • Serve naan fresh. If reheating, warm in a covered pan so it stays soft.

Serving Ideas

Gluten-free naan pairs wonderfully with:

  • Chicken tikka masala

  • Butter chicken

  • Lentil dal or chickpea curry

  • Hummus, tzatziki, or labneh

  • Fried eggs and smashed avocado for breakfast

Or simply enjoy it warm with butter and a cup of tea—comfort in its purest form.

Storage

  • Refrigerator: Store in an airtight bag for up to 3 days.

  • Freezer: Wrap individually and freeze up to 2 months.

  • Reheat: Warm in a covered pan or wrap in foil and heat in the oven at 350°F.

This gluten-free naan bread is everything naan should be—soft, warm, flexible, and satisfying. Whether you’re gluten-free by choice or necessity, this recipe brings back the joy of warm bread made for dipping, tearing, and savoring. Enjoy every tender bite.

Gluten-Free Butter Drop Biscuits

When someone first transitions to a gluten-free way of eating, one of the foods they often miss most is a warm, fluffy biscuit. Traditional biscuits rely heavily on the stretch and elasticity of wheat flour, meaning gluten-free versions can sometimes turn out dense, crumbly, or bland. But today’s recipe turns that expectation on its head. These Gluten-Free Butter Drop Biscuits are pillowy, soft in the center, beautifully golden on top, and made with simple ingredients you likely already have. No complicated shaping or rolling needed—just scoop and bake.

This recipe uses buttermilk, a touch of tapioca starch, and cold butter to mimic the tenderness and rise of a classic Southern biscuit. Drop-style biscuits are easier and more forgiving than rolled ones, especially in gluten-free baking, where dough texture can vary. The result is a biscuit with a tender crumb, lightly crispy edges, and a rich buttery flavor that pairs with savory dishes or sweet toppings equally well.

Ingredients

  • 1 ¾ cups gluten-free all-purpose flour blend
    (preferably one containing xanthan gum; if not, add ½ tsp xanthan gum)

  • ¼ cup tapioca starch (helps give lightness and chew)

  • 1 tablespoon baking powder

  • ½ teaspoon baking soda

  • ½ teaspoon fine sea salt

  • 2 teaspoons sugar (optional, but recommended for flavor balance)

  • 6 tablespoons cold unsalted butter, cut into small cubes

  • 1 cup cold buttermilk
    (or make your own: 1 cup milk + 1 tbsp white vinegar, rest 10 minutes)

  • 1 teaspoon apple cider vinegar (optional, but improves tenderness)

  • Melted butter for brushing (optional but amazing)

Method

  1. Prepare the Dry Ingredients
    In a large mixing bowl, whisk together the gluten-free flour, tapioca starch, baking powder, baking soda, salt, and sugar. This step helps aerate the flour and ensures the biscuits rise evenly. Gluten-free flours sometimes settle, so whisking well makes a noticeable difference in texture.

  2. Cut in the Butter
    Add the cold, cubed butter to the flour mixture. Using your fingertips or a pastry cutter, rub the butter into the flour until it resembles coarse crumbs with some pea-sized pieces remaining. Do not overwork it. Those little butter chunks are what create steam during baking—giving you lift and layers.

  3. Add the Buttermilk
    Pour in the buttermilk and the apple cider vinegar. Stir gently with a fork or silicone spatula just until the mixture comes together. The dough will be shaggy and slightly sticky—that’s perfect.

  4. Form the Drop Biscuits
    Line a baking sheet with parchment paper. Using a large spoon or ice cream scoop, drop mounds of dough onto the sheet, spacing them about 2 inches apart. You should get 8–10 biscuits depending on size.

  5. Bake
    Bake at 425°F (220°C) for about 13–16 minutes, or until golden brown on top and firm to the touch. Brush while warm with a little melted butter for the ultimate flavor finish.

  6. Cool Slightly and Serve Warm
    These biscuits taste best fresh from the oven, but they also reheat very well.

Serving Suggestions

  • Spread with honey butter for a comforting breakfast.

  • Serve with sausage gravy for a classic Southern interpretation.

  • Use as a base for strawberry shortcake—yes, they’re that good.

  • Split and toast them to accompany soup or stew.

What Makes This Recipe Unique

  1. Tapioca Starch
    Rather than using only a gluten-free flour blend, this recipe adds tapioca starch to bring softness, chew, and a slightly stretchy texture reminiscent of wheat-based biscuits.

  2. Apple Cider Vinegar Boost
    Vinegar reacts with the baking soda to create lift, while also softening the crumb for a more bakery-like interior.

  3. Cold Butter Technique
    Just like in pie crust, cold butter ensures steam pockets during baking—creating the right biscuit structure without gluten.

  4. Drop Style Simplicity
    No rolling, no cutting, no sticking. The dough is scooped and dropped, making it nearly foolproof and beginner-friendly.

Storage and Reheating Tips

  • Store cooled biscuits in an airtight container at room temperature for up to 2 days.

  • For longer storage, freeze individually wrapped biscuits for up to 3 months.

  • Reheat in the oven at 350°F (175°C) for 8–10 minutes. They emerge tasting freshly baked again.

Variations to Try

Flavor Style Add-Ins
Cheddar & Chive ½ cup shredded sharp cheddar + 2 tbsp fresh chives
Garlic Herb 1 tsp garlic powder + 1 tbsp mixed dried herbs
Sweet Cinnamon 1 tbsp sugar + ½ tsp cinnamon + honey drizzle
Lemon Blueberry 1 tbsp sugar + ½ cup fresh blueberries + lemon zest

These biscuits are a foundation you can easily tailor to your table.

Final Thoughts

Gluten-free baking doesn’t have to feel like compromise. With a few smart ingredient choices and gentle handling, you can enjoy the same fluffy comfort foods you’ve always loved. These Gluten-Free Butter Drop Biscuits are proof—warm, tender, simple to prepare, and deeply satisfying. This recipe is one to save, share, and repeat often.

Praline Crunch

Praline Crunch is the kind of snack that feels like it came straight from a Southern grandma’s candy tin—warm, buttery, sweet, toasty, and absolutely irresistible. It’s a mix of crispy cereal clusters coated in a glossy praline caramel glaze made from butter, brown sugar, vanilla, and pecans. The result is a snack that crunches gently at first and then melts into a caramel-pecan finish that makes it almost impossible to stop eating. If you love the flavor of pecan pralines, this is basically that flavor in snackable handfuls.

This recipe is easy enough to make on a weekday, but special enough to bag up as gifts, holiday treats, or party snacks. And because it’s baked low and slow, every piece gets coated evenly and crisps up beautifully without burning. Once it cools, the praline glaze sets into a shiny, sweet shell that tastes like the best candy shop crunch.

Praline Crunch (Unique Homemade Recipe)

Servings: About 10 cups
Prep Time: 10 minutes
Cook Time: 1 hour
Cooling Time: 20–30 minutes

Ingredients:

  • 8 cups crisp corn cereal (Chex or similar)

  • 2 cups pecan halves or pieces (lightly toasted preferred)

  • 1 cup packed light brown sugar

  • ½ cup (1 stick) unsalted butter

  • ¼ cup light corn syrup or honey

  • 1 teaspoon pure vanilla extract

  • ½ teaspoon salt

  • Optional: ¼ teaspoon cinnamon or a pinch of nutmeg for a warm spice note

Directions

  1. Prepare the Baking Setup:
    Preheat your oven to 250°F (120°C). Line a large baking sheet with parchment paper or lightly grease it. This makes cleanup simple and prevents sticking.

  2. Mix the Base:
    In a large bowl, combine your corn cereal and pecans. If your pecans are raw, consider toasting them lightly in a dry skillet or oven for about 5–7 minutes beforehand—this deepens their nutty flavor and gives the praline crunch a richer taste.

  3. Make the Praline Glaze:
    In a medium saucepan over medium heat, melt the butter. Add in the brown sugar and corn syrup (or honey) and stir until everything blends into a smooth caramel-like mixture. Continue heating and stirring until it begins to bubble gently. Let it simmer for 3 minutes—this helps the glaze thicken and cling better to the cereal.
    Remove from heat and stir in the vanilla extract, salt, and cinnamon (if using). The fragrance at this point is heavenly.

  4. Coat the Cereal Mixture:
    Pour the warm praline glaze evenly over the cereal and pecans. Use a spatula to gently fold the mixture until everything is coated in that golden, glossy goodness. Work carefully so you don’t crush the cereal.

  5. Bake Low & Slow:
    Spread the coated cereal on your prepared baking sheet in as even a layer as possible. Bake for 1 hour, but stir every 15 minutes. This keeps the coating evenly distributed and allows it to dry and set without pooling.

  6. Cool and Crunch:
    When the hour is up, remove from the oven and let the mix cool completely. As it cools, the praline glaze sets into a crisp, sweet shell. Break into clusters and transfer into an airtight container.

What Makes This Recipe Unique

Most versions of praline crunch rely heavily on sweetness alone—but this version emphasizes balance. The use of real vanilla, salted butter, lightly toasted pecans, and that little pinch of salt ensure the sweetness never becomes overwhelming. The touch of cinnamon is optional, but it adds warmth that makes the snack taste like autumn fairs, fireside gatherings, and holiday mornings.

The low oven bake is also key. Instead of rushing the process, the hour-long slow bake allows the coating to firm up and the cereal to stay crisp—no soggy bits, no sticky, wet patches, just clean, crunchy praline perfection.

Serving Ideas

  • Holiday gift bags: Package in cellophane bags tied with ribbon.

  • Ice cream topper: Sprinkle over vanilla ice cream or butter pecan gelato.

  • Sweet & salty snack mix: Add pretzels, popcorn, or chocolate candies once cooled.

  • Breakfast treat: Mix into Greek yogurt or sprinkle on pancakes (trust me).

Storage

Store in an airtight container at room temperature for up to 2 weeks. If you’re in a humid climate, place a small food-safe silica gel packet in with the container to keep the crunch intact. It also freezes very well for up to 3 months—just thaw at room temperature before serving.

Final Thought

Praline Crunch is more than a snack—it’s a memory-maker. The combination of toasted pecans and buttery brown sugar evokes old-fashioned kitchens, warm hands around coffee mugs, and family gatherings where the best treats are never store-bought. Once you know how easy and stunningly delicious this is, you’ll find endless occasions to make it—from cozy weekends to celebrations.

Fajita Chicken Casserole

There’s something undeniably comforting about a hearty casserole that bubbles with flavor, aroma, and warmth straight from the oven. This Fajita Chicken Casserole takes everything we love about sizzling fajitas—the smoky peppers, tender chicken, and bold seasoning—and bakes it into a creamy, cheesy dish that practically melts into the plate. It’s perfect for busy weeknights, meal prepping for the week, or feeding a table full of hungry loved ones. The best part? This casserole has layers of textures and flavors that work together effortlessly—juicy chicken, tender bell peppers, creamy sauce, and perfectly melted cheese—all tied together with cozy southwestern flair.

Why This Recipe Works

Unlike many casseroles that rely heavily on pasta or potatoes, this dish highlights the flavor of the chicken, seasoning, and vegetables. The combination of cream cheese and sour cream forms a silky sauce that coats every bite, while smoked paprika, chili powder, cumin, and garlic bring that classic fajita taste. You can use rotisserie chicken to make this ultra quick, or cook seasoned chicken breasts at home for an even fresher taste. The bell peppers offer sweetness and crunch, and the cheese brings everything together with a gooey finish. It’s indulgent, yet balanced, hearty but not heavy, and so satisfying.

Ingredients

For the Chicken & Seasoning:

  • 3 cups cooked chicken, shredded or chopped (rotisserie works perfectly)

  • 1 tbsp olive oil (if cooking fresh chicken)

  • 1 tbsp chili powder

  • 1 tsp smoked paprika

  • 1 tsp ground cumin

  • ½ tsp garlic powder

  • ½ tsp onion powder

  • ½ tsp dried oregano

  • ½ tsp salt

  • ¼ tsp black pepper

Vegetables & Sauce:

  • 1 tbsp butter

  • 1 medium onion, thinly sliced

  • 1 red bell pepper, sliced

  • 1 green bell pepper, sliced

  • 1 yellow bell pepper, sliced (optional but beautiful!)

  • 3 cloves garlic, minced

  • 8 oz cream cheese, softened

  • ½ cup sour cream

  • ½ cup chicken broth

  • Juice of 1 lime

Cheese & Toppings:

  • 1 ½ cups shredded Mexican blend cheese (or cheddar + Monterey Jack)

  • Chopped cilantro, to garnish

  • Sliced jalapeños (optional for heat)

  • Crushed tortilla chips or sliced green onions (optional for texture)

Instructions

  1. Prepare the Chicken:
    If using raw chicken, heat olive oil in a skillet over medium heat. Rub the chicken breasts with chili powder, cumin, paprika, garlic powder, onion powder, oregano, salt, and pepper. Cook for 6–8 minutes per side, or until fully cooked, then shred or chop. If using rotisserie chicken, simply toss it with the seasoning to coat evenly.

  2. Sauté the Veggies:
    In a large skillet, melt butter. Add sliced onions and bell peppers and cook for about 6–7 minutes, until softened and beginning to caramelize. Stir in minced garlic and cook for another 1 minute. Remove from heat.

  3. Make the Creamy Fajita Sauce:
    In a mixing bowl, combine cream cheese, sour cream, chicken broth, lime juice, and half of your shredded cheese. Mix until smooth and creamy. If the cream cheese is too firm, microwave it for 20 seconds to soften more.

  4. Assemble the Casserole:
    Preheat your oven to 375°F (190°C). In a baking dish (9×13 works well), layer the seasoned chicken and sautéed peppers. Pour your creamy sauce over everything and gently stir to distribute evenly. Sprinkle the remaining cheese on top.

  5. Bake:
    Place the casserole in the oven and bake for 20–25 minutes, or until the cheese is melted and bubbling at the edges.

  6. Finish & Serve:
    Remove from the oven and let rest for at least 5 minutes. Garnish with cilantro, jalapeños, green onions, or crushed tortilla chips for crunch.

Serving Suggestions

This casserole is incredibly versatile. Serve it:

  • Over steamed rice or Spanish rice for a full meal

  • Over cauliflower rice for a low-carb or keto-friendly version

  • With warm flour or corn tortillas for scoop-and-wrap bites

  • With a side of black beans, guacamole, or pico de gallo

Tips & Variations

  • Add heat: Stir in ½ tsp cayenne or chopped pickled jalapeños.

  • Make it creamier: Add extra sour cream or a bit of shredded mozzarella.

  • Make it heartier: Add cooked rice or black beans before baking.

  • Make it lighter: Use reduced-fat cream cheese and Greek yogurt in place of sour cream.

Why You’ll Make This Again and Again

This dish is beautifully balanced—each bite brings creamy richness, smoky warmth, sweet pepper notes, and a comforting cheese pull. It reheats wonderfully, freezes well, and adapts to whatever you have on hand. It’s the kind of meal that earns a permanent place in your kitchen rotation.

Garbage Bread (Loaded Stuffed Bread Roll)

Garbage Bread is one of those magical, crowd-pleasing creations that looks impressive, tastes indulgent, and is secretly incredibly easy to make. The name might make you laugh, but the idea is simple: take all your favorite comforting, flavorful ingredients—think seasoned ground beef, melty cheese, sautéed onions, pepperoni, bacon, or even leftover roast chicken—and roll them inside soft dough to bake into a golden, pull-apart loaf. It’s the ultimate “use what you have” meal. This recipe gives you a delicious base version, but consider it a template to make your own signature version every time.

Why It Works

Garbage Bread is basically a handheld meal. The dough becomes the wrapper, holding everything inside. As it bakes, the flavors meld beautifully—the cheese melts, the meat juices soak slightly into the bread, and everything becomes gooey and irresistible. It slices easily, making it great for parties, movie nights, game days, or a lazy “no forks needed” dinner.

Ingredients

For the Filling:

  • 1 lb (450g) ground beef

  • 1 small onion, finely chopped

  • 2 cloves garlic, minced

  • ½ tsp salt

  • ½ tsp black pepper

  • 1 tsp Italian seasoning

  • ½ cup chopped pepperoni (optional but delicious)

  • ½ cup cooked crumbled bacon (optional)

  • 1 cup shredded mozzarella cheese

  • 1 cup shredded cheddar cheese

  • ¼ cup pizza sauce or marinara

For the Dough:
You may use any of the following:

  • 1 store-bought refrigerated pizza dough or

  • 1 can crescent roll dough or

  • Homemade dough if you prefer

For the Brushed Crust:

  • 2 tbsp melted butter

  • ½ tsp garlic powder

  • ½ tsp dried parsley

Step-by-Step Instructions

  1. Prepare the Filling:
    Heat a large skillet over medium heat. Add the ground beef and chop it apart with a spoon as it browns. Add the chopped onion and garlic once the beef begins to color. Cook until the beef is completely browned and the onions are soft. Drain off excess grease so your bread does not become soggy.

  2. Season the Mixture:
    Sprinkle in salt, pepper, and Italian seasoning. Stir well and cook for an additional minute to let the flavors meld.

  3. Add the “Garbage” Ingredients:
    Stir in the chopped pepperoni and crumbled bacon, if using. Remove from heat and allow it to cool slightly. You do not want to add cheese to piping-hot meat or it may melt before rolling.

  4. Prepare the Dough:
    Roll out your dough on a lightly floured surface into a large rectangle. The shape doesn’t need to be perfect, but aim for around 12×16 inches. If using crescent dough, pinch seams together to form a solid sheet.

  5. Layer Your Fillings:
    Spread the pizza sauce in a thin layer across the dough. Then sprinkle the mozzarella and cheddar evenly. Finally, scatter the seasoned meat mixture across the surface. Make sure to leave an inch border around the edges.

  6. Roll the Bread:
    Starting from the long side, gently but firmly roll the dough into a log, tucking the filling inside as you go. Place seam-side down on a lined baking sheet. Fold and pinch the ends to seal completely.

  7. Bake It:
    Preheat your oven to 375°F (190°C). Stir together melted butter, garlic powder, and parsley. Brush this over the top of your bread roll. Bake for 25–30 minutes or until golden brown and fully cooked.

  8. Rest Before Cutting:
    Allow the bread to rest for 8–10 minutes before slicing. This makes the inside set and keeps the slices clean instead of messy.

Serving Suggestions

Serve warm, sliced into thick rounds with:

  • Extra marinara

  • Ranch dressing

  • Garlic butter

  • Spicy chipotle mayo

This bread is a game-day champion, a busy-night dinner saver, and a “wow” appetizer all at once.

Variations (Choose Your Personality!)

Flavor Theme Swap the Meat Swap the Cheese Add-Ins
Bacon Cheeseburger Ground beef + bacon Cheddar + American Diced pickles, caramelized onions
Buffalo Chicken Shredded chicken tossed in buffalo sauce Mozzarella + Blue cheese crumbles Green onions, ranch drizzle
Italian Sub Salami, ham, pepperoni Provolone Banana peppers, shredded lettuce (added after baking)
Taco Seasoned taco meat Pepper jack Black beans, jalapeños, drizzle sour cream when serving

Tips for Success

  • Drain the meat well – excess grease is your enemy.

  • Cool the filling slightly before rolling to avoid tearing.

  • Seal edges firmly so cheese doesn’t escape.

  • Let it rest after baking for clean slices.

What Makes This Version Unique

This particular recipe layers flavor thoughtfully instead of just tossing ingredients in. The seasoned beef, smoky pepperoni, and bacon give deep umami richness. The mozzarella ensures the classic stretchy pull, while cheddar adds sharpness. The garlic-butter crust finishing touch elevates the bread from “snack” to “special.”

Garbage Bread isn’t just a recipe—it’s an invitation to improvise, to use leftovers creatively, and to play with flavor. Once you master the technique, you’ll find yourself making it different every time—and loving every result.

Apple Cinnamon Streusel Loaf

There are certain scents that instantly make a home feel warm, safe, and welcoming—and freshly baked apples with cinnamon is one of those magical fragrances. This Apple Cinnamon Streusel Loaf combines soft, tender cake, juicy apple pieces, and a buttery cinnamon-sugar crumble that melts right into the top as it bakes. It’s the kind of loaf you bake on a relaxing weekend morning, or when you want something homemade but comforting, familiar, and nostalgic. What makes this recipe unique is the way we prepare the apples and the secret touch of sour cream that gives the loaf a soft, plush crumb that stays moist for days.

Ingredients

For the Loaf:

  • 1 ¾ cups all-purpose flour

  • 1 teaspoon baking powder

  • ½ teaspoon baking soda

  • ½ teaspoon fine salt

  • 1 teaspoon ground cinnamon

  • ¼ teaspoon ground nutmeg

  • ½ cup (1 stick) unsalted butter, softened

  • ¾ cup granulated sugar

  • 2 large eggs, room temperature

  • 1 teaspoon vanilla extract

  • ½ cup sour cream (or plain yogurt)

  • 2 tablespoons milk

  • 2 cups peeled and finely diced apples (use Honeycrisp, Fuji, or Gala)

For the Cinnamon Sugar Layer:

  • ⅓ cup brown sugar

  • 1 teaspoon cinnamon

For the Streusel Topping:

  • ½ cup all-purpose flour

  • ¼ cup brown sugar

  • ½ teaspoon cinnamon

  • 4 tablespoons cold butter, cubed

Instructions

1. Prepare the Apple Filling

Peel and finely dice your apples. The key is small pieces—large chunks don’t soften as nicely and interrupt the tender crumb. Toss the diced apples with just a pinch of cinnamon and set aside. This allows the apples to release their natural aroma and develop flavor before going into the batter.

2. Make the Streusel

In a small bowl, mix flour, brown sugar, and cinnamon. Add the cold, cubed butter and use your fingertips to pinch and crumble until the mixture resembles coarse, buttery sand. Place into the refrigerator to keep it cold—chilled streusel bakes more beautifully and crisps instead of melting flat.

3. Mix the Dry Ingredients

In a medium bowl, whisk together flour, baking powder, baking soda, salt, cinnamon, and nutmeg. This ensures even distribution of spices before combining with the wet ingredients.

4. Cream the Butter and Sugar

In a separate large bowl, use a hand mixer or whisk to beat the softened butter with granulated sugar until pale and fluffy, about 3 minutes. This step aerates the batter and contributes to a lighter texture.

5. Add Eggs and Flavor

Beat in the eggs, one at a time, followed by vanilla extract. Then mix in the sour cream—this is the secret to a moist and tender loaf that doesn’t dry out.

6. Combine Wet and Dry

Add the dry ingredients to the wet bowl in two additions, alternating with the milk. Mix only until smooth—overmixing can toughen the batter. Fold in the diced apples.

7. Layer the Batter

Pour half the batter into a greased and lined loaf pan. Sprinkle the cinnamon sugar layer evenly over the batter—this creates a sweet ribbon inside the loaf. Then spread the remaining batter on top.

8. Finish With Streusel

Scatter the chilled streusel topping generously over the surface. Don’t press; just let it sit loosely so it bakes into a beautiful, crumbly crust.

9. Bake

Bake at 350°F (175°C) for 55–70 minutes, depending on your oven. A toothpick inserted in the center should come out clean or with moist crumbs—just not wet batter.

10. Cool and Serve

Allow the loaf to cool in the pan for 10 minutes before transferring to a cooling rack. Serve warm or at room temperature.

Serving Suggestions

This loaf is delightful on its own, but here are a few simple enhancements:

  • Drizzle with vanilla glaze for extra sweetness.

  • Serve warm with butter or cream cheese spread.

  • Pair with hot tea, apple cider, or a cinnamon latte.

  • Toast slices lightly the next morning—it becomes even more fragrant.

Storage Tips

  • Room Temperature: Store tightly wrapped for 3 days.

  • Refrigerator: Lasts up to 6 days.

  • Freezer: Wrap slices individually and freeze up to 2 months.

What Makes This Recipe Special

Most apple loaves rely solely on moisture from apples, but apples alone can sometimes make a loaf gummy. The combination of sour cream, milk, and butter in this recipe ensures a soft, fluffy texture while maintaining richness. The cinnamon sugar layer inside gives a surprise sweetness with each bite, and the streusel topping brings a satisfying contrast of texture—soft crumb meets crunchy top.

Mexican Shrimp Cocktail Recipe

Here we go — a unique, flavor-loaded Mexican Shrimp Cocktail recipe with a bright, chilled, spicy-tangy sauce that tastes like a sunny afternoon by the ocean. This version adds roasted peppers, a splash of orange juice, and a cilantro-lime “bright finish” that sets it apart.

Mexican Shrimp Cocktail (Cóctel de Camarones)

Serves: 4 to 6
Prep Time: 20 minutes
Chill Time: 30 minutes
Total Time: ~50 minutes

Ingredients

For the Shrimp:

  • 1 ½ lbs medium shrimp, peeled and deveined

  • 1 tsp sea salt

  • 1 tsp onion powder

  • 1 bay leaf

  • ½ lemon

For the Cocktail Sauce:

  • 1 ½ cups Clamato (or tomato juice if you want it milder)

  • ½ cup ketchup (for sweetness + body)

  • ½ cup fresh orange juice (this is the unique twist—adds brightness)

  • 3 tbsp fresh lime juice

  • 2 tbsp hot sauce (Valentina, Tapatío, or Cholula)

  • ½ tsp Worcestershire sauce

Vegetables & Add-ins:

  • 1 medium red onion, finely diced

  • 2 Roma tomatoes, finely diced

  • 1 medium English cucumber, diced small

  • 1 ripe avocado, diced

  • 1 small jalapeño or serrano, minced (seeds removed if mild)

  • ½ cup chopped fresh cilantro

  • 1 roasted red pepper, finely diced (adds smoky sweetness—unique!)

For Serving:

  • Lime wedges

  • Corn tortilla chips or saltine crackers

  • Tajín or chili salt for the rim of the glass (optional)

Instructions

Step 1: Cook the Shrimp

  1. Bring a pot of water to a gentle boil.

  2. Add salt, onion powder, bay leaf, and squeeze in the half lemon.

  3. Add shrimp and cook just until pink and opaque, about 1–2 minutes.

  4. Transfer immediately to an ice bath to stop cooking.

  5. Chop shrimp into bite-size pieces (or leave whole if preferred).

The key is to not overcook the shrimp—it should stay juicy and tender.

Step 2: Prepare the Cocktail Base

In a large bowl, whisk together:

  • Clamato

  • Ketchup

  • Orange juice

  • Lime juice

  • Hot sauce

  • Worcestershire

Taste — it should be tangy, a little sweet, lightly spicy.
Adjust:

  • More lime → brighter

  • More ketchup → sweeter & thicker

  • More hot sauce → spicier

Step 3: Add the Fresh Ingredients

Fold into the bowl:

  • Red onion

  • Tomatoes

  • Cucumber

  • Jalapeño

  • Cilantro

  • Roasted red pepper

Stir gently to coat everything.

Step 4: Add Shrimp & Avocado

Add the chopped shrimp and very gently add avocado last to prevent mashing.

Mix softly.

Step 5: Chill

Cover and refrigerate at least 30 minutes to allow flavors to mingle.
The longer it rests (up to 4 hours), the better the flavor synergy.

How to Serve (Traditional & FUN Presentation)

This cocktail is traditionally served chilled in tall glasses or goblets.

Optional but recommended:
Dip rim of glasses in lime juice → then Tajín or chili salt.

Fill glass with shrimp cocktail.
Top with extra cilantro, avocado cubes, or a squeeze of lime.

Serve with:

  • Corn tortilla chips (crunchy + salty)

  • Saltine crackers (classic Mexican style)

  • A cold beer or agua fresca 😉

Flavor Notes & What Makes This Version Unique

This recipe takes the traditional Mexican shrimp cocktail and elevates it in three distinctive ways:

Element Traditional This Unique Version
Citrus Usually just lime Orange + lime creates layered brightness
Pepper flavor Raw chile only Roasted pepper adds smoky sweetness
Texture Sometimes watery Ketchup + citrus ratio creates a silky, balanced broth

The result?
A cocktail that is refreshing yet deeply flavored, spicy but not harsh, and beautifully layered.

Make It Even More Impressive

If you want to take it over the top:

  • Add diced mango or pineapple for a sweet-tropical edge.

  • Swap shrimp for mixed seafood (shrimp + scallops + crab).

  • Add a splash of tequila to the sauce (party-approved 😄).

Storage

  • Keep chilled.

  • Best enjoyed within 24 hours (because of avocado and seafood).

  • If storing longer, add avocado only right before serving.

Final Touch

Before serving, always taste and adjust:

  • Lime wakes everything up.

  • Salt brings clarity.

  • Hot sauce controls the mood.

Creamy Garden Harvest Vegetable Casserole

A cozy, layered bake full of tender vegetables, creamy sauce, and a golden cheesy crumb topping.

This vegetable casserole is the kind of dish that warms your heart and fills your home with the comforting aroma of garlic, herbs, and browned butter. It’s a celebration of garden flavors—soft roasted squash, sweet carrots, earthy potatoes, bright broccoli, and caramelized onions, all tucked into a creamy, savory sauce and topped with a crisp golden crust. It’s perfect as a main dish with bread or as a hearty side alongside roasted chicken, baked fish, or a holiday table spread.

Servings: 6

Baking Time: 45 minutes

Skill Level: Easy

Ingredients

Vegetables

  • 2 medium potatoes, thinly sliced

  • 2 cups broccoli florets

  • 1 large carrot, thinly sliced

  • 1 small zucchini, thinly sliced

  • 1 cup sliced mushrooms (optional but wonderful)

  • 1 small onion, thinly sliced

  • 2 tablespoons olive oil

  • Salt & pepper to taste

Creamy Herb Sauce

  • 3 tablespoons butter

  • 3 tablespoons flour

  • 2 cups whole milk (or half milk + half cream for richer flavor)

  • 2 cloves garlic, minced

  • 1 teaspoon Dijon mustard

  • ½ teaspoon dried thyme

  • ½ teaspoon dried basil

  • ¼ teaspoon smoked paprika

  • Salt and black pepper to taste

Cheese & Topping

  • 1 cup shredded mozzarella or Monterey Jack

  • ½ cup grated parmesan

  • 1 cup breadcrumbs (panko recommended)

  • 2 tablespoons melted butter

Instructions

Step 1: Prepare the Vegetables

  1. Preheat your oven to 375°F (190°C).

  2. Toss the sliced potatoes, broccoli, carrots, zucchini, mushrooms, and onion with olive oil, a pinch of salt, and a little black pepper.

  3. Spread them on a baking tray and roast for 15 minutes.
    Roasting first intensifies flavor and prevents the vegetables from turning watery in the casserole.

Step 2: Make the Creamy Herb Sauce

  1. In a medium saucepan, melt the butter over medium heat.

  2. Add flour, whisking until smooth and lightly golden (about 1 minute).

  3. Slowly pour in the milk, whisking constantly until thick and velvety.

  4. Stir in garlic, Dijon mustard, thyme, basil, smoked paprika, and season generously with salt and pepper.

  5. Let the sauce simmer for 2 minutes, then remove from heat.

The mustard and smoked paprika give the sauce warmth and complexity—don’t skip them!

Step 3: Assemble the Casserole

  1. Lightly butter a 9×13 baking dish.

  2. Add the roasted vegetables and toss gently so they’re evenly mixed.

  3. Pour the creamy herb sauce over them, coating well.

  4. Sprinkle evenly with mozzarella and parmesan.

Step 4: Make the Golden Crumb Topping

  1. Stir together the breadcrumbs and melted butter until lightly moistened.

  2. Spread this mixture across the top of the casserole.
    This ensures a beautifully crunchy, golden-brown crust.

Step 5: Bake

  • Place in the oven for 30–35 minutes, or until:

    • The sauce is bubbling,

    • The cheese has melted,

    • The topping is crisp and golden brown.

Let rest 5 minutes before serving so the layers settle.

Serving Suggestions

  • As a main dish: Pair with warm garlic bread, a side salad, or buttered cornbread.

  • As a side: Serve next to roast chicken, grilled salmon, meatloaf, or baked ham.

  • For brunch: Add a few soft-poached eggs or crumble feta on top after baking.

Flavor Variations (Make It Your Own!)

Twist What to Add Flavor Result
Italian Style Add ½ cup ricotta & fresh basil Creamier & aromatic
Spicy Kick Add red pepper flakes & pepper jack cheese Warm, spicy finish
Mediterranean Add olives, artichokes & oregano Bright & savory
Protein Boost Add chickpeas, rotisserie chicken, or white beans More filling & hearty

Tips for Best Results

  • Slice vegetables thin so they cook evenly.

  • Pre-roasting prevents sogginess and deepens their flavor.

  • Avoid skipping the crumb topping—texture matters!

  • Leftovers are even better the next day because the flavors meld beautifully.

Why This Recipe Works

Unlike many casseroles that drown vegetables in heavy sauce or too much cheese, this recipe keeps the balance. The vegetables are the star—sweet, nutty, earthy—and the creamy sauce simply enhances them. The topping adds crunch, preventing the dish from feeling too soft or monotone in texture. Every bite has layers: warm vegetables, silky sauce, melty cheese, and crisp topping.

Caramel Chocolate Crunch Bars

A decadent, no-bake treat with layers of creamy caramel, buttery crunch, and smooth chocolate.

If you love desserts that combine silky sweetness with a satisfying crunch, these Caramel Chocolate Crunch Bars are going to become your new go-to indulgence. They require no baking, come together with minimal ingredients, and deliver a gourmet flavor that tastes like something from a boutique chocolate shop. Imagine a crisp golden cookie layer, followed by a ribbon of chewy caramel, all capped with velvety chocolate that melts on your tongue. These bars are perfect for parties, holidays, or whenever you need a luxurious dessert without a lot of effort.

Ingredients

Crunch Base

  • 3 cups crispy rice cereal (Rice Krispies or similar)

  • 1 cup crushed digestive biscuits or graham crackers

  • ½ cup melted butter (unsalted)

  • ⅓ cup light brown sugar

  • ½ cup creamy peanut butter (optional but recommended)

  • 1 teaspoon vanilla extract

Caramel Layer

  • 1 can (14 oz) sweetened condensed milk

  • ½ cup unsalted butter

  • ½ cup brown sugar

  • ¼ teaspoon sea salt

  • 1 teaspoon vanilla

Chocolate Topping

  • 2 cups semi-sweet chocolate chips or chopped chocolate

  • 1 tablespoon butter or coconut oil (for smooth finish)

Instructions

1. Make the Crunch Layer

Begin by preparing the foundation of your bars. Place the crispy rice cereal in a large mixing bowl. Crush your biscuits until they resemble coarse crumbs—this gives the bars structure and deepens the flavor. In a small saucepan, melt the butter and whisk in the brown sugar until dissolved and lightly bubbly. Remove from heat and stir in the peanut butter and vanilla. Pour this warm mixture over the cereal and biscuit crumbs, stirring until every piece is coated. Press this mixture firmly into the bottom of a lined 9×13-inch pan. The tighter you press, the better your bars will hold. Chill for 15 minutes.

2. Prepare the Caramel Filling

The caramel is where magic happens. In a medium saucepan over medium-low heat, melt the butter. Add the brown sugar and sweetened condensed milk, stirring continuously to prevent scorching. Allow the mixture to gently simmer, stirring until it thickens into a glossy golden caramel (about 8–10 minutes). Add the vanilla and salt, then pour the caramel evenly over your chilled base. Use a spatula to smooth it out. Place the pan back in the refrigerator for at least 20 minutes to set.

3. Top with Chocolate

Place the chocolate and butter (or coconut oil) in a heat-safe bowl and melt using either a microwave in 20–30 second intervals or a double boiler. Stir until silky and smooth. Pour this chocolate layer over the caramel, tilting the pan slightly to ensure full coverage. Chill again until the chocolate is set, about 30 minutes.

Cutting & Serving

When ready to cut, remove the bars from the fridge and let them sit at room temperature for 5–8 minutes. This helps the chocolate soften just enough to slice cleanly. Use a sharp knife and cut into squares or bars.

These bars are wonderfully rich, so small pieces go a long way. Store in an airtight container in the refrigerator for up to 1 week, or freeze for up to 3 months.

Tips for the Best Results

  • Add texture: For an extra layer of crunch, sprinkle chopped toasted almonds or pecans over the caramel before adding the chocolate.

  • Salt is key: A tiny pinch of sea salt on top of the chocolate creates a perfect sweet-salty balance.

  • Don’t rush chilling: Each layer needs time to firm up so your bars slice beautifully.

  • Customize chocolate: Dark chocolate gives elegance, while milk chocolate makes them extra sweet and dessert-like.

Why These Bars Are Special

There’s something irresistibly comforting about desserts that have multiple textures working in harmony. The crisp cereal layer offers lightness, preventing the bars from feeling heavy. The caramel brings depth and indulgence, rich and buttery with just the right chew. The chocolate sealing the top ties everything together with a luxurious finish. Every bite is balanced—sweet but not overwhelming, soft yet crunchy, simple yet undeniably impressive.

Carrot Salad with Pineapple and Raisins

There is something beautifully nostalgic about a bowl of carrot salad—a dish that feels like sunshine. It’s sweet, lightly tangy, creamy, and full of texture. It brings to mind family picnics, church luncheons, and summertime cookouts where every dish was made with care and meant to be shared. Carrot Salad with Pineapple and Raisins is especially timeless; it’s refreshing but comforting, and it comes together with only a few humble ingredients that somehow create something wonderful.

This unique take on the classic stays true to its roots but incorporates a few thoughtful touches that elevate flavor and texture. We’ll build creaminess without heaviness, balance sweetness with a touch of acid, and add optional crunchy elements for depth. The result is a salad that is not only simple to make, but also lively and satisfying.

Why This Recipe Works

Carrots are naturally sweet, crisp, and refreshing. When shredded, they release juices that help blend into the dressing. Pineapple adds bright tropical sweetness and moisture, while raisins introduce the chewy contrast. The creamy dressing ties everything together with just enough tang to keep it from tasting overly sweet. A pinch of salt—not optional—makes all the difference, waking up every flavor in the bowl.

This salad tastes best after chilling, allowing the flavors to meld and the raisins to plump slightly in the creamy dressing. It can be served as a side dish, a light snack, or even part of a brunch spread.

Ingredients

For 4–6 servings:

  • 4 cups freshly grated carrots (about 5–6 medium carrots)

  • 1 cup crushed pineapple, well-drained (reserve 1–2 tablespoons of juice)

  • ½ cup raisins (golden raisins recommended for brighter flavor)

  • ½ cup mayonnaise (or Greek yogurt for a lighter version, or half of each)

  • 2 tablespoons honey or sugar (adjust to taste)

  • 1 teaspoon apple cider vinegar or lemon juice

  • Pinch of salt (essential)

  • ¼ teaspoon cinnamon (optional but delightful)

  • ¼ cup toasted chopped pecans or walnuts (optional for crunch)

Step-by-Step Instructions

  1. Prepare the Carrots:
    Peel and grate the carrots using the coarse side of a box grater or a food processor. Freshly grated carrots are important—pre-shredded packaged carrots are too dry and lack natural moisture and flavor. Place the shredded carrots in a large mixing bowl.

  2. Drain the Pineapple:
    Drain the crushed pineapple thoroughly, pressing it lightly to remove excess liquid. Too much juice can make the salad watery. However, reserve just a tablespoon or two of the juice to add flavor to the dressing.

  3. Soften the Raisins (optional but recommended):
    If your raisins are firm or dry, soak them in warm water for 5 minutes, then drain well. This gives them a plump, soft bite in the finished salad.

  4. Make the Dressing:
    In a separate small bowl, whisk together the mayonnaise (or yogurt), honey (or sugar), reserved pineapple juice, apple cider vinegar or lemon juice, salt, and cinnamon (if using). Taste and adjust until the flavor is balanced—creamy, lightly sweet, and a little tangy.

  5. Combine Everything:
    Add the pineapple and raisins to the bowl with the carrots. Pour the dressing over them and toss gently until everything is evenly coated.

  6. Add Crunch (Optional, but Recommended):
    If you enjoy a contrast in texture, fold in toasted pecans or walnuts. Toasting them enhances their flavor and helps them stay crisp in the salad.

  7. Chill Before Serving:
    Cover and refrigerate for at least 30 minutes. This helps the flavors blend and the dressing settle perfectly.

Serving Suggestions

  • Serve chilled as a refreshing side dish.

  • Pair with roasted chicken, grilled kebabs, sandwiches, or summer BBQ dishes.

  • Add it to a brunch table alongside fruit salad and fresh bread.

  • Make it into a light lunch by adding a scoop on top of a bed of leafy greens.

Storage Notes

This salad keeps well in the fridge for up to 48 hours. Stir it before serving, as some natural juices may settle. If making ahead for a gathering, add the nuts right before serving so they stay crunchy.

Customization Variations

Variation What to Add Flavor Result
Zingy Extra lemon juice + zest Bright + lively
Spiced Pinch of nutmeg + cinnamon Cozy + aromatic
Tropical Add coconut flakes Sweeter & island-inspired
Health Boost Use Greek yogurt only + add chia seeds Higher protein + more texture

Final Thoughts

This Carrot Salad with Pineapple and Raisins is a beautiful expression of simplicity—proof that fresh, everyday ingredients can become something comforting, nostalgic, and even elegant when thoughtfully combined. It tastes like sunshine in a bowl: sweet, soft, crisp, creamy, and refreshing. It’s a dish that fits any season, any table, and any gathering.