7 Cup Coconut Cake No Eggs No Scale Required

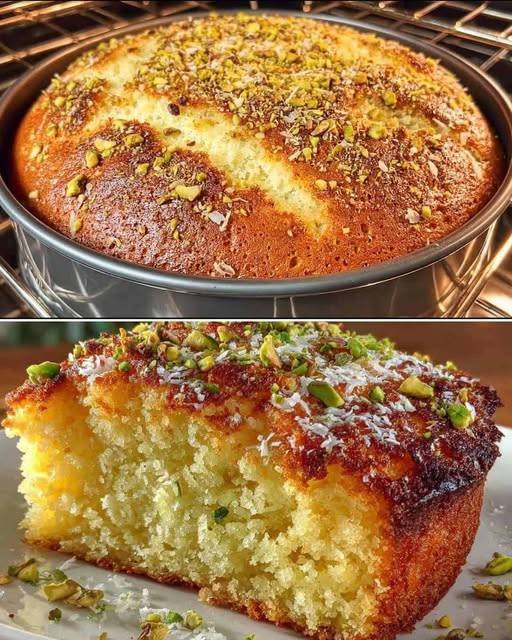
7-Cup Coconut Cake – No Eggs, No Scale Required

If you love soft, fragrant, and moist cakes but dislike complicated measurements or the hassle of eggs, the 7-Cup Coconut Cake is your dream come true. This delightful old-fashioned recipe is popular in many parts of the world for one simple reason—it’s foolproof. You don’t need a kitchen scale, mixer, or eggs—just one cup, a bowl, and a spoon. The result? A rich, golden coconut cake that’s slightly crisp on the outside and beautifully tender inside, with a hint of tropical sweetness in every bite.

Let’s explore this easy, comforting cake in detail—from its origins to the simple steps that make it shine.


The Beauty of the “7-Cup” Formula

The name “7-Cup Cake” comes from the equal ratio of ingredients—one cup each of seven basic items. It’s a wonderfully practical idea, especially for home bakers who don’t like dealing with scales or measuring spoons. Traditionally, this cake includes flour, sugar, grated coconut, semolina, yogurt, oil, and milk. These humble ingredients create a perfectly balanced texture: soft, dense, and aromatic, with a satisfying bite from the semolina and coconut.

This cake is a cousin of the popular Indian “7-Cup Barfi” but adapted into a moist, sliceable tea cake. Its texture lies somewhere between a pound cake and a coconut loaf—moist, aromatic, and slightly chewy at the edges.


Ingredients (Measured by Cups, Not Scale!)

You’ll only need a simple kitchen cup—any standard measuring cup will do.

Ingredients:

  • 1 cup all-purpose flour

  • 1 cup fine semolina (suji or rava)

  • 1 cup desiccated coconut (unsweetened preferred)

  • 1 cup plain yogurt (curd)

  • 1 cup sugar

  • 1 cup milk (room temperature)

  • 1 cup vegetable oil (or melted butter)

  • 1 ½ tsp baking powder

  • ½ tsp baking soda

  • 1 tsp vanilla extract or cardamom powder (optional for flavor)

  • A pinch of salt

Optional for topping:

  • 2 tbsp grated coconut or chopped nuts (almonds or pistachios)


Why No Eggs?

This cake is completely eggless yet beautifully soft. The yogurt and baking soda work together as a perfect substitute for eggs, providing moisture, lightness, and lift. The reaction between the yogurt’s acidity and the soda helps the batter rise without making it heavy. This makes the 7-Cup Coconut Cake ideal for vegetarians or anyone avoiding eggs.


Step-by-Step Method

1. Prepare the Pan

Grease a loaf tin or 8-inch round cake pan with oil or butter. Line the bottom with parchment paper for easy removal. Preheat your oven to 170°C (340°F).

2. Mix the Wet Ingredients

In a large mixing bowl, combine:

  • Yogurt

  • Sugar

  • Milk

  • Oil

  • Vanilla extract (if using)

Whisk until the sugar dissolves completely and the mixture turns smooth and creamy. This forms the moist foundation of your cake.

3. Combine the Dry Ingredients

In another bowl, mix together:

  • Flour

  • Semolina

  • Desiccated coconut

  • Baking powder

  • Baking soda

  • Salt

Stir with a spoon or whisk until well combined.

4. Bring It All Together

Pour the dry ingredients into the wet mixture in batches. Use a spatula or wooden spoon to gently mix until a thick, smooth batter forms. Don’t overmix; just fold until there are no dry streaks.

If the batter feels too thick (depending on your semolina), you can add 2–3 tablespoons of extra milk. The texture should be pourable but not runny.

5. Rest the Batter

Let the batter rest for 10 minutes. This allows the semolina and coconut to absorb moisture and helps the cake develop a rich, dense crumb.

6. Pour and Bake

Pour the rested batter into the prepared cake pan. Tap it gently on the counter to remove air bubbles. Sprinkle some grated coconut or chopped nuts on top if you like a golden crust.

Bake in the preheated oven for 40–50 minutes, or until the top is golden brown and a toothpick inserted in the center comes out clean.

7. Cool and Serve

Once baked, let the cake rest in the pan for 10 minutes, then remove it to a cooling rack. Slice only after it has completely cooled. This helps the texture set properly.


Flavor Variations

The beauty of the 7-Cup Coconut Cake is its flexibility. You can easily tweak it to your taste or what’s available in your kitchen.

  • Lemon Coconut Cake: Add 1 tablespoon of lemon zest to the batter for a fresh, citrusy note.

  • Tropical Twist: Mix in a handful of chopped pineapple or mango for extra moisture and fruity flavor.

  • Nutty Delight: Add chopped almonds, walnuts, or cashews to the batter for crunch.

  • Chocolate Swirl: Mix 2 tablespoons of cocoa powder with ¼ cup batter and swirl it into the cake before baking for a marble effect.


Serving Ideas

This cake is perfect on its own with a cup of tea or coffee. However, you can dress it up for special occasions too:

  • Drizzle with a coconut glaze: Mix powdered sugar with a little coconut milk until smooth, then drizzle it over the cooled cake.

  • Serve with whipped cream and fruits: Add a light layer of whipped cream and garnish with berries or tropical fruits for a dessert-worthy treat.

  • Warm it up: Lightly toast a slice and serve with a pat of butter—it tastes heavenly!


Storage Tips

Because it’s rich with oil, milk, and yogurt, this cake stays moist for days.

  • Room temperature: Store in an airtight container for up to 3 days.

  • Refrigerator: Keeps well for up to 6–7 days.

  • Freezer: Wrap slices individually and freeze for up to a month. Just thaw and warm slightly before serving.


Why You’ll Love This Cake

  1. No Eggs, No Fuss: Perfect for vegetarians or when you’re out of eggs.

  2. One-Cup Wonder: No scales, no fancy tools—just one cup for measuring everything.

  3. Soft and Moist: Yogurt and oil make the texture unbelievably tender.

  4. Tropical Aroma: Coconut and semolina give a subtle crunch and flavor that’s simply addictive.

  5. Versatile Recipe: Easy to flavor, glaze, or top to suit your mood or season.


A Bite of Simplicity and Comfort

The 7-Cup Coconut Cake is the kind of recipe that connects generations—it’s simple, homely, and full of nostalgic warmth. Every slice feels like a hug from the kitchen: golden, aromatic, and satisfying without being too sweet or heavy.

It’s the perfect cake to bake when you want something special but stress-free, when you’re hosting guests, or when you just crave a cozy treat with your evening tea. And the best part? You’ll never have to worry about measuring or cracking eggs—just seven cups, one bowl, and pure coconut magic.

Cheesy Mashed Potato Puffs

If you’ve ever wondered what to do with leftover mashed potatoes, this Cheesy Mashed Potato Puffs recipe will make you look forward to having extra mash every time! These puffs are crispy on the outside, fluffy inside, and oozing with melted cheese — a perfect comfort snack or side dish that’s elegant enough for a dinner party yet simple enough for everyday meals.

Ingredients

(Makes 12–15 golden puffs)

  • 2 cups mashed potatoes (preferably cold leftovers)

  • 1 cup shredded cheddar cheese (or a blend of mozzarella and cheddar for a gooey center)

  • 2 large eggs

  • ¼ cup grated Parmesan cheese

  • 2 tablespoons butter, melted

  • 3 tablespoons milk or cream

  • 2 tablespoons chopped green onions or chives

  • ½ teaspoon garlic powder

  • ½ teaspoon onion powder

  • Salt and black pepper, to taste

  • ½ cup breadcrumbs (for coating, optional)

  • Cooking spray or a little melted butter (for greasing muffin tin)

Optional Add-Ins

  • Crumbled cooked bacon for a smoky touch

  • Finely chopped jalapeños for a spicy kick

  • Minced herbs like parsley or dill for freshness

  • A small cube of cheese hidden in the center for a molten surprise

Instructions

  1. Preheat & Prep
    Preheat your oven to 400°F (200°C). Grease a mini muffin pan lightly with cooking spray or melted butter. This helps the puffs lift out easily once baked.

  2. Mix the Base
    In a large mixing bowl, combine the mashed potatoes, eggs, milk, melted butter, Parmesan, and shredded cheddar. Mix until smooth and creamy. The eggs will help the mixture puff up beautifully in the oven.

  3. Season to Perfection
    Add garlic powder, onion powder, salt, pepper, and chopped green onions. Stir everything until evenly combined. The mixture should be thick but scoopable — if it’s too loose, add a spoonful of breadcrumbs or grated cheese to firm it up.

  4. Shape & Fill
    Spoon the mixture into the muffin cups, filling each one almost to the top. If you want a gooey surprise, press a small cube of cheese into the center of each puff and cover it with a little potato mixture.

  5. Crispy Finish (Optional)
    For extra crunch, sprinkle breadcrumbs over the tops or lightly roll each puff in breadcrumbs before baking.

  6. Bake to Golden Glory
    Bake for 20–25 minutes or until the tops are puffed and golden brown. The edges should crisp up, and you’ll smell that irresistible cheesy aroma filling the kitchen.

  7. Cool Slightly Before Serving
    Let the puffs rest for about 5 minutes before removing them from the pan. This allows them to firm up just enough to hold their shape perfectly.

Serving Ideas

Serve your Cheesy Mashed Potato Puffs as:

  • A snack or appetizer with sour cream or ranch dip

  • A side dish with roasted meats or grilled vegetables

  • A party favorite, easy to pick up and pop in your mouth

  • A breakfast bite, paired with scrambled eggs and crispy bacon

Chef’s Tips for the Perfect Puffs

  • Cold mashed potatoes work best because they’re firmer and hold their shape better.

  • Use sharp cheddar for a rich flavor, or swap for gouda, pepper jack, or Swiss.

  • Want to make them ahead? Mix and refrigerate the batter overnight, then bake fresh the next day.

  • You can also air fry them at 375°F (190°C) for 10–12 minutes for an even crispier crust.

Why This Recipe Is Unique

Unlike ordinary mashed potato fritters, these puffs are baked to perfection — not fried — making them light yet indulgent. The combination of Parmesan for flavor, cheddar for melt, and green onions for brightness transforms simple mashed potatoes into a gourmet delight. Each bite offers a contrast of textures: a crispy shell giving way to a soft, cheesy, cloud-like interior.

Savory Braised Oxtails

If you crave a dish that defines slow-cooked luxury — rich, hearty, and deeply satisfying — Savory Braised Oxtails is the masterpiece your kitchen deserves. This dish transforms humble oxtail pieces into tender morsels bathed in a velvety, aromatic sauce. With layers of flavor from herbs, wine, and slow caramelization, this recipe celebrates patience and soul-warming food at its finest.

Cooking Time

  • Prep Time: 25 minutes

  • Cook Time: 3 hours

  • Servings: 4–6

Ingredients

For the Oxtails:

  • 3 pounds beef oxtails, trimmed of excess fat

  • 2 teaspoons kosher salt

  • 1 teaspoon black pepper

  • 2 tablespoons all-purpose flour

  • 3 tablespoons olive oil or beef tallow

For the Braising Base:

  • 1 large onion, finely chopped

  • 2 carrots, diced

  • 2 celery stalks, diced

  • 6 garlic cloves, minced

  • 2 tablespoons tomato paste

  • 1 teaspoon smoked paprika

  • 1 teaspoon dried thyme

  • 1 teaspoon rosemary

  • 2 bay leaves

  • 1 cup red wine (or beef broth for non-alcoholic version)

  • 3 cups beef stock (preferably homemade or low-sodium)

  • 1 tablespoon Worcestershire sauce

  • 2 teaspoons brown sugar

  • 1 tablespoon soy sauce (for depth and umami)

Optional for extra flavor:

  • 1 small piece of star anise (for subtle aromatic warmth)

  • ½ teaspoon crushed red pepper (for gentle heat)

For Finishing:

  • 1 tablespoon butter

  • 1 tablespoon fresh parsley, chopped

Instructions

Step 1: Season and Brown the Oxtails

Pat your oxtails dry with paper towels — moisture prevents browning. Season them generously with salt and pepper, then dust lightly with flour.
In a heavy-bottomed Dutch oven or cast-iron pot, heat olive oil over medium-high heat. Add oxtails in batches (don’t overcrowd!) and sear each side until golden brown and caramelized, about 3–4 minutes per side.
Remove and set aside on a plate — this crust is the foundation of flavor.

Step 2: Build the Flavor Base

Lower the heat slightly. In the same pot, add the onion, carrots, and celery. Cook for 6–7 minutes, stirring occasionally, until they soften and pick up the fond (browned bits) from the pan.
Add garlic and cook for another 30 seconds until fragrant. Stir in tomato paste, smoked paprika, thyme, rosemary, and bay leaves. Let the tomato paste darken slightly — this adds depth and sweetness.

Step 3: Deglaze and Enrich

Pour in the red wine and scrape up all those delicious brown bits from the pot’s bottom. Let the wine simmer for 3–4 minutes until slightly reduced.
Now add beef stock, Worcestershire sauce, soy sauce, and brown sugar. Stir to combine. If you’re using star anise or crushed red pepper, add them now for subtle background flavor.

Step 4: Braise Low and Slow

Return the oxtails (and their juices) to the pot. The liquid should nearly cover the meat — add more stock if necessary.
Bring the pot to a gentle simmer, then cover tightly with a lid.
Transfer to a preheated oven at 325°F (160°C) and braise for about 2½ to 3 hours, turning the oxtails once during cooking.

By the end, the meat should be fall-off-the-bone tender, and the sauce thick, glossy, and rich.

Step 5: Finish and Serve

Carefully remove the oxtails and bay leaves. Skim off excess fat from the surface of the sauce (or chill and remove solidified fat later for extra clarity).
Place the pot on the stovetop and simmer uncovered for 10–15 minutes to thicken the sauce if desired. Stir in a knob of butter to give the sauce that final silky sheen.

Sprinkle with fresh parsley before serving.

Serving Suggestions

This luxurious dish deserves equally comforting sides. Serve it over:

  • Creamy mashed potatoes or buttered polenta

  • Steamed white rice or coconut rice

  • Buttered egg noodles or fresh sourdough bread to soak up every drop of sauce

Pair it with a glass of red wine or spiced tea for the perfect cozy meal.

Chef’s Unique Tips

  1. Slow Cooker Method: After browning, transfer everything to a slow cooker and cook on Low for 8 hours or High for 4 hours — perfect for busy days.

  2. Flavor Depth: A teaspoon of balsamic vinegar or cocoa powder stirred in at the end adds surprising richness.

  3. Make-Ahead Magic: Braised oxtails taste even better the next day, as the flavors deepen overnight.

  4. Thickening Trick: If your sauce is too thin, mix 1 teaspoon cornstarch with 2 teaspoons cold water and whisk it into the simmering sauce for a luxurious finish.

The Story Behind the Dish

Oxtails have humble origins — once considered a “poor man’s cut,” they are now celebrated as a delicacy for their gelatin-rich texture and robust flavor. Slow braising transforms this tough cut into buttery tenderness, while the natural collagen thickens the sauce into a luscious glaze.
Every spoonful carries the warmth of tradition — a dish your grandmother might have simmered on a Sunday, filling the house with irresistible aroma.

Final Thoughts

Savory Braised Oxtails are not just a meal — they’re a slow-cooked symphony of time, care, and love. From the initial sear to the final rich spoonful, this recipe is proof that the best things truly take time. Whether served at a family dinner or a special occasion, this dish guarantees comfort and elegance in every bite.

KFC Air Fryer Chicken

If you’ve ever found yourself craving that irresistible golden crunch and juicy tenderness of KFC fried chicken, this Air Fryer KFC Chicken recipe will change the way you think about homemade fried chicken forever. It’s a healthier, quicker version that still delivers that iconic blend of herbs, spices, and crispy perfection — all without deep-frying in oil. Imagine biting into a piece of chicken so flavorful, with a crust that shatters lightly and meat that stays tender inside. This is the magic of air-frying done right, and today we’ll recreate that world-famous taste right in your kitchen.

Why This Recipe Works

This air fryer version captures the signature KFC flavor with a special 11-spice mix, while the buttermilk brine ensures each bite is juicy and seasoned throughout. Instead of soaking in oil, the air fryer circulates hot air to create a golden, crispy crust that rivals traditional frying. It’s also easier to clean up and much healthier — with about 70% less fat than deep-fried chicken. You’ll still get that finger-lickin’ good crunch, only lighter and guilt-free.

Ingredients

For the Buttermilk Marinade:

  • 2 lbs (about 1 kg) bone-in chicken (drumsticks, thighs, or breasts)

  • 1 ½ cups buttermilk

  • 1 teaspoon salt

  • 1 teaspoon black pepper

  • ½ teaspoon paprika

  • ½ teaspoon garlic powder

For the Seasoned Coating:

  • 1 ½ cups all-purpose flour

  • 1 teaspoon salt

  • 1 teaspoon ground black pepper

  • 1 teaspoon paprika

  • 1 teaspoon dried basil

  • ½ teaspoon dried thyme

  • ½ teaspoon oregano

  • ½ teaspoon celery salt

  • ½ teaspoon mustard powder

  • ½ teaspoon garlic powder

  • ½ teaspoon onion powder

  • ¼ teaspoon white pepper

  • ¼ teaspoon cayenne pepper (optional for a spicy kick)

For Cooking:

  • Olive oil spray or cooking spray

tep 1: Marinate for Maximum Juiciness

In a large mixing bowl, whisk together the buttermilk, salt, black pepper, paprika, and garlic powder. Add the chicken pieces, making sure each one is fully submerged in the mixture. Cover and refrigerate for at least 4 hours, or overnight if possible.

This buttermilk bath does more than flavor the chicken — it tenderizes it. The acidity breaks down the muscle fibers, while the spices infuse deep inside. When you bite into your cooked chicken, you’ll taste the seasoning from the surface all the way to the bone.

Step 2: Create the Legendary KFC Spice Blend

In another large bowl, mix the flour with all the seasonings. This is where the secret lies — the 11 herbs and spices inspired by the original KFC recipe. It’s a blend of warmth, spice, and savory depth that makes the coating addictive.

For an extra-crispy result, double-dip the chicken:

  1. Remove a piece of marinated chicken, letting the excess buttermilk drip off.

  2. Coat it in the seasoned flour mixture, pressing the flour onto the surface.

  3. Dip it back into the buttermilk.

  4. Coat once again in the flour mixture.

This double coating builds up that iconic flaky crust that shatters when you bite into it.

Step 3: Preheat the Air Fryer

Preheat your air fryer to 375°F (190°C) for about 5 minutes. Preheating is crucial because it mimics the instant sear you’d get in hot oil — sealing in juices and ensuring an even golden color.

Step 4: Arrange and Spray

Lightly spray the air fryer basket with oil to prevent sticking. Arrange the chicken pieces in a single layer, making sure they don’t touch. You may need to cook in batches depending on your air fryer’s size.

Once arranged, spray the chicken generously with cooking oil on all sides. This step is key to creating that beautiful fried look and crunch — it helps the flour coating crisp evenly and turn golden brown.

Step 5: Air Fry to Crispy Perfection

Air fry the chicken at 375°F (190°C) for 25–30 minutes, flipping halfway through. Spray again after flipping to maintain the crispy coating.

  • For smaller pieces (like wings or drumsticks): 22–25 minutes.

  • For larger pieces (like thighs or breasts): 28–30 minutes.

The chicken is done when the crust is golden and the internal temperature reaches 165°F (74°C). You’ll know it’s perfect when the air fryer basket smells like a KFC bucket.

Step 6: Let It Rest

When the chicken is finished, let it rest for 5 minutes on a wire rack. This allows the juices to settle and keeps the coating from getting soggy. The result? A perfectly crisp outside and tender, flavorful inside.

Step 7: Serve and Enjoy

Serve your KFC-style Air Fryer Chicken hot, with your favorite sides: mashed potatoes, coleslaw, buttery corn on the cob, or even fries. For the full experience, drizzle a little honey over the crispy chicken or pair it with your favorite dipping sauces like ranch, BBQ, or spicy mayo.

Tips for the Best Air Fryer KFC Chicken

  1. Don’t overcrowd the basket: Air circulation is key for even crisping.

  2. Use bone-in chicken: It stays juicier and more flavorful.

  3. Rest before serving: This ensures a perfectly crunchy exterior.

  4. Oil spray matters: A good mist of oil helps the crust fry up evenly.

  5. Try a spicy version: Add more cayenne or crushed chili flakes for a fiery Southern twist.

Why You’ll Love This Recipe

This recipe captures everything we adore about KFC — that secret blend of spices, crispy coating, and juicy meat — but transforms it into a healthier, mess-free version. It’s perfect for family dinners, game nights, or even meal prep. You can reheat leftovers in the air fryer for a few minutes, and they’ll crisp right back up.

Every bite feels like a trip down memory lane, with that nostalgic KFC flavor — only fresher, crunchier, and made with love in your kitchen.

Final Bite:
This KFC Air Fryer Chicken isn’t just a copycat; it’s a tribute to the legendary comfort food that defined crispy fried chicken for generations. It’s proof that with the right technique and a little spice magic, you can create restaurant-quality fried chicken at home — with a healthier, air-fried twist that keeps you coming back for more.

Air Fryer Garlic Toast Pizza

If you love the comforting aroma of garlic bread and the cheesy delight of pizza, this Air Fryer Garlic Toast Pizza is about to become your new obsession. It’s the perfect fusion of crispy garlic toast and gooey, melty pizza toppings—all cooked to perfection in the air fryer. This recipe is so quick, delicious, and customizable that you’ll wonder how you ever lived without it. Whether you’re craving a quick lunch, an easy dinner, or a late-night snack, this mouthwatering creation will satisfy every craving with minimal effort and maximum flavor.

Why This Recipe Works

Using garlic toast as the pizza base eliminates the need for pizza dough—saving you time while adding incredible buttery, garlicky flavor. The air fryer ensures a crispy, golden crust while melting the cheese evenly, creating that irresistible pizza stretch we all love. Plus, it’s endlessly versatile—you can top it with anything from classic pepperoni to vegetables, or even turn it into a breakfast pizza with eggs and bacon.

This recipe is ideal for busy weeknights, family movie nights, or anyone who loves a quick homemade meal without sacrificing taste. You’ll only need about 10 minutes from start to finish, and no oven preheating required!

Ingredients

For 4 servings (2 slices each):

  • 8 slices frozen Texas-style garlic toast (thick and buttery)

  • 1 cup pizza sauce (store-bought or homemade)

  • 2 cups shredded mozzarella cheese

  • ½ cup pepperoni slices (or any topping of choice)

  • ¼ cup sliced black olives (optional)

  • ¼ cup diced bell peppers

  • ¼ cup sliced mushrooms

  • 1 teaspoon Italian seasoning

  • ½ teaspoon crushed red pepper flakes (optional, for heat)

  • 2 tablespoons fresh basil or parsley, chopped, for garnish

Homemade Garlic Toast Option (optional)

If you prefer to make your own garlic toast base instead of using frozen toast, here’s a quick method:

  • 8 slices of thick-cut bread (French, sourdough, or brioche)

  • 3 tablespoons softened butter

  • 2 cloves garlic, minced

  • 1 teaspoon parsley flakes

  • ¼ teaspoon salt

Mix butter, garlic, parsley, and salt together, spread over one side of each slice, and toast them in the air fryer at 350°F for 3–4 minutes before adding toppings.

Instructions

Step 1: Preheat Your Air Fryer

Preheat the air fryer to 375°F (190°C). Preheating ensures the garlic toast crisps up perfectly and that the cheese melts evenly. If your air fryer doesn’t require preheating, you can skip this step—but starting hot gives you the best texture.

Step 2: Prepare the Garlic Toast Base

Place the frozen garlic toast slices in the air fryer basket in a single layer. Air fry for 3 minutes to get them slightly crisped but not fully cooked. This step prevents soggy bottoms once you add sauce and cheese.

Step 3: Add the Sauce and Toppings

Carefully spread about 1 to 2 tablespoons of pizza sauce over each partially toasted slice. Sprinkle with a generous layer of mozzarella cheese, then add your desired toppings. Try mixing and matching—some slices with pepperoni and olives, others with bell peppers and mushrooms for variety.

Step 4: Air Fry to Perfection

Return the loaded garlic toast pizzas to the air fryer basket (don’t overcrowd—cook in batches if needed). Air fry for 5 to 7 minutes until the cheese is bubbly, golden, and the edges are perfectly crisp. Keep a close eye during the last minute to prevent over-browning.

Step 5: Garnish and Serve

Remove the garlic toast pizzas carefully using tongs or a spatula. Sprinkle with Italian seasoning, red pepper flakes, and fresh basil or parsley. Let them cool for a minute—they’ll be piping hot and melty—then serve immediately.

Flavor Variations

Here’s where you can get creative! Try some of these tasty variations:

  1. Margherita Style:
    Top with fresh mozzarella slices, tomato, and basil leaves for a fresh Italian twist.

  2. BBQ Chicken Pizza:
    Use BBQ sauce instead of pizza sauce, add cooked shredded chicken, red onions, and smoked gouda cheese.

  3. Veggie Lovers:
    Add spinach, onions, olives, and bell peppers with a sprinkle of feta for a Mediterranean vibe.

  4. Meat Lovers:
    Load up with pepperoni, sausage crumbles, ham, and bacon for the ultimate carnivore feast.

  5. Breakfast Garlic Toast Pizza:
    Add scrambled eggs, bacon, and cheddar cheese, then drizzle with hot sauce for a morning treat.

Tips for Perfect Air Fryer Garlic Toast Pizza

  • Avoid soggy toast: Pre-toast the bread before adding sauce and toppings—it keeps the base firm and crisp.

  • Don’t overload toppings: Air fryers work best with even airflow. Too many toppings may result in uneven cooking.

  • Watch the cheese: Mozzarella melts fast. For a golden top, cook until just bubbly.

  • Reheat with ease: Leftovers reheat beautifully in the air fryer for 2–3 minutes at 350°F. They’ll taste just as fresh as when you made them!

Serving Suggestions

Serve these garlic toast pizzas with a side of Caesar salad, creamy tomato soup, or air fryer fries for a full meal. They’re perfect for parties, casual dinners, or even kids’ lunches. Pair them with a chilled soda or sparkling lemonade for a simple yet satisfying combo.

Storage and Reheating

  • Refrigerate: Store leftovers in an airtight container for up to 3 days.

  • Freeze: Once cooled, wrap individual slices in foil and freeze for up to 1 month.

  • Reheat: Pop in the air fryer at 350°F for 5 minutes—crispy and cheesy again!

Final Thoughts

The Air Fryer Garlic Toast Pizza proves that you don’t need a fancy crust or hours in the kitchen to enjoy the magic of homemade pizza. With crispy garlic butter bread, gooey cheese, and your favorite toppings, this quick and easy dish delivers instant satisfaction. It’s the perfect balance of convenience and flavor—a nostalgic comfort food with a modern air fryer twist.

Gluten-Free Crescent Rolls

If you’ve been missing the soft, buttery goodness of crescent rolls since going gluten-free, you’re in for a treat. These Gluten-Free Crescent Rolls are tender, golden, and layered with buttery flavor—so much so that you’ll hardly believe they’re gluten-free. Whether served alongside a hearty dinner, filled with chocolate for a sweet treat, or stuffed with ham and cheese for a quick snack, these rolls rise to every occasion. This recipe delivers that nostalgic crescent roll experience with wholesome, gluten-free ingredients and a touch of homemade love.

Why You’ll Love This Recipe

Unlike many gluten-free bread recipes that turn out dry or crumbly, these crescent rolls are soft and pull apart beautifully. The secret lies in using a combination of gluten-free flours and the right technique for rolling and shaping the dough. You’ll get a melt-in-your-mouth texture that’s light, buttery, and satisfying.

These rolls are perfect for holidays, brunches, or just to have something special at the dinner table. And because they freeze beautifully, you can make them ahead of time and bake them fresh whenever the craving hits.

Ingredients

For the Dough:

  • 1 ½ cups gluten-free all-purpose flour (with xanthan gum included)

  • ½ cup tapioca starch

  • ¼ cup sorghum flour

  • 2 ½ tsp baking powder

  • 1 tsp salt

  • 3 tbsp sugar

  • 1 packet (2 ¼ tsp) active dry yeast

  • ½ cup warm milk (100°F to 110°F; can use almond or oat milk)

  • 1 tsp honey or sugar (to activate the yeast)

  • 2 large eggs (room temperature)

  • ¼ cup unsalted butter, melted and cooled slightly

  • ¼ cup plain Greek yogurt (or sour cream)

  • 1 tsp apple cider vinegar

For Brushing and Finishing:

  • 3 tbsp melted butter (for brushing before baking)

  • 1 tbsp melted butter (for brushing after baking)

  • Optional: a sprinkle of sea salt or sesame seeds on top

Step 1: Activate the Yeast

In a small bowl, combine the warm milk, honey (or sugar), and yeast. Stir gently and let it sit for about 5–10 minutes, until it becomes foamy. If it doesn’t foam, your yeast may be expired or the milk too hot or cold, so start again. This step ensures your rolls rise properly and have that delicate, fluffy texture.

Step 2: Mix the Dry Ingredients

In a large mixing bowl, whisk together the gluten-free flour, tapioca starch, sorghum flour, baking powder, salt, and sugar. Mixing the flours before adding the wet ingredients ensures even distribution, which is key to consistent texture.

Step 3: Combine the Wet Ingredients

In another bowl, whisk together the eggs, melted butter, yogurt, and apple cider vinegar. Add in the activated yeast mixture and mix until well blended. This wet mixture should be creamy and slightly frothy from the yeast.

Step 4: Form the Dough

Slowly pour the wet mixture into the dry ingredients, stirring as you go. Use a wooden spoon or a mixer with a dough hook to bring it together. The dough will be soft, slightly sticky, and more pliable than typical gluten-based dough.

If it feels too sticky, add a tablespoon of gluten-free flour at a time until it holds its shape. Cover the bowl with plastic wrap and let it rest for 30–40 minutes in a warm spot. This allows the yeast to develop flavor and the flours to hydrate.

Step 5: Roll and Shape

Once rested, lightly flour your work surface with gluten-free flour. Roll the dough into a 12-inch circle about ¼-inch thick. Using a pizza cutter or knife, slice it into 8 triangles like you would a pizza.

To shape each crescent roll, take one triangle, gently stretch the wide end a bit, then roll it tightly toward the tip. Tuck the tip underneath so it stays in place while baking. Arrange the rolls on a parchment-lined baking sheet with space between them.

Step 6: Proof the Rolls

Cover the rolls lightly with a kitchen towel and let them proof for 20–25 minutes in a warm area. They should puff up slightly but not double in size. This second rise helps develop the light, airy texture.

Step 7: Bake to Golden Perfection

Preheat your oven to 375°F (190°C). Brush the rolls with melted butter before baking. Bake for 16–20 minutes, or until the tops are beautifully golden brown.

Remove from the oven and immediately brush with another layer of melted butter for that glossy finish and irresistible buttery aroma.

Step 8: Serve and Enjoy

Allow the rolls to cool slightly before serving. They’re best enjoyed warm—soft, fragrant, and perfectly golden. You can serve them with honey butter, jam, or a simple pat of butter.

Tips for Perfect Gluten-Free Crescent Rolls

  1. Use a quality gluten-free flour blend: Not all blends behave the same way. Look for one with a mix of rice flour, potato starch, and xanthan gum.

  2. Don’t skip the resting time: Gluten-free doughs need that hydration time to avoid a grainy texture.

  3. Handle gently: Gluten-free doughs are more delicate; avoid overworking them.

  4. Try dairy-free: Substitute butter with vegan butter and milk with almond milk for a dairy-free version.

  5. Freeze for later: Freeze unbaked rolls on a tray, then store them in a zip-top bag. Bake straight from frozen—just add 5 extra minutes to baking time.

Creative Variations

  • Garlic Butter Crescent Rolls: Add ½ tsp garlic powder to the dough and brush with garlic butter after baking.

  • Cheese-Filled Crescents: Before rolling, sprinkle shredded mozzarella or cheddar on each triangle.

  • Sweet Crescents: Sprinkle cinnamon sugar over the dough and drizzle with vanilla glaze after baking.

  • Stuffed Ham & Cheese Rolls: Add a slice of ham and cheese before rolling for an irresistible savory snack.

Conclusion

These Gluten-Free Crescent Rolls prove that you don’t have to sacrifice flavor or texture when eating gluten-free. With their light, tender crumb and buttery layers, they’re sure to impress anyone at the table—gluten-free or not. Whether you enjoy them plain, filled, or topped with your favorite spread, each bite brings back that comforting warmth of homemade baking.

Quick & Simple Donut Recipe

There’s something wonderfully comforting about a warm, freshly made donut. That soft, pillowy texture paired with a golden crisp exterior and a dusting of sugar or drizzle of glaze—few things rival that bliss. If you’ve ever craved donuts but didn’t want to deal with the hassle of yeast, long proofing times, or complex techniques, this Quick & Simple Donut Recipe is your new best friend. These donuts are tender, light, and ready in under 30 minutes, perfect for breakfast, dessert, or a cozy afternoon treat.

Why This Donut Recipe is So Special

This recipe is designed for simplicity and speed without compromising flavor or texture. Traditional yeast donuts require proofing, kneading, and time for the dough to rise, but this version uses baking powder as the leavening agent. That means no waiting around for the dough to double—just mix, roll, fry, and enjoy. The result? A deliciously soft inside with a golden, crisp outside, ready to devour almost immediately.

You can glaze, sugar coat, or even fill them with jam or custard. It’s a blank canvas for your favorite flavors, but the base donut itself is irresistibly good on its own.

Ingredients You’ll Need

(Makes about 12 medium donuts)

  • 2 cups all-purpose flour

  • 1/4 cup granulated sugar

  • 1 tablespoon baking powder

  • 1/2 teaspoon salt

  • 1/4 teaspoon ground nutmeg (optional, adds that classic donut flavor)

  • 3/4 cup whole milk

  • 2 tablespoons melted butter

  • 1 large egg

  • 1 teaspoon pure vanilla extract

  • Oil for frying (vegetable or canola oil works best)

For coating or glazing:

  • Cinnamon sugar mixture: 1/2 cup sugar + 1 teaspoon cinnamon

  • Classic glaze: 1 cup powdered sugar + 2 tablespoons milk + 1/2 teaspoon vanilla

  • Chocolate glaze: 1/2 cup chocolate chips + 2 tablespoons heavy cream

Step-by-Step Instructions

Step 1: Prepare the Dough

In a large mixing bowl, whisk together the flour, sugar, baking powder, salt, and nutmeg. The nutmeg gives the donuts that nostalgic bakery-style aroma, but you can leave it out if you prefer.

In a separate bowl, whisk the milk, melted butter, egg, and vanilla extract until smooth. Slowly pour the wet mixture into the dry ingredients and stir until a soft dough forms. The dough should be smooth, slightly sticky but firm enough to roll out. If it’s too sticky, add a tablespoon of flour at a time until manageable.

Step 2: Shape the Donuts

Lightly flour a clean surface and roll the dough out to about ½ inch thickness. Use a round cookie cutter (about 3 inches wide) or a glass to cut circles. For the donut holes, use a small cap or the end of a piping tip. Gather the scraps, re-roll, and cut again until all dough is used.

If you don’t have cutters, simply shape small balls for “donut holes”—they’re easier and fry beautifully.

Step 3: Heat the Oil

Pour about 2 inches of oil into a deep pan or pot. Heat over medium heat until the oil reaches 350°F (175°C). If you don’t have a thermometer, drop a small piece of dough into the oil—if it sizzles and floats to the surface within a few seconds, it’s ready.

Make sure the temperature doesn’t drop too low or the donuts will absorb oil and become greasy; too hot, and they’ll brown too quickly without cooking inside.

Step 4: Fry the Donuts

Carefully add 2–3 donuts at a time into the hot oil. Fry for about 1–2 minutes per side until golden brown. Use a slotted spoon or tongs to turn them gently. Once evenly browned, remove and place them on a paper towel-lined plate to drain excess oil.

Repeat with the remaining donuts and donut holes. The holes will cook faster—usually under a minute.

Step 5: Coat or Glaze

Now comes the fun part—topping your donuts! While they’re still warm:

  • For a sugar coating: Roll the donuts in the cinnamon sugar mixture.

  • For a classic glaze: Whisk powdered sugar, milk, and vanilla until smooth, then dip the tops of the donuts in the glaze and let them set on a wire rack.

  • For chocolate lovers: Melt chocolate chips with heavy cream, stir until glossy, and dip each donut for a rich chocolate finish.

You can even add sprinkles, crushed nuts, or shredded coconut before the glaze sets.

Tips for Perfect Donuts

  1. Do not overmix the dough. Mixing too much makes the donuts dense. Stop as soon as the ingredients combine.

  2. Keep the oil temperature steady. Fluctuating heat can lead to uneven cooking.

  3. Use fresh oil. Old oil can affect both flavor and texture.

  4. Work in small batches. Overcrowding the pan lowers the oil temperature.

  5. Experiment! Try flavoring the dough with lemon zest, almond extract, or a pinch of cocoa powder for variety.

Serving Suggestions

Serve your donuts fresh and warm with a cup of coffee, hot chocolate, or a cold glass of milk. You can also turn them into dessert by adding a scoop of ice cream and a drizzle of caramel or chocolate sauce. If you want to go all out, stack them and dust with powdered sugar for a stunning brunch presentation.

These donuts also make fantastic party treats. You can prepare different coatings—like vanilla glaze, chocolate drizzle, or strawberry icing—and let guests decorate their own.

Storage

If you somehow have leftovers (which is rare!), store them in an airtight container at room temperature for up to 2 days. To bring them back to life, warm them in the microwave for about 10 seconds. You can also freeze unglazed donuts for up to 2 months; thaw and reheat before glazing.

A Little Story Behind the Recipe

This recipe was born out of a rainy morning craving—something sweet, warm, and nostalgic, but with no yeast on hand. After some quick mixing, rolling, and frying, the kitchen filled with that unmistakable donut-shop aroma. One bite sealed the deal—these simple donuts had all the joy of homemade comfort food without the effort.

Every time I make them, I’m reminded that sometimes the simplest recipes bring the most happiness. They’re proof that you don’t need a long list of ingredients or a complicated process to create something truly delightful.

Final Thoughts

This Quick & Simple Donut Recipe is everything homemade baking should be—easy, satisfying, and downright delicious. Whether you’re making them for breakfast, a weekend indulgence, or just to brighten your day, these donuts deliver every single time.

5-Minute Caramel Walnuts

If you’ve ever craved something sweet, crunchy, and deeply satisfying but didn’t have hours to spend in the kitchen, this 5-Minute Caramel Walnuts recipe is your dream come true. In just a few minutes, you can transform ordinary walnuts into glossy, golden nuggets of caramel-coated perfection. These nuts are a delightful mix of nutty warmth and sugary crunch — perfect for snacking, topping desserts, or gifting during the holidays. What makes them even better is how fast and easy they are to prepare — no oven, no candy thermometer, just one pan and five minutes of your time.

Ingredients You’ll Need

  • 1 cup walnut halves (fresh and unsalted)

  • ½ cup granulated sugar

  • 2 tablespoons butter (unsalted, for a rich flavor)

  • 1 tablespoon water

  • ¼ teaspoon salt (balances the sweetness)

  • ½ teaspoon vanilla extract (optional, for aroma and depth)

Step-by-Step Directions

Step 1: Prepare your space.
Before you start, have everything ready — caramelizing sugar moves fast. Line a baking sheet with parchment paper or a silicone mat, and set a fork or wooden spoon nearby for spreading. Measure your walnuts and keep them within reach. Once the sugar melts, you’ll need to act quickly.

Step 2: Melt the sugar and butter.
In a medium, non-stick skillet or saucepan, add sugar, butter, and water over medium heat. Stir gently as the butter melts, allowing the sugar to dissolve evenly. The water helps the sugar melt smoothly, while the butter adds a luscious richness to the caramel.

Step 3: Add the walnuts.
Once the sugar begins to dissolve and form a light syrup, toss in the walnut halves. Stir constantly to coat them evenly. The sugar mixture will bubble and thicken as it caramelizes, coating every piece with a shiny amber glaze. This is where the magic happens — the sugar transforms from white crystals into a warm, golden caramel in under two minutes.

Step 4: Watch carefully.
Keep stirring to prevent burning. As soon as the sugar turns a deep golden color and the nuts smell toasted, remove the pan from the heat immediately. Overcooking even for 10 seconds can lead to bitterness.

Step 5: Flavor and finish.
Quickly stir in the salt and vanilla extract. The salt heightens the caramel’s sweetness while cutting through the richness, and the vanilla adds a lovely aroma. Be cautious — the mixture will sizzle when the vanilla hits the hot caramel.

Step 6: Cool and crisp.
Spread the caramel-coated walnuts on your prepared parchment-lined sheet. Use a fork to separate them while they’re still warm, so they don’t clump together. Let them cool completely for about 5–10 minutes. Once cooled, the caramel hardens into a crisp shell that shatters deliciously with every bite.

Tips for Perfect Caramel Walnuts

  1. Use fresh walnuts. Stale nuts can ruin the flavor. For extra nuttiness, you can lightly toast them in a dry skillet for 2–3 minutes before adding to the caramel.

  2. Don’t walk away. Caramel can burn in seconds. Keep your eyes on the pan at all times.

  3. Avoid overcrowding. One cup of walnuts per batch is ideal — this ensures even coating.

  4. Work fast when spreading. Caramel hardens quickly once off the heat. Use two forks if needed to separate the pieces before it sets.

  5. Clean-up hack: Fill the caramel pan with hot water and let it sit. The hardened caramel will dissolve easily, saving you from scrubbing.

Creative Ways to Enjoy Caramel Walnuts

These glossy, crunchy nuts are incredibly versatile. Here are some irresistible ways to enjoy them:

  • Snack Straight: Enjoy them as they are — sweet, salty, and utterly addictive.

  • Dessert Topping: Sprinkle over ice cream, brownies, cheesecake, or yogurt parfaits for a decadent crunch.

  • Salad Star: Toss them into a spinach or arugula salad with goat cheese and dried cranberries — the caramelized sweetness balances tangy and savory flavors beautifully.

  • Breakfast Upgrade: Add them to oatmeal, pancakes, or French toast for a gourmet touch.

  • Gift Idea: Package cooled caramel walnuts in small jars tied with ribbon for an easy, homemade holiday gift.

Flavor Variations

Want to put your own twist on this quick recipe? Try these fun variations:

  • Cinnamon Sugar Walnuts: Add ½ teaspoon of ground cinnamon for a warm, cozy flavor.

  • Spicy Caramel Walnuts: Sprinkle a pinch of cayenne pepper or chili powder for a sweet-and-spicy kick.

  • Maple Caramel Walnuts: Replace half the sugar with pure maple syrup for a softer, richer caramel.

  • Chocolate Drizzle: Once cooled, drizzle melted dark or white chocolate over the walnuts for an indulgent candy-like treat.

Storage Tips

Store cooled caramel walnuts in an airtight container at room temperature. They’ll stay fresh and crunchy for up to two weeks. For longer storage, refrigerate them for up to a month — just be sure to let them come to room temperature before eating to restore their crisp texture.

Why You’ll Love This Recipe

What makes these 5-Minute Caramel Walnuts truly special is their simplicity. You get the satisfaction of homemade candy without needing a candy thermometer or complicated steps. The combination of buttery caramel and toasty walnuts is classic, yet it never loses its charm. It’s a recipe that feels fancy enough for a party but simple enough for a weekday snack.

With just a handful of pantry staples and five minutes of your time, you can create something that tastes like it took hours. Each bite delivers a satisfying crunch followed by a wave of caramel sweetness that melts into the nut’s earthy depth. Whether you use them to dress up your desserts, impress guests, or satisfy a late-night craving, these caramel walnuts are guaranteed to disappear faster than you can make them.

Final Thoughts

In a world full of elaborate desserts, this 5-Minute Caramel Walnuts recipe proves that sometimes, the simplest things are the most memorable. The process is quick, the ingredients are humble, and yet the result is pure indulgence. Once you make these, you’ll wonder how you ever lived without them. Keep a jar handy — you never know when the craving for something sweet, crunchy, and irresistible will strike!

Lazy Man Peach Cobbler

There’s something magical about the smell of bubbling peaches and buttery crust wafting through the kitchen. The “Lazy Man Peach Cobbler” is a recipe that embodies the very heart of Southern comfort cooking—simple ingredients, minimal effort, and a result so delightful that it tastes like you spent all day baking. This old-fashioned dessert goes back generations, loved for its golden, crisp edges, soft cake-like base, and sweet, syrupy peaches that melt in your mouth. The beauty of this cobbler lies in its effortless preparation; there’s no need for pie crusts or fancy mixers. It’s the kind of dessert that anyone can make with just a few pantry staples and a craving for something warm and cozy.

Ingredients

For the batter:

  • 1 cup all-purpose flour

  • 1 cup granulated sugar

  • 2 teaspoons baking powder

  • ¼ teaspoon salt

  • 1 cup whole milk (or buttermilk for extra richness)

  • 1 teaspoon pure vanilla extract

  • ½ cup (1 stick) unsalted butter, melted

For the fruit filling:

  • 1 (29-ounce) can of sliced peaches in heavy syrup (or use 3 cups fresh or frozen peaches)

  • ½ cup brown sugar

  • ½ teaspoon ground cinnamon

  • ¼ teaspoon nutmeg

  • 1 teaspoon lemon juice

Optional for topping:

  • A sprinkle of coarse sugar

  • A scoop of vanilla ice cream or whipped cream for serving

Directions

Step 1: Preheat and Prepare

Preheat your oven to 350°F (175°C). Place the stick of butter in a 9×13-inch baking dish, then slide it into the oven while it preheats. The butter will slowly melt and lightly brown as the oven heats, giving your cobbler a richer, nutty flavor. Keep an eye on it—you want melted golden butter, not burnt.

Step 2: Mix the Batter

In a medium bowl, whisk together the flour, granulated sugar, baking powder, and salt. Add the milk and vanilla extract, stirring until the batter is smooth and lump-free. The texture should be similar to pancake batter—thin enough to pour, but thick enough to coat a spoon. Set it aside while you prepare the peaches.

Step 3: Prepare the Peaches

If you’re using canned peaches, pour the syrup and fruit into a saucepan. For fresh or frozen peaches, add ¾ cup sugar and ½ cup water. Add the brown sugar, cinnamon, nutmeg, and lemon juice, and simmer over medium heat for 5–7 minutes until the mixture becomes fragrant and slightly thickened. This creates that iconic syrupy filling that makes the cobbler irresistible.

Step 4: Layer It – The Lazy Way

Once your butter is fully melted in the pan, carefully remove it from the oven. Pour the batter directly into the pan—do not stir. The butter will rise up around the edges of the batter, helping to create that crispy, caramelized border. Next, spoon the peach mixture evenly over the batter, gently pouring in the syrup as well. Again, resist the urge to stir. As the cobbler bakes, the batter will rise to the top through the fruit, creating a beautiful, rustic crust.

Step 5: Bake to Perfection

Bake the cobbler for 40–45 minutes, or until the top is golden brown and crisp around the edges. The bubbling fruit syrup should peek through in spots, creating a glossy, caramelized finish. If you like a crunchier top, sprinkle a little coarse sugar over the batter before baking.

Step 6: Cool and Serve

Allow the cobbler to cool for at least 10–15 minutes before serving. This rest time allows the juices to thicken slightly while keeping the cobbler perfectly moist underneath. Serve warm, ideally with a scoop of vanilla ice cream or a dollop of whipped cream.

Tips for the Perfect Lazy Man Peach Cobbler

  1. Use quality peaches: Fresh peaches in summer make this dish shine, but canned peaches in heavy syrup work wonderfully when you’re short on time.

  2. Don’t stir the layers: The magic of this cobbler lies in its self-forming crust. Stirring mixes everything together and ruins that perfect rise.

  3. Add a twist: A pinch of cardamom or a splash of bourbon in the peach filling adds depth and a grown-up flavor twist.

  4. Double the recipe for a crowd: This cobbler disappears fast, especially at potlucks or family gatherings.

Why It’s Called “Lazy Man”

The name says it all—there’s no kneading, rolling, or complicated steps involved. This is a “dump-and-bake” style dessert that rewards minimal effort with maximum flavor. It’s the kind of recipe passed down from grandmothers who believed good food didn’t need to be complicated. You simply melt, mix, pour, and bake—and let the oven work its magic.

A Taste of Nostalgia

Each spoonful of Lazy Man Peach Cobbler tastes like a summer afternoon captured in dessert form—sweet peaches, tender crust, and that buttery richness that feels like home. It’s a recipe that brings back childhood memories of backyard picnics, Sunday dinners, and the smell of cobbler baking while laughter filled the house.

The contrast between the gooey, juicy peaches and the crisp, golden crust creates a perfect harmony of textures and flavors. It’s indulgent yet familiar, making it one of those rare desserts that everyone loves—whether it’s served fresh out of the oven or enjoyed cold the next morning with coffee.

Conclusion

Lazy Man Peach Cobbler proves that simplicity is the ultimate secret to comfort food. It’s a dessert that looks impressive but takes almost no effort to make, and its rich aroma and golden-brown crust will have everyone asking for seconds. Whether you’re whipping it up for a family gathering, a summer barbecue, or just because you crave something sweet and soulful, this cobbler is sure to become a beloved favorite.

Stuffed Bell Peppers Unique Recipe

Stuffed Bell Peppers are a beloved comfort dish that brings together the sweetness of tender bell peppers with a hearty, flavorful filling. This unique version elevates the classic by combining savory beef, Italian sausage, creamy cheese, and aromatic herbs in a rich tomato-based sauce that seeps into every layer. The result is a warm, satisfying, and beautifully colorful meal that looks as good as it tastes.

The Story Behind the Dish

Stuffed bell peppers have been enjoyed in countless variations across cultures—from the Mediterranean to Eastern Europe to Latin America. Each version reflects its region’s ingredients and spirit. This unique recipe takes inspiration from the comforting flavors of Italian home cooking while adding modern flair with a creamy cheese layer and garlic-infused rice. The peppers become edible vessels that hold a hearty mix of textures and aromas, making this dish perfect for a family dinner, special occasion, or cozy night in.

Ingredients

For the Peppers:

  • 4 large bell peppers (any color; red and yellow are sweetest)

  • 1 tablespoon olive oil

  • ½ teaspoon salt

  • ¼ teaspoon black pepper

For the Filling:

  • 1 tablespoon butter

  • 1 small onion, finely diced

  • 3 cloves garlic, minced

  • ½ pound ground beef

  • ½ pound Italian sausage (mild or spicy)

  • 1 teaspoon smoked paprika

  • 1 teaspoon Italian seasoning

  • ½ teaspoon crushed red pepper flakes (optional for spice)

  • 1 cup cooked rice (long grain or jasmine)

  • 1 cup tomato sauce

  • 2 tablespoons tomato paste

  • ¼ cup grated Parmesan cheese

  • 1 cup shredded mozzarella cheese

  • 2 tablespoons chopped fresh parsley

  • Salt and pepper, to taste

For the Sauce Topping:

  • 1 cup marinara sauce

  • ¼ cup heavy cream

  • ½ teaspoon garlic powder

  • 1 teaspoon dried basil

For Garnish:

  • Extra mozzarella or Parmesan cheese

  • Fresh parsley or basil leaves

Preparation Steps

Step 1: Prepare the Peppers

Cut off the tops of the bell peppers and remove the seeds and membranes. Rub the outsides lightly with olive oil, sprinkle with salt and pepper, and place them upright in a baking dish. Bake in a preheated oven at 375°F (190°C) for 10 minutes to soften slightly. This pre-roasting step ensures the peppers turn tender without losing shape during final baking.

Step 2: Make the Filling

In a large skillet over medium heat, melt butter and sauté diced onion until translucent, about 3 minutes. Add minced garlic and cook for another 30 seconds until fragrant. Stir in the ground beef and Italian sausage, breaking it apart with a spatula. Cook until browned and slightly crispy at the edges. Drain excess fat if needed.

Season the mixture with smoked paprika, Italian seasoning, and crushed red pepper flakes. Stir in tomato paste, then pour in tomato sauce. Let it simmer gently for 5 minutes until thickened. Add cooked rice and Parmesan cheese, stirring until everything is well combined. Adjust seasoning with salt and pepper.

Finally, fold in half the shredded mozzarella and chopped parsley. The mixture should be moist but not runny, rich with meaty aroma and cheesy goodness.

Step 3: Prepare the Sauce

In a small saucepan, combine marinara sauce, heavy cream, garlic powder, and dried basil. Simmer for about 5 minutes over low heat, stirring occasionally. This creamy tomato sauce will complement the filling beautifully, adding depth and smoothness to the dish.

Step 4: Stuff the Peppers

Spoon the filling generously into each pre-roasted pepper, pressing gently to pack it down. Pour the creamy tomato sauce over each stuffed pepper, letting it drip down the sides. Sprinkle remaining mozzarella cheese on top for that irresistible golden crust.

Step 5: Bake to Perfection

Cover the baking dish with foil and bake at 375°F (190°C) for 25 minutes. Remove the foil and bake uncovered for an additional 10 minutes, or until the cheese is bubbly and lightly browned. The peppers should be fork-tender but still hold their shape.

Serving Suggestions

Serve the stuffed bell peppers hot, garnished with fresh parsley or basil for color and aroma. They pair beautifully with:

  • A crisp green salad with vinaigrette

  • Garlic bread or buttered sourdough toast

  • A side of roasted potatoes or steamed vegetables

Each bite delivers a perfect blend of soft pepper, flavorful meat, creamy sauce, and melty cheese—a comforting balance of textures and tastes.

Unique Tips for Perfection

  1. Cheese Variation: Substitute mozzarella with provolone or fontina for a richer melt and deeper flavor.

  2. Add a Crunch: Sprinkle buttered breadcrumbs or crushed crackers on top before the final bake for a golden, crispy topping.

  3. Rice Alternatives: Swap rice for quinoa, cauliflower rice, or even orzo for a twist on texture.

  4. Make Ahead: You can prepare the filling and stuff the peppers up to a day ahead. Refrigerate, then bake when ready to serve.

  5. Freezer Friendly: Cool completely, wrap individually, and freeze. Reheat in the oven for a quick, hearty meal anytime.

Conclusion

These Unique Stuffed Bell Peppers capture the essence of comfort food—vibrant, flavorful, and nourishing. Every element, from the savory filling to the creamy sauce, harmonizes beautifully inside the roasted pepper shell. It’s a dish that celebrates simplicity and creativity, turning humble ingredients into a stunning centerpiece for any dinner table.