Truffle Garlic Butter Mashed Potatoes

Here’s a unique recipe and cooking tip for making the creamiest, most flavorful mashed potatoes you’ve ever had — with a little gourmet twist that elevates this humble side dish into something unforgettable.

Truffle Garlic Butter Mashed Potatoes

Serves: 4–6
Prep Time: 15 minutes
Cook Time: 25 minutes

Ingredients

  • 2 lbs Yukon Gold potatoes (for a creamy, buttery texture)

  • 4 cloves roasted garlic (see tip below)

  • ½ cup unsalted butter (cut into cubes)

  • ½ cup warm heavy cream (or warm whole milk for lighter texture)

  • 2 tbsp sour cream (adds tang and silkiness)

  • 1 tbsp truffle oil (white or black, depending on your taste)

  • Salt and freshly cracked black pepper to taste

  • 1 tbsp chopped fresh chives (optional garnish)

Cooking Instructions

  1. Start with Cold Water:
    Peel and cut potatoes into even chunks. Place them in a large pot, cover with cold salted water, and bring to a boil.
    Cooking Tip: Starting with cold water ensures even cooking and prevents a gummy texture.

  2. Simmer Until Tender:
    Boil for 15–20 minutes until potatoes are fork-tender but not falling apart. Drain well and return to the hot pot for 1–2 minutes to steam dry.
    Unique Tip: Letting them dry slightly removes excess moisture — key to a fluffy mash!

  3. Roast the Garlic:
    While the potatoes cook, roast 4 unpeeled garlic cloves in a small pan or oven (375°F for 10–15 minutes) until soft and golden. Squeeze out the roasted garlic into a bowl.

  4. Mash the Potatoes:
    Mash the hot potatoes using a ricer or masher until smooth. Stir in roasted garlic and butter cubes so they melt into the potatoes.
    Chef’s Secret: Melt butter directly into the hot potatoes before adding any cream or milk — the fat coats the starch, giving you silkier mashed potatoes.

  5. Add Cream & Flavor:
    Slowly pour in the warm heavy cream, mixing gently. Stir in sour cream and drizzle truffle oil. Season with salt and pepper to taste.

  6. Fluff & Serve:
    Don’t overmix! Serve warm, topped with chopped chives and a small drizzle of truffle oil for a restaurant-style finish.

Unique Cooking Tip: “Butter Blooming” Method

To give your mashed potatoes a gourmet depth of flavor:

  • Melt your butter gently with a few sprigs of thyme and a crushed garlic clove before adding it to the potatoes.

  • This infuses the butter with aromatic notes, giving every bite a buttery, herb-kissed richness that regular mashed potatoes can’t match.

Serving Idea

Pair these truffle garlic mashed potatoes with:

  • Grilled steak or lamb chops

  • Crispy fried chicken

  • Or simply a drizzle of olive oil and parmesan for a luxurious vegetarian side

Bonus Tip:

If you want to make ahead, refrigerate your mashed potatoes in a baking dish. Reheat in the oven with a few dollops of butter and a splash of cream covered in foil at 325°F for 15–20 minutes — it’ll taste freshly made!

12 Foods You Should Never Eat Past Expiration

When it comes to food safety, expiration dates aren’t just a suggestion — they can be the line between a delicious bite and a day of regret. While some foods like dry pasta or rice can outlive their printed date, others are ticking time bombs for spoilage and bacteria. Below is a list of 12 foods you should never eat past expiration, followed by a creative snack recipe that helps you use up fresh ingredients before they expire!

 1. Milk

Milk is one of the first perishables to go bad. When it sours, it gives off a rancid smell and a curdled texture. Even a small sip of expired milk can lead to stomach cramps and food poisoning. Always sniff before you pour!

 2. Raw Meat (Chicken, Beef, Pork)

Raw meat harbors bacteria like Salmonella and E. coli once it’s past its prime. If it smells sour, feels sticky, or has a grayish hue, don’t risk it. When in doubt — throw it out.

 3. Seafood

Fish and shellfish spoil quickly and can cause severe foodborne illness if consumed past expiration. A strong fishy odor, slimy surface, or dull eyes (for whole fish) are telltale signs it’s no longer safe.

 4. Deli Meats

Even if they look fine, deli meats can be breeding grounds for Listeria after the expiration date. Always consume within 3–5 days of opening the package.

5. Soft Cheeses

Cheeses like Brie, Feta, and Ricotta are prone to mold and bacterial growth once expired. Unlike hard cheeses, they can’t be salvaged by just cutting off the moldy part.

 6. Eggs

Eggs can harbor Salmonella when old. To test freshness, place one in a glass of water — if it floats, it’s bad. Always keep eggs refrigerated and check the “use by” date carefully.

 7. Pre-Packaged Salads

Bagged salads can become bacterial breeding grounds, especially if condensation forms inside. Once slimy leaves or funky odors appear, it’s time to toss them.

 8. Butter

Butter can go rancid after its expiration date, turning sour and developing a strange odor. If it smells like old paint or sour milk, it’s best to replace it.

 9. Ready-to-Eat Desserts

Store-bought puddings, custards, and cream pies have short shelf lives. Once expired, bacteria can grow quickly, especially if not stored at a consistent temperature.

 10. Canned Foods (When Bulging or Rusty)

While most canned foods last years, any can that’s bulging, rusted, or leaking is dangerous. These can harbor Clostridium botulinum, which causes botulism — a potentially fatal illness.

 11. Bread

Mold on bread is not to be ignored. Even if you cut off the fuzzy parts, invisible mold spores spread through the loaf. Use it for croutons before it spoils, or freeze for longevity.

12. Fruit Juices

Expired fruit juices can ferment, becoming fizzy and sour. If you open the cap and it hisses like soda or smells strange, it’s time to pour it out.

Bonus: “Fresh Keeper” Snack Recipe

Use up your almost-expired ingredients before they go bad!

Fresh Keeper Veggie Toast Cups

Ingredients:

  • 2 slices of day-old bread (not moldy, just slightly stale)

  • 1 egg

  • 2 tbsp milk

  • 1/4 cup chopped bell peppers

  • 1/4 cup shredded cheese

  • 1/2 small onion, finely diced

  • Salt & pepper to taste

  • 1/4 tsp garlic powder

  • Butter or olive oil for greasing

Instructions:

  1. Preheat oven to 375°F (190°C). Grease a muffin tin.

  2. Cut the bread into circles or squares large enough to line each muffin cup.

  3. In a small bowl, whisk the egg, milk, salt, pepper, and garlic powder.

  4. Place bread pieces in each muffin cup to form a crust.

  5. Pour egg mixture into each cup. Top with veggies and cheese.

  6. Bake for 15–18 minutes, until golden and puffy.

  7. Remove carefully and enjoy warm.

💡 Tip: This recipe is perfect for using up near-expiry eggs, milk, or vegetables — giving them a delicious second chance before they spoil.

Final Thought

Expiration dates aren’t just ink on packaging — they’re warnings that protect your health. Keeping track of your fridge inventory and whipping up creative recipes like the Fresh Keeper Toast Cups ensures nothing goes to waste, and your kitchen stays both safe and delicious.

Pulled out some stale bread

Most people think of bread pudding as a sweet dessert, but this savory version brings new life to old bread. It’s creamy, crispy, cheesy, and aromatic with herbs — like a mix between a soufflé and a quiche. The best part? It’s made from pantry staples and perfect for breakfast, brunch, or even dinner with a salad.

 Ingredients

  • 4 cups stale bread, cut into cubes (French, sourdough, or sandwich bread)

  • 3 large eggs

  • 1 ½ cups milk (or half-and-half for richness)

  • 1 small onion, finely chopped

  • 2 garlic cloves, minced

  • 1 cup shredded cheese (cheddar, mozzarella, or a mix)

  • 2 tbsp butter

  • 1 tsp Dijon mustard

  • ½ tsp black pepper

  • ½ tsp salt

  • ½ tsp dried thyme or Italian herbs

  • A handful of chopped parsley or green onions

  • (Optional): chopped cooked bacon, spinach, or sun-dried tomatoes for extra flavor

Directions

1. Prep the Bread

Cut your stale bread into bite-sized cubes. If it’s not fully dry, toast it lightly in the oven at 350°F (175°C) for about 10 minutes to crisp it up. You want firm, golden cubes that will hold their shape once soaked.

2. Sauté Aromatics

In a small pan, melt butter and sauté onions until soft and golden, about 4–5 minutes. Add garlic and cook for another minute. This brings out a deep, savory flavor that forms the base of the pudding.

3. Make the Custard

In a large bowl, whisk together eggs, milk, Dijon mustard, salt, pepper, and herbs. Stir in half the cheese and the sautéed onion mixture.

4. Combine Bread & Custard

Add the bread cubes to the custard and gently mix until each piece is coated. Let it sit for 10–15 minutes so the bread can soak up the liquid. The cubes should be plump and slightly soggy, not mushy.

5. Bake

Preheat your oven to 375°F (190°C). Grease a small baking dish (around 8×8 inches). Pour in the mixture, sprinkle the remaining cheese on top, and bake for 35–40 minutes, until golden brown and puffed.

6. Rest & Serve

Let it rest for 5 minutes before slicing. The inside will be soft, custardy, and full of flavor, while the top stays crisp and cheesy.

 Serving Ideas

  • Serve warm with a dollop of sour cream or Greek yogurt.

  • Pair it with a fresh tomato salad or roasted vegetables.

  • For breakfast, top with a poached egg and a drizzle of hot sauce.

  • It also works beautifully as a side dish for roasted chicken or grilled steak.

 Chef’s Tip

For an extra gourmet touch, sprinkle a little grated Parmesan on top before baking and add a pinch of crushed red pepper flakes for subtle heat. If you have leftover veggies or cooked meat, toss them in — this recipe is endlessly customizable.

Why This Recipe Works

This savory bread pudding celebrates humble ingredients — taking something as simple as stale bread and turning it into a show-stopping dish. The custard infuses the bread with creamy richness, while herbs and cheese add depth and aroma. The baked top provides just the right crunch, making every bite a balance of soft and crisp.

Baked Garlic Parmesan Potato Wedges

Baked Garlic Parmesan Potato Wedges are the perfect balance of comfort and sophistication — a crispy, golden exterior wrapped around fluffy potato centers, coated in a buttery garlic-Parmesan seasoning that’s absolutely irresistible. This recipe transforms humble potatoes into restaurant-quality wedges with minimal effort and maximum flavor. Whether you’re serving them as a side dish, party appetizer, or a midnight snack, these wedges steal the show every single time.

Ingredients

For the Wedges:

  • 4 large russet potatoes, scrubbed and cut into thick wedges

  • 3 tablespoons olive oil (or melted butter for extra richness)

  • 4 cloves fresh garlic, finely minced

  • 1 teaspoon smoked paprika

  • 1 teaspoon garlic powder

  • 1 teaspoon onion powder

  • 1 teaspoon Italian seasoning

  • ½ teaspoon black pepper

  • 1 teaspoon sea salt

  • ½ cup grated Parmesan cheese (plus extra for sprinkling)

  • 2 tablespoons fresh parsley, finely chopped (for garnish)

Optional Dipping Sauces:

  • Creamy garlic aioli

  • Ranch dressing

  • Marinara or spicy ketchup

Instructions

  1. Preheat the Oven:
    Set your oven to 425°F (220°C). Line a large baking sheet with parchment paper or foil for easy cleanup. Lightly grease with olive oil spray to help crisp the potatoes.

  2. Prepare the Potatoes:
    Slice each potato lengthwise into 8 thick wedges. To help them crisp beautifully, soak the wedges in cold water for 20–30 minutes — this removes excess starch. Drain and pat them completely dry with paper towels.

  3. Make the Garlic Parmesan Seasoning:
    In a large bowl, combine olive oil, minced garlic, paprika, garlic powder, onion powder, Italian seasoning, salt, and pepper. Whisk until smooth and aromatic.

  4. Coat the Wedges:
    Add the dried potato wedges to the bowl. Toss well until every piece is coated in the flavorful oil mixture. Sprinkle ½ cup of Parmesan cheese over them and toss again — this creates that signature crispy, cheesy crust.

  5. Arrange for Baking:
    Spread the wedges in a single layer on your baking sheet, skin side down if possible. This helps each wedge bake evenly and develop a crunchy edge.

  6. Bake to Perfection:
    Bake for 35–40 minutes, flipping halfway through, until the wedges are deep golden brown and crisp. For an extra crunch, broil for the last 2–3 minutes — just watch carefully so they don’t burn.

  7. Finish with Flavor:
    Once out of the oven, immediately sprinkle extra Parmesan cheese and fresh parsley on top while they’re still hot. The cheese melts slightly, creating a savory layer that sticks perfectly.

  8. Serve & Savor:
    Serve warm with your favorite dipping sauce. Each bite bursts with a combination of roasted garlic, nutty Parmesan, and tender potato — an addictive comfort in every wedge.

Tips for Perfect Potato Wedges

  • Choose the Right Potato: Russet or Yukon Gold potatoes give the best crispy-on-the-outside, fluffy-on-the-inside texture.

  • Dry Thoroughly: Moisture prevents crisping. The drier the wedges, the crunchier the outcome.

  • Don’t overcrowd: Spread them out so air can circulate, ensuring even browning.

  • Cheese Timing: Adding Parmesan before baking lets it melt into the crust, while a post-bake sprinkle enhances flavor and texture.

Serving Ideas

Pair these golden beauties with grilled chicken, steak, or even a juicy burger. They also make a mouthwatering appetizer for movie nights or casual gatherings. Try serving them with truffle mayo, chipotle ranch, or a drizzle of hot honey for a modern twist.

Why This Recipe Is Unique

This version stands out for its dual-layer Parmesan coating — part baked into the crust for crunch, and part melted on top for richness. The use of fresh minced garlic (instead of powdered only) infuses every bite with authentic flavor. The result? A perfectly balanced wedge — crisp, garlicky, cheesy, and incredibly satisfying without ever being greasy.

Can’t Stop Baking These” Brown Butter Toffee Chocolate Chip Cookies

There’s something about the smell of freshly baked cookies that feels like home. But these aren’t your average cookies — they’re a small piece of indulgent alchemy. Made with nutty brown butter, rich dark chocolate chunks, and bits of crunchy toffee, they melt in your mouth with every bite. The combination of flavors creates a perfect balance: caramelized, chocolatey, and slightly salty. Once you bake them once, you’ll understand the name — “Can’t Stop Baking These.”

Every time you pull a batch from the oven, the scent alone guarantees you’ll be mixing the next batch before these even cool.

Ingredients

For about 20 large cookies:

  • 1 cup (2 sticks) unsalted butter

  • 1 cup packed brown sugar

  • ½ cup granulated sugar

  • 2 large eggs (room temperature)

  • 2 tsp pure vanilla extract

  • 2 ¼ cups all-purpose flour

  • 1 tsp baking soda

  • ½ tsp baking powder

  • ½ tsp salt (plus extra for topping)

  • 1 cup toffee bits (such as Heath or homemade)

  • 1 ½ cups dark chocolate chunks or chips

  • Optional: ½ cup chopped pecans or walnuts for crunch

Instructions

Step 1: Brown the Butter

In a medium saucepan over medium heat, melt the butter. Continue cooking until it turns golden brown and gives off a nutty aroma — about 5–7 minutes. Stir occasionally and watch carefully to prevent burning.
Pour into a mixing bowl and let cool for 10 minutes.

Step 2: Cream and Combine

Once the butter cools slightly, add both sugars and whisk until smooth and glossy. Add the eggs one at a time, followed by the vanilla extract. Mix until fully combined and slightly thickened.

Step 3: Whisk Dry Ingredients

In a separate bowl, whisk together flour, baking soda, baking powder, and salt. Gradually add the dry mixture to the wet ingredients, stirring until just combined. Do not overmix — the dough should be soft and thick.

Step 4: Add the Good Stuff

Fold in the dark chocolate chunks, toffee bits, and nuts (if using). Cover the dough and refrigerate for at least 30 minutes to let the flavors develop and prevent spreading.

Step 5: Shape & Bake

Preheat oven to 350°F (175°C). Line two baking sheets with parchment paper. Scoop the dough into 2-tablespoon-sized balls and place them 2 inches apart. Sprinkle a tiny pinch of sea salt on top of each for that perfect sweet-salty bite.

Bake for 10–12 minutes, until edges are golden but centers are still soft. Don’t overbake — they’ll continue cooking on the sheet.

Step 6: Cool & Devour

Let cookies cool on the baking sheet for 5 minutes before transferring to a wire rack. This step creates that dreamy chewy texture with crisp edges.

Tips for Perfection

  • Brown butter makes all the difference — its nutty aroma deepens the flavor.

  • Chill the dough — even 30 minutes helps control spreading.

  • Add a sprinkle of flaky sea salt just before baking for an irresistible finish.

  • Store in an airtight container — or better yet, freeze some dough balls and bake on demand!

Flavor Variations

  • Swap toffee for white chocolate and macadamia.

  • Mix in espresso powder for mocha-style cookies.

  • Add a dash of cinnamon and cayenne for a spicy-sweet twist.

  • Use salted caramel chips for extra decadence.

Why You’ll Keep Baking Them

Every batch delivers that gooey-meets-crisp perfection — like the first warm cookie bite that melts your worries away. The browned butter adds depth, while toffee adds crunch and nostalgia. It’s comfort in cookie form, a simple pleasure that turns an ordinary afternoon into something extraordinary.

7UP Lemon Cake

If sunshine had a flavor, it would taste just like a slice of 7UP Lemon Cake. This bright, citrusy dessert combines the nostalgic charm of a classic pound cake with a bubbly twist from the famous lemon-lime soda. The 7UP not only adds a unique lightness and subtle zest but also enhances the cake’s moisture and texture, making each bite tender and perfectly balanced. Topped with a luscious lemon glaze, this cake bursts with flavor—sweet, tart, and wonderfully refreshing. Whether served at a picnic, tea party, or after-dinner treat, this dessert is sure to steal the spotlight.

Why You’ll Love This Recipe

What makes this 7UP Lemon Cake truly unique is its clever use of soda as both a flavor enhancer and leavening agent. Instead of milk or water, 7UP adds a delicate tang, a hint of fizz, and moisture that keeps the crumb soft for days. Combined with lemon zest, fresh juice, and rich butter, this cake is the perfect blend of classic comfort and modern creativity. It’s an old-fashioned recipe reborn with a twist, delightfully simple yet undeniably luxurious.

Ingredients You’ll Need

For the Cake:

  • 1 cup (2 sticks) unsalted butter, softened

  • 2 cups granulated sugar

  • 4 large eggs, room temperature

  • 3 cups all-purpose flour, sifted

  • 1 teaspoon baking powder

  • ½ teaspoon salt

  • ¾ cup 7UP (not diet)

  • 2 tablespoons lemon zest (about 2 large lemons)

  • 3 tablespoons fresh lemon juice

  • 1 teaspoon pure vanilla extract

For the Lemon Glaze:

  • 1½ cups powdered sugar

  • 2 tablespoons melted butter

  • 2–3 tablespoons 7UP

  • 1 tablespoon fresh lemon juice

  • Zest of 1 lemon (optional, for garnish)

Step-by-Step Instructions

Step 1: Preheat and Prepare

Preheat your oven to 325°F (160°C). Grease and flour a bundt pan (or a loaf pan, if preferred). A bundt pan works beautifully because its ridges catch the lemon glaze perfectly.

Step 2: Cream the Butter and Sugar

In a large mixing bowl, use an electric mixer to beat the butter and sugar together for 4–5 minutes, until light and fluffy. This creaming process is crucial—it builds the foundation for a tender, airy crumb.

Step 3: Add the Eggs

Add the eggs one at a time, beating well after each addition. Scrape down the sides of the bowl to ensure everything blends smoothly. The batter should now be creamy and pale yellow.

Step 4: Mix the Dry Ingredients

In a separate bowl, whisk together the flour, baking powder, and salt. This helps distribute the leavening evenly throughout the batter.

Step 5: Combine the Wet and Dry

Alternate adding the dry mixture and 7UP to the creamed butter mixture, beginning and ending with the flour. Mix on low speed to prevent overbeating. Gently stir in the lemon zest, lemon juice, and vanilla extract.

The result? A smooth, velvety batter with a hint of sparkle from the soda and a citrusy perfume that fills the kitchen.

Step 6: Bake to Golden Perfection

Pour the batter evenly into the prepared pan. Smooth the top with a spatula and tap the pan lightly on the counter to remove air bubbles.
Bake for 55–65 minutes, or until a toothpick inserted in the center comes out clean.

As the cake bakes, your kitchen will fill with the aroma of lemon, butter, and sugar—a scent that evokes summer mornings and cozy family gatherings.

Step 7: Cool and Glaze

Allow the cake to cool in the pan for 15 minutes before transferring it to a wire rack. Once completely cool, drizzle the lemon glaze generously over the top, letting it cascade down the sides.

To make the glaze, whisk together powdered sugar, melted butter, lemon juice, and enough 7UP to reach a pourable consistency. The glaze should be glossy and smooth, with just enough tartness to balance the cake’s sweetness.

Serving Suggestions

Slice thick, buttery wedges and serve them with a dollop of whipped cream or a scoop of vanilla ice cream. For an elegant presentation, garnish with thin lemon slices, mint leaves, or candied zest. This cake pairs wonderfully with a cup of Earl Grey tea, iced coffee, or sparkling lemonade.

If you’re hosting a brunch or potluck, serve the cake chilled—it becomes even more refreshing as it rests. For a festive touch, sprinkle with powdered sugar before serving.

Tips for the Perfect 7UP Lemon Cake

  1. Use room temperature ingredients – This ensures everything blends evenly for a smooth, rich batter.

  2. Don’t overmix – Overbeating can make the cake dense instead of tender.

  3. Use real 7UP – Avoid diet versions; the sugar in regular 7UP helps with both flavor and texture.

  4. Test for doneness early – Every oven is different; check at 50 minutes to prevent overbaking.

  5. Add extra lemon zest for a stronger tang if you love bold citrus flavor.


Why 7UP Makes a Difference

The secret to this recipe’s magic lies in the carbonation and acidity of 7UP. The bubbles help create lift, resulting in a lighter crumb, while the soda’s subtle sweetness enhances the lemon flavor without overpowering it. It’s a brilliant example of how simple ingredients—when combined thoughtfully—can transform a traditional recipe into something extraordinary.

Storage and Make-Ahead Tips

This cake stays moist and flavorful for up to 4 days when stored in an airtight container at room temperature. For longer storage, wrap slices individually and freeze for up to 2 months. To serve, thaw at room temperature and re-glaze lightly for that fresh-from-the-oven shine.

Final Thoughts

The 7UP Lemon Cake is a timeless dessert with a playful twist. It bridges the gap between old-fashioned baking and modern flair, combining simplicity with sophistication. Each bite offers a refreshing burst of citrus balanced by the buttery richness of a classic pound cake. Whether you’re reviving a family recipe or discovering it for the first time, this cake promises to bring warmth, joy, and a touch of sparkle to every occasion.

7 powerful blood-thinning foods you need to know about

7 Powerful Blood-Thinning Foods You Need to Know About

Blood plays a vital role in carrying oxygen, nutrients, and hormones throughout the body. However, when blood becomes too thick or “sticky,” it can increase the risk of dangerous clots, strokes, and heart attacks. That’s why maintaining healthy circulation is essential — and nature provides several foods that act as natural blood thinners. These foods help prevent excessive clotting, improve flow, and support heart health without the side effects of synthetic anticoagulants (though they should never replace prescribed medication).

Here are seven powerful, science-backed blood-thinning foods you should know about.


1. Garlic – Nature’s Anticoagulant

Garlic has been used for centuries as a natural remedy for heart and circulatory problems. Modern research confirms that it contains sulfur compounds like allicin, which help reduce platelet aggregation — meaning it prevents platelets from clumping together and forming clots.

Regular garlic consumption can help lower blood pressure, reduce cholesterol, and protect against atherosclerosis (the hardening of arteries).

How to use it:

  • Eat 1–2 raw cloves daily on an empty stomach for best results.

  • Add minced or crushed garlic to soups, stir-fries, or salad dressings.

  • Avoid overcooking, as heat can reduce its beneficial compounds.

Note: If you are already taking blood-thinning medication like warfarin, consult your doctor before taking garlic supplements to prevent excessive bleeding.


2. Ginger – The Circulation Booster

Ginger is more than a soothing digestive aid — it’s also a powerful natural anticoagulant. The active compound gingerol helps prevent platelet stickiness and reduces inflammation in blood vessels. This dual action supports smoother blood flow and helps prevent clot formation.

Ginger can also lower cholesterol and blood pressure, which further protects cardiovascular health.

How to use it:

  • Drink fresh ginger tea daily (boil sliced ginger in water for 10 minutes).

  • Add grated ginger to curries, smoothies, or stir-fries.

  • A teaspoon of fresh ginger juice with honey on an empty stomach can also be effective.

Tip: Combine ginger and garlic in your meals for an even stronger blood-thinning effect.


3. Turmeric – Golden Spice for Heart Health

Turmeric’s active compound, curcumin, has been shown to prevent platelets from clumping and reduce inflammation in the circulatory system. It also improves endothelial function — the lining of blood vessels — promoting smoother, healthier blood flow.

Turmeric is one of the best natural protectors against heart disease and stroke.

How to use it:

  • Add ½ teaspoon of turmeric powder to warm milk or tea daily.

  • Incorporate it into curries, soups, and stews.

  • For enhanced absorption, always pair turmeric with black pepper and a healthy fat like olive or coconut oil.

Bonus: Curcumin’s antioxidant power also helps fight oxidative stress and aging.


4. Cinnamon – Sweet and Powerful Blood Flow Support

Cinnamon doesn’t just make your coffee or oatmeal taste better — it can help improve circulation naturally. It contains coumarin, a compound with mild anticoagulant properties that can prevent clot formation and support smooth blood flow.

Additionally, cinnamon helps regulate blood sugar and cholesterol levels, reducing the burden on your heart.

How to use it:

  • Add ½ teaspoon of Ceylon cinnamon powder to tea, smoothies, or oatmeal daily.

  • Avoid excessive use of cassia cinnamon, as it contains higher levels of coumarin, which may be harmful to the liver in large doses.

Note: Always choose Ceylon cinnamon, also known as “true cinnamon,” for safe long-term use.


5. Cayenne Pepper – Spicing Up Circulation

Cayenne pepper is loaded with capsaicin, a compound known to improve blood circulation, strengthen arteries, and reduce the risk of clots. Capsaicin helps dilate blood vessels, lowering blood pressure and improving oxygen delivery throughout the body.

Cayenne also helps dissolve fibrin — a key component of blood clots — making it one of the most effective natural blood thinners available.

How to use it:

  • Sprinkle a pinch of cayenne pepper in soups, lemon water, or salads.

  • Mix ⅛ teaspoon of cayenne powder with honey and warm water for a circulation-boosting tonic.

  • Start with small amounts, as it’s very potent and can cause stomach irritation in sensitive individuals.


6. Dark Chocolate – A Delicious Heart Protector

Good news for chocolate lovers: high-quality dark chocolate (at least 70% cocoa) contains flavonoids, plant compounds that improve blood vessel flexibility and reduce platelet stickiness. These antioxidants also lower inflammation and improve overall cardiovascular function.

Eating small amounts of dark chocolate regularly can enhance blood flow, reduce clot risk, and boost heart health without the need for added sugar.

How to use it:

  • Enjoy one or two small squares (about 20–30 grams) of dark chocolate daily.

  • Add unsweetened cocoa powder to smoothies or oatmeal.

  • Avoid milk chocolate or heavily sweetened varieties, as they can negate the benefits.


7. Omega-3 Rich Foods – Fat That Heals

Omega-3 fatty acids, found abundantly in fatty fish (like salmon, mackerel, and sardines) and plant sources (like flaxseeds, chia seeds, and walnuts), are well-known natural blood thinners. They help reduce platelet aggregation, lower triglycerides, and prevent arterial inflammation.

A regular intake of omega-3 fats supports healthy circulation, keeps arteries elastic, and reduces the risk of clot-related strokes and heart disease.

How to use it:

  • Eat fatty fish at least twice a week.

  • Add ground flaxseed or chia seeds to smoothies, yogurt, or salads.

  • Use cold-pressed flaxseed or walnut oil in dressings (never heat them).


Other Helpful Tips for Healthy Blood Flow

While these foods are powerful, they work best as part of a balanced lifestyle. To further support natural blood thinning and heart health:

  • Stay hydrated: Thick blood often results from dehydration. Drink plenty of water daily.

  • Exercise regularly: Physical movement keeps blood flowing efficiently.

  • Avoid excessive salt and sugar: Both can cause high blood pressure and damage blood vessels.

  • Limit alcohol and quit smoking: These habits severely restrict circulation and increase clotting risk.

The Real Causes of Constant Phlegm and Mucus in Throat and How to Get Rid of It

The Real Causes of Constant Phlegm and Mucus in the Throat—and How to Get Rid of It

If you constantly find yourself clearing your throat or feeling a thick layer of mucus stuck at the back, you’re not alone. Millions of people around the world experience persistent phlegm buildup—a frustrating symptom that can interfere with speaking, eating, and even sleeping. While many assume it’s just from a “cold that won’t go away,” chronic mucus can signal underlying issues that need attention. Understanding what causes it—and how to effectively manage it—can bring real relief.


What Exactly Is Phlegm and Why Does It Form?

Phlegm is a type of mucus produced in the respiratory system—specifically in the lungs and throat. It’s slightly thicker than the mucus that lines your nasal passages, and it plays an important protective role: trapping dust, allergens, bacteria, and pollutants before they reach your lungs. Normally, your body produces small amounts daily without you noticing. But when your body’s defenses are triggered—by infection, irritation, or inflammation—it ramps up production, leading to that unpleasant feeling of congestion or “something stuck” in your throat.


1. Postnasal Drip – The Silent Culprit

One of the most common reasons for constant throat mucus is postnasal drip. This occurs when excess mucus from your nasal passages drips down the back of your throat. Allergies, sinus infections, or even dry indoor air can cause your nasal glands to overproduce mucus.

Symptoms of postnasal drip include:

  • The need to clear your throat often

  • A lump-like sensation in the throat

  • Persistent coughing, especially at night

  • Bad breath or a sour taste in the mouth

What to do:

  • Stay hydrated to thin out mucus.

  • Use a saline nasal rinse or spray to flush out allergens.

  • Avoid irritants like cigarette smoke or strong perfumes.

  • If allergies are the cause, antihistamines or nasal corticosteroids may help (under doctor supervision).


2. Allergies and Environmental Irritants

If you find your mucus worsens during certain seasons or when you’re exposed to dust, pollen, or pet dander, you may be dealing with allergic rhinitis. Allergic reactions cause your body to release histamines, which trigger swelling and mucus overproduction as a defense mechanism.

Other irritants—like smoke, pollution, chemical fumes, or strong scents—can also inflame your airways and boost mucus formation even in people without allergies.

How to fix it:

  • Identify and avoid triggers as much as possible.

  • Keep windows closed during pollen-heavy days.

  • Use an air purifier indoors to reduce dust and allergens.

  • Shower before bed to remove pollen from hair and skin.


3. Acid Reflux or Silent Reflux (LPR)

Many people are surprised to learn that acid reflux—even without heartburn—can cause constant throat phlegm. When stomach acid creeps up into the throat, it irritates the lining, causing your body to produce more mucus to protect itself. This condition is often called laryngopharyngeal reflux (LPR) or “silent reflux.”

Symptoms may include:

  • Frequent throat clearing

  • Hoarseness or voice changes

  • Burning sensation in the throat

  • Feeling of mucus without nasal congestion

To reduce reflux-related mucus:

  • Avoid eating 2–3 hours before bedtime.

  • Elevate your head while sleeping.

  • Limit spicy, fatty, or acidic foods (tomatoes, citrus, coffee, chocolate).

  • Maintain a healthy weight and avoid tight clothing around the stomach.

  • Consider speaking to a gastroenterologist if symptoms persist.


4. Respiratory Infections

Viral or bacterial infections—like colds, flu, bronchitis, or sinus infections—cause your body to increase mucus as part of the healing process. This thick phlegm can linger even after the infection clears, especially if your airways remain inflamed.

How to support recovery:

  • Stay well hydrated—water helps thin mucus.

  • Use warm steam inhalation to loosen phlegm.

  • Avoid overuse of decongestant sprays, which can irritate the nasal passages.

  • If symptoms last more than 10 days or worsen, see a doctor for possible bacterial infection.


5. Smoking and Vaping

Cigarette smoke and vaping fluids contain chemicals that damage the respiratory lining, paralyze cilia (the tiny hair-like structures that move mucus), and stimulate mucus production. The result: constant throat clearing, chest congestion, and phlegm buildup—especially in the morning.

If you smoke or vape:

  • Quitting is the most effective solution. Within weeks, cilia start to recover, and mucus clears more efficiently.

  • Use nicotine replacement therapy or join a cessation program.

  • Drink plenty of fluids to flush toxins from your airways.


6. Dehydration and Diet

Surprisingly, not drinking enough water can make mucus thicker and harder to clear. Caffeine and alcohol also dehydrate the body, contributing to sticky mucus buildup. Additionally, dairy products (especially full-fat milk and cheese) can temporarily thicken mucus in some individuals, though they don’t increase production.

Simple fixes:

  • Aim for at least 8 glasses of water daily.

  • Limit caffeine and alcohol.

  • Add moisture to the air with a humidifier, particularly during winter.

  • Eat hydrating foods like cucumbers, oranges, and soups.


7. Chronic Conditions and Structural Issues

Persistent phlegm can sometimes point to more serious or chronic conditions, including:

  • Chronic sinusitis: inflamed sinuses cause long-term postnasal drip.

  • Asthma or COPD: both conditions can cause thick mucus due to airway inflammation.

  • Deviated septum or nasal polyps: physical blockages that affect mucus drainage.

If you’ve had constant mucus for more than a few months, a medical evaluation (including nasal endoscopy or imaging) can help uncover the root cause.


Natural and Home Remedies for Relief

You can often manage mild to moderate mucus buildup with simple, natural remedies that soothe the throat and support drainage:

  1. Saltwater Gargle: Dissolve half a teaspoon of salt in warm water and gargle several times daily to break down mucus and reduce inflammation.

  2. Honey and Ginger Tea: Both ingredients have anti-inflammatory and antimicrobial properties that can calm irritated throats.

  3. Steam Inhalation: Add a few drops of eucalyptus or peppermint oil to hot water, cover your head with a towel, and inhale deeply for 5–10 minutes.

  4. Warm Fluids: Herbal teas, broths, and warm lemon water can loosen mucus and soothe the throat.

  5. Humidifier Use: Keeps your airways moist and prevents mucus from thickening.


When to See a Doctor

Constant mucus isn’t always harmless. Seek medical attention if you experience:

  • Blood in your phlegm

  • Chest pain or shortness of breath

  • Mucus that lasts more than 4–6 weeks

  • Unexplained weight loss or fatigue

  • Difficulty swallowing

These may signal an underlying infection, chronic respiratory issue, or other medical condition needing treatment.


Final Thoughts

While persistent throat mucus is common, it’s not something you should simply “live with.” It’s your body’s way of signaling that something is irritating or inflaming your airways. Whether it’s allergies, reflux, smoking, or chronic sinus issues, identifying and addressing the cause is the key to long-term relief.

By staying hydrated, keeping your environment clean, and adopting gentle lifestyle adjustments, you can restore comfort to your throat, breathe easier, and finally say goodbye to that constant need to clear your throat.

Homemade Turtle Candy

Homemade Turtle Candy

If you’ve ever walked through a candy shop and spotted those glossy clusters of caramel, pecans, and chocolate glistening under glass, you’ve probably met the irresistible Turtle Candy. Named for their resemblance to little turtles—round caramel “shells” with pecan “legs”—these treats are a timeless combination of chewy, nutty, and chocolatey perfection. Making them at home is not only rewarding but also surprisingly simple, requiring just a few ingredients and a little patience. The result? A decadent candy that’s every bit as indulgent as what you’d buy from a fancy chocolatier.


What Are Turtle Candies?

Turtle candies are a classic confection made from three simple components: toasted pecans, creamy caramel, and a coating of rich chocolate. The name “turtle” comes from the shape—the pecans form the head and legs, while the caramel and chocolate form the shell. Traditionally made by candy makers in the early 1900s, turtles quickly became a beloved American sweet, often gifted during holidays or used as a luxurious homemade treat.

When made at home, these candies have a freshness and flavor that’s unmatched. You can control the level of sweetness, the type of chocolate, and even experiment with add-ins like sea salt or toasted coconut for your own unique twist.


Ingredients You’ll Need

Here’s what you’ll need to make about 20 pieces of homemade turtle candy:

  • 2 cups pecan halves (toasted for best flavor)

  • 1 ½ cups soft caramels (store-bought or homemade)

  • 2 tablespoons heavy cream

  • 2 cups semisweet or milk chocolate chips

  • 1 tablespoon coconut oil or butter (for smooth melting)

  • Flaky sea salt (optional) for topping


Step-by-Step Instructions

Step 1: Toast the Pecans

Toasting the pecans brings out their deep, buttery flavor and gives your turtles that irresistible crunch. Spread the pecans in a single layer on a baking sheet and toast them in a preheated oven at 350°F (175°C) for about 7–8 minutes, stirring halfway through. You’ll know they’re ready when they smell warm and nutty. Allow them to cool before assembling the candies.


Step 2: Arrange the “Turtles”

Line a large baking sheet with parchment paper. Arrange four pecan halves in small clusters, each forming a “cross” shape. These will be the turtle’s legs. Leave about two inches between each cluster so there’s room for the caramel and chocolate.


Step 3: Melt the Caramel

If you’re using store-bought soft caramels, unwrap them and place them in a microwave-safe bowl with two tablespoons of heavy cream. Heat in 30-second bursts, stirring between each, until smooth and creamy. The mixture should be thick but pourable.

If you’re using homemade caramel, warm it gently over low heat until it reaches a silky consistency.


Step 4: Add the Caramel to the Pecans

Using a spoon, drop about one tablespoon of melted caramel onto the center of each pecan cluster, letting it flow slightly to stick to the nuts. Work quickly before the caramel begins to cool and harden. Let the caramel set for about 15–20 minutes at room temperature or pop the tray in the fridge for a few minutes to speed up the process.


Step 5: Melt the Chocolate

Place the chocolate chips and coconut oil (or butter) in a heatproof bowl. Melt them gently using one of these methods:

  • Microwave method: Heat in 30-second bursts, stirring between each, until smooth.

  • Double boiler method: Place the bowl over a pot of simmering water, stirring continuously until fully melted.

Once smooth and glossy, remove from heat and let it cool slightly before spooning over the caramel.


Step 6: Coat the Turtles with Chocolate

Spoon about a tablespoon of melted chocolate over each caramel cluster, spreading it just enough to cover the caramel while still showing some pecans peeking out—after all, that’s part of their charm!

If you like, sprinkle a pinch of flaky sea salt on top of each turtle while the chocolate is still warm. The salt balances the sweetness beautifully.


Step 7: Let Them Set

Allow the candies to rest at room temperature until the chocolate hardens, about 30–45 minutes. If you’re in a hurry, you can refrigerate them for 10–15 minutes. Once set, gently peel them off the parchment paper and store them in an airtight container.


Storage Tips

Homemade turtle candies keep well at room temperature for up to two weeks in a sealed container. If your kitchen is warm, store them in the refrigerator for longer freshness—just bring them to room temperature before serving for the best texture. You can also freeze them for up to three months.


Variations to Try

The beauty of homemade turtle candy lies in its versatility. Here are a few creative ways to make it your own:

  • Dark Chocolate Turtles: Swap out milk chocolate for dark chocolate to create a more intense, bittersweet flavor.

  • White Chocolate Turtles: Drizzle or coat the candies in creamy white chocolate for a softer, sweeter touch.

  • Salted Caramel Turtles: Stir a pinch of sea salt directly into the caramel before assembling for an extra-sophisticated flavor.

  • Nut Mix: Use almonds, cashews, or hazelnuts instead of pecans for a fun twist.

  • Drizzle Design: After coating the turtles in chocolate, drizzle melted white or dark chocolate in zigzags across the top for a gourmet look.


Homemade Caramel Option

For candy purists, homemade caramel is worth the effort. Here’s a quick version:

In a medium saucepan, combine 1 cup granulated sugar, 6 tablespoons butter, and ½ cup heavy cream. Cook over medium heat, stirring until the sugar melts and the mixture becomes golden brown and smooth. Let it cool slightly before using—it thickens as it sits.

This version offers a buttery richness that makes your turtles taste truly artisanal.


Tips for Success

  1. Use fresh pecans. Stale nuts can dull the flavor, so always check the date and give them a quick toast to refresh them.

  2. Don’t overheat the chocolate. Gentle melting ensures a glossy finish without seizing.

  3. Work in batches. Caramel sets quickly, so it’s easier to make smaller groups at a time.

  4. Add texture. A sprinkle of crushed pretzels or crispy rice can make for a delightful crunch.


Serving and Gifting Ideas

Homemade turtle candies are perfect for gifting. Arrange them in small boxes lined with parchment, or wrap each one individually in clear candy wrappers tied with ribbon. They make thoughtful homemade gifts during Christmas, Valentine’s Day, or birthdays.

Serve them alongside coffee, hot cocoa, or as a finishing touch to a dessert platter. Their combination of creamy caramel and crunchy nuts makes them a universally loved treat.


Final Thoughts

Homemade Turtle Candy embodies the perfect harmony of textures and flavors—sweet caramel, nutty pecans, and smooth chocolate, all working together in every bite. It’s a candy that’s both nostalgic and indulgent, reminding us that the simplest ingredients often create the most memorable treats.

Whether you’re making them for yourself, for friends, or as a gift, these turtle candies are proof that a little homemade love always tastes better than store-bought. Once you try them, you’ll wonder why you ever paid for them in a box.

No-Oven Stovetop Bread

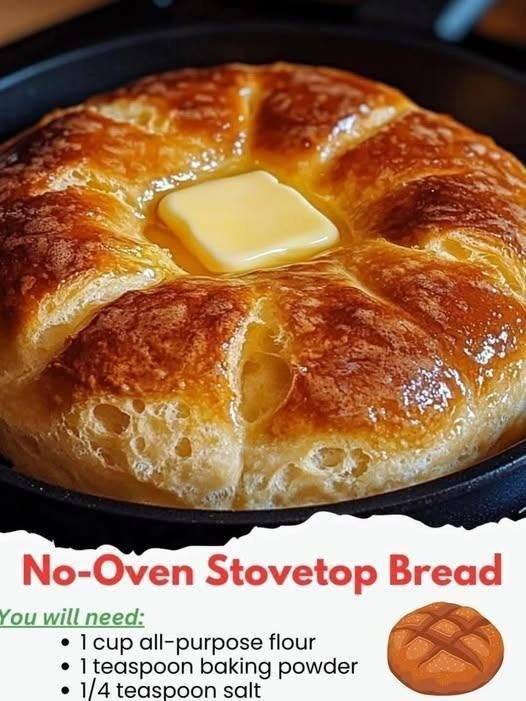
No-Oven Stovetop Bread – Soft, Fluffy, and Perfect Every Time

If you’ve ever wanted to bake fresh, warm bread but don’t have an oven, this no-oven stovetop bread recipe will change the way you think about homemade loaves. Made right on your stovetop, this bread is soft, airy, and golden with a slightly crisp crust — perfect for sandwiches, butter spreads, or dipping into soups. It’s simple, foolproof, and ideal for anyone who loves fresh bread but wants to skip the oven.


Why Make Stovetop Bread?

Baking bread on the stove is a centuries-old technique used long before electric ovens became common. The beauty of this recipe is its accessibility — you can make bakery-style bread using just a heavy pot, skillet, or tawa (flat pan). It’s perfect for students, campers, or anyone living in a small kitchen. You don’t even need fancy equipment or ingredients — just a little patience and a good pan with a lid.


Ingredients You’ll Need

Here’s what you need for one large round loaf or two smaller loaves:

  • 2 ½ cups (320 g) all-purpose flour – You can use whole wheat flour or a 50/50 mix for a heartier texture.

  • 1 teaspoon salt – Balances the flavor and strengthens the dough.

  • 1 tablespoon sugar – Helps activate the yeast and adds a touch of sweetness.

  • 1 tablespoon oil or melted butter – Makes the crumb soft and moist.

  • 1 teaspoon instant yeast (or 1 ½ teaspoons active dry yeast) – For leavening and fluffy texture.

  • ¾ cup (180 ml) warm water – Lukewarm, not hot, to activate the yeast properly.

  • Optional: herbs, garlic powder, or sesame seeds for extra flavor.


Step-by-Step Method

Step 1: Activate the Yeast (if using active dry yeast)

If you’re using instant yeast, you can skip this step. For active dry yeast, dissolve it in warm water with the sugar and let it sit for 10 minutes until it becomes frothy. This ensures the yeast is alive and ready to work its magic.


Step 2: Mix the Dough

In a large mixing bowl, combine the flour and salt. Add the yeast mixture (or water and instant yeast) and oil. Stir until the dough begins to come together. Use your hands to knead the dough inside the bowl for a minute or two.

Transfer it to a lightly floured surface and knead for about 8–10 minutes until smooth and elastic. The dough should be soft but not sticky — add a tablespoon of flour if it feels too wet.


Step 3: First Rise

Place the dough in a lightly greased bowl and cover it with a damp cloth or plastic wrap. Let it rise in a warm place for 1 to 1½ hours, or until doubled in size.

This rising process develops flavor and structure. In cooler climates, you can keep the bowl near the stove or in a switched-off oven with the light on to speed up fermentation.


Step 4: Shape the Dough

Once risen, punch down the dough gently to release air bubbles. Shape it into a smooth ball or oval loaf. If using a skillet or pot, make sure the dough fits comfortably inside with space to expand as it cooks.

You can also divide the dough into smaller rolls or mini loaves — perfect for individual servings.


Step 5: Second Rise

Place the shaped dough onto a piece of parchment paper or directly into a greased pan. Cover it again and let it rest for 30 minutes, or until slightly puffed. This short rise gives the bread its final volume and softness.


Step 6: Prepare Your Stovetop Setup

You can cook stovetop bread in a heavy-bottomed pot, non-stick pan, or cast-iron skillet. The key is even heat and a tight-fitting lid to trap steam — that’s what makes the bread fluffy inside and crisp outside.

Set the pan on low heat and let it preheat for about 5 minutes before placing the dough inside.


Step 7: Cook the Bread

Gently transfer the risen dough to the pan. Cover immediately with the lid. Cook on low heat for about 15–20 minutes on one side.

After 20 minutes, carefully flip the bread using a spatula or tongs. Cook the other side for another 15–20 minutes until golden brown.

Tip: Avoid opening the lid frequently — the trapped steam is essential for proper baking.

If you want an extra-crisp crust, you can briefly toast each side uncovered for 2–3 minutes at the end.


Step 8: Check for Doneness

Tap the top of the bread; it should sound hollow, which means it’s fully cooked. You can also insert a skewer in the center — it should come out clean and dry.

Once done, transfer the bread to a wire rack and let it cool for at least 15 minutes before slicing.


Texture and Taste

The result? A loaf that’s soft, fluffy, and slightly chewy inside with a beautifully golden crust. The stovetop method actually keeps the bread more moist than oven baking because the steam stays trapped inside the pan.

When you cut into it, the aroma of fresh bread fills the air — warm, comforting, and nostalgic. It pairs wonderfully with butter, jam, curry, or soup.


Variations to Try

You can customize your stovetop bread easily:

  • Garlic and Herb Bread: Add 1 teaspoon garlic powder and 1 tablespoon mixed herbs to the flour.

  • Cheese Bread: Mix shredded cheese into the dough or sprinkle it on top before cooking.

  • Whole Wheat Version: Replace half or all of the flour with whole wheat flour (add a bit more water as it absorbs more).

  • Stuffed Flat Bread: Fill with mashed potatoes, sautéed onions, or cheese for a hearty twist.


Storage Tips

Let the bread cool completely before storing. Wrap it in a clean cloth and keep it in an airtight container at room temperature for up to 2 days. For longer storage, refrigerate for up to a week or freeze for up to a month.

To reheat, simply warm on a pan or in the microwave for 20–30 seconds.


Troubleshooting

  • Bread too dense? The yeast may not have activated properly, or the dough wasn’t kneaded enough.

  • Burning on the bottom? Reduce the heat — stovetop bread requires gentle, steady cooking.

  • Dough too sticky? Add flour a little at a time during kneading until it’s manageable.


Final Thoughts

Making no-oven stovetop bread is both an art and a joy. There’s something deeply satisfying about creating a beautiful loaf using only your stovetop and a few pantry staples. It’s a practical solution for anyone without an oven — and the taste rivals any bakery’s fresh bread.

Once you try it, you’ll realize that fresh, warm, homemade bread doesn’t require fancy tools — just patience, love, and a simple pan. Serve it warm with butter melting into the crust, and you’ll know why stovetop bread has become a timeless favorite around the world.