Lebkuchen Bars

Lebkuchen, often called German gingerbread, has been a treasured wintertime treat for centuries. Known for its deep spices, soft texture, warm citrus notes, and honeyed sweetness, it evokes the essence of Christmas markets and cozy kitchens. Traditionally shaped into rounds or cutouts, Lebkuchen can feel labor-intensive—aging dough, carefully spooning it onto Oblaten wafers, and glazing each piece. This recipe transforms that classic flavor into Lebkuchen Bars, simplifying the process while keeping all the enchanting aroma and festive charm.

These bars are tender, slightly chewy, and full of spice—just the way real Lebkuchen should be. A light citrus glaze on top sets into a shiny, crackled finish that makes these bars beautiful enough for a cookie platter yet sturdy enough to pack in tins or gift boxes. What makes this recipe unique is the addition of dark brown butter, a touch of rye flour for depth, and an orange-cardamom glaze that adds a bright lift to the rich spices.

Ingredients

For the Lebkuchen Bars

  • 1 cup honey

  • ½ cup unsalted butter

  • ¼ cup dark brown sugar

  • 1 teaspoon vanilla extract

  • 1 large egg

  • 1 tablespoon orange zest

  • 1 tablespoon lemon zest

  • 1½ cups all-purpose flour

  • ½ cup rye flour (or substitute more all-purpose flour)

  • 1 teaspoon baking powder

  • ¼ teaspoon baking soda

  • 1 tablespoon ground cinnamon

  • 1 teaspoon ground ginger

  • 1 teaspoon ground nutmeg

  • ½ teaspoon ground cloves

  • ½ teaspoon allspice

  • ¼ teaspoon ground cardamom

  • ½ teaspoon salt

  • ¾ cup finely chopped nuts (almonds or hazelnuts are best)

  • ½ cup finely chopped candied orange peel (optional but traditional)

For the Orange-Cardamom Glaze

  • 1 cup powdered sugar

  • 2–3 tablespoons fresh orange juice

  • ¼ teaspoon ground cardamom

  • Pinch of salt

Instructions

1. Prepare the honey-butter mixture

In a medium saucepan, combine the honey, butter, and dark brown sugar over medium heat. Allow the butter to melt and the mixture to warm until it just reaches a simmer—no need to boil. Stir often to dissolve the sugar and keep the mixture smooth. Remove from heat and let it cool for about 10 minutes; the warmth helps dissolve the spices later, but you don’t want it so hot it scrambles the egg.

2. Add flavorings

Once the mixture has cooled slightly, whisk in the vanilla, egg, orange zest, and lemon zest. The citrus zest is essential—it cuts through the sweetness and creates the classic, fragrant lift that makes Lebkuchen taste like the holidays.

3. Mix the dry ingredients

In a separate bowl, whisk together the all-purpose flour, rye flour, baking powder, baking soda, spices, and salt. This spice blend is what sets Lebkuchen apart from other gingerbread recipes, so try not to skip anything. The touch of cardamom provides that almost floral aroma characteristic of German Christmas cookies.

4. Combine and fold in nuts

Gently fold the dry mixture into the honey mixture. When the batter is almost combined, stir in the chopped nuts and candied orange peel. The dough should be thick and sticky—more like a dense cake batter than traditional cookie dough.

5. Bake

Preheat your oven to 350°F (175°C). Line an 8×12-inch pan or a 9×13-inch pan with parchment paper, leaving a bit of overhang to lift out the bars later. Spread the dough evenly in the pan; a spatula dipped in warm water helps smooth it out. Bake for 20–25 minutes or until the bars are puffed, the surface looks matte rather than glossy, and a toothpick comes out mostly clean (a few moist crumbs are okay).

6. Prepare the glaze

While the bars bake, whisk together the powdered sugar, orange juice, cardamom, and a pinch of salt. For a thinner, more translucent glaze, add an extra splash of orange juice. For a thicker, opaque one, keep it on the stiffer side. The glaze should be pourable but not watery.

7. Glaze the bars warm

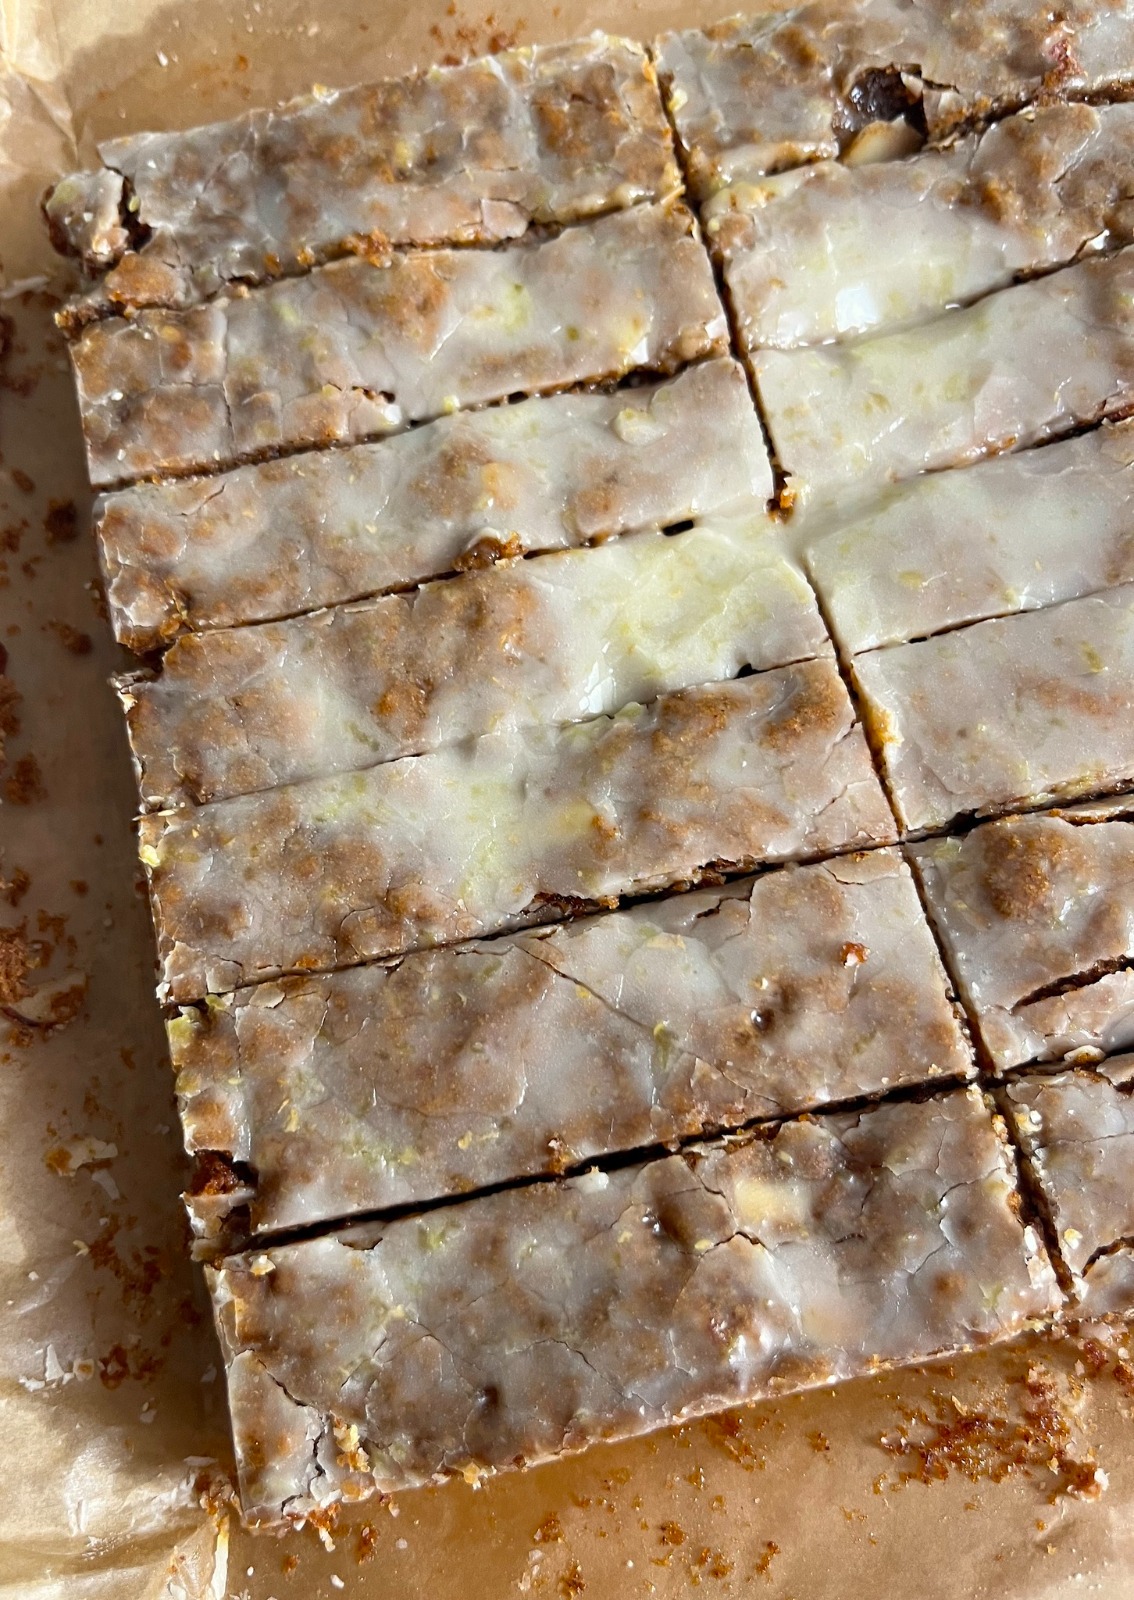
As soon as the bars come out of the oven, pour the glaze over the warm surface. Use an offset spatula or the back of a spoon to spread it into an even layer. The warmth of the bars will help the glaze seep into the top, creating a shiny crackle as it cools.

8. Cool and slice

Allow the bars to cool completely in the pan; this step helps them set and ensures clean edges. Once cooled, lift them out using the parchment paper and cut them into small squares or diamonds. Lebkuchen is traditionally served in compact pieces, so smaller is better.


Tips for Best Results

  • Make Ahead: Like classic Lebkuchen, these bars improve with time. After a day or two in an airtight container, the spices meld together beautifully.

  • Flavor Variations: Add chopped dried apricots, switch hazelnuts for almonds, or include chocolate chips for a modern twist.

  • Storing: Keep the bars in a sealed container for up to a week, or freeze them for up to two months.

Serving Suggestions

Serve these Lebkuchen Bars with hot tea, mulled wine, or a holiday coffee blend. They also pair beautifully with a citrusy cocktail during winter gatherings. Wrapped in parchment and tied with twine, they make an elegant homemade gift—soft, fragrant, and utterly festive.

The One Vitamin That Helps Open Blood Vessels and Improve Circulation: Vitamin B3 (Niacin)

Healthy blood circulation is one of the cornerstones of overall wellness. Our blood vessels transport oxygen, nutrients, and hormones throughout the body while removing waste. When circulation slows or vessels tighten—due to stress, poor diet, inflammation, or inactivity—many people experience cold hands and feet, low energy, headaches, or sluggish recovery after exercise.

While no single nutrient can “fix” circulation on its own, one vitamin stands out for its well-studied ability to help blood vessels relax and widen naturally: Vitamin B3, also known as niacin.

Why Niacin Helps Blood Vessels Open

Niacin is essential for turning the food you eat into energy. But one of its unique features is its ability to trigger a process called vasodilation, a gentle widening of the blood vessels. This happens because niacin stimulates the release of prostaglandins, natural compounds that cause smooth muscle relaxation and increased blood flow.

People often notice a temporary “niacin flush”—a warm, tingling feeling in the skin—after consuming higher doses. This effect is actually the result of superficial capillaries opening and more blood flow rushing through.

Key circulation-supporting benefits of niacin include:

1. Natural Vasodilation

Niacin helps relax blood vessel walls, allowing more blood to flow with less resistance. Better flow means better oxygen delivery to tissues.

2. Supports Healthy Cholesterol Levels

Balanced cholesterol levels help maintain clear, flexible arteries. Niacin has been studied for its potential role in supporting healthy HDL (“good cholesterol”) levels.

3. Improves Microcirculation

Small blood vessels—especially in hands, feet, and skin—benefit from niacin’s widening effect. Some people notice improved warmth or color in cold extremities.

4. Supports Brain and Heart Oxygenation

Healthy circulation means more efficient nutrient delivery to vital organs, including the brain and heart.

5. Energy Production

Niacin is part of coenzymes NAD and NADP, crucial for cellular energy. When your cells have more energy, overall circulation and metabolism improve.

Important: High supplemental doses of niacin should only be taken under medical guidance, as they can cause side effects. Food-based niacin, however, is safe and beneficial.

Top Natural Sources of Niacin

You can increase niacin intake through whole foods such as:

  • Salmon, tuna, sardines

  • Chicken breast and turkey

  • Mushrooms

  • Peanuts and peanut butter

  • Sunflower seeds

  • Brown rice

  • Avocado

  • Lentils and beans

  • Whole grains

  • Fortified cereals

But the best way to enjoy niacin is by combining several niacin-rich foods into one circulation-boosting recipe.

Unique Recipe: “Warm Circulation-Boosting Niacin Harvest Bowl”

A rich, savory, high-niacin meal designed to naturally support blood flow, heart health, and energy.

Serves: 2

Prep Time: 15 minutes

Cook Time: 20 minutes

Ingredients

For the base:

  • 1 cup cooked brown rice (niacin & fiber)

  • 1 cup cooked lentils (niacin & plant protein)

  • 1 tablespoon olive oil

  • ½ teaspoon turmeric (anti-inflammatory)

  • ¼ teaspoon black pepper (boosts turmeric absorption)

For the topping:

  • 1 cup sliced mushrooms (excellent niacin source)

  • ½ cup spinach

  • 1 medium avocado, sliced (healthy fats & B vitamins)

  • ¼ cup sunflower seeds (niacin + circulation-friendly vitamin E)

For the warm glaze:

  • 2 tablespoons peanut butter (niacin-dense)

  • 1 tablespoon soy sauce or coconut aminos

  • 1 tablespoon honey or pure maple syrup

  • 1 teaspoon grated ginger (warming, improves circulation)

  • 1 teaspoon apple cider vinegar

  • 2–3 tablespoons warm water to thin

Instructions

1. Prepare the Base

In a large pan, heat olive oil on medium. Add cooked brown rice and lentils. Mix in turmeric and black pepper. Warm through for 3–4 minutes until fragrant. This forms a hearty, nutrient-packed foundation rich in niacin and slow-burning energy.

2. Cook the Mushroom & Spinach Mix

In a separate skillet, sauté sliced mushrooms for 4–5 minutes until browned. Add a pinch of salt if desired. Once softened, stir in spinach and cook for another minute until wilted. Mushrooms are one of the best plant sources of niacin, giving this dish its circulation-supporting power.

3. Make the Warm Glaze

In a small bowl, whisk together peanut butter, soy sauce, honey, ginger, and apple cider vinegar. Add warm water gradually until it reaches a pourable consistency. The mix should be silky, slightly tangy, and naturally sweet.

4. Build the Bowl

Divide the rice-lentil base into two bowls. Top with mushrooms, spinach, and sliced avocado. Drizzle the warm glaze generously over everything. Sprinkle sunflower seeds on top for crunch and extra niacin.

5. Optional Boost

Add chili flakes for extra warmth and circulation support.

Why This Recipe Works for Circulation

This bowl is intentionally crafted to include several high-niacin whole foods, giving your body a steady supply of Vitamin B3 without supplements.

  • Mushrooms, peanuts, lentils, and brown rice provide natural niacin.

  • Ginger and turmeric are known for promoting warm, healthy blood flow.

  • Sunflower seeds and avocado support flexible arteries thanks to healthy fats and vitamin E.

  • The combination of protein, fiber, and good fats ensures stable energy and smooth digestion.

Eating meals like this regularly can help support overall vascular wellness, energy levels, and nutrient circulation throughout the body.

Final Thoughts

Vitamin B3 (niacin) stands out as one of the most effective nutrients for naturally supporting blood-vessel relaxation and circulation. While supplements should be used cautiously, niacin-rich whole foods offer a safe, delicious, and nourishing way to give your circulatory system daily support.

10 Simple and Delicious Casseroles to Make for Family Dinners

For generations, people have passed down little household tricks that feel almost magical—tricks that don’t come from modern technology, but from observation, creativity, and a bit of old-fashioned wisdom. One such tradition, whispered from grandmothers to mothers and from mothers to daughters, is the curious practice of dropping aspirin tablets into a load of laundry. It sounds strange at first: why would something used for discomfort relief end up tossed into a washing machine? Yet this old-school hack has been used for decades to help restore whites, lift stubborn stains, and give fabrics a brighter, cleaner look without harsh chemicals. Today, we explore the secret behind this tradition and show you the step-by-step “recipe” for using aspirin in laundry—simple, safe, and surprisingly effective.

A Bit of History: How the Aspirin Trick Began

Long before modern stain removers filled store shelves, families relied on accessible items that happened to have more than one purpose. Baking soda, vinegar, lemon juice—and yes, aspirin—became the foundation of homemaking tricks. Aspirin contains acetylsalicylic acid, a compound that gently breaks down discoloration on fabrics. Early homemakers discovered that crushed aspirin dissolved in water could brighten dull whites and release stains that soap alone couldn’t remove.

Over time, the trick became something of a secret handshake between people who loved caring for their homes:
“If your white shirts are turning yellow, try aspirin,” someone would whisper, passing the knowledge like a treasured recipe. And indeed, many families still swear by it today.

Why Aspirin Works in Laundry

Aspirin is mildly acidic—gentler than vinegar, but strong enough to help break down grime. When dissolved in warm water, it works like a fabric brightener, especially for white cotton, socks, undershirts, pillowcases, and sheets. It doesn’t bleach the fabric or weaken fibers; instead, it helps loosen buildup from sweat, detergent residue, and hard-water minerals.

It’s not a miracle cure, but it is a surprisingly effective addition to your laundry routine, especially if you love clean, crisp whites.


**The Aspirin Laundry Recipe

(Traditional Method Passed Down Through Generations)**

Below is the complete, step-by-step “recipe” for using aspirin as a natural laundry booster—written just like a kitchen recipe but designed for your washing machine.


Ingredients

  • 5–6 aspirin tablets (standard, uncoated; 325 mg each)

  • 1 bowl of warm water

  • 1 load of white laundry

  • Your usual laundry detergent


Instructions

Step 1: Crush the Aspirin

Place the aspirin tablets between two sheets of paper or inside a small plastic bag. Use a spoon or rolling pin to crush them into a fine powder. Crushing helps them dissolve faster and work more evenly on the fabric.

Step 2: Dissolve in Warm Water

Pour warm (not boiling) water into a bowl and sprinkle the powdered aspirin on top. Stir until it dissolves completely. The warm water activates the acids that help loosen stains.

Step 3: Pre-Soak the Whites

Place your white clothes directly into a basin, bucket, or your machine’s drum. Pour the aspirin mixture over the clothes until they’re fully soaked. Let them sit for 4–6 hours—or overnight for heavily yellowed fabrics.

During this soak, the aspirin solution works like a gentle brightening bath, loosening grime from fibers without damaging them.

Step 4: Wash as Usual

After soaking, transfer the clothes into the washing machine (if you’re not already using it as the soaking vessel). Add your normal amount of detergent. Select a warm-water wash cycle for best results.

Step 5: Inspect and Dry

Once washed, check the fabric. You’ll often notice that yellowing is minimized, sweat stains fade, and the clothes appear fresher. Dry as you normally would—sun-drying can boost brightness even more.


Alternative “Quick Method” (No Pre-Soak Needed)

If you’re short on time, simply:

  1. Toss 5 aspirin tablets into the washing machine drum.

  2. Add your whites.

  3. Wash with warm water and regular detergent.

This quick method won’t be as dramatic as a long soak, but it still offers a noticeable improvement.


Tips for Best Results

  • Works best on white cotton fabrics.

  • Avoid using aspirin on delicate silks or wool.

  • If using coated tablets, crush them well so coating dissolves.

  • Combine aspirin with baking soda for extremely dull whites (½ cup baking soda + aspirin mixture).


Why This Tradition Endures

Part of what makes this trick so enduring isn’t just the effectiveness—it’s the nostalgic link to the past. In an age of complicated products, a simple tablet reminds us that resourcefulness never goes out of style. Grandparents used aspirin because it was inexpensive and always available. Today, people use it because they’re rediscovering natural, gentle cleaning methods.

This “laundry recipe” isn’t just a cleaning hack—it’s a reminder that wisdom often hides in the simplest places. Every time you drop those little white tablets into your washing machine, you’re not just brightening your clothes; you’re honoring a tradition lovingly passed down through generations.

The Secret of Aspirin in Laundry: A Tradition Passed Down

For generations, people have passed down little household tricks that feel almost magical—tricks that don’t come from modern technology, but from observation, creativity, and a bit of old-fashioned wisdom. One such tradition, whispered from grandmothers to mothers and from mothers to daughters, is the curious practice of dropping aspirin tablets into a load of laundry. It sounds strange at first: why would something used for discomfort relief end up tossed into a washing machine? Yet this old-school hack has been used for decades to help restore whites, lift stubborn stains, and give fabrics a brighter, cleaner look without harsh chemicals. Today, we explore the secret behind this tradition and show you the step-by-step “recipe” for using aspirin in laundry—simple, safe, and surprisingly effective.

A Bit of History: How the Aspirin Trick Began

Long before modern stain removers filled store shelves, families relied on accessible items that happened to have more than one purpose. Baking soda, vinegar, lemon juice—and yes, aspirin—became the foundation of homemaking tricks. Aspirin contains acetylsalicylic acid, a compound that gently breaks down discoloration on fabrics. Early homemakers discovered that crushed aspirin dissolved in water could brighten dull whites and release stains that soap alone couldn’t remove.

Over time, the trick became something of a secret handshake between people who loved caring for their homes:
“If your white shirts are turning yellow, try aspirin,” someone would whisper, passing the knowledge like a treasured recipe. And indeed, many families still swear by it today.

Why Aspirin Works in Laundry

Aspirin is mildly acidic—gentler than vinegar, but strong enough to help break down grime. When dissolved in warm water, it works like a fabric brightener, especially for white cotton, socks, undershirts, pillowcases, and sheets. It doesn’t bleach the fabric or weaken fibers; instead, it helps loosen buildup from sweat, detergent residue, and hard-water minerals.

It’s not a miracle cure, but it is a surprisingly effective addition to your laundry routine, especially if you love clean, crisp whites.

The Aspirin Laundry Recipe

(Traditional Method Passed Down Through Generations)**

Below is the complete, step-by-step “recipe” for using aspirin as a natural laundry booster—written just like a kitchen recipe but designed for your washing machine.

Ingredients

  • 5–6 aspirin tablets (standard, uncoated; 325 mg each)

  • 1 bowl of warm water

  • 1 load of white laundry

  • Your usual laundry detergent

Instructions

Step 1: Crush the Aspirin

Place the aspirin tablets between two sheets of paper or inside a small plastic bag. Use a spoon or rolling pin to crush them into a fine powder. Crushing helps them dissolve faster and work more evenly on the fabric.

Step 2: Dissolve in Warm Water

Pour warm (not boiling) water into a bowl and sprinkle the powdered aspirin on top. Stir until it dissolves completely. The warm water activates the acids that help loosen stains.

Step 3: Pre-Soak the Whites

Place your white clothes directly into a basin, bucket, or your machine’s drum. Pour the aspirin mixture over the clothes until they’re fully soaked. Let them sit for 4–6 hours—or overnight for heavily yellowed fabrics.

During this soak, the aspirin solution works like a gentle brightening bath, loosening grime from fibers without damaging them.

Step 4: Wash as Usual

After soaking, transfer the clothes into the washing machine (if you’re not already using it as the soaking vessel). Add your normal amount of detergent. Select a warm-water wash cycle for best results.

Step 5: Inspect and Dry

Once washed, check the fabric. You’ll often notice that yellowing is minimized, sweat stains fade, and the clothes appear fresher. Dry as you normally would—sun-drying can boost brightness even more.

Alternative “Quick Method” (No Pre-Soak Needed)

If you’re short on time, simply:

  1. Toss 5 aspirin tablets into the washing machine drum.

  2. Add your whites.

  3. Wash with warm water and regular detergent.

This quick method won’t be as dramatic as a long soak, but it still offers a noticeable improvement.

Tips for Best Results

  • Works best on white cotton fabrics.

  • Avoid using aspirin on delicate silks or wool.

  • If using coated tablets, crush them well so coating dissolves.

  • Combine aspirin with baking soda for extremely dull whites (½ cup baking soda + aspirin mixture).

Why This Tradition Endures

Part of what makes this trick so enduring isn’t just the effectiveness—it’s the nostalgic link to the past. In an age of complicated products, a simple tablet reminds us that resourcefulness never goes out of style. Grandparents used aspirin because it was inexpensive and always available. Today, people use it because they’re rediscovering natural, gentle cleaning methods.

This “laundry recipe” isn’t just a cleaning hack—it’s a reminder that wisdom often hides in the simplest places. Every time you drop those little white tablets into your washing machine, you’re not just brightening your clothes; you’re honoring a tradition lovingly passed down through generations.

Put 2 Drops in Your Ear and You Will Hear Like Before?

For generations, people have passed down simple home remedies that promised relief for clogged ears, muffled hearing, or wax buildup. The phrase “Put two drops in your ear and you will hear like before” is often used to describe natural solutions that help soften earwax, soothe irritation, and bring back that comfortable clarity you didn’t realize you were missing. While no drop can reverse true medical hearing loss, a gentle natural formula can help many people who struggle with temporary issues like wax blockage, dryness, or mild inflammation.

Today, you’ll learn a unique, safe, and time-tested recipe for an ear-care oil that people have relied on for decades. It is easy to prepare, deeply soothing, and surprisingly effective for helping ears feel cleaner, clearer, and more open.

Understanding the Real Reason Sounds Become Muffled

Before the recipe, it helps to understand what actually causes sudden or gradual muffled hearing. Most of the time, the cause is not “hearing loss” at all — it’s something reversible:

1. Earwax buildup

This is the most common cause. Wax is important for protection, but too much can block sound waves. When wax becomes hard and impacted, hearing can feel dull or distant.

2. Dry or irritated ear canal

The skin inside the ear is extremely delicate. When it becomes dry, tight, or flaky, sounds may feel distorted. Soothing oils help re-hydrate this sensitive area.

3. Mild congestion

Sometimes, blocked Eustachian tubes make you feel like your ears won’t “pop.” While this remedy doesn’t fix sinus issues, the warmth and moisture can still give relief.

4. Minor inflammation

If the canal is irritated from cotton buds, earbuds, or dryness, a calming natural oil can help restore comfort.

This brings us to the star of today’s guide: a traditional mixture known as Warm Garlic–Olive Ear Oil — a gentle recipe passed down in many cultures for easing wax, calming irritation, and making ears feel clean and refreshed.

The Unique 2-Drop Ear Care Recipe

Warm Garlic–Olive Ear Oil

This simple preparation has been used for centuries because garlic contains natural soothing compounds, while high-quality olive oil softens hardened earwax and moisturizes the canal.

Ingredients

  • 1 tablespoon pure extra-virgin olive oil

  • 1 small clove of fresh garlic

  • 1 pinch of turmeric (optional but helpful)

  • A very small sterilized dropper bottle

Why these ingredients?

  • Olive oil softens wax, moisturizes skin, and helps loosen debris.

  • Garlic contains allicin, a natural soothing agent.

  • Turmeric has mild anti-inflammatory properties and gives the oil extra warmth.

How to Prepare the Ear Oil

Follow these steps carefully:

  1. Gently crush the garlic clove just enough to release its juices — do NOT mash it completely.

  2. Place the garlic in a small pan with the olive oil.

  3. Heat on the lowest flame for 1–2 minutes, just until warm — never hot.
    You should be able to touch a drop on your wrist without discomfort.

  4. Remove from heat and add a pinch of turmeric if using.

  5. Strain the oil through a clean cloth or fine sieve.

  6. Pour into your dropper bottle.

Your ear oil is ready.

How to Use the Drops Safely

Step-by-step method

  1. Lie on your side with the affected ear facing upward.

  2. Using the dropper, place 2 warm drops into the ear.
    Make sure the oil is warm, not hot — test it on your wrist.

  3. Stay in that position for 5–10 minutes, allowing the oil to travel inside.

  4. Sit up and gently wipe away excess oil.

You may repeat this process 1–2 times per week, not daily.

What You May Notice After Using the Oil

People often report:

  • A feeling of warm relaxation inside the ear

  • Softening of hard wax, making it easier for the ear to clear naturally

  • Reduced dryness or irritation

  • A sense that the ear feels “open,” “lighter,” or “clearer”

  • Occasional improvement in muffled sounds caused by wax blockage

Remember: this recipe does not cure hearing loss, but it can help ears function more comfortably and naturally when the issue is wax, dryness, or irritation.

Important Safety Guidelines

Before using any ear remedy:

  • Do NOT use if you suspect an ear infection, severe pain, or discharge.

  • Do NOT use if you have a ruptured eardrum or tubes in your ears.

  • Never insert objects (cotton buds, clips, keys) into your ear.

  • Always test the oil temperature to avoid burns.

  • Consult a doctor if your hearing suddenly changes.

This recipe is for mild wax issues only, not medical hearing loss.

Why This Remedy Has Survived Generations

People love this remedy because it feels comforting, works gently, and supports the ear’s natural cleaning process. Unlike harsh chemical solutions, warm oil soothes the skin and encourages natural wax release. Even one session can make your ears feel refreshed and renewed — the way they’re meant to feel.

Warm garlic–olive ear oil isn’t a miracle cure, but for mild blockage or dryness, those two drops can truly make a noticeable difference in how clearly you hear the world around you.

Homemade crunch bars

There are certain treats that transport you straight back to childhood, and homemade crunch bars sit proudly at the top of that list. Crunch bars are nostalgic, irresistibly crispy, and beautifully simple — the kind of sweet you can whip up with minimal effort yet maximum satisfaction. But today, we’re taking this old-school favorite and giving it a completely fresh spin, transforming it into a richer, smoother, more wholesome treat that tastes better than anything you’ll find in a wrapper. This unique recipe uses pantry staples, requires zero baking, and creates bars with the perfect balance of melting chocolate and airy crispiness.

Why These Homemade Crunch Bars Stand Out

Many crunch bar recipes are basic: chocolate and crispy rice cereal, mixed and chilled. Good? Yes. Memorable? Not really. This version upgrades the flavor and texture by adding three game-changing elements:

  1. Silky nut butter to create a more tender bite and deeper flavor.

  2. A touch of honey for natural sweetness and chewiness.

  3. A combination of dark and milk chocolate to balance bitterness and creaminess.

The result is a crunch bar that snaps beautifully when cold, melts softly on the tongue, and delivers a layered chocolate flavor that feels handcrafted, not store-bought.

Ingredients (Makes 12 Bars)

  • 2 cups crispy rice cereal (such as Rice Krispies, the hero crunch ingredient)

  • 1 cup dark chocolate chips

  • 1 cup milk chocolate chips

  • ½ cup creamy peanut butter (or almond, cashew, or sunflower butter)

  • 3 tablespoons honey

  • 1 teaspoon vanilla extract

  • Pinch of salt (enhances the chocolate flavor)

  • Optional mix-ins: crushed nuts, mini marshmallows, coconut flakes, freeze-dried fruit

Instructions

Step 1: Prepare Your Pan

Line an 8×8 baking pan with parchment paper, leaving extra paper hanging over the edges for easy lifting later. A smooth, flat layer is key for perfectly shaped bars.

Step 2: Melt the Chocolate Base

In a heatproof bowl, combine the dark chocolate, milk chocolate, and peanut butter. Melt the mixture using the double-boiler method or microwave in 20-second increments, stirring each time until fully smooth.

Once melted, stir in the honey, vanilla extract, and salt. The honey adds shine, smoothness, and an addictive chew you won’t find in traditional crunch bars.

Step 3: Add the Cereal

Pour the crispy rice cereal into a large mixing bowl. Slowly pour the warm chocolate mixture over the cereal. Gently fold with a silicone spatula, making sure every piece is coated but not crushed. Lift and fold rather than stir vigorously — the crunch depends on the cereal staying whole.

Step 4: Press into the Pan

Transfer the mixture to the prepared baking pan. Smooth it out using a spatula or press gently with the back of a spoon. Do not press too hard, or the bars may become dense instead of airy and crisp.

Step 5: Chill

Refrigerate for 1 to 2 hours, or freeze for 30 minutes if serving sooner. Once firm, lift out using the parchment paper overhang and slice into squares or bars.

The Magic Behind This Recipe

This unique recipe stands out not only for its flavor but also its texture science. The peanut butter acts as a fat that softens the chocolate slightly, preventing the hard “snap” that makes some homemade crunch bars too brittle. Honey binds the chocolate and cereal without making the bars sticky, while the combination of dark and milk chocolate gives depth and creaminess.

The crispy cereal is naturally airy, and when coated correctly, it traps tiny pockets of air within the chocolate mixture. When chilled, these pockets solidify into delicate layers that create the signature crunch with every bite.

Variations to Make It Your Own

1. Salted Caramel Crunch Bars

Add 2 tablespoons caramel sauce into the chocolate mixture and sprinkle coarse sea salt on top.

2. Peanut Butter Swirl Bars

Reserve 2 tablespoons of peanut butter, melt it separately, and drizzle over the top before chilling. Swirl with a toothpick for a marbled look.

3. Rocky Road Crunch Bars

Add mini marshmallows, chopped walnuts, and chopped dark chocolate chunks before pressing into the pan.

4. Coconut Chocolate Crunch Bars

Mix ¼ cup shredded coconut into the cereal for a tropical twist.

5. Healthy Protein Crunch Bars

Replace half the chocolate with melted coconut oil + ½ cup chocolate protein powder.

Storage Tips

Homemade crunch bars store beautifully and stay fresh:

  • In the fridge: up to 10 days

  • In the freezer: up to 3 months

  • Wrap individually for lunchboxes, road trips, or quick dessert cravings.

Serving Ideas

These bars pair perfectly with:

  • A glass of cold milk

  • Hot coffee or espresso

  • A scoop of vanilla ice cream

  • A drizzle of warm melted chocolate

For a party or gathering, cut them into mini squares and arrange on a dessert board.

Final Thoughts

Homemade Crunch Bars may be one of the easiest treats you’ll ever make, but this upgraded version elevates them into something spectacular. It’s the perfect blend of childhood nostalgia and grown-up flavor — silky, crunchy, chocolatey, and endlessly customizable. Whether you want a quick dessert, a sweet snack, or a freezer-friendly treat to keep on hand, these no-bake bars deliver every single time. One bite and you’ll realize why homemade versions always taste better than store-bought: they’re fresher, richer, and made with real ingredients that turn simple sweets into memorable moments.

HomeNO-BAKE HOMEMADE CRUNCH BARS

There is something wonderfully nostalgic about biting into a chocolate crunch bar—the crisp snap, the airy crackle of puffed rice, and the silky melt of chocolate on your tongue. But when you make them at home, without even turning on the oven, something magical happens. These no-bake homemade crunch bars are richer, fresher, and more satisfying than anything wrapped in foil from the store. This recipe transforms a handful of simple pantry ingredients into a decadent dessert that tastes like childhood comfort wrapped in gourmet chocolate luxury.

Whether you’re craving a quick treat, planning a party platter, or want a crowd-pleaser dessert that requires almost zero effort, these bars deliver perfection every single time. And the best part? They take just minutes to assemble and only need a short chill to set. No mixers, no stovetop pot juggling, no stressful techniques—just melt, mix, pour, and enjoy.

Why Homemade Crunch Bars Taste Better

Store-bought crunch bars are crispy, yes—but they’re also full of preservatives, stabilizers, and waxy chocolate substitutes. When you make your own, you control the quality. Use creamy chocolate, fragrant vanilla, real butter, and fresh crispy rice cereal, and the flavor instantly levels up. The texture becomes dreamy: crackly yet soft, sweet yet balanced, indulgent yet wonderfully light.

Moreover, the no-bake method keeps everything quick and fun. You can customize these bars endlessly: peanut butter swirl, caramel ribbons, coconut flakes, crushed nuts, or even a hot cocoa version. But today’s recipe focuses on the classic, clean, crunchy chocolate bar—simple, pure, unforgettable.

Ingredients for Homemade No-Bake Crunch Bars

  • 2 cups chocolate chips (milk, dark, or semi-sweet—your choice)

  • 1 cup creamy peanut butter (or almond/cashew butter)

  • 3 tablespoons butter

  • 1 tablespoon honey or maple syrup

  • 1 teaspoon vanilla extract

  • 3 cups crispy rice cereal (NOT cornflakes—stick to puffed rice)

  • Optional add-ins: ¼ cup crushed peanuts, almonds, coconut flakes, mini marshmallows, or caramel bits.


Step-by-Step Instructions

Step 1: Melt the Chocolate Base

In a microwave-safe bowl or on the stovetop, melt together:

  • chocolate chips

  • peanut butter

  • butter

  • honey

Stir gently until everything becomes smooth and glossy. The mixture should be creamy, pourable, and smell like a chocolate-peanut butter dream. The honey not only sweetens but also helps the bars set with the perfect snap.

Step 2: Add the Vanilla

Remove from heat and stir in vanilla extract. This tiny addition makes a surprisingly big difference—it deepens the flavor and adds warmth that takes the recipe from “good” to “fantastic.”

Step 3: Fold in the Crispy Rice

Add the rice cereal to the chocolate mixture.
Use a spatula to fold carefully so the cereal stays crisp and doesn’t get crushed.

You want every little grain coated in chocolate.
The mixture will look thick, shiny, and textured—exactly how a crunch bar should be.

Step 4: Press Into a Pan

Line an 8×8 inch pan with parchment paper.
Pour the mixture in, spreading evenly and pressing slightly with the spatula.

Pack it just enough to hold together—but not so hard that the cereal becomes dense.
This balance is what gives you that light, airy crunch.

Step 5: Chill to Set

Place the pan in the fridge for 1 hour, or the freezer for 20–25 minutes if you’re impatient.

Once fully set, lift the block out by the parchment paper and slice into bars or squares.

You’ll hear that satisfying crack as the knife goes through—your sign that the magic worked.


Storage Tips

These bars store beautifully:

  • Fridge: up to 10 days

  • Freezer: up to 2 months (thaw 5 minutes before eating)

Keep them chilled for the best crunch and clean cuts.


What Makes This Recipe Unique

This recipe avoids refined sugar syrups, complicated tempering, and the overly sweet taste of commercial bars. Instead, it celebrates real chocolate, creamy nut butter, and natural sweetness.

A few things that make this recipe stand out:

1. The Butter-Chocolate Fusion

Butter makes the chocolate velvety but not greasy. It helps the bars soften at room temperature just enough to melt delightfully in your mouth.

2. Honey for Structure

Unlike white sugar, honey gives a soft chewiness underneath the crisp, making the bars feel gourmet—even though the recipe is simple.

3. Customizable Texture

You can choose between:

  • light crunch (use 2.5 cups cereal), or

  • extra crispy bars (use up to 3.5 cups cereal).

4. No Baking, No Mess

Every step is simple, approachable, and fast. Even beginner cooks turn into dessert heroes with this recipe.


Variations to Try

Chocolate-Caramel Crunch Bars

Drizzle caramel over the mixture before chilling.

Nutty Crunch Bars

Add ¼ cup crushed almonds or peanuts for a deeper bite.

White Chocolate Crunch Bars

Swap the chocolate for white chocolate chips—sweet, smooth, and holiday-perfect.

Protein Crunch Bars

Add 1 scoop chocolate or vanilla protein powder.

Coconut Crunch Bars

Mix in ¼ cup shredded coconut for a tropical twist.

Final Bite

These No-Bake Homemade Crunch Bars are everything a dessert should be: quick, delicious, and made with simple, honest ingredients. Each bar snaps beautifully, melts on the tongue, and delivers that irresistible chocolate crunch you crave—all without ever turning on the oven.

No-Bake Chocolate Oat Bars Recipe

If you’re craving a quick, satisfying sweet — but don’t want to turn on the oven — these no-bake chocolate oat bars are just the ticket. With only a handful of pantry staples and no baking required, they’re perfect for busy afternoons, snack prep, or even a make-and-freeze treat for later. I designed this recipe to balance chewy oats, rich chocolate, and a hint of warmth from vanilla and salt. The result: a bar that’s fudgy, slightly chewy, and deeply chocolatey — with a homey oat-crisp texture underneath.

 Ingredients

Make about 12–15 bars (depending on thickness) from this batch:

  • 2 cups (about 180 g) old-fashioned rolled oats

  • ½ cup (50 g) unsweetened shredded coconut — optional, but adds a lovely bite and subtle flavor contrast

  • ⅔ cup (160 ml) creamy natural peanut butter (or almond butter) — nut butter gives richness and binds the bars

  • ⅓ cup (60 g) coconut oil (or unsalted butter)

  • ¼ cup (50 g) brown sugar (packed) — adds gentle caramel-like sweetness and chew

  • ¼ cup (50 g) granulated sugar — to balance and help set the bars

  • ¾ cup (130 g) dark or semisweet chocolate chips (or chopped chocolate bar)

  • 1 teaspoon pure vanilla extract

  • ¼ teaspoon fine sea salt (plus a pinch more for sprinkling, optional)

  • 2–3 tablespoons milk (dairy or plant-based) — to adjust final texture

Optional add-ins:

  • A handful (~2–3 tablespoons) chopped nuts (e.g., almonds, pecans, walnuts)

  • 2 tablespoons unsweetened cocoa powder — for deeper chocolate flavor in the oat base

  • ¼ cup mini chocolate chips — for extra pockets of chocolate


🍫 Step-by-Step Instructions

  1. Line and prep the pan.

    • Use an 8″×8″ (20 cm × 20 cm) square baking pan. Line it with parchment paper, leaving an overhang on two sides to allow easy lifting once set.

  2. Toast the dry mix (optional, but recommended).

    • In a large skillet over medium-low heat, combine the oats and shredded coconut. Stir gently for 3–4 minutes until fragrant and slightly toasted (don’t let them burn). This step brings out a nutty aroma and deepens the flavor. Remove from heat and allow to cool slightly.

  3. Melt the “wet” binder.

    • In a medium saucepan (or double boiler) over low heat, combine the peanut butter, coconut oil (or butter), brown sugar, and granulated sugar. Stir constantly until everything melts together into a smooth, glossy mixture. Once melted and combined, remove from heat and stir in the vanilla extract and sea salt. If using cocoa powder for extra chocolatey oats, whisk it in here.

  4. Combine oats and binder.

    • Pour the melted mixture over the toasted oats and coconut (or plain oats, if skipping coconut) in a large mixing bowl. Mix thoroughly until all oats are evenly coated. At this point, if the mixture seems dry or crumbly, stir in 1–2 tablespoons of milk to soften and help it hold together.

  5. Press base layer into pan.

    • Transfer the oat mixture into your lined 8″ × 8″ pan. Use a spatula or the back of a spoon (or another piece of parchment) to press the oats down firmly — this ensures the bars hold together when set.

  6. Make the chocolate layer.

    • Using the same saucepan (or a clean one), melt the chocolate chips (or chopped chocolate) over low heat, stirring often. Once smooth, remove from heat. If desired, add 1 tablespoon of coconut oil or butter for a glossier, softer chocolate top.

  7. Top and swirl (optional).

    • Pour the melted chocolate over the pressed oat base. Tilt the pan gently to help the chocolate layer spread evenly. For a marbled effect, you can swirl a teaspoon of peanut butter or almond butter into the chocolate before it sets. Finish with a light sprinkle of flaked sea salt for a sweet-salty balance.

  8. Chill until firm.

    • Transfer the pan to the refrigerator and chill for at least 2 hours (or until chocolate is firm and the bars hold together when pressed). For quicker results, 45–60 minutes in the freezer works too — just avoid freezing so long that the bars become rock-hard.

  9. Slice and serve.

    • Once set, lift the bars out using the parchment overhang. Cut into 12–15 pieces (or smaller, bite-sized squares). Serve chilled or at room temperature.

 Tips & Variations

  • Swap nut butters — If you prefer a different flavor, try sunflower seed butter (nut-free), cashew butter (for a milder flavor), or even cookie-butter for a fun twist.

  • For gluten-free version: Ensure your oats are certified gluten-free. Skip the coconut (or use gluten-free insurances-not in standard order) if it’s a concern.

  • Add-ins for texture: Mix-ins like chopped nuts, seeds (like chia or flax), or even dried fruit (e.g. chopped dried cranberries or raisins) can add chew and nutritional variety.

  • Chocolate swirl pattern: For a more decorative look — melt a bit of peanut butter, fork-whip it gently, and draw zigzags over the chocolate layer.

  • Make them thicker: For thicker bars, double the oat layer (use ~4 cups oats + extra binder) and press into a loaf pan instead of 8″ square pan — just adjust chilling time.

  • No coconut oil on hand? Use unsalted butter or margarine — the bars will still be delicious, just slightly less “tropical” in flavor from missing coconut.

  • Storage: Keep bars in an airtight container in the fridge for up to 1 week, or freeze for up to 2 months. If frozen, allow to thaw a few minutes before slicing to avoid crumbling.


Why This Recipe Works

  • No-bake simplicity: By using melted nut butter, coconut oil (or butter), and minimal sugar, the bars bind together without heat. The chill does the “setting” — so no preheating, no oven time, and no waiting.

  • Texture contrast: Toasting oats adds depth and avoids a raw-oats taste; the shredded coconut gives a subtle chew or crunch depending on how finely shredded. The melted chocolate on top provides a glossy, luxurious contrast to the rustic oats beneath.

  • Balanced sweetness: With a mix of brown sugar and granulated sugar — plus bittersweet or dark chocolate — the bars are sweet, but not cloying. A pinch of salt (plus optional sea-salt sprinkle) helps highlight the chocolate and peanut-butter notes.

Serving Ideas

  • Snack box staples: These bars travel well — pack three or four for a quick energy snack at work, school, or on hikes.

  • Dessert upgrade: Warm slightly in the microwave (~8–10 seconds) so the chocolate softens, then top with a sprinkle of sea salt or a drizzle of caramel for extra decadence.

  • Ice-cream combo: Use a bar as a “crust” under a scoop of vanilla ice cream for a quick, no-bake ice-cream sandwich (especially good if you use peanut- or almond-butter flavor).

Final Thoughts

This no-bake chocolate oat bar recipe balances convenience and flavor beautifully. With a few staple ingredients you likely already have — oats, nut butter, chocolate — you can whip up a snack or dessert in under 15 minutes (plus chilling). The result is a bar that’s homey and wholesome, but with enough sweetness and richness to satisfy a chocolate craving.

Whether you stick to the base version for simplicity or customize with nuts, dried fruits, or extra chocolate, these bars are versatile. Feel free to treat yourself, gift a batch to a friend — or simply devour them all yourself with a glass of cold milk (or chai!).

Apple Slab Pie

Apple pie is a dessert with a long and beloved history, but sometimes the familiar round version just isn’t enough. Whether you’re feeding a crowd, preparing for a potluck, or simply craving a dessert that slices cleanly and serves beautifully, an Apple Slab Pie delivers everything you love about the traditional dish—just bigger, bolder, and with more room for creativity. This version offers buttery, flaky layers, a deeply caramelized apple filling, and a playful streusel twist that makes it unforgettable.

What makes this slab pie unique is the combination of textures: crisp bottom crust, tender apple filling, a top crust that’s part lattice and part crumble, and a finishing glaze that catches the light like sugar on autumn leaves. It’s rustic, charming, and impressive all at once.


Ingredients

For the Crust

  • 3 ½ cups all-purpose flour

  • 1 tablespoon granulated sugar

  • 1 teaspoon fine sea salt

  • 1 ½ cups cold unsalted butter, cubed

  • ¾ cup ice water (more if needed)

  • 1 teaspoon apple cider vinegar

For the Filling

  • 8 cups peeled, thinly sliced apples (a mix of Honeycrisp, Granny Smith, and Fuji works best)

  • ¾ cup light brown sugar

  • ¼ cup granulated sugar

  • 3 tablespoons cornstarch

  • 1 tablespoon lemon juice

  • 1 tablespoon vanilla extract

  • 1 ½ teaspoons cinnamon

  • ¼ teaspoon freshly grated nutmeg

  • ¼ teaspoon ground cardamom (optional, but highly recommended)

  • ¼ teaspoon salt

  • 3 tablespoons unsalted butter, melted

For the Streusel Topping

  • ¾ cup all-purpose flour

  • ½ cup rolled oats

  • ½ cup brown sugar

  • ½ teaspoon cinnamon

  • 6 tablespoons cold unsalted butter, cubed

Finishing Touch

  • 1 egg beaten with 1 tablespoon milk (egg wash)

  • ½ cup powdered sugar

  • 1–2 tablespoons apple cider


Instructions

1. Prepare the Crust

Begin by whisking together the flour, sugar, and salt in a large bowl. Add the cold butter and work it in with a pastry cutter or your fingertips until the mixture resembles coarse crumbs with scattered pea-sized butter bits. The key to a flaky crust is keeping those butter pockets intact—so resist the urge to overwork it.

Combine the ice water and apple cider vinegar, then drizzle it into the flour mixture a little at a time. Gently mix until the dough just comes together. Divide it into two portions, one slightly larger for the bottom crust. Flatten each into a rectangle, wrap tightly, and refrigerate for at least one hour.

2. Make the Apple Filling

In a large mixing bowl, toss together the sliced apples, both sugars, cornstarch, lemon juice, vanilla, cinnamon, nutmeg, cardamom, and salt. Pour over the melted butter and stir until the apples are coated and glossy. Let the mixture sit for 10–15 minutes. This brief resting helps the apples release some of their natural juices and ensures the filling thickens perfectly in the oven.

3. Roll Out the Crust

Preheat your oven to 400°F (200°C). Line a 10×15-inch baking sheet with parchment paper.

On a lightly floured surface, roll out the larger dough portion into a rectangle several inches bigger than your pan. Carefully lay it into the sheet, allowing a bit of overhang on all sides. This ensures your slab pie holds all that luscious filling without collapsing.

Roll out the smaller dough portion into strips for a rustic lattice, or leave it whole if you prefer a more traditional top crust. For this unique version, we’re doing both—a partial lattice draped diagonally across the pie, leaving room for a crumble topping.

4. Add the Filling and Toppings

Spoon the apple filling onto the crust and spread it evenly. Arrange your lattice strips over the top at an angle so they cover about half the pie.

Next, prepare the streusel: Mix the flour, oats, brown sugar, and cinnamon, then cut in the butter until the mixture forms chunky crumbs. Scatter the streusel across the uncovered portion of the pie for a beautiful contrast of textures.

Brush the visible lattice strips with egg wash to help develop a golden sheen.

5. Bake to Perfection

Bake the slab pie for 40–50 minutes. The crust should be a deep golden brown, the streusel toasted, and the apple filling bubbling. If the edges begin to darken too quickly, tent the pie loosely with foil.

Let the pie cool for at least 30 minutes. This resting time allows the filling to set and ensures clean slices.

6. Glaze and Serve

Whisk together powdered sugar and apple cider until smooth and drizzle over the cooled pie. The glaze adds a sweet tang that brightens the warm spices.

Cut into squares and serve just as they are or alongside vanilla ice cream, whipped cream, or a drizzle of warm caramel.


Why This Apple Slab Pie Is Special

What sets this recipe apart is the interplay of textures and flavor profiles. The crisp bottom crust supports a filling that is both gooey and structured, thanks to the cornstarch-lemon-spice trio. The combination of lattice and streusel gives each bite a unique character—sometimes buttery and flaky, sometimes crunchy and cinnamon-kissed. And the apple cider glaze provides a finishing accent that pulls the entire dessert together.

This slab pie offers the heart of a traditional apple pie but reimagined to be more festive, more shareable, and more visually exciting. It’s the kind of dessert that brings people together around a table, forks in hand, ready to savor the first slice.

Air Fryer Baked Potato

Air fryer baked potatoes are a revelation: crisp skins that crackle when you tap them and cloud-soft, steamy centers that taste like they came straight from a steakhouse kitchen. What makes this recipe unique is the flavor-infused oil rub, the optional roasted-garlic steam bath, and a finishing step that seasons the potato after it cooks, boosting the flavor dramatically. Whether you’re cooking for a busy weeknight or elevating comfort food to something gourmet, this recipe gives you consistently perfect results.

Ingredients 

  • 2–4 large russet potatoes (between 8–12 oz each)

  • 1 ½ tbsp olive oil or avocado oil

  • ½ tsp flaky sea salt (plus more for finishing)

  • ½ tsp black pepper

  • ½ tsp smoked paprika

  • ¼ tsp garlic powder

  • Optional aromatic steam bath:

    • 3 whole garlic cloves, smashed

    • 1 sprig fresh rosemary or thyme

    • 1 tbsp water

Topping Ideas

  • Butter, sour cream, chives

  • Sharp cheddar + bacon crumbles

  • Greek yogurt + lemon zest

  • Chili + shredded Monterey Jack

  • Pesto + parmesan

  • Smoked salmon + dill cream

Instructions

1. Prep the Potatoes

Start by scrubbing the potatoes thoroughly. Russets are the gold standard because their high starch content creates a fluffy interior, but you can use Yukon Golds for a creamier, buttery texture. Dry the potatoes well—moisture is the enemy of crisp skin.

Use a fork to poke each potato 6–8 times. This venting keeps them from bursting and also allows steam to escape slowly, helping the inside stay soft rather than gummy.

2. Make the Flavor-Infused Oil Rub

In a small bowl, mix together:

  • Olive oil

  • Sea salt

  • Black pepper

  • Smoked paprika

  • Garlic powder

This blend gives the skin a savory, slightly smoky crust that you’ll actually want to eat. Unlike traditional baked potatoes that rely on plain salt, this rubbed seasoning caramelizes beautifully in the air fryer.

Massage each potato with the oil mixture until fully coated. Don’t rush this step—the more evenly the oil covers the skin, the better the crisping reaction.

3. Create the Optional Aromatic Steam Bath (Unique Step!)

This extra step subtly perfumes the potato’s interior.

Place a small piece of foil or a heat-safe cup in the corner of the air fryer basket. Add garlic, herb sprig, and 1 tablespoon water. As the air fryer heats, the aromatics release steam that circulates into the potato through the fork holes.

It doesn’t add strong flavor—just a faint roasted-garlic warmth that makes each bite feel more complex.

4. Air Fry the Potatoes

Preheat the air fryer to 390°F (200°C) if your model requires preheating.

Arrange the potatoes in the basket with space between them for airflow. Don’t stack or crowd; air fryers crisp using circulation, so each potato needs room.

Air fry for:

40–50 minutes, depending on size.

Turn them halfway through for even crisping.

You’ll know they’re done when a fork slides into the center without resistance and the skin feels firm and crackly.

5. Finish with the “Steakhouse Split” Technique

As soon as the potatoes are done, remove them with tongs and place them on a cutting board. Using a small knife, slice down the center lengthwise—but don’t cut all the way through.

Here’s the unique part:
Grasp both ends of the potato and push inward gently. This causes the interior to puff up like a cloud, giving that iconic steakhouse presentation.

While still piping hot, sprinkle a bit more flaky sea salt onto the interior. Adding the finishing salt after cooking heightens the flavor dramatically.

6. Load Up the Toppings

Butter is classic, but you can take your potato in many directions:

Classic Comfort

  • Butter

  • Sour cream

  • Fresh chives

  • Black pepper

Backyard BBQ

  • Cheddar

  • Bacon bits

  • Green onions

  • A drizzle of BBQ sauce

Mediterranean Inspired

  • Olive oil

  • Greek yogurt

  • Lemon zest

  • Chopped parsley

  • Pinch of sumac

Gourmet Twist

  • Truffle oil

  • Parmesan shavings

  • Cracked black pepper

Healthy & Vibrant

  • Pesto

  • Cherry tomatoes

  • Fresh basil


Tips for the Best Air Fryer Baked Potato

1. Use russet potatoes for the fluffiest interior

Their high starch content softens beautifully in dry air frying heat.

2. Don’t skip the oil

It helps crisp the skin and carries spices. If you want ultra-crunchy skins, use avocado oil for its higher smoke point.

3. Avoid wrapping in foil

Foil traps moisture and causes steaming rather than crisping—counterproductive in an air fryer.

4. Check doneness by feel, not just time

Cooking time varies with potato size. Aim for a potato that yields slightly when squeezed but still feels crisp on the outside.

5. Finish under a minute of broil (optional)

If your air fryer has a broil or crisp function, a final 1-minute blast makes the skin shatter-crisp.


Why Air Fryer Baked Potatoes Are Superior

Compared to oven baking, air fryer potatoes cook faster, use less energy, and create more consistent crisping. The circulating hot air mimics the effect of a convection oven but in a smaller, more concentrated space, ensuring even browning.

The interior texture is impressive—moist, fluffy, and evenly cooked without needing foil, extra butter, or long oven preheating.

Final Thoughts

This unique air fryer baked potato recipe delivers a perfect blend of texture, flavor, and ease. The infused oil rub and optional aromatic steam bath elevate simple ingredients into something restaurant-worthy. Whether you enjoy them loaded with toppings or simply split open with butter and salt, these air-fried baked potatoes are an incredibly satisfying side dish—or even a full meal.