Low Carb Cheesecake Brownies

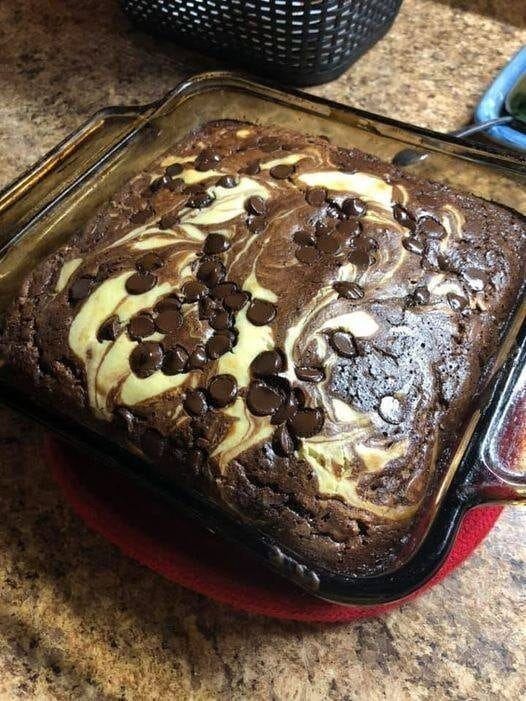
If you love brownies and cheesecake but are trying to keep your carbs low, this recipe is about to become your new obsession. These Low Carb Cheesecake Brownies combine deep, chocolatey brownie layers with a silky vanilla cheesecake swirl — all without sugar, flour, or guilt. They’re perfect for keto lifestyles, low-carb diets, or anyone who simply wants a smarter dessert that still tastes indulgent.

What makes this recipe special is the balance of textures. The brownie base is dense, moist, and intensely chocolate-forward, while the cheesecake layer adds creaminess and a subtle tang that cuts through the richness. Unlike many low-carb desserts that can feel dry or artificial, these brownies taste bakery-quality and satisfy even non-keto eaters.

Let’s dive in.

Why You’ll Love These Low Carb Cheesecake Brownies

  • Ultra fudgy texture – no crumbly or dry brownies here

  • No refined sugar or flour

  • Easy to make in one pan

  • Perfect for meal prep – they store beautifully

  • Only a few net carbs per serving

  • Freezer-friendly for cravings anytime

These brownies are ideal for holidays, potlucks, or those late-night chocolate cravings when you want something sweet without spiking your blood sugar.Ingredients You’ll Need

For the Low Carb Brownie Layer:

  • ½ cup unsalted butter

  • ¾ cup sugar-free sweetener (erythritol or monk fruit blend)

  • 2 large eggs, room temperature

  • 1 teaspoon vanilla extract

  • ¾ cup almond flour

  • ⅓ cup unsweetened cocoa powder

  • ½ teaspoon baking powder

  • ¼ teaspoon salt

  • ½ cup sugar-free dark chocolate chips (optional but recommended)

For the Cheesecake Layer:

  • 8 oz full-fat cream cheese, softened

  • ¼ cup sugar-free sweetener

  • 1 large egg

  • 1 teaspoon vanilla extract

Step-by-Step Instructions

Step 1: Prepare Your Pan

Preheat your oven to 350°F (175°C). Line an 8×8-inch baking pan with parchment paper, leaving overhang on the sides for easy removal. Lightly grease the parchment.

Step 2: Make the Brownie Batter

In a saucepan over low heat, melt the butter gently. Remove from heat and whisk in the sugar-free sweetener until smooth. Allow it to cool slightly.

Add the eggs one at a time, whisking well after each addition. Stir in the vanilla extract.

In a separate bowl, mix almond flour, cocoa powder, baking powder, and salt. Slowly fold the dry ingredients into the wet mixture until smooth. If using chocolate chips, fold them in now.

Reserve ¼ cup of brownie batter for swirling later.

Step 3: Prepare the Cheesecake Layer

In a medium bowl, beat the softened cream cheese until completely smooth. Add the sweetener and mix until fluffy. Beat in the egg and vanilla extract until creamy and lump-free.

The key here is softness — fully softened cream cheese ensures a silky cheesecake layer.

Step 4: Assemble the Layers

Spread the brownie batter evenly into the prepared pan.

Gently pour the cheesecake mixture over the brownie layer and smooth it out.

Drop spoonfuls of the reserved brownie batter on top of the cheesecake layer. Use a knife or skewer to gently swirl, creating a marbled pattern. Don’t overmix — less swirling gives prettier layers.

Step 5: Bake to Perfection

Bake for 28–35 minutes, or until the edges are set and the center is just slightly jiggly. Overbaking can dry out low-carb brownies, so err on the side of underbaking.

Remove from the oven and allow to cool completely in the pan. For best results, refrigerate for at least 2 hours before slicing.

Tips for the Best Low Carb Cheesecake Brownies

  • Use room-temperature ingredients for smooth batter and even baking

  • Don’t overbake — they firm up as they cool

  • Chill before cutting for clean slices

  • Use parchment paper for easy removal

  • Choose high-quality cocoa powder for deep chocolate flavor

Flavor Variations

Want to customize your brownies? Try these ideas:

  • Peanut Butter Swirl: Add spoonfuls of sugar-free peanut butter on top

  • Espresso Brownies: Add 1 teaspoon instant espresso powder to the brownie batter

  • Mint Chocolate: Add a few drops of sugar-free peppermint extract

  • Nutty Crunch: Fold chopped walnuts or pecans into the brownie layer

Storage & Serving

  • Refrigerator: Store in an airtight container for up to 5 days

  • Freezer: Freeze individual slices for up to 2 months

  • Serving Tip: Serve slightly chilled or at room temperature with sugar-free whipped cream

These brownies actually taste better the next day once the flavors settle.

Final Thoughts

These Low Carb Cheesecake Brownies prove that you don’t need sugar or flour to enjoy an indulgent dessert. They’re rich, creamy, chocolatey, and satisfying — everything a brownie should be, without the carb crash.

Whether you’re following a keto lifestyle, watching your carbs, or simply want a healthier dessert option, this recipe delivers comfort, flavor, and elegance in every bite. One pan, simple ingredients, and bakery-level results — you’ll find yourself making these again and again.

Christmas Appetizer Favorite’: Just 4 ingredients. I make this nonstop during Christmas season.

Christmas Appetizer Favorite: Just 4 Ingredients

There’s something magical about Christmas appetizers—the kind you can place on the table and watch disappear faster than you can say happy holidays. This four‑ingredient Christmas appetizer is exactly that kind of recipe. It’s simple, cozy, crowd‑pleasing, and almost suspiciously easy for how addictive it is. I make this nonstop during the Christmas season because it works for every occasion: family gatherings, office parties, unexpected guests, and those quiet nights when you just want something warm and festive without spending hours in the kitchen.

What makes this recipe special isn’t just the minimal ingredient list—it’s the way those ingredients come together to create bold flavor, creamy texture, and irresistible aroma. This appetizer hits all the right notes: salty, sweet, savory, and just a touch indulgent. Best of all, you don’t need fancy equipment or advanced cooking skills. If you can turn on an oven, you can make this.

The 4 Simple Ingredients

Here’s the beauty of it—only four ingredients, all easy to find, especially during the holiday season:

  1. Cocktail sausages (or mini smoked sausages) – These bring smoky, savory depth and make the appetizer hearty enough to satisfy hungry guests.
  2. Cream cheese – Soft, rich, and creamy, it balances the saltiness of the sausages and creates a luxurious texture.
  3. Sweet chili sauce – This adds a glossy finish with just the right balance of sweetness and mild heat.
  4. Puff pastry – Flaky, buttery layers that bake into golden perfection and hold everything together.

That’s it. No extra seasoning required. Each ingredient plays a role, and together they create a holiday appetizer that tastes far more complex than it actually is.

Why This Appetizer Is a Christmas Favorite

During Christmas, kitchens are already busy with main dishes, desserts, and endless cups of tea or coffee. This recipe shines because it requires minimal prep and delivers maximum impact. You can prepare it ahead of time, bake it just before serving, and it stays delicious even as it cools.

The puff pastry gives it a festive, bakery‑style look, making it feel special enough for Christmas while still being comfort food at heart. Guests love finger foods during the holidays, and these are perfectly sized—no plates or forks required.

Another reason I make this nonstop? Kids love it, adults love it, and picky eaters rarely turn it down. It’s familiar yet exciting, simple yet indulgent.

How to Make It Step by Step

Step 1: Prepare the Puff Pastry

Remove the puff pastry from the freezer and allow it to thaw slightly until it’s easy to unfold. Roll it gently on a lightly floured surface to smooth out the seams and create an even sheet.

Step 2: Spread the Cream Cheese

Using a spatula or the back of a spoon, spread a thin, even layer of cream cheese over the puff pastry. You don’t want it too thick—just enough to coat the surface and add creaminess to every bite.

Step 3: Add the Sweet Chili Sauce

Drizzle the sweet chili sauce over the cream cheese. Spread it gently so it blends slightly without fully mixing. This creates layers of flavor rather than a single note.

Step 4: Add the Sausages

Place the mini sausages evenly across the pastry. You can line them up for easy slicing or scatter them slightly for a rustic look.

Step 5: Roll, Slice, and Bake

Carefully roll the pastry into a log, keeping it snug but not too tight. Slice into bite‑sized rounds and place them cut‑side up on a lined baking tray. Bake in a preheated oven at 200°C (400°F) for about 18–22 minutes, or until puffed, golden, and fragrant.

The Holiday Aroma You’ll Love

As these bake, your kitchen fills with the buttery scent of puff pastry, the smoky aroma of sausages, and a subtle sweetness from the chili sauce. It instantly feels like Christmas. This is the kind of smell that makes people wander into the kitchen asking, “What’s in the oven?”

Serving Suggestions

Serve these warm for the best texture and flavor. Arrange them on a festive platter with a small bowl of extra sweet chili sauce on the side for dipping. They pair beautifully with:

  • Hot chocolate or spiced tea
  • Mulled juice or cider
  • A simple green salad for balance

They’re also great as part of a larger appetizer spread alongside cheese boards, dips, and roasted nuts.

Make‑Ahead Tips

One of the best things about this recipe is how well it fits into busy holiday schedules:

  • Prepare ahead: Assemble the rolls, slice them, and refrigerate up to 24 hours before baking.
  • Freeze for later: Freeze unbaked slices and bake straight from frozen—just add a few extra minutes.
  • Reheat easily: Warm leftovers in the oven to bring back the crisp pastry.

Old-School Pecan Dandy Do’s Sweetened, Sticky, and Wonderfully Retro

If you grew up around church bake sales, roadside diners, or a grandmother who kept wax paper in a drawer just for candy-making days, Pecan Dandy Do’s will feel like a warm flashback. These glossy, caramel-coated pecan clusters are unapologetically sweet, a little messy, and absolutely timeless. Before gourmet chocolates and sea salt caramels took over, candies like this were made with confidence, butter, and a sturdy wooden spoon.

This version leans fully into that old-school charm—no corn syrup shortcuts, no candy thermometers if you don’t want them, and just enough vanilla to make the whole kitchen smell like memory. The result is a chewy-crisp candy with toasted pecans wrapped in a deep, buttery caramel that sets just enough to hold together but still sticks lovingly to your fingers.

What Makes a True Pecan Dandy Do?

A proper Pecan Dandy Do isn’t brittle and it isn’t fudge. It lives somewhere in between—soft-set caramel clinging to pecans in craggy little mounds. The sugar is cooked just past the thread stage, enriched with butter and milk, then poured hot over nuts that have been toasted until fragrant. Once spooned onto wax paper, they cool into shiny, amber clusters that beg to be stolen before they fully set.

Ingredients (Simple, Honest, and Retro)

  • 2 ½ cups pecan halves

  • 1 ¾ cups granulated sugar

  • ½ cup whole milk (or evaporated milk for extra richness)

  • 6 tablespoons unsalted butter

  • 1 tablespoon light molasses (for depth and old-time color)

  • 1 teaspoon pure vanilla extract

  • ¼ teaspoon fine sea salt

  • Optional: a pinch of baking soda (for a slightly lighter, less dense caramel)

Step 1: Toast the Pecans (Do Not Skip)

Spread the pecans in a single layer on a dry skillet or baking sheet. Toast over medium heat (or in a 350°F oven) for 7–10 minutes, stirring once or twice, until fragrant and just beginning to darken. This step transforms the candy—raw pecans will taste flat and oily, while toasted ones bring warmth and complexity.

Transfer the hot pecans to a heatproof bowl and keep nearby. Candy-making waits for no one.

Step 2: Build the Old-Fashioned Caramel

In a heavy-bottomed saucepan, combine the sugar, milk, butter, molasses, and salt. Cook over medium heat, stirring constantly until the sugar dissolves and the butter melts. Once the mixture begins to bubble, reduce stirring to occasional gentle sweeps to prevent scorching.

Let the caramel cook steadily for 10–14 minutes. It should thicken, darken slightly, and smell deeply buttery. If you’re using a thermometer, aim for about 238–240°F (soft-ball stage). If you’re going by instinct, drop a small spoonful into cold water—it should form a soft ball that flattens when pressed.

If using baking soda, stir it in quickly now. The caramel will foam slightly—this is normal and very old-school.

Remove from heat and immediately stir in the vanilla.

Step 3: Marry the Pecans and Caramel

Working quickly, pour the hot caramel over the toasted pecans. Stir until every nut is thickly coated and glossy. The mixture should be sticky, not runny, and heavy on the spoon.

Line your counter with wax paper or parchment. Using two spoons, drop rustic mounds of the pecan mixture onto the paper. Don’t fuss with them—irregular shapes are part of the charm.

Step 4: Cool, Set, and Sneak One Early

Let the Pecan Dandy Do’s cool at room temperature for 30–45 minutes. They will firm up as they cool but remain pleasantly chewy. If you can’t wait and steal one warm, you’ll be rewarded with stretchy caramel and toasted pecans at their peak—just mind your fingers.

Storage & Serving (If They Last That Long)

Store in an airtight tin with wax paper between layers. They keep well for about a week at room temperature, though in most kitchens they disappear long before then. Serve with black coffee, sweet tea, or tucked into holiday cookie trays where they always stand out as the nostalgic favorite.

Retro Tips from the Candy Drawer

  • For extra chew, swap half the milk for evaporated milk.

  • For deeper flavor, use dark brown sugar in place of ½ cup of the white sugar.

  • If the caramel sets too hard, you cooked it a touch too long—next time pull it off earlier.

  • Sticky fingers are a sign of success.

Shepherd’s Pie

Shepherd’s Pie is one of those dishes that instantly brings comfort. Warm, hearty, and deeply satisfying, it has fed families for generations. Traditionally made with minced lamb, vegetables, and topped with mashed potatoes, Shepherd’s Pie was born as a way to turn leftovers into something magical. This version stays true to its roots while adding a few thoughtful twists that deepen flavor and create a rich, unforgettable meal.

This is not rushed food. It’s the kind of dish that fills your kitchen with aromas and your home with calm. Perfect for family dinners, chilly evenings, or when you want something nourishing and timeless.

Why This Shepherd’s Pie Is Special

What makes this Shepherd’s Pie unique is balance. The meat filling is deeply savory without being heavy, the vegetables are tender but not mushy, and the mashed potato topping is creamy with a lightly crisped finish. A small splash of Worcestershire sauce and a hint of garlic elevate the flavor without overpowering it. The result is comfort food that feels familiar yet refined.

Ingredients

For the Meat Filling

  • 1½ pounds ground lamb

  • 1 medium onion, finely chopped

  • 2 carrots, diced small

  • 1 cup green peas

  • 3 cloves garlic, minced

  • 2 tablespoons olive oil

  • 2 tablespoons tomato paste

  • 1 tablespoon Worcestershire sauce

  • 1 teaspoon fresh thyme (or ½ teaspoon dried)

  • 1 teaspoon salt (adjust to taste)

  • ½ teaspoon black pepper

  • 1 cup beef or lamb broth

For the Mashed Potato Topping

  • 2½ pounds potatoes, peeled and cut into chunks

  • ½ cup warm milk

  • 4 tablespoons butter

  • ½ teaspoon salt

  • ¼ teaspoon black pepper

Optional topping upgrade:

  • ½ cup grated cheddar or parmesan cheese

Step-by-Step Instructions

1. Prepare the Potatoes

Place the potato chunks in a large pot and cover with cold, salted water. Bring to a boil and cook until fork-tender, about 15–18 minutes. Drain well and return them to the pot. Add butter, warm milk, salt, and pepper. Mash until smooth and creamy. Cover and set aside.

Tip: Warm milk makes the potatoes extra fluffy and prevents them from becoming gluey.

2. Build the Flavor Base

Heat olive oil in a large skillet over medium heat. Add chopped onion and carrots. Cook for about 5–7 minutes until softened and fragrant. Stir in garlic and cook for another 30 seconds, just until aromatic.

3. Cook the Lamb

Add ground lamb to the skillet. Break it up with a spoon and cook until browned and no longer pink. Drain excess fat if needed, but leave a little for flavor.

Stir in tomato paste, Worcestershire sauce, thyme, salt, and pepper. Let the tomato paste cook for a minute to deepen its flavor.

4. Simmer the Filling

Pour in the broth and stir well. Reduce heat to low and let the mixture simmer for 10–15 minutes, until slightly thickened. Add peas during the last few minutes so they stay bright and tender.

Taste and adjust seasoning if needed. The filling should be rich, savory, and spoonable—not soupy.

5. Assemble the Pie

Preheat your oven to 400°F (200°C). Spread the lamb mixture evenly into a baking dish. Spoon the mashed potatoes on top and gently spread them to the edges, sealing in the filling.

For texture, use a fork to create ridges on the surface of the potatoes. Sprinkle cheese on top if using.

6. Bake to Perfection

Bake uncovered for 25–30 minutes, until the top is lightly golden and the edges are bubbling. For extra crispiness, broil for the final 2–3 minutes, watching carefully.

Let the Shepherd’s Pie rest for 10 minutes before serving. This helps it set and makes serving easier.

Serving Suggestions

Shepherd’s Pie is a complete meal on its own, but it pairs beautifully with:

  • A simple green salad with lemon dressing

  • Steamed green beans or broccoli

  • Crusty bread to soak up every bite

Storage and Reheating

  • Refrigerator: Store leftovers in an airtight container for up to 3 days.

  • Freezer: Shepherd’s Pie freezes well for up to 2 months.

  • Reheat: Warm in the oven at 350°F until heated through, or microwave individual portions.

Final Thoughts

Shepherd’s Pie is more than a recipe—it’s tradition, comfort, and care baked into one dish. This version honors the classic while adding layers of flavor that make it memorable. Whether you’re cooking for loved ones or preparing meals ahead, this Shepherd’s Pie delivers warmth in every bite.

Homemade Picadillo with Roasted Pepper Sofrito and Warm Spices

Picadillo is one of those dishes that feels like home no matter where you’re from. Versions exist across Latin America, the Caribbean, and the Philippines, each shaped by local ingredients and family traditions. This recipe honors that comforting heritage while introducing a few unexpected layers—roasted peppers, warm spices, and a gentle sweetness that balances the savory depth. The result is a picadillo that tastes familiar yet unmistakably special, perfect for weeknight dinners or leisurely weekend meals.

What Makes This Picadillo Unique

Traditional picadillo usually relies on tomatoes, onions, garlic, and ground meat. In this version, we deepen the flavor by roasting the peppers first, blooming the spices in oil, and finishing the dish with a splash of citrus. A touch of cinnamon and smoked paprika adds warmth without overpowering the dish, while raisins and olives create the classic sweet-and-savory contrast that picadillo lovers crave.

Ingredients

For the Roasted Pepper Sofrito

  • 1 red bell pepper

  • 1 green bell pepper

  • 1 small yellow onion

  • 4 cloves garlic, unpeeled

  • 2 tablespoons olive oil

For the Picadillo

  • 1½ pounds ground beef (80/20 for best flavor)

  • 2 tablespoons olive oil

  • 1 teaspoon ground cumin

  • 1 teaspoon smoked paprika

  • ½ teaspoon ground cinnamon

  • 1 teaspoon dried oregano

  • 2 bay leaves

  • 1 cup crushed tomatoes

  • ½ cup beef broth or water

  • ⅓ cup green olives, sliced

  • ¼ cup raisins

  • 1 tablespoon capers (optional but recommended)

  • 1 tablespoon tomato paste

  • 1 teaspoon brown sugar

  • Salt and black pepper to taste

To Finish

  • Juice of ½ lime or orange

  • Fresh cilantro or parsley, finely chopped

Preparation

Step 1: Roast the Peppers

Preheat your oven to 425°F (220°C). Place the bell peppers, onion (cut into large chunks), and garlic cloves on a baking sheet. Drizzle with olive oil and toss lightly. Roast for 20–25 minutes, turning once, until the vegetables are blistered and slightly charred. The garlic should be soft and fragrant.

Once cooled, peel the garlic and transfer all the roasted vegetables to a blender or food processor. Blend into a coarse, rustic puree. This roasted sofrito is the backbone of the dish, delivering sweetness and smokiness that raw vegetables simply can’t achieve.

Step 2: Brown the Meat

Heat a large skillet or Dutch oven over medium-high heat. Add the olive oil, then the ground beef. Break it apart with a wooden spoon and allow it to brown deeply. Avoid stirring too much—those caramelized bits on the bottom of the pan will build richness.

Season lightly with salt and pepper as the beef cooks. Once browned, reduce the heat to medium and drain excess fat if needed, leaving about two tablespoons in the pan.

Step 3: Bloom the Spices

Add cumin, smoked paprika, cinnamon, oregano, and bay leaves directly to the beef. Stir continuously for about 30 seconds, allowing the spices to bloom in the warm fat. This step intensifies their aroma and ensures the spices permeate the entire dish.

Step 4: Build the Sauce

Stir in the roasted pepper sofrito, scraping up any browned bits from the pan. Add the crushed tomatoes, tomato paste, and beef broth. Mix well and bring to a gentle simmer.

At this stage, the picadillo should look slightly loose. That’s intentional—the flavors will concentrate as it cooks.

Step 5: Sweet and Savory Balance

Add the olives, raisins, capers, and brown sugar. Stir to combine. The raisins soften and release their sweetness, while the olives provide a briny counterpoint. This balance is what gives picadillo its signature complexity.

Lower the heat and let the mixture simmer uncovered for 20–25 minutes, stirring occasionally. The sauce should thicken and cling to the meat without becoming dry.

Step 6: Bright Finish

Remove the bay leaves. Squeeze in fresh lime or orange juice and stir gently. This final touch lifts the dish, cutting through the richness and awakening all the flavors.

Taste and adjust seasoning with salt and pepper. Sprinkle with chopped cilantro or parsley just before serving.

How to Serve

This picadillo is incredibly versatile:

  • Classic Style: Serve over fluffy white rice with black beans and sliced avocado.

  • Comfort Bowl: Spoon it over mashed potatoes or creamy polenta.

  • Handheld: Use as a filling for empanadas, tacos, or stuffed peppers.

  • Breakfast Twist: Top with a fried egg and serve with crusty bread.

Storage and Flavor Development

Like many braised dishes, picadillo tastes even better the next day. Store it in an airtight container in the refrigerator for up to four days or freeze for up to three months. Reheat gently on the stovetop, adding a splash of broth if needed.

Christmas-Style Steak Pozole (Pozole Navideño con Carne de Res)

Pozole is one of Mexico’s most beloved dishes, deeply rooted in family gatherings, celebrations, and holidays. While pork pozole is the most common version, pozole de res made with tender steak is especially popular for Christmas in many regions, where its deep red broth, warm spices, and comforting aroma fill the house on cold December evenings. This Pozole Navideño con Carne de Res is hearty, festive, and perfect for sharing with loved ones after a long day of celebration.

Ingredients

For the broth and meat:

  • 2 ½ pounds beef steak, cut into large chunks (chuck steak, sirloin, or beef shank work well)

  • 1 large onion, halved

  • 6 cloves garlic

  • 2 bay leaves

  • 1 tablespoon salt (plus more to taste)

  • 12 cups water

  • 3 cans (15 oz each) white hominy, drained and rinsed

For the red chile sauce:

  • 6 dried guajillo chiles, stemmed and seeded

  • 3 dried ancho chiles, stemmed and seeded

  • 2 dried pasilla chiles (optional, for depth)

  • 2 cloves garlic

  • ½ teaspoon ground cumin

  • ½ teaspoon dried oregano (preferably Mexican oregano)

  • ¼ teaspoon ground cloves (a subtle Christmas touch)

  • ¼ teaspoon ground cinnamon

  • 1 teaspoon salt

  • 2 cups warm soaking liquid from the chiles

For garnish (essential):

  • Shredded cabbage or lettuce

  • Thinly sliced radishes

  • Chopped white onion

  • Fresh cilantro

  • Dried Mexican oregano

  • Lime wedges

  • Crushed red chile flakes or chile piquín

  • Warm corn tostadas or tortillas

Instructions

1. Cook the Beef

In a large stockpot or Dutch oven, place the beef chunks, onion halves, garlic cloves, bay leaves, salt, and water. Bring everything to a boil over medium-high heat, skimming off any foam that rises to the surface. Once boiling, reduce the heat to low, cover partially, and simmer for 1½ to 2 hours, or until the beef is fork-tender and deeply flavorful.

This slow simmer is the heart of pozole. As the meat cooks, the broth becomes rich and comforting, setting the foundation for the dish.

2. Prepare the Chile Sauce

While the beef cooks, place the dried chiles in a saucepan and cover them with hot water. Simmer gently for 10–15 minutes, until the chiles soften completely. Remove from heat and let them soak.

Transfer the softened chiles to a blender, along with garlic, cumin, oregano, cloves, cinnamon, salt, and about 2 cups of the soaking liquid. Blend until completely smooth. For a refined, velvety broth, strain the sauce through a fine mesh sieve, pressing with a spoon to extract all the flavor.

The warm spices in this chile sauce—especially the hint of clove and cinnamon—give this pozole its Christmas character without overpowering the traditional taste.

3. Combine and Simmer

Once the beef is tender, remove the onion, garlic, and bay leaves from the pot and discard them. Add the drained hominy directly into the broth.

Slowly stir in the red chile sauce, mixing well so the broth turns a deep, festive red. Let the pozole simmer uncovered for 30–40 minutes, allowing the flavors to meld. Taste and adjust salt as needed. If the broth becomes too thick, add a little more water or beef broth.

During this final simmer, the hominy absorbs the chile flavor while releasing its own subtle sweetness, creating the classic pozole texture.

4. Serve Christmas-Style

Serve the pozole piping hot in large bowls. Set up a garnish station so everyone can customize their bowl—this is a cherished part of the pozole experience.

Top with shredded cabbage, radishes, onion, cilantro, and a generous squeeze of lime. Sprinkle with oregano and chile flakes for extra warmth. Serve with tostadas or warm tortillas on the side, perfect for dipping into the broth.

Holiday Tips and Variations

  • This pozole tastes even better the next day, making it ideal for Christmas Eve preparation.

  • For extra richness, add a beef marrow bone to the broth during cooking.

  • You can substitute part of the beef with short ribs for deeper flavor.

  • Keep the garnishes colorful and abundant to reflect the festive spirit of the season.

The Science: Why the Green Ring Forms

If you’ve ever peeled a hard-boiled egg and noticed a dull green or grayish ring circling the yolk, you might have wondered what went wrong. Was the egg old? Was it unsafe to eat? Or did you somehow “overcook” it? This mysterious green ring has puzzled home cooks for generations, but the truth is far less alarming—and far more fascinating—than most people think. The green ring is not a sign of spoilage or poor quality. Instead, it’s a visible result of a simple chemical reaction driven by heat, time, and sulfur.

Let’s break down exactly why that green ring forms, what it means for taste and nutrition, and how you can prevent it if you prefer a perfectly golden yolk.

The Chemistry Inside an Egg

An egg may look simple, but it’s a remarkably complex structure. The egg white (albumen) is rich in proteins that contain sulfur-containing amino acids. The yolk, on the other hand, is packed with fats, vitamins, and iron.

When an egg is heated, its proteins begin to denature—meaning they unfold and bond together, transforming the egg from liquid to solid. This process is normal and desirable when cooking eggs. However, when heat is applied for too long or at too high a temperature, chemical reactions accelerate and new compounds begin to form.

One of those reactions is responsible for the green ring.

Sulfur Meets Iron: The Key Reaction

As the egg white heats up, sulfur-containing proteins release hydrogen sulfide gas. You might recognize hydrogen sulfide by its familiar “rotten egg” smell, though in cooked eggs it’s usually present in very small amounts.

At the same time, the yolk’s iron becomes more reactive under heat. When hydrogen sulfide migrates from the white toward the yolk, it reacts with the iron in the yolk to form iron sulfide. Iron sulfide is a greenish-gray compound, and it deposits itself right where the white and yolk meet—creating that unmistakable ring.

The longer the egg is cooked, and the hotter it gets, the more hydrogen sulfide is released and the more iron sulfide is formed. That’s why the green ring is most common in eggs that have been boiled too long or cooled too slowly.

Is the Green Ring Safe to Eat?

Yes—completely safe. The green ring may not be visually appealing, but it poses no health risk. Iron sulfide is harmless in the tiny amounts formed during cooking, and the egg remains perfectly edible.

In fact, the presence of the green ring has nothing to do with freshness. Even a very fresh egg can develop a green ring if it’s overcooked, while an older egg can avoid it if cooked gently and cooled properly.

The main downside of the green ring is texture and flavor. Overcooked yolks tend to become dry, crumbly, and slightly chalky. The sulfur compounds can also create a stronger eggy smell, which some people find unpleasant.

Why Timing and Temperature Matter

The green ring forms most readily under two conditions: high heat and long cooking times. Rapid boiling causes the egg white to heat aggressively, releasing more hydrogen sulfide. Prolonged cooking gives that gas plenty of time to react with iron in the yolk.

Cooling also plays a role. If hot eggs are left sitting in hot water after cooking, the residual heat continues the reaction. This is why eggs that are immediately cooled in cold or ice water are much less likely to develop the green ring.

In short, it’s not just how you cook the egg—it’s how you stop cooking it.

How to Prevent the Green Ring

Avoiding the green ring is surprisingly simple once you understand the science behind it.

First, don’t overcook the eggs. For classic hard-boiled eggs, bring the water to a boil, add the eggs, then reduce the heat to a gentle simmer. Cooking for about 9–10 minutes is usually sufficient for fully set whites and creamy, fully cooked yolks.

Second, cool the eggs quickly. As soon as cooking is complete, transfer the eggs to an ice bath or run them under cold water for several minutes. This rapid cooling stops the chemical reaction almost immediately.

Finally, peel or store properly. Cooling not only prevents discoloration but also makes eggs easier to peel and helps maintain better texture.

A Visual Lesson in Food Science

The green ring is a perfect example of how cooking is really applied chemistry. Tiny changes in heat and time can dramatically alter the appearance and texture of food, even when the ingredients remain exactly the same.

Rather than seeing the green ring as a mistake, it can be viewed as a lesson in balance. Gentle heat preserves color and texture, while excessive heat pushes reactions further than we want them to go.

The Takeaway

The green ring around a hard-boiled egg yolk forms when sulfur from the egg white reacts with iron in the yolk, creating iron sulfide. It’s harmless, common, and entirely preventable. While it may not look appetizing, it doesn’t mean the egg is bad or unsafe.

Understanding why it happens gives you control in the kitchen. With proper timing, moderate heat, and quick cooling, you can consistently produce hard-boiled eggs with bright yellow yolks and tender texture—no green ring in sight.

Hog Pogs: The Old-School Southern Bite That Never Goes Out of Style

Hog Pogs are one of those recipes that rarely show up in cookbooks but live on in family kitchens, church potlucks, and small-town gatherings. They’re hearty, crispy on the outside, tender on the inside, and deeply satisfying. At their heart, Hog Pogs are a clever combination of seasoned pork and cornmeal dough—pan-fried into golden, hand-held bites that feel both rustic and comforting. If you’ve never had them before, imagine a cross between a sausage fritter and a cornmeal hushpuppy, only richer and more filling.

This recipe stays true to that humble tradition while refining the texture and flavor just enough to make them unforgettable.

What Makes Hog Pogs Special

Hog Pogs were born from the idea of stretching simple ingredients into something filling and delicious. Pork was mixed with cornmeal, spices, and just enough moisture to bind everything together. The result was an affordable meal that could feed a crowd. Today, Hog Pogs are still loved for the same reasons—but also because they’re incredibly versatile. You can serve them for breakfast, lunch, or dinner, and they’re just as good hot from the skillet as they are reheated the next day.

Ingredients for Classic Hog Pogs

For the Pork Filling

  • 1 pound ground pork (or breakfast sausage for extra flavor)

  • 1 teaspoon salt

  • ½ teaspoon black pepper

  • ½ teaspoon smoked paprika

  • ½ teaspoon garlic powder

  • ¼ teaspoon crushed red pepper flakes (optional)

  • 1 small onion, finely minced

  • 1 tablespoon cold water

For the Cornmeal Dough

  • 1 cup yellow cornmeal

  • ½ cup all-purpose flour

  • 1 teaspoon baking powder

  • ½ teaspoon salt

  • 1 teaspoon sugar (optional, but traditional)

  • 1 large egg

  • ¾ cup buttermilk

  • 1 tablespoon melted butter

For Frying

  • Vegetable oil or lard, enough to shallow-fry

Step-by-Step Instructions

Step 1: Season the Pork

In a bowl, combine the ground pork with salt, pepper, smoked paprika, garlic powder, red pepper flakes, onion, and cold water. Mix gently with your hands until just combined. Overmixing can make the filling dense, so stop as soon as everything is evenly distributed. Set aside.

Step 2: Make the Cornmeal Dough

In a separate bowl, whisk together the cornmeal, flour, baking powder, salt, and sugar. In another small bowl, beat the egg with the buttermilk and melted butter. Pour the wet ingredients into the dry and stir until you have a thick, spoonable batter. Let it rest for 5 minutes—this allows the cornmeal to hydrate and improves texture.

Step 3: Combine Pork and Dough

Fold the seasoned pork into the cornmeal batter. The mixture should be thick but soft, able to hold its shape when scooped. If it feels too stiff, add a tablespoon of buttermilk. If it’s too loose, sprinkle in a little more cornmeal.

Step 4: Heat the Oil

Heat about ½ inch of oil in a heavy skillet over medium heat. The oil is ready when a small drop of batter sizzles immediately but doesn’t burn.

Step 5: Fry the Hog Pogs

Scoop the mixture by heaping tablespoons and gently drop into the hot oil. Flatten slightly with the back of the spoon. Fry for 3–4 minutes per side until deeply golden brown and cooked through. Transfer to a paper towel-lined plate to drain.

Serving Suggestions

Hog Pogs are best served hot, but they’re incredibly flexible. For breakfast, pair them with fried eggs and a drizzle of honey or maple syrup. At lunch, serve them with coleslaw or sliced tomatoes. For dinner, they shine alongside greens, beans, or mashed potatoes. Many people enjoy them dipped in mustard, hot sauce, or even a creamy gravy.

Tips for Perfect Hog Pogs

  • Use cold ingredients for better texture and juiciness.

  • Don’t overcrowd the skillet, or the oil temperature will drop.

  • Taste-test a small patty first and adjust seasoning if needed.

  • Rest the mixture for a few minutes before frying—it makes a big difference.

Clove Water Sitz Baths for Women: A Gentle Guide to Hygiene and Comfort

In many traditional cultures, natural sitz baths have long been used as a soothing ritual for feminine hygiene, relaxation, and personal comfort. One such time-honored practice is the clove water sitz bath. Simple, aromatic, and grounding, this gentle routine is not about harsh treatments or quick fixes—it’s about creating a calm moment of care for the body using warm water and cloves, a spice cherished for centuries.

This guide walks you through a unique, gentle clove water sitz bath recipe, explains how to prepare it safely, and shares tips on how to make the experience comforting and mindful.

What Is a Sitz Bath?

A sitz bath involves sitting in warm water that covers the hips and buttocks. Traditionally, it is used to promote cleanliness, relaxation, and comfort in the intimate area. Sitz baths are often part of postpartum routines, monthly self-care rituals, or simply moments of calm after a long day.

Adding cloves to the water introduces a warm, spicy aroma that many women find grounding and comforting.

Why Cloves?

Cloves (Syzygium aromaticum) are known for their strong scent and warming nature. In traditional home care practices, cloves have been valued for:

  • Their pleasant, calming aroma

  • A feeling of warmth and freshness

  • Helping create a sense of cleanliness and comfort

  • Supporting mindful self-care rituals

This is not a medical treatment, but rather a traditional wellness practice meant to enhance comfort and relaxation.

The Gentle Clove Water Sitz Bath Recipe (Unique Method)

Ingredients:

  • 1 tablespoon whole cloves

  • 1 liter (about 4 cups) clean water

  • Additional warm water (enough to fill your sitz bath or basin)

Optional Additions (Choose One Only):

  • A small piece of cinnamon stick (for aroma)

  • 1 tablespoon dried rose petals (for scent and softness)

  • 1 teaspoon sea salt (optional, mild and non-irritating)

Step-by-Step Preparation

Step 1: Prepare the Clove Infusion

Add 1 tablespoon of whole cloves to 1 liter of water. Bring it to a gentle boil, then reduce heat and simmer for 10–15 minutes. The water will turn light brown and release a warm, spicy aroma.

Step 2: Cool and Strain

Remove from heat and allow the clove water to cool until it is comfortably warm, never hot. Strain out the cloves completely.

Step 3: Prepare the Sitz Bath

Pour the strained clove water into a clean sitz bath basin or wide bowl. Add enough warm plain water so the level comfortably covers the hips when seated.

Step 4: Create a Calm Space

Choose a quiet area. Dim the lights, take slow breaths, and allow yourself to relax. This is a moment of care, not a rush.

Step 5: Sit and Relax

Sit in the bath for 10–15 minutes. Breathe deeply and allow the warmth and aroma to create a sense of ease.

Step 6: Gently Dry

After finishing, stand up slowly and gently pat dry with a clean, soft towel. Avoid rubbing.

How Often Can It Be Used?

  • 1–2 times per week is generally enough for comfort and hygiene rituals.

  • Some women enjoy it after menstruation, long days, or as part of a weekly self-care routine.

  • Avoid daily use unless advised by a healthcare professional.

Important Safety Tips

  • Always ensure the water is warm, not hot.

  • Do not use if you have open wounds, severe irritation, or known sensitivity to cloves.

  • Avoid using essential clove oil directly—whole cloves are gentler.

  • If you experience burning, itching, or discomfort, stop immediately.

  • This practice is not a replacement for medical care. Consult a healthcare provider for persistent symptoms.

Making It a Self-Care Ritual

A clove water sitz bath isn’t just about hygiene—it’s about slowing down. Consider pairing it with:

  • Soft music or silence

  • Deep breathing

  • Gentle stretching afterward

  • A warm cup of herbal tea

These small additions can turn a simple bath into a nurturing ritual.

Final Thoughts

Clove water sitz baths offer a gentle, traditional approach to comfort and personal care. Simple to prepare and deeply calming, they remind us that hygiene doesn’t need to be harsh or complicated. Sometimes, warm water, natural ingredients, and a few quiet minutes are enough to restore a sense of balance and well-being.

4 Gentle Ways to Erase Age Spots with Baking Soda for Younger, More Even Skin

Age spots—also called sun spots or liver spots—are one of the most common skin concerns as we get older. They usually appear on the hands, face, arms, and shoulders after years of sun exposure. While they’re harmless, many people feel they make the skin look uneven, tired, or older than it really is. One simple ingredient found in almost every kitchen—baking soda—has quietly earned a reputation for helping fade the appearance of age spots when used correctly and gently.

Baking soda works as a mild exfoliant. It helps remove dead skin cells on the surface, encourages fresh skin turnover, and balances the skin’s pH. When combined with soothing or nourishing ingredients, it can help brighten dull areas and soften the look of dark spots over time. Below are four gentle, practical ways to use baking soda safely for a more even-looking complexion.

1. Baking Soda and Water Spot-Smoothing Paste

This is the simplest and mildest method, making it a good starting point if you’re new to using baking soda on your skin.

What you need:

  • 1 teaspoon baking soda

  • 1–2 teaspoons clean water

How to use:
Mix the baking soda with water until you get a smooth, soft paste. Clean your skin and pat it dry. Using clean fingers, apply the paste directly to the age spots only—not the entire face. Gently massage in small circular motions for 20–30 seconds. Let it sit for another minute, then rinse thoroughly with lukewarm water. Finish with a gentle moisturizer.

Why it helps:
This method lightly exfoliates the top layer of skin, which can make age spots look less noticeable over time. Regular but limited use helps reveal brighter, fresher skin underneath.

How often:
1–2 times per week only.

2. Baking Soda and Lemon Juice Brightening Treatment

Lemon juice is naturally rich in vitamin C, which is often used to brighten uneven skin tone. When paired with baking soda, it can enhance surface exfoliation—but this method should be used carefully.

What you need:

  • 1 teaspoon baking soda

  • A few drops of fresh lemon juice

How to use:
Mix the ingredients to form a paste. Apply only to dark spots using a cotton swab or fingertip. Leave on for no more than 1 minute, then rinse well. Apply moisturizer afterward.

Why it helps:
Lemon juice helps visually brighten dark areas, while baking soda gently removes dead skin cells that trap pigment.

Important caution:
Lemon juice can make skin sensitive to sunlight. Use this treatment only at night, and apply sunscreen the next day.

How often:
Once a week maximum.

. Baking Soda and Honey Nourishing Mask

If your skin is dry or sensitive, this method is one of the gentlest options.

What you need:

  • 1 teaspoon baking soda

  • 1 teaspoon raw honey

How to use:
Mix well and apply to age spots or small areas of uneven tone. Gently massage for 20 seconds, then leave on for 5 minutes. Rinse with lukewarm water and pat dry.

Why it helps:
Honey is naturally soothing and moisturizing. It reduces dryness and irritation while baking soda exfoliates gently. This combination helps improve the skin’s overall appearance without stripping moisture.

How often:
2 times per week.

4. Baking Soda and Aloe Vera Skin-Renewal Blend

Aloe vera is known for its calming and skin-repairing properties, making it ideal for mature or sun-exposed skin.

What you need:

  • 1 teaspoon baking soda

  • 1 tablespoon pure aloe vera gel

How to use:
Mix until smooth. Apply to clean skin and massage lightly over age spots. Leave on for 5–7 minutes, then rinse and moisturize.

Why it helps:
Aloe vera supports skin renewal and hydration, while baking soda exfoliates. Together, they help soften the look of dark spots and promote smoother, healthier-looking skin.

How often:
2–3 times per week.

Important Safety Tips for Best Results

  • Always do a patch test before using baking soda on your skin.

  • Avoid using baking soda on broken, irritated, or very sensitive skin.

  • Never scrub aggressively—gentle pressure is enough.

  • Moisturize after every treatment to protect the skin barrier.

  • Results take time. Consistency over several weeks matters more than frequent use.

Final Thoughts

Baking soda isn’t a miracle cure, but when used carefully and sparingly, it can be a helpful, low-cost way to improve the appearance of age spots and uneven skin tone. The key is gentle exfoliation, proper moisturizing, and patience. Over time, these simple treatments can help your skin look smoother, brighter, and more refreshed—without harsh chemicals or expensive products.