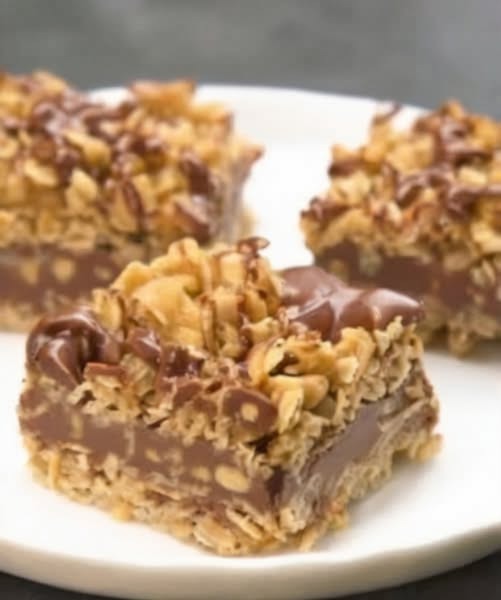
If you’re craving a quick, satisfying sweet — but don’t want to turn on the oven — these no-bake chocolate oat bars are just the ticket. With only a handful of pantry staples and no baking required, they’re perfect for busy afternoons, snack prep, or even a make-and-freeze treat for later. I designed this recipe to balance chewy oats, rich chocolate, and a hint of warmth from vanilla and salt. The result: a bar that’s fudgy, slightly chewy, and deeply chocolatey — with a homey oat-crisp texture underneath.
Ingredients
Make about 12–15 bars (depending on thickness) from this batch:
-
2 cups (about 180 g) old-fashioned rolled oats
-
½ cup (50 g) unsweetened shredded coconut — optional, but adds a lovely bite and subtle flavor contrast
-
⅔ cup (160 ml) creamy natural peanut butter (or almond butter) — nut butter gives richness and binds the bars
-
⅓ cup (60 g) coconut oil (or unsalted butter)
-
¼ cup (50 g) brown sugar (packed) — adds gentle caramel-like sweetness and chew
-
¼ cup (50 g) granulated sugar — to balance and help set the bars
-
¾ cup (130 g) dark or semisweet chocolate chips (or chopped chocolate bar)
-
1 teaspoon pure vanilla extract
-
¼ teaspoon fine sea salt (plus a pinch more for sprinkling, optional)
-
2–3 tablespoons milk (dairy or plant-based) — to adjust final texture
Optional add-ins:
-
A handful (~2–3 tablespoons) chopped nuts (e.g., almonds, pecans, walnuts)
-
2 tablespoons unsweetened cocoa powder — for deeper chocolate flavor in the oat base
-
¼ cup mini chocolate chips — for extra pockets of chocolate
🍫 Step-by-Step Instructions
-
Line and prep the pan.
-
Use an 8″×8″ (20 cm × 20 cm) square baking pan. Line it with parchment paper, leaving an overhang on two sides to allow easy lifting once set.
-
-
Toast the dry mix (optional, but recommended).
-
In a large skillet over medium-low heat, combine the oats and shredded coconut. Stir gently for 3–4 minutes until fragrant and slightly toasted (don’t let them burn). This step brings out a nutty aroma and deepens the flavor. Remove from heat and allow to cool slightly.
-
-
Melt the “wet” binder.
-
In a medium saucepan (or double boiler) over low heat, combine the peanut butter, coconut oil (or butter), brown sugar, and granulated sugar. Stir constantly until everything melts together into a smooth, glossy mixture. Once melted and combined, remove from heat and stir in the vanilla extract and sea salt. If using cocoa powder for extra chocolatey oats, whisk it in here.
-
-
Combine oats and binder.
-
Pour the melted mixture over the toasted oats and coconut (or plain oats, if skipping coconut) in a large mixing bowl. Mix thoroughly until all oats are evenly coated. At this point, if the mixture seems dry or crumbly, stir in 1–2 tablespoons of milk to soften and help it hold together.
-
-
Press base layer into pan.
-
Transfer the oat mixture into your lined 8″ × 8″ pan. Use a spatula or the back of a spoon (or another piece of parchment) to press the oats down firmly — this ensures the bars hold together when set.
-
-
Make the chocolate layer.
-
Using the same saucepan (or a clean one), melt the chocolate chips (or chopped chocolate) over low heat, stirring often. Once smooth, remove from heat. If desired, add 1 tablespoon of coconut oil or butter for a glossier, softer chocolate top.
-
-
Top and swirl (optional).
-
Pour the melted chocolate over the pressed oat base. Tilt the pan gently to help the chocolate layer spread evenly. For a marbled effect, you can swirl a teaspoon of peanut butter or almond butter into the chocolate before it sets. Finish with a light sprinkle of flaked sea salt for a sweet-salty balance.
-
-
Chill until firm.
-
Transfer the pan to the refrigerator and chill for at least 2 hours (or until chocolate is firm and the bars hold together when pressed). For quicker results, 45–60 minutes in the freezer works too — just avoid freezing so long that the bars become rock-hard.
-
-
Slice and serve.
-
Once set, lift the bars out using the parchment overhang. Cut into 12–15 pieces (or smaller, bite-sized squares). Serve chilled or at room temperature.
-
Tips & Variations
-
Swap nut butters — If you prefer a different flavor, try sunflower seed butter (nut-free), cashew butter (for a milder flavor), or even cookie-butter for a fun twist.
-
For gluten-free version: Ensure your oats are certified gluten-free. Skip the coconut (or use gluten-free insurances-not in standard order) if it’s a concern.
-
Add-ins for texture: Mix-ins like chopped nuts, seeds (like chia or flax), or even dried fruit (e.g. chopped dried cranberries or raisins) can add chew and nutritional variety.
-
Chocolate swirl pattern: For a more decorative look — melt a bit of peanut butter, fork-whip it gently, and draw zigzags over the chocolate layer.
-
Make them thicker: For thicker bars, double the oat layer (use ~4 cups oats + extra binder) and press into a loaf pan instead of 8″ square pan — just adjust chilling time.
-
No coconut oil on hand? Use unsalted butter or margarine — the bars will still be delicious, just slightly less “tropical” in flavor from missing coconut.
-
Storage: Keep bars in an airtight container in the fridge for up to 1 week, or freeze for up to 2 months. If frozen, allow to thaw a few minutes before slicing to avoid crumbling.
Why This Recipe Works
-
No-bake simplicity: By using melted nut butter, coconut oil (or butter), and minimal sugar, the bars bind together without heat. The chill does the “setting” — so no preheating, no oven time, and no waiting.
-
Texture contrast: Toasting oats adds depth and avoids a raw-oats taste; the shredded coconut gives a subtle chew or crunch depending on how finely shredded. The melted chocolate on top provides a glossy, luxurious contrast to the rustic oats beneath.
-
Balanced sweetness: With a mix of brown sugar and granulated sugar — plus bittersweet or dark chocolate — the bars are sweet, but not cloying. A pinch of salt (plus optional sea-salt sprinkle) helps highlight the chocolate and peanut-butter notes.
Serving Ideas
-
Snack box staples: These bars travel well — pack three or four for a quick energy snack at work, school, or on hikes.
-
Dessert upgrade: Warm slightly in the microwave (~8–10 seconds) so the chocolate softens, then top with a sprinkle of sea salt or a drizzle of caramel for extra decadence.
-
Ice-cream combo: Use a bar as a “crust” under a scoop of vanilla ice cream for a quick, no-bake ice-cream sandwich (especially good if you use peanut- or almond-butter flavor).
Final Thoughts
This no-bake chocolate oat bar recipe balances convenience and flavor beautifully. With a few staple ingredients you likely already have — oats, nut butter, chocolate — you can whip up a snack or dessert in under 15 minutes (plus chilling). The result is a bar that’s homey and wholesome, but with enough sweetness and richness to satisfy a chocolate craving.
Whether you stick to the base version for simplicity or customize with nuts, dried fruits, or extra chocolate, these bars are versatile. Feel free to treat yourself, gift a batch to a friend — or simply devour them all yourself with a glass of cold milk (or chai!).
