Best Grilled Cheese Sandwich

Few foods revive childhood comfort and grown-up cravings at the same time like a perfectly made grilled cheese sandwich. But while most people treat it as a quick snack, the truth is that a truly great grilled cheese is an art form. The crunch must be audible, the cheese must stretch like molten gold, and the flavor should be unforgettable. This recipe is more than instructions—it’s a small ritual that transforms simple ingredients into the most satisfying bite you’ll have all week.

Today, you’ll learn how to make the best, deeply flavorful, ultra-crispy, buttery grilled cheese sandwich using a few chef-style tricks that elevate it far above the ordinary.

Ingredients

For One Perfect Sandwich

  • 2 slices thick-cut artisan bread (sourdough, brioche, or country white)

  • 1 ½ tbsp salted butter, softened

  • 1 tbsp mayonnaise

  • ½ cup freshly grated cheese blend:

    • ¼ cup sharp cheddar

    • ¼ cup low-moisture mozzarella or Monterey Jack

  • 1 slice provolone (optional but recommended)

  • ½ tsp Dijon mustard

  • 1 small pinch garlic powder

  • 1 small pinch black pepper

Optional add-ins (choose one or more):

  • Thinly sliced tomato, lightly salted

  • Caramelized onions

  • Crispy beef bacon

  • A drizzle of hot honey

  • A sprinkle of dried oregano

Why This Recipe Works

Most grilled cheese sandwiches rely on just cheddar and butter. Good—but not great.
This recipe becomes the best for three reasons:

1. The Mayo-Butter Combo

Butter browns beautifully, giving color and flavor. Mayo spreads smoothly, creating an even crust. Mixed together, they form a golden, crisp shell that tastes like the bread from a gourmet café.

2. Three-Cheese Strategy

Sharp cheddar gives boldness. Mozzarella or Monterey Jack adds stretch. Provolone infuses that classic sandwich-shop richness. Together? A perfect melt.

3. Low and Slow Cooking

Most people burn the bread before the cheese melts. The key is to cook low and slow, allowing the cheese to gently transform into a silky pool inside the sandwich.

How to Make the Best Grilled Cheese Sandwich

Step 1: Prepare the Bread

Spread a thin layer of softened butter on one side of each bread slice.
On top of the butter, add a very thin coat of mayonnaise. This gives the sandwich the caramelized golden crust that restaurants achieve with griddles.

Flip the slices over to the un-buttered side.

Step 2: Build the Flavor Base

Mix your Dijon mustard, a pinch of garlic powder, and a pinch of black pepper.
Spread this lightly on the inside of the bread. It should be a whisper of flavor—just enough to enhance the cheese without overpowering it.

Step 3: Add the Cheese Blend

On one slice of bread, add the grated cheese mixture.
Freshly grated cheese melts far better than packaged shredded cheese, which contains anti-caking agents.

Lay a slice of provolone over the top. Cheese should reach the edges—this creates the famous “cheese crown” that crisps beautifully when it touches the pan.

If you’re adding extras, arrange them between the cheeses so everything binds together.

Step 4: Heat the Pan Slowly

Place a nonstick or cast-iron pan over low heat.
Let it warm gradually for a minute. This is essential—starting hot burns the bread before the cheese melts.

Step 5: Grill the Sandwich

Place the sandwich in the warm pan. Press gently with a spatula.
Cook for 3–4 minutes per side, or until:

  • The bread is deep golden

  • The cheese begins to melt out the sides

  • The kitchen smells like toasted heaven

If the bread browns too quickly, reduce the heat. If the cheese isn’t melting, cover the pan briefly to trap steam.

When both sides are a perfect, even brown, remove the sandwich from the pan and let it rest for one minute. Resting allows the cheese to thicken slightly so it doesn’t gush out when you cut it.

Chef-Style Tips for a Perfect Grilled Cheese

Cut the Sandwich Diagonally

It’s not just about looks—cutting on a diagonal increases surface area, letting you admire the cheese melt and making every bite the perfect ratio of crunch and gooeyness.

Use Thick Bread

Too-thin slices burn fast and don’t hold enough cheese. Thick artisan bread gives the sandwich structure and flavor.

Try the “Cheese Skirt” Trick

During the last 30 seconds of cooking, sprinkle a pinch of cheese directly onto the pan around the sandwich.
When it crisps, press the sandwich edges onto the cheese.
You’ll get a golden, lacy, crunchy cheese halo—absolutely addictive.

Serving Suggestions

This grilled cheese is incredible on its own, but you can elevate the experience:

  • Serve with tomato basil soup

  • Add a side of garlic dill pickles

  • Pair with crispy fries or wedges

  • Sip with cold iced tea or a hot latte

Final Thoughts

A grilled cheese sandwich may seem simple, but when you use the right ingredients and proper technique, it becomes pure comfort-food perfection. The balance of crispy bread, rich butter, stretchy melted cheese, and subtle seasonings transforms a humble sandwich into something unforgettable. This unique recipe gives you the exact steps to make the best grilled cheese sandwich of your life—deeply savory, perfectly crisp, and irresistibly gooey in every bite.

Ginger Water: The Delicious Daily Drink That Burns Waist & Thigh Fat and Relieves Joint Pain

When you think of simple kitchen ingredients that quietly transform your health, ginger easily tops the list. For centuries, people have turned to this fiery root for its ability to soothe inflammation, calm digestion, improve circulation, and melt stubborn fat. But one of the easiest—and tastiest—ways to enjoy ginger’s magic is by turning it into refreshing ginger water, a powerful drink that works throughout the day to detox your system, reduce bloating, shrink the waistline, and ease joint discomfort.

This recipe creates a bright, zesty drink that you can sip warm or chilled, making it perfect year-round. More importantly, it is crafted to support your body naturally: ginger boosts metabolism, lemon enhances detoxification, mint soothes the stomach, and honey adds gentle sweetness along with antibacterial benefits. Let’s dive into this unique ginger water recipe that works beautifully for fat loss, mobility, and overall wellness.

Why Ginger Water Works

Before we get to the recipe, here’s what makes this drink so effective:

🔥 Burns Belly & Thigh Fat

Ginger increases thermogenesis (your body’s fat-burning process), helping the body burn more calories even at rest. It also reduces water retention and bloating—especially important for trimming the waistline.

💧 Improves Digestion & Cleanses the Gut

A warm ginger infusion activates digestive enzymes, easing constipation, gas, and indigestion. A healthy gut leads to reduced belly fat and better nutrient absorption.

🦴 Relieves Joint Pain & Stiffness

The compounds gingerol and shogaol fight inflammation, which is especially helpful for knee pain, arthritis, and post-exercise soreness.

⚡ Boosts Circulation & Energy

Ginger increases blood flow, helping your muscles and joints get the oxygen they need while making you feel more energized.

Unique Ginger Water Fat-Melting Recipe

This recipe makes 1 litre of highly flavorful detox ginger water.

Ingredients

  • 2 tablespoons freshly grated ginger (or thinly sliced)

  • 1 liter water

  • 1 tablespoon fresh lemon juice

  • 1 teaspoon honey (optional, but recommended)

  • A small handful of fresh mint leaves

  • 1 teaspoon apple cider vinegar (optional, for extra fat-burning support)


Instructions

1. Prepare the Ginger

Wash the ginger thoroughly. If the skin is thin, you don’t need to peel it—most nutrients lie just beneath the surface. Grate it for stronger flavor and more active compounds, or slice it thin if you prefer a milder taste.

2. Boil the Water

Pour the liter of water into a pot and bring it to a gentle boil. Once boiling, reduce heat to low.

3. Add Ginger and Simmer

Add the ginger to the pot. Let it simmer on low heat for 10–15 minutes to release its oils and medicinal compounds.

4. Add Lemon and Mint

Turn off the heat and add the lemon juice and mint leaves. Allow the mixture to cool naturally for 5–10 minutes.

5. Strain and Sweeten

Strain the ginger water into a jug. Add honey and apple cider vinegar only once the water is warm—not hot—to protect their nutrients.

6. Chill or Serve Warm

You can drink this water warm in the morning or pour it into a bottle and sip throughout the day. Cold ginger water is especially refreshing in hot weather.

How to Use Ginger Water for Best Results

In the Morning

Drink 1 cup on an empty stomach as soon as you wake up. It boosts metabolism, jump-starts digestion, and eliminates overnight toxins.

Throughout the Day

Sip the remaining ginger water over the next 4–6 hours. This keeps your metabolism active, reduces hunger, and prevents bloating.

Before Exercise

Take a small glass 20 minutes before working out to enhance fat-burning during exercise.

At Night (Optional)

A warm half-cup after dinner helps digestion and keeps inflammation low.

Benefits You’ll Notice Within Days

1. A Smaller, Flatter Waist

Consistent ginger water drinking reduces bloating first—often within 24–48 hours. Then, over time, the thermogenic effect helps melt deep belly fat.

2. Slimmer Thighs & Hips

Ginger’s circulation-boosting power helps the body break down stored fat in stubborn areas like the thighs.

3. Relief from Knee, Hip, & Back Pain

Ginger naturally inhibits inflammatory enzymes, giving you smoother movement and less stiffness.

4. More Energy and Mental Focus

With toxins removed and blood flow improved, you’ll feel lighter, more alert, and less sluggish.

5. Better Digestion and Fewer Cravings

Balanced blood sugar and improved gut health reduce unnecessary snacking.

Tips to Make Your Ginger Water Even More Powerful

  • Add turmeric (½ teaspoon) for stronger anti-inflammatory effects.

  • Add black pepper (just a pinch) to increase absorption of gingerol.

  • Use raw honey for extra antioxidants.

  • Add cucumber slices for an additional slimming and hydrating effect.

  • Drink consistently for at least 7–14 days for visible results.

Final Thoughts

This easy, refreshing ginger water recipe is more than a drink—it’s a gentle daily detox that supports weight loss, cleans your digestive system, relieves joint pain, and boosts overall vitality. Whether you sip it warm or chilled, ginger water is a simple habit that delivers powerful changes.

Delicious Beetroot & Lemon Juice: Cleans Colon Waste & Helps Weight Loss

If you’re looking for a natural, refreshing drink that cleanses the digestive system, improves gut motility, boosts metabolism, and helps shed stubborn weight, this vibrant Beetroot and Lemon Colon Cleanser Juice is the perfect addition to your wellness routine. Beetroot is rich in antioxidants, nitrates, and fiber, while lemon supports detoxification and digestion. Together, they create a powerhouse juice that gently clears colon waste, reduces bloating, and provides clean, lasting energy.

Why This Juice Works

This recipe isn’t just delicious—it’s functional. Here’s why it’s a gut-cleansing and weight-loss ally:

1. Beetroot Flushes Toxins

Beetroot contains betalains and natural electrolytes that support liver detoxification, promote healthy bile flow, and help the colon eliminate old waste.

2. Lemon Activates Digestion

Fresh lemon juice increases stomach acid, improves digestion, and helps break down accumulated fats in the gut.

3. Fiber Supports Healthy Bowel Movements

When blended instead of strained, beets provide natural fiber that pushes old waste out of the colon.

4. Metabolism Boost

The natural nitrates in beetroot improve blood flow and provide clean energy—helping your body burn more calories throughout the day.

Beetroot & Lemon Colon Cleanse Juice — UNIQUE RECIPE

Ingredients

  • 1 large beetroot, peeled and chopped

  • 1 medium carrot (optional but boosts cleansing)

  • 1 small apple (adds natural sweetness)

  • 1–2 tbsp fresh lemon juice

  • 1 tsp ginger, grated

  • 1 cup cold water or coconut water

  • 3–4 mint leaves (optional, for cooling digestion)

  • A pinch of black salt or pink Himalayan salt (optional but improves mineral balance)

Instructions

  1. Prepare the ingredients
    Wash and peel the beetroot. Chop it into small cubes. Do the same with the apple and carrot if using.

  2. Blend until smooth
    Add beetroot, apple, carrot, ginger, mint, and water to a blender. Blend on high until smooth and vibrant.

  3. Strain (Optional)
    If you prefer a smooth juice, strain through a fine sieve or cloth.
    If you want maximum fiber for colon cleansing, do not strain.

  4. Add lemon
    Squeeze fresh lemon juice into the mixture. Stir well.

  5. Serve immediately
    Pour into a glass and enjoy the rich, refreshing flavor. Add ice if desired.

How to Use It for Colon Cleansing & Weight Loss

For best results:

Drink 1 glass in the morning

On an empty stomach for maximum digestive cleansing.

Use 4–5 days per week

Consistent use helps regulate bowel movements and reduce bloating.

Avoid eating immediately after

Wait at least 20–30 minutes to allow digestion and detox to start working.

Benefits You’ll Notice

  • Reduction in bloating

  • Easier, more regular bowel movements

  • Cleaner gut and improved digestion

  • Better skin clarity

  • Fewer cravings due to improved metabolism

  • Natural energy boost

  • Gradual weight loss due to detox + improved digestion

Flavor Notes

This drink is:

  • Refreshing

  • Slightly sweet

  • Earthy from the beetroot

  • Bright and citrusy from lemon

  • Comfortingly warm due to ginger

ptional Enhancements

You can upgrade the recipe based on your goals:

For faster weight loss:

Add ½ teaspoon chia seeds (soak 10 minutes).

For fat burning:

Add ¼ teaspoon cinnamon.

For gut repair:

Replace water with cooled green tea.

For skin glow:

Add a few drops of raw honey.

Oklahoma Nut Candy

Oklahoma has a long tradition of creating simple, rustic sweets that rely on pantry staples, and Oklahoma Nut Candy is one of those beloved heritage recipes. It’s the kind of candy you’ll find at church potlucks, holidays, roadside stands, and family reunions—sweet, nutty, buttery, and so satisfying. This recipe captures everything people love about old-school homemade candy: easy ingredients, quick cooking, and a rich, melt-in-the-mouth texture that feels like a warm hug from Grandma.

Below is an 800-word unique recipe that includes its history, tips, and step-by-step instructions so you can create the perfect Oklahoma Nut Candy right in your kitchen.

Oklahoma Nut Candy – Unique Homemade Recipe

Oklahoma Nut Candy is best described as a cross between fudge, praline, and old-fashioned nut bars. It’s soft yet holds its shape, sweet but beautifully balanced by the deep roasted flavor of toasted nuts. Traditionally, cooks in Oklahoma used whatever nuts were available—pecans being the favorite thanks to the region’s abundant pecan trees. However, walnuts, peanuts, and mixed nuts are just as delicious.

The beauty of this recipe lies in its simplicity. No candy thermometer is required, no complicated methods—just butter, sugar, milk, marshmallows, and a generous handful of nuts. The result is a creamy, rich candy that slices into perfect squares and stores beautifully.

Ingredients

Dry Ingredients

  • 2 cups granulated sugar

  • 1 cup light brown sugar, packed

  • 2 cups chopped pecans (or walnuts, peanuts, or mixed nuts)

  • 2 cups mini marshmallows

  • 1 tsp vanilla extract

  • Pinch of salt

Wet Ingredients

  • 1 cup whole milk

  • ½ cup unsalted butter

Instructions

Step 1: Toast the Nuts for Maximum Flavor

Place chopped nuts in a dry skillet over medium heat. Toast them for 3–4 minutes, stirring constantly until fragrant. This step intensifies the nutty flavor and gives your candy a richer, deeper taste.

Step 2: Prepare the Candy Base

In a large heavy-bottomed saucepan, combine the white sugar, brown sugar, milk, salt, and butter. Stir constantly over medium heat until the butter melts and the sugar dissolves completely. Let the mixture come to a gentle boil.

Step 3: Cook the Mixture

Continue cooking for 5–7 minutes. You want the mixture to reach a soft-ball stage in texture, even without using a thermometer. You’ll know it’s ready when the bubbles look thick and glossy.

Step 4: Add Marshmallows and Vanilla

Remove the pot from heat and immediately stir in the mini marshmallows. They will melt quickly, turning the mixture creamy and smooth. Add the vanilla extract for warmth and aroma.

Step 5: Fold in the Toasted Nuts

Gently fold in the toasted nuts until evenly distributed. The mixture will thicken as the nuts blend into the warm candy base.

Step 6: Pour and Set

Line an 8×8-inch dish with parchment paper. Pour the candy mixture into the pan and spread it evenly using a greased spatula. Let it cool at room temperature for 2–3 hours, or refrigerate for 1 hour if you want faster setting.

Step 7: Slice and Serve

Once fully set, lift the candy out of the pan using the parchment paper. Slice into 1-inch squares and enjoy immediately—or store for later.

Why This Oklahoma Nut Candy Is Special

What sets this recipe apart from traditional fudge or nut bars is its combination of marshmallows and brown sugar. The marshmallows melt into a silky, creamy consistency, while the brown sugar adds a caramel-like depth that regular fudge doesn’t offer. The balance of soft, chewy candy with crunchy toasted nuts creates an irresistible texture. It’s nostalgic, comforting, and incredibly simple to make.

This candy also holds up beautifully during holidays. You can package it in tins, jars, or gift boxes for Christmas, Thanksgiving, or parties. Because it doesn’t melt easily and keeps its shape, it travels well and makes a lovely hostess gift or potluck dessert.

Tips for the Best Results

  • Use quality nuts: Pecans give the most authentic Oklahoma flavor, but walnuts add richness, and peanuts offer a classic Southern flair.

  • Toast the nuts: This one step makes a huge difference in aroma and taste.

  • Don’t overcook: Boiling the mixture for too long can make the candy dry or crumbly. When the bubbles look thick and slow, it’s done.

  • Grease your spatula: Helps spread the candy smoothly into the pan.

  • Add-ins: Try adding shredded coconut, dried cranberries, or a sprinkle of flaky salt on top.

  • Storage: Keep candy in an airtight container for up to 1 week or freeze for up to 3 months.Serving Ideas

  • Serve with tea or coffee as a sweet afternoon bite.

  • Add pieces to a dessert board with chocolates, cookies, and fruits.

  • Chop and sprinkle over ice cream or yogurt for a crunchy topping.

  • Wrap individually in wax paper for lunchbox treats.

Final Thoughts

Oklahoma Nut Candy is a timeless recipe that brings together simple ingredients and heartfelt tradition. Its creamy sweetness and roasted nut crunch make it a standout treat for any occasion—holidays, family gatherings, or just a cozy night at home. With its effortless preparation and unforgettable flavor, this candy deserves a place in everyone’s recipe collection.

18 Powerful Ways to Use Clove Tea to Boost Health and Heal Naturally

Clove tea might seem like a simple, warming drink, but inside each sip lies a powerful natural healer that has been used for centuries in traditional medicine. Made from dried clove buds—the same spice often added to biryani, desserts, and chai—this tea is packed with antioxidants, antibacterial compounds, and soothing oils like eugenol, which is known for its pain-relieving, anti-inflammatory, and digestive benefits. When brewed correctly and used consistently, clove tea can support nearly every part of the body—from the mouth, stomach, and liver to the lungs, skin, and immune system. Below you’ll find a unique clove tea recipe, followed by 18 powerful ways this simple drink can help heal naturally.


Unique Clove Tea Recipe (Healing Blend)

Ingredients

  • 1 cup water

  • 4–5 whole cloves (slightly crushed for more flavor)

  • 1 small cinnamon stick (optional but enhances benefits)

  • ½ tsp grated ginger (optional for stronger healing power)

  • 1 tsp honey or jaggery (optional, added after brewing)

  • A slice of lemon (optional)

Instructions

  1. Bring 1 cup of water to a gentle boil.

  2. Add the cloves, cinnamon, and ginger.

  3. Simmer for 5–7 minutes until the water turns amber.

  4. Turn off heat, cover, and let it steep for 2 minutes.

  5. Strain into a cup.

  6. Add honey or lemon if desired.

How to Use

  • Drink once daily for general health.

  • Drink twice daily for specific health concerns like digestion, cold, or pain.


18 Powerful Ways Clove Tea Boosts Health and Heals Naturally

1. Strengthens the Immune System

Clove tea is rich in antioxidants that help the body fight infections, viruses, and harmful bacteria. Drinking it daily boosts your natural defenses and keeps common illnesses away.

2. Acts as a Natural Pain Reliever

The eugenol in cloves reduces pain instantly—especially headaches, toothaches, and joint pain. A warm cup of clove tea helps relax tense muscles and eases aches.

3. Improves Digestion and Relieves Gas

Clove tea stimulates digestive enzymes, reduces stomach bloating, eliminates gas, and soothes indigestion. Drink after meals for the best effect.

4. Helps Treat Nausea and Vomiting

A few sips of warm clove tea calm the stomach and reduce nausea caused by travel sickness, food reactions, or early pregnancy.

5. Powerful Antibacterial Tea

Clove naturally kills harmful bacteria such as E. coli and Staphylococcus. Drinking clove tea helps cleanse your gut and keeps infections away.

6. Freshens Breath Naturally

Clove tea neutralizes mouth bacteria and removes foul odors. Drinking or gargling with clove tea works better than many mouthwashes.

7. Improves Respiratory Health

Clove tea loosens mucus, clears congestion, and opens airways. It is excellent for:

  • Cough

  • Asthma

  • Bronchitis

  • Sinus infections

8. Reduces Inflammation in the Body

Chronic inflammation causes fatigue, swelling, joint pain, and diseases. Clove tea fights inflammation naturally and reduces soreness.

9. Detoxifies the Liver

Cloves support liver enzymes and help the body remove toxins. Regular use helps lighten the liver’s workload and supports better energy and metabolism.

10. Supports Weight Loss

Clove tea boosts metabolism, reduces cravings, improves digestion, and helps burn fat faster—especially when taken in the morning on an empty stomach.

11. Balances Blood Sugar Levels

Clove improves insulin function, helping stabilize blood glucose. Great for people with diabetes or those trying to avoid sugar spikes.

12. Relieves Toothache and Gum Pain

Gargle warm clove tea to numb gums, reduce swelling, and kill bacteria causing tooth pain or infections.

13. Improves Skin Health

Clove tea removes toxins, fights acne-causing bacteria, and improves blood circulation, giving your skin a natural glow.

14. Reduces Stress and Anxiety

The aroma and compounds in cloves calm the nervous system, reduce stress hormones, and help you relax.

15. Helps Regulate Menstrual Pain

Clove tea eases period cramps, reduces bloating, and balances hormones naturally.

16. Improves Blood Circulation

It boosts overall circulation, helping the body receive more oxygen and nutrients—leading to better energy and clearer thinking.

17. Enhances Sexual Health

Clove is known for boosting libido in both men and women, improving stamina, reducing stress, and supporting reproductive health.

18. Supports Better Sleep

Drinking clove tea before bed helps relax the mind and body, promotes deeper sleep, and reduces nighttime anxiety.


How Much Should You Drink?

  • For general health: 1 cup daily

  • For healing specific problems: 2 cups daily

  • Do not exceed: 2 cups per day


Who Should Avoid Clove Tea

  • Pregnant women (unless approved by a doctor)

  • People with bleeding disorders

  • Those taking anticoagulant medicine

  • Anyone allergic to cloves


Conclusion

Clove tea is a powerful yet simple natural remedy that can transform your health from inside out. Its healing powers—from boosting immunity to improving digestion, reducing pain, and enhancing sleep—make it one of the most valuable teas you can add to your daily routine. With the unique recipe above and these 18 natural benefits, you now have everything you need to use clove tea as a daily wellness boost.

Pick A Nut To Reveal If You’re Lazy Or A Workaholic

Personality quizzes often rely on symbols, visuals, or quick choices to uncover hidden traits. In this fun and insightful guide, you’ll choose one nut — almond, walnut, cashew, pistachio, or peanut — and your selection will “reveal” whether you lean more toward a laid-back lifestyle or a full-speed-ahead work ethic. While this is light-hearted and not scientific, many people find that their preferences surprisingly match their habits. Below is an engaging, story-style personality recipe that mixes psychology, intuition, and a dash of entertainment.

The Personality Test: Choose Your Nut

Imagine five nuts placed on a wooden tray. Each nut represents a different energy, mindset, and rhythm of life. Without overthinking, choose the nut that feels the most appealing to you:

  1. Almond

  2. Walnut

  3. Cashew

  4. Pistachio

  5. Peanut

Hold your choice in mind — now let’s reveal what it says about your work style.

1. Almond – The Efficient Hustler

If you chose almond, you are the kind of person who doesn’t waste time. You are naturally productive, organized, and can easily slip into work mode without needing external pressure. Almond lovers tend to enjoy structure, routine, and a sense of progress. You’re not a workaholic in the unhealthy sense, but you are definitely more hardworking than lazy.

You like to:

  • Plan your day

  • Set goals

  • Stay away from chaos

  • Keep yourself mentally sharp

Your “recipe for success” is a blend of discipline and self-respect. People admire your reliability, and you often finish tasks long before deadlines. Sometimes, though, you need to relax intentionally because your brain rarely takes a break.

Verdict: Productive Worker — not lazy, not extreme, just efficient.

2. Walnut – The Deep-Thinking Workaholic

Choosing a walnut reveals a more intense personality. Walnuts resemble the brain, and walnut-choosers often carry mental depth, ambition, and drive. You pour your energy into projects with a thoroughness that impresses others. You may forget to rest because once your mind latches onto an idea, you go all in.

Walnut people tend to:

  • Overwork without noticing

  • Prefer complex tasks

  • Carry a sense of responsibility everywhere

  • Have difficulty relaxing

You define yourself by your achievements and often push past personal limits. While you are admired for your dedication, burnout can become a real risk if you don’t learn balance.

Verdict: Workaholic — gifted, driven, but needs rest.

3. Cashew – The Peaceful Relaxer

If cashew was your pick, you are someone who values comfort, enjoyment, and mental peace. Nothing motivates you more than good vibes and emotional balance. You don’t like unnecessary stress, preferring to work at your own pace and in environments that feel calm.

Cashew people love:

  • Soft routines

  • Cozy spaces

  • Flexible schedules

  • Harmony over pressure

You’re not lazy — you’re selective. You work best when you feel appreciated; otherwise, you step back. Some people mistake your calmness for lack of ambition, but your quiet consistency gets things done… just not loudly.

Verdict: Relaxed Worker — calm, steady, sometimes slow but reliable.

4. Pistachio – The Creative Sprinter

Picking pistachio reveals a personality full of energy, creativity, and uneven work rhythms. You’re not a workaholic, but you’re not lazy either. Instead, you move in waves: when inspiration hits, you work passionately; when it doesn’t, you rest guilt-free.

Pistachio lovers tend to:

  • Be imaginative

  • Crave variety

  • Dive into new ideas

  • Drop rigid schedules

You are the type who can do 10 hours of work in 3 hours when motivated, then take a long break to recharge. It’s not laziness — it’s inspiration-driven productivity.

Verdict: Creative Burst Worker — dynamic, not consistent, but powerful when active.

5. Peanut – The Laid-Back Dreamer

If you selected peanut, you are someone who appreciates simplicity and doesn’t complicate life. You like slow mornings, relaxed schedules, and doing things when you feel the time is right. You don’t enjoy pressure, competition, or rushing.

Peanut people often:

  • Live in the moment

  • Avoid stressful environments

  • Prefer easygoing routines

  • Enjoy comfort over hustle

Others may call you lazy, but you simply refuse to exhaust yourself for things you don’t care about. When something matters to you, you become surprisingly hardworking — but in general, your spirit leans toward relaxation.

Verdict: Laid-Back — tendency toward laziness unless deeply motivated.

Final Thoughts: What This Nut “Recipe” Really Means

This unique personality recipe blends symbolism and psychology to reveal your natural work rhythm. Whether you’re a workaholic walnut, an efficient almond, a peaceful cashew, a spontaneous pistachio, or a chill peanut, the nut you chose highlights how you approach responsibility, productivity, and life’s pace.

Classic Beef Lasagna

Few dishes feel as warm, nostalgic, and soul-hugging as a classic beef lasagna. Layer after layer of tender pasta, savory meat sauce, creamy ricotta, and bubbling golden cheese creates a symphony of flavors that makes any table feel festive. This unique recipe elevates the traditional lasagna with a deeper, richer sauce and a perfectly balanced cheese blend. It isn’t rushed or overly complicated—just the right combination of slow-simmered comfort and homestyle goodness. Whether you’re feeding family, impressing guests, or preparing a hearty meal for the week, this recipe guarantees thick, satisfying slices that hold together beautifully and taste even better the next day.

 Why This Lasagna Stands Out

This version brings a few thoughtful enhancements that set it apart:

  • A long-simmered beef sauce with crushed tomatoes and aromatic herbs

  • A ricotta filling infused with parsley, garlic, and Parmesan

  • A cheese blend using both mozzarella and provolone for better melt and stretch

  • Parboiled lasagna sheets for perfect texture—never mushy, never dry

  • A balanced ratio of meat, cheese, and pasta for clean-cut slices

What you get is a traditional Italian-style lasagna with depth, warmth, and layers that stay intact instead of collapsing.

 Ingredients

For the Beef Sauce

  • 1 lb (450g) ground beef

  • 1 medium onion, finely chopped

  • 4 cloves garlic, minced

  • 1 tbsp olive oil

  • 1 can (28 oz) crushed tomatoes

  • 3 tbsp tomato paste

  • 1 tsp sugar

  • 1 tsp dried basil

  • 1 tsp dried oregano

  • ½ tsp dried thyme

  • ½ tsp black pepper

  • 1 tsp salt (adjust to taste)

  • ½ cup beef broth or water

  • 1 bay leaf

For the Ricotta Layer

  • 2 cups ricotta cheese

  • 1 large egg

  • ½ cup grated Parmesan

  • 2 tbsp chopped parsley

  • 1 tsp garlic powder

  • ½ tsp salt

For Assembly

  • 12 lasagna sheets (oven-ready or parboiled)

  • 3 cups shredded mozzarella

  • 1 cup shredded provolone

  • Extra Parmesan for topping

Step-by-Step Instructions

1. Make the Rich Beef Sauce

Heat olive oil in a large pot over medium heat. Add the onions and sauté until soft and translucent. Add the garlic and cook until fragrant. Add the ground beef and break it apart as it browns. Cook until no pink remains.

Stir in the tomato paste and let it toast for about one minute—this deepens the flavor. Add crushed tomatoes, beef broth, sugar, herbs, salt, pepper, and the bay leaf. Reduce heat and let the sauce simmer uncovered for 25–30 minutes. The longer it simmers, the richer it becomes. This thick, meaty sauce is the foundation of the lasagna, so don’t rush it. Remove the bay leaf before assembly.

2. Prepare the Creamy Ricotta Mixture

In a medium bowl, mix ricotta, egg, Parmesan, parsley, garlic powder, and salt until smooth. The egg binds the filling, while Parmesan adds salty depth. Keep this mixture chilled until needed.

3. Cook or Prepare the Pasta Sheets

If using oven-ready sheets, proceed directly. If using traditional sheets, parboil them for 4–5 minutes—not fully soft, just bendable. Lay them flat on parchment so they don’t stick. Perfect pasta texture is key to a stable layered lasagna.4. Assemble the Lasagna

Preheat oven to 375°F (190°C).

Use a deep baking dish and begin with a thin layer of meat sauce to prevent sticking.

Layer in this order:

  1. Sauce – thin, even layer

  2. Pasta sheets – side by side

  3. Ricotta mixture – spoon and spread gently

  4. Mozzarella + provolone – a light but even sprinkle

  5. More sauce

Repeat these layers until ingredients are used. Finish with a generous cheese layer on top and a dusting of Parmesan. The provolone adds a slightly sharper melt than mozzarella alone, giving the top a golden, bubbly finish.

5. Bake to Perfection

Cover with foil (non-stick side down) and bake for 30 minutes. Remove foil and continue baking for another 15–20 minutes, or until the top is deeply golden and bubbling.

Let the lasagna rest for 15 minutes before slicing. This is crucial—it allows the layers to settle, firm up, and hold together beautifully.

 Serving Tips

Serve with:

  • Garlic bread or buttered baguette

  • A crisp green salad

  • Roasted vegetables

  • A sprinkle of fresh basil or parsley on top

This lasagna is filling and comforting enough to be the centerpiece of any meal.

Storage & Make-Ahead Instructions

  • Refrigerate: Up to 4 days

  • Freeze (unbaked or baked): Up to 3 months

  • Reheat: Cover and warm in a 325°F oven for 20–25 minutes

It reheats exceptionally well, making it ideal for meal prep or gatherings.

Final Thoughts

This classic beef lasagna is everything you want in a timeless comfort dish—rich sauce, creamy cheese, perfectly layered pasta, and flavors that bloom with every bite. It’s the kind of recipe that brings people together, fills the house with aroma, and tastes like home. Once you make it, it might become your go-to lasagna for years to come.

Creamy Cucumber Tomato Salad

Sometimes the best dishes are the ones that take you back to simpler moments—warm days, cool breezes, and a bowl of something crisp, creamy, and refreshing. This Creamy Cucumber Tomato Salad does exactly that. It’s a dish that transforms just a handful of everyday ingredients into something incredibly satisfying. Instead of the usual heavy dressings or basic vinegar versions, this recipe uses a silky, tangy, herb-kissed cream base that clings to every bite of crunchy cucumber and juicy tomato.

Perfect for hot afternoons, potlucks, BBQs, or as a quick five-minute side dish, this salad stands out because of one secret: a velvety garlic-herb cream dressing that tastes like it came from a countryside kitchen where everything is made fresh.

Unique Creamy Cucumber Tomato Salad Recipe

🕒 Prep Time: 10 minutes

🍽 Servings: 4

 Ingredients

For the Salad

  • 2 large cucumbers, peeled or unpeeled, sliced into thin rounds

  • 3 large ripe tomatoes, chopped into wedges or bite-sized cubes

  • ½ small red onion, thinly sliced

  • 2 tbsp fresh dill, chopped

  • 1 tbsp fresh parsley, chopped

For the Creamy Dressing

  • ½ cup thick yogurt (Greek-style or strained)

  • ¼ cup mayonnaise

  • 2 tbsp heavy cream or milk

  • 1 ½ tsp sugar (balances the acidity—don’t skip!)

  • 1 garlic clove, grated into a paste

  • 1 tbsp lemon juice

  • 1 tsp apple cider vinegar

  • ½ tsp black pepper

  • ¾ tsp salt (plus more to taste)

  • ¼ tsp white pepper (optional but delicious)

How to Make It (Step-by-Step) Salt the Cucumbers (The Secret Step)

Place the cucumber slices in a bowl and sprinkle lightly with salt.
Let them sit for 6–7 minutes to release excess water.
This keeps your salad ultra-creamy instead of watery.

Drain the liquid and pat cucumbers dry.

 Mix the Creamy Garlic-Herb Dressing

In a medium bowl, whisk together:

  • yogurt

  • mayo

  • cream/milk

  • lemon juice

  • apple cider vinegar

  • garlic paste

  • sugar

  • black + white pepper

Mix until smooth and silky. Taste and adjust salt.

The consistency should be pourable but thick enough to coat vegetables—like ranch dressing with a slightly tangier edge.

 Combine the Vegetables

In a large salad bowl, add:

  • drained cucumbers

  • chopped tomatoes

  • thin red onion slices

  • dill + parsley

Toss lightly with a spoon.

 Add the Dressing

Pour the creamy dressing over the vegetables and toss until everything is beautifully coated.

For best flavor, chill for 10–15 minutes before serving.

Why This Recipe Is Unique

✔ Uses yogurt + mayo, creating a lighter yet rich dressing
✔ The balance of garlic, lemon, sugar, and vinegar makes the flavors pop
✔ Fresh dill gives a refreshing garden aroma
✔ Cucumbers are salted first for the perfect crisp texture
✔ Dressing clings to vegetables, never watery or runny

Serving Suggestions

This salad pairs wonderfully with:

  • Grilled chicken or kebabs

  • BBQ beef

  • Rice dishes

  • Fish and shrimp meals

  • Sandwiches or burgers

Also amazing eaten straight from the fridge as a cooling snack!

Storage Tips

  • Keep chilled in an airtight container.

  • Best eaten within 24 hours.

  • If storing longer, keep dressing and vegetables separate.

Foil-Wrapped Crock Pot Potatoes

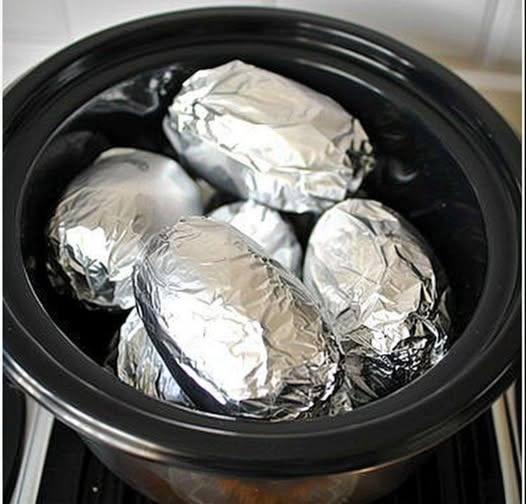
Sometimes the best kitchen magic happens with the simplest ingredients—and today’s recipe proves exactly that. Wrapping potatoes in foil and cooking them low and slow in a crock pot may sound too easy to be special, but the result is pure comfort: soft, fluffy potatoes with a rich, earthy flavor that tastes like they spent hours in a traditional oven. Whether you’re preparing a stress-free dinner, meal-prepping for the week, or feeding a crowd without turning on the oven, this recipe is your secret weapon.

The foil creates its own tiny oven around each potato, sealing in moisture and allowing the potato to steam from the inside out. That means soft centers, creamy texture, and skins that stay intact without drying out. Because crock pots cook gently and evenly, every potato comes out perfect—no hard spots, no guesswork. These foil-wrapped potatoes also stay warm beautifully inside the slow cooker, making them great for gatherings, potlucks, or build-your-own-baked-potato dinners.

Ingredients

  • 6 medium russet potatoes (or as many as will fit in your crock pot)

  • 2 tablespoons olive oil or melted butter

  • Salt, to taste

  • Freshly ground black pepper

  • Optional seasonings: garlic powder, paprika, onion powder, or Italian seasoning

  • Optional toppings: butter, sour cream, shredded cheese, green onions, bacon bits, chili, salsa, ranch, or anything you love

Why Russet Potatoes Work Best

Russets have that classic starchy interior that turns wonderfully fluffy when cooked slowly. Their thick skins also hold up well wrapped in foil, preventing them from bursting or becoming mushy. However, you can absolutely use Yukon Golds or sweet potatoes—the method stays the same, though cooking times may vary slightly.

Step-by-Step Instructions

1. Wash and Dry the Potatoes

Scrub each potato thoroughly under running water to remove dirt. Pat them completely dry—moisture can steam too aggressively in the foil.

2. Pierce the Skins

Using a fork, poke 5–6 holes into each potato. This allows steam to escape gently and prevents splitting.

3. Season the Potatoes

Rub each potato with olive oil or melted butter. This step enhances flavor and helps the seasonings stick.
Sprinkle generously with salt and pepper. If you’re feeling adventurous, dust them with garlic powder, smoked paprika, or your favorite spice mix—this builds flavor under the foil.

4. Wrap Each Potato in Foil

Tear off pieces of aluminum foil large enough to wrap each potato completely.
Place the potato in the center, wrap tightly, and seal all edges. Make sure the foil is secure so the steam stays inside.

5. Load the Crock Pot

Place the foil-wrapped potatoes directly into the slow cooker. You can stack them if needed, but try to arrange them evenly for the most consistent cooking.

6. Cook Low and Slow

  • On LOW: 7–8 hours (best texture!)

  • On HIGH: 4–5 hours

Low is ideal because the potatoes cook gently and evenly, developing a fluffy interior.

7. Check for Doneness

Insert a fork through the foil into the potato. If it slides in effortlessly, they’re ready. If not, continue cooking for an additional 30–60 minutes.

8. Keep Warm

Once done, switch your slow cooker to Warm mode. The foil keeps the potatoes moist and warm for hours—perfect for gatherings, game nights, or busy dinners.Serving Ideas

Classic Baked Potato Bar

Set up bowls of:

  • Butter

  • Sour cream

  • Cheddar cheese

  • Chives or green onions

  • Bacon bits

  • Black pepper

Everyone builds their perfect potato!

Loaded Dinner Potatoes

Top cooked potatoes with:

  • Chili and shredded cheese

  • Butter, garlic, and parmesan

  • Taco-seasoned ground beef and salsa

  • Creamed spinach

  • BBQ pulled chicken or pulled pork

Healthy Options

  • Greek yogurt instead of sour cream

  • Steamed broccoli and a sprinkle of cheese

  • Cottage cheese and chives

  • Salsa and avocado slices

Breakfast Potatoes

Slice open a potato and top with:

  • Scrambled eggs

  • Crumbled sausage or bacon

  • Melted cheese

  • Hot sauce

It becomes the fluffiest breakfast bowl ever.

Make-Ahead and Storage Tips

  • Refrigerate: Keep cooked potatoes (still in foil or unwrapped) in an airtight container for up to 4 days.

  • Reheat:

    • Microwave 2–3 minutes

    • Oven at 375°F for 15–20 minutes

    • Air fryer at 350°F for 10 minutes (crisps the skin beautifully!)

  • Freezer-Friendly: You can freeze them! Just cool the potatoes completely, remove foil, wrap in plastic wrap, and freeze for up to 3 months. Reheat in the oven for best texture.

Why This Recipe Works So Well

This method is nearly foolproof because slow cookers maintain consistent temperatures without sudden spikes. The foil acts like a pressure-controlled environment, ensuring the potato cooks evenly. You get the tenderness of oven-baked potatoes without heating the kitchen or watching a timer. It’s simplicity with surprisingly gourmet results.

Even better, this method frees up your oven for other dishes—roasts, casseroles, pies—or gives you a no-fuss way to prep a side dish while you’re at work or sleeping. It’s the ultimate “set it and forget it” recipe.

Final Thoughts

Foil-wrapped crock pot potatoes may be one of the easiest recipes you’ll ever make, yet the payoff is huge. They’re soft, fluffy, customizable, and endlessly versatile. Pair them with any protein, serve them at parties, or enjoy them with nothing more than butter and a sprinkle of salt. With just a few pantry ingredients and a little time, your slow cooker turns humble potatoes into the perfect comfort food—every single time.

Soak Your Feet in Vinegar Once a Week and Watch These 9 Health Problems Disappear

In many cultures, the simplest home remedies are the ones people swear by the most. One of those timeless secrets is the humble vinegar foot soak — an old remedy enjoying a major comeback. Whether it’s apple cider vinegar or plain white vinegar, this acidic, antimicrobial liquid has surprising benefits that go far beyond softening your heels. When used once a week, it becomes a powerful detoxifying ritual that can help restore comfort, confidence, and health from the ground up.

Below is a unique, in-depth guide exploring how a weekly vinegar soak may help ease nine common foot and body-related problems — and how to make the perfect foot soak at home.

Why Vinegar Works

Vinegar is naturally antifungal, antibacterial, anti-inflammatory, and acidic, helping balance the skin’s pH. When feet soak in diluted vinegar, it helps break down buildup, loosen dead skin, fight microbes, and refresh the skin barrier. The result? Healthier, cleaner, smoother feet — and sometimes improvements that travel up the body.

The 9 Health Problems a Weekly Vinegar Foot Soak May Help Improve

1. Chronic Foot Odor

Foot odor often comes from bacteria trapped in shoes, socks, and skin creases. Vinegar lowers the pH of your feet, making it hard for odor-causing microbes to survive.
After a few weekly sessions, you’ll notice that stubborn stink disappears — even after long workdays or sweaty workouts.

2. Cracked Heels and Dry Skin

Vinegar’s gentle exfoliating acids help soften dry, flaky skin and promote new cell turnover. With consistent use, even deep heel cracks may begin to smooth out.
Add a tablespoon of olive or coconut oil to your soak for extra moisture and silky softness.

3. Fungal Infections (Including Athlete’s Foot)

Fungi love warm, moist environments, especially between the toes. Vinegar’s antifungal power creates conditions where fungus struggles to grow or spread.
A weekly foot soak can help calm itching, reduce scaling, and minimize flare-ups.

4. Nail Discoloration & Thick Toenails

If your toenails have turned yellowish or rough, vinegar helps by softening keratin buildup and reducing fungal presence.
While it’s not a fast fix, many people notice their nails growing in clearer and smoother when using regular vinegar soaks.

5. Swollen, Tired, or Achy Feet

Standing all day? Walking long distances? Wearing tight shoes?
Vinegar helps by stimulating circulation and calming inflammation. The warm water relaxes muscles while the vinegar gently reduces puffiness.
It’s like a mini spa session that melts fatigue away.

6. Calluses and Rough Patches

Calluses form from friction and pressure. Vinegar softens these hard areas, making them easier to gently exfoliate with a pumice stone.
Over time, feet look and feel noticeably smoother.

7. Mild Foot Infections & Skin Irritations

Because vinegar contains acetic acid, it can help inhibit harmful bacteria on the skin.
A weekly soak may help reduce minor irritations, redness, and itchiness — especially for people who spend time in sweaty shoes or humid environments.

8. unpleasant Foot Swelling from Long Standing

Whether caused by heat, long work shifts, or circulation issues, swollen feet look and feel uncomfortable.
A vinegar soak encourages fluid movement, helping your feet feel lighter and more energized afterward.

9. Stress, Restlessness, and Poor Sleep

Your feet contain hundreds of nerve endings. When they relax, your whole body relaxes.
A warm vinegar soak once a week becomes a grounding routine that lowers tension, soothes the nervous system, and prepares your mind for deeper sleep — especially when done before bedtime.

How to Make the Perfect Vinegar Foot Soak (Simple Recipe)

Ingredients

  • 1 cup apple cider vinegar or white vinegar

  • 2–3 liters warm water

  • Optional boosters:

    • 1 tablespoon salt (Epsom or Himalayan)

    • 3–5 drops lavender or tea tree essential oil

    • 1 tablespoon olive or coconut oil for extra softness

Instructions

  1. Prepare the soak:
    Fill a basin with warm water and add your vinegar.

  2. Mix well:
    Ensure the vinegar is evenly distributed.

  3. Add optional ingredients:
    Salt enhances detoxification, tea tree oil boosts antimicrobial effects, and lavender promotes relaxation.

  4. Soak your feet for 15–20 minutes:
    Sit comfortably and allow your feet to fully relax.

  5. Rinse gently:
    Use lukewarm water to rinse off any residue.

  6. Dry your feet well:
    Especially between toes — moisture encourages fungus.

  7. Moisturize:
    Apply a nourishing foot cream or simple coconut oil for long-lasting softness.

How Often Should You Do It?

Once a week is enough to see meaningful improvements.
If you have severe odor, calluses, or fungal issues, you can start with 2–3 times a week for the first two weeks, then reduce to weekly maintenance.

Tips for Best Results

  • Use apple cider vinegar with “the mother” for maximum benefits.

  • Avoid soaking if you have open wounds, severe eczema, or diabetes-related foot conditions without medical advice.

  • Always dilute vinegar — never soak in pure vinegar.

  • Replace old socks and disinfect shoes to maintain results.

The Bottom Line

This simple weekly ritual can transform the way your feet look and feel. From reducing odor and softening rough skin to easing swelling and improving sleep, a vinegar foot soak offers a surprising range of benefits for minimal cost and effort. It’s a soothing self-care habit that refreshes your feet and resets your whole body.