CROCKPOT HOLIDAY DELIGHT

When the holiday season arrives, kitchens everywhere come alive with the aroma of warm spices, slow-cooked meats, sweet fruits, and nostalgic ingredients that instantly feel like home. But not everyone has the time to hover over the stove for hours, stirring, simmering, and worrying. That’s where the Crockpot Holiday Delight steps in—a comforting, festive, hands-off recipe that feels like it came straight from your grandmother’s table, yet fits perfectly into a modern, busy lifestyle. This dish is a blend of tender chicken, dried fruits, cinnamon, herbs, butter, and a luscious holiday glaze that cooks itself while you enjoy the season. Whether you’re hosting a big dinner or preparing something special for a quiet night in, this recipe is your effortless celebration in a bowl.

 CROCKPOT HOLIDAY DELIGHT – THE RECIPE

Ingredients

  • 4 boneless, skinless chicken breasts (or thighs for richer flavor)

  • 1 cup baby carrots

  • 1 cup cubed sweet potatoes

  • 1 medium onion, sliced

  • ½ cup dried cranberries

  • ½ cup dried apricots, chopped

  • 2 tbsp butter

  • 1 tbsp olive oil

  • 1 tsp ground cinnamon

  • 1 tsp smoked paprika

  • ½ tsp garlic powder

  • ½ tsp onion powder

  • ½ tsp dried rosemary

  • ½ tsp dried thyme

  • 1 tsp salt

  • ½ tsp black pepper

Holiday Glaze

  • 1 cup apple cider (or apple juice)

  • ¼ cup honey or maple syrup

  • 2 tbsp brown sugar

  • 1 tbsp Dijon mustard

  • 1 tbsp balsamic vinegar

  • Zest of 1 orange

  • 1 tsp cornstarch mixed with 1 tbsp water (optional, for thickening)

 Instructions

1. Prep Your Crockpot Base

Layer the sliced onions at the bottom of your slow cooker. This creates a natural barrier and ensures your chicken cooks evenly without drying out. Add the carrots and sweet potatoes next—these hearty vegetables soften beautifully during long cooking.

2. Season the Chicken Generously

Rub the chicken with olive oil and sprinkle all the dry seasonings on both sides: cinnamon, smoked paprika, rosemary, thyme, garlic powder, onion powder, salt, and pepper. The cinnamon might seem surprising in a savory dish, but it gives this recipe its true holiday magic by pairing beautifully with the dried fruit and sweet glaze.

Place the seasoned chicken on top of the veggies.

3. Add the Holiday Fruits

Scatter the dried cranberries and chopped dried apricots over the chicken. As they cook, they plump up and release sweet juices that melt into the glaze, giving the entire dish a warm, festive richness.

4. Mix the Holiday Glaze

In a bowl, whisk together apple cider, honey, brown sugar, Dijon mustard, balsamic vinegar, and orange zest. Pour this mixture evenly over everything in the crockpot. Dot the surface with butter to help create an ultra-silky finish.

5. Slow Cook to Perfection

Cook on LOW for 5–6 hours or HIGH for 2½–3 hours. Once done, the chicken should be fork-tender and the fruits beautifully softened. If you prefer a thicker sauce, stir in the cornstarch slurry during the last 15 minutes.

6. Serve Warm and Festive

Carefully spoon the chicken and vegetables onto plates or into shallow bowls. Drizzle generously with the warm holiday glaze. Finish with a few extra cranberries, fresh herbs, or a sprinkle of orange zest for garnish if desired.

 Serving Suggestions

This dish pairs perfectly with:

  • Creamy mashed potatoes

  • Buttered egg noodles

  • Herbed rice pilaf

  • Warm dinner rolls

  • Roasted green beans or Brussels sprouts

If you want a full holiday plate without the stress, simply serve this Crockpot Holiday Delight next to a simple salad and some crusty bread. It’s comforting, light, sweet, savory, and festive all at once.

Why This Dish Is a Holiday Must-Make

What sets this recipe apart is how effortlessly it blends elegance with simplicity. The slow cooker does all the work while you focus on decorating, greeting guests, or enjoying a peaceful evening. The combination of sweet and savory—chicken, fruit, warm spices, apple cider glaze—creates a cozy flavor profile that feels like memories wrapped in a bowl.

The ingredients are inexpensive, accessible, and pantry-friendly. Yet the final dish tastes like something that took hours of gourmet preparation. The aroma that fills your home while it cooks makes it worth making even before you taste it!

Final Thoughts

Crockpot Holiday Delight is more than just a meal—it’s the feeling of togetherness, warmth, and celebration brought to life with minimal effort. Let it simmer while you savor the season. This recipe is perfect for family dinners, potlucks, or simply spoiling yourself with a comforting, festive meal during the holidays.


Amish Onion Fritters

There’s something undeniably heartwarming about Amish-style cooking—simple ingredients, slow traditions, and flavors that feel like a hug from the kitchen. Among the many treasured dishes tucked away in Amish recipe boxes, Amish Onion Fritters stand out as a true comfort classic. Crispy on the outside, tender on the inside, and bursting with sweet onion flavor, these fritters have become a beloved side dish across generations. What makes them special is how they transform humble pantry staples into a golden, irresistible treat. This unique recipe will guide you through the process step by step while capturing the cozy spirit of old-fashioned farmhouse cooking.

The Magic Behind Amish Onion Fritters

Amish onion fritters are more than just snacks—they’re a clever way of turning inexpensive ingredients into something unforgettable. The Amish cooking philosophy embraces minimal waste, meaning every ingredient has purpose. In this recipe, sweet onions shine through a fluffy, well-seasoned batter. When fried, the fritters puff up beautifully, giving you a crisp shell with soft, savory goodness inside.

Unlike onion rings, these fritters don’t require individual coating. Instead, chopped onions are folded into a thick but smooth batter, then dropped by spoonfuls into hot oil. This gives each fritter a rustic, uneven shape—perfect for holding dips or soaking up gravy. They’re amazing as a side dish for BBQ, fried chicken, pot roast, or even a simple soup-and-bread dinner.

Ingredients You Will Need

For the Fritters:

  • 2 large sweet onions, finely diced

  • 1 cup all-purpose flour

  • 1 teaspoon baking powder

  • 1 teaspoon salt

  • ½ teaspoon black pepper

  • ½ teaspoon garlic powder

  • ½ teaspoon paprika

  • 1 tablespoon sugar

  • 1 cup whole milk (or buttermilk for extra fluffiness)

  • 1 large egg

  • Oil for frying (vegetable or canola)

Optional Dipping Sauce:

  • ½ cup mayonnaise

  • 1 tablespoon ketchup

  • ½ teaspoon smoked paprika

  • ¼ teaspoon black pepper

  • ½ teaspoon garlic powder

  • ½ teaspoon lemon juice or apple cider vinegar

Step-By-Step Amish Fritter Method

1. Prepare the Onions

Start by finely dicing your onions. Amish fritters taste best when the onion pieces are small enough to blend into the batter but large enough to give texture. Sweet onions like Vidalia, Walla Walla, or even common yellow onions work beautifully.

To reduce sharpness, you can sprinkle a pinch of salt over the onions and let them sit for 10 minutes—this draws out excess moisture and softens their flavor.

2. Make the Batter

In a large mixing bowl, whisk together the flour, baking powder, salt, pepper, garlic powder, paprika, and sugar. The sugar is a secret Amish trick—it enhances the natural sweetness of the onions and helps the fritters brown evenly.

In a separate bowl, whisk the milk and egg together until smooth. Pour this mixture into the dry ingredients and whisk until a thick, lump-free batter forms. It should resemble thick pancake batter—dense enough to hold the onions but soft enough to drop from a spoon.

Fold in the diced onions until fully combined.

3. Heat the Oil

In a deep skillet or heavy-bottomed pot, heat about 1 inch of oil over medium heat. You’ll know the oil is ready when a small drop of batter sizzles immediately but doesn’t burn. Aim for about 350°F (175°C) for best results.

4. Fry the Fritters

Scoop heaping tablespoons of batter and gently drop them into the hot oil. Don’t overcrowd the pan—give each fritter space to crisp.

Fry for 2–3 minutes per side, or until both sides are golden brown. Use a slotted spoon to transfer the fritters onto a paper towel–lined plate to drain extra oil.

The fritters should feel light, crisp, and slightly puffed when done.

Serving Suggestions

These fritters taste incredible on their own, but dipping sauces take them to another level. Try them with:

  • Smoky paprika mayo (recipe above)

  • Ranch dressing

  • Sweet chili sauce

  • Homemade honey mustard

For a true Amish-style meal, serve them alongside:

  • Roast chicken

  • Mashed potatoes

  • Beef stew

  • Fresh garden salad

They’re also perfect for potlucks, parties, and family gatherings—easy to prepare in large batches and surprisingly addictive.

Tips for Perfect Amish Onion Fritters

  • Use buttermilk if you want extra tender, fluffy fritters.

  • Don’t overmix the batter or it will become dense.

  • Fry in small batches to maintain the oil temperature.

  • If the fritters get too dark, lower the heat slightly.

  • Want spice? Add ½ teaspoon of crushed red pepper flakes.

Final Thoughts

Amish Onion Fritters are a testament to the beauty of simple cooking. With basic ingredients and a timeless method, you can create a dish that tastes like it came straight from a warm and welcoming country kitchen. Crispy, golden, savory, and slightly sweet, these fritters prove that great food doesn’t need to be complicated—just made with care. Enjoy every crunchy, tender bite!

Cabbage Is More Appetizing Than Meat

Cabbage is often underestimated—thought of as a humble, inexpensive vegetable meant only for soups, stews, or slaws. But when treated with care, seasoned boldly, and cooked to the perfect texture, cabbage can rival even the most tempting meat dishes. This recipe transforms a simple head of cabbage into an irresistible, mouthwatering entrée so full of depth, richness, and aroma that even devoted meat-lovers will come back for seconds. The key lies in caramelization, spice layering, and creating a dish that hits every note—crispy, tender, savory, smoky, and slightly sweet. Once you taste this, you’ll understand why many call it “better than meat.”

Caramelized Spiced Cabbage Steaks With Creamy Garlic Herb Drizzle

Ingredients

  • 1 large head green cabbage

  • 4 tbsp olive oil (or melted butter for extra flavor)

  • 1 tbsp soy sauce

  • 1 tsp smoked paprika

  • 1 tsp cumin

  • ½ tsp turmeric

  • 1 tsp black pepper

  • 1 tsp crushed red pepper (optional for heat)

  • 1 ½ tsp salt

  • 1 tbsp honey or maple syrup

  • 5 cloves garlic, minced

  • 1 tbsp lemon juice

  • 2 tbsp chopped fresh parsley

For the Garlic Herb Drizzle:

  • ½ cup Greek yogurt or sour cream

  • 1 tbsp lemon juice

  • 1 clove garlic, grated

  • 1 tbsp dill or parsley, finely chopped

  • Pinch of salt and pepper

Why This Cabbage Outshines Meat

This recipe is built on flavor engineering. First, cabbage naturally contains sugars that, when roasted at high heat, caramelize beautifully—creating crisp golden edges and a tender, almost meaty interior. Unlike many vegetable dishes, this one develops layers of complexity through smoky paprika, earthy cumin, and umami-rich soy sauce. The drizzle adds a cooling, tangy finish that balances the deep roasted spices. The result is a dish with the chew, satisfaction, and richness you might expect from a meat entrée—but with more freshness and far fewer calories.

Step-by-Step Instructions

1. Prepare the Cabbage

Remove any tough outer leaves from the cabbage, then slice it into thick steaks—about 1½ inches each. Thicker slices help keep the cabbage tender in the center while allowing the edges to crisp beautifully. Place the steaks on a parchment-lined baking sheet.

2. Create the Flavor Paste

In a small bowl, mix olive oil, soy sauce, smoked paprika, cumin, turmeric, black pepper, crushed red pepper, honey, lemon juice, and minced garlic. This mixture should resemble a glossy, fragrant paste—both spicy and slightly sweet.

3. Season Generously

Brush the paste over each cabbage steak, covering both sides thoroughly. Don’t be shy—cabbage absorbs flavor wonderfully, and a generous coating will help it roast into a deeply savory dish.

4. Roast to Perfection

Bake at 425°F (220°C) for 25–30 minutes, flipping halfway through. You want the edges deeply browned, even a little charred—that’s where the flavor really develops. The centers should be soft enough to cut with a fork.

5. Prepare the Drizzle

While the cabbage roasts, whisk together the yogurt (or sour cream), garlic, lemon juice, herbs, salt, and pepper. Keep chilled until serving. This sauce adds brightness and creaminess to elevate the cabbage even further.

6. Serve Beautifully

Place the roasted cabbage steaks on a platter, spoon the garlic herb drizzle over the top, and finish with fresh parsley. For added richness, you can also sprinkle toasted breadcrumbs or grated Parmesan.

Why This Dish Works

1. Deep Umami Without Meat

The soy sauce and caramelized garlic provide savory depth usually found only in meat dishes. Cabbage becomes a sponge for these flavors, absorbing them into every layer.

2. A Perfect Contrast of Textures

The crispy outer leaves offer crunch, while the center stays buttery soft—mimicking the satisfying chew of slow-roasted meat.

3. Balanced, Vibrant Seasoning

The spice blend gives the cabbage complexity, warmth, and a smoky aroma. The drizzle cools and complements the spices, creating a harmonious bite every time.

4. Surprisingly Filling

Roasted cabbage has a density and heartiness that makes it incredibly satisfying—even as a main course. Paired with rice, mashed potatoes, or flatbread, it becomes a full meal.

Serving Ideas

  • Serve with warm garlic naan or toasted sourdough.

  • Pair with mashed potatoes or herb-butter rice.

  • Add roasted chickpeas or beans for extra protein.

  • Top with avocado slices and chili flakes for a modern twist.

Final Thoughts

This recipe celebrates cabbage in its most irresistible form—bold, smoky, caramelized, and deeply satisfying. It proves that vegetables, when seasoned and cooked with creativity, can be every bit as exciting as meat. Whether you’re trying to eat lighter, explore new flavors, or simply enjoy a delicious meal, these Caramelized Spiced Cabbage Steaks are a revelation. One bite, and you’ll understand why many say cabbage has never tasted this good—and why, in this recipe, it truly is more appetizing than meat.

loaded cheesy pocket tacos

If there’s one recipe that brings pure joy to any table—whether for weeknight dinners, family gatherings, or game-day snacking—it’s Loaded Cheesy Pocket Tacos. These portable, crispy, cheese-packed pockets are everything you love about tacos but wrapped inside a golden, buttery shell that locks in every juicy, savory, melty bite. Unlike traditional tacos that sometimes fall apart or lose fillings, these pocket tacos stay compact, crispy, and utterly irresistible.

This recipe is designed to be easy, customizable, and unapologetically indulgent, with layers of seasoned beef, melted cheeses, crunchy veggies, and a creamy, zesty sauce. Each pocket has a satisfying crunch on the outside and a molten, flavor-dense filling on the inside—like the perfect marriage between a taco, a quesadilla, and a grilled cheese.

Ingredients

For the Beef Filling

  • 1 lb (450 g) ground beef

  • 1 tbsp olive oil

  • 1 small onion, finely diced

  • 3 cloves garlic, minced

  • 1 packet taco seasoning (or homemade)

  • ½ tsp smoked paprika

  • ½ tsp chili flakes (optional for heat)

  • Salt & pepper to taste

  • ½ cup water

  • ½ cup salsa (any spice level)

For the Cheesy Pocket Mix

  • 1 cup shredded cheddar

  • 1 cup shredded mozzarella

  • ½ cup Monterey Jack (optional but adds amazing meltiness)

  • ½ cup sour cream

  • ¼ cup cream cheese, softened

  • ½ cup chopped green onions

  • ½ cup diced tomatoes (seeds removed)

  • ½ cup canned corn (drained)

  • ½ cup black beans (optional)

  • 1 jalapeño, finely chopped (optional)

For Assembling

  • 10 small flour tortillas

  • 2 tbsp melted butter or oil (for brushing)

  • Additional cheese for sealing the pockets

  • Taco sauce or hot sauce for serving

Instructions

1. Prepare the Flavorful Beef Base

Start by heating olive oil in a skillet over medium heat. Add the diced onion and sauté until it becomes soft and lightly golden. Stir in the minced garlic and cook another 30 seconds until fragrant.

Add the ground beef and let it brown completely, breaking it apart with a wooden spoon. Sprinkle in taco seasoning, smoked paprika, chili flakes, salt, and pepper. Pour in the water and salsa, allowing the mixture to simmer for 5–7 minutes. The goal is a thick, flavorful, saucy beef that clings to the tortillas rather than dripping. Once reduced, remove from heat and cool slightly.

2. Make the Cheesy Filling Mix

In a large bowl, combine shredded cheddar, mozzarella, and Monterey Jack. Stir in the sour cream and cream cheese until creamy and smooth. Add the green onions, tomatoes, corn, black beans (if using), and jalapeño. Mix well.

You want a thick, scoopable mixture that sticks together—this helps prevent leaking when the pockets cook.

3. Assemble the Tacos Into “Pockets”

Lay a tortilla flat on a board and add:

  • 2 tablespoons of the cheesy mix

  • 2 tablespoons of the beef filling

  • A sprinkle of extra cheese on top

Fold the tortilla in half, and then fold the sides inward to form a secure rectangle or “pocket.” Press gently to seal.

To ensure they stay closed, lightly brush the edges with melted cheese—when heated, it acts like delicious glue.

4. Crisp to Golden Perfection

Heat a skillet over medium heat and brush it with butter or oil. Place the pockets seam-side down and cook for 2–3 minutes per side, pressing occasionally with a spatula. They should become crisp, golden, and slightly blistered.

For an even crispier shell, you can place them in an air fryer at 375°F (190°C) for 5–7 minutes.

Why These Loaded Cheesy Pocket Tacos Are Special

These aren’t just tacos—they’re flavor bombs wrapped in crispy golden goodness. The combination of seasoned beef, melty cheese blend, and fresh veggies creates a filling that’s hearty yet bright. The creamy additions make every bite luscious, while the tortilla pocket ensures zero mess and maximum crunch.

The triple-cheese blend ensures a perfect stretchy pull every time you bite in, while the cream cheese adds unbeatable smoothness that elevates these pockets way past regular tacos or quesadillas.

Because the filling is fully cooked and stabilized, these pockets are also fantastic for meal prep, freezing, or reheating. They don’t fall apart and retain their crisp texture beautifully.

Serving Suggestions

Serve your Loaded Cheesy Pocket Tacos with:

  • Guacamole or avocado crema

  • Pico de gallo

  • Chipotle mayo

  • Sour cream

  • Nacho cheese dip

  • A squeeze of fresh lime

For a feast, pair them with rice bowls, a fresh corn salad, or crunchy tortilla chips.

Tips & Variations

  • Swap beef for chicken, turkey, chorizo, or pulled beef.

  • Add veggies like bell peppers, cilantro, or shredded lettuce (after cooking).

  • Spice it up with hot sauce, cayenne, or chipotle peppers in adobo.

  • Make it creamy by adding queso or a drizzle of jalapeño ranch.

  • Turn them into sliders by using mini tortillas and serving as party snacks.

French Toast Bites: A Sweet, Bite-Sized Twist on a Classic Breakfast Favorite

There are few breakfast dishes as universally loved as French toast. Warm, buttery, cinnamon-kissed slices of bread soaked in a silky custard and pan-fried to golden perfection—this breakfast classic holds generations of memories. But what if you could take everything you adore about French toast and transform it into something even more fun, more shareable, and more deliciously addictive? Enter French Toast Bites—the sweet, poppable twist that turns breakfast into a joyful, finger-friendly feast. These tiny cubes of caramelized heaven are crispy on the outside, soft in the center, and endlessly customizable. Whether you drizzle them with maple syrup, roll them in cinnamon sugar, or pair them with fruit and whipped cream, every bite delivers pure morning happiness.

This unique recipe doesn’t just scale French toast down—it elevates it. By cutting the bread into small cubes, each piece gets more exposure to heat and butter, creating crispier edges and richer flavor. Plus, French Toast Bites cook faster than traditional slices, making them perfect for busy mornings, brunch gatherings, or even a sweet late-night treat. And unlike regular French toast, these little gems stay satisfyingly crispy even after a drizzle of syrup, thanks to a clever finishing technique.

Below is a truly special take on this breakfast staple—one that blends classic flavors with a few irresistible twists.

 Unique French Toast Bites Recipe

Ingredients

  • 6 thick slices brioche or challah bread, cut into 1-inch cubes

  • 3 large eggs

  • ½ cup whole milk (or half-and-half for richer bites)

  • 1 tbsp heavy cream (adds luxurious texture)

  • 1 tbsp sugar

  • 1 tsp vanilla extract

  • ½ tsp cinnamon

  • ¼ tsp nutmeg

  • Pinch of salt

  • 2 tbsp unsalted butter, for frying

  • Optional coating:

    • ¼ cup sugar + 1 tsp cinnamon

  • Toppings:

    • Maple syrup, honey, powdered sugar, berries, Nutella, caramel sauce

 Instructions

1. Prepare the Bread

Choose a soft, rich bread like brioche or challah. Day-old is perfect because it absorbs custard without falling apart. Cut the slices into small, even cubes—this ensures quick cooking and uniform crispiness.

2. Make the Custard

In a mixing bowl, whisk together the eggs, milk, heavy cream, sugar, vanilla, cinnamon, nutmeg, and salt. The cream adds a silky richness that makes every bite taste luxurious.

3. Soak the Bread Cubes

Add the bread cubes to the bowl and gently toss with your hands or a spatula. Let them soak for 2–3 minutes, just until each cube is saturated but still holding its shape.

4. Heat the Pan

Place a large skillet over medium heat and melt 1 tablespoon of butter. Make sure the pan isn’t too hot—you want the bites to cook through without burning.

5. Cook the French Toast Bites

Add the soaked cubes in a single layer. Cook each side for 1–2 minutes, rotating frequently to get all sides golden and crisp. Add the remaining butter as needed to keep the pan moist and flavorful.

6. The Secret Finishing Touch

For a signature twist, toss the hot French Toast Bites immediately in a cinnamon-sugar mixture. This creates a lightly caramelized coating that stays crispy even after syrup is added. It’s the magic that makes these bites unforgettable.

7. Serve Warm

Plate your French Toast Bites and dress them your way—maple syrup for classic sweetness, powdered sugar for a cafe-style touch, berries for freshness, or warm Nutella for pure indulgence.

 Why These French Toast Bites Are So Special

More surface area = more flavor.
Cutting the bread into cubes exposes more edges to butter and heat, creating the perfect contrast between crisp and tender.

The cream-enhanced custard.
A splash of heavy cream gives each bite a velvety texture and richer taste than traditional French toast.

Cinnamon-sugar coating.
Unlike most recipes, this one finishes with a warm coating that caramelizes slightly, giving a churro-like crunch while keeping the inside soft.

Endlessly customizable.
Serve with chocolate dips, fruit sauces, coffee-flavored syrups, or flavored whipped creams. These bites adapt to every craving.

 Serving Ideas

  • Brunch boards: Pair with fruit, bacon, and dipping sauces.

  • Kids’ breakfast: Fun, no-mess bites perfect for little hands.

  • Holiday mornings: Add orange zest or pumpkin spice for seasonal flair.

  • Dessert style: Serve with ice cream and caramel drizzle.

Never Use Ginger If You Have Any of These Conditions – It Can Cause Serious Health Problems

Ginger is often praised as one of nature’s strongest natural remedies. From soothing nausea to easing digestion, warming the body, and calming inflammation, it has earned its place in kitchens and traditional medicine for centuries. But what many people don’t know is that ginger is not safe for everyone.
Yes — this powerful root can actually make certain health conditions worse, especially when consumed daily or in large amounts.

If you’ve been adding ginger to your teas, detox drinks, smoothies, or meals without thinking twice, it’s time to learn when ginger can shift from helpful to harmful. Below are the specific conditions where ginger should be used with caution or avoided entirely, followed by a safe, delicious ginger-free recipe that still supports your wellness naturally.

1. If You Have Certain Blood Disorders

Ginger naturally thins the blood. This can be beneficial for circulation, but dangerous if you’re already dealing with:

  • Hemophilia

  • Low platelet count (thrombocytopenia)

  • Bleeding disorders

  • If you take blood-thinning medications (warfarin, aspirin, clopidogrel)

Ginger can increase bleeding risk, slow clotting, and even cause internal bleeding in extreme cases. People with these conditions should avoid ginger in medicinal amounts and speak to a healthcare professional before consuming it regularly.

2. If You Have Gallstones

Ginger increases bile production — useful for digestion but harmful for those with gallstones. When the gallbladder contracts harder due to ginger, stones may shift or block ducts, causing painful gallbladder attacks.

If you’ve ever experienced right-side abdominal pain after eating fatty foods, ginger may worsen the discomfort.

3. During Pregnancy (Especially the Last Trimester)

Ginger is often used for morning sickness, but it can become risky when:

  • Consumed in large amounts

  • Combined with herbal remedies

  • Taken late in pregnancy

Because ginger can affect hormones and stimulate uterine contractions, it may increase the risk of preterm contractions or amplify bleeding during labor for some women.

Pregnant women should never exceed small culinary amounts unless advised by a medical provider.

4. If You Have Diabetes on Medication

Ginger can lower blood sugar — but for people already taking:

  • Insulin

  • Metformin

  • Sulfonylureas

  • Other glucose-lowering medicines

…the combination may cause blood sugar to drop too low (hypoglycemia).
This leads to dizziness, sweating, confusion, and fainting.

People with diabetes can still enjoy small culinary amounts of ginger, but concentrated ginger teas, shots, or supplements may be risky.

5. If You Have Acid Reflux or Stomach Ulcers

Ginger increases stomach acid levels. For people dealing with:

  • GERD

  • Severe acid reflux

  • Gastric ulcers

  • Hiatal hernia

…ginger can worsen burning, bloating, chest discomfort, and stomach irritation.

If ginger tea burns your stomach or causes burping, heartburn, or nausea, your body is telling you it’s too strong for you.

6. If You Are Underweight or Have Appetite Loss

Ginger boosts metabolism and speeds digestion — a benefit for some, but not for those who:

  • Need to gain weight

  • Are recovering from illness

  • Have chronic low appetite

Because ginger suppresses hunger and increases fat burning, it may make it harder to maintain a healthy weight.

If You Should Avoid Ginger — Try This Safe, Nourishing, Healing Ginger-Free Wellness Tonic (Unique Recipe)

This recipe delivers warmth, digestion support, and natural energy without using ginger, making it safe for people sensitive to it. It uses ingredients that soothe the stomach, support immunity, and reduce bloating gently — all without the risks ginger can pose.

 Golden Cinnamon-Honey Wellness Elixir (Ginger-Free) – Unique Recipe

Ingredients

  • 1 cup warm water (not boiling)

  • 1 tbsp raw honey

  • ½ tsp ground cinnamon

  • 1 tbsp freshly squeezed lemon juice

  • A pinch of turmeric

  • A tiny pinch of black pepper (optional, enhances turmeric absorption)

  • 1 tsp apple cider vinegar (optional, gentle digestive support)

 Why This Works

  • Cinnamon helps balance blood sugar gently without thinning the blood.

  • Turmeric supports inflammation reduction without irritating the stomach like ginger.

  • Honey naturally boosts energy and soothes the throat.

  • Lemon refreshes the body with vitamin C.

  • Warm water stimulates gentle digestion without increasing acid.

This makes the drink perfect for mornings, after meals, or anytime you want a warm, comforting wellness boost without the risks that come with ginger.

 Directions

  1. Warm water until it’s comfortably hot but not boiling.

  2. Stir in the honey until completely dissolved.

  3. Add cinnamon, turmeric, and lemon juice.

  4. If using, stir in apple cider vinegar and a pinch of black pepper.

  5. Mix well, sip slowly, and enjoy the warm, soothing effect.

 When to Drink It

  • First thing in the morning

  • After a heavy meal

  • Anytime you need a gentle immune or digestion boost

  • When avoiding ginger due to health conditions

This simple elixir supports the body without stressing it — a perfect alternative when ginger is off the menu.

This Is the Vitamin Your Body Is Missing When Your Legs and Bones Hurt

Leg and bone pain can sneak into your life quietly—first as a dull ache after a long day, then as persistent stiffness that refuses to leave. Many people assume it’s aging, fatigue, or stress, but one silent and overlooked culprit is a deficiency in Vitamin D, often called the “sunshine vitamin.” When your legs feel heavy, your shins ache at night, or your joints feel weak and brittle, your body may be sending distress signals that it lacks this powerful nutrient.

Vitamin D plays a major role in keeping your bones strong, your muscles flexible, and your nerves functioning smoothly. Without enough of it, calcium cannot be properly absorbed—meaning your bones gradually lose strength even if you consume plenty of dairy or supplements. Over time, low vitamin D can cause muscle cramps, deep bone aches, restless legs, lower back pain, and even trouble climbing stairs.

One of the biggest reasons deficiency has become common worldwide is modern living: working indoors, avoiding sunlight, using sunscreen, living in polluted cities, having darker skin tones, and not eating enough vitamin D–rich foods. Even when you think you get “enough sunlight,” factors like season, latitude, clouds, clothing, and time of day dramatically reduce vitamin D synthesis. The body is brilliant, but without the right ingredients, it struggles.

When vitamin D drops too low, your legs may start hurting because the muscles begin to weaken and tire quickly. Small movements—walking up steps, bending, stretching—feel more exhausting. The bones also become more sensitive, sometimes causing throbbing sensations at night or “growing pains” in adults. Some people notice numbness, tingling, or unexplained fatigue. The deficiency can even slow healing, worsen mood, and affect immunity.

The good news? You can restore vitamin D with sun exposure, fortified foods, and supplements—but it becomes even more powerful when combined with magnesium, which helps activate Vitamin D inside the body. And that’s where this unique, restorative recipe comes in: a delicious, calming, mineral-rich drink designed to support healthy bones, reduce inflammation, and help your legs feel lighter and stronger.

Vitamin D–Boosting Golden Milk Elixir (Unique Bone & Leg Pain Relief Recipe)

This nourishing drink does more than comfort—it supplies essential nutrients that help replenish vitamin D levels indirectly while supporting calcium absorption, muscle relaxation, and joint strength. The recipe combines warm milk, turmeric, magnesium-rich nuts, and healing spices to create a nightly tonic your bones will love.

Ingredients

  • 1 cup milk (dairy or fortified almond/soy milk for added vitamin D)

  • 1 teaspoon turmeric powder

  • 1 tablespoon honey (or to taste)

  • ½ teaspoon cinnamon

  • A pinch of black pepper (helps activate turmeric’s anti-inflammatory benefits)

  • 1 teaspoon ghee or coconut oil

  • 1 tablespoon finely ground almonds or cashews (rich in magnesium and healthy fats)

  • Optional: ½ teaspoon vanilla extract for flavor

  • Optional: 1 teaspoon chia seeds for added calcium and omega-3s

Instructions

  1. Warm the milk over low heat until it begins to steam—do not boil.

  2. Add the turmeric, cinnamon, ground nuts, black pepper, and ghee.

  3. Whisk continuously until everything blends smoothly and the milk turns a golden yellow color.

  4. Remove from heat and stir in the honey and vanilla.

  5. Pour into a mug and sip slowly while warm, preferably at night before bed.

This drink nourishes the body when it repairs itself most: during sleep.

Why This Recipe Helps With Leg & Bone Pain

1. Fortified milk boosts vitamin D intake

Fortified dairy and plant milks contain vitamin D2 or D3, which helps rebuild bone density and reduce muscle weakness.

2. Almonds and cashews provide magnesium

Magnesium is essential for converting vitamin D into its active form. Without it, vitamin D supplements are far less effective.

3. Turmeric reduces inflammation

Chronic leg and joint pain is often worsened by inflammation. Curcumin in turmeric calms swollen tissues and supports mobility.

4. Ghee or coconut oil helps absorption

Vitamin D is fat-soluble, meaning your body absorbs it better with healthy fats.

5. Cinnamon improves circulation

Better blood flow means more oxygen to tired muscles and aching bones.

6. Honey soothes and nourishes

It provides antioxidants and supports nighttime relaxation.

How to Use This Remedy

Drink 1 cup every evening for 7–14 days.
Alongside this, try spending 10–20 minutes in the morning sun, and include vitamin D–rich foods like eggs, fish, yogurt, and mushrooms.

If leg pain is severe or persistent, consider checking your vitamin D levels through a blood test.

Everything Bagel Bits

Here is a unique, flavorful, bakery-style recipe for Everything Bagel Bits — soft, chewy, savory mini bites bursting with that iconic “everything” crunch. This version includes a simple dough, a custom seasoning blend, and a warm, buttery finish. Enjoy!

Everything Bagel Bits – Unique Recipe

Makes: 30–36 bite-size pieces
Prep Time: 20 minutes
Rest Time: 45 minutes
Cook Time: 15 minutes

Why These Everything Bagel Bits Are Special

These aren’t just mini bagels — they’re soft, chewy snackable bombs of flavor with a golden exterior and a tender, pillowy center. Instead of shaping individual bagels, this recipe uses an easy pull-apart method so every bite is coated in seasoning. A quick baking-soda dunk gives them the classic bagel chew, while a buttery garlic glaze takes them over the top. They store well, reheat perfectly, and make an addictive breakfast, snack, or party appetizer.

Homemade Everything Seasoning Blend

You can use store-bought, but this blend tastes brighter and fresher:

  • 2 tbsp sesame seeds (white or mixed)

  • 1 tbsp poppy seeds

  • 1 tbsp dried minced garlic

  • 1 tbsp dried minced onion

  • 1 tsp flaky salt

  • ½ tsp black pepper

  • ½ tsp crushed red pepper (optional)

Mix and set aside.

 Dough Ingredients

  • 2 cups all-purpose flour

  • 2 tsp sugar

  • 1 tsp salt

  • 1 tbsp instant yeast

  • ¾ cup warm water

  • 1 tbsp olive oil

 Garlic Butter Finish

  • 2 tbsp melted butter

  • ½ tsp garlic powder

  • ½ tsp parsley (optional)📌 Step-By-Step Instructions

1. Make the Dough

  1. In a bowl, whisk together flour, sugar, salt, and instant yeast.

  2. Pour in warm water and olive oil.

  3. Mix until a dough forms, then knead 5–7 minutes until smooth and stretchy.

  4. Cover and let rise 30–45 minutes or until puffy.

2. Shape the Bagel Bits

  1. Punch down the dough and cut it into small marble-sized pieces.

  2. Roll each piece into a soft ball.

  3. Place on a parchment-lined tray and cover while you prepare the boil.

3. Classic Bagel Boil

Prepare a pot of water with 1 tablespoon baking soda (this gives the chewy crust).
Bring to a boil.

  1. Drop the dough balls in batches.

  2. Boil for 30 seconds, stirring gently so they don’t stick.

  3. Remove with a slotted spoon and place back on the tray.

4. Season Generously

While the boiled dough is still damp, roll them in the homemade everything seasoning, pressing lightly so it sticks.

5. Bake

Bake at 400°F (205°C) for 12–15 minutes until golden, puffy, and crisp on the outside.

6. Brush With Garlic Butter

As soon as they come out of the oven:

  1. Mix melted butter, garlic powder, and parsley.

  2. Brush generously over the warm bagel bits.

  3. Add a pinch more seasoning if you want extra crunch.

 Serving Ideas

  • Dip in whipped cream cheese

  • Toss warm in parmesan + basil for an Italian twist

  • Serve with smoked salmon spread

  • Use as mini sandwich sliders

  • Dip in spicy honey butter

 Storage & Reheating

  • Store in an airtight container for 3 days.

  • Reheat in the oven or air fryer for 2–3 minutes.

  • Freeze fully baked bagel bits up to 2 months.

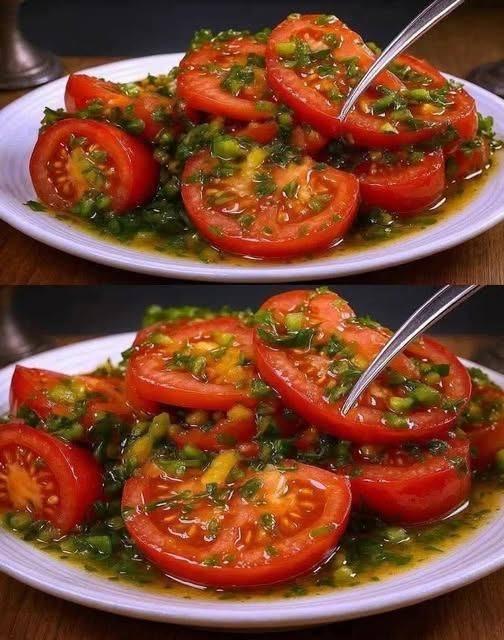
Magic Tomato Salad

There’s something undeniably enchanting about tomatoes—how they hold sunlight in their skins, how their juices burst with natural sweetness, and how they transform the simplest dish into something extraordinary. The Magic Tomato Salad is more than just another fresh side—it’s a vibrant, refreshing, flavor-packed creation that feels almost spellbinding from the very first bite. This recipe brings together luscious tomatoes, aromatic herbs, a whisper of garlic, and a tangy-sweet dressing that makes the whole bowl taste alive. If you’re looking for a salad that “wows” without effort, you’ve found it.

Let’s unlock the secret of this magical dish.

Why It’s Called “Magic”

This salad earned its name for three reasons:

  1. The Flavor Harmony: Every bite is a perfect balance of sweet, tangy, savory, and fresh—your palate lights up instantly.

  2. The Aroma: As soon as the dressing touches the tomatoes, the herbs release a fragrant burst that smells like a garden after rain.

  3. The Transformation: Simple ingredients combine into something unexpectedly gourmet. It’s the kind of dish people taste once and keep talking about.

This is the kind of salad you serve when you want something effortless yet unforgettable.

The Magic Tomato Salad – Full Unique Recipe

🧾 Ingredients

For the Salad:

  • 4 large ripe tomatoes (mixed heirloom colors if available)

  • 1 cup cherry tomatoes, halved

  • ½ small red onion, thinly sliced

  • 1 small cucumber, diced

  • ¼ cup fresh basil leaves, torn

  • 2 tbsp fresh mint leaves, finely sliced

  • 1 tbsp chopped fresh dill (optional but magical!)

For the Magic Dressing:

  • 4 tbsp extra virgin olive oil

  • 1 tbsp pomegranate molasses (or balsamic glaze)

  • 2 tbsp freshly squeezed lemon juice

  • 1 tsp honey

  • 1 garlic clove, grated into a paste

  • ½ tsp sea salt

  • ¼ tsp black pepper

  • A pinch of crushed red chili flakes

  • ½ tsp dried oregano

Finishing Touches (Optional but Perfect):

  • 2 tbsp crumbled feta OR small mozzarella pearls

  • A sprinkle of toasted sesame seeds

  • A drizzle of olive oil before serving

Step-by-Step Instructions

1. Prepare the Tomatoes with Care

Slice the large tomatoes into thick wedges—this keeps them juicy and prevents them from turning mushy. The cherry tomatoes should be halved so their sweetness bursts through. Place them in a wide bowl so they don’t get crushed.

2. Add the Fresh Crunch

Toss in your diced cucumber and thin red onion slices. The cucumber adds cooling crispness, while the onion provides a delicate sharpness that balances the sweetness of the tomatoes.

3. Fresh Herbs: The Real Magic

Add basil, mint, and dill. These herbs awaken the salad:

  • Basil adds sweet floral notes.

  • Mint brings cool freshness.

  • Dill adds a soft, grassy zing.

Together, they create a garden-fresh aroma you’ll inhale before you even taste the salad.

4. Make the Magic Dressing

In a small bowl whisk together olive oil, pomegranate molasses (or balsamic glaze), lemon juice, honey, garlic paste, oregano, chili flakes, salt, and pepper.

The combination creates a dressing that’s:

  • sweet,

  • tangy,

  • silky,

  • slightly spicy, and

  • beautifully aromatic.

This dressing is the spell that binds everything together.

5. Pour and Toss Gently

Drizzle the dressing over the salad and use your hands or a large spoon to gently coat everything. Tomatoes are delicate—treat them kindly.

Let the salad sit for 5–10 minutes. This short rest lets the tomatoes release their juices and mix with the dressing to form an irresistible natural marinade.

6. Finish with a Touch of Magic

Add feta or mozzarella for creaminess, sprinkle toasted sesame seeds for subtle crunch, and drizzle a little more olive oil for richness. Serve immediately.

Why This Salad Works So Well

The magic lies in contrast:

  • Juicy vs. crunchy

  • Sweet vs. tangy

  • Soft herbs vs. crisp veggies

  • Creamy cheese vs. bold dressing

The ingredients play off each other like instruments in a perfect orchestra. Each bite tastes slightly different depending on which combination ends up on your fork—and that keeps it exciting.

How to Serve Magic Tomato Salad

This salad shines in many settings:

  • As a refreshing side to grilled chicken or steak

  • As a beautiful starter for dinner guests

  • Spoon over crusty toasted bread

  • Toss with cooked pasta for a cold summer pasta salad

  • Enjoy on its own as a light meal

The Benefits of Tomatoes for the Skin: A Well-Kept Anti-Aging Secret

For generations, the humble tomato has sat quietly in kitchens around the world—bright, juicy, acidic, and subtly sweet. But beyond its role in salads, sauces, and sandwiches, this everyday fruit guards one of nature’s most underrated beauty secrets: powerful anti-aging benefits for the skin. While modern skincare aisles are filled with expensive serums and creams promising miracles, tomatoes provide many of the same effects naturally, gently, and effectively. When used consistently, tomatoes can help brighten the complexion, tighten pores, reduce fine lines, and protect the skin from harsh environmental damage.

A Natural Source of Lycopene – The Anti-Aging Powerhouse

The superstar nutrient in tomatoes is lycopene, a potent antioxidant responsible for their vibrant red color. What makes lycopene special is its ability to neutralize free radicals, unstable molecules that accelerate skin aging, break down collagen, and contribute to wrinkles. By reducing oxidative stress, lycopene preserves the skin’s elasticity and firmness. Studies show that people who consume tomatoes—or use tomato-based treatments—often exhibit a smoother, more youthful complexion with fewer visible signs of aging.

Vitamin C for Brighter, More Radiant Skin

Tomatoes are rich in Vitamin C, a key ingredient found in high-end brightening products. Vitamin C helps fade dark spots caused by sun exposure, acne scars, and uneven pigmentation. It boosts collagen synthesis, giving the skin a plumper and more radiant appearance. When applied topically, tomatoes can offer an instant glow, making the skin look refreshed and revitalized within minutes.

Natural Astringent Properties – Minimizes Pores

Oily skin and enlarged pores are common concerns, especially in warm climates. Tomatoes act as a natural astringent, meaning they help tighten pores and reduce excess oil without stripping the skin of moisture. This makes tomatoes ideal for individuals with oily, combination, and acne-prone skin. With regular use, pores appear smaller, breakouts reduce, and the skin develops a smoother texture.

Balances pH and Controls Oil Production

Many skin problems—acne, dullness, irritation—arise when the skin’s pH balance is disrupted. Tomatoes naturally help restore this balance due to their mild acidity. When the skin’s pH is stable, oil production becomes regulated, breakouts lessen, and the complexion appears healthier. A balanced pH also allows the skin to respond better to other skincare products.

Natural Protection Against Sun Damage

Continuous exposure to sunlight can lead to premature aging, sunspots, rough texture, and collagen loss. Lycopene, combined with beta-carotene and Vitamin E present in tomatoes, provides a mild protective effect against UV damage. While tomatoes are not a replacement for sunscreen, they enhance the skin’s natural defense system, reducing redness and inflammation caused by sun exposure.

Anti-Inflammatory Benefits for Calm, Clear Skin

Tomatoes contain flavonoids and carotenoids, both of which have strong anti-inflammatory effects. Whether your skin is irritated, inflamed from acne, or reacting to heat, tomatoes help calm the surface and soothe redness. A chilled slice of tomato placed on the skin can immediately cool and comfort sensitive areas.

Promotes Collagen Production Naturally

Collagen is the protein that keeps skin firm. As we age, collagen breaks down—and this is where tomatoes shine. The combination of Vitamin C, Vitamin A, potassium, and antioxidants supports natural collagen repair. This results in stronger skin structure, better elasticity, and a noticeable reduction in fine lines over time.

Unique Anti-Aging Tomato Face Mask Recipe

Below is a simple, effective tomato-based recipe that you can prepare at home. It’s designed to brighten, tighten, and rejuvenate the skin—unlocking the anti-aging power of tomatoes with just a few ingredients.

✨ Tomato Radiance Anti-Aging Mask (All-Natural & Easy)

Ingredients

  • 1 ripe tomato

  • 1 teaspoon honey

  • 1 teaspoon yogurt (or aloe gel for sensitive skin)

  • ½ teaspoon lemon juice (optional for dark spots)

Instructions

  1. Cut the tomato and scoop out the pulp.

  2. Mash the pulp or blend it until smooth.

  3. Mix in the honey, yogurt (or aloe), and lemon juice if using.

  4. Apply a thin layer to your clean face and neck.

  5. Leave it on for 10–12 minutes.

  6. Rinse with cool water and pat dry.

  7. Follow with moisturizer or a few drops of coconut or argan oil.

Benefits of This Mask

  • Tightens pores

  • Brightens the complexion

  • Reduces fine lines

  • Hydrates without clogging pores

  • Lightens dark spots and pigmentation

  • Adds a natural youthful glo