Golden, Crispy Baked Wraps Stuffed with Creamy Feta & Finished with a Sticky-Spicy Honey Glaze

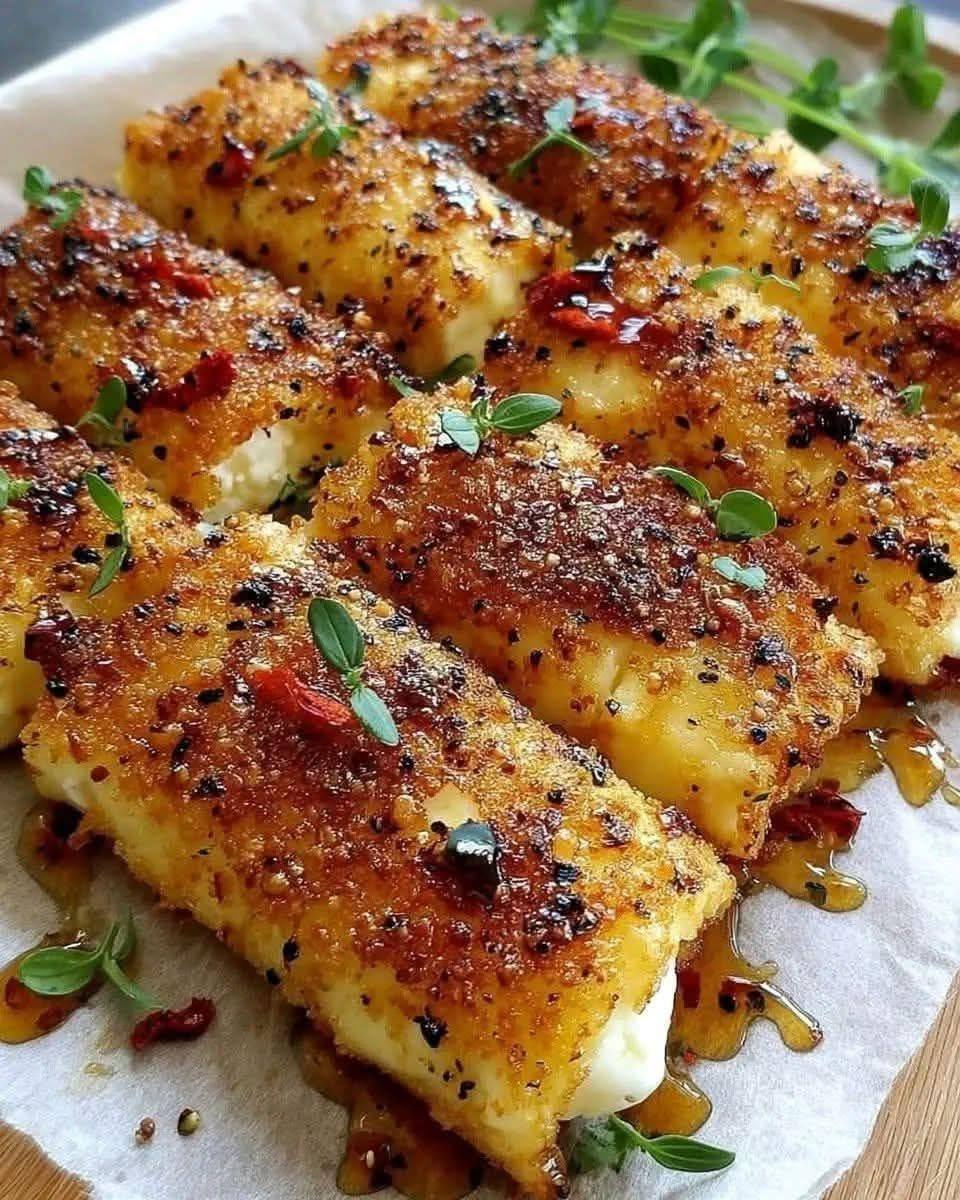
There’s something irresistible about the contrast of textures and flavors in these golden, crispy baked wraps. Shatteringly crisp on the outside, warm and creamy on the inside, and finished with a glossy honey glaze that hits sweet first, then spicy—this dish feels indulgent yet surprisingly simple. These wraps are perfect as a party appetizer, a light dinner with a salad, or a cozy snack when you want something a little fancy without deep-frying or complicated prep. Baking keeps them lighter, while smart technique guarantees crunch.

At the heart of the recipe is feta cheese—salty, tangy, and creamy when softened with a touch of yogurt or cream cheese. Wrapped snugly in thin flatbread or spring-roll style wrappers and brushed with olive oil or butter, they bake up beautifully crisp. The final drizzle of sticky-spicy honey glaze takes them from good to unforgettable.

Why You’ll Love This Recipe

  • Crispy without frying: Baking delivers crunch with less mess and oil.

  • Bold flavor balance: Salty feta, creamy filling, sweet honey, and gentle heat.

  • Make-ahead friendly: Assemble early, bake when ready.

  • Versatile: Serve as appetizers, mezze, or a vegetarian main.

Ingredients

For the Feta Filling

  • 200 g feta cheese, crumbled

  • ½ cup cream cheese or thick Greek yogurt

  • 1 small garlic clove, finely grated

  • 1 tablespoon fresh lemon juice

  • 1 tablespoon olive oil

  • 1 tablespoon fresh herbs (dill, parsley, or thyme), finely chopped

  • Freshly ground black pepper, to taste

For the Wraps

  • 8–10 thin wraps (lavash, tortillas, or spring-roll wrappers)

  • Olive oil or melted butter, for brushing

For the Sticky-Spicy Honey Glaze

  • ⅓ cup honey

  • 1–2 teaspoons chili flakes (adjust to taste)

  • 1 teaspoon apple cider vinegar or lemon juice

  • Pinch of salt

Optional Garnishes

  • Sesame seeds

  • Fresh herbs

  • Extra chili flakes

Instructions

1. Prepare the Creamy Feta Filling

In a medium bowl, combine the crumbled feta and cream cheese (or Greek yogurt). Use a fork to mash until mostly smooth but still lightly textured. Add the garlic, lemon juice, olive oil, chopped herbs, and black pepper. Mix well and taste—feta is salty on its own, so additional salt is rarely needed. The filling should be creamy and spreadable, not runny.

2. Assemble the Wraps

Preheat your oven to 200°C (400°F) and line a baking tray with parchment paper.

Lay one wrap flat on a clean surface. Spoon 2–3 tablespoons of the feta mixture onto the lower third of the wrap, shaping it into a short log. Fold the sides inward, then roll tightly from the bottom up, enclosing the filling. Repeat with the remaining wraps.

Place the rolled wraps seam-side down on the prepared tray. Lightly brush all sides with olive oil or melted butter—this is key to achieving that golden, crackly finish.

3. Bake Until Golden and Crisp

Bake for 18–22 minutes, turning once halfway through, until the wraps are evenly golden and crisp. Keep an eye on them during the last few minutes; thin wraps can go from perfect to too dark quickly.

4. Make the Sticky-Spicy Honey Glaze

While the wraps bake, prepare the glaze. In a small saucepan over low heat, combine the honey, chili flakes, vinegar or lemon juice, and a pinch of salt. Warm gently for 2–3 minutes, stirring, until slightly thickened and glossy. Do not boil—just heat enough to infuse the chili and balance the sweetness with acidity.

5. Finish and Serve

Remove the wraps from the oven and let them cool for 2–3 minutes (the filling will be very hot). Drizzle generously with the warm sticky-spicy honey glaze. Garnish with sesame seeds, extra herbs, or more chili flakes if you like extra heat.

Serve immediately while hot and crunchy.

Tips for Perfect Results

  • Use thin wraps: The thinner the wrap, the crispier the result.

  • Don’t overfill: Too much filling can cause leaks and soggy spots.

  • Turn halfway: Ensures even browning on all sides.

  • Adjust heat: Swap chili flakes for chili oil, hot honey, or even a pinch of smoked paprika for milder warmth.

Serving Ideas & Variations

  • Mediterranean platter: Pair with olives, cucumber salad, and hummus.

  • Add crunch: Mix chopped walnuts or pistachios into the feta filling.

  • Herb twist: Try basil and mint for a fresher profile.

  • Extra indulgent: Finish with a light crumble of feta on top after glazing.

Fluffy 2-Ingredient Bread

If you’ve ever wanted to bake bread but felt intimidated by yeast, rising times, or complicated techniques, this fluffy 2-ingredient bread is about to become your new best friend. It’s soft, tender, and surprisingly satisfying for something made with just two simple ingredients you may already have in your kitchen. No kneading, no proofing, no special equipment—just mix, bake, and enjoy.

This bread is perfect for beginners, busy home cooks, or anyone craving fresh homemade bread without the stress. Whether you serve it warm with butter, use it for sandwiches, or enjoy it alongside soup, it delivers comfort in every bite.

Why This 2-Ingredient Bread Works

The magic behind this recipe lies in self-rising flour and yogurt. Self-rising flour already contains baking powder and salt, eliminating the need for yeast. Yogurt adds moisture, tenderness, and a subtle tang while helping the dough rise beautifully in the oven.

When combined, these two ingredients create a soft dough that bakes into a light, fluffy loaf with a delicate crumb. It’s proof that baking doesn’t need to be complicated to be delicious.

Ingredients (That’s It!)

  • 2 cups self-rising flour

  • 1½ cups plain yogurt (Greek yogurt works best, but regular plain yogurt is fine)

That’s all. No oil, no sugar, no eggs, no yeast.

Step-by-Step Instructions

1. Preheat Your Oven

Set your oven to 375°F (190°C). Lightly grease a loaf pan or line it with parchment paper for easy removal.

2. Mix the Dough

In a large mixing bowl, add the self-rising flour. Slowly stir in the yogurt using a spoon or spatula. At first, the mixture may look shaggy or sticky, but keep mixing until it forms a soft, slightly tacky dough.

If the dough feels too wet, sprinkle in a little more flour—one tablespoon at a time. If it’s too dry, add a spoonful of yogurt.

3. Shape the Dough

Turn the dough out onto a lightly floured surface. Gently shape it into a loaf or oval—no kneading required. Overworking the dough can make the bread dense, so handle it lightly.

Place the shaped dough into your prepared loaf pan.

4. Bake

Bake for 30–35 minutes, or until the top is lightly golden and a toothpick inserted into the center comes out clean. The bread should sound hollow when tapped gently.

5. Cool Slightly

Let the bread rest in the pan for about 10 minutes, then transfer it to a wire rack. This helps the texture set and makes slicing easier.

Texture and Flavor

Despite its simplicity, this bread is soft on the inside with a lightly crisp exterior. The yogurt gives it a tender crumb and mild tang, similar to traditional homemade bread. It’s neutral enough to go sweet or savory, making it incredibly versatile .Optional Add-Ins (Still Easy!)

While the base recipe uses just two ingredients, you can customize it without ruining its simplicity:

  • Garlic & herbs – Mix in garlic powder and dried herbs

  • Cheese – Fold in shredded cheddar or mozzarella

  • Sweet version – Add a tablespoon of honey and a sprinkle of cinnamon

  • Seeds – Top with sesame or sunflower seeds before baking

Serving Ideas

This fluffy 2-ingredient bread shines in so many ways:

  • Warm with butter or honey

  • Sliced for sandwiches or toast

  • Served with soup, stew, or chili

  • Toasted and topped with avocado or eggs

  • Used as a quick side for dinner

It’s best enjoyed fresh, but it also toasts beautifully the next day.

Storage Tips

  • Room temperature: Store in an airtight container for up to 2 days

  • Refrigerator: Keeps for up to 5 days

  • Freezer: Slice and freeze for up to 2 months. Reheat in the toaster or oven

Final Thoughts

This fluffy 2-ingredient bread proves that homemade baking doesn’t need to be complicated to be satisfying. With minimal effort and zero stress, you get fresh, warm bread that tastes like comfort and feels like a small win in the kitchen.

Stomach Pain and Nausea: Caus es, Symptom s, Treatments, and When to See a Doctor

Stomach pain and nausea are two of the most common complaints people experience at some point in their lives. They can appear suddenly, linger for hours or days, or come and go without warning. While these symptoms are often harmless and short-lived, they can sometimes signal an underlying condition that needs medical attention. Understanding what causes stomach pain and nausea, how to recognize accompanying symptoms, and when to seek help can make a big difference in your comfort and health.

Common Causes of Stomach Pain and Nausea

There are many possible reasons why your stomach hurts and you feel nauseated. Some causes are mild, while others may be more serious.

One of the most frequent causes is indigestion. Eating too quickly, overeating, or consuming fatty or spicy foods can irritate the stomach lining, leading to discomfort and queasiness. Food poisoning is another common culprit, caused by bacteria, viruses, or toxins in contaminated food. This often comes with vomiting, diarrhea, and abdominal cramps.

Viral gastroenteritis, commonly known as the stomach flu, can cause nausea, vomiting, stomach pain, and sometimes fever. Although unpleasant, it usually resolves within a few days with rest and fluids.

Acid reflux or GERD can also lead to upper abdominal pain and nausea, especially after meals or when lying down. The stomach acid irritates the esophagus, causing burning discomfort and queasiness.

In some cases, stomach pain and nausea may be linked to stress and anxiety. The gut and brain are closely connected, and emotional stress can trigger real physical symptoms in the digestive system.

More serious causes include appendicitis, gallstones, pancreatitis, ulcers, or intestinal blockages. These conditions often cause severe or persistent pain and should never be ignored.

Symptoms That May Accompany Stomach Pain and Nausea

Stomach pain and nausea rarely occur alone. Other symptoms can help identify the underlying issue.

You may experience vomiting, diarrhea, bloating, or gas, which often point to digestive upset or infection. Heartburn, burping, or a sour taste in the mouth may suggest acid reflux.

If the pain is sharp, localized, or worsening over time, it could indicate inflammation or infection. Fever, chills, and fatigue may signal that your body is fighting an illness.

More concerning symptoms include blood in vomit or stool, unexplained weight loss, persistent loss of appetite, or yellowing of the skin or eyes. These signs should always be evaluated by a healthcare professional.

Home Treatments and Self-Care Options

For mild and short-term stomach pain and nausea, simple home remedies are often effective.

Start by resting your stomach. Avoid heavy, greasy, or spicy foods and opt for bland options like rice, toast, bananas, or applesauce. Eating small, frequent meals instead of large portions can also help.

Staying hydrated is essential, especially if vomiting or diarrhea is present. Sip water, clear broths, or oral rehydration solutions throughout the day.

Ginger is well known for its anti-nausea properties. Ginger tea, ginger chews, or small amounts of fresh ginger may ease discomfort. Peppermint tea can also help relax the digestive tract.

Over-the-counter medications such as antacids, anti-nausea remedies, or pain relievers like acetaminophen may provide relief. However, avoid excessive use and always follow the instructions.

Reducing stress through deep breathing, light stretching, or relaxation techniques can be surprisingly helpful, especially if anxiety plays a role in your symptoms.

Medical Treatments

If stomach pain and nausea persist or are caused by a specific condition, medical treatment may be necessary.

Doctors may prescribe anti-nausea medications, acid-reducing drugs, or antibiotics if a bacterial infection is suspected. Conditions like ulcers or gallbladder disease may require longer-term medication or, in some cases, surgery.

Diagnostic tests such as blood work, imaging scans, or endoscopy may be used to determine the exact cause of ongoing symptoms.

When to See a Doctor

While occasional stomach pain and nausea are usually not dangerous, certain situations require medical attention.

See a doctor if symptoms last more than a few days, become severe, or interfere with daily life. Seek immediate care if you experience intense abdominal pain, a high fever, persistent vomiting, signs of dehydration, or blood in vomit or stool.

Pregnant individuals, young children, older adults, and people with chronic medical conditions should be especially cautious and seek care sooner.

Final Thoughts

Stomach pain and nausea are common but can range from mild inconvenience to signs of a serious health issue. Paying attention to your body, recognizing accompanying symptoms, and knowing when to seek help are key to managing these uncomfortable sensations. With proper care, rest, and timely medical advice, most people can find relief and return to feeling their best.

Potassium Deficiency – Causes, Symptoms and What To Do

Potassium is one of those quiet nutrients that rarely gets the spotlight, yet it plays a powerful role in keeping your body running smoothly. From steady heartbeats to proper muscle movement and balanced fluids, potassium works behind the scenes every second of the day. When levels drop too low, however, the body quickly lets you know. Potassium deficiency—also known as hypokalemia—can cause a wide range of symptoms that are often mistaken for stress, aging, or dehydration. Understanding the causes, recognizing the warning signs, and knowing what to do can make a big difference in your overall health.

Why Potassium Is So Important

Potassium is an essential electrolyte that helps transmit electrical signals in the body. These signals control muscle contractions, including the heart, support nerve function, regulate fluid balance, and help maintain healthy blood pressure. Unlike some nutrients that can be stored long-term, potassium needs to be replenished regularly through food because the body excretes it daily through urine and sweat.

When potassium levels fall, cells struggle to function properly. Muscles may weaken, nerves may misfire, and the heart’s rhythm can become unstable. Even mild deficiency can affect energy levels and overall well-being.

Common Causes of Potassium Deficiency

Potassium deficiency doesn’t usually happen overnight. It often develops gradually due to lifestyle factors, medical conditions, or certain medications.

One of the most common causes is inadequate dietary intake. Diets high in processed foods tend to be low in potassium, while fresh fruits, vegetables, and legumes—the richest sources—are often lacking.

Excess fluid loss is another major contributor. Vomiting, diarrhea, excessive sweating, or frequent urination can flush potassium out of the body faster than it can be replaced. This is especially common during stomach illnesses or extreme heat.

Certain medications can also lower potassium levels. Diuretics (water pills) used for high blood pressure, some asthma medications, and long-term use of laxatives are well-known culprits.

Underlying health conditions such as kidney disorders, hormonal imbalances, or eating disorders may interfere with potassium balance as well. In these cases, deficiency may persist unless the root cause is addressed.

Symptoms You Shouldn’t Ignore

Potassium deficiency can be tricky because early symptoms are often subtle. Many people dismiss them as fatigue or everyday stress. As levels drop further, symptoms become more noticeable.

One of the earliest signs is muscle weakness or cramps, especially in the legs. You may notice your muscles feel tired even after minimal activity or that cramps occur more frequently at night.

Fatigue and low energy are also common. Potassium helps convert nutrients into usable energy, so low levels can leave you feeling drained and sluggish.

Digestive issues such as constipation or bloating may appear because potassium plays a role in smooth muscle movement within the intestines.

As deficiency worsens, irregular heartbeats or palpitations can occur. This is a serious warning sign and should never be ignored, as potassium is essential for maintaining a stable heart rhythm.

Other possible symptoms include tingling or numbness, mood changes, dizziness, and difficulty concentrating.

Who Is Most at Risk?

Some people are more vulnerable to potassium deficiency than others. Older adults, athletes, people with chronic digestive problems, and individuals taking diuretics are at higher risk. Those who follow very restrictive diets or consume mostly processed foods may also fall short without realizing it.

People with high blood pressure, diabetes, or kidney conditions should be especially mindful, as potassium balance is closely tied to these health issues.

What To Do If You’re Low on Potassium

The good news is that potassium deficiency is often manageable—and even preventable—with the right approach.

The first step is dietary improvement. Potassium-rich foods include bananas, oranges, avocados, spinach, sweet potatoes, beans, lentils, tomatoes, yogurt, and fish like salmon. Including a variety of these foods daily can help restore and maintain healthy levels naturally.

Hydration matters, too. Drinking enough water supports proper electrolyte balance, especially if you sweat heavily or exercise often. Avoid excessive caffeine and alcohol, which can increase potassium loss.

If deficiency is suspected, a blood test can confirm potassium levels. This is especially important if symptoms are persistent or severe. Never assume—testing provides clarity and safety.

In some cases, supplements may be recommended, but these should only be taken under medical guidance. Too much potassium can be just as dangerous as too little, particularly for people with kidney issues.

Finally, addressing underlying causes—such as adjusting medications or managing digestive problems—is key to preventing recurrence.

The Bottom Line

Potassium deficiency is more common than many people realize, and its symptoms can quietly interfere with daily life. Muscle weakness, fatigue, digestive trouble, and heart rhythm changes are all signals the body uses to ask for help. By recognizing these signs early, nourishing your body with potassium-rich foods, staying hydrated, and seeking proper medical advice when needed, you can restore balance and protect your health.

The Fruit That Aids Digestion, Is Rich in Vitamin C, and Has a Natural Laxative Effect

When digestion feels slow, bloating becomes uncomfortable, or constipation starts interfering with daily life, many people immediately turn to supplements or medications. But nature already offers a gentle, delicious solution. One humble fruit stands out for its impressive digestive benefits, high vitamin C content, and natural laxative effect: kiwi fruit. Small in size but powerful in nutrients, kiwi has earned its place as a true digestive ally and wellness booster.

Why Kiwi Is a Digestive Superfruit

Kiwi is unique among fruits because it contains a natural enzyme called actinidin. This enzyme helps break down proteins in the stomach, making digestion smoother and faster. Unlike some digestive aids that can be harsh or irritating, kiwi works gently with your body’s natural processes.

Research and traditional use alike have shown that eating kiwi regularly can improve bowel movements, reduce bloating, and support overall gut health. It is especially helpful for people who struggle with occasional constipation but want a natural, food-based solution instead of laxatives.

A Natural Laxative Without the Harsh Effects

What makes kiwi special is its fiber composition. One medium kiwi contains both soluble and insoluble fiber:

  • Insoluble fiber adds bulk to stool and helps food move through the intestines.

  • Soluble fiber feeds beneficial gut bacteria and helps regulate digestion.

Together, these fibers create a mild laxative effect that encourages regular bowel movements without cramping or dependency. Unlike stimulant laxatives, kiwi supports long-term digestive balance rather than forcing quick results.

Many people notice improvement within a few days of eating one to two kiwis daily.

Packed With Vitamin C and Antioxidants

Kiwi is one of the richest natural sources of vitamin C, containing more per serving than oranges. Vitamin C plays a vital role in:

  • Supporting immune function

  • Helping the body absorb iron

  • Reducing inflammation in the digestive tract

  • Promoting collagen production for gut lining health

In addition to vitamin C, kiwi contains antioxidants such as flavonoids and carotenoids, which help protect digestive cells from oxidative stress and inflammation.

Additional Health Benefits of Kiwi

Beyond digestion, kiwi supports overall wellness in several ways:

  • Supports heart health by helping regulate blood pressure and cholesterol

  • Balances blood sugar due to its low glycemic index

  • Improves skin health through vitamin C and hydration

  • Supports eye health with lutein and zeaxanthin

  • Aids hydration, as kiwi has a high water content

This combination makes kiwi an excellent daily fruit for people of all ages.

How to Eat Kiwi for Best Digestive Results

For digestive support, consistency matters more than quantity. Most people benefit from:

  • 1–2 kiwis per day, preferably eaten in the morning or between meals

  • Eating the fruit fresh and ripe

  • Chewing thoroughly to activate digestive enzymes

Yes, the skin is edible and contains extra fiber. If organic and well-washed, eating the skin can enhance the laxative effect even more.

Simple Digestive Kiwi Recipe (Gentle & Effective)

This easy recipe is perfect for supporting digestion and boosting vitamin C naturally.

Ingredients:

  • 2 ripe kiwi fruits, peeled (or washed if eating skin-on)

  • ½ cup plain yogurt or plant-based yogurt

  • 1 teaspoon honey (optional)

  • 1 tablespoon chia seeds

  • ½ cup water or coconut water

Instructions:

  1. Slice the kiwi into small pieces.

  2. Add all ingredients to a blender.

  3. Blend until smooth.

  4. Drink slowly, preferably in the morning on an empty stomach.

This blend supports digestion, feeds healthy gut bacteria, and gently encourages regular bowel movements.

Who Should Be Careful With Kiwi

While kiwi is safe for most people, a few should take caution:

  • People with kiwi or latex allergies

  • Those with very sensitive stomachs should start with half a kiwi

  • Individuals on blood-thinning medication should consult a healthcare provider

For the majority, kiwi is a safe and nourishing addition to daily meals.

Final Thoughts

Kiwi may be small, but its digestive benefits are impressive. Rich in vitamin C, loaded with fiber, and containing unique digestive enzymes, it offers a natural laxative effect without harsh side effects. Whether eaten fresh, blended into smoothies, or added to meals, kiwi supports gut health in a gentle, effective way.

When Someone in the Family Passes Away, Never Throw Away These 4 Things at Their Funeral

The loss of a loved one is one of life’s most painful experiences. In the middle of grief, shock, and emotional exhaustion, families often rush through arrangements, cleanups, and decisions simply to get through the days following a funeral. During this overwhelming time, it’s easy to discard items that may seem ordinary or emotionally heavy. However, some things should never be thrown away, no matter how difficult the moment feels.

Across cultures and generations, elders have quietly passed down wisdom about what must be preserved after death—not out of superstition, but out of respect, memory, and emotional healing. These items often hold meaning far beyond their physical form. Once lost, they can never be replaced.

Here are four important things you should never throw away when someone in the family passes away, especially during or immediately after the funeral.

1. Personal Letters, Notes, and Handwritten Items

In a digital world, handwritten words are becoming rare—and irreplaceable. Old letters, notebooks, diaries, greeting cards, and even small handwritten notes may look unimportant during a rushed cleanup. But these are often the last living echoes of a person’s voice.

A handwritten note captures personality, emotions, humor, faith, and love in ways that photographs cannot. Years later, reading those words can bring comfort, guidance, and a deep sense of connection. Children and grandchildren often treasure these items most, especially if they never had the chance to know the person well.

Even grocery lists or short reminders written in familiar handwriting can hold immense emotional value. Never throw these items away in the days following a funeral. Instead, gather them carefully and store them safely. You may not feel ready to read them now—but one day, you will be grateful they were saved.

2. Clothing with Strong Personal Meaning

While not all clothing needs to be kept, certain pieces should never be discarded too quickly. This includes items the person wore often, clothing associated with important life events, or garments that carry cultural, religious, or emotional meaning.

A favorite scarf, prayer cap, wedding outfit, jacket, or even a simple sweater may hold memories that become more precious over time. For many families, these items offer comfort during moments of grief, acting as a physical reminder of love and presence.

Some cultures believe that discarding meaningful clothing too soon symbolizes emotional detachment before proper mourning has occurred. Even if you eventually decide to donate or repurpose the item, it’s important to wait until emotions have settled and decisions can be made with clarity, not pain.

3. Jewelry and Small Personal Belongings

Jewelry often carries deep symbolism—rings, watches, bracelets, or pendants may represent love, milestones, faith, or family history. These items are frequently small and easily misplaced or discarded unintentionally during funeral preparations.

Never throw away or casually give away personal belongings immediately after death. What may seem insignificant now could later become a treasured family heirloom. A watch a grandfather wore daily or a necklace a mother never removed may one day hold great emotional value for future generations.

Before making any decisions, collect all small personal items and store them in a safe place. Label them if needed. Over time, families can decide how to distribute or preserve these belongings in a meaningful way.

4. Photos, Documents, and Memory Objects

Photographs—both printed and digital—should never be thrown away during grief. Old photo albums, loose pictures, framed photos, or even damaged images tell a story that cannot be recreated. They preserve faces, places, and moments that may exist nowhere else.

Along with photos, important documents such as letters, certificates, awards, prayer books, or religious items should be handled with care. Some objects may appear outdated or unnecessary but carry historical or emotional significance within the family.

Memory objects—like a favorite book, rosary, recipe notebook, or tool—may one day become a bridge between generations. These items help keep stories alive long after voices fade.

A Gentle Reminder During Grief

Grief clouds judgment. What feels like clutter today may become comfort tomorrow. There is no rush to discard a loved one’s belongings immediately after their passing. Taking time honors both the departed and those left behind.

If you are unsure about an item, keep it. You can always let go later—but once something is gone, it cannot be recovered. Many people regret throwing away meaningful belongings far more than they regret keeping them.

In moments of loss, preserving memory is an act of love. These four things—handwritten items, meaningful clothing, personal belongings, and memory objects—carry emotional weight that lasts long beyond the funeral.

How To Remove Stubborn Stains From Clothing And Linens

Stubborn stains have a way of showing up at the worst possible moments—right before a big event, on freshly washed sheets, or on a favorite shirt you thought was ruined forever. The good news? Most stains can be removed with the right approach, a little patience, and items you already have at home. Understanding how stains work and when to treat them is the secret to restoring clothes and linens to their original glory.

The Golden Rule of Stain Removal

Before tackling any stain, remember this: act fast. Fresh stains are far easier to remove than ones that have set into fabric fibers. Always blot—never rub—because rubbing pushes the stain deeper into the material. And if possible, treat the stain before washing, since heat can permanently lock it in.

Common Stains and How to Remove Them

1. Grease and Oil Stains

Grease stains from cooking oils, butter, or cosmetics cling stubbornly to fabric fibers.

What works best:

  • Sprinkle baking soda or cornstarch on the stain to absorb excess oil.

  • Let it sit for 15–30 minutes.

  • Brush off the powder and apply a few drops of dish soap.

  • Gently work it in with your fingers, then rinse with warm water.

  • Wash as usual.

Dish soap is especially effective because it’s designed to cut through grease.

2. Coffee and Tea Stains

Dark beverages are notorious for leaving yellow or brown marks, especially on light fabrics.

Solution:

  • Rinse immediately with cold water from the back of the fabric.

  • Apply liquid laundry detergent directly to the stain.

  • For older stains, soak in a mixture of warm water and white vinegar for 30 minutes before washing.

Avoid using hot water at first—it can make the stain permanent.

3. Blood Stains

Blood stains can be intimidating, but they’re surprisingly manageable.

Important rule: Use cold water only.

Steps:

  • Rinse the stain with cold water as soon as possible.

  • Apply hydrogen peroxide (for white fabrics) or salt mixed with cold water.

  • Gently blot until the stain fades.

  • Wash in cold water and air-dry to check results before using heat.

4. Wine and Juice Stains

Red wine spills feel disastrous—but they don’t have to be.

Quick fix:

  • Blot excess liquid immediately.

  • Sprinkle salt over the stain to absorb moisture.

  • Rinse with cold water.

  • Follow with liquid detergent or a vinegar and baking soda paste if needed.

Never let wine stains dry untreated.

5. Sweat and Deodorant Marks

Yellow underarm stains on shirts and sheets are common, especially on white fabrics.

Effective remedy:

  • Mix baking soda, hydrogen peroxide, and water into a paste.

  • Apply to the stain and let sit for 30–60 minutes.

  • Scrub gently with a soft brush and wash normally.

This method breaks down protein-based stains and odor buildup.

6. Ink Stains

Ink stains can spread quickly if treated incorrectly.

Best approach:

  • Place a paper towel under the fabric.

  • Dab rubbing alcohol or hand sanitizer onto the stain.

  • Blot gently—don’t rub.

  • Rinse and wash as usual.

Test first on colored fabrics to avoid fading.

Linen-Specific Care Tips

Linens such as bedsheets, tablecloths, and towels require special attention because they’re often made of delicate or natural fibers.

  • Avoid bleach unless absolutely necessary—it can weaken fibers over time.

  • Sun-dry white linens when possible; sunlight naturally brightens fabric.

  • For musty or set-in stains, soak linens overnight in warm water and oxygen-based cleaner.

Natural Stain Removal Alternatives

If you prefer eco-friendly solutions, these natural options work surprisingly well:

  • Lemon juice: Brightens whites and removes mild stains.

  • White vinegar: Cuts odors and loosens residue.

  • Baking soda: Absorbs moisture and neutralizes smells.

  • Sunlight: Acts as a natural bleaching agent for whites.

Always test natural solutions on a hidden area first.

What to Avoid When Removing Stains

  • Don’t use heat until the stain is fully gone.

  • Avoid mixing cleaning chemicals—it can be dangerous.

  • Never scrub delicate fabrics aggressively.

  • Don’t dry stained clothing; drying sets stains permanently.

Final Thoughts

Stubborn stains don’t mean the end of your favorite clothes or linens. With quick action, the right technique, and a little knowledge, even the toughest marks can be erased. Whether it’s grease, wine, ink, or sweat, each stain has a solution waiting in your laundry room or kitchen cabinet. Treat stains with patience and care, and your fabrics will reward you with a longer, cleaner life.

Chocolate Crunch Bars From Scratch

There’s something deeply comforting about chocolate crunch bars. They’re simple, unapologetically chocolatey, and packed with that irresistible crisp bite that makes you reach for just one more square. These bars are a throwback to childhood lunches and bake-sale classics, but when made from scratch with real ingredients, they transform into a grown-up dessert that still hits all the right nostalgic notes.

This homemade version skips artificial flavors and store-bought shortcuts, relying instead on quality chocolate, real butter, and a perfectly balanced crunch. Best of all, they’re no-bake, quick to assemble, and nearly impossible to mess up. Whether you’re making dessert for guests, a sweet snack for the family, or a last-minute treat for a celebration, these chocolate crunch bars deliver every single time.

Why Homemade Chocolate Crunch Bars Are Better

Making chocolate crunch bars from scratch gives you total control over flavor, texture, and sweetness. Store-bought versions often taste overly sweet or waxy, but homemade bars have a smoother chocolate finish and a more satisfying crunch. You can also customize them easily—add nuts, drizzle white chocolate, or sprinkle flaky sea salt for a gourmet twist.

Another huge bonus? No oven required. These bars come together on the stovetop and set in the fridge, making them perfect for warm days or when you just don’t feel like baking.

Ingredients You’ll Need

This recipe uses simple pantry staples, but the quality of your chocolate matters. Choose something you enjoy eating on its own.

  • 2 cups semi-sweet chocolate chips or chopped chocolate

  • ½ cup unsalted butter

  • ¼ cup light brown sugar, packed

  • ¼ cup honey or golden syrup

  • 1 teaspoon vanilla extract

  • 3 cups crispy rice cereal

  • ¼ teaspoon salt

Optional add-ins:
Chopped peanuts, almonds, mini marshmallows, shredded coconut, or a pinch of flaky sea salt for topping.

Step-by-Step Instructions

1. Prepare the Pan

Line an 8×8-inch square pan with parchment paper, leaving a bit of overhang on the sides. This makes removing and slicing the bars much easier later. Set aside.

2. Melt the Chocolate Base

In a medium saucepan over low heat, combine the butter, brown sugar, and honey. Stir gently until the butter melts and the mixture becomes smooth and glossy. Be patient—low heat prevents scorching and keeps the texture silky.

Once melted, add the chocolate and salt. Stir continuously until the chocolate is fully melted and the mixture looks thick and luxurious. Remove from heat and stir in the vanilla extract.

3. Add the Crunch

Pour the crispy rice cereal into a large mixing bowl. Slowly add the warm chocolate mixture over the cereal, folding gently with a spatula until every piece is evenly coated. Take your time here—this ensures a perfect crunch in every bite.

If you’re adding nuts or other mix-ins, fold them in now.

4. Press and Chill

Transfer the mixture into the prepared pan. Press it down firmly using the back of a spoon or a spatula, making sure the surface is smooth and compact. A tightly packed bar slices cleanly and holds together better.

Place the pan in the refrigerator for at least 1 hour, or until fully set.

5. Slice and Serve

Once firm, lift the bars out using the parchment overhang. Slice into squares or rectangles with a sharp knife. Serve chilled or at room temperature.

Tips for Perfect Chocolate Crunch Bars

  • Low heat is key: Chocolate scorches easily, so always melt gently.

  • Don’t overmix: Stir just until combined to keep the cereal crisp.

  • Press firmly: This prevents crumbly bars when slicing.

  • Use good chocolate: It’s the star flavor—choose wisely.

Fun Variations to Try

  • Peanut Butter Crunch Bars: Swirl in ¼ cup creamy peanut butter before pressing into the pan.

  • Dark Chocolate Sea Salt Bars: Use dark chocolate and finish with flaky salt.

  • White Chocolate Drizzle: Melt white chocolate and drizzle over the top once set.

  • Holiday Version: Add red and green sprinkles or crushed candy canes.

Storage and Make-Ahead Tips

Store chocolate crunch bars in an airtight container in the refrigerator for up to 7 days. They also freeze beautifully—just wrap individual bars and freeze for up to 2 months. Let them thaw slightly before serving.

Final Thoughts

Chocolate crunch bars from scratch prove that the simplest desserts are often the most satisfying. With their glossy chocolate coating and light, crispy texture, these bars strike the perfect balance between indulgent and comforting. They’re quick, customizable, and guaranteed to disappear fast—so you might want to make a double batch.

Detox Water with Cucumber, Lemon & Ginger: What Really Changes in Your Body After 14 Days

“Detox water” gets a lot of buzz, but what actually happens if you drink it consistently for two weeks? When made thoughtfully, cucumber, lemon, and ginger water isn’t a magic cleanse—it’s a gentle daily habit that supports hydration, digestion, and metabolic balance. The changes are subtle but noticeable, especially when consumed regularly.

A Unique Detox Water Recipe (Not the Usual Throw-It-All-In)

This version is designed to balance flavor, digestion support, and nutrient release—without bitterness or stomach irritation.

Ingredients (1.5 liters)

  • ½ English cucumber, thinly sliced (leave peel on)

  • 1 organic lemon, thinly sliced and lightly squeezed

  • 1-inch fresh ginger root, peeled and gently crushed

  • 6–8 fresh mint leaves (optional but recommended)

  • 1 pinch of sea salt (optional, for mineral balance)

  • Cold filtered water

Preparation Method (Key Difference)

  1. Add cucumber and lemon slices to a glass pitcher.

  2. Gently crush the ginger with the back of a spoon before adding—this releases gingerols more effectively.

  3. Add mint leaves and a tiny pinch of sea salt (this helps absorption and reduces electrolyte imbalance).

  4. Fill with cold water and let steep at least 4 hours, ideally overnight.

  5. Consume within 24 hours for best potency.

Drink 1–2 glasses in the morning and sip throughout the day.

What “Detox” Actually Means (And What It Doesn’t)

Your liver and kidneys already detox your body. This drink does not replace those organs. What it does do is:

  • Improve hydration

  • Support digestion

  • Reduce bloating

  • Encourage better daily habits

Think of it as supportive, not curative.

Days 1–3: Hydration Reset Begins

The first noticeable change is hydration. Many people are mildly dehydrated without realizing it.

What you may feel:

  • More frequent urination (normal)

  • Reduced sugar cravings

  • Slight decrease in bloating

  • Fresher breath

Cucumber is over 95% water and provides potassium, while lemon adds citric acid, which can stimulate digestive enzymes. Ginger begins gently activating gut motility.

This phase is about flushing excess sodium and water retention, not fat loss.

Days 4–7: Digestive Comfort Improves

By the end of the first week, digestion often becomes smoother.

Common changes:

  • Less post-meal heaviness

  • Reduced gas and bloating

  • More regular bowel movements

  • Calmer stomach in the morning

Ginger is the star here. Its active compounds help speed gastric emptying and reduce gut inflammation. Lemon stimulates bile production, supporting fat digestion, while cucumber soothes the digestive tract.

Your appetite may start to feel more regulated—not suppressed, just balanced.

Days 8–10: Energy and Skin Shifts

At this stage, hydration begins to affect systems beyond digestion.

You may notice:

  • More stable energy levels

  • Fewer afternoon crashes

  • Brighter, more hydrated skin

  • Reduced puffiness around eyes and face

This isn’t detoxification—it’s cellular hydration. When cells receive adequate water and electrolytes, nutrient transport improves and inflammation markers may decrease slightly.

Lemon provides vitamin C, supporting collagen synthesis, while cucumber’s silica contributes to skin elasticity.

Days 11–14: Metabolic Support & Habit Formation

After two weeks, the biggest benefit isn’t physical—it’s behavioral.

Longer-term changes include:

  • Reduced cravings for sugary drinks

  • Improved awareness of thirst vs hunger

  • Slight reduction in water-retention weight

  • More consistent digestion

Some people report modest waistline changes, mostly due to decreased bloating—not fat loss. Ginger can support thermogenesis slightly, but the real win is replacing processed beverages with water.

Your metabolism works more efficiently when hydration is consistent.

What Does Not Happen (Important Truth)

Let’s be honest:

  • You won’t “flush toxins” out of fat cells

  • You won’t lose significant weight from this alone

  • It won’t cure inflammation or chronic illness

Anyone promising dramatic detox results is overselling.

Who Should Be Careful

This drink is safe for most people, but caution is advised if you:

  • Have acid reflux (use less lemon)

  • Are on potassium-restricted diets

  • Have gallbladder issues (limit ginger)

  • Are pregnant (keep ginger minimal)

Listen to your body.

Final Verdict: Is 14 Days Worth It?

Yes—not because it detoxes you, but because it recalibrates hydration, digestion, and habits.

Cucumber, lemon, and ginger detox water works best as a daily wellness ritual, not a cleanse. The real transformation is subtle: better digestion, clearer skin, reduced bloating, and a healthier relationship with hydration.

Loaded Cheeseburger

This burger is designed around contrast: crispy and creamy, smoky and tangy, rich and fresh. Every layer earns its place. The secret isn’t just the beef—it’s how all the toppings talk to each other.

What Makes It “Loaded”?

Instead of piling on random toppings, this burger is loaded strategically:

  • Butter-toasted brioche bun

  • Juicy beef patty with melted cheese inside and out

  • Bacon jam (sweet, smoky, sticky)

  • Garlic-parmesan fries on the burger

  • Sharp pickles for bite

  • A house sauce that ties everything together

Yes, fries on the burger. Trust the process.

Ingredients (Serves 4)

For the Beef Patties

  • 1½ lb (680 g) ground beef (80/20 for juiciness)

  • 1 tsp kosher salt

  • ½ tsp freshly cracked black pepper

  • ½ tsp smoked paprika

  • ½ tsp garlic powder

  • 4 slices sharp cheddar

  • 4 slices American cheese (for melt factor)

For the Bacon Jam

  • 8 slices thick-cut bacon, chopped

  • 1 small onion, finely diced

  • 2 cloves garlic, minced

  • 2 tbsp brown sugar

  • 1 tbsp balsamic vinegar

  • 1 tbsp maple syrup

  • Black pepper to taste

Garlic-Parmesan Fries

  • 3 cups frozen or fresh fries

  • 2 tbsp olive oil

  • 1 tsp garlic powder

  • ½ tsp paprika

  • ¼ cup grated parmesan

  • Salt to taste

  • Fresh parsley (optional)

House Burger Sauce

  • ½ cup mayonnaise

  • 2 tbsp ketchup

  • 1 tbsp yellow mustard

  • 1 tbsp dill pickle relish

  • ½ tsp smoked paprika

  • ½ tsp garlic powder

  • A squeeze of lemon juice

Burger Assembly

  • 4 brioche burger buns

  • Dill pickle chips

  • Butter for toasting buns

Step 1: Make the Bacon Jam

Start here—this is flavor gold.

In a skillet over medium heat, cook the chopped bacon until crispy. Remove the bacon and set it aside, leaving about 2 tablespoons of bacon fat in the pan. Add the diced onion and cook until soft and lightly caramelized, about 8 minutes. Stir in garlic and cook for 30 seconds.

Add brown sugar, balsamic vinegar, maple syrup, and black pepper. Let the mixture simmer until thick and sticky, about 5–7 minutes. Stir the bacon back in. Remove from heat and let cool slightly—it thickens as it rests.

Step 2: Garlic-Parmesan Fries

Bake or air-fry the fries according to package directions (or fry fresh ones until golden). While hot, toss with olive oil, garlic powder, paprika, parmesan, and salt. Finish with parsley if using. These fries should be crispy—soggy fries are burger betrayal.

Step 3: The Burger Sauce

Mix all sauce ingredients in a bowl until smooth. Taste and adjust—more pickle relish if you like tang, more paprika if you want smoke. Chill until ready to use.

Step 4: Build the Patties

Divide the beef into four equal portions. Gently shape into patties slightly wider than your buns. Don’t overwork the meat.

Season both sides with salt, pepper, smoked paprika, and garlic powder. Make a small dimple in the center of each patty—this prevents puffing.

Step 5: Cook the Burgers

Heat a cast-iron skillet or grill over high heat. Cook patties for about 3–4 minutes per side for medium, flipping once.

In the final minute, top each patty with one slice of cheddar and one slice of American cheese. Cover loosely to melt.

Step 6: Toast the Buns

Butter the cut sides of the brioche buns and toast until golden. This step matters—it adds structure and flavor.

Step 7: Assemble Like a Pro

Here’s the order (bottom to top):

  1. Bottom bun

  2. Generous swipe of burger sauce

  3. Cheeseburger patty

  4. Spoonful of warm bacon jam

  5. A small pile of garlic-parmesan fries

  6. Pickle chips

  7. More burger sauce on the top bun

  8. Top bun (press gently, commit fully)

Final Thoughts

This loaded cheeseburger isn’t about being neat—it’s about being memorable. Sweet bacon jam balances salty beef, fries add crunch, pickles cut the richness, and the sauce pulls it all together. Serve with extra napkins, cold drinks, and zero shame.