Only 3 ingredients for the most flavorful potatoes ever

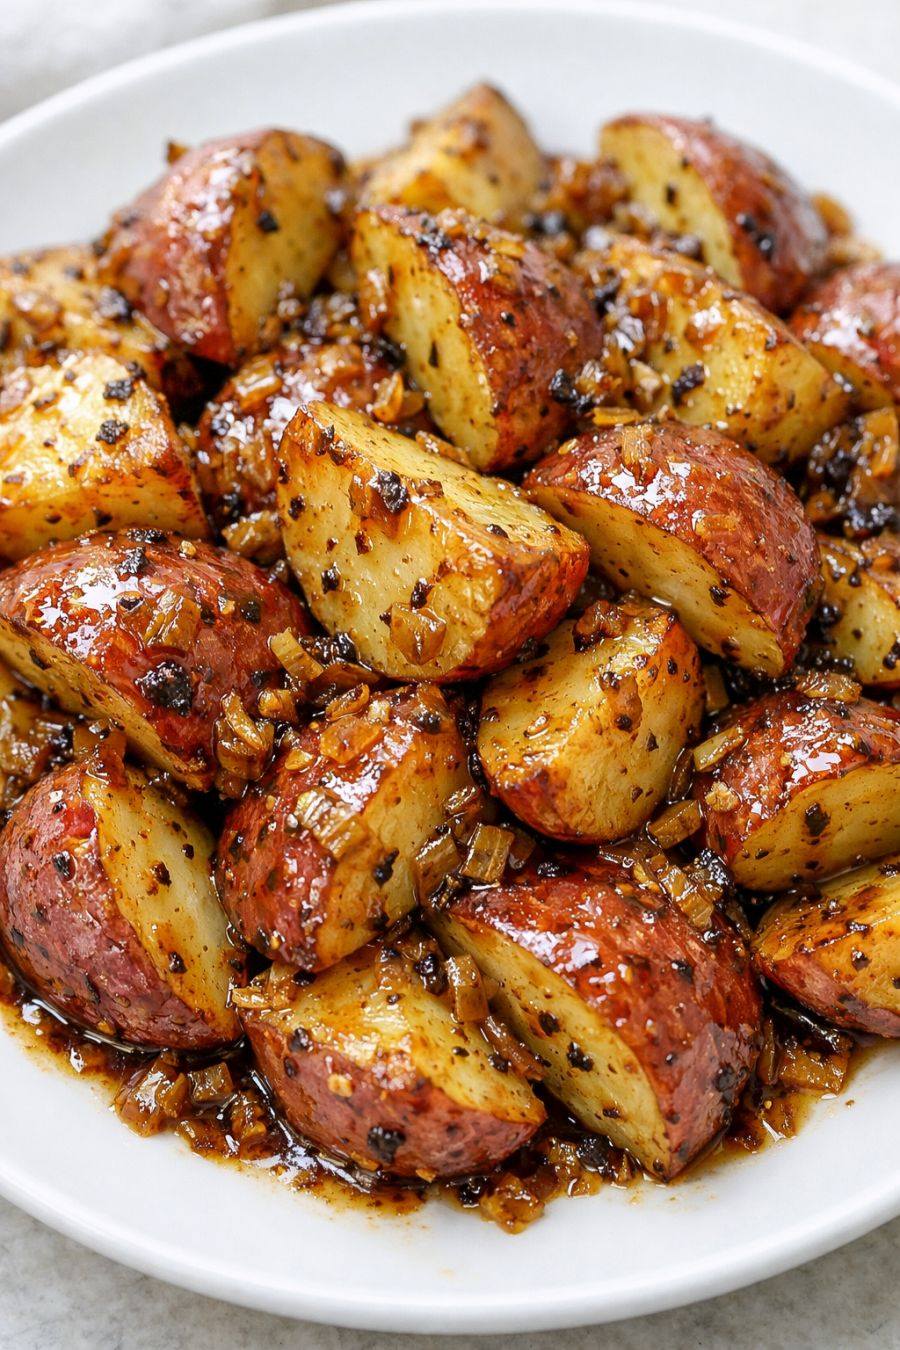
Only 3 Ingredients for the Most Flavorful Potatoes Ever

If you think incredible flavor requires a long list of ingredients, think again. Sometimes, simplicity is the secret to perfection. These 3-ingredient potatoes are crispy on the outside, tender on the inside, and coated in a rich, savory glaze that tastes like you spent hours building layers of flavor. In reality, you only need baby potatoes, soy sauce, and garlic to create a side dish that steals the spotlight at any meal.

This recipe is perfect for busy weeknights, family dinners, or even holiday gatherings when you want something impressive without extra effort. The magic lies in how these three humble ingredients work together to create deep, bold flavor.


Ingredients (Serves 4)

  • 1.5 pounds (700 g) baby red or yellow potatoes

  • 3 tablespoons soy sauce

  • 5–6 cloves garlic, finely minced

That’s it. Just three simple ingredients.


Why These 3 Ingredients Work So Well

Potatoes are naturally creamy and mild, which makes them the perfect canvas for bold flavors. Baby potatoes are especially great because they hold their shape well and have thin skins that crisp beautifully.

Soy sauce brings saltiness, umami depth, and a rich color. As it caramelizes in the oven or pan, it creates a savory glaze that coats every bite.

Garlic adds warmth and aroma. When roasted or sautéed, it becomes slightly sweet and nutty, infusing the potatoes with irresistible flavor.

Together, these ingredients create a balance of salty, savory, and slightly sweet notes that make it hard to stop at one serving.


Step-by-Step Instructions

Step 1: Prepare the Potatoes

Wash the baby potatoes thoroughly and pat them dry. Cut them in half. If some are larger, cut them into quarters so all pieces are roughly the same size. This ensures even cooking.

Uniform pieces are important because smaller pieces cook faster and crisp better.


Step 2: Parboil for Perfect Texture

Place the cut potatoes in a pot of cold water. Bring to a boil and cook for about 8–10 minutes, or until just fork-tender but not falling apart.

Drain them well and let them sit in the colander for a few minutes. Allowing steam to escape helps the exterior dry out slightly, which leads to better browning.

This step guarantees a creamy interior and crispy edges later.


Step 3: Roast or Pan-Sauté

You have two cooking options:

Option A: Oven Roasting (Best for Crispy Edges)

  1. Preheat your oven to 425°F (220°C).

  2. Spread the drained potatoes on a baking sheet in a single layer.

  3. Roast for 20–25 minutes until golden and slightly crispy.

Once they begin to brown, remove the tray briefly. Toss the potatoes with soy sauce and minced garlic. Return to the oven for another 10–15 minutes, flipping once, until deeply golden and caramelized.

The soy sauce will reduce and cling to the potatoes, creating a glossy, flavorful coating.


Option B: Stovetop Method (Faster and Just as Delicious)

  1. Heat a large skillet over medium heat.

  2. Add the drained potatoes cut-side down in a single layer.

  3. Cook undisturbed for 5–7 minutes until golden.

Flip the potatoes and cook another 5 minutes. Add the soy sauce and minced garlic directly to the pan. Stir gently and let everything cook together for another 3–5 minutes until the sauce thickens and coats the potatoes.

Be careful not to burn the garlic — lower the heat if needed.


The Secret to Maximum Flavor

The key is timing. Adding the soy sauce and garlic after the potatoes have started browning prevents burning and allows the sauce to caramelize properly. Garlic burns quickly, so always introduce it later in the cooking process.

Also, avoid overcrowding. Potatoes need space to crisp. If they’re too close together, they’ll steam instead of brown.


Texture and Taste

When done correctly, these potatoes have:

  • Crispy, golden edges

  • Creamy, fluffy centers

  • Deep savory flavor

  • Slight caramelized sweetness

  • Rich garlic aroma

They are bold enough to stand alone yet versatile enough to complement grilled chicken, steak, fish, or even a simple salad.


Serving Suggestions

Serve these potatoes hot, straight from the oven or skillet. They pair beautifully with:

  • Roasted meats

  • Grilled vegetables

  • Fried eggs for brunch

  • A dollop of sour cream or yogurt (if you’re willing to add a fourth ingredient!)

They also reheat well in a skillet, regaining their crispiness with just a few minutes of heat.


Storage Tips

Store leftovers in an airtight container in the refrigerator for up to 3 days. Reheat in a pan over medium heat to restore texture. Avoid microwaving if possible, as it softens the crisp edges.


Common Mistakes to Avoid

  1. Skipping the parboil: This step ensures the interior cooks perfectly.

  2. Adding garlic too early: It can burn and turn bitter.

  3. Overcrowding the pan: Leads to soggy potatoes instead of crispy ones.

  4. Using too much soy sauce: It should coat, not drown, the potatoes.

f peanut butter fudge

If you love smooth, melt-in-your-mouth sweets with deep nutty flavor, peanut butter fudge is a timeless treat that never disappoints. It’s creamy, rich, slightly salty, and perfectly sweet — ideal for holidays, family gatherings, or simply satisfying a craving. The best part? You don’t need fancy equipment or complicated techniques. This recipe is beginner-friendly and delivers consistent, bakery-style results every time.

Below is a detailed, step-by-step guide to making classic peanut butter fudge at home.


3 mistakes to avoid when charging your phone

3 Mistakes to Avoid When Charging Your Phone

In today’s world, smartphones are more than just communication devices — they are cameras, wallets, alarm clocks, offices, and entertainment hubs all in one. Because we rely on them so heavily, keeping the battery healthy is extremely important. Yet many people unknowingly damage their phone’s battery through poor charging habits.

Modern smartphones use lithium-ion batteries. These batteries are powerful and long-lasting, but they are also sensitive to heat, overcharging stress, and poor charging practices. If you want your phone battery to last longer and perform better, here are three major mistakes you should avoid when charging your phone.


1. Charging Your Phone to 100% All the Time

Many people believe that charging their phone to 100% every single time is the best practice. It feels logical — full battery means more usage time. However, lithium-ion batteries don’t like being at 100% for long periods.

When your phone stays at full charge for hours, especially overnight, it creates stress on the battery cells. While modern phones are smart enough to stop charging once they reach 100%, they still experience small “top-up” cycles that keep the battery full. Over time, this constant stress can reduce battery lifespan.

Experts often recommend keeping your battery between 20% and 80% for optimal health. This range reduces strain and helps maintain long-term performance. Some smartphones even include battery optimization features that delay charging past 80% until just before you wake up.

Charging to 100% occasionally is perfectly fine — especially if you need the extra power for travel or a long day. The problem arises when it becomes a daily habit.

Better habit: Try unplugging your phone once it reaches around 80–90%, especially if you’re charging during the day.


2. Letting Your Battery Drop to 0% Frequently

On the other end of the spectrum, some people wait until their phone completely dies before charging it again. This habit may have been useful years ago with older battery technologies, but it’s harmful for modern lithium-ion batteries.

Deep discharging — letting your phone drop to 0% — places significant stress on the battery. If done repeatedly, it can permanently reduce battery capacity. In extreme cases, if a battery remains fully discharged for a long time, it may struggle to charge again.

Lithium-ion batteries perform best with partial charges. They prefer short, frequent charging sessions rather than dramatic 0% to 100% cycles.

If your battery regularly drops below 10%, it’s time to change your charging routine. Keeping it above 20% is ideal for long-term battery health.

Better habit: Plug in your phone when it reaches 20–30% instead of waiting for it to die.


3. Using Cheap or Unsafe Chargers

Not all chargers are created equal. Using low-quality or counterfeit chargers can damage your battery and even pose safety risks.

Cheap chargers may not regulate voltage properly. Inconsistent power delivery can overheat your battery, which is one of the biggest enemies of lithium-ion technology. Excessive heat accelerates battery degradation and may cause swelling or long-term performance issues.

Overheating doesn’t just come from poor chargers — it can also happen when you use your phone heavily while charging. Gaming, streaming videos, or running demanding apps during charging generates additional heat. Combined with charging heat, this can strain the battery.

Whenever possible, use the original charger that came with your phone or purchase certified replacements from reputable brands. It’s a small investment that protects an expensive device.

Better habit: Use manufacturer-approved chargers and avoid heavy phone use while charging.


Bonus Tips for Healthier Charging

Beyond the three major mistakes above, here are a few additional tips that can help extend your battery life:

  • Avoid charging your phone under your pillow or in hot environments.

  • Remove thick cases if your phone becomes hot during charging.

  • Turn on battery optimization settings in your phone’s system.

  • Avoid leaving your phone in direct sunlight.

  • If storing your phone for a long period, keep it at around 50% charge.

Temperature control is just as important as charge percentage. Heat is the number one factor that reduces battery lifespan.


Why Battery Health Matters

Many people only think about battery care when they start noticing problems — shorter battery life, sudden shutdowns, or slow performance. But battery degradation happens gradually.

Replacing a battery can be expensive, and in some modern smartphones, it requires professional service. Good charging habits can extend your battery’s lifespan by months or even years.

Taking care of your battery doesn’t mean obsessing over every percentage point. It simply means avoiding extreme habits — don’t keep it full constantly, don’t let it die regularly, and don’t expose it to excessive heat.


Final Thoughts

Your smartphone battery is designed to last, but your habits determine how well it ages. Avoiding these three common mistakes — charging to 100% all the time, letting it drop to 0% frequently, and using poor-quality chargers — can significantly improve battery longevity.

Think of your battery like your health. Balance is key. Moderate charging, proper equipment, and temperature awareness will keep your phone running smoothly for years.

Small changes today can save you money and frustration tomorrow.

It removes kidney stones, dissolves gravel, and relieves urinary tract infections.

Claims that a simple homemade drink can “remove kidney stones, dissolve gravel, and relieve urinary tract infections” are extremely popular online. The idea is appealing: something natural, inexpensive, and easy to prepare that can repair your kidneys while you sleep. However, when it comes to kidney health, it is important to separate hope from medical reality.

Your kidneys are highly sophisticated organs. They filter waste from your blood, balance fluids and electrolytes, regulate blood pressure, and help produce hormones that control red blood cell production and bone health. Because of their complexity, there is no single drink that can magically “repair” them overnight.

Let’s start with kidney stones. Kidney stones form when certain minerals and salts in the urine become concentrated and crystallize. The most common type is made of calcium oxalate, but stones can also contain uric acid, struvite, or cystine. Small stones sometimes pass on their own with adequate hydration. Drinking plenty of water is the most evidence-based recommendation for preventing and helping pass small stones. Increasing fluid intake dilutes urine, making it harder for crystals to form and easier for tiny stones to move through the urinary tract.

Certain dietary measures can also help depending on the type of stone. For example, reducing excessive sodium intake, maintaining normal dietary calcium (not too low), and limiting high-oxalate foods in people prone to calcium oxalate stones may reduce recurrence. Lemon juice or citrus beverages may help some people because citrate can inhibit stone formation. However, this is supportive—not a guaranteed cure. Larger stones often require medical treatment such as medications, shock wave therapy, or surgical procedures.

Now consider the claim that a drink can “dissolve gravel.” The term “gravel” is often used informally to describe tiny crystals or very small stones in the urinary tract. In reality, once a stone has formed, it cannot usually be dissolved by random herbal mixtures. Only specific types of stones, such as certain uric acid stones, may be dissolved with carefully monitored medications that alkalinize the urine. This is done under medical supervision. Drinking a mixture of herbs or spices without knowing the stone type can be ineffective or even harmful.

As for urinary tract infections (UTIs), these are typically caused by bacteria, most commonly Escherichia coli. Symptoms can include burning during urination, frequent urination, pelvic pain, cloudy urine, or fever. While staying well hydrated helps flush bacteria from the urinary tract, hydration alone does not reliably cure an established infection. Most UTIs require appropriate antibiotics prescribed by a healthcare professional. Delaying treatment in favor of home remedies can allow the infection to spread to the kidneys, causing a more serious condition called pyelonephritis.

Some natural ingredients are often mentioned in “kidney repair” drinks. Cranberry, for example, may help reduce the risk of recurrent UTIs in some individuals by preventing bacteria from sticking to the urinary tract lining. However, it does not reliably treat an active infection. Ginger and turmeric have anti-inflammatory properties, but there is no solid evidence that they dissolve kidney stones. Parsley and other herbs are sometimes promoted as “kidney cleansers,” yet scientific support for these claims is limited.

It is also important to recognize that not all natural substances are safe for everyone. People with chronic kidney disease must be especially careful with herbal supplements, as some can worsen kidney function or interact with medications. Even high amounts of vitamin C, often included in health drinks, may increase the risk of kidney stones in susceptible individuals.

That does not mean you are powerless when it comes to protecting your kidneys. There are well-established, evidence-based steps you can take:

First, drink adequate water throughout the day unless your doctor has advised fluid restriction. Clear or pale yellow urine is often a sign of good hydration.

Second, maintain a balanced diet. Limit excess salt, processed foods, and sugary beverages. Eat fruits and vegetables, moderate amounts of protein, and maintain a healthy weight.

Third, manage chronic conditions. High blood pressure and diabetes are leading causes of kidney damage. Keeping blood pressure and blood sugar under control is one of the most powerful ways to protect your kidneys.

Fourth, avoid unnecessary overuse of painkillers such as nonsteroidal anti-inflammatory drugs (NSAIDs), which can strain the kidneys when taken frequently or in high doses.

Finally, seek medical evaluation if you have symptoms of kidney stones or a UTI. Severe back or side pain, blood in the urine, fever, chills, or persistent burning with urination should never be ignored.

The idea of “repairing your kidneys while you sleep” with a single drink is attractive, but it oversimplifies a complex medical issue. While healthy beverages and proper hydration support kidney function, they are not miracle cures. Kidney stones, urinary infections, and other kidney conditions require accurate diagnosis and appropriate treatment.

If you are interested in natural ways to support kidney health, think in terms of overall lifestyle rather than quick fixes. Good hydration, balanced nutrition, and regular medical checkups are far more powerful than any viral recipe. When it comes to your kidneys, science-based care is always the safest path

If your HANDS fall asleep it’s a clear sign that you might have

If you have this plant in your home, it’s because it has

Especially after 60: Who should an older person live with

Turning 60 is not just a milestone birthday — it often marks the beginning of a new chapter in life. Retirement, changing health needs, emotional shifts, and evolving family dynamics all raise an important question: who should an older person live with? The answer is deeply personal and depends on health, finances, relationships, independence, and personal preferences. There is no single “correct” arrangement, but understanding the options can help seniors and their families make thoughtful, empowering decisions.

Living With a Spouse or Partner

For many older adults, continuing to live with a spouse or long-term partner is the most natural choice. A familiar companion provides emotional stability, shared history, and daily support. Studies consistently show that companionship can reduce loneliness, depression, and cognitive decline.

However, as couples age, health differences can become more noticeable. One partner may become a caregiver for the other. While this can strengthen bonds, it can also lead to stress and burnout. Honest conversations about future care needs, finances, and possible outside help are essential. When both partners remain relatively healthy and independent, living together can offer comfort, security, and a strong sense of purpose.

Living With Adult Children

In many cultures, multigenerational living is common and valued. Living with adult children can offer practical benefits: shared expenses, assistance with medical appointments, help with daily tasks, and the joy of being close to grandchildren. It may also provide emotional reassurance for both generations.

However, this arrangement requires clear boundaries. Older parents may struggle with feeling like a burden, while adult children may face financial or emotional pressure. Privacy and independence must be respected on both sides. Successful multigenerational households usually rely on open communication, shared responsibilities, and mutual respect.

Living Alone

Many people over 60 prefer to live alone — and thrive doing so. Independence fosters confidence, control, and a sense of dignity. For seniors who are healthy and socially active, living alone can be empowering.

That said, safety becomes an important consideration. Falls, sudden illnesses, or emergencies are real risks. Seniors living alone benefit from strong community ties, regular family check-ins, accessible healthcare, and possibly medical alert systems. Social engagement is also crucial. Isolation can negatively affect both mental and physical health, so maintaining friendships, hobbies, and community involvement is essential.

Living With Other Seniors

Senior communities, retirement villages, and shared housing arrangements with peers are increasingly popular. These settings allow older adults to maintain independence while enjoying social interaction and shared activities.

Living among peers reduces loneliness and provides built-in companionship. Many communities also offer amenities such as fitness programs, meal services, and healthcare access. This option is particularly appealing for widowed or single seniors who want both independence and social support without relying entirely on family.

Assisted Living or Care Facilities

When health concerns become more complex, assisted living facilities or nursing homes may be the safest option. These environments provide medical supervision, help with daily activities, and structured routines.

Some families feel guilt when considering professional care, but it can actually improve quality of life when needs exceed what family members can provide. The key is choosing a facility that prioritizes dignity, respect, and individualized care. Regular visits from family members help maintain emotional bonds and reduce feelings of abandonment.

Factors to Consider

Choosing the right living arrangement after 60 involves more than convenience. Important factors include:

Health Status
Chronic conditions, mobility limitations, or cognitive decline may require additional support. A healthy 62-year-old may prefer independence, while an 80-year-old with medical needs might require assistance.

Financial Situation
Housing, healthcare, and daily expenses must be sustainable. Some living arrangements reduce costs through shared expenses, while others may require long-term financial planning.

Emotional Well-Being
Loneliness can significantly impact health. Living in a supportive, socially connected environment is just as important as physical care.

Level of Independence
Many seniors value autonomy. The ideal arrangement supports independence while ensuring safety.

Family Dynamics
Relationships matter. A peaceful, respectful household is far more important than simply living under the same roof.

There Is No One-Size-Fits-All Answer

The best living arrangement after 60 is one that balances independence, safety, emotional fulfillment, and practical support. For some, that means staying in their own home with occasional help. For others, it means moving closer to family or joining a senior community.

What matters most is choice. Older adults should be involved in the decision-making process whenever possible. Their voice, preferences, and dignity deserve respect. Rather than asking “Where should they live?” the better question might be, “Where will they feel safest, happiest, and most valued?”

Aging does not mean losing independence or identity. With thoughtful planning and open communication, living arrangements after 60 can support not just survival, but a meaningful and fulfilling life.

Doctors reveal that eating boiled eggs causes

Because they give you leg cramps at night

Leg cramps at night can be painful, sudden, and incredibly frustrating. They often strike when your body should be resting, interrupting your sleep and leaving your muscles sore and tight. These cramps commonly occur because of dehydration, mineral deficiencies, poor circulation, or muscle fatigue. Fortunately, there is a simple and natural solution you can prepare at home using ingredients that nourish your muscles and support healthy nerve function. This nighttime leg cramp relief drink recipe is designed to provide essential nutrients like magnesium, potassium, and calcium—three minerals known to help prevent muscle cramps and promote relaxation.

Health experts, including those at Mayo Clinic, emphasize that electrolyte balance plays a key role in muscle health. When your body lacks important minerals, muscles can contract involuntarily, causing cramps. This gentle, natural drink supports your body overnight and may reduce the frequency and intensity of nighttime leg cramps.

Why This Recipe Works

This recipe combines ingredients that work together to calm muscles and support hydration. Bananas are rich in potassium, which helps muscles contract and relax properly. Almond milk provides calcium and magnesium, both essential for muscle relaxation and nerve signaling. Honey offers natural glucose, which helps your muscles replenish energy stores. Cinnamon improves circulation, while warm water helps your body absorb nutrients efficiently.

Drinking this soothing mixture before bed prepares your muscles for overnight recovery and reduces the chances of painful cramping.

Ingredients

  • 1 ripe banana

  • 1 cup warm unsweetened almond milk

  • ½ teaspoon ground cinnamon

  • 1 teaspoon natural honey

  • ½ cup warm water

  • Optional: pinch of turmeric (for anti-inflammatory support)

Preparation Instructions

Start by peeling the ripe banana and placing it into a blender. Bananas that are slightly spotted are ideal because they contain higher levels of easily absorbed potassium.

Add the warm almond milk to the blender. Make sure the milk is warm, not hot, as excessive heat can reduce nutrient effectiveness and alter flavor.

Next, add the cinnamon and honey. Cinnamon enhances circulation, helping blood flow more efficiently to your muscles. Honey adds gentle sweetness and supports muscle energy recovery.

Pour in the warm water. This helps thin the drink and improves hydration, which is essential for preventing cramps.

Blend the mixture until completely smooth and creamy. If you prefer a thinner consistency, you can add a little more warm water.

Pour the drink into a cup and consume it slowly about 30 to 60 minutes before bedtime.

How Each Ingredient Supports Muscle Health

Bananas are one of the best natural sources of potassium. Potassium helps regulate muscle contractions and prevents involuntary tightening. Low potassium levels are a common cause of muscle cramps.

Almond milk contains calcium and magnesium, two minerals essential for muscle relaxation. Magnesium is particularly important because it helps muscles release after contraction, preventing painful tightening.

Cinnamon improves circulation, ensuring that oxygen and nutrients reach your muscles efficiently. Better circulation helps reduce muscle fatigue and tension.

Honey provides natural sugars that support glycogen replenishment in muscles. This helps muscles recover and reduces nighttime cramping.

Warm water supports hydration and improves nutrient absorption. Dehydration is one of the leading causes of leg cramps.

Turmeric, if added, provides anti-inflammatory benefits and supports overall muscle recovery.

Best Time to Drink It

The best time to drink this remedy is in the evening, about 30 to 60 minutes before sleep. This allows your body time to absorb the nutrients and prepare your muscles for overnight relaxation.

You can drink it daily for consistent benefits, especially if you frequently experience leg cramps at night.

Additional Tips to Prevent Nighttime Leg Cramps

While this drink is highly effective, combining it with healthy habits can improve results even more.

Stay hydrated throughout the day. Dehydration increases the risk of muscle cramps.

Stretch your legs gently before bed. Simple calf stretches improve circulation and muscle flexibility.

Avoid excessive caffeine late in the day, as it can contribute to dehydration.

Maintain balanced nutrition with foods rich in magnesium, potassium, and calcium.

Light evening walks can improve circulation and reduce muscle stiffness.

Expected Benefits

When consumed regularly, this nighttime relief drink may help:

Reduce frequency of nighttime leg cramps
Relax muscles naturally
Improve sleep quality
Support muscle recovery
Enhance hydration
Promote healthy circulation

Many people notice improvement within a few days, especially when combined with proper hydration and stretching.

Who Can Benefit Most

This recipe is especially helpful for:

Older adults
People who stand for long periods
Athletes
Individuals with mineral deficiencies
Those who experience frequent nighttime cramps

It is gentle, natural, and safe for regular use.

Conclusion

Nighttime leg cramps are often your body’s signal that your muscles need better hydration and proper mineral support. This simple nighttime leg cramp relief drink recipe provides essential nutrients that help muscles relax, recover, and function properly. With its natural ingredients and easy preparation, it offers a safe and effective way to support muscle health and improve sleep comfort.

Fresh Guava Wellness Bowl

The Fresh Guava Wellness Bowl is a refreshing, nutrient-rich recipe designed to energize your body, strengthen your immune system, and support overall wellness. Guava is often called a “superfruit,” and for good reason. This tropical fruit is packed with vitamin C, fiber, antioxidants, and essential nutrients that promote digestion, heart health, and glowing skin. Popular across tropical regions like Pakistan and India, guava has been treasured for centuries not only for its sweet flavor but also for its healing and restorative properties.

This wellness bowl combines fresh guava with creamy yogurt, crunchy nuts, and wholesome toppings to create a perfectly balanced meal. It’s ideal for breakfast, a midday energy boost, or even a light, healthy dessert. The combination of natural sweetness, protein, fiber, and healthy fats helps stabilize blood sugar, improve digestion, and keep you feeling full and satisfied.

Why This Guava Wellness Bowl Is So Healthy

Guava is one of the richest sources of vitamin C, often containing more than oranges. Vitamin C strengthens immunity, helps the body fight infections, and supports collagen production for healthy skin. Guava is also high in dietary fiber, which improves digestion, prevents constipation, and supports gut health.

The yogurt adds probiotics, which help balance gut bacteria and improve nutrient absorption. Nuts and seeds provide healthy fats, protein, and minerals like magnesium and zinc, which support brain function, heart health, and energy production.

Together, these ingredients create a powerful wellness bowl that nourishes your body from the inside out.

Ingredients (Serves 1–2)

  • 2 fresh ripe guavas (pink or white flesh), washed and chopped

  • 1 cup plain Greek yogurt or natural yogurt

  • 1 tablespoon honey (optional, for natural sweetness)

  • 2 tablespoons rolled oats or granola

  • 1 tablespoon chia seeds

  • 1 tablespoon chopped almonds

  • 1 tablespoon chopped walnuts

  • 2 tablespoons fresh fruit (banana slices, berries, or apple pieces)

  • 1 teaspoon pumpkin seeds or sunflower seeds (optional)

  • A few fresh mint leaves for garnish

Preparation Time

  • Prep time: 10 minutes

  • Total time: 10 minutes

  • No cooking required

Step-by-Step Instructions

Step 1: Prepare the Guava

Wash the guavas thoroughly under clean water. Cut them in half, remove any tough seeds if desired, and chop them into small bite-sized pieces. Guava skin is edible and contains valuable nutrients, so keep it on if it’s tender.

Step 2: Prepare the Yogurt Base

In a bowl, add the yogurt and stir until smooth and creamy. If you prefer a sweeter taste, mix in honey. This creates a rich, probiotic base that supports digestive health.

Step 3: Assemble the Bowl

Add the chopped guava on top of the yogurt. Spread it evenly so every spoonful contains fresh fruit.

Step 4: Add Crunch and Nutrition

Sprinkle oats or granola over the guava and yogurt. Add chia seeds, almonds, walnuts, and pumpkin or sunflower seeds. These toppings add texture, protein, and healthy fats that keep you energized longer.

Step 5: Add Extra Fresh Fruit

Add banana slices, berries, or apple pieces for additional vitamins, antioxidants, and natural sweetness.

Step 6: Garnish and Serve

Finish with fresh mint leaves for a refreshing flavor. Serve immediately and enjoy this nourishing wellness bowl.

Health Benefits of the Fresh Guava Wellness Bowl

1. Strengthens Immunity

Guava’s extremely high vitamin C content helps your body fight infections and strengthens your immune system naturally.

2. Supports Digestive Health

The fiber in guava, oats, and seeds improves digestion, prevents constipation, and supports a healthy gut microbiome.

3. Boosts Energy Naturally

This bowl provides natural carbohydrates, protein, and healthy fats, giving you steady, long-lasting energy without crashes.

4. Promotes Heart Health

Nuts, seeds, and guava contain nutrients that help lower cholesterol, reduce inflammation, and support healthy blood circulation.

5. Supports Weight Management

High fiber and protein help you feel full longer, reducing overeating and supporting healthy weight control.

6. Improves Skin Health

Vitamin C and antioxidants support collagen production, helping your skin stay firm, smooth, and healthy.

Tips for Best Results

  • Use ripe guavas for the best sweetness and flavor.

  • Choose plain yogurt without added sugar for maximum health benefits.

  • Add protein powder if you want to make it a high-protein fitness meal.

  • Keep toppings natural and avoid processed sweeteners.

  • Eat immediately for maximum freshness and nutrient value.

Variations You Can Try

  • Add coconut flakes for tropical flavor

  • Add flaxseeds for extra omega-3 fatty acids

  • Add dark chocolate chips for a healthy dessert version

  • Blend guava and yogurt for a smoothie bowl texture

When to Eat This Wellness Bowl

This bowl is perfect for:

  • Morning breakfast for energy

  • Post-workout recovery

  • Midday healthy snack

  • Light evening meal

Conclusion

The Fresh Guava Wellness Bowl is simple, delicious, and incredibly nourishing. It combines one of nature’s most powerful fruits with probiotic yogurt, fiber-rich oats, and nutrient-dense nuts and seeds. In just 10 minutes, you can create a meal that strengthens immunity, improves digestion, boosts energy, and supports overall health.