Opened canned tomatoes and saw bubbles rising immediately. Is that fermentation or spoilage

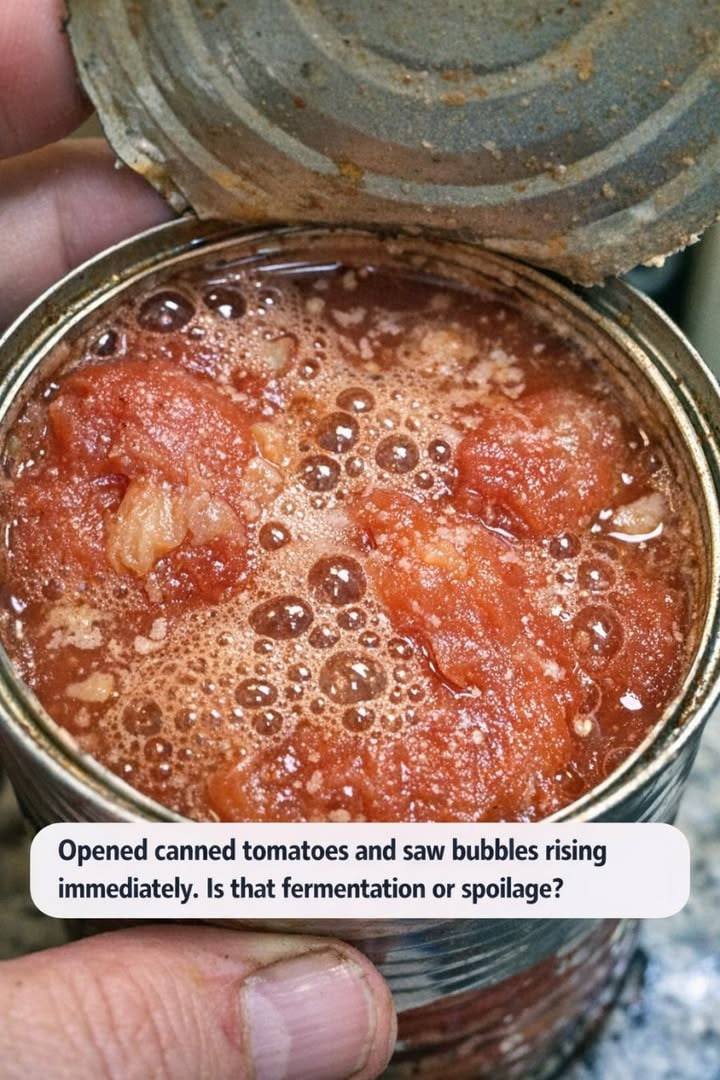
If you open a can of tomatoes and immediately see bubbles rising, it’s a sign you should pause before using them. While bubbling can be related to fermentation, in canned foods it more often points toward spoilage or contamination, especially if the product wasn’t meant to be fermented.

Let’s break it down clearly so you know what’s safe—and what’s not.

 Why Are There Bubbles in Canned Tomatoes?

When you open a can and see bubbles forming right away, it usually means gas has built up inside. This gas can come from:

1. Microbial Activity (Spoilage)

The most common reason is that bacteria or yeast have started breaking down the tomatoes, producing gases like carbon dioxide. This happens when:

  • The can wasn’t properly sealed
  • There was contamination during processing
  • The can was damaged or stored improperly

👉 In this case, bubbling is a warning sign of spoilage, not something safe to consume.

2. Fermentation (Less Common in Canned Goods)

Fermentation is a natural process where beneficial microbes convert sugars into acids or alcohol, producing gas.

However, canned tomatoes are not designed to ferment inside the can. Unlike homemade pickles or kimchi:

  • Commercial canned foods are sterilized
  • The environment inside should be microbe-free

👉 So if fermentation is happening, it means the seal likely failed and harmful microbes may also be present.

3. Pressure Release (Harmless but Rare)

Sometimes, temperature changes can cause slight pressure differences inside the can. When opened, you might see a few bubbles.

But here’s the key difference:

  • Harmless bubbles are brief and minimal
  • They don’t continue rising or fizzing

 Warning Signs of Spoiled Canned Tomatoes

If bubbling is accompanied by any of these, do not use the tomatoes:

  • Bulging or dented can
  • A hissing sound when opened
  • Sour, rotten, or “off” smell
  • Foam or excessive fizzing
  • Discoloration (very dark or unusual shades)
  • Mold (rare but possible after opening)

These signs could indicate contamination by dangerous bacteria such as Clostridium botulinum, which causes Botulism—a rare but serious illness.

👉 Important: Botulism toxins can be present without obvious smell or taste, so when in doubt, throw it out.

 So, Is It Fermentation or Spoilage?

Here’s the honest answer:

  • In canned tomatoes, bubbling almost always means spoilage, not safe fermentation
  • Even if it looks like fermentation, it’s not controlled or safe
  • You should not taste or try to cook it “to be safe”

 What Should You Do?

If you notice immediate bubbling:

✔️ Do not eat it
✔️ Do not taste it
✔️ Dispose of it safely (preferably sealed in a bag)
✔️ Wash your hands after handling

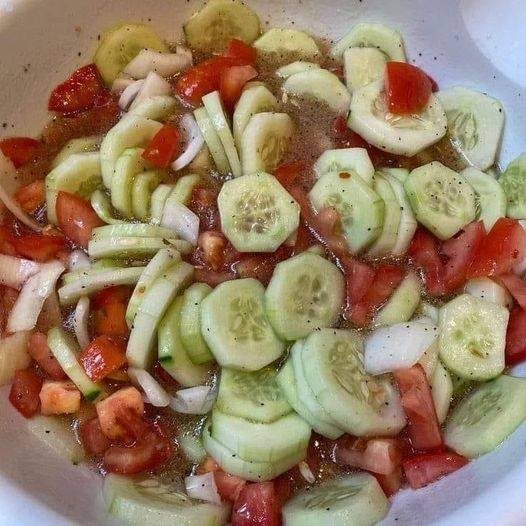
 Safe Homemade Tomato Recipe (Fresh Alternative)

Instead of risking questionable canned tomatoes, here’s a simple fresh tomato sauce recipe you can trust.

Ingredients:

  • 6 fresh ripe tomatoes
  • 3 cloves garlic (minced)
  • 2 tablespoons olive oil
  • 1 small onion (finely chopped)
  • Salt to taste
  • ½ teaspoon black pepper
  • Fresh basil (optional)

 Instructions:

  1. Blanch the tomatoes
    Boil for 1 minute, then transfer to cold water. Peel skins easily.
  2. Chop and cook
    Dice tomatoes and set aside.
  3. Sauté aromatics
    Heat olive oil in a pan, add onion and garlic. Cook until fragrant.
  4. Add tomatoes
    Stir in chopped tomatoes, salt, and pepper.
  5. Simmer
    Cook on low heat for 20–30 minutes until thickened.
  6. Finish
    Add basil for freshness and blend if you prefer a smooth sauce.

 Final Takeaway

Bubbles in canned tomatoes are not something to ignore. While fermentation might sound harmless, in this context it’s usually a sign that something has gone wrong inside the can.

Homemade Natural Hair Dye: A Gentle Alternative to Conceal Gray Hair

In a world where chemical-laden beauty products dominate the shelves, many people are turning back to nature for safer, more nourishing alternatives. One such growing trend is the use of homemade natural hair dyes to conceal gray hair. These DIY solutions not only help restore your hair’s natural color but also improve its overall health without exposing it to harsh chemicals like ammonia or parabens.

Gray hair is a natural part of aging, but factors such as stress, genetics, and nutritional deficiencies can cause premature graying. While commercial hair dyes offer quick results, they often weaken the hair over time, leading to dryness, breakage, and scalp irritation. Natural hair dyes, on the other hand, work gently with your hair, gradually enhancing its color while strengthening it from root to tip.

Benefits of Natural Hair Dye

Homemade hair dyes come with a range of benefits. First and foremost, they are free from toxic chemicals, making them safe for regular use. They are also cost-effective, using ingredients that are often already available in your kitchen. Additionally, these natural remedies condition your hair, add shine, and improve scalp health.

Another major advantage is that natural dyes rarely cause allergic reactions. This makes them an excellent option for people with sensitive skin or those who have experienced irritation from commercial dyes.

A Simple Homemade Natural Hair Dye Recipe

Here’s an effective and easy-to-make recipe that can help darken gray hair naturally over time.

Ingredients:

  • 2 tablespoons of coffee grounds
  • 2 tablespoons of black tea leaves
  • 1 tablespoon of amla powder
  • 1 tablespoon of henna powder
  • 1 cup of water

Instructions:

  1. Prepare the Base:
    Boil the water in a small pot. Add the black tea leaves and coffee grounds. Let it simmer for about 10–15 minutes until the mixture becomes strong and concentrated.
  2. Strain the Liquid:
    Once the mixture cools slightly, strain it into a bowl to remove solid particles.
  3. Add Herbal Powders:
    Mix in the amla powder and henna powder. Stir well until you get a smooth, paste-like consistency. Adjust thickness if needed.
  4. Let It Rest:
    Allow the mixture to sit for 1–2 hours. This helps release the natural coloring agents.
  5. Apply to Hair:
    Apply the paste evenly to clean, dry hair, focusing on gray areas. Wear gloves to avoid staining your hands.
  6. Leave It On:
    Let the dye sit for about 1–2 hours, depending on the intensity you want.
  7. Rinse Thoroughly:
    Wash your hair with plain water (avoid shampoo immediately after). You can shampoo the next day for best results.

How It Works

Each ingredient in this recipe plays a vital role. Coffee and black tea are rich in natural pigments that help darken hair. Henna is a well-known natural dye that coats the hair shaft, giving it a reddish-brown tint while strengthening it. Amla, rich in vitamin C, promotes hair health and enhances the dye’s effectiveness.

Tips for Best Results

  • Consistency is key: Natural dyes do not work instantly like chemical dyes. You may need to apply this treatment once or twice a week to see visible results.
  • Patch test first: Even natural ingredients can cause reactions in rare cases. Always test on a small area before full application.
  • Use regularly: Continued use will gradually deepen the color and improve hair texture.
  • Avoid harsh shampoos: Use mild, sulfate-free shampoos to maintain the color longer.

Other Natural Alternatives

If you want to experiment, there are other natural ingredients you can use depending on your hair color:

  • For darker shades: Use indigo powder along with henna.
  • For lighter brown tones: Chamomile tea can add golden highlights.
  • For reddish hues: Beetroot juice or hibiscus powder works beautifully.

Final Thoughts

Switching to homemade natural hair dye is not just about covering gray hair—it’s about embracing a healthier hair care routine. While the results may take a little longer to appear, the long-term benefits far outweigh the wait. Your hair becomes stronger, shinier, and more vibrant, all without the damage caused by synthetic chemicals.

Homemade Natural Hair Dye: A Gentle Alternative to Conceal Gray Hair

In a world where chemical-laden beauty products dominate store shelves, many people are turning back to nature for safer, more nourishing alternatives. One area where this shift is especially popular is hair care—particularly when it comes to covering gray hair. Homemade natural hair dyes offer a gentle, chemical-free way to enhance your hair’s color while also improving its health. Unlike commercial dyes that often contain ammonia, parabens, and harsh synthetic ingredients, natural dyes work with your hair rather than against it.

If you’re looking for a simple, effective, and affordable way to conceal gray hair, this homemade natural hair dye recipe is worth trying. Not only does it add subtle color, but it also strengthens and conditions your hair over time.

Why Choose Natural Hair Dye?

Before diving into the recipe, it’s important to understand why natural dyes are gaining popularity:

  • Chemical-Free: No harmful toxins that can damage hair or irritate the scalp.
  • Gentle on Hair: Helps maintain hair strength and texture.
  • Eco-Friendly: Uses biodegradable, plant-based ingredients.
  • Gradual Results: Offers a more natural look as color builds over time.

Natural dyes don’t produce instant dramatic results like chemical dyes, but they provide a healthier, more sustainable approach to hair coloring.

Ingredients for Homemade Natural Hair Dye

This recipe works especially well for darkening gray hair and giving it a rich, earthy tone.

  • 2 tablespoons henna powder
  • 1 tablespoon amla powder (Indian gooseberry)
  • 1 tablespoon coffee powder (finely ground)
  • 1 tablespoon black tea (strongly brewed)
  • 1 teaspoon coconut oil
  • Water (as needed)

Benefits of Key Ingredients

  • Henna Powder: A natural dye that gives a reddish-brown tint and strengthens hair.
  • Amla Powder: Enhances darker tones and promotes hair growth.
  • Coffee: Adds depth and helps darken gray strands.
  • Black Tea: Improves shine and intensifies color.
  • Coconut Oil: Moisturizes and prevents dryness during the coloring process.

Step-by-Step Preparation

  1. Prepare the Liquid Base
    Brew a strong cup of black tea and allow it to cool. This will serve as the mixing liquid.
  2. Mix the Powders
    In a bowl, combine henna powder, amla powder, and coffee powder.
  3. Create a Paste
    Gradually add the cooled black tea to the powder mixture. Stir until you get a smooth, thick paste (similar to yogurt consistency).
  4. Add Coconut Oil
    Mix in the coconut oil to keep your hair hydrated.
  5. Let It Rest
    Cover the mixture and let it sit for 2–3 hours. This allows the natural pigments to activate.

How to Apply

  1. Prep Your Hair
    Wash your hair with a mild shampoo and let it dry slightly (damp, not dripping wet).
  2. Section Your Hair
    Divide your hair into manageable sections for even application.
  3. Apply the Paste
    Using gloves, apply the mixture from roots to ends, focusing on gray areas.
  4. Cover and Wait
    Cover your hair with a shower cap and leave the dye on for 1–2 hours, depending on how intense you want the color.
  5. Rinse Thoroughly
    Rinse with plain water until it runs clear. Avoid shampooing for at least 24 hours to let the color set.

Expected Results

This natural dye won’t completely “cover” gray hair like chemical dyes, but it will:

  • Blend grays with your natural color
  • Add a soft brown to reddish tint
  • Improve shine and texture
  • Make hair appear fuller and healthier

With repeated use (once a week or every two weeks), the color becomes deeper and more noticeable.

Tips for Best Results

  • Consistency is Key: Natural dyes build up over time, so regular use is important.
  • Patch Test First: Always test on a small section of hair or skin to avoid reactions.
  • Avoid Metal Bowls: Use glass or plastic bowls to preserve the dye’s effectiveness.
  • Be Patient: Results may vary depending on your natural hair color and texture.

Customizing Your Shade

You can tweak the recipe depending on your desired shade:

  • Darker Tone: Add more coffee or a teaspoon of indigo powder.
  • Warmer Tone: Increase henna slightly for more reddish hues.
  • Cool Brown: Add a bit more amla to tone down red undertones.

How Often to Use

For best results, apply this natural dye once every 1–2 weeks. Unlike chemical dyes, it doesn’t damage your hair, so frequent use is safe and even beneficial.

Final Thoughts

Switching to a homemade natural hair dye is not just about covering gray hair—it’s about embracing a healthier approach to beauty. This gentle recipe nourishes your hair while gradually enhancing its color, giving you a natural, radiant look without the risks associated with synthetic dyes.

Mix cloves with petroleum jelly: a secret no one will ever tell you. Thank me later

Natural remedies have been passed down for generations, often using simple ingredients found right in your kitchen. One such surprising combination is cloves and petroleum jelly. While it may sound unusual at first, this mixture has gained popularity for its soothing, protective, and multipurpose benefits for the skin. If you’re looking for an easy, budget-friendly solution for common skin concerns, this “secret” blend might be worth adding to your routine.


🌿 Why Cloves?

Cloves are small but powerful. They are packed with natural compounds, especially eugenol, which has antibacterial, antifungal, and anti-inflammatory properties. Traditionally, cloves have been used to help with skin irritation, minor pain relief, and even improving circulation.

Benefits of cloves for skin:

  • Helps reduce inflammation
  • Supports acne-prone skin
  • May relieve itching and irritation
  • Contains antioxidants that protect skin

🧴 Why Petroleum Jelly?

Petroleum jelly is a well-known skin protectant. It creates a barrier on the skin that locks in moisture and helps healing. It’s commonly used for dry skin, cracked heels, and minor wounds.

Benefits of petroleum jelly:

  • Deeply moisturizes dry skin
  • Protects skin from environmental damage
  • Helps heal minor cuts and burns
  • Softens rough areas like elbows and heels

🥄 The Clove & Petroleum Jelly Recipe

Ingredients:

  • 1 tablespoon whole cloves or 1 teaspoon clove powder
  • 2–3 tablespoons petroleum jelly

Instructions:

  1. Prepare the cloves
    If using whole cloves, grind them into a fine powder using a mortar and pestle or blender.
  2. Heat gently (optional but effective)
    Place the petroleum jelly in a small heat-safe bowl and warm it slightly (do not boil). This helps it blend better with cloves.
  3. Mix together
    Add the clove powder to the petroleum jelly and stir thoroughly until evenly combined.
  4. Let it sit
    Allow the mixture to cool and infuse for a few hours or overnight for stronger potency.
  5. Store properly
    Transfer into a clean container with a lid. Keep it in a cool, dry place.

💡 How to Use It

This mixture can be used in several ways depending on your needs:

1. For Dry Skin

Apply a small amount to dry areas like hands, feet, elbows, or knees before bedtime. It helps lock in moisture and soften rough skin.

2. For Cracked Heels

Massage onto clean feet and wear socks overnight. Regular use may help heal cracks and smooth your heels.

3. For Minor Skin Irritations

Apply a thin layer to areas with mild irritation, itching, or insect bites. The clove may help soothe while the jelly protects.

4. As a Lip Balm

Use a tiny amount on dry, chapped lips for hydration. Be cautious, as cloves can feel slightly warm.

5. For Muscle Comfort

Massage gently onto sore areas. Clove’s natural warming effect may provide mild relief.


⚠️ Important Precautions

While this remedy is natural and simple, it’s important to use it safely:

  • Patch test first: Apply a small amount on your wrist to check for any allergic reaction.
  • Avoid sensitive areas: Do not use near eyes or on broken skin.
  • Use in moderation: Cloves are potent; too much can cause irritation.
  • Not for everyone: People with sensitive skin should dilute further or avoid use.

🌟 Why People Love This Combination

What makes this remedy appealing is its simplicity and versatility. You don’t need expensive creams or complicated formulas—just two ingredients that work together:

  • Cloves provide natural healing and soothing properties
  • Petroleum jelly seals and protects the skin

Together, they create a powerful yet affordable skincare solution.


🏡 Final Thoughts

Sometimes, the most effective remedies are the simplest ones. Mixing cloves with petroleum jelly is an easy DIY solution that can help with dryness, irritation, and general skin care. While it’s not a miracle cure, many people find it surprisingly helpful for everyday use.

7 Exercises to Help Relieve Heel Discomfort and Support Foot Health

Heel discomfort is a common issue that can affect people of all ages, often caused by long hours of standing, improper footwear, overuse, or conditions like plantar fasciitis. The good news is that simple exercises can significantly relieve pain, improve flexibility, and strengthen the muscles that support your feet. By incorporating these seven exercises into your daily routine, you can promote better foot health and reduce discomfort over time.

1. Toe Stretch

This gentle exercise helps improve flexibility in the toes and the plantar fascia (the band of tissue along the bottom of your foot). Sit comfortably and cross one leg over the other. Grab your toes and gently pull them back toward your shin until you feel a stretch along the arch of your foot. Hold for 15–30 seconds and repeat 3–5 times on each foot. This is especially beneficial in the morning when heel pain tends to be worse.

2. Heel Raises

Heel raises strengthen the calf muscles and provide better support for your heel. Stand with your feet shoulder-width apart, using a wall or chair for balance. Slowly raise your heels off the ground so you’re standing on your toes, then lower them back down. Perform 10–15 repetitions for 2–3 sets. As your strength improves, try doing this exercise on one foot at a time for added intensity.

3. Calf Stretch

Tight calf muscles are a major contributor to heel discomfort. Stand facing a wall and place your hands against it. Step one foot back while keeping it straight and press the heel firmly into the ground. Bend your front knee until you feel a stretch in the calf of the back leg. Hold for 20–30 seconds and repeat 2–3 times per leg. This stretch helps reduce tension that pulls on the heel.

4. Towel Curl Exercise

This exercise strengthens the small muscles in your feet. Sit on a chair and place a towel flat on the floor in front of you. Use your toes to scrunch the towel toward you. Repeat this movement for 1–2 minutes per foot. To increase difficulty, place a small weight (like a book) on the towel. Stronger foot muscles provide better support and reduce strain on the heel.

5. Rolling Massage

A rolling massage helps relieve tension and improve blood circulation. Place a tennis ball, frozen water bottle, or foot roller under your foot. Roll it back and forth from your heel to your toes for 2–3 minutes. This not only massages the plantar fascia but also reduces inflammation and soreness. Using a cold object like a frozen bottle can provide additional relief for swelling.

6. Ankle Circles

Healthy ankle mobility contributes to better foot function. Sit or lie down and lift one foot slightly off the ground. Slowly rotate your ankle in a circular motion, making 10 circles in each direction. Repeat with the other foot. This exercise helps improve joint flexibility and reduces stiffness, which can indirectly ease heel discomfort.

7. Marble Pickup

This fun exercise strengthens the intrinsic muscles of your feet. Place a few marbles (or small objects) on the floor and use your toes to pick them up and place them in a bowl. Continue for 2–3 minutes on each foot. This movement improves coordination and builds strength in the arch, helping to support the heel.


Additional Tips for Heel Relief

In addition to these exercises, consider making small lifestyle changes to support your foot health. Wear supportive, well-cushioned shoes that fit properly and avoid walking barefoot on hard surfaces. Stretch your feet regularly, especially after long periods of standing or walking. Maintaining a healthy weight can also reduce pressure on your heels.

Consistency is key when it comes to these exercises. Performing them daily can lead to noticeable improvements in flexibility, strength, and pain reduction within a few weeks. However, if your heel discomfort persists or worsens, it’s important to consult a healthcare professional for proper evaluation and treatment.


Final Thoughts

Taking care of your feet is essential for overall mobility and comfort. These seven simple exercises are easy to perform at home and require little to no equipment. By dedicating just a few minutes each day, you can relieve heel discomfort, prevent future problems, and keep your feet strong and healthy. Whether you’re dealing with mild soreness or ongoing pain, these movements can be a powerful step toward better foot wellness.

Especially after 60: Who should an older person live with?

Deciding who an older person should live with—especially after the age of 60—is a deeply personal choice that depends on health, independence, emotional needs, finances, and family dynamics. There is no one-size-fits-all answer, but understanding the main living options can help older adults and their families make the best decision for comfort, dignity, and quality of life.

First, many older adults prefer to live independently in their own home. This option works best for those who are still physically active, mentally sharp, and capable of managing daily tasks such as cooking, cleaning, and personal care. Living alone provides a strong sense of freedom and familiarity. However, it’s important to ensure safety by making small home adjustments like installing grab bars, improving lighting, and reducing fall hazards. Regular check-ins from family or neighbors can also help prevent isolation and provide peace of mind.

Another common option is living with a spouse or partner. For couples who have shared their lives for many years, staying together offers emotional stability, companionship, and mutual support. They can help each other with daily routines and maintain a familiar lifestyle. However, if both individuals begin to experience health issues, additional outside support—such as home care services—may become necessary.

Living with children or extended family is a traditional and popular choice in many cultures. This arrangement can provide emotional warmth, a sense of belonging, and practical support. Older adults may benefit from help with meals, medication, transportation, and medical appointments. In return, they often contribute wisdom, childcare, and emotional grounding to the household. However, it’s important to maintain clear boundaries and mutual respect. Differences in lifestyle, privacy needs, or financial expectations can sometimes lead to tension if not addressed openly.

For seniors who value independence but want some level of support, retirement communities or senior living communities can be an excellent option. These communities are designed specifically for older adults and often include social activities, healthcare access, and maintenance-free living. Residents can enjoy a sense of community, make new friends, and participate in organized events, which helps reduce loneliness and depression.

Assisted living facilities are another option for those who need help with daily activities but do not require full-time medical care. In these settings, trained staff assist with bathing, dressing, medication management, and meals while still allowing residents to maintain some independence. This option is ideal for seniors who find it difficult to live alone but do not want to rely entirely on family members.

For individuals with serious health conditions or mobility challenges, nursing homes or long-term care facilities may be the most appropriate choice. These facilities provide 24/7 medical supervision and specialized care. While some people may feel hesitant about this option, modern care homes often focus on comfort, safety, and social engagement, ensuring residents maintain dignity and quality of life.

Another increasingly popular option is aging in place with professional home care. This allows seniors to remain in their own home while receiving assistance from caregivers. Services can range from a few hours a week to full-time care, depending on needs. This approach combines independence with support and can be customized over time as health conditions change.

Emotional well-being is just as important as physical care. Older adults should live in an environment where they feel respected, heard, and valued. Loneliness and isolation can negatively impact mental health, so regular social interaction—whether through family, friends, or community programs—is essential.

Financial considerations also play a key role in this decision. Living arrangements should be sustainable without causing stress or burden. Families should openly discuss costs, responsibilities, and expectations to avoid misunderstandings later.

Ultimately, the best living arrangement after 60 depends on the individual’s health, preferences, and support system. Some may thrive independently, while others benefit from family support or structured care environments. The key is to plan ahead, communicate openly, and remain flexible as needs evolve over time.

In conclusion, there is no “perfect” place for every older adult to live. The right choice is one that balances independence, safety, emotional connection, and practical support. By carefully considering all options and prioritizing well-being, older individuals can enjoy a fulfilling, comfortable, and secure life in their later years.

Marinated cucumber salad

Here’s a unique, flavor-packed marinated cucumber salad that goes beyond the usual vinegar-and-salt approach. This version layers sweet, tangy, spicy, and umami elements with a touch of crunch and aroma—perfect as a refreshing side or even a light meal.


🥒 Sweet, Spicy & Tangy Marinated Cucumber Salad

🌿 What makes this recipe unique?

Instead of a basic dressing, this salad uses a multi-layered marinade combining toasted spices, a hint of fruitiness, and a subtle heat kick. It’s inspired by Asian and Middle Eastern flavor profiles, but with a modern twist.


🧾 Ingredients

For the salad:

  • 4 medium fresh cucumbers (thinly sliced, preferably with skin on)
  • 1 small red onion (very thinly sliced)
  • 1 small carrot (julienned for color and crunch)
  • 2 tablespoons chopped fresh coriander (cilantro)
  • 1 tablespoon chopped mint leaves

For the marinade:

  • 3 tablespoons rice vinegar (or apple cider vinegar)
  • 1 tablespoon lemon juice (freshly squeezed)
  • 1 tablespoon honey (or brown sugar for deeper flavor)
  • 1 tablespoon soy sauce
  • 1 teaspoon sesame oil
  • ½ teaspoon red chili flakes (adjust to taste)
  • 1 clove garlic (finely minced)
  • 1 teaspoon grated fresh ginger
  • ½ teaspoon toasted cumin powder
  • 1 tablespoon crushed roasted peanuts or sesame seeds
  • Salt to taste

🔪 Preparation Steps

1. Prep the cucumbers

Wash the cucumbers thoroughly. Slice them thinly—either into rounds or half-moons. If you prefer a less watery salad, lightly sprinkle them with salt and let them sit for 15 minutes. Then gently squeeze out excess moisture. This step helps the cucumbers absorb more marinade.

2. Prepare the vegetables

Slice the red onion as thinly as possible for a delicate bite. Julienne the carrot into fine strips. Chop the herbs just before mixing to preserve freshness.

3. Make the marinade

In a bowl, whisk together the vinegar, lemon juice, honey, soy sauce, and sesame oil. Add garlic, ginger, chili flakes, and cumin powder. Mix until well combined. Taste and adjust—add more honey if too sharp, or more vinegar if too sweet.

4. Combine everything

In a large mixing bowl, combine cucumbers, onion, carrot, and herbs. Pour the marinade over the vegetables. Toss gently but thoroughly to coat every piece.

5. Let it marinate

Cover the bowl and refrigerate for at least 30 minutes. For best results, let it sit for 2–3 hours. The longer it marinates, the deeper the flavors become.

6. Add crunch before serving

Just before serving, sprinkle crushed peanuts or sesame seeds on top for texture. Give it one final toss.


🍽️ Serving Suggestions

  • Serve chilled as a side dish with grilled meats or rice dishes.
  • Pair it with spicy foods—it balances heat beautifully.
  • Add grilled chicken or chickpeas to turn it into a light meal.
  • Serve in lettuce cups for a fresh appetizer idea.

🔄 Variations to Try

1. Mango Twist

Add thin slices of ripe mango for a sweet, tropical flavor that pairs amazingly with the tangy marinade.

2. Yogurt Creaminess

Mix in 2 tablespoons of plain yogurt to create a creamy, tangy version. This softens the acidity and makes it more filling.

3. Garlic-Chili Kick

Increase garlic and add a chopped green chili for a bold, spicy version.

4. Pickled Style

Leave the salad overnight in the fridge—the cucumbers will take on a lightly pickled texture and stronger flavor.


💡 Tips for the Best Flavor

  • Use fresh, firm cucumbers—soft ones won’t hold the marinade well.
  • Balance is key: taste your marinade before mixing.
  • Don’t skip the resting time—it transforms the dish.
  • Add crunchy elements last to keep them crisp.

🧠 Why this works

Cucumbers are naturally mild and watery, so they act like a sponge for bold flavors. The acidity from vinegar and lemon brightens the dish, while honey balances it out. Soy sauce adds depth (umami), and sesame oil gives a nutty aroma. Ginger and garlic bring warmth, while herbs keep it fresh and vibrant.


🥗 Final Thoughts

This marinated cucumber salad is more than just a side—it’s a refreshing, complex dish that plays with contrast: crisp and tender, sweet and tangy, cool and spicy. It’s quick to prepare but tastes like something thoughtfully crafted.

Take 2 tablespoons in the morning, and say goodbye to joint pain, nerve pain, damaged cartilage, anxiety, depression, insomnia, rheumatism, hemorrhoids and fatigue

If you’re looking for a simple, natural way to support your overall well-being, this easy morning remedy might become a favorite part of your daily routine. While no single drink can magically cure multiple conditions, certain natural ingredients are known to help reduce inflammation, support joint health, calm the mind, and improve sleep quality. This recipe combines those ingredients into a gentle, nourishing blend you can take each morning.

Let’s explore this wellness mix, how to prepare it, and why each ingredient is beneficial.


🌿 Ingredients

  • 2 tablespoons raw honey
  • 1 tablespoon chia seeds
  • 1 tablespoon ground flaxseeds
  • 1 teaspoon turmeric powder
  • 1/2 teaspoon cinnamon powder
  • 1 tablespoon lemon juice (freshly squeezed)
  • 1 cup warm water (not boiling)
  • A pinch of black pepper

🥄 Instructions

  1. Start by warming a cup of water. Make sure it’s warm, not hot, to preserve the nutrients in honey.
  2. Add the chia seeds and flaxseeds to the water. Let them sit for 5–10 minutes so they can swell and form a gel-like texture.
  3. Stir in the turmeric powder, cinnamon, and a pinch of black pepper. The black pepper helps your body absorb turmeric more effectively.
  4. Add the lemon juice and mix well.
  5. Finally, stir in the honey until everything is well combined.

Take 2 tablespoons of this mixture every morning on an empty stomach. You can store the rest in the refrigerator for up to 2 days.


🌟 Why This Recipe Works

Each ingredient in this blend plays a supportive role in improving your health naturally.

1. Honey – Natural Energy Booster

Raw honey is rich in antioxidants and provides a quick source of natural energy. It may help reduce fatigue and support immune function. It also has soothing properties that can be helpful for digestion.

2. Chia Seeds – Joint & Nerve Support

Chia seeds are loaded with omega-3 fatty acids, which are known to help reduce inflammation. They also provide fiber, protein, and minerals that support joint health and nerve function.

3. Flaxseeds – Anti-Inflammatory Power

Flaxseeds contain lignans and omega-3s, which may help reduce inflammation in the body. Regular consumption can support healthy joints and may ease stiffness over time.

4. Turmeric – The Golden Healer

Turmeric is widely known for its active compound, curcumin, which has strong anti-inflammatory and antioxidant properties. It may help with joint discomfort, muscle soreness, and overall inflammation.

5. Cinnamon – Blood Sugar Balance

Cinnamon helps regulate blood sugar levels and improves circulation. Stable blood sugar can also positively affect mood and energy levels.

6. Lemon Juice – Detox & Digestion

Lemon juice supports digestion and helps flush out toxins. It’s also rich in vitamin C, which boosts the immune system and supports skin health.

7. Black Pepper – Nutrient Absorption

Black pepper enhances the absorption of curcumin in turmeric, making the mixture more effective.


🧠 Potential Benefits

While this drink is not a cure, regular use may help support:

  • Reduced inflammation in joints
  • Improved digestion and metabolism
  • Better sleep quality
  • Increased energy levels
  • Reduced stress and improved mood
  • Healthier skin and immune function

⚠️ Important Note

It’s important to be realistic: no single remedy can completely eliminate conditions like joint pain, nerve issues, anxiety, or chronic diseases overnight. However, this natural mix can be a helpful addition to a healthy lifestyle that includes proper diet, exercise, and medical care when needed.

If you have any existing medical conditions or are taking medications, it’s always a good idea to consult a healthcare professional before adding new remedies to your routine.


💡 Tips for Best Results

  • Use high-quality, raw ingredients whenever possible
  • Be consistent—take it daily for a few weeks
  • Combine with a balanced diet and regular physical activity
  • Stay hydrated throughout the day

🌞 Final Thoughts

Sometimes, the simplest habits can make the biggest difference. This morning wellness mix is easy to prepare, affordable, and packed with natural ingredients your body will appreciate. While it’s not a miracle cure, it can gently support your body’s natural healing processes and help you feel more energized, balanced, and refreshed.

Miracle Onion Water: The Secret to Regrowing Lost Hair Naturally To Keep Receiving My Recipe, You Just Need to Say Something… Thank You

If you’re struggling with hair fall, thinning strands, or slow hair growth, you’re not alone. Many people are now turning to simple, natural remedies that have stood the test of time—and one of the most talked-about solutions is onion water. Yes, the humble onion sitting in your kitchen could be the secret weapon for stronger, thicker, and healthier hair.

Onion water has gained popularity because of its rich sulfur content, which plays a vital role in boosting collagen production. Collagen is essential for hair growth, helping to strengthen hair follicles and promote regrowth in areas where hair has thinned. In addition, onions have antibacterial properties that help keep the scalp healthy and free from infections that may cause hair loss.

Let’s explore how to make this powerful onion water at home and how to use it effectively.


Ingredients:

  • 2 medium-sized onions (red onions work best)
  • 2 cups of water
  • Optional: a few drops of coconut oil or essential oil (like lavender or rosemary) to reduce smell

Instructions:

  1. Peel and Chop the Onions
    Start by peeling the onions and cutting them into small pieces. The smaller the pieces, the easier it will be to extract their nutrients.
  2. Boil the Water
    In a pot, bring 2 cups of water to a boil.
  3. Add the Onions
    Once the water is boiling, add the chopped onions and let them simmer for about 10–15 minutes.
  4. Cool and Strain
    Turn off the heat and allow the mixture to cool completely. Then strain the liquid into a clean bowl or bottle, removing all onion pieces.
  5. Add Optional Oils
    To make the smell more pleasant, you can add a few drops of coconut oil or essential oil.
  6. Store Properly
    Store the onion water in a clean container. It can be kept in the refrigerator for up to 3–4 days.

How to Use Onion Water for Hair:

  1. Apply to Scalp
    Using a cotton ball or your fingers, apply the onion water directly to your scalp. Make sure to massage gently so it penetrates the roots.
  2. Leave It On
    Let it sit for 20–30 minutes. If you can tolerate the smell, leaving it on longer may provide better results.
  3. Rinse Thoroughly
    Wash your hair with a mild shampoo to remove the smell and residue.
  4. Repeat Regularly
    For best results, use this treatment 2–3 times a week.

Benefits of Onion Water for Hair:

  • Promotes Hair Growth: Sulfur boosts collagen and strengthens hair follicles.
  • Reduces Hair Fall: Nourishes roots and minimizes breakage.
  • Improves Scalp Health: Fights dandruff and infections.
  • Adds Shine and Volume: Regular use can make hair look fuller and healthier.

Tips for Best Results:

  • Always do a patch test before applying onion water to avoid irritation.
  • Be consistent—natural remedies take time, but they are effective with regular use.
  • Maintain a healthy diet rich in vitamins and minerals for overall hair health.
  • Avoid using very hot water on your hair, as it can weaken the roots.

A Natural Path to Stronger Hair

While onion water may not work overnight, many people have seen noticeable improvements in hair texture and growth within a few weeks of consistent use. It’s a simple, affordable, and chemical-free remedy that you can easily prepare at home.

Thanksgiving Stuffing Bites

If you love classic Thanksgiving stuffing but want something fun, bite-sized, and irresistibly crispy, these Thanksgiving Stuffing Bites are the perfect twist. They combine all the comforting flavors of traditional stuffing—savory herbs, buttery bread, and aromatic vegetables—into golden, crunchy bites that are ideal as appetizers, side dishes, or even snacks the next day.

These little bites are especially great if you’re hosting a gathering or want a creative way to use leftover stuffing. Easy to make and even easier to enjoy, they deliver a perfect balance of crispy edges and soft, flavorful centers.


Ingredients

To make about 24 stuffing bites, you’ll need:

  • 4 cups prepared stuffing (homemade or leftover)
  • 2 large eggs
  • ½ cup shredded mozzarella or cheddar cheese
  • ¼ cup grated Parmesan cheese
  • 2 tablespoons melted butter
  • 1 teaspoon garlic powder
  • 1 teaspoon dried parsley
  • ½ teaspoon black pepper
  • Optional: ½ cup cooked sausage, diced turkey, or chopped mushrooms

Instructions

Step 1: Preheat the Oven

Start by preheating your oven to 375°F (190°C). Lightly grease a mini muffin tin or line it with silicone molds to prevent sticking.

Step 2: Prepare the Mixture

In a large bowl, combine your prepared stuffing with eggs, shredded cheese, Parmesan, melted butter, and seasonings. Mix everything well until fully combined. The mixture should be moist but firm enough to hold its shape when pressed together.

If your stuffing is too dry, add a splash of chicken broth. If it’s too wet, mix in a bit of breadcrumbs.

Step 3: Add Optional Fillings

For extra flavor, fold in cooked sausage, leftover turkey, or sautéed mushrooms. These additions give the bites more texture and richness.

Step 4: Shape the Bites

Scoop about 1–2 tablespoons of the mixture and press it firmly into each cavity of the muffin tin. Make sure each portion is packed tightly so the bites hold together during baking.

Step 5: Bake to Perfection

Place the tray in the oven and bake for 20–25 minutes, or until the tops are golden brown and slightly crispy. The edges should be firm, and the centers should remain soft and flavorful.

Step 6: Cool and Serve

Let the stuffing bites cool for about 5 minutes before removing them from the tin. This helps them set and prevents breaking.

Serve warm for the best taste and texture.


Flavor Variations

One of the best things about stuffing bites is how customizable they are. Here are a few delicious variations you can try:

  • Cheesy Herb Bites: Add extra mozzarella and fresh rosemary for a richer flavor.
  • Cranberry Twist: Mix in dried cranberries for a sweet and savory contrast.
  • Spicy Kick: Add a pinch of chili flakes or diced jalapeños.
  • Bacon Lovers: Fold in crispy bacon bits for a smoky flavor.

Serving Suggestions

These stuffing bites are incredibly versatile and pair beautifully with:

  • Turkey or roasted chicken
  • Gravy for dipping
  • Cranberry sauce
  • A fresh green salad

You can serve them as an appetizer, side dish, or even pack them for lunch the next day.


Tips for Perfect Stuffing Bites

  • Use Day-Old Stuffing: Slightly dry stuffing works best because it absorbs moisture without becoming mushy.
  • Don’t Skip the Eggs: Eggs act as a binder and help the bites hold their shape.
  • Press Firmly: Compacting the mixture ensures the bites don’t fall apart.
  • Crispy Finish: For extra crispiness, broil for 2–3 minutes at the end.

Storage and Reheating

  • Refrigerator: Store leftovers in an airtight container for up to 4 days.
  • Freezer: Freeze for up to 2 months.
  • Reheating: Warm in the oven at 350°F (175°C) for 10–15 minutes to keep them crispy.

Avoid microwaving if possible, as it can make them soft instead of crispy.


Why You’ll Love This Recipe

Thanksgiving Stuffing Bites take everything you love about traditional stuffing and turn it into a convenient, crowd-pleasing dish. They’re easy to prepare, perfect for entertaining, and a great way to reduce food waste by using leftovers creatively.

Each bite delivers a satisfying crunch followed by a burst of savory, herby goodness. Whether you’re hosting a big holiday feast or just craving comfort food, these stuffing bites are guaranteed to impress.


Final Thoughts

Simple, delicious, and endlessly adaptable, Thanksgiving Stuffing Bites are a must-try recipe for any holiday table. They bring a modern twist to a beloved classic while keeping all the flavors that make stuffing so special.