Remove dental plaque in 5 minutes naturally, without going to the dentist.

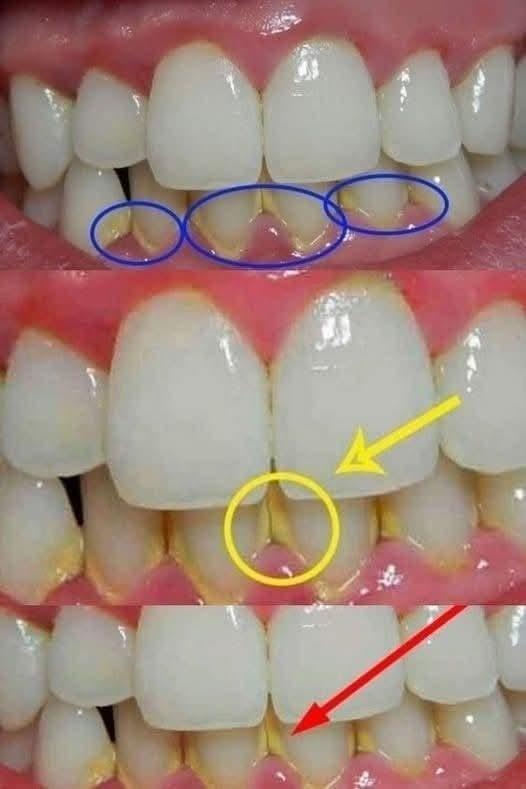
Dental plaque is a sticky, colorless film of bacteria that constantly forms on your teeth. If not removed regularly, it can harden into tartar and lead to cavities, bad breath, and gum disease. While professional dental cleaning is the most effective solution, there are simple natural methods you can use at home to help reduce plaque buildup quickly and safely.

This guide shares a gentle, natural routine you can follow to loosen and reduce plaque in just a few minutes using common household ingredients.


What Is Dental Plaque?

Dental plaque is a biofilm made up of bacteria, food particles, and saliva. It forms when sugars and starches from food interact with bacteria in your mouth. Over time, plaque produces acids that weaken tooth enamel and irritate the gums.

The key to managing plaque is breaking it down before it hardens.


5-Minute Natural Plaque Removal Routine

This quick routine combines gentle abrasion, antibacterial action, and rinsing to help loosen and reduce plaque effectively.

Ingredients You’ll Need:

  • 1 teaspoon baking soda
  • A pinch of salt
  • A few drops of water
  • 1 teaspoon coconut oil (optional but recommended)

Step-by-Step Method

Step 1: Baking Soda Paste (2 Minutes)

Mix baking soda with a few drops of water and a pinch of salt to form a paste.

  • Dip your toothbrush into the paste
  • Gently brush your teeth for 2 minutes
  • Focus on areas where plaque builds up (near the gums and between teeth)

Why it works:
Baking soda is mildly abrasive and helps scrub away plaque without damaging enamel. It also neutralizes acids in the mouth.


Step 2: Coconut Oil Pulling (2 Minutes)

Take 1 teaspoon of coconut oil and swish it around your mouth.

  • Move it between your teeth
  • Do not swallow it
  • Spit it out after 2 minutes

Why it works:
Coconut oil contains natural antibacterial compounds that help reduce bacteria responsible for plaque formation.


Step 3: Warm Saltwater Rinse (1 Minute)

Mix a pinch of salt in warm water and rinse your mouth thoroughly.

Why it works:
Saltwater helps kill bacteria, soothe gums, and wash away loosened plaque particles.


Optional Boost: Lemon & Mint Freshener

For extra freshness, you can rub a drop of lemon juice on your teeth occasionally or chew fresh mint leaves.

⚠️ Use lemon sparingly, as excessive acidity can weaken enamel.


Important Tips for Best Results

  • Use a soft-bristled toothbrush to avoid damaging gums
  • Always brush gently—scrubbing too hard can harm enamel
  • Floss daily to remove plaque between teeth
  • Drink plenty of water to wash away food particles

What to Expect

This method won’t magically remove hardened tartar in 5 minutes, but it can:

  • Loosen fresh plaque
  • Reduce bacteria
  • Improve breath
  • Make teeth feel smoother and cleaner

With consistent use, you’ll notice better oral hygiene and less buildup over time.


When to See a Dentist

Even with natural care, professional cleaning is sometimes necessary. You should consult a dentist if you notice:

  • Yellow or brown hardened deposits
  • Bleeding gums
  • Persistent bad breath
  • Tooth sensitivity

Natural remedies are best used as maintenance—not a full replacement for dental care.


Final Thoughts

Removing dental plaque naturally is possible with simple ingredients you likely already have at home. This 5-minute routine combines the power of baking soda, coconut oil, and saltwater to help break down plaque safely and effectively.

How Often Should You Really Change Your Bed Sheets? This Is How Often You Should Wash Your Sheets, According to Experts. The Truth Will Surprise You.

When it comes to maintaining a clean and healthy home, washing your bed sheets is one of those tasks many people underestimate. You might think changing your sheets once in a while is enough—but experts say otherwise. The truth about how often you should wash your sheets may actually surprise you, and once you learn it, you might rethink your routine entirely.

Why Clean Sheets Matter More Than You Think

Your bed may feel like a clean, cozy sanctuary, but over time, it becomes a hidden hub for sweat, body oils, dead skin cells, and even microscopic organisms. Every night, your body sheds thousands of skin cells and releases moisture, creating the perfect environment for bacteria and dust mites to thrive.

Even if you shower before bed, your sheets still collect residue from your skin, hair, and the surrounding air. Add in pets, snacks, or lounging during the day, and your bedding can quickly become less hygienic than it appears.

So, How Often Should You Wash Your Sheets?

According to hygiene and health experts, you should wash your bed sheets once every 1 to 2 weeks. This is the general recommendation for most people.

However, certain situations call for more frequent washing:

  • Once a week (or more often) if you sweat heavily at night
  • If you sleep with pets
  • If you have allergies or asthma
  • If you’re sick or recovering from illness
  • If you eat or spend a lot of time in bed during the day

In these cases, washing your sheets every 3 to 5 days can help maintain better hygiene and comfort.

What Happens If You Don’t Wash Them Often Enough?

Skipping regular sheet washing doesn’t just make your bed feel less fresh—it can actually affect your health. Dirty sheets can lead to:

  • Increased allergies due to dust mites
  • Skin irritation or acne from bacteria buildup
  • Unpleasant odors
  • Poor sleep quality

Over time, sleeping on unwashed sheets can even contribute to respiratory issues, especially for those sensitive to allergens.

The “Recipe” for Perfectly Clean Sheets

Think of this as your simple, foolproof method for fresh, clean bedding:

Ingredients:

  • Warm or hot water
  • Mild laundry detergent
  • Optional: baking soda or white vinegar (for odor removal)
  • Dryer or clothesline

Instructions:

  1. Strip the Bed Completely
    Remove pillowcases, fitted sheets, flat sheets, and even duvet covers.
  2. Check Care Labels
    Different fabrics like cotton, linen, or silk require specific washing temperatures.
  3. Use the Right Water Temperature
    • Hot water (if safe) helps kill bacteria and dust mites
    • Warm water works well for most fabrics
  4. Don’t Overload the Machine
    Sheets need space to move freely for a thorough clean.
  5. Add Natural Fresheners (Optional)
    A half cup of baking soda or vinegar can help eliminate odors and soften fabric.
  6. Dry Thoroughly
    Damp sheets can develop mildew. Use a dryer or hang them in sunlight for natural freshness.
  7. Make Your Bed Fresh Again
    There’s nothing quite like the feeling of freshly washed sheets!

Bonus Tips for Better Bedding Hygiene

  • Shower before bed to reduce dirt and oil transfer
  • Avoid sleeping with makeup on
  • Change pillowcases more often (every 3–4 days) if you have acne or oily skin
  • Rotate multiple sheet sets to make washing easier
  • Air out your bed daily by pulling back covers in the morning

What About Pillows and Blankets?

Sheets aren’t the only items that need attention. Experts recommend:

  • Pillowcases: every 3–7 days
  • Pillows: every 3–6 months
  • Blankets/duvets: every 2–4 weeks (depending on use)

Keeping your entire bedding system clean ensures better sleep and overall health.

The Surprising Truth

Many people believe washing sheets once a month is enough—but experts strongly disagree. Waiting that long allows bacteria, sweat, and allergens to build up significantly. The surprising truth is that weekly washing isn’t excessive—it’s ideal.

Once you adopt this habit, you’ll likely notice improved sleep, fewer skin issues, and a fresher overall feeling every night.

Final Thoughts

Changing your bed sheets regularly isn’t just about cleanliness—it’s about taking care of your health and well-being. While it may seem like a small task, it has a big impact on your daily comfort and long-term hygiene.

8 Hidden Signs That Angels Are in Your Home

Many people believe that angels are gentle, unseen protectors who surround us with love, guidance, and peace. While they may not appear in physical form, their presence is often felt through subtle signs and experiences that bring comfort and reassurance. If you’ve ever sensed an unexplained calm or noticed unusual yet peaceful occurrences in your home, you might be witnessing signs of angelic presence.

Here are eight hidden signs that angels may be visiting or watching over your home.

1. A Sudden Sense of Peace

One of the most common signs of angelic presence is an overwhelming feeling of calm. Even during stressful moments, you may suddenly feel relaxed, safe, and at ease. This peaceful energy can fill a room without any obvious reason, creating a comforting atmosphere.

Angels are believed to carry a soothing energy that helps reduce anxiety and fear. If your home often feels like a sanctuary where worries seem to fade away, it could be a sign that angels are near.

2. Unexplained Pleasant Fragrances

Have you ever noticed a sweet or pleasant smell—like flowers, perfume, or fresh air—without any clear source? This is often described as a spiritual sign.

These fragrances may appear briefly and disappear just as quickly. Many people believe angels use scents as a gentle way to signal their presence, especially during moments when you need comfort or reassurance.

3. Flickering Lights or Electrical Changes

While flickering lights can have practical explanations, frequent or meaningful occurrences—especially during emotional moments—may feel different.

You might notice lights dimming, turning on or off unexpectedly, or electronic devices behaving unusually. Some believe angels can influence energy fields to make their presence known, especially when they are trying to get your attention.

4. Feathers Appearing Unexpectedly

Finding feathers in unusual places—inside your home, on your bed, or in areas where birds couldn’t have reached—is often considered a classic sign of angels.

White feathers are especially symbolic of protection and guidance. If you keep finding feathers during important moments in your life, it may be a reminder that you are not alone.

5. Vivid Dreams or Gentle Messages

Angels are believed to communicate through dreams because the mind is more open and receptive during sleep. You may experience vivid, peaceful dreams or receive guidance in symbolic ways.

These dreams often leave you feeling comforted, inspired, or reassured. Sometimes, you may even dream of a figure offering help or protection without fear or confusion.

6. Hearing Soft Sounds or Whispers

Some people report hearing faint sounds such as soft chimes, gentle whispers, or distant music when no source is present. These sounds are usually calm and pleasant rather than alarming.

This can be interpreted as a subtle form of communication, a reminder that you are being watched over and supported.

7. Repeated Signs or Coincidences

Seeing repeating numbers (like 111 or 444), meaningful symbols, or experiencing repeated coincidences can be another sign. These patterns often appear during moments when you are seeking answers or direction.

Many believe angels use repetition to guide you, helping you notice important messages or decisions you need to make.

8. Feeling a Loving Presence

Perhaps the most powerful sign is simply feeling that you are not alone. This isn’t fear—it’s a warm, loving sensation, like someone is gently watching over you.

You might feel this presence during quiet moments, prayer, or reflection. It often brings comfort, strength, and a sense of protection.

A Gentle “Angelic Energy” Ritual for Your Home

While there’s no literal recipe for angels, you can create an environment that feels peaceful and welcoming to positive energy.

Ingredients:

  • 1 clean and quiet space
  • A candle (white is often preferred)
  • A calming scent (like lavender or rose)
  • A few minutes of silence

Instructions:

  1. Light the candle and sit comfortably.
  2. Close your eyes and take slow, deep breaths.
  3. Focus on feelings of gratitude and peace.
  4. Silently invite positivity, protection, and guidance into your home.
  5. Sit in stillness for a few minutes, allowing calm energy to settle.

This simple practice can help you feel more connected, grounded, and open to gentle spiritual experiences.

Final Thoughts

Whether you interpret these signs spiritually or simply as comforting experiences, they often bring a sense of peace and reassurance. The idea that your home is filled with positive, protective energy can be deeply uplifting.

Visible Veins What They Mean and Why You Might See Them

Visible veins are something many people notice at some point in their lives. For some, they appear as faint blue or green lines just beneath the skin, while for others they may look more prominent, raised, or even twisted. While visible veins are often completely normal, they can sometimes raise questions or concerns about health. Understanding why veins become more noticeable can help you determine whether what you’re seeing is harmless or something that may need attention.

First, it’s important to understand what veins do. Veins are blood vessels responsible for carrying deoxygenated blood back to the heart. Unlike arteries, which carry oxygen-rich blood away from the heart, veins work against gravity—especially in the legs—using small valves that prevent blood from flowing backward. When these veins become more visible, it’s usually due to changes in the skin, blood flow, or the veins themselves.

One of the most common reasons for visible veins is simply having thin or light-colored skin. People with fair complexions or less body fat often have veins that show more clearly because there is less tissue covering them. As you age, your skin naturally becomes thinner and loses elasticity, making veins more noticeable. This is a normal part of aging and not usually a cause for concern.

Another common reason is physical activity. Exercise increases blood flow and causes veins to expand temporarily. This is why athletes or people who work out regularly often have more prominent veins, especially in the arms and legs. Over time, consistent exercise can make veins appear more visible even at rest due to improved circulation and muscle definition.

Hot weather can also make your veins more noticeable. When temperatures rise, your body works to cool itself by expanding blood vessels near the surface of the skin. This process, called vasodilation, allows heat to escape more easily but can also make veins stand out more than usual. This effect is typically temporary and goes away once your body cools down.

Hormonal changes are another factor that can influence vein visibility. During pregnancy, for example, the body produces more blood to support the developing baby. This increased blood volume can cause veins to enlarge and become more visible. Hormonal fluctuations from birth control or menopause can also affect how veins appear.

Sometimes, visible veins may be linked to medical conditions. One of the most well-known is varicose veins. These occur when the valves inside the veins weaken or become damaged, causing blood to pool and veins to bulge. Varicose veins are often seen in the legs and may be accompanied by symptoms such as aching, swelling, or a feeling of heaviness.

A milder form of this condition is spider veins. These are smaller, thin veins that appear close to the surface of the skin and often resemble a web-like pattern. While they are usually harmless, some people choose to treat them for cosmetic reasons.

In some cases, visible veins can be a sign of low body fat or sudden weight loss. When you lose fat, there is less cushioning between your skin and veins, making them more apparent. This is common among individuals who are very lean or who have recently lost a significant amount of weight.

Dehydration can also play a role. When your body lacks enough fluids, blood volume decreases, which can make veins appear more prominent. Staying well-hydrated helps maintain proper circulation and can reduce the appearance of overly visible veins.

Certain medical conditions may also contribute to changes in vein appearance. For example, chronic venous insufficiency occurs when veins have trouble sending blood from the limbs back to the heart. This condition can lead to swelling, skin changes, and more noticeable veins. If visible veins are accompanied by pain, swelling, or skin discoloration, it’s important to seek medical advice.

Lifestyle factors such as prolonged standing or sitting can also impact vein health. Jobs that require long hours on your feet or sitting in one position can increase pressure in the veins, particularly in the legs. Over time, this pressure can lead to vein enlargement and visibility.

So, when should you be concerned? Visible veins are usually harmless, especially if they are not causing discomfort. However, you should pay attention if you notice symptoms like pain, swelling, itching, or changes in skin color around the veins. These could indicate an underlying issue that may require medical evaluation.

In most cases, visible veins are simply a natural part of your body and reflect factors like genetics, lifestyle, and age. Maintaining a healthy lifestyle—staying active, drinking enough water, and avoiding prolonged periods of inactivity—can help support good vein health.

7 Silent Body Signs That Could Warn of Serious Illness

Your body has a remarkable way of communicating when something isn’t quite right. Often, the earliest warning signs of serious illness are subtle and easy to overlook. Paying attention to these “silent signals” can help you catch potential health issues early and seek timely medical advice. Below are seven silent body signs that may indicate something more serious is going on.

1. Unexplained Weight Loss
Losing weight without trying might seem like a positive change, but it can sometimes signal an underlying problem. If you drop more than 5–10% of your body weight within a few months without changes in diet or activity, it could be linked to conditions such as thyroid disorders, digestive diseases, or even certain cancers. Your body may be burning energy differently or struggling to absorb nutrients properly.

2. Persistent Fatigue
Everyone feels tired occasionally, but constant, overwhelming fatigue that doesn’t improve with rest is not normal. This type of exhaustion can be associated with chronic conditions such as anemia, heart disease, diabetes, or autoimmune disorders. If you feel drained even after a full night’s sleep, it’s worth investigating further.

3. Changes in Skin Appearance
Your skin often reflects your internal health. Yellowing of the skin or eyes (jaundice) may indicate liver problems, while dark patches or unusual pigmentation changes could be linked to hormonal imbalances or metabolic issues. Persistent itching, new moles, or changes in existing moles should also be checked, as they may signal skin-related conditions, including cancer.

4. Frequent or Persistent Pain
Pain is one of the body’s clearest warning signals, but when it becomes chronic or appears without an obvious cause, it can be concerning. Ongoing headaches, abdominal pain, or joint discomfort may indicate underlying issues such as infections, inflammation, or neurological conditions. Ignoring persistent pain can allow a problem to worsen over time.

5. Shortness of Breath
Feeling breathless after mild activity—or even at rest—can be a sign of something serious. It may be related to heart or lung conditions such as asthma, chronic obstructive pulmonary disease (COPD), or heart failure. Sudden or severe shortness of breath should always be treated as a medical emergency.

6. Changes in Bathroom Habits
Your digestive and urinary systems can reveal a lot about your health. Persistent diarrhea, constipation, blood in stool or urine, or changes in frequency can point to infections, kidney issues, or gastrointestinal disorders. These symptoms are often ignored due to embarrassment, but they should never be overlooked if they last more than a few days.

7. Unusual Lumps or Swelling
Any new lump, swelling, or thickening in the body—especially in areas like the neck, breast, or abdomen—should be evaluated by a healthcare professional. While many lumps are harmless, some may be early signs of tumors or infections. Early detection is key to effective treatment.

Final Thoughts
Your body is constantly sending signals, even when they seem minor. The key is not to panic, but to stay aware. If you notice any of these signs persisting or worsening, it’s important to consult a qualified healthcare provider. Early diagnosis can make a significant difference in treatment outcomes and overall health.

Listening to your body isn’t about fear—it’s about awareness and care. Small signals today could prevent major health issues tomorrow.

Ancestral herbal remedy to remove mucus from the nose, throat and lungs in just 2 days

Ancestral Herbal Remedy to Remove Mucus from the Nose, Throat, and Lungs in Just 2 Days

For generations, traditional healing systems across the world have relied on simple, natural ingredients to relieve respiratory discomfort. Excess mucus in the nose, throat, and lungs can lead to congestion, coughing, and difficulty breathing—often caused by colds, allergies, or environmental irritants. This time-tested herbal remedy combines powerful natural ingredients known for their soothing, anti-inflammatory, and mucus-clearing properties.

While no remedy works like magic overnight for everyone, this blend can significantly ease symptoms within 48 hours when used consistently.


Why This Remedy Works

This ancestral recipe uses ingredients that help:

  • Break down and loosen mucus
  • Soothe irritated airways
  • Support the immune system
  • Reduce inflammation in the respiratory tract

The key lies in combining warming, antibacterial, and expectorant herbs.


Ingredients

  • 1 tablespoon fresh ginger (grated)
  • 1 tablespoon turmeric powder (or fresh turmeric, grated)
  • 2 cloves garlic (crushed)
  • 1 tablespoon raw honey
  • Juice of 1 lemon
  • 2 cups water
  • Optional: a pinch of black pepper

Preparation

  1. Boil the Base
    Pour 2 cups of water into a saucepan and bring it to a gentle boil.
  2. Add the Herbs
    Add the grated ginger, turmeric, and crushed garlic. Let the mixture simmer for 10–15 minutes. This allows the active compounds to infuse into the water.
  3. Strain the Liquid
    Remove from heat and strain the mixture into a cup.
  4. Enhance the Remedy
    Add fresh lemon juice and raw honey. Stir well. If desired, add a pinch of black pepper to boost absorption of turmeric.

How to Use

  • Drink 1 cup warm in the morning on an empty stomach
  • Drink another cup before bedtime
  • Continue for 2 days for best results

You may also inhale the steam from the hot mixture before drinking to help open nasal passages.


How It Helps Your Body

Ginger acts as a natural expectorant, helping loosen mucus and making it easier to expel. It also has warming properties that improve circulation and reduce throat irritation.

Turmeric is rich in curcumin, known for its strong anti-inflammatory and antimicrobial effects. It helps reduce swelling in the respiratory tract and supports healing.

Garlic is a powerful natural antibiotic. It helps fight infections that may be causing mucus buildup and strengthens the immune response.

Honey coats and soothes the throat, reducing coughing and irritation. It also has mild antibacterial properties.

Lemon provides vitamin C and helps thin mucus, making it easier to clear from the body.

Black pepper, if added, enhances the absorption of turmeric and helps stimulate mucus flow.


Additional Tips for Faster Relief

  • Stay hydrated throughout the day to keep mucus thin
  • Avoid cold foods and drinks during treatment
  • Use warm steam inhalation once or twice daily
  • Rest well to allow your body to recover
  • Avoid dairy temporarily, as it may thicken mucus in some people

Important Note

While this remedy can provide quick and natural relief, it is not a substitute for medical treatment if symptoms are severe, persistent, or accompanied by high fever, chest pain, or breathing difficulty. Always consult a healthcare professional if needed.


Conclusion

This simple ancestral herbal remedy is a powerful example of how natural ingredients can support the body’s healing process. With consistent use over just two days, many people experience noticeable relief from mucus buildup in the nose, throat, and lungs. Gentle, effective, and rooted in tradition, it’s a comforting solution worth keeping in your wellness routine.

An essential vitamin that relieves leg and bone pain.

Leg and bone pain can quietly affect your daily life—making it harder to walk, stand, or even rest comfortably. While there are many causes, one of the most overlooked reasons is a deficiency in Vitamin D. Often called the “sunshine vitamin,” Vitamin D plays a crucial role in maintaining strong bones, supporting muscle function, and reducing inflammation.

If your body lacks this essential nutrient, it can lead to aching legs, weak bones, and persistent discomfort. The good news? With the right natural recipe and habits, you can restore your Vitamin D levels and ease pain effectively.

 Why Vitamin D Matters for Bone and Leg Health

Vitamin D helps your body absorb calcium, which is the main building block of bones. Without enough Vitamin D, your bones can become soft, brittle, or painful—a condition linked to disorders like Osteomalacia in adults.

Low Vitamin D levels can cause:

  • Deep, aching bone pain
  • Muscle weakness (especially in legs)
  • Fatigue and low energy
  • Increased risk of fractures

In many cases, people assume their pain is due to aging or overuse, when in fact, a simple nutritional deficiency is the root cause.

 Natural Vitamin D Boosting Recipe

This easy, nutrient-rich recipe combines Vitamin D sources with calcium and healthy fats for better absorption.

Ingredients:

  • 1 cup whole milk (or fortified plant-based milk)
  • 1 boiled egg
  • 1 tablespoon chia seeds
  • 1 teaspoon honey
  • 1/2 teaspoon turmeric powder
  • 1 small piece of banana

 Instructions:

  1. Warm the milk slightly (do not boil).
  2. Mash the boiled egg yolk and banana together.
  3. Add chia seeds, honey, and turmeric.
  4. Mix everything into the milk until smooth.
  5. Drink once daily, preferably in the morning.

How This Recipe Helps

Each ingredient contributes to relieving leg and bone pain:

  • Milk: Rich in calcium and often fortified with Vitamin D
  • Egg yolk: One of the few natural food sources of Vitamin D
  • Chia seeds: Provide magnesium and support bone density
  • Turmeric: Contains anti-inflammatory compounds that reduce pain
  • Banana: Supports muscle function with potassium

Together, they form a powerful combination that supports bone repair, improves strength, and reduces discomfort.

 Bonus Tip: Sunlight Is Your Best Friend

Your body naturally produces Vitamin D when your skin is exposed to sunlight. Try to get 15–20 minutes of morning sun exposure daily. This simple habit can significantly improve your Vitamin D levels and overall health.

 Additional Foods Rich in Vitamin D

To enhance the effects of the recipe, include these foods in your diet:

  • Fatty fish (salmon, sardines, tuna)
  • Egg yolks
  • Fortified cereals and dairy products
  • Mushrooms exposed to sunlight

A balanced diet combined with natural sunlight can work wonders for your bones.

 When to Be Careful

While Vitamin D is essential, excessive intake (especially from supplements) can lead to toxicity. Always aim for natural sources and consult a healthcare provider if you suspect a severe deficiency.

 Final Thoughts

Leg and bone pain doesn’t always require complicated treatments. Sometimes, your body is simply asking for the right nutrients. Vitamin D stands out as one of the most important vitamins for bone strength and muscle comfort.

8 ways to deal with people who disrespect you.

Dealing with disrespect can feel frustrating, confusing, and even hurtful—especially when it comes from people you interact with regularly. Whether it’s subtle dismissiveness, rude comments, or outright disregard, learning how to handle disrespect calmly and effectively is a powerful life skill. Think of this as a “recipe” for self-respect: a set of intentional steps you can follow to protect your peace while maintaining dignity.

Here are 8 practical and empowering ways to deal with people who disrespect you:


1. Stay Calm Instead of Reacting Instantly

The first and most important step is to control your emotional response. Disrespect often provokes anger, but reacting impulsively can make the situation worse. When you stay calm, you remain in control.

Take a deep breath, pause for a moment, and resist the urge to fire back. A composed response shows strength and prevents escalation. Calmness also makes the other person more aware of their behavior.


2. Set Clear Boundaries

People often continue disrespectful behavior when there are no consequences. Setting boundaries is essential.

Let them know what is acceptable and what is not. For example, you might say, “I don’t appreciate being spoken to like that.” Keep your tone firm but respectful. Boundaries are not about controlling others—they’re about protecting your self-worth.


3. Address the Behavior Directly

Ignoring disrespect doesn’t always make it go away. In many cases, it allows it to continue.

Speak up clearly and confidently. Focus on the behavior rather than attacking the person. For instance:
“I felt disrespected when you interrupted me earlier.”

This approach keeps the conversation constructive and reduces defensiveness.


4. Don’t Take It Personally

Not all disrespect is about you. Sometimes people project their own stress, insecurities, or frustrations onto others.

Understanding this can help you avoid internalizing their negativity. Instead of thinking, “What’s wrong with me?” ask yourself, “What might they be going through?”

This shift in perspective protects your confidence and emotional well-being.


5. Use Assertive Communication

Assertiveness is the balance between passivity and aggression. It allows you to stand up for yourself without being rude.

Use “I” statements, maintain eye contact, and speak clearly. For example:
“I expect to be treated with respect in this conversation.”

Assertive communication earns respect over time and discourages others from crossing the line again.


6. Limit Your Interaction

If someone consistently disrespects you despite your efforts, it may be necessary to reduce your contact with them.

Not everyone deserves access to your time and energy. Whether it’s a coworker, acquaintance, or even a friend, creating distance can protect your mental peace.

Sometimes the most powerful statement is simply stepping away.


7. Choose Your Battles Wisely

Not every instance of disrespect requires a response. Some situations are minor and not worth your energy.

Ask yourself:
“Is this important enough to address?”

If it’s a one-time comment or something trivial, letting it go might be the better choice. Save your energy for situations that truly matter.


8. Strengthen Your Self-Respect

Ultimately, how you deal with disrespect depends on how you see yourself. When you value yourself, you naturally expect others to do the same.

Invest in your confidence—whether through personal growth, learning new skills, or surrounding yourself with supportive people. The stronger your self-respect, the less impact others’ behavior will have on you.

Remember: you teach people how to treat you by what you allow.

Final Thoughts

Dealing with disrespect isn’t about “winning” or proving a point—it’s about maintaining your dignity and emotional balance. By staying calm, setting boundaries, and communicating assertively, you take control of how others treat you.

If you have high blood pressure, NEVER do this in the Morning

If you have high blood pressure, your morning routine matters more than you might think. The first hour after waking up is when your body naturally experiences a surge in blood pressure—a phenomenon known as the “morning spike.” For people managing hypertension, certain common habits can quietly make this spike worse, increasing the risk of heart strain, dizziness, or even serious complications over time.

Let’s explore what you should NEVER do in the morning if you have high blood pressure—and a simple, natural “morning recipe” to help keep your numbers balanced and your body calm.


🚫 1. Don’t Jump Out of Bed Too Quickly

One of the biggest mistakes is getting up suddenly. When you go from lying down to standing instantly, your blood pressure can fluctuate rapidly.

Why it matters:
This sudden movement can cause dizziness, increase heart workload, and trigger a sharp spike in blood pressure.

Better habit:
Take 2–3 minutes. Sit up slowly, stretch gently, and let your body adjust before standing.


🚫 2. Avoid Checking Your Phone Immediately

Scrolling through emails, news, or social media first thing in the morning can trigger stress hormones like cortisol.

Why it matters:
Stress hormones constrict blood vessels and raise blood pressure quickly—before your body has even fully woken up.

Better habit:
Give yourself 15–20 minutes of calm time. Focus on breathing, stretching, or quiet reflection.


🚫 3. Never Skip Your Morning Hydration

Many people wake up dehydrated, especially after 6–8 hours of sleep.

Why it matters:
Dehydration thickens the blood and makes it harder for your heart to pump efficiently, raising blood pressure.

Better habit:
Start your day with a glass of water before anything else.


🚫 4. Don’t Drink Coffee on an Empty Stomach

Coffee is a common morning ritual—but it can be risky if consumed immediately.

Why it matters:
Caffeine can cause a temporary spike in blood pressure, especially when taken on an empty stomach.

Better habit:
Eat something light first, or delay coffee by 30–60 minutes.


🚫 5. Avoid Salty Breakfast Foods

Processed breakfast items like sausages, fried foods, or packaged snacks are often high in sodium.

Why it matters:
Excess sodium leads to water retention, increasing blood pressure.

Better habit:
Choose fresh, whole foods with natural flavors.


🚫 6. Don’t Skip Your Medication

If you’ve been prescribed blood pressure medication, skipping it—even occasionally—can disrupt your control.

Why it matters:
Morning is when your blood pressure naturally rises, making medication especially important.

Better habit:
Take your medication at the same time every day as directed.


🌿 The “Calm Pressure” Morning Drink (Natural Recipe)

Instead of harmful habits, start your day with this simple, soothing drink designed to support circulation and hydration.

🥤 Ingredients:

  • 1 glass of warm water
  • ½ teaspoon cinnamon powder
  • 1 teaspoon honey (optional)
  • 1 teaspoon fresh lemon juice
  • A pinch of grated ginger

🥄 Instructions:

  1. Warm the water (not boiling).
  2. Add cinnamon and ginger.
  3. Stir in lemon juice.
  4. Add honey if desired.
  5. Mix well and drink slowly on an empty stomach.

🌟 Benefits:

  • Cinnamon may help support healthy blood sugar and circulation
  • Ginger promotes blood flow and reduces inflammation
  • Lemon provides antioxidants and supports vessel health
  • Warm water rehydrates and gently awakens your system

🌅 A Better Morning Routine for Healthy Blood Pressure

To keep your blood pressure stable, try this simple routine:

  1. Wake up slowly and stretch
  2. Drink your natural morning drink
  3. Practice 5 minutes of deep breathing
  4. Eat a light, balanced breakfast (like oats, fruit, or eggs)
  5. Take medications if prescribed
  6. Delay caffeine slightly

⚠️ Final Thought

High blood pressure doesn’t just depend on what you eat—it’s deeply influenced by how you start your day. Small habits, repeated daily, can either support your heart or silently strain it.

Avoiding these morning mistakes and adopting calming, nourishing routines can make a meaningful difference over time. Think of your morning as the foundation for your health—build it wisely, and your body will thank you.

Smile lines: 2 DIY creams to smooth and eliminate them.

Smile lines—often called laugh lines or nasolabial folds—are a natural part of aging, but that doesn’t mean you can’t soften their appearance. These lines develop over time due to repeated facial expressions, loss of skin elasticity, decreased collagen production, and environmental factors like sun exposure. The good news? You don’t always need expensive treatments to care for your skin. With the right natural ingredients, you can create effective DIY creams at home that deeply nourish, hydrate, and help smooth out those lines.

Below are two powerful, easy-to-make DIY creams designed to support skin elasticity and reduce the appearance of smile lines over time.

✨ Why it works

Aloe vera is rich in antioxidants and enzymes that help hydrate and tighten the skin, while vitamin E is known for its skin-repairing and anti-aging properties. Together, they help improve elasticity and reduce fine lines.

🧴 Ingredients

  • 2 tablespoons fresh aloe vera gel
  • 1 vitamin E capsule (or ½ teaspoon vitamin E oil)
  • 1 teaspoon coconut oil
  • 3–4 drops rose essential oil (optional)

🥣 Instructions

  1. Scoop fresh aloe vera gel into a clean bowl.
  2. Pierce the vitamin E capsule and squeeze the oil into the gel.
  3. Add coconut oil and mix thoroughly until smooth.
  4. Add rose essential oil if desired and stir again.
  5. Transfer to a small airtight container.

🌙 How to use

Apply a small amount to clean skin, focusing on smile lines. Gently massage in upward circular motions before bedtime. Leave it overnight for best results.

⏳ Benefits over time

With regular use, this cream can help plump the skin, improve hydration, and soften the depth of smile lines. It also leaves your skin feeling smooth and refreshed.

✨ Why it works

Avocado is packed with healthy fats and vitamins that deeply nourish the skin, while shea butter provides intense moisture and helps boost collagen production. This combination is ideal for dry or mature skin.

🧴 Ingredients

  • 2 tablespoons ripe avocado (mashed)
  • 1 tablespoon shea butter
  • 1 teaspoon olive oil
  • 1 teaspoon honey

🥣 Instructions

  1. Mash the avocado until smooth and lump-free.
  2. Melt the shea butter slightly (do not overheat).
  3. Combine the avocado with shea butter in a bowl.
  4. Add olive oil and honey, then mix until creamy.
  5. Store in a clean container in the refrigerator for up to 5 days.

🌙 How to use

Apply a thin layer to your face, especially around smile lines. Leave it on for 20–30 minutes, then rinse with lukewarm water. Use 3–4 times a week.

⏳ Benefits over time

This cream helps restore moisture, improve skin firmness, and reduce the visibility of deep lines. Your skin will feel softer, fuller, and more youthful.


💡 Extra Tips to Reduce Smile Lines Naturally

  • Stay hydrated: Drinking enough water keeps your skin plump.
  • Use sunscreen daily: UV rays break down collagen and accelerate aging.
  • Facial massage: Gentle daily massage boosts blood circulation and skin elasticity.
  • Healthy diet: Foods rich in antioxidants, like fruits and vegetables, support skin repair.
  • Consistent routine: Natural remedies take time—stick with them for visible results.

🌸 Final Thoughts

Smile lines are a beautiful reminder of laughter and expression, but if you’d like to soften them, these natural DIY creams offer a safe and affordable solution. By nourishing your skin with ingredients like aloe vera, vitamin E, avocado, and shea butter, you’re giving it the support it needs to stay firm, hydrated, and radiant.

Consistency is key—use these treatments regularly, and over time, you’ll likely notice smoother, healthier-looking skin.