Russian Tea Balls

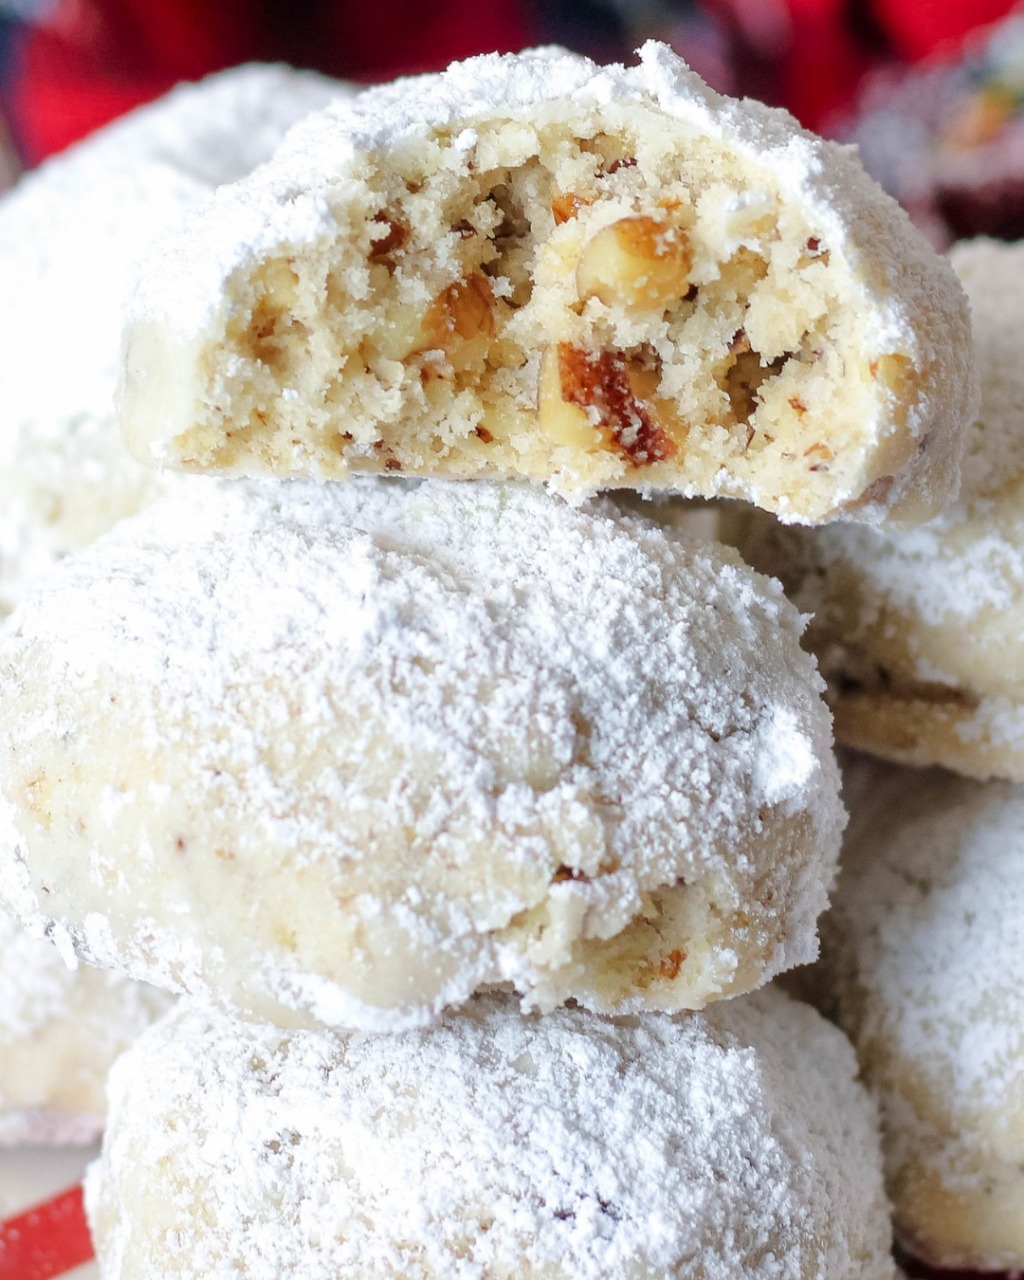
Russian Tea Balls, also known as Snowball Cookies or Mexican Wedding Cookies, are the epitome of delicate simplicity — buttery, nutty, and dusted in clouds of powdered sugar. These little bites of bliss crumble gently with each nibble, filling your mouth with a melt-in-your-tongue sweetness that makes them irresistible during holidays, tea times, or any day that calls for something cozy and nostalgic. This unique version combines traditional flavor with a hint of vanilla and toasted nuts, creating a rich and aromatic cookie that captures the warmth of a Russian winter in every bite.

Ingredients You’ll Need

(Makes about 30–35 cookies)

  • 1 cup (230g) unsalted butter, softened to room temperature

  • ½ cup (60g) powdered sugar, sifted

  • 1 teaspoon pure vanilla extract

  • 2¼ cups (280g) all-purpose flour, sifted

  • ¼ teaspoon salt

  • ¾ cup (90g) finely chopped toasted walnuts or pecans

  • 1 cup (120g) powdered sugar, for rolling and coating

Why These Ingredients Matter

Each component of this recipe plays a vital role in achieving the perfect texture and taste:

  • Butter: The soul of Russian Tea Balls. It creates a tender, crumbly texture that melts in your mouth. Always use real unsalted butter — it’s what gives these cookies their luxurious richness.

  • Powdered sugar: Unlike granulated sugar, powdered sugar blends seamlessly into the dough, ensuring a smooth, melt-away crumb.

  • Vanilla extract: Adds warmth and depth to the buttery base. You can also try almond extract for a slightly different twist.

  • Flour and salt: Balance the richness of the butter and create structure while maintaining softness.

  • Toasted nuts: Provide a nutty crunch and rich aroma. Toasting enhances their natural oils and flavor, making every bite heavenly.

Step-by-Step Preparation

Step 1: Toast the Nuts

Place your chopped walnuts or pecans on a baking sheet and toast them in a preheated oven at 350°F (175°C) for 6–8 minutes, stirring once halfway through. This step elevates the flavor dramatically — the aroma of toasted nuts mingled with butter later creates the signature “tea ball” essence. Let them cool completely before mixing into the dough.

Step 2: Cream the Butter and Sugar

In a large mixing bowl, beat the softened butter and ½ cup powdered sugar together using an electric mixer on medium speed for 2–3 minutes until light and creamy. This step incorporates air into the mixture, which ensures a tender and airy cookie texture. Add in the vanilla extract and beat for another 30 seconds.

Step 3: Add the Dry Ingredients

In a separate bowl, whisk together the flour and salt. Gradually add the dry mixture to the butter-sugar mixture, blending on low speed until just combined. Avoid overmixing — you want a dough that holds together without becoming tough.

Step 4: Incorporate the Nuts

Gently fold in the cooled, chopped nuts with a spatula or wooden spoon. The dough will be soft but not sticky. If it feels too soft, refrigerate for 20–30 minutes to firm it up slightly — this helps the cookies hold their shape during baking.

Step 5: Shape the Cookies

Preheat your oven to 350°F (175°C) and line a baking sheet with parchment paper. Scoop about 1 tablespoon of dough and roll it into a smooth ball between your palms. Arrange the balls about 1 inch apart on the baking sheet — these cookies don’t spread much, so you can fit quite a few on one tray.

Step 6: Bake to Perfection

Bake for 12–14 minutes, or until the bottoms are lightly golden but the tops remain pale. Be careful not to overbake — the magic lies in their delicate texture. Let the cookies cool on the baking sheet for 5 minutes before transferring them to a wire rack.

Step 7: The Powdered Sugar Snowfall

While the cookies are still slightly warm, roll them gently in a bowl of powdered sugar to coat them completely. Place them back on the rack to cool fully. Once cooled, give them a second coating of powdered sugar for that beautiful, snow-dusted finish. This double layer not only looks enchanting but adds a lovely sweetness to balance the nutty flavor.

Serving and Storage

Serve your Russian Tea Balls with a cup of hot tea, spiced chai, or black coffee. They also make wonderful gifts — tuck them into a decorative tin or glass jar lined with parchment paper and tie with a ribbon for a classic, homemade touch.

To store, keep them in an airtight container at room temperature for up to 10 days. For longer storage, freeze them (without the powdered sugar coating) for up to 2 months. When ready to enjoy, let them thaw and then dust freshly with powdered sugar.

Tips for the Perfect Russian Tea Balls

  1. Use cold hands: Warm hands can soften the dough too much while rolling; rinse your hands under cool water if necessary.

  2. Sift your powdered sugar: This ensures a silky coating with no clumps.

  3. Change up the nuts: Try hazelnuts, pistachios, or almonds for different flavors.

  4. Flavor variations: Add a hint of cinnamon, nutmeg, or lemon zest for a festive twist.

  5. For extra flavor depth: Brown the butter first, cool it, and use it in place of plain butter — the nutty aroma will make these cookies unforgettable.

A Bit of History

Russian Tea Balls are beloved around the world under many names — Mexican Wedding Cookies, Italian Butterballs, and Viennese Crescents, to name a few. Their origins are traced back to medieval Europe, where buttery nut cookies were a symbol of celebration and hospitality. The name “Russian Tea Balls” became popular in America during the mid-20th century, likely due to their association with elegant tea service and old-world charm.

Conclusion

Russian Tea Balls are the embodiment of simple elegance — no fancy frosting, no complicated steps, just pure buttery goodness encased in a snowy sugar coat. They’re a timeless treat that brings warmth to chilly days and sweetness to any gathering. Whether you’re baking them for Christmas, gifting them to loved ones, or simply indulging in a cozy afternoon tea, these delicate cookies promise to melt hearts just as easily as they melt in your mouth.

Garlic Butter Lobster & Scallops

If you’re craving a restaurant-quality seafood dish that delivers pure indulgence, Garlic Butter Lobster & Scallops is the ultimate choice. This recipe combines the sweetness of lobster tails and the delicate tenderness of sea scallops, all bathed in a velvety garlic butter sauce infused with lemon and herbs. It’s the kind of meal that feels extravagant yet surprisingly simple to prepare at home — perfect for date nights, special dinners, or when you just want to treat yourself to something spectacular.

The Essence of the Dish

What makes this dish so exceptional is the harmony between two of the ocean’s most luxurious treasures — lobster and scallops. Lobster brings a rich, slightly sweet flavor that pairs beautifully with the mild, buttery taste of scallops. The key is to cook them just right so they stay tender, not rubbery. When coated in aromatic garlic butter with a touch of lemon juice and white wine, the result is a meal that melts in your mouth.

Ingredients

For the Seafood:

  • 2 lobster tails (about 6 oz each), split in half lengthwise

  • ½ pound large sea scallops, cleaned and patted dry

  • Salt and freshly ground black pepper, to taste

  • 1 tablespoon olive oil

For the Garlic Butter Sauce:

  • 5 tablespoons unsalted butter

  • 4 garlic cloves, finely minced

  • ½ teaspoon crushed red pepper flakes (optional, for a gentle heat)

  • Juice of ½ lemon (plus wedges for serving)

  • ¼ cup dry white wine (or seafood stock if preferred)

  • 2 tablespoons chopped fresh parsley

  • 1 tablespoon chopped fresh chives (optional)

For Garnish:

  • Fresh lemon wedges

  • Extra parsley or microgreens for color

Preparation Steps

1. Preparing the Seafood

Begin by ensuring the lobster tails and scallops are properly prepped. Using kitchen shears, carefully cut through the top of the lobster shell and gently pull the meat upward so it sits on top of the shell — this allows even cooking and beautiful presentation. Pat the scallops dry with paper towels to help them sear perfectly. Season both lobster and scallops with salt and pepper on all sides.

2. Searing the Scallops

Heat olive oil in a large skillet over medium-high heat. Once shimmering hot, gently place the scallops in the pan without overcrowding. Sear each side for 1½ to 2 minutes, until they develop a golden crust. Do not move them around while searing — patience ensures that beautiful caramelization. Once done, remove the scallops from the skillet and set aside.

3. Cooking the Lobster

In the same skillet, add a tablespoon of butter. Place the lobster tails meat-side down and sear for 2 minutes until lightly golden. Flip them over and cook for another 3–4 minutes while basting with melted butter. You’ll notice the shells turning a vivid red and the meat becoming opaque — a sign they’re cooked to perfection. Transfer to a warm plate and tent loosely with foil.

4. Making the Garlic Butter Sauce

Reduce the heat to medium and add the remaining butter to the skillet. Once melted, add minced garlic and sauté for about 30 seconds, releasing that irresistible aroma. Pour in the white wine (or stock) to deglaze the pan, scraping up any browned bits. Let it simmer for 2–3 minutes until slightly reduced. Squeeze in lemon juice and sprinkle with crushed red pepper flakes for a touch of brightness and warmth. Stir in fresh parsley and chives to finish the sauce.

5. Bringing It All Together

Return the lobster and scallops to the pan, spooning the garlic butter sauce generously over the top. Let everything heat together for about 1–2 minutes so the flavors blend beautifully. The buttery sauce will coat each bite of tender lobster and scallop with luscious flavor.

Serving Suggestions

Serve immediately, garnished with extra parsley and lemon wedges. This dish pairs beautifully with buttery mashed potatoes, creamy risotto, or a simple side of roasted asparagus. For a lighter option, serve it with angel hair pasta tossed in olive oil and a sprinkle of Parmesan. A chilled glass of Chardonnay or Sauvignon Blanc complements the richness of the butter and the sweetness of the seafood perfectly.

Cooking Tips for Perfection

  1. Pat dry the scallops: Moisture is the enemy of a good sear. Always dry them thoroughly to achieve that crisp, golden crust.

  2. Use a heavy skillet: A cast-iron or stainless-steel skillet ensures even heat distribution for consistent searing.

  3. Don’t overcook the lobster: Lobster meat cooks quickly — about 5–6 minutes total is perfect. Overcooking will make it tough.

  4. Add butter gradually: Layering butter during cooking deepens the flavor and prevents burning.

  5. Fresh garlic and herbs: Fresh ingredients make a world of difference in the final aroma and taste.

The Flavor Story

The beauty of this recipe lies in its simplicity and sophistication. The lobster, naturally sweet and rich, contrasts wonderfully with the silky, buttery scallops. The garlic butter ties it all together — deep, nutty, and aromatic — while lemon and wine cut through the richness to add brightness. Every bite feels like a coastal escape, bursting with luxury yet grounded in comfort.

The moment the butter starts to bubble and the garlic perfumes your kitchen, you’ll know you’re creating something extraordinary. As the scallops develop their golden crust and the lobster turns brilliant red, the anticipation builds. When you finally drizzle the garlic butter sauce over the seafood, you’ll be rewarded with a dish that looks stunning, tastes divine, and feels like a five-star restaurant experience right at home.

Conclusion

Garlic Butter Lobster & Scallops is a celebration of oceanic flavors and culinary elegance. It’s rich yet balanced, impressive yet effortless. Whether you serve it as a show-stopping entrée for a romantic dinner or a centerpiece for a special occasion, it promises to leave everyone in awe. The tender lobster and perfectly seared scallops glisten in a golden garlic butter sauce — a true masterpiece that honors the sea’s finest offerings.

Italian Lemon Magic Cake

Italian Lemon Magic Cake is a dessert that truly lives up to its enchanting name. This delightful treat, light as a cloud and bursting with zesty lemon flavor, seems to perform culinary sorcery in the oven—transforming a single batter into three distinct layers: a dense, custard-like base, a silky lemon cream center, and a fluffy sponge cake top. The magic happens from the precise balance of eggs, milk, butter, sugar, and lemon, creating a dessert that’s elegant enough for a dinner party yet comforting enough for an afternoon tea. The Italian touch lies in the use of fresh lemons (preferably Amalfi or Sicilian lemons) and a subtle hint of vanilla that complements their vibrant acidity.

Ingredients

For the Magic Cake Batter:

  • 4 large eggs, room temperature, separated

  • ¾ cup granulated sugar

  • 1 tablespoon lemon zest (from 2 large lemons)

  • ½ cup unsalted butter, melted and cooled

  • ¾ cup all-purpose flour, sifted

  • 1 ¾ cups whole milk, lukewarm

  • ¼ cup freshly squeezed lemon juice

  • 1 teaspoon pure vanilla extract

  • Pinch of salt

For Finishing:

  • Powdered sugar, for dusting

  • Thin lemon slices or zest curls, for garnish

Step-by-Step Instructions

1. Prepare the Pan and Ingredients

Preheat your oven to 325°F (160°C) and lightly grease an 8×8-inch baking dish. Line the bottom with parchment paper to make removal easy once the cake cools. Separate the eggs carefully—any trace of yolk will prevent your whites from whipping correctly. Set aside.

2. Whip the Egg Whites

In a clean, dry bowl, beat the egg whites with a pinch of salt until they form firm peaks. This step is crucial; these airy whites will later help create the top sponge layer. Once whipped, set them aside in the refrigerator while preparing the rest of the batter.

3. Beat the Yolks, Sugar, and Lemon

In a large mixing bowl, whisk together the egg yolks and granulated sugar until the mixture becomes pale, thick, and creamy—about 3 minutes. Add in the lemon zest, lemon juice, and vanilla extract, stirring until well combined. The aroma will already hint at the cake’s bright, citrusy character.

4. Add Melted Butter

Pour in the melted butter gradually, mixing gently to create a smooth consistency. The butter gives the cake richness while enhancing the lemon flavor. Avoid overmixing; the goal is a silky texture, not a frothy one.

5. Incorporate the Flour

Sift in the flour in two parts, stirring gently with a spatula or whisk after each addition. At this stage, the batter may seem thick, but that’s perfect for the next transformation.

6. Add the Milk Slowly

Slowly pour in the lukewarm milk while whisking continuously. The mixture will appear very thin—almost like a pancake batter—but don’t worry. This fluid consistency is key to creating the cake’s signature three-layer structure once baked.

7. Fold in the Egg Whites

Take the whipped egg whites and gently fold them into the lemon batter in three batches. Use a spatula to incorporate them without deflating the air completely. The batter will look slightly lumpy or uneven, which is normal. These pockets of egg white will rise and separate during baking, forming the airy top layer.

8. Bake the Cake

Pour the batter into the prepared pan and smooth the top. Bake for 50–55 minutes, or until the top is golden and slightly firm to the touch. The center should still have a delicate jiggle, similar to a custard. If it browns too quickly, cover it loosely with foil.

9. Cool and Set

Allow the cake to cool completely in the pan for at least 1 hour. Then, refrigerate it for another 2–3 hours to help the layers fully set. This chilling step intensifies the flavors and creates that clean, beautiful separation between sponge, cream, and custard.

10. Serve

Once chilled, carefully lift the cake from the pan using the parchment paper. Dust the top generously with powdered sugar and garnish with a few lemon zest curls or thin slices. Cut into neat squares and admire the three distinct layers—a buttery custard base, a creamy lemon middle, and a golden sponge top.

Tips for Perfection

  • Use fresh lemons. Bottled juice cannot replicate the aromatic oils from fresh zest and juice.

  • Room-temperature eggs help the batter emulsify smoothly.

  • Don’t skip chilling time—it’s what perfects the layers.

  • For a more intense flavor, substitute ¼ cup milk with heavy cream.

  • A dash of Limoncello (Italian lemon liqueur) can be added for an adult twist.

Homemade Croquettes

Golden, crispy on the outside and creamy, savory on the inside — croquettes are one of those timeless comfort foods that never fail to impress. Originating from France but embraced around the world, croquettes can be filled with anything from mashed potatoes to minced meat, seafood, or even cheese. This unique version combines the rich flavor of seasoned mashed potatoes with bits of chicken, cheese, and herbs for the ultimate crunchy bite-sized delight. Perfect as an appetizer, snack, or side dish, these homemade croquettes are a celebration of texture and taste.

Ingredients

For the filling:

  • 2 large potatoes, peeled and cubed

  • 1 tablespoon butter

  • 1/4 cup milk

  • 1 cup finely shredded cooked chicken (or ham/tuna for variation)

  • 1/2 cup shredded mozzarella or cheddar cheese

  • 2 tablespoons finely chopped onion

  • 1 tablespoon chopped fresh parsley

  • 1/2 teaspoon garlic powder

  • 1/2 teaspoon black pepper

  • 1/2 teaspoon paprika

  • Salt to taste

For coating and frying:

  • 1/2 cup all-purpose flour

  • 2 large eggs, beaten

  • 1 cup breadcrumbs (panko or regular)

  • Oil for deep frying

Optional for serving:

  • Garlic aioli, spicy ketchup, or creamy mustard sauce

Step 1: Prepare the Potato Base

Begin by boiling the potatoes in salted water until tender — about 12 to 15 minutes. Drain them thoroughly and return them to the pot while still hot. Add butter and milk, mashing the potatoes until smooth and fluffy. The secret to perfect croquettes lies in a mash that’s creamy but not overly wet; too much moisture will cause the croquettes to break apart when frying.

Let the mashed potatoes cool slightly, about 5 minutes, before mixing in the remaining ingredients.

Step 2: Mix the Filling

In a large bowl, combine the mashed potatoes with shredded chicken, cheese, chopped onion, parsley, garlic powder, paprika, pepper, and a pinch of salt. Mix until well combined — the texture should be firm enough to hold its shape but soft enough to roll easily.

If the mixture feels too sticky, chill it in the refrigerator for 15–20 minutes. This step helps the croquettes hold their form while shaping.

Step 3: Shape the Croquettes

Scoop about 2 tablespoons of the mixture and roll it between your palms to form smooth cylinders or small ovals (you can also make them round like balls). Consistency in size ensures even frying. Once shaped, place them on a parchment-lined tray and chill again for another 10–15 minutes to firm up before coating.

Step 4: Coat for Crunch

Set up a simple breading station: one plate with flour, one bowl with beaten eggs, and another plate with breadcrumbs.

Roll each croquette first in flour, tapping off excess, then dip into the beaten egg, and finally coat generously in breadcrumbs. For an extra-crispy exterior, you can double-dip: after the first breadcrumb layer, repeat the egg and breadcrumb coating once more.

Return coated croquettes to the fridge for about 10 minutes while heating the oil. This helps the coating set and prevents splitting during frying.

Step 5: Fry to Perfection

In a deep frying pan, heat oil to 350°F (175°C). Fry a few croquettes at a time, being careful not to overcrowd the pan. Turn occasionally to ensure even browning.

Each batch should take about 3–4 minutes until golden and crisp. Remove with a slotted spoon and drain on paper towels. The croquettes should have a satisfying crunch when tapped — a sign that they’re perfectly done.

Step 6: Serve and Enjoy

Serve the croquettes hot and fresh, paired with your favorite dipping sauce. A creamy garlic aioli or spicy chili mayo enhances the flavor beautifully. If you’re hosting guests, garnish your platter with parsley and lemon wedges for a restaurant-style presentation.

Unique Flavor Variations

What makes croquettes endlessly appealing is how adaptable they are. Once you master the base, you can create endless variations. Here are some creative twists:

  1. Cheesy Jalapeño Croquettes: Add chopped jalapeños and extra mozzarella for a spicy, gooey center.

  2. Smoked Salmon Croquettes: Substitute chicken with flaked smoked salmon, a touch of dill, and cream cheese for a gourmet version.

  3. Vegetable Croquettes: Mix in finely chopped carrots, peas, and spinach for a vegetarian option.

  4. Beef & Onion Croquettes: Use minced cooked beef, caramelized onions, and Worcestershire sauce for a hearty snack.

  5. Sweet Croquettes: Swap savory fillings for mashed sweet potatoes with cinnamon and sugar — ideal for dessert lovers!

Tips for Perfect Croquettes

  • Keep them chilled before frying: Cold croquettes hold their shape better and fry evenly.

  • Oil temperature matters: Too cool, and they’ll absorb oil and get soggy; too hot, and they’ll brown before the inside heats.

  • Use panko breadcrumbs: They create a lighter, crispier crust compared to regular breadcrumbs.

  • Don’t skip the double coating: It’s the secret to an ultra-crunchy, professional texture.

Storage and Reheating

Croquettes can be made ahead — store shaped, uncooked croquettes in an airtight container in the fridge for up to 2 days. To freeze, place them on a tray until solid, then transfer to freezer bags for up to 2 months.

When ready to serve, fry directly from frozen without thawing; just add a minute or two to the cooking time. Leftover fried croquettes can be reheated in an air fryer or oven to restore their crispiness.

Final Thoughts

This unique croquette recipe captures the essence of home-style comfort food with a gourmet twist. The combination of creamy mashed potatoes, savory chicken, melted cheese, and herbs encased in a golden crust makes every bite irresistible. Whether served as an elegant appetizer, a side for dinner, or a quick snack, these croquettes always impress. Their crispy exterior and velvety interior embody the perfect balance of textures — proof that sometimes, the simplest ingredients can create the most unforgettable dishes.

Cheesy Beef and Bacon Gratin

When it comes to indulgent comfort food, few dishes can rival the hearty satisfaction of a Cheesy Beef and Bacon Gratin. This rich and savory casserole layers tender ground beef, smoky bacon, creamy cheese sauce, and soft, baked potatoes to create a meal that feels both rustic and elegant. It’s a crowd-pleaser perfect for cozy family dinners, potlucks, or whenever you crave a warm, cheesy hug on a plate. Let’s dive into this one-of-a-kind recipe that will have everyone asking for seconds.

Ingredients

For the Beef Layer:

  • 1 lb (450 g) ground beef

  • 6 strips bacon, chopped

  • 1 small onion, finely diced

  • 2 cloves garlic, minced

  • 1 tsp smoked paprika

  • ½ tsp black pepper

  • 1 tsp salt (adjust to taste)

  • 1 tbsp Worcestershire sauce

  • 1 tbsp tomato paste

For the Creamy Cheese Sauce:

  • 2 tbsp butter

  • 2 tbsp all-purpose flour (use gluten-free if needed)

  • 2 cups whole milk (warm)

  • 1 cup shredded cheddar cheese

  • ½ cup shredded mozzarella cheese

  • ¼ cup grated Parmesan cheese

  • Salt and pepper to taste

  • A pinch of nutmeg (optional, for depth of flavor)

For the Potato Layer:

  • 4 large potatoes, peeled and thinly sliced

  • 1 tbsp olive oil

  • Salt and pepper to taste

  • ½ tsp garlic powder

Topping:

  • ½ cup cheddar cheese

  • 2 tbsp chopped parsley (for garnish)

Step 1: Prepare the Beef and Bacon Filling

Start by heating a large skillet over medium heat. Add the chopped bacon and cook until it turns crispy and releases its smoky fat. Remove the bacon pieces and set them aside, leaving a small amount of bacon grease in the pan for flavor.

Next, add the ground beef to the same skillet and cook until browned, breaking it apart with a spatula. Once the meat begins to brown, stir in the diced onion and minced garlic. Let the mixture cook until the onions become translucent and fragrant.

Season the mixture with smoked paprika, black pepper, and salt. Add the tomato paste and Worcestershire sauce, stirring well to blend everything together. The tomato paste gives the beef a rich umami depth, while Worcestershire enhances its savory kick. Finally, stir in the crispy bacon pieces and remove the skillet from heat. Set this flavorful beef and bacon mixture aside to cool slightly.

Step 2: Make the Creamy Cheese Sauce

In a saucepan, melt the butter over medium heat. Whisk in the flour and cook for about one minute to form a smooth roux. Slowly add the warm milk while whisking continuously to avoid lumps. The sauce will thicken as it cooks — this is your base for creamy deliciousness.

Lower the heat and add the shredded cheddar, mozzarella, and Parmesan cheese. Stir until the cheese melts and the sauce becomes velvety smooth. Season with salt, pepper, and a tiny pinch of nutmeg to enhance the overall flavor.

This sauce will be the magic layer that ties everything together — creamy, cheesy, and irresistibly rich.

Step 3: Prepare the Potato Layer

Preheat your oven to 375°F (190°C).
Grease a large baking dish (around 9×13 inches) with olive oil or butter. Arrange half of the thinly sliced potatoes in an even layer across the bottom of the dish. Season lightly with salt, pepper, and garlic powder.

Step 4: Assemble the Gratin

Now comes the fun part — layering!

  1. First layer: Spread half of the cheesy sauce over the potatoes.

  2. Second layer: Add the entire beef and bacon mixture evenly over the cheese sauce.

  3. Third layer: Add the remaining sliced potatoes, seasoning lightly again.

  4. Top layer: Pour the remaining cheese sauce over the top, spreading it evenly.

Finally, sprinkle the last ½ cup of cheddar cheese over the surface for that golden, bubbly finish.

Step 5: Bake to Perfection

Cover the dish with foil and bake for 35 minutes. Then remove the foil and bake for an additional 20 minutes, or until the top turns beautifully golden and the potatoes are fork-tender.

For an extra crispy top, switch to broil mode for the last 2–3 minutes — just keep an eye on it to prevent burning.

Step 6: Let It Rest and Serve

Remove the gratin from the oven and let it rest for about 10 minutes before serving. This resting time allows the layers to settle and makes slicing easier. Garnish with freshly chopped parsley for a burst of color and freshness.

When you dig in, you’ll get layers of soft potatoes soaked in cheesy sauce, meaty beef and bacon with smoky notes, and that irresistible golden crust on top.

Tips for Success

  • Choose the right potatoes: Russet or Yukon Gold potatoes work best because they hold their shape and absorb flavor well.

  • Add veggies: You can mix in sautéed mushrooms, spinach, or caramelized onions for a flavorful twist.

  • Cheese options: Try a blend of Gruyère, Monterey Jack, or Fontina for extra creaminess and complexity.

  • Make ahead: Assemble the gratin up to a day ahead and bake it when ready to serve — perfect for busy evenings or entertaining guests.

Gluten-Free Perogies

There’s nothing quite like a plate of warm, buttery perogies — tender dough pockets filled with creamy mashed potatoes, cheese, or savory meats. For those who avoid gluten, this beloved Eastern European comfort food can feel off-limits, but with the right ingredients and technique, you can enjoy authentic gluten-free perogies that taste just as good as traditional ones. This unique recipe captures all the flavors and textures of classic homemade perogies, featuring a soft, pliable gluten-free dough and a rich, cheesy potato filling that melts in your mouth.

Ingredients

For the Gluten-Free Dough:

  • 2 cups gluten-free all-purpose flour blend (with xanthan gum)

  • 1 teaspoon salt

  • 1 large egg

  • ½ cup sour cream (or Greek yogurt for a tangier flavor)

  • 2 tablespoons melted butter

  • 2–4 tablespoons warm water (as needed for consistency)

For the Filling:

  • 3 large russet potatoes, peeled and cubed

  • 1 cup shredded sharp cheddar cheese

  • 2 tablespoons butter

  • ¼ cup sour cream

  • Salt and pepper to taste

  • Optional: ½ cup finely sautéed onions or crumbled cooked bacon for extra flavor

For Serving:

  • Butter for frying

  • Chopped onions or green onions

  • Sour cream for dipping

Step 1: Prepare the Filling

Start by making the filling so it has time to cool before assembling the perogies.

  1. Boil the potatoes: Place cubed potatoes into a large pot, cover with salted water, and bring to a boil. Cook until fork-tender, about 12–15 minutes.

  2. Mash and flavor: Drain the potatoes well, then mash them with butter, sour cream, and shredded cheese until smooth and creamy. Season generously with salt and pepper.

  3. Enhance the flavor (optional): Stir in sautéed onions or crispy bacon for a heartier filling. Set aside to cool completely — a cooled filling makes it easier to shape and seal the perogies later.

Step 2: Make the Gluten-Free Dough

Creating gluten-free dough that’s elastic and workable can be tricky, but sour cream and egg help achieve that tender, supple texture.

  1. Mix the dry ingredients: In a large bowl, whisk together the gluten-free flour and salt.

  2. Add wet ingredients: Create a well in the center and add the egg, sour cream, and melted butter. Mix gently with a fork or spatula until the dough starts to come together.

  3. Adjust the moisture: Add warm water, one tablespoon at a time, until you achieve a soft but not sticky dough.

  4. Knead lightly: Transfer the dough onto a floured surface and knead just until smooth. Gluten-free dough doesn’t require much kneading — overworking can make it crumbly.

  5. Rest: Wrap the dough in plastic wrap and let it rest for 15–20 minutes. This allows the flour to hydrate fully, improving elasticity and ease of rolling.

Step 3: Shape and Fill the Perogies

  1. Roll the dough: Lightly dust a clean surface and rolling pin with gluten-free flour. Roll the dough out to about ⅛-inch thickness.

  2. Cut circles: Use a round cookie cutter or drinking glass (about 3 inches wide) to cut out circles from the dough.

  3. Fill them: Place a teaspoon-sized scoop of the cooled potato filling in the center of each circle.

  4. Seal the edges: Fold the dough over the filling to form a half-moon shape. Press the edges together tightly, then crimp with a fork to ensure a firm seal. If the dough seems dry, moisten the edges with a little water before sealing.

Tip: If the dough cracks, patch it gently with a small piece of extra dough — gluten-free dough can be delicate but is very forgiving when handled carefully.

Step 4: Cook the Perogies

There are two delicious ways to enjoy your gluten-free perogies — boiled and butter-fried.

To boil:

  1. Bring a large pot of salted water to a gentle boil.

  2. Drop in the perogies, a few at a time, to avoid overcrowding.

  3. Cook for 3–4 minutes, or until they float to the surface.

  4. Remove with a slotted spoon and place on a plate lightly brushed with butter to prevent sticking.

To fry:
For a golden, crispy finish, pan-fry the boiled perogies in a skillet with butter until both sides are beautifully browned. Add onions to the pan and cook until caramelized for extra flavor.

Step 5: Serve and Enjoy

Serve your gluten-free perogies hot, topped with caramelized onions, a dollop of sour cream, and a sprinkle of green onions or herbs. They pair perfectly with a side of applesauce, roasted vegetables, or a fresh cucumber salad.

For variation, try different fillings:

  • Savory Mushroom & Onion: Sautéed mushrooms with cream cheese.

  • Spinach & Feta: A Mediterranean twist on the classic.

  • Sweet Cottage Cheese: Add sugar and vanilla for a dessert version.

Tips for Perfect Gluten-Free Perogies

  • Use the right flour blend: Choose a gluten-free flour that includes xanthan gum or guar gum for elasticity. Without it, the dough will tear easily.

  • Don’t overboil: Gluten-free dough can turn mushy if overcooked. Boil just until they float.

  • Freeze for later: Arrange uncooked perogies on a baking sheet and freeze until solid. Then transfer them to a freezer bag. Cook directly from frozen — no need to thaw.

  • Keep dough covered: Gluten-free dough dries quickly, so cover it with a damp towel when working in batches.

Why This Recipe Works

Traditional perogies rely on gluten for that chewy texture and flexible dough. This gluten-free version achieves a similar consistency through the magic of sour cream and butter, which add moisture and tenderness, while the egg provides structure. The filling combines classic comfort — creamy potatoes and melted cheese — with the versatility to adapt to your taste. Whether you fry them for a crispy exterior or enjoy them soft and pillowy right from the pot, these gluten-free perogies deliver everything you love about the original — warmth, nostalgia, and irresistible flavor.

Creamy Mushroom Chicken and Wild Rice Soup

There’s something incredibly soul-soothing about a bowl of creamy soup that fills the kitchen with rich aromas and wraps you in comfort from the first spoonful. This Creamy Mushroom Chicken and Wild Rice Soup is the perfect balance of earthy, savory, and creamy goodness — a bowlful of cozy that’s perfect for chilly nights, family dinners, or when you need a touch of homemade comfort. The combination of tender chicken, hearty wild rice, and meaty mushrooms creates a rustic dish with gourmet flair.

This isn’t your ordinary chicken soup; it’s deeply flavorful and wholesome. The wild rice adds texture and nutty depth, the mushrooms bring an earthy umami quality, and the creamy broth ties everything together in harmony. Unlike traditional chicken soups that rely solely on broth, this version enriches the base with milk and a touch of cream to achieve a velvety finish that feels indulgent without being heavy.

Ingredients

For the soup base:

  • 2 tablespoons butter

  • 1 tablespoon olive oil

  • 1 medium onion, finely chopped

  • 2 carrots, diced

  • 2 celery stalks, diced

  • 3 garlic cloves, minced

  • 8 ounces cremini or baby bella mushrooms, sliced

  • 1 teaspoon dried thyme (or 1 tablespoon fresh thyme)

  • 1 teaspoon dried rosemary

  • 1/2 teaspoon smoked paprika

  • Salt and black pepper, to taste

For the chicken and rice:

  • 1 cup uncooked wild rice blend

  • 6 cups low-sodium chicken broth

  • 2 cups cooked chicken, shredded (rotisserie works great)

For the creamy finish:

  • 3 tablespoons butter

  • 3 tablespoons all-purpose flour

  • 2 cups milk (whole milk preferred)

  • 1/2 cup heavy cream (optional but highly recommended)

  • 1/4 cup grated Parmesan cheese (for extra flavor)

  • Fresh parsley, chopped, for garnish

Instructions

Step 1: Sauté the Aromatics and Mushrooms

Start by heating butter and olive oil in a large soup pot or Dutch oven over medium heat. Add the chopped onions, carrots, and celery. Sauté for about 5–6 minutes, until the onions become translucent and the vegetables soften. Add the minced garlic and cook for another minute until fragrant.

Next, stir in the sliced mushrooms. As they cook, they’ll release their juices and develop a rich brown color. This process adds depth to the soup’s flavor base. Once the mushrooms are tender and slightly golden, sprinkle in the thyme, rosemary, smoked paprika, salt, and black pepper. The herbs will infuse the vegetables, creating an aromatic foundation.

Step 2: Add Rice and Broth

Pour in the uncooked wild rice blend, stirring it into the vegetables to coat with the seasonings. Slowly add the chicken broth, scraping the bottom of the pot to release any flavorful bits. Bring the mixture to a boil, then reduce the heat to low. Cover the pot and simmer gently for about 45–50 minutes, or until the wild rice is tender but not mushy.

Wild rice takes longer to cook than white rice, but its chewy texture and nutty flavor are worth the wait. Keep an eye on the pot and stir occasionally to prevent the rice from sticking to the bottom.

Step 3: Add the Chicken

Once the rice is nearly cooked, add the shredded cooked chicken. If using leftover rotisserie chicken, this is the perfect time to fold it in. Let it warm through while the soup continues to simmer. The chicken will absorb all those savory flavors, making every bite deliciously satisfying.

Step 4: Create the Creamy Base

In a separate saucepan, melt the butter over medium heat. Whisk in the flour to create a smooth roux, cooking for 1–2 minutes until it turns slightly golden and loses its raw flour taste. Slowly pour in the milk while whisking constantly, ensuring no lumps form. Continue stirring until the mixture thickens into a creamy sauce.

Once thickened, add the heavy cream and Parmesan cheese, whisking until smooth and glossy. This step transforms the soup from simple to sensational.

Step 5: Combine and Serve

Pour the creamy mixture into the soup pot, stirring until fully combined. Let the soup simmer for another 5–10 minutes so the flavors can meld together beautifully. Taste and adjust seasoning as needed — a pinch more salt or a crack of pepper might bring it to perfection.

For extra texture and presentation, garnish each bowl with freshly chopped parsley and a sprinkle of Parmesan cheese. Serve it alongside crusty bread or sourdough toast to soak up that luscious broth.

Why This Soup is Special

This Creamy Mushroom Chicken and Wild Rice Soup stands out because of its balance — it’s hearty yet refined, earthy yet delicate. The wild rice gives each spoonful a pleasant chew, the mushrooms bring a forest-like aroma, and the creamy broth provides luxurious comfort without overpowering the other ingredients.

It’s also flexible. You can easily make it gluten-free by using cornstarch instead of flour for the roux, or dairy-free by substituting coconut milk and plant-based butter. It freezes beautifully and tastes even better the next day as the flavors deepen overnight.

For busy cooks, this recipe can be simplified by using pre-cooked rice or rotisserie chicken. For flavor enthusiasts, adding a splash of white wine while sautéing the mushrooms or a few drops of truffle oil before serving elevates the dish to restaurant quality.

Serving Suggestions

Pair this soup with:

  • A warm loaf of sourdough bread or garlic toast.

  • A crisp green salad with vinaigrette to balance the creaminess.

  • A glass of chardonnay or sparkling water with lemon for a refreshing complement.

If you want to make it a complete meal, serve smaller portions as a starter before roasted chicken, steak, or a simple pasta dish.

Final Thoughts

This Creamy Mushroom Chicken and Wild Rice Soup captures the heart of comfort food — it’s rich, nourishing, and full of flavor that lingers long after the bowl is empty. Whether you’re cooking for loved ones or craving something warm after a long day, this soup delivers in every way. It’s a timeless classic with a homemade touch that turns any meal into a cozy celebration.

Fresh Pickled Cucumber Salad

If you’re searching for a dish that balances bright flavors, crisp textures, and refreshing tang in one bowl, this Fresh Pickled Cucumber Salad is the ultimate choice. It’s light yet full of personality, with thinly sliced cucumbers marinated in a quick, zesty brine that captures the perfect balance of sweet, sour, and savory notes. Whether you serve it as a side dish for grilled meats, tuck it into sandwiches, or enjoy it as a cool snack on a warm day, this salad delivers the satisfying crunch and zing that make every bite memorable.

Why You’ll Love This Recipe

Unlike traditional salads that wilt over time, this pickled cucumber version gets better as it sits. The cucumbers absorb the flavorful brine, becoming tangy yet still maintaining their crispness. The addition of onions, herbs, and a subtle touch of spice transforms a simple cucumber into a vibrant, flavor-packed dish that pairs beautifully with both light and hearty meals. Best of all, this salad takes just minutes to prepare and can last up to a week in the fridge — making it a perfect make-ahead side dish.

Ingredients

For the Salad:

  • 4 medium cucumbers, thinly sliced (English or Persian cucumbers work best)

  • 1 small red onion, very thinly sliced

  • 1 small carrot, julienned (optional for color and crunch)

  • 2 tablespoons chopped fresh dill or cilantro

  • 1 teaspoon mustard seeds (optional but adds great flavor)

  • ½ teaspoon crushed red pepper flakes (optional for spice)

For the Pickling Brine:

  • 1 cup white vinegar (or apple cider vinegar for a softer tang)

  • ½ cup water

  • 3 tablespoons sugar

  • 1 teaspoon salt

  • 1 garlic clove, smashed

  • 1 tablespoon olive oil (optional for a smoother finish)

Instructions

Step 1: Prepare the Vegetables

Start by washing your cucumbers thoroughly. If you prefer, you can peel them for a softer texture, but leaving the skins on adds more color and crunch. Slice the cucumbers into thin, even rounds using a sharp knife or mandoline. Place them in a large mixing bowl.
Add the thinly sliced red onion and, if using, the julienned carrot. The combination of colors — green cucumber, purple onion, and orange carrot — makes this salad visually stunning. Sprinkle in the mustard seeds, red pepper flakes, and fresh dill.

Step 2: Make the Brine

In a small saucepan, combine vinegar, water, sugar, salt, and the smashed garlic clove. Bring the mixture to a gentle simmer over medium heat, stirring until the sugar and salt are fully dissolved. The aroma of warm vinegar and garlic will immediately let you know you’re on the right track. Once dissolved, remove the pan from the heat and let the brine cool for about 10 minutes.

Step 3: Combine and Marinate

Pour the slightly cooled brine over the cucumber mixture. Stir well to ensure all the vegetables are submerged and coated evenly in the liquid. If you’d like, drizzle a tablespoon of olive oil over the top for a velvety finish.
Cover the bowl with plastic wrap or transfer the salad into a glass jar. Let it rest in the refrigerator for at least one hour before serving — though overnight is ideal for the flavors to fully develop.

Step 4: Serve and Enjoy

After chilling, give the salad a good stir and taste to adjust the seasoning. You can add a little more vinegar for tang or a pinch of sugar for balance. Serve this Fresh Pickled Cucumber Salad chilled as a crisp accompaniment to grilled chicken, fish, or even spicy curries. It also adds a refreshing crunch when layered in sandwiches or wraps.

Tips for the Best Pickled Cucumber Salad

  1. Use firm, fresh cucumbers: The fresher they are, the crunchier your salad will be. Avoid overripe cucumbers that feel soft or spongy.

  2. Adjust sweetness and acidity: If you prefer a more tart salad, reduce the sugar slightly. For a milder taste, increase the water or use rice vinegar.

  3. Let it marinate: Though it’s delicious after an hour, this salad shines when left to pickle for a full 12–24 hours.

  4. Add your twist: Try adding thinly sliced radishes, bell peppers, or even a few sprigs of mint for extra flavor depth.

  5. Store properly: Keep it in an airtight glass jar in the refrigerator. It will stay fresh and crisp for up to a week.

The Flavor Experience

Each bite of this salad is a harmony of contrasts — the crisp cucumbers against the tangy brine, the sharp bite of onion mellowed by the slight sweetness of sugar, and the aromatic herbs tying everything together. The pickling liquid lightly penetrates the cucumber slices, transforming their mild flavor into something vibrant and invigorating. It’s a flavor explosion that manages to be both comforting and refreshing, making it suitable for any season.

Serving Ideas

  • Summer BBQ Companion: Pairs wonderfully with grilled meats, hot dogs, or burgers.

  • Asian-Inspired Bowls: Add a spoonful on top of rice bowls or noodles for a crunchy bite.

  • Sandwich Upgrade: Use it in sandwiches or sliders instead of traditional pickles.

  • Refreshing Snack: Enjoy straight from the jar for a light, guilt-free treat.

A Simple Pleasure with Endless Appeal

There’s something nostalgic yet modern about a Fresh Pickled Cucumber Salad. It harks back to old-fashioned garden pickles yet feels perfectly suited for today’s quick, health-conscious meals. The simplicity of its ingredients and the speed of its preparation make it a recipe you’ll return to again and again. Whether you’re hosting a summer cookout, prepping meal sides for the week, or just craving something crisp and flavorful, this salad delivers every single time.

Melt in Your Mouth Chicken

When you think of comfort food, few dishes can compete with the incredible satisfaction of Melt in Your Mouth Chicken. True to its name, this recipe delivers unbelievably tender, juicy chicken with a golden, creamy coating that practically dissolves in your mouth. This dish has been loved for generations, not just for its heavenly texture but also for its simplicity — it takes minimal effort yet results in a restaurant-quality meal.

The secret lies in a tangy, savory mixture of mayonnaise (or Greek yogurt), Parmesan cheese, and a few carefully chosen seasonings that work together to lock in moisture and create a flavorful crust as it bakes. The result is chicken so succulent, it feels like butter on your tongue. Whether you’re cooking for family dinner, a special occasion, or meal prepping for the week, this is one recipe you’ll come back to time and again.

Ingredients You’ll Need

For the Chicken:

  • 4 boneless, skinless chicken breasts (about 2 pounds total)

  • 1 cup mayonnaise (or substitute Greek yogurt for a lighter version)

  • ½ cup grated Parmesan cheese

  • 1 teaspoon garlic powder

  • 1 teaspoon onion powder

  • ½ teaspoon paprika

  • ½ teaspoon salt (adjust to taste)

  • ½ teaspoon freshly ground black pepper

  • ½ teaspoon dried parsley (optional for color and aroma)

Optional Garnish:

  • Fresh parsley, chopped

  • A sprinkle of extra Parmesan

Step-by-Step Directions

Step 1: Prepare the Chicken

Start by preheating your oven to 375°F (190°C). Lightly grease a baking dish with butter or nonstick spray to ensure the chicken doesn’t stick.

Trim any excess fat from the chicken breasts. If they are quite thick, slice them in half horizontally or pound them to an even thickness. This ensures they cook evenly and remain juicy throughout. Pat each piece dry with a paper towel — this helps the creamy coating adhere better.

Step 2: Make the Creamy Topping

In a medium bowl, combine mayonnaise, Parmesan cheese, garlic powder, onion powder, paprika, salt, pepper, and dried parsley. Mix until smooth and creamy. This mixture is the magic behind the “melt in your mouth” texture. The mayonnaise adds moisture and richness, while the Parmesan gives a slightly salty, nutty crust that crisps beautifully in the oven.

Step 3: Coat the Chicken

Place the chicken breasts in the prepared baking dish in a single layer. Using a spatula or spoon, spread the creamy mixture evenly over the top of each piece. Make sure every inch is covered — this is what keeps the chicken juicy and flavorful as it bakes.

Step 4: Bake to Perfection

Bake the chicken uncovered in the preheated oven for 30–40 minutes, depending on the thickness of your chicken. The coating should turn a lovely golden brown, and the internal temperature should reach 165°F (74°C) when checked with a meat thermometer.

For an extra crispy top, switch the oven to broil for the last 2–3 minutes of baking. Keep a close eye to prevent burning — this step will give your chicken a slightly caramelized, bubbly crust.

Step 5: Serve and Enjoy

Remove the chicken from the oven and let it rest for a few minutes. Sprinkle with freshly chopped parsley or a little extra Parmesan before serving.

This dish pairs perfectly with sides like garlic mashed potatoes, buttered noodles, steamed broccoli, or roasted vegetables. You can even slice it up and serve over a fresh green salad for a lighter meal.

Tips for the Perfect “Melt in Your Mouth” Chicken

  1. Don’t overbake. Overcooking chicken breast can dry it out. Use a meat thermometer for accuracy — once it hits 165°F, it’s done.

  2. Use room temperature chicken. This ensures even cooking and a consistent, tender texture.

  3. Experiment with flavors. Try adding a dash of Dijon mustard, a pinch of cayenne pepper, or fresh herbs like thyme or rosemary to the mixture for variation.

  4. Make it ahead. You can assemble the chicken and topping a day in advance, cover it with plastic wrap, and refrigerate until ready to bake. Perfect for busy nights!

  5. Use dark meat for extra juiciness. Boneless chicken thighs work beautifully with this recipe for a richer flavor and buttery texture.

Why This Recipe Works

The beauty of Melt in Your Mouth Chicken is in the chemistry of its ingredients. The mayonnaise locks in moisture by forming a protective barrier on the chicken’s surface, ensuring it stays tender even after baking. The Parmesan cheese adds a salty, umami kick and caramelizes during baking to create a slightly crispy exterior. The seasonings blend seamlessly into the creamy sauce, infusing every bite with rich flavor.

This dish is also remarkably forgiving. Even novice cooks can pull it off easily — there’s no frying, marinating, or complicated steps. Plus, it’s versatile: you can serve it with pasta, rice, or veggies, and it still shines as the star of the meal.

Serving Suggestions

  • For a cozy family dinner: Serve it with mashed potatoes and green beans for a classic comfort plate.

  • For a light lunch: Slice the chicken thin and place it on top of a Caesar salad or spinach greens.

  • For a fancy twist: Pair it with a creamy risotto or roasted asparagus and drizzle with a hint of lemon butter sauce.

Storage and Reheating

If you have leftovers (which is rare with this dish!), store them in an airtight container in the refrigerator for up to 3 days. Reheat gently in the oven at 350°F (175°C) for 10–12 minutes or in the microwave on medium power until warmed through. The coating stays surprisingly creamy even after reheating.

You can also freeze the cooked chicken for up to 2 months. Just thaw it overnight in the refrigerator before reheating.

Final Thoughts

Melt in Your Mouth Chicken is one of those timeless recipes that proves you don’t need fancy ingredients or long preparation to create something truly extraordinary. Every bite delivers juicy, flavorful chicken wrapped in a creamy, golden crust that lives up to its name.

Gluten-Free Lemon Blueberry Bread

If you’ve been craving something sweet yet refreshing, this Gluten-Free Lemon Blueberry Bread is the perfect choice. It’s tender, moist, and bursting with tangy lemon zest and juicy blueberries in every bite. Whether you’re gluten-sensitive or simply want a lighter, fruit-forward dessert, this bread captures everything delightful about homemade baking without the gluten. What makes this recipe special is its balance — the zing of lemon complements the natural sweetness of blueberries beautifully, creating a loaf that’s as elegant for brunch as it is comforting for tea time.

The Inspiration Behind the Recipe

Classic lemon loafs have long been a favorite for their light, citrusy flavor. But when you add blueberries, magic happens — their subtle tartness adds depth and natural sweetness. Making it gluten-free doesn’t mean compromising texture or flavor; the combination of almond flour, rice flour, and a bit of cornstarch ensures a moist and fluffy crumb that rivals any traditional bread. This recipe is designed to be foolproof, with easy-to-find ingredients and simple steps that anyone can follow.

Ingredients You’ll Need

To create this heavenly gluten-free lemon blueberry bread, gather the following:

Dry Ingredients:

  • 1 ½ cups gluten-free all-purpose flour blend (with xanthan gum included)

  • ½ cup almond flour (for extra tenderness and flavor)

  • 2 tsp baking powder

  • ¼ tsp baking soda

  • ¼ tsp salt

Wet Ingredients:

  • ¾ cup granulated sugar (or coconut sugar for a natural twist)

  • ½ cup unsalted butter, softened (or coconut oil for dairy-free)

  • 2 large eggs, room temperature

  • ¼ cup Greek yogurt or sour cream (adds richness and moisture)

  • ¼ cup milk of choice (almond, oat, or dairy milk)

  • Zest of 2 large lemons

  • 2 tbsp fresh lemon juice

  • 1 tsp pure vanilla extract

Add-ins:

  • 1 cup fresh or frozen blueberries (if frozen, don’t thaw)

  • 1 tbsp gluten-free flour (to toss blueberries and prevent sinking)

Optional Lemon Glaze:

  • ½ cup powdered sugar

  • 1–2 tbsp fresh lemon juice

Step-by-Step Instructions

Step 1: Preheat and Prepare

Preheat your oven to 350°F (175°C). Grease and line a 9×5-inch loaf pan with parchment paper, leaving some overhang for easy removal later. This ensures your bread lifts out cleanly without breaking apart.

Step 2: Mix the Dry Ingredients

In a large mixing bowl, whisk together the gluten-free flour blend, almond flour, baking powder, baking soda, and salt. This dry mixture forms the foundation of the bread, keeping it light yet structured.

Step 3: Cream the Butter and Sugar

In a separate bowl, use an electric mixer to cream the butter and sugar together until pale and fluffy — about 2–3 minutes. This step helps incorporate air, giving the bread a tender crumb.

Step 4: Add the Wet Ingredients

Beat in the eggs one at a time, mixing well after each addition. Then add the Greek yogurt, lemon zest, lemon juice, vanilla extract, and milk. The aroma of lemon at this stage is irresistible — it’s what gives this bread its signature brightness.

Step 5: Combine Wet and Dry Mixtures

Gradually add the dry ingredients to the wet mixture, stirring gently with a spatula until combined. Avoid overmixing, as it can make the bread dense. The batter should be thick but smooth.

Step 6: Fold in Blueberries

Toss the blueberries with 1 tablespoon of gluten-free flour, then gently fold them into the batter. This trick prevents the berries from sinking to the bottom while baking and helps them stay evenly distributed.

Step 7: Bake to Perfection

Pour the batter into your prepared loaf pan and smooth the top with a spatula. Bake for 50–60 minutes, or until a toothpick inserted into the center comes out mostly clean with a few moist crumbs. If the top starts browning too quickly, cover loosely with foil during the last 10 minutes.

Step 8: Cool and Glaze

Let the bread cool in the pan for 10 minutes, then lift it out using the parchment paper and transfer to a wire rack. Once completely cooled, drizzle with the optional lemon glaze for an extra burst of citrus sweetness.

Baker’s Tips for Success

  1. Use room temperature ingredients – This ensures better mixing and helps the bread rise evenly.

  2. Don’t overmix – Gluten-free batters are delicate; stirring too much can lead to a gummy texture.

  3. Try frozen blueberries – They work beautifully and prevent the batter from becoming too wet.

  4. For dairy-free version – Swap butter for coconut oil, yogurt for coconut yogurt, and milk for almond milk.

  5. Add a crunch – Top with a sprinkle of coarse sugar or sliced almonds before baking for texture contrast.

Flavor Variations

  • Lemon Poppyseed Blueberry Bread: Add 1 tablespoon of poppy seeds for a subtle crunch.

  • Coconut Lemon Loaf: Replace half the milk with coconut milk and add shredded coconut to the batter.

  • Lavender Lemon Loaf: Add ½ teaspoon of dried culinary lavender for a delicate floral note.

Serving Suggestions

This bread is delightful as is, but you can elevate it further by serving slices warm with:

  • A dollop of whipped cream or Greek yogurt

  • A drizzle of honey or lemon curd

  • Fresh blueberries and mint leaves for presentation

It pairs perfectly with a cup of tea or iced coffee on a sunny morning.

Storage and Freezing

Wrap the cooled loaf tightly in plastic wrap or an airtight container and store at room temperature for up to 3 days, or refrigerate for up to 1 week. For longer storage, freeze slices individually for up to 2 months — simply thaw and warm before serving.

Final Thoughts

This Gluten-Free Lemon Blueberry Bread proves that gluten-free baking can be just as luscious and satisfying as traditional recipes. The soft crumb, vibrant citrus notes, and bursts of juicy berries make it a showstopper at any table. Whether enjoyed as breakfast, a snack, or dessert, each slice brings a refreshing burst of flavor that reminds you of sunshine and homemade goodness. With its perfect balance of sweet and tangy, this bread is more than just a treat — it’s a celebration of flavor, freshness, and the joy of gluten-free baking done right.