Philly cheesesteak egg rolls

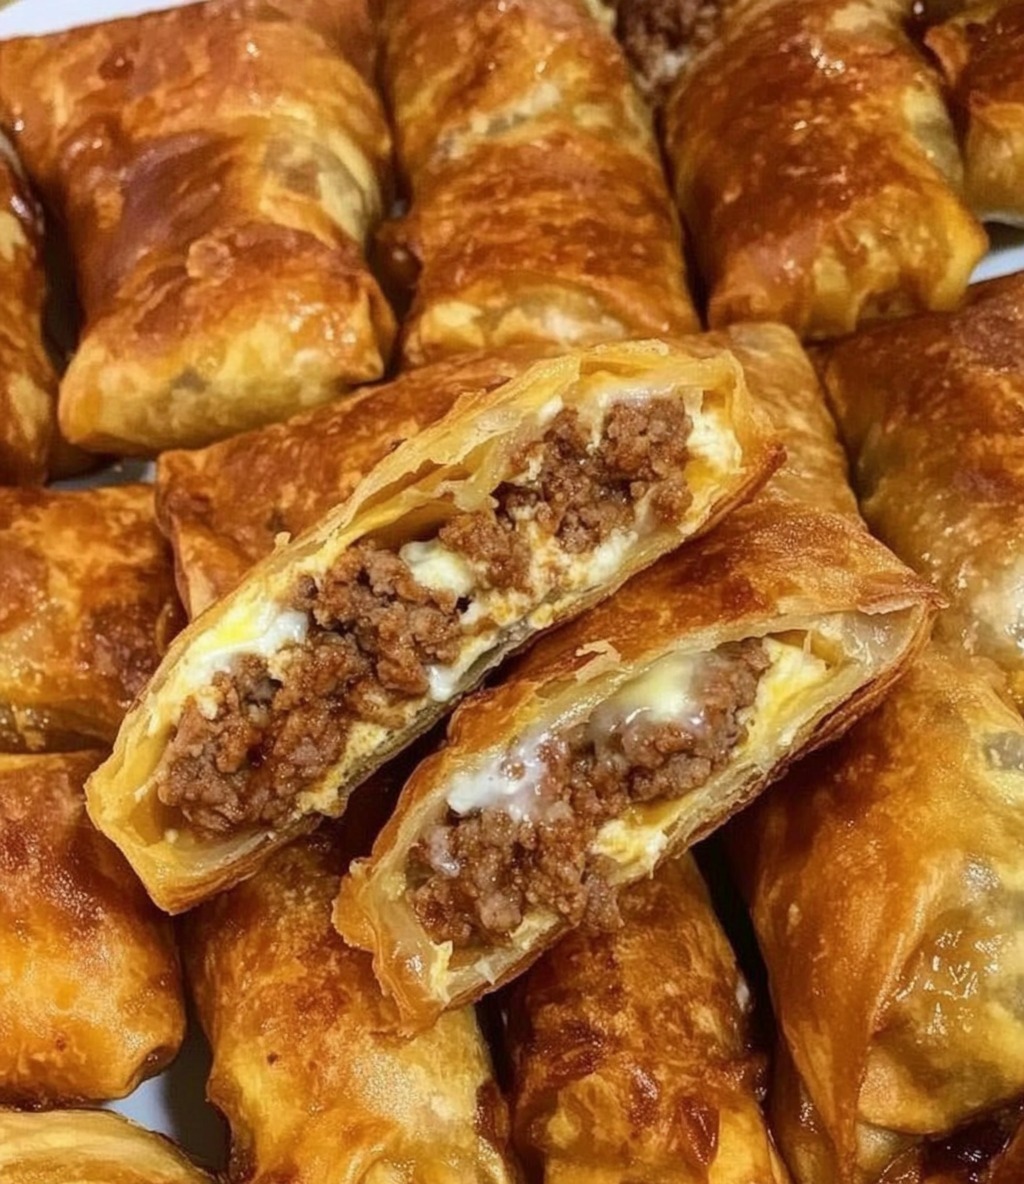
If you love bold flavors, crunchy textures, and ooey-gooey cheese, Philly Cheesesteak Egg Rolls are about to become your new obsession. This recipe combines the iconic flavors of a classic Philadelphia cheesesteak—tender beef, caramelized onions, sautéed peppers, and melty cheese—with the satisfying crunch of a golden-fried egg roll wrapper. The result is a handheld appetizer or meal that’s comforting, indulgent, and guaranteed to disappear fast.

These egg rolls are perfect for game nights, parties, family gatherings, or even as a fun twist on dinner. Unlike traditional cheesesteaks, there’s no bread to get soggy—just layers of flavor wrapped in crispy perfection.

Why This Recipe Works

The secret to an unforgettable Philly cheesesteak egg roll lies in balance. You want juicy, well-seasoned beef, vegetables that are cooked until sweet and tender (not mushy), and cheese that melts smoothly without leaking out. This recipe achieves all of that by cooking each component carefully and assembling the rolls in a way that locks in flavor and crunch.

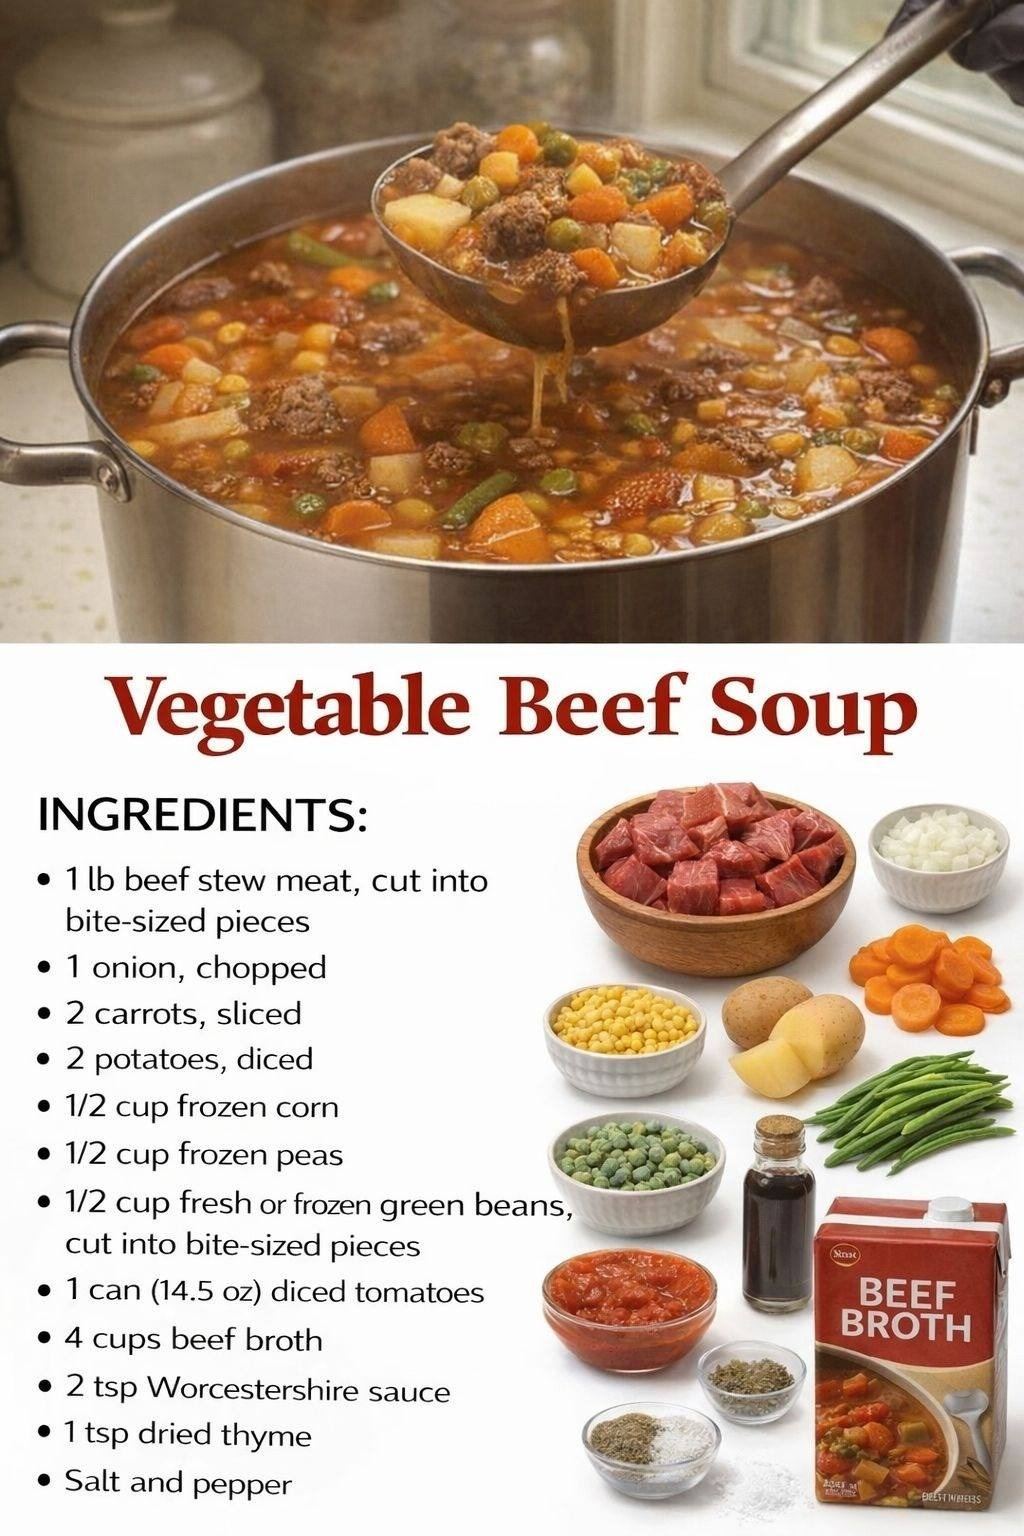
Ingredients (Makes 12–14 Egg Rolls)

For the Filling:

  • 1 lb thinly sliced beef (ribeye is traditional, but sirloin or shaved steak works well)

  • 1 tablespoon vegetable oil

  • 1 medium onion, thinly sliced

  • 1 green bell pepper, thinly sliced

  • 1 small red bell pepper, thinly sliced

  • 2 cloves garlic, finely minced

  • 1 teaspoon Worcestershire sauce

  • ½ teaspoon salt (or to taste)

  • ½ teaspoon black pepper

  • ½ teaspoon paprika (optional, for depth)

  • ½ teaspoon onion powder

For the Cheese:

  • 1½ cups shredded provolone cheese
    or

  • 8 slices provolone or American cheese, torn into strips

For Assembly & Frying:

  • 12–14 egg roll wrappers

  • 1 small bowl of water (for sealing)

  • Vegetable or canola oil, for frying

Optional for Serving:

  • Cheese sauce

  • Garlic aioli

  • Spicy ketchup

  • Ranch dressing

Step-by-Step Instructions

1. Cook the Vegetables

Heat the vegetable oil in a large skillet over medium heat. Add the sliced onions and bell peppers. Cook for 6–8 minutes, stirring occasionally, until the vegetables soften and begin to caramelize. This step builds sweetness and depth, which is essential for authentic cheesesteak flavor.

Add the minced garlic and cook for another 30 seconds until fragrant. Remove the vegetables from the skillet and set aside.

2. Cook the Beef

Using the same skillet, increase the heat slightly and add the sliced beef in a single layer. Let it sear undisturbed for about 1 minute, then stir and cook until just browned. Avoid overcooking—tender beef is key.

Season with salt, black pepper, paprika, onion powder, and Worcestershire sauce. Return the cooked vegetables to the skillet and stir everything together. Cook for 1–2 more minutes, then remove from heat.

Allow the mixture to cool slightly before assembling. This prevents the egg roll wrappers from tearing.

3. Assemble the Egg Rolls

Lay one egg roll wrapper on a clean surface in a diamond shape. Spoon 2–3 tablespoons of the beef and vegetable mixture into the center. Add a generous sprinkle of shredded cheese or a few strips of sliced cheese on top.

Fold the bottom corner over the filling, then fold in both sides. Roll tightly toward the top corner. Dip your finger in water and seal the edge firmly. Repeat with remaining wrappers.

4. Fry to Golden Perfection

Heat about 2 inches of oil in a deep skillet or saucepan to 350°F (175°C). Carefully add 2–3 egg rolls at a time, seam-side down. Fry for 3–4 minutes, turning occasionally, until deeply golden and crispy.

Remove and drain on paper towels. Let them rest for a minute before serving—the cheese inside will be very hot.

Pro Tips for the Best Egg Rolls

  • Freeze the beef slightly before slicing to get ultra-thin strips.

  • Don’t overfill the wrappers, or they may burst while frying.

  • Use low-moisture cheese to prevent leaks.

  • For a lighter version, bake at 400°F (200°C) for 18–20 minutes, flipping halfway, or air-fry at 375°F for 10–12 minutes.

Serving Ideas

Serve Philly cheesesteak egg rolls hot and crispy with a side of cheese sauce for dipping, or pair them with a fresh salad to balance the richness. They also make an excellent party platter centerpiece—slice them in half for bite-sized portions that show off the cheesy filling.

Final Thoughts

Philly Cheesesteak Egg Rolls are the perfect example of comfort food creativity—familiar flavors reinvented in a fun, crave-worthy way. Crispy on the outside, juicy and cheesy on the inside, they deliver everything you love about a cheesesteak with an irresistible crunch. Make them once, and they’ll quickly earn a permanent place in your recipe rotation.

10 SILENT SIGNS Your KIDNEYS Are FAILING — Most People Miss These

Excess mucus in the throat and lungs can be uncomfortable, irritating, and exhausting. It can cause constant throat clearing, coughing, chest tightness, and that heavy feeling when breathing doesn’t feel as clear as it should. Mucus buildup is often linked to seasonal changes, colds, allergies, pollution, dehydration, or certain foods. While mucus plays an important role in protecting your respiratory system, too much of it can interfere with comfort and breathing.

The good news is that nature offers gentle ingredients that may help loosen mucus, soothe irritated airways, and support the body’s natural clearing process. This simple warm drink recipe has been used in various cultures for generations and is easy to prepare at home using everyday ingredients. It focuses on hydration, warmth, and natural compounds known for their soothing properties.

Why Warm Drinks Help With Mucus

Warm liquids are one of the simplest ways to support mucus clearance. Heat helps thin thick secretions, making them easier for the body to move out naturally through coughing or swallowing. Warmth also relaxes throat muscles, reduces irritation, and provides comfort during congestion.

This recipe combines warmth with ingredients traditionally associated with respiratory comfort, digestion support, and throat soothing.

The Mucus-Clearing Soothing Drink Recipe

Ingredients:

  • 1½ cups water

  • 1 tablespoon fresh ginger (grated or sliced)

  • 1 tablespoon fresh lemon juice

  • 1 tablespoon raw honey

  • A pinch of turmeric powder (optional)

  • A pinch of black pepper (optional, helps turmeric absorption)

How to Prepare It

  1. Pour the water into a small pot and bring it to a gentle boil.

  2. Add the fresh ginger and reduce the heat. Let it simmer for 8–10 minutes so the ginger infuses into the water.

  3. Remove from heat and strain the liquid into a cup.

  4. Stir in the lemon juice and honey while the drink is still warm (not boiling hot).

  5. If using turmeric, add a small pinch along with a tiny pinch of black pepper and stir well.

  6. Sip slowly while warm.

How Each Ingredient Supports Comfort

Ginger
Ginger has warming properties that may help relax the airway muscles and promote circulation. It’s traditionally used to support digestion and soothe irritation, which can be helpful when mucus feels thick or stubborn.

Lemon Juice
Lemon provides vitamin C and a mild acidic quality that may help break down mucus consistency. It also stimulates saliva production, which can help reduce dryness in the throat.

Raw Honey
Honey coats the throat, helping calm irritation and dryness caused by constant coughing or throat clearing. Its thick texture provides immediate soothing relief and adds natural sweetness without refined sugar.

Turmeric (Optional)
Turmeric contains curcumin, which is traditionally associated with supporting inflammation balance. Adding a small amount may enhance the soothing effect, especially when combined with warmth.

Black Pepper (Optional)
Only a pinch is needed. Black pepper gently stimulates circulation and enhances turmeric absorption while adding mild warmth that can help loosen congestion.

When and How Often to Drink It

  • Drink once in the morning to help clear overnight mucus buildup.

  • Drink again in the evening if congestion feels heavy or persistent.

  • Sip slowly rather than gulping for best throat-coating benefits.

Consistency matters more than quantity. Using this drink daily for several days often feels more supportive than using it only once.

Additional Tips to Reduce Mucus Naturally

  • Stay well hydrated throughout the day with warm or room-temperature fluids.

  • Reduce very cold drinks, which may thicken mucus for some people.

  • Limit heavy dairy foods if you notice they increase congestion.

  • Keep indoor air humid, especially in dry weather.

  • Practice gentle steam inhalation for added relief.

A Gentle Reminder

This recipe is meant to support comfort and natural body processes, not replace medical care. If mucus is persistent, thick, discolored, or accompanied by fever, chest pain, or breathing difficulty, a healthcare professional should be consulted.

Final Thoughts

Clearing mucus from the throat and lungs doesn’t have to involve harsh solutions. Sometimes the most effective support comes from warmth, hydration, and time-tested natural ingredients. This soothing drink is simple, comforting, and easy to make, making it a helpful addition to your daily routine during times of congestion or irritation.

Clear your throat and lungs of mucus with this recipe

Excess mucus in the throat and lungs can be uncomfortable, irritating, and exhausting. It can cause constant throat clearing, coughing, chest tightness, and that heavy feeling when breathing doesn’t feel as clear as it should. Mucus buildup is often linked to seasonal changes, colds, allergies, pollution, dehydration, or certain foods. While mucus plays an important role in protecting your respiratory system, too much of it can interfere with comfort and breathing.

The good news is that nature offers gentle ingredients that may help loosen mucus, soothe irritated airways, and support the body’s natural clearing process. This simple warm drink recipe has been used in various cultures for generations and is easy to prepare at home using everyday ingredients. It focuses on hydration, warmth, and natural compounds known for their soothing properties.

Why Warm Drinks Help With Mucus

Warm liquids are one of the simplest ways to support mucus clearance. Heat helps thin thick secretions, making them easier for the body to move out naturally through coughing or swallowing. Warmth also relaxes throat muscles, reduces irritation, and provides comfort during congestion.

This recipe combines warmth with ingredients traditionally associated with respiratory comfort, digestion support, and throat soothing.

The Mucus-Clearing Soothing Drink Recipe

Ingredients:

  • 1½ cups water

  • 1 tablespoon fresh ginger (grated or sliced)

  • 1 tablespoon fresh lemon juice

  • 1 tablespoon raw honey

  • A pinch of turmeric powder (optional)

  • A pinch of black pepper (optional, helps turmeric absorption)

How to Prepare It

  1. Pour the water into a small pot and bring it to a gentle boil.

  2. Add the fresh ginger and reduce the heat. Let it simmer for 8–10 minutes so the ginger infuses into the water.

  3. Remove from heat and strain the liquid into a cup.

  4. Stir in the lemon juice and honey while the drink is still warm (not boiling hot).

  5. If using turmeric, add a small pinch along with a tiny pinch of black pepper and stir well.

  6. Sip slowly while warm.

How Each Ingredient Supports Comfort

Ginger
Ginger has warming properties that may help relax the airway muscles and promote circulation. It’s traditionally used to support digestion and soothe irritation, which can be helpful when mucus feels thick or stubborn.

Lemon Juice
Lemon provides vitamin C and a mild acidic quality that may help break down mucus consistency. It also stimulates saliva production, which can help reduce dryness in the throat.

Raw Honey
Honey coats the throat, helping calm irritation and dryness caused by constant coughing or throat clearing. Its thick texture provides immediate soothing relief and adds natural sweetness without refined sugar.

Turmeric (Optional)
Turmeric contains curcumin, which is traditionally associated with supporting inflammation balance. Adding a small amount may enhance the soothing effect, especially when combined with warmth.

Black Pepper (Optional)
Only a pinch is needed. Black pepper gently stimulates circulation and enhances turmeric absorption while adding mild warmth that can help loosen congestion.

When and How Often to Drink It

  • Drink once in the morning to help clear overnight mucus buildup.

  • Drink again in the evening if congestion feels heavy or persistent.

  • Sip slowly rather than gulping for best throat-coating benefits.

Consistency matters more than quantity. Using this drink daily for several days often feels more supportive than using it only once.

Tips to Reduce Mucus Naturally

  • Stay well hydrated throughout the day with warm or room-temperature fluids.

  • Reduce very cold drinks, which may thicken mucus for some people.

  • Limit heavy dairy foods if you notice they increase congestion.

  • Keep indoor air humid, especially in dry weather.

  • Practice gentle steam inhalation for added relief.

A Gentle Reminder

This recipe is meant to support comfort and natural body processes, not replace medical care. If mucus is persistent, thick, discolored, or accompanied by fever, chest pain, or breathing difficulty, a healthcare professional should be consulted.

Final Thoughts

Clearing mucus from the throat and lungs doesn’t have to involve harsh solutions. Sometimes the most effective support comes from warmth, hydration, and time-tested natural ingredients. This soothing drink is simple, comforting, and easy to make, making it a helpful addition to your daily routine during times of congestion or irritation.

Easy Vegetable Beef Soup

There’s something deeply comforting about a bowl of vegetable beef soup. It’s the kind of meal that warms you from the inside out, fills your kitchen with rich, savory aromas, and makes you feel like everything is going to be okay. This easy vegetable beef soup is a timeless classic, but with simple techniques and everyday ingredients that make it approachable for busy weeknights while still tasting like it simmered all day.

What makes this soup special is its balance. Tender beef, colorful vegetables, and a deeply flavorful broth come together in one pot to create a nourishing meal that’s as satisfying as it is simple. Whether you’re cooking for your family, meal-prepping for the week, or using up vegetables in your fridge, this recipe is forgiving, flexible, and always delicious.

Why This Vegetable Beef Soup Works

This recipe is designed to be easy without sacrificing flavor. By browning the beef first, you build a rich foundation for the broth. The vegetables are added in stages so nothing turns mushy, and gentle simmering allows all the flavors to meld beautifully.

Another reason this soup shines is its versatility. You can adjust the vegetables, swap seasonings, or even make it in a slow cooker or pressure cooker. It’s naturally filling, protein-rich, and packed with vitamins, making it a wholesome meal you’ll want to return to again and again.

Ingredients You’ll Need

For the soup base:

  • 1½ pounds beef chuck or stew meat, cut into bite-sized cubes

  • 2 tablespoons olive oil

  • 1 large onion, diced

  • 3 cloves garlic, minced

Vegetables:

  • 3 carrots, sliced

  • 2 celery stalks, chopped

  • 2 medium potatoes, diced

  • 1 cup green beans, trimmed and cut

  • 1 cup corn (fresh or frozen)

  • 1 cup diced tomatoes (canned or fresh)

For the broth and seasoning:

  • 6 cups beef broth

  • 1 cup water

  • 2 tablespoons tomato paste

  • 1 teaspoon salt (adjust to taste)

  • ½ teaspoon black pepper

  • 1 teaspoon paprika

  • ½ teaspoon dried thyme

  • 1 bay leaf

Optional additions:

  • ½ teaspoon Worcestershire sauce

  • Fresh parsley for garnish

Step-by-Step Instructions

1. Brown the Beef

Heat the olive oil in a large pot or Dutch oven over medium-high heat. Add the beef in batches, making sure not to overcrowd the pot. Brown the beef on all sides, about 3–4 minutes per batch. This step builds deep flavor, so don’t rush it. Once browned, remove the beef and set it aside.

2. Build the Flavor Base

In the same pot, add the diced onion. Cook for 3–4 minutes until softened and lightly golden. Add the minced garlic and cook for another 30 seconds, just until fragrant. Stir in the tomato paste and cook for 1 minute to deepen its flavor.

3. Deglaze and Simmer

Return the browned beef to the pot. Pour in the beef broth and water, scraping up any browned bits from the bottom of the pot. Add salt, pepper, paprika, thyme, bay leaf, and Worcestershire sauce if using. Bring the soup to a gentle boil, then reduce the heat to low, cover, and simmer for 45 minutes.

4. Add the Vegetables

After the beef has started to become tender, add the carrots, celery, and potatoes. Stir well, cover, and simmer for another 20 minutes.

5. Finish the Soup

Add the green beans, corn, and diced tomatoes. Continue simmering for 10–15 minutes, or until all the vegetables are tender and the beef is fork-soft. Remove the bay leaf and taste, adjusting seasoning as needed.

Serving Suggestions

Serve this easy vegetable beef soup hot, garnished with fresh parsley for a pop of color and freshness. It pairs beautifully with crusty bread, dinner rolls, or a simple side salad. For an extra cozy touch, serve it with buttered toast or cornbread.

Tips for the Best Soup

  • Cut vegetables evenly so they cook at the same rate.

  • Low and slow simmering keeps the beef tender and the broth rich.

  • Taste at the end, not the beginning—broth reduces slightly as it cooks.

  • Make it ahead: This soup tastes even better the next day as flavors deepen.

Storage and Freezing

This vegetable beef soup stores wonderfully. Keep it in an airtight container in the refrigerator for up to 4 days. To freeze, let the soup cool completely, then store in freezer-safe containers for up to 3 months. Thaw overnight in the refrigerator and reheat gently on the stove.

Final Thoughts

Easy vegetable beef soup is more than just a recipe—it’s a dependable, comforting meal that fits any season. It’s hearty without being heavy, nourishing without being complicated, and endlessly adaptable to what you have on hand. Once you make it, you’ll understand why this classic soup has stood the test of time.

If a Doctor Ever Prescribed You One of These Medications, You Should Read This Immediately

Medications save lives, ease suffering, and help millions of people manage chronic conditions every day. However, even commonly prescribed drugs can carry risks that many patients are never fully told about—or forget to ask about—once they leave the doctor’s office. This article is not meant to scare you or encourage you to stop taking prescribed medication. Instead, it’s designed to help you become a more informed, empowered patient who understands why awareness, monitoring, and communication with your doctor matter more than blind trust alone.

Below are categories of widely prescribed medications that deserve closer attention, along with what you should know if you’ve ever been given one.

1. Painkillers (Especially Opioids)

Prescription pain medications such as opioids are often given after surgery, injury, or for chronic pain conditions. While they can be effective, they also carry serious risks.

What to know:

  • They can cause dependency even when taken exactly as prescribed.

  • Long-term use may worsen pain sensitivity rather than reduce it.

  • Side effects include constipation, hormonal imbalance, mood changes, and slowed breathing.

What you should do:
Ask your doctor how long you truly need them, whether non-opioid alternatives exist, and how to taper safely if stopping.

2. Anti-Anxiety Medications and Sleeping Pills

Medications often prescribed for anxiety or insomnia can be helpful in the short term, but they are not always intended for long-term use.

What to know:

  • Some can lead to tolerance, meaning you need higher doses for the same effect.

  • Sudden discontinuation may cause withdrawal symptoms such as anxiety, insomnia, or tremors.

  • Long-term use has been linked to memory and concentration problems in some people.

What you should do:
Discuss duration of use upfront and explore behavioral or lifestyle strategies alongside medication.

3. Antidepressants

Antidepressants help millions manage depression, anxiety, and other mood disorders. However, they affect brain chemistry and should be taken with informed care.

What to know:

  • They may take weeks to show benefits.

  • Side effects can include weight changes, emotional numbness, sleep disturbances, and sexual dysfunction.

  • Stopping suddenly can cause withdrawal-like symptoms in some individuals.

What you should do:
Never stop abruptly. If you feel “off” or unchanged after several weeks, tell your doctor—adjustments are common and normal.

4. Blood Pressure Medications

High blood pressure drugs are often prescribed for long-term or lifelong use, sometimes without symptoms being present.

What to know:

  • Dizziness, fatigue, or electrolyte imbalances can occur.

  • Some medications may affect kidney function or heart rate.

  • Lifestyle changes can sometimes reduce the need for higher doses.

What you should do:
Regular monitoring is essential. Ask if diet, exercise, stress reduction, or weight loss could reduce your dosage over time.

5. Cholesterol-Lowering Drugs

These medications are frequently prescribed as preventive measures, even when no symptoms are present.

What to know:

  • Muscle pain, weakness, or fatigue may occur in some users.

  • Liver function may need periodic monitoring.

  • Benefits vary depending on individual risk factors.

What you should do:
Ask about your personal risk profile and whether lifestyle changes could complement or reduce medication needs.

6. Acid Reflux and Stomach Medications

Drugs for heartburn and acid reflux are often taken daily for months or years.

What to know:

  • Long-term use may affect nutrient absorption.

  • Some people experience rebound acid symptoms when stopping suddenly.

  • They can mask symptoms of underlying issues.

What you should do:
Review the necessity of continued use and ask about step-down strategies if symptoms improve.

7. Antibiotics

Antibiotics are essential—but only when truly needed.

What to know:

  • Overuse contributes to antibiotic resistance.

  • They can disrupt gut bacteria, affecting digestion and immunity.

  • Side effects may include diarrhea or yeast infections.

What you should do:
Always complete the prescribed course, but don’t request antibiotics for viral infections like colds or flu.

Why This Matters More Than Ever

Modern medicine is powerful, but no medication is completely risk-free. Many problems arise not from the drug itself, but from lack of follow-up, long-term use without review, or poor communication between patient and provider. You have the right to understand why a medication was prescribed, how long you should take it, and what warning signs to watch for.

The Most Important Rule: Never Stop Suddenly on Your Own

One of the biggest dangers comes from stopping medication abruptly without medical guidance. This can cause rebound symptoms, withdrawal effects, or serious health complications. Always talk to your doctor or pharmacist before making changes.

Final Thoughts

Being prescribed a medication doesn’t mean something is “wrong” with you—it means your doctor is trying to help. But true healthcare works best when you are an active participant. Ask questions. Read labels. Report side effects. Schedule reviews.

Two Spoons in the Morning: A Natural Remedy for Bone Pain, Diabetes, Nerves, and Depression

In many traditional cultures, the morning begins not with pills or processed supplements, but with a simple spoonful of nourishment designed to gently wake the body and support long-term wellness. The idea behind “two spoons in the morning” is not magic or instant healing—it’s about consistency, nutrient density, and giving your body supportive ingredients it recognizes and knows how to use. This natural morning blend combines time-honored foods that have been associated with bone strength, balanced blood sugar, nervous system support, and emotional well-being when used as part of a healthy lifestyle.

Before diving in, it’s important to be clear: this recipe is not a cure and does not replace medical treatment, especially for diabetes, chronic pain, nerve disorders, or depression. However, many people find that adding this nourishing ritual to their mornings helps them feel steadier, calmer, and more energized over time.

The Philosophy Behind the Two-Spoon Remedy

Your body does most of its repair and regulation when it is consistently supplied with minerals, healthy fats, antioxidants, and natural anti-inflammatory compounds. Morning is an ideal time to deliver these nutrients because digestion is fresh, cortisol levels are naturally higher, and absorption tends to be efficient.

This recipe focuses on:

  • Minerals for bones and nerves

  • Natural compounds that support insulin sensitivity

  • Healthy fats for brain and mood

  • Anti-inflammatory ingredients for daily comfort

Taken slowly, two spoons each morning can become a grounding ritual—both physically and mentally.

The Two-Spoon Morning Wellness Paste

Ingredients

  • 4 tablespoons raw honey (preferably dark or forest honey)

  • 2 tablespoons black seed (Nigella sativa) powder

  • 2 tablespoons ground sesame seeds

  • 1 tablespoon turmeric powder

  • 1 teaspoon cinnamon powder

  • 1 tablespoon extra virgin olive oil

This quantity makes about one week’s supply.

How to Prepare

  1. In a clean glass bowl, add the raw honey.

  2. Stir in the black seed powder until fully blended.

  3. Add ground sesame seeds, turmeric, and cinnamon.

  4. Pour in the olive oil and mix slowly until a thick, smooth paste forms.

  5. Transfer the mixture to a glass jar with a lid and store at room temperature away from direct sunlight.

How to Use

  • Take two teaspoons every morning on an empty stomach.

  • Let it sit in your mouth briefly before swallowing to aid digestion.

  • Wait 15–20 minutes before eating breakfast or drinking tea or coffee.

Consistency is more important than quantity. Avoid increasing the dose.

Why These Ingredients Matter

For Bone Pain and Joint Comfort

Sesame seeds are rich in calcium, magnesium, and zinc—minerals essential for bone density and joint function. Turmeric contains curcumin, a compound widely studied for its anti-inflammatory properties, which may help reduce daily stiffness when used regularly with healthy fats like olive oil.

For Blood Sugar Balance

Cinnamon has long been associated with improved insulin sensitivity in traditional diets. Black seed has also been studied for its potential role in supporting balanced glucose metabolism. When combined with honey in small, controlled amounts, this mixture avoids sharp sugar spikes while delivering antioxidants.

For Nerve Support

Nerves rely heavily on healthy fats and minerals. Olive oil provides monounsaturated fats that support cell membranes, while black seed is traditionally used to support nerve calmness and resilience. Magnesium from sesame seeds plays a key role in nerve signaling and muscle relaxation.

For Mood and Emotional Well-Being

The brain is highly sensitive to inflammation and nutrient deficiencies. Turmeric, black seed, and olive oil all contain compounds associated with reduced oxidative stress. Raw honey may help stabilize morning energy levels, preventing sharp crashes that can affect mood. The act of maintaining a gentle morning ritual itself can also support emotional grounding.

What to Expect Over Time

  • First 1–2 weeks: Improved digestion, warmer joints, steadier morning energy

  • After 3–4 weeks: Reduced stiffness, calmer nerves, fewer energy swings

  • Long term: Better overall resilience when combined with balanced meals, movement, and proper sleep

Results vary from person to person. Subtle changes are normal and often more sustainable than dramatic short-term effects.

Important Safety Notes

  • People with diabetes should monitor blood sugar closely and consult a healthcare professional before use.

  • Avoid if allergic to sesame seeds or black seed.

  • Pregnant or breastfeeding individuals should seek medical advice before starting.

  • This remedy supports wellness but does not replace prescribed medication.

Final Thoughts

Sometimes, healing begins not with complexity, but with simplicity done consistently. Two small spoons each morning can serve as a reminder to nourish your body gently and intentionally. When paired with mindful eating, movement, sunlight, and proper medical care, this traditional-style remedy may become a quiet but powerful ally in your daily routine.

True wellness is built one small habit at a time—and mornings are the perfect place to begin.

ooey-gooey-bars-recipe

Few desserts can compete with the indulgent charm of ooey-gooey bars. These classic crowd-pleasers are known for their buttery crust, creamy center, and melt-in-your-mouth texture that lives up to their name. Whether you’re baking for a family gathering, potluck, or simply craving something sweet and comforting, ooey-gooey bars deliver maximum flavor with minimal effort. This unique recipe elevates the traditional version while keeping it simple, foolproof, and incredibly satisfying.

What Makes Ooey-Gooey Bars So Special?

Ooey-gooey bars are all about contrast. The base is firm yet tender, providing structure, while the topping remains soft, luscious, and almost custard-like. As they cool, the center sets just enough to slice cleanly, but stays rich and gooey inside. The result is a dessert that feels decadent without requiring advanced baking skills.

Another reason these bars are beloved is versatility. You can enjoy them plain, dusted with powdered sugar, or customize them with chocolate chips, nuts, citrus zest, or even a swirl of caramel. This recipe focuses on a classic buttery vanilla profile that lets the texture shine.

Ingredients You’ll Need

For the crust:

  • 1 box vanilla or butter cake mix

  • ½ cup unsalted butter, melted

  • 1 large egg

For the ooey-gooey topping:

  • 225 g (8 oz) cream cheese, softened

  • 2 large eggs

  • 3½ cups powdered sugar

  • ½ cup unsalted butter, melted

  • 1 teaspoon vanilla extract

  • Pinch of salt

Optional add-ins: chocolate chips, toasted pecans, shredded coconut, or lemon zest.

Step-by-Step Instructions

1. Prepare the pan
Preheat your oven to 175°C (350°F). Line a 9×13-inch baking pan with parchment paper or lightly grease it with butter. This ensures easy removal and clean slices.

2. Make the crust
In a large bowl, combine the cake mix, melted butter, and egg. Stir until a thick, dough-like mixture forms. Press this evenly into the bottom of the prepared pan. Use your hands or the back of a spoon to create a compact, even layer.

3. Mix the gooey topping
In another bowl, beat the softened cream cheese until smooth and lump-free. Add the eggs one at a time, mixing well after each addition. Slowly pour in the melted butter, vanilla extract, salt, and powdered sugar. Beat until the mixture is creamy, glossy, and thick.

4. Assemble
Pour the cream cheese mixture over the crust, spreading it evenly to the edges. Don’t worry if it looks very soft—this is exactly what creates the signature gooey center.

5. Bake to perfection
Bake for 40–45 minutes, or until the edges are lightly golden and the center still has a slight jiggle. Avoid overbaking; the bars will firm up as they cool.

6. Cool completely
Allow the bars to cool at room temperature for at least 1–2 hours before slicing. This step is essential for clean cuts and the best texture.

Tips for Perfect Ooey-Gooey Bars

  • Do not overbake: A slightly underbaked center ensures that iconic gooey texture.

  • Room-temperature ingredients: Softened cream cheese blends smoothly and prevents lumps.

  • Chill for neat slices: For extra clean cuts, refrigerate the bars for 30 minutes before slicing.

  • Use powdered sugar only: Granulated sugar will not produce the same silky consistency.

Delicious Variations

  • Chocolate Lover’s Bars: Stir chocolate chips into the topping or drizzle melted chocolate on top.

  • Lemon Gooey Bars: Add lemon zest and a tablespoon of lemon juice for a bright, tangy twist.

  • Nutty Crunch: Sprinkle chopped pecans or walnuts over the top before baking.

  • Cinnamon Sugar Version: Add a teaspoon of cinnamon to the crust for warm spice notes.

How to Store and Serve

Store ooey-gooey bars in an airtight container at room temperature for up to 2 days or in the refrigerator for up to 5 days. They taste wonderful chilled, but bringing them to room temperature enhances their softness and flavor. Serve as-is, with a dusting of powdered sugar, or paired with coffee, tea, or a scoop of vanilla ice cream.

Why This Recipe Always Works

This ooey-gooey bars recipe balances structure and softness perfectly. The cake-mix crust provides a reliable base, while the cream cheese topping delivers richness without being overly sweet. It’s forgiving, adaptable, and nearly impossible to mess up—ideal for beginner bakers and seasoned dessert lovers alike.

Final Thoughts

If you’re looking for a dessert that’s easy to make, incredibly indulgent, and guaranteed to impress, ooey-gooey bars are the answer. One bite of their buttery crust and soft, creamy center explains why this recipe has stood the test of time. Bake a batch once, and it’s sure to become a regular favorite in your kitchen.

7 Early Signs of Alzheimer’s Disease That You Should Never Ignore

Alzheimer’s disease is the most common form of dementia, affecting millions of people worldwide. While it is often associated with old age, the earliest warning signs can begin years before a formal diagnosis is made. Recognizing these early signals is crucial because early awareness allows for medical evaluation, lifestyle adjustments, and planning that may significantly improve quality of life.

Many people dismiss early symptoms as “normal aging,” but Alzheimer’s disease is not a normal part of getting older. Below are seven early warning signs that should never be ignored.

1. Memory Loss That Disrupts Daily Life

Occasionally forgetting a name or appointment is normal. However, one of the earliest and most common signs of Alzheimer’s is persistent memory loss, especially forgetting recently learned information.

People may repeatedly ask the same questions, rely heavily on reminder notes, or forget important dates and events. Unlike typical forgetfulness, these memories do not return later. This kind of memory loss interferes with daily routines and becomes noticeable to family members.

2. Difficulty Planning or Solving Problems

Early Alzheimer’s can affect the brain’s ability to concentrate and think logically. A person may struggle to follow a familiar recipe, manage monthly bills, or keep track of numbers.

Tasks that once felt easy may now require much more effort, and mistakes become more frequent. This difficulty isn’t occasional—it’s consistent and progressive, making everyday responsibilities increasingly frustrating.

3. Confusion with Time or Place

Losing track of dates, seasons, or the passage of time is another early red flag. Someone may forget where they are or how they got there, even in familiar surroundings.

They may struggle to understand something if it isn’t happening immediately, such as remembering a future appointment or recalling a past event. This confusion can lead to anxiety, especially when the person suddenly realizes they feel “lost.”

4. Trouble Completing Familiar Tasks

People in the early stages of Alzheimer’s may have difficulty completing everyday tasks they’ve done for years. This might include driving to a familiar location, using household appliances, or remembering the rules of a favorite game.

At work or at home, tasks may take much longer than usual, or steps may be skipped entirely. This is more than distraction—it’s a breakdown in procedural memory.

5. Problems with Words in Speaking or Writing

Language difficulties often appear early. A person may struggle to find the right word, repeat themselves frequently, or call objects by the wrong name.

They might pause often during conversations, lose their train of thought, or withdraw from discussions because it becomes too difficult to follow or contribute. Over time, these language issues can significantly impact communication and social interaction.

6. Misplacing Things and Losing the Ability to Retrace Steps

Everyone misplaces keys occasionally. But a concerning sign of Alzheimer’s is placing items in unusual locations—such as putting a phone in the refrigerator—and being unable to retrace steps to find them.

As the disease progresses, the person may accuse others of stealing, which can cause tension and confusion. This symptom reflects changes in both memory and reasoning abilities.

7. Changes in Mood, Personality, or Judgment

One of the most overlooked early signs is a noticeable change in personality. A person may become confused, suspicious, depressed, fearful, or anxious—especially when out of their comfort zone.

Judgment may also decline. This can show up as poor financial decisions, neglecting personal hygiene, or being unusually trusting of strangers. These changes often surprise loved ones because they represent a clear shift from the person’s usual behavior.

Why Early Detection Matters

Alzheimer’s disease currently has no cure, but early detection is still incredibly important. Identifying symptoms early allows individuals to:

  • Seek medical evaluation and rule out reversible causes

  • Begin treatments that may slow symptom progression

  • Make lifestyle changes that support brain health

  • Plan for future care and decision-making

  • Give family members time to understand and prepare

Ignoring early signs delays help and can make later stages much more difficult for everyone involved.

When to Seek Help

If you or someone you love is experiencing several of these symptoms—especially if they are worsening over time—it’s important to consult a healthcare professional. Many conditions, including vitamin deficiencies, depression, or medication side effects, can mimic Alzheimer’s symptoms and may be treatable.

Final Thoughts

Alzheimer’s disease often begins quietly, with small changes that are easy to dismiss. But paying attention to early warning signs can make a meaningful difference. Trust your instincts—if something feels off, it’s worth taking seriously.

“Didn’t Realize I’d Been Doing It Wrong the Entire Time!” – The One-Pan Dinner Technique That Changes Everything

We all have those moments in the kitchen when a tiny realization completely flips the way we cook. For me, it was discovering that the reason my weeknight dinners were just okay—not amazing—wasn’t the ingredients, but the order and timing. I’d been rushing, crowding the pan, and seasoning too late. Once I fixed those mistakes, everything changed. If you’re thinking, “Gonna try this tonight,” you’re exactly where I was. This recipe is built around a simple but powerful technique that turns ordinary ingredients into a deeply flavorful, restaurant-quality meal—with just one pan.

This is not about fancy tools or rare ingredients. It’s about doing the right thing at the right moment. Let’s get into it.

The Game-Changing Recipe: Perfect One-Pan Garlic Butter Chicken with Golden Potatoes

Why This Works

Most people throw everything into the pan at once and hope for the best. The result? Steamed chicken, soggy potatoes, and muted flavor. The secret is layered cooking—each ingredient gets its moment to shine before coming together at the end. Same pan. Totally different outcome.

Ingredients (Serves 3–4)

  • 4 bone-in or boneless chicken thighs (skin-on recommended)

  • 500 g (about 1 lb) baby potatoes, halved

  • 4 tablespoons butter (divided)

  • 2 tablespoons olive oil

  • 5 cloves garlic, lightly crushed

  • 1 teaspoon salt (plus more to taste)

  • ½ teaspoon black pepper

  • 1 teaspoon paprika (smoked if available)

  • ½ teaspoon dried thyme or oregano

  • ½ teaspoon chili flakes (optional)

  • Juice of ½ lemon

  • Fresh parsley or coriander for garnish

Step-by-Step Method (This Is Where Most People Get It Wrong)

Step 1: Season Early—Not at the End

Pat the chicken completely dry. This is crucial. Moisture is the enemy of browning. Season both sides generously with salt, pepper, and paprika at least 10 minutes before cooking. This allows the salt to penetrate the meat instead of just sitting on the surface.

Most people season while cooking—too late.

Step 2: Don’t Touch the Chicken

Heat a large heavy pan over medium-high heat. Add olive oil and 1 tablespoon butter. Once hot, place the chicken skin-side down.

Now the hard part: don’t move it for 5–6 minutes.

This is how you get deep golden skin. If you flip too early, the skin sticks and tears. When it’s ready, it releases naturally.

Flip and cook the other side for 4 minutes. Remove chicken from the pan and set aside. It won’t be fully cooked yet—that’s intentional.

Step 3: Potatoes Go Into the Chicken Fat

Lower the heat slightly. Add the halved potatoes directly into the same pan, cut-side down. Sprinkle with a pinch of salt and thyme.

Cook undisturbed for 6–8 minutes until deeply golden. This step alone changes everything—the potatoes absorb all that chicken flavor instead of just boiling blandly.

Step 4: Garlic Butter Timing Is Everything

Push potatoes to the side. Add 2 tablespoons butter and the crushed garlic. Stir gently for about 30 seconds—just until fragrant.

Garlic burns fast. This short bloom in butter gives intense flavor without bitterness.

Step 5: Bring It All Together

Return the chicken to the pan, nestling it among the potatoes. Add chili flakes if using. Spoon some of the garlic butter over the chicken.

Cover the pan, reduce heat to low, and cook for 10–12 minutes until the chicken is juicy and fully cooked and the potatoes are tender.

Step 6: The Finishing Touch Most People Skip

Turn off the heat. Add the remaining 1 tablespoon butter and a squeeze of fresh lemon juice.

This final butter isn’t for cooking—it’s for shine, richness, and aroma. Let the pan rest uncovered for 2 minutes.

How This Tastes

  • Chicken: crispy on the outside, juicy inside

  • Potatoes: golden, buttery, and infused with garlic

  • Sauce: rich but balanced, never greasy

It tastes like something you’d get at a small family-run restaurant, not a rushed weeknight meal.

Common Mistakes to Avoid

  • ❌ Crowding the pan

  • ❌ Cooking everything at once

  • ❌ Adding garlic too early

  • ❌ Skipping the resting time

The Lazy Genius’s 4-Ingredient Slow Cooker Pierogi Casserole: The Ultimate No-Boil Comfort Food Hack

Some days call for ambitious cooking projects. Other days call for survival-level comfort food that practically makes itself. This recipe is for those days. Inspired by the Lazy Genius philosophy—be a genius about the things that matter and lazy about the things that don’t—this 4-Ingredient Slow Cooker Pierogi Casserole delivers maximum cozy flavor with almost no effort. No boiling. No sautéing. No complicated prep. Just layer, set, and walk away.

This dish takes everything we love about pierogies—buttery potatoes, tender pasta, creamy richness, and savory depth—and transforms it into a hands-off slow cooker casserole that tastes like you worked far harder than you did. It’s the kind of meal that makes weeknights easier, weekends lazier, and everyone at the table happy.

Why This Recipe Works

Traditional pierogies require dough, filling, shaping, boiling, and pan-frying. Delicious? Absolutely. Practical on a busy day? Not always. This casserole uses frozen pierogies as the foundation, allowing you to skip every complicated step while keeping all the comfort.

The slow cooker gently steams and softens the pierogies while the sauce turns luxuriously creamy. Everything melds together into a scoopable, crave-worthy dish that feels like a warm hug in a bowl.

Four ingredients. One slow cooker. Zero stress.

The 4 Simple Ingredients

  1. Frozen Cheese or Potato Pierogies (24–32 oz)
    These are the heart of the dish. Cheese pierogies give the creamiest result, while potato or potato-onion varieties add savory depth.

  2. Cream of Chicken Soup (2 cans, 10.5 oz each)
    This forms the rich, velvety sauce that coats every bite. It also adds seasoning and body without extra steps.

  3. Shredded Cheddar Cheese (2 cups)
    Sharp cheddar works best, melting beautifully and adding that classic pierogi flavor profile.

  4. Butter (½ cup, sliced)
    Butter is essential here—it adds silkiness, richness, and that unmistakable comfort-food finish.

That’s it. No salt, no pepper, no onions to chop, no water to boil.

How to Make the Lazy Genius Pierogi Casserole

Step 1: Layer the Base

Lightly grease your slow cooker. Add half of the frozen pierogies in an even layer. There’s no need to thaw them first.

Step 2: Add the Sauce

Spread one can of cream of chicken soup over the pierogies. Use the back of a spoon to gently smooth it out.

Step 3: Cheese and Butter

Sprinkle one cup of shredded cheddar cheese over the soup layer. Dot with half of the sliced butter.

Step 4: Repeat

Add the remaining pierogies, followed by the second can of soup, the remaining cheese, and the rest of the butter.

Step 5: Slow Cook

Cover and cook:

  • Low for 4–5 hours, or

  • High for 2–3 hours

The pierogies should be tender, the cheese fully melted, and the sauce creamy and cohesive.

Step 6: Stir and Serve

Gently stir before serving to coat everything evenly. Let it sit for 10 minutes if you want a thicker, more casserole-like texture.

What It Tastes Like

This casserole tastes like the inside of a pierogi turned into a creamy bake. The pasta is tender but not mushy, the sauce is rich and comforting, and the cheese adds just enough sharpness to balance the butteriness. It’s indulgent without being heavy and simple without being boring.

Lazy Genius Tips for Success

  • Don’t overcook: Once the pierogies are tender, you’re done. Overcooking can cause them to break apart.

  • Use liners if you want zero cleanup: This dish can be gloriously creamy and sticky.

  • Stir gently: Pierogies are soft—treat them kindly.

Easy Variations (If You Feel Like It)

Still lazy, just slightly upgraded:

  • Add protein: Stir in cooked sausage, rotisserie chicken, or crispy bacon at the end.

  • Onion lovers: Add a layer of frozen caramelized onions or onion soup mix.

  • Extra tang: A spoonful of sour cream stirred in before serving mimics traditional pierogi toppings.

  • Different cheese: Try Colby-Jack, mozzarella, or a cheddar blend.

None of these are required. The beauty of this recipe is that it’s perfect as-is.

What to Serve With It

This casserole is rich, so simple sides work best:

  • A crisp green salad with vinaigrette

  • Steamed broccoli or green beans

  • Applesauce or pickles for contrast

Or just serve it on its own and call it a day.

Final Thoughts

The Lazy Genius’s 4-Ingredient Slow Cooker Pierogi Casserole proves that comfort food doesn’t need to be complicated. It’s the ultimate no-boil, no-fuss hack for busy days, tired evenings, or anytime you want something warm and satisfying without thinking too hard.