A dirty mop is more than just unpleasant to look at — it can actually spread bacteria, unpleasant odors, and grime across your floors instead of cleaning them. Over time, mop heads absorb dirt, grease, food particles, and moisture, creating the perfect environment for bacteria to thrive. If your mop smells bad even after rinsing or looks permanently stained, you might be tempted to throw it away.
But don’t buy a new one just yet.
With one powerful household ingredient, you can restore your mop to a clean, fresh, almost-new condition — and it only takes a few minutes of effort.
The Magic Ingredient: White Vinegar
The secret ingredient is simple and affordable: white vinegar.
White vinegar is a natural disinfectant, deodorizer, and mineral deposit remover. Thanks to its acetic acid content, it breaks down bacteria, dissolves grime, and eliminates stubborn odors. Unlike harsh chemical cleaners, vinegar is safe, eco-friendly, and inexpensive.
If you’ve never tried deep-cleaning your mop with vinegar, you’ll be surprised at the results.
Why Mops Get So Dirty
Before jumping into the cleaning method, it’s helpful to understand why mops become so unpleasant:
-
They stay damp for long periods.
-
They collect grease and sticky residue from kitchen floors.
-
They absorb bathroom moisture and bacteria.
-
They are often stored without fully drying.
All of this creates a breeding ground for odor-causing microorganisms.
Regular rinsing with water isn’t enough. You need something that disinfects and neutralizes odors — and that’s where vinegar comes in.
Deep-Clean Your Mop: Step-by-Step Method
What You’ll Need:
-
1 cup white vinegar
-
Hot water
-
A bucket or sink
-
Optional: 1 tablespoon baking soda (for extra odor removal)
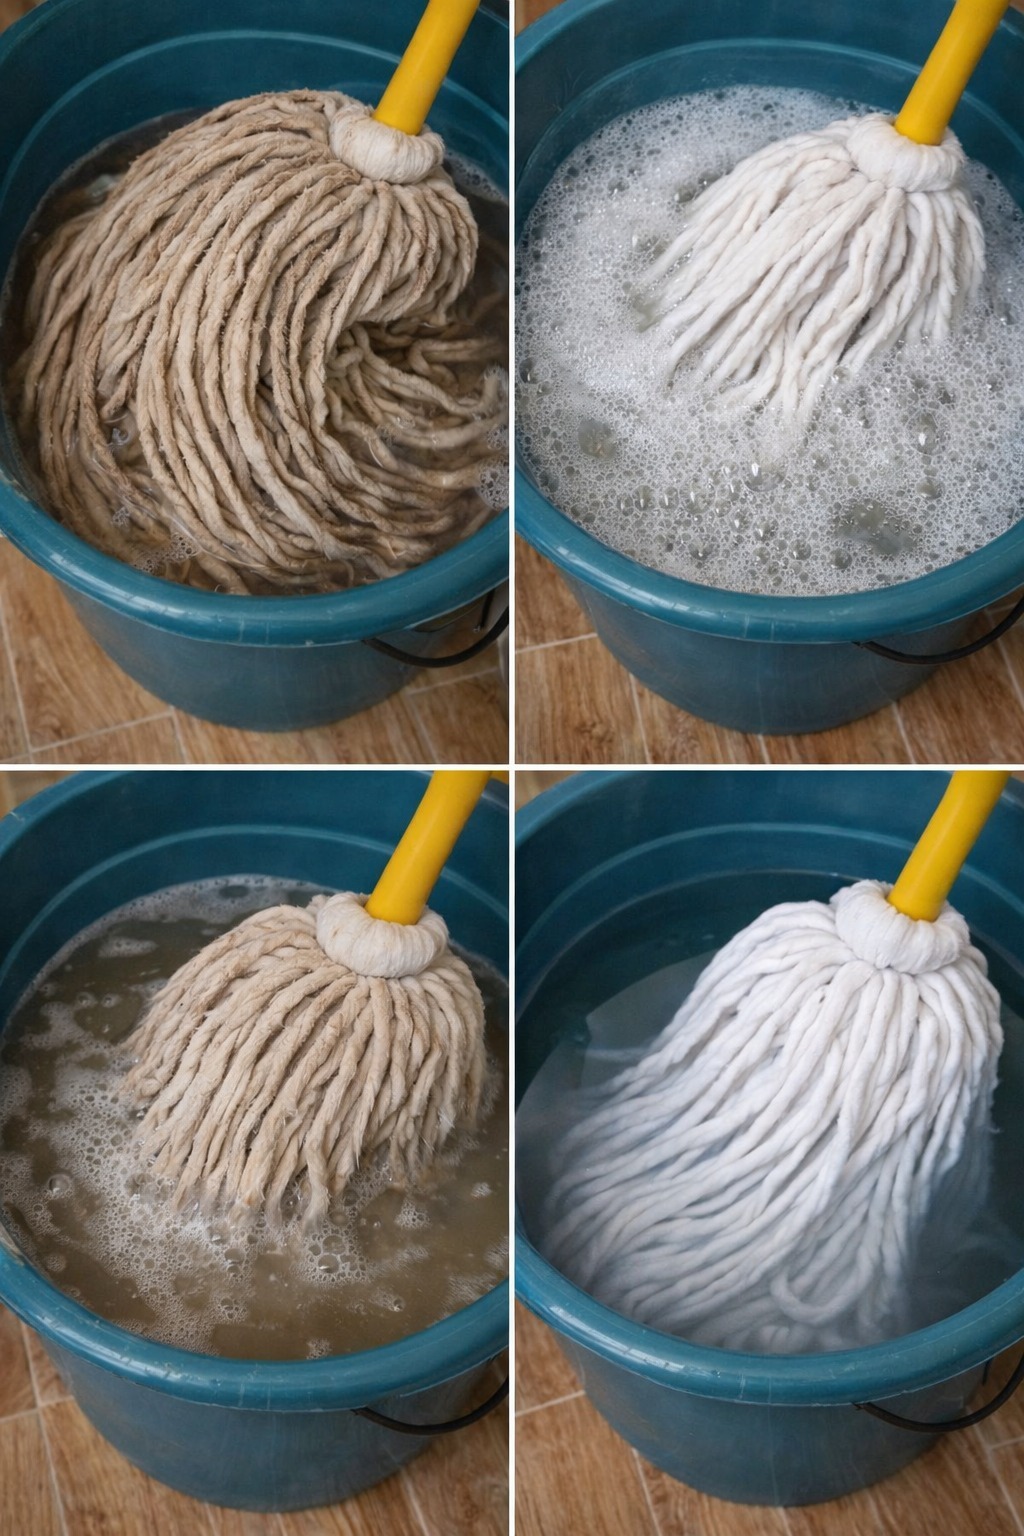
Step 1: Rinse the Mop First
Start by rinsing your mop thoroughly under hot running water. Squeeze it several times to remove loose dirt and debris. This prepares it for deep cleaning.
Step 2: Prepare the Vinegar Soak
Fill a bucket or sink with hot water — enough to fully submerge the mop head.
Add 1 cup of white vinegar. If your mop smells especially bad, add 1 tablespoon of baking soda. (Be careful — it will fizz!)
Mix gently.
Step 3: Soak for 30–60 Minutes
Place the mop head completely in the solution. Let it soak for at least 30 minutes. For extremely dirty or smelly mops, leave it for up to one hour.
The vinegar will:
-
Break down grease
-
Kill odor-causing bacteria
-
Loosen embedded dirt
-
Dissolve mineral buildup
Step 4: Rinse Thoroughly
After soaking, rinse the mop under hot running water again. Squeeze repeatedly until the water runs clear and the vinegar smell fades.
Step 5: Dry Properly
This is crucial.
Hang your mop upside down or in a well-ventilated area so it can dry completely. Never leave it damp in a bucket or closet — that’s how odors return.
Extra Boost for Extremely Dirty Mops
If your mop is still stained or smelly after the vinegar soak, try this advanced method:
-
Boil a pot of water.
-
Pour it carefully into a bucket.
-
Add 1 cup vinegar.
-
Soak the mop for 10–15 minutes (only if the mop material can handle high heat).
The heat helps kill stubborn bacteria and loosen deep grime.
How Often Should You Clean Your Mop?
To keep your mop fresh:
-
Rinse after every use.
-
Deep clean with vinegar once a week (if used frequently).
-
Replace the mop head every 3–6 months, depending on wear.
Regular maintenance prevents buildup and extends the life of your cleaning tools.
Why Vinegar Works So Well
White vinegar contains acetic acid, which:
-
Breaks down organic material
-
Disrupts bacterial cell membranes
-
Neutralizes alkaline odors
-
Dissolves hard water residue
Unlike bleach, vinegar doesn’t leave harmful chemical fumes behind. It’s safer for homes with children and pets.
However, never mix vinegar with bleach — this creates toxic fumes.
Signs Your Mop Is Truly Beyond Saving
While vinegar works wonders, some mop heads should be replaced. Look for:
-
Torn or frayed fibers
-
Mold spots that don’t disappear
-
Permanent strong odor after cleaning
-
Extremely flattened, worn-out strands
If the fibers are damaged, cleaning won’t restore performance.
Bonus Tip: Prevent Future Mop Odors
To keep your mop fresh longer:
-
Add a small splash of vinegar to your mop water regularly.
-
Always wring it out completely after use.
-
Store it hanging, not sitting flat.
-
Avoid leaving it soaking overnight.
A little prevention goes a long way.
Final Thoughts
Before you throw away that dirty, smelly mop, try this simple vinegar method. With just one inexpensive ingredient, you can eliminate odors, remove grime, and extend the life of your cleaning tool.
It’s easy, affordable, and environmentally friendly.
Sometimes the simplest solutions are the most powerful — and in this case, one cup of white vinegar can save you money and keep your home truly clean.
