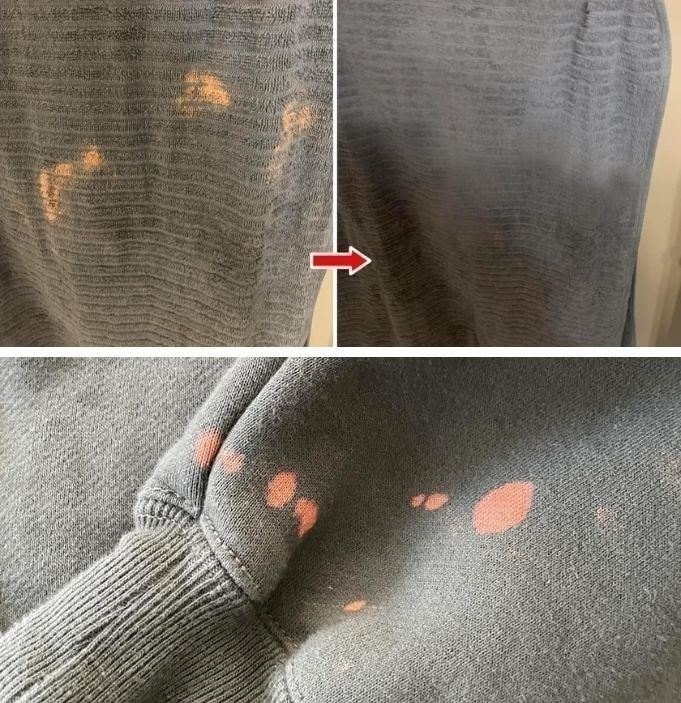
Bleach stains are one of the most frustrating laundry disasters. Unlike most stains, bleach doesn’t add color—it removes it. That means the fabric isn’t stained; it’s chemically lightened. But you’re not helpless. With the right “recipe,” you can disguise, restore, or completely revive the damaged area. This guide reveals two powerful at-home techniques—one for restoring color and one for camouflaging the damage—so your favorite clothes can look fresh again.
Technique 1: The DIY Color-Restoration Solution
“A Homemade Dye Repair Recipe That Brings the Color Back to Life”
This method works best for dark-colored clothing—black, navy, maroon, olive, chocolate brown, charcoal gray—anything where a small patch of fresh dye blends in smoothly. The goal is to reintroduce pigment only to the bleached area using ingredients easily found at home.
Ingredients (Your Color Repair Recipe)
-
1 teaspoon fabric dye (black is most commonly used; match your garment’s color)
OR instant alternatives:-
Strong black tea
-
Strong coffee
-
Hair dye (temporary or semi-permanent; match color)
-
-
Q-tips or a fine paintbrush
-
A small bowl
-
Rubber gloves
-
White vinegar (optional—helps set dye)
-
Cotton swabs for blending
-
Warm water
Why It Works
Bleach strips pigments from fibers. This recipe adds controlled color only where needed. Tea and coffee contain natural tannins that cling to fibers, while fabric dye and hair dye act as concentrated color restorers.
Step-by-Step Recipe Instructions
1. Neutralize the Bleach First (VERY Important)
If bleach is still active, it will continue to eat the color—even the repair color you apply.
Make a neutralizing rinse:
-
Mix 1 tablespoon baking soda with 1 cup water.
-
Apply to the bleached spot.
-
Blot until the fabric no longer smells like bleach.
2. Prepare Your Color “Repair Dye”
Depending on the option you chose:
-
Fabric Dye: Mix ½ teaspoon dye with a few drops of warm water to create a paste.
-
Coffee/Tea: Brew extremely strong, almost syrup-level liquid.
-
Hair Dye: Mix according to instructions, but only make a teaspoon of mixture.
You want a thick, concentrated color—not watery.
3. Apply Color with Precision
Use a Q-tip or paintbrush and dab only on the bleached area.
-
Work slowly.
-
Build color little by little.
-
Let it absorb for 5 minutes.
-
Add more layers until the spot matches the rest of the fabric.
4. Blend the Edges
Use a slightly damp cotton swab to blur the edges so the repair looks natural, not like a block of color.
5. Set the Color
Dip a cotton pad in white vinegar and lightly press it on the stained area. Vinegar helps lock pigments into natural fibers.
6. Dry and Evaluate
Let the garment air dry completely.
If the spot is still faint, repeat another layer.
When This Technique Works Best
-
Small to medium bleach spots
-
Dark fabrics
-
Cotton, denim, canvas, linen, sweatshirts, hoodies
-
Clothing where a little variation won’t be visible
End Result
Your clothing regains a smooth, uniform color, and the bleach stain becomes unnoticeable—like it never happened.
Technique 2: The Fabric Color-Revive Paste (A Clever Camouflage Method)
“A paint-like recipe that hides bleach stains instantly”
Sometimes the bleach stain is:
-
too large,
-
too bright,
-
or the garment is multicolored or patterned.
In these cases, restoring exact color is nearly impossible—but camouflaging it is incredibly effective. This technique uses a fabric-safe paint paste that blends into the garment’s natural design.
Ingredients (Your Camouflage Paste Recipe)
-
1 teaspoon fabric paint (color matched to garment)
-
½ teaspoon acrylic paint (optional for blending)
-
4–6 drops fabric medium (makes paint flexible)
-
Extra-fine paintbrush
-
A toothpick for mixing
-
Water
Why This Works
Fabric paint bonds to the fibers and creates a wearable, soft, permanent finish. Bleach spots usually appear light and irregular, and this technique allows you to “paint” the color back—almost like repairing a canvas.
Step-by-Step Instructions
1. Neutralize the Bleach (Same as Above)
Never skip this step.
Bleach must be fully deactivated before adding color.
2. Make the Color-Blending Paste
Mix:
-
1 teaspoon fabric paint
-
4 drops fabric medium
-
2–3 drops water
Use a toothpick to blend until the texture is creamy—like thick yogurt.
3. Test the Shade
Paint a tiny dot on scrap fabric or inside the hem.
Adjust color by adding:
-
black → darken
-
white → lighten
-
brown → mute tone
-
a tiny bit of acrylic → adjust richness
4. Apply Thin Layers
Paint over the bleached patch with delicate strokes.
Let each thin layer dry before adding more.
This prevents cracking and ensures a smooth finish.
5. Blend the Surroundings
Use a barely-damp brush to feather the edges into the original fabric.
This gives a seamless effect.
6. Heat-Set for Permanence
Once fully dry:
-
Place a thin cloth over the area.
-
Iron on low heat for 20–30 seconds.
This locks the color permanently.
When This Technique Works Best
-
Large bleach spots
-
Multicolored or patterned clothing
-
Garments you want to artistically repair
-
T-shirts, hoodies, joggers, jackets, canvas totes
End Result
The stain becomes totally disguised, blending into the fabric’s natural tone. Sometimes the repaired area looks even better than the original, giving the garment a custom-designed look.
Final Thoughts: Choosing the Right Technique
-
If your stain is small and the garment is dark, choose Technique 1: Color Restoration.
-
If the stain is large or on patterned/light fabric, choose Technique 2: Camouflage Paste.
Both methods allow you to revive clothing that would otherwise be thrown away—saving money, reducing waste, and giving your garments a second life.
