
Classic Old-Fashioned Oatmeal Cake

There’s something deeply comforting about a traditional oatmeal cake fresh from the oven. This humble dessert has been passed down through generations, especially during the early 20th century when simple pantry ingredients were transformed into unforgettable treats. Much like recipes found in vintage community cookbooks and inspired by classics such as the comforting baked goods of Quaker Oats kitchens, this old-fashioned oatmeal cake is moist, warmly spiced, and topped with a rich, broiled coconut pecan frosting that caramelizes beautifully.

Unlike modern frosted layer cakes, this recipe is baked in a single pan and finished under the broiler, creating a sticky, golden topping that soaks slightly into the cake. The result is a dessert that tastes like home — soft, tender crumb below and sweet, nutty topping above.

Why You’ll Love This Recipe

This classic oatmeal cake stands out because of its texture. The soaked oats give it a hearty yet delicate crumb, keeping the cake incredibly moist for days. The warm cinnamon adds depth without overpowering the natural sweetness. And that broiled topping? It creates a caramelized crust that perfectly balances the soft cake underneath.

It’s simple, nostalgic, and perfect for family gatherings, potlucks, or an everyday dessert with coffee or tea.

Ingredients

For the Cake:

  • 1 cup old-fashioned rolled oats

  • 1 ¼ cups boiling water

  • ½ cup unsalted butter, softened

  • 1 cup brown sugar, packed

  • ½ cup granulated sugar

  • 2 large eggs

  • 1 ½ cups all-purpose flour

  • 1 teaspoon baking soda

  • 1 teaspoon ground cinnamon

  • ½ teaspoon salt

  • 1 teaspoon vanilla extract

For the Coconut Pecan Topping:

  • ½ cup unsalted butter

  • ½ cup brown sugar

  • ¼ cup heavy cream or evaporated milk

  • ¾ cup sweetened shredded coconut

  • ½ cup chopped pecans

  • 1 teaspoon vanilla extract

Step-by-Step Instructions

Step 1: Soak the Oats

Preheat your oven to 350°F (175°C). Grease a 9×13-inch baking dish.

In a medium bowl, combine the rolled oats and boiling water. Stir gently and let sit for about 15–20 minutes. This softens the oats and allows them to blend smoothly into the batter.

Step 2: Prepare the Batter

In a large mixing bowl, cream together the softened butter, brown sugar, and granulated sugar until light and fluffy. This step helps create a tender cake texture.

Add the eggs one at a time, beating well after each addition. Stir in the vanilla extract.

In a separate bowl, whisk together the flour, baking soda, cinnamon, and salt.

Gradually add the dry ingredients to the creamed mixture, mixing just until combined. Avoid overmixing.

Finally, fold in the soaked oatmeal mixture (including any remaining liquid). The batter will be slightly loose — that’s exactly how it should be.

Step 3: Bake

Pour the batter evenly into the prepared baking dish. Smooth the top with a spatula.

Bake for 30–35 minutes, or until a toothpick inserted into the center comes out clean. The cake should be golden brown and spring back lightly when touched.

Prepare the Topping

While the cake is baking, prepare the coconut pecan topping.

In a small saucepan over medium heat, melt the butter. Stir in the brown sugar and cream. Cook for 2–3 minutes, stirring constantly, until slightly thickened.

Remove from heat and stir in the shredded coconut, chopped pecans, and vanilla extract.

Step 4: Broil the Topping

Once the cake is fully baked, remove it from the oven. Turn the oven setting to broil.

Spread the coconut pecan mixture evenly over the hot cake.

Place the cake back in the oven under the broiler for 1–3 minutes. Watch carefully! The topping should bubble and turn golden brown. Do not walk away — it can burn quickly.

Remove from the oven and allow the cake to cool for at least 15 minutes before slicing. The topping will set slightly as it cools.

Tips for the Perfect Oatmeal Cake

  • Use old-fashioned rolled oats, not instant oats. They provide the best texture.

  • Don’t skip soaking the oats. This step ensures a moist crumb.

  • Watch closely while broiling to prevent burning.

  • For extra flavor, add a pinch of nutmeg to the batter.

  • Toast the pecans beforehand for deeper nutty richness.

Storage Instructions

Store leftover cake covered at room temperature for up to 3 days. Because it’s so moist, it stays soft without refrigeration. If you prefer, refrigerate for up to 5 days and warm slices slightly before serving.

This cake also freezes beautifully. Wrap individual slices tightly in plastic wrap and store in a freezer-safe container for up to 3 months.

Serving Suggestions

Serve warm with:

  • A scoop of vanilla ice cream

  • Fresh whipped cream

  • A drizzle of caramel sauce

  • A hot cup of coffee or tea

It’s perfect for holidays, Sunday dinners, or whenever you crave something sweet and nostalgic.

Final Thoughts

Classic Old-Fashioned Oatmeal Cake is proof that simple ingredients can create extraordinary flavor. It’s not flashy or complicated — just honest baking at its finest. The tender oat-filled crumb and caramelized coconut topping make each bite rich, cozy, and satisfying.
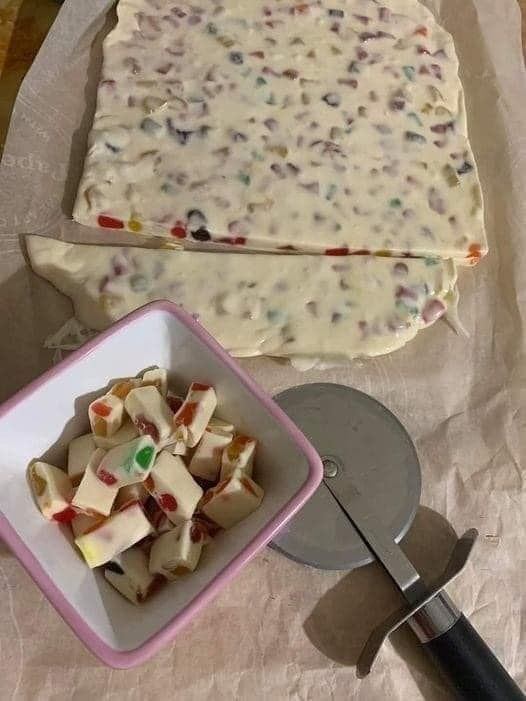

Four-Ingredient Nougat Bars

If you love sweet treats that are soft, chewy, and packed with nostalgic flavor, these Four-Ingredient Nougat Bars are about to become your new favorite dessert. Nougat has been enjoyed for centuries across many cultures, known for its fluffy texture and sweet, creamy taste. Traditionally, nougat requires careful temperature control and multiple ingredients, but this simplified version brings you the same indulgent experience using just four basic ingredients and minimal effort.

These homemade nougat bars are perfect for busy home cooks, beginner bakers, or anyone craving a quick and satisfying dessert. With no complicated equipment required and only a short preparation time, you can create a batch of delicious candy bars that rival store-bought versions. Whether you’re making them for family gatherings, holiday gifts, or personal treats, these nougat bars deliver impressive results every time.

Ingredients

You only need four simple ingredients, most of which you may already have in your kitchen:

  • 4 cups mini marshmallows

  • 2 tablespoons butter

  • 2 cups white chocolate chips

  • 1½ cups colorful gumdrops or soft jelly candies, chopped

These ingredients work together to create the perfect balance of sweetness, softness, and chewiness. The marshmallows form the base of the nougat, the white chocolate adds richness, the butter ensures a smooth texture, and the gumdrops provide bursts of fruity flavor and color.


Instructions

Step 1: Prepare your pan

Line an 8×8-inch baking pan with parchment paper or lightly grease it with butter. This step is essential to prevent sticking and makes it easier to remove the nougat later.

Step 2: Melt the butter and marshmallows

In a medium saucepan, melt the butter over low heat. Once melted, add the mini marshmallows. Stir continuously to prevent burning and ensure even melting. The marshmallows will gradually soften and turn into a smooth, creamy mixture. Be patient and keep the heat low to maintain the best texture.

Step 3: Add the white chocolate

Once the marshmallows are fully melted, remove the saucepan from the heat. Immediately stir in the white chocolate chips. The residual heat will melt the chocolate. Stir until the mixture becomes smooth, glossy, and fully combined.

Step 4: Fold in the gumdrops

Allow the mixture to cool slightly for 2–3 minutes. Then gently fold in the chopped gumdrops. Make sure they are evenly distributed throughout the mixture. This step ensures every bite has a perfect balance of nougat and fruity candy.

Step 5: Transfer and set

Pour the mixture into your prepared baking pan. Use a spatula or lightly greased hands to spread and press it evenly into the pan. Smooth the top for a neat appearance.

Let the nougat cool at room temperature for about 2 hours, or place it in the refrigerator for 1 hour to speed up the setting process.

Step 6: Slice and serve

Once fully set, remove the nougat from the pan using the parchment paper. Place it on a cutting board and slice into bars or squares using a sharp knife.

Your homemade four-ingredient nougat bars are now ready to enjoy!

Tips for Perfect Nougat Bars

Use low heat: High heat can cause the marshmallows or chocolate to burn, resulting in a grainy texture. Low, gentle heat ensures smooth and creamy nougat.

Grease your tools: Lightly greasing your spatula or hands prevents sticking when spreading the mixture.

Cut with a sharp knife: For clean edges, use a sharp knife and wipe it between cuts.

Let it cool completely: Cutting too early can cause the bars to lose their shape.

Flavor Variations

One of the best things about this recipe is how easy it is to customize. Try these creative variations:

Nutty Nougat: Add chopped almonds, pistachios, or peanuts for crunch and flavor.

Chocolate Swirl: Drizzle melted dark chocolate over the top before setting.

Festive Colors: Use holiday-colored gumdrops for Christmas, Eid, or birthdays.

Fruity Twist: Substitute gumdrops with dried fruits like cranberries or apricots.

Cookies and Cream: Mix in crushed chocolate sandwich cookies for a cookies-and-cream flavor.

Storage Instructions

Store your nougat bars in an airtight container at room temperature for up to 5 days. If your kitchen is warm, store them in the refrigerator to prevent softening. Proper storage helps maintain their chewy texture and fresh flavor.

You can also freeze nougat bars for up to 2 months. Wrap them individually in plastic wrap and place them in a freezer-safe container. Thaw at room temperature before serving.

Why This Recipe Works

This four-ingredient recipe simplifies traditional nougat without sacrificing taste or texture. The marshmallows provide structure, the white chocolate adds richness, and the butter enhances smoothness. The gumdrops create contrast with their fruity chewiness, making each bite exciting and satisfying.

Because the recipe uses easy-to-find ingredients and straightforward steps, it’s ideal for beginners and experienced cooks alike. It’s also a wonderful recipe to make with children, as it’s fun, colorful, and safe with supervision.

Perfect for Any Occasion

These nougat bars are incredibly versatile. Serve them at parties, include them in dessert trays, or package them as homemade gifts. Their bright appearance and delicious flavor make them popular with both kids and adults.

They are especially wonderful during holidays, when homemade sweets bring warmth and joy to gatherings. Making your own nougat also allows you to control the ingredients and avoid unnecessary additives found in commercial candies.

Conclusion

Four-Ingredient Nougat Bars prove that you don’t need complicated techniques or long ingredient lists to create something truly delicious. With just marshmallows, butter, white chocolate, and gumdrops, you can prepare a beautiful, chewy, and flavorful treat in your own kitchen.

Grandma’s 15-Minute “Crazy Cake”: The Legendary Recipe That Defies Time

Some recipes are more than instructions—they are memories, traditions, and proof that simple ingredients can create something magical. Grandma’s famous “Crazy Cake” is one of those timeless treasures. Known for its incredible simplicity and rich chocolate flavor, this cake earned its unusual name because it breaks traditional baking rules. There are no eggs, no butter, and no milk—yet the result is soft, moist, and deeply satisfying.

This cake became popular generations ago when families needed affordable desserts made from pantry staples. Despite its humble origins, Crazy Cake has remained beloved because of its reliability, speed, and delicious taste. Best of all, you can mix everything directly in the baking pan—no bowls required. In just 15 minutes of preparation and a short baking time, you’ll have a comforting dessert that tastes like it came straight from Grandma’s kitchen.

Why This Cake Is Called “Crazy Cake”

What makes this recipe “crazy” is how unconventional it is. Traditional cakes rely on eggs and butter for richness and structure. Crazy Cake uses simple chemistry instead. The reaction between baking soda and vinegar creates bubbles that help the cake rise, giving it a light, fluffy texture without eggs.

This method not only makes the cake economical but also perfect for those who may not have access to fresh dairy or eggs. Yet somehow, the flavor remains rich, chocolatey, and deeply satisfying.

Ingredients You’ll Need

These ingredients are simple and probably already in your pantry:

  • 1 ½ cups all-purpose flour

  • 1 cup granulated sugar

  • ¼ cup unsweetened cocoa powder (such as Hershey’s cocoa)

  • 1 teaspoon baking soda (such as Arm & Hammer baking soda)

  • ½ teaspoon salt

  • 1 teaspoon vanilla extract

  • 1 tablespoon white vinegar

  • 5 tablespoons vegetable oil

  • 1 cup water

Optional topping:

  • Powdered sugar for dusting

  • Chocolate glaze or frosting

step-by-Step Instructions

Step 1: Preheat the Oven

Preheat your oven to 180°C (350°F). Lightly grease an 8-inch square baking pan if desired, though the oil in the batter usually prevents sticking.

Step 2: Mix the Dry Ingredients

Add the flour, sugar, cocoa powder, baking soda, and salt directly into the baking pan. Mix thoroughly with a fork or spoon until evenly combined.

This step ensures the cocoa and baking soda are evenly distributed, which helps the cake rise properly.

Step 3: Create Three Wells

Using your spoon, make three small wells in the dry mixture. Pour the vanilla extract into the first well, the vinegar into the second, and the vegetable oil into the third.

This old-fashioned technique allows each ingredient to distribute evenly.

Step 4: Add the Water

Pour the water over everything. Mix gently but thoroughly until a smooth batter forms. Be careful not to overmix—just stir until no dry spots remain.

You’ll notice the batter looks silky and slightly glossy.

Step 5: Bake the Cake

Place the pan in the preheated oven and bake for 30–35 minutes. The cake is ready when a toothpick inserted in the center comes out clean.

Step 6: Cool and Serve

Allow the cake to cool in the pan for at least 15 minutes. This helps it set and improves the texture.

Serve warm or at room temperature.

What Makes Crazy Cake So Special

This cake proves that you don’t need expensive ingredients to create something wonderful. The oil keeps the cake moist, while the vinegar and baking soda create the perfect rise. The cocoa gives it a rich chocolate flavor that feels indulgent without being heavy.

The texture is soft, tender, and slightly fluffy. Each bite melts in your mouth, delivering pure comfort.

Optional Variations

One of the best things about Crazy Cake is how easy it is to customize.

Chocolate Chip Version:
Add ½ cup chocolate chips to the batter for extra richness.

Spiced Version:
Add ½ teaspoon cinnamon or a pinch of instant coffee to enhance the chocolate flavor.

Vanilla Crazy Cake:
Replace cocoa powder with ¾ cup flour and increase vanilla extract to 2 teaspoons.

Nut Version:
Add chopped walnuts or pecans for crunch and depth.

Simple Chocolate Glaze (Optional)

For extra indulgence, drizzle with this easy glaze:

Ingredients:

  • 1 cup powdered sugar

  • 2 tablespoons cocoa powder

  • 2–3 tablespoons water or milk

Instructions:

Mix until smooth and pour over the cooled cake.

Tips for Perfect Results

  • Use fresh baking soda for best rise.

  • Do not skip the vinegar—it activates the baking soda.

  • Avoid overbaking to keep the cake moist.

  • Mix gently to maintain a soft texture.

These small details make a big difference.

Storage and Shelf Life

Crazy Cake stores beautifully.

  • Room temperature: 3 days in an airtight container

  • Refrigerator: Up to 5 days

  • Freezer: Up to 2 months

In fact, the flavor often improves the next day.

Why This Recipe Has Lasted Generations

Grandma’s Crazy Cake is more than a dessert—it’s a symbol of creativity, resilience, and love. It shows how something simple can bring joy and comfort to families year after year.

Its quick preparation makes it perfect for busy days, unexpected guests, or late-night cravings. You don’t need fancy equipment or special ingredients. Just a few pantry staples and a little time.

The result is a cake that feels nostalgic, comforting, and timeless.

Final Thoughts

Grandma’s 15-Minute Crazy Cake continues to amaze bakers around the world because of its simplicity and incredible taste. It defies expectations by turning the most basic ingredients into something truly special.

Whether you’re baking for family, friends, or yourself, this legendary cake never disappoints. One bite, and you’ll understand why this humble dessert has stood the test of time.

How Sleeping on Your Right Side Affects Your Health

How Sleeping on Your Right Side Affects Your Health

Sleep is a fundamental aspect of health, yet many people underestimate the impact of sleep position on the body. While personal comfort often dictates whether someone sleeps on their back, stomach, or side, emerging evidence suggests that the side you choose to sleep on can significantly influence digestion, heart health, and even hormone balance. In particular, sleeping on the right side—though common—may come with some drawbacks compared to sleeping on the left side. Understanding these effects can help you make an informed choice for better health and overall well-being.

1. Impact on Digestion

One of the most noticeable effects of sleeping on your right side is how it affects the digestive system. The human stomach is slightly angled to the left. When you lie on your right side, the stomach is positioned above the esophagus. This positioning can make it easier for gastric acid to flow back into the esophagus, causing acid reflux or heartburn. People who frequently experience indigestion at night may find that right-side sleeping worsens their symptoms.

On the other hand, sleeping on the left side allows gravity to help keep gastric acid in the stomach, reducing the risk of reflux. It also promotes smoother movement of food waste from the small intestine to the large intestine, improving overall digestion.

2. Effects on Heart Function

Although the heart is located slightly to the left of the chest, sleeping on the right side can sometimes place more pressure on it. While the heart can still function normally during right-side sleeping, studies suggest that left-side sleeping may support more efficient blood flow. For individuals with heart conditions, sleeping on the right side may lead to slight discomfort or a feeling of heaviness in the chest, especially if they have fluid retention or other cardiac issues.

Additionally, lying on the right side may affect the circulation of lymph fluid around the heart. Proper lymphatic drainage is essential for removing toxins and maintaining a healthy immune system. In some cases, right-side sleeping can make this process less efficient.

3. Effects on Lymphatic Drainage

The lymphatic system is a network of vessels that transport lymph—a fluid containing white blood cells, nutrients, and waste products—throughout the body. Most of the body’s lymphatic drainage occurs on the left side. Sleeping on the right side can limit the efficiency of this drainage, potentially slowing the removal of toxins and metabolic waste. Over time, this could contribute to a feeling of fatigue or sluggishness in the morning.

By contrast, sleeping on the left side can help lymph flow more freely, supporting the body’s natural detoxification processes and reducing morning puffiness or fluid retention.

4. Implications for Liver Health

The liver, a crucial organ for detoxification, is located on the right side of the body. While sleeping on the right side doesn’t necessarily damage the liver, it can slightly compress the organ, potentially affecting its optimal function during rest. Sleeping on the left side allows the liver to hang freely without pressure, enabling more efficient detoxification while you sleep.

5. Effects on Spleen Function

The spleen, which helps filter blood and support the immune system, is located on the left side of the body. Sleeping on the right side may reduce the efficiency of the spleen in circulating blood and filtering toxins. Left-side sleeping allows gravity to support better spleen function, which can indirectly aid in overall immune health.

6. Implications for Sleep Quality and Snoring

Some people may find sleeping on the right side more comfortable for reducing snoring, particularly if they suffer from sleep apnea. However, right-side sleeping can sometimes exacerbate acid reflux, leading to disrupted sleep. Chronic acid reflux during the night not only affects comfort but may also reduce the amount of restorative deep sleep your body gets. Poor sleep quality can impact memory, hormone regulation, and overall energy levels.

7. Pregnancy Considerations

For pregnant women, sleeping on the left side is strongly recommended, as it improves circulation to the fetus, uterus, and kidneys. Sleeping on the right side can slightly reduce blood flow, potentially affecting fetal development and increasing discomfort for the mother. Right-side sleeping may also increase swelling in the legs and feet due to less efficient circulation.

8. When Right-Side Sleeping Might Be Necessary

Despite the potential drawbacks, right-side sleeping is not inherently dangerous. Some people may find it more comfortable due to muscle pain, injury, or sleep habits. For instance, people with certain shoulder or hip issues may benefit from right-side sleeping if the left side causes pain. However, for optimal digestion, heart, and lymphatic health, it is usually advised to favor the left side whenever possible.

Conclusion

While many people naturally prefer sleeping on their right side, research suggests that this position may increase the risk of acid reflux, reduce lymphatic drainage efficiency, and slightly impact heart and liver function. On the other hand, sleeping on the left side aligns more naturally with the body’s anatomy, promoting better digestion, toxin removal, circulation, and overall organ function.

If you regularly experience heartburn, acid reflux, or digestive discomfort at night, it may be worth experimenting with left-side sleeping. Small adjustments, such as using a supportive pillow and slightly elevating the upper body, can further enhance the benefits. Ultimately, paying attention to how your sleep position affects your body can help you wake up feeling more refreshed, healthier, and more energized.

Every Morning Joint Pain You’re Missing These 3 Vitamins

Waking up with stiff, aching joints every morning can be frustrating. You go to bed feeling relatively fine, but when you get up, your knees, fingers, hips, or shoulders feel tight and uncomfortable. While aging, inactivity, or underlying conditions like Osteoarthritis can contribute to joint pain, one often-overlooked cause is vitamin deficiency.

Your body relies on specific nutrients to maintain healthy cartilage, reduce inflammation, and support bone strength. If you’re consistently waking up with joint pain, you may be missing three essential vitamins: Vitamin D, Vitamin C, and Vitamin B12.

Let’s explore how these vitamins affect your joints and how you can make sure you’re getting enough.

1. Vitamin D: The Bone and Joint Protector

Vitamin D is one of the most important nutrients for bone and joint health. It helps your body absorb calcium, which is essential for maintaining strong bones. Without enough vitamin D, your bones can become weak and more prone to pain and stiffness.

Low vitamin D levels have been linked to increased joint discomfort, especially in the knees and hips. Many people are deficient without realizing it because symptoms can be subtle at first. Morning stiffness is often one of the earliest signs.

Why Morning Pain Happens

During the night, your body remains inactive for several hours. If your bones and joints lack proper support from vitamin D, inflammation and stiffness can feel more intense when you first wake up.

Common Signs of Vitamin D Deficiency:

  • Frequent joint or bone pain

  • Muscle weakness

  • Fatigue

  • Mood changes

How to Boost Vitamin D:

  • Get 15–30 minutes of sunlight daily

  • Eat fatty fish like salmon and sardines

  • Include fortified milk or cereals

  • Consider supplements (after consulting your doctor)

If you spend most of your time indoors or live in areas with limited sunlight, your risk of deficiency is higher.

2. Vitamin C: The Collagen Builder

Vitamin C plays a critical role in producing collagen, the protein that forms cartilage, tendons, and ligaments. Cartilage acts as a cushion between your bones. When collagen production is low, joints can feel stiff and sore.

Without enough vitamin C, your body struggles to repair joint tissues. Over time, this may contribute to cartilage breakdown and increased discomfort.

Why It Matters for Joint Health

Collagen keeps joints flexible and shock-resistant. If your collagen levels are low, joints may become more sensitive to pressure and inflammation, especially after long periods of rest — like during sleep.

Vitamin C also has antioxidant properties, helping reduce inflammation that can worsen joint pain.

Signs You Might Be Low in Vitamin C:

  • Slow wound healing

  • Easy bruising

  • Bleeding gums

  • Dry or rough skin

  • Joint tenderness

Good Sources of Vitamin C:

  • Oranges and lemons

  • Strawberries

  • Kiwi

  • Bell peppers

  • Broccoli

Eating fresh fruits and vegetables daily can significantly support joint repair and reduce inflammation naturally.

3. Vitamin B12: The Nerve Supporter

Vitamin B12 is essential for nerve health and red blood cell production. While it’s not directly responsible for cartilage or bone strength, a deficiency can cause nerve-related pain that feels like joint discomfort.

Many people mistake nerve pain for joint pain. If your joints feel stiff, tingly, or slightly numb in the morning, vitamin B12 deficiency could be a contributing factor.

Who Is at Risk?

  • Adults over 50

  • Vegetarians and vegans

  • People with digestive issues

  • Those taking certain medications

Vitamin B12 is mainly found in animal-based foods. If your diet lacks meat, eggs, or dairy, your levels may be low.

Symptoms of Vitamin B12 Deficiency:

  • Tingling in hands or feet

  • Fatigue

  • Memory problems

  • Weakness

  • Balance issues

Best Food Sources:

  • Meat and poultry

  • Fish

  • Eggs

  • Milk and dairy products

If untreated, severe B12 deficiency can lead to long-term nerve damage, so it’s important to address symptoms early.


The Inflammation Connection

Chronic inflammation is one of the leading causes of joint pain. Conditions like Rheumatoid arthritis are strongly linked to inflammatory processes in the body.

While vitamins alone cannot cure inflammatory diseases, deficiencies can worsen inflammation and make symptoms more noticeable. Ensuring adequate intake of these three vitamins may help reduce morning stiffness and improve overall joint comfort.


When to See a Doctor

If your morning joint pain lasts longer than 30–60 minutes or is accompanied by swelling, redness, or severe stiffness, it’s important to consult a healthcare provider. Persistent joint pain may signal an underlying medical condition that requires proper diagnosis and treatment.

A simple blood test can check your vitamin D and B12 levels. Addressing deficiencies early may significantly improve how you feel each morning.


Small Changes, Big Difference

You don’t have to wait until joint pain becomes severe. Supporting your body with the right nutrients can make a noticeable difference over time.

Start with simple steps:

  • Eat a balanced diet rich in fruits, vegetables, and protein

  • Spend time outdoors for natural sunlight

  • Stay physically active to improve joint flexibility

  • Talk to your doctor about testing for deficiencies

Morning joint pain isn’t something you should ignore. Sometimes, your body is simply asking for better nutritional support. By ensuring you’re getting enough Vitamin D, Vitamin C, and Vitamin B12, you may reduce stiffness, support joint repair, and wake up feeling more comfortable and energized.

Only 3 ingredients for the most flavorful potatoes ever

Only 3 Ingredients for the Most Flavorful Potatoes Ever

If you think incredible flavor requires a long list of ingredients, think again. Sometimes, simplicity is the secret to perfection. These 3-ingredient potatoes are crispy on the outside, tender on the inside, and coated in a rich, savory glaze that tastes like you spent hours building layers of flavor. In reality, you only need baby potatoes, soy sauce, and garlic to create a side dish that steals the spotlight at any meal.

This recipe is perfect for busy weeknights, family dinners, or even holiday gatherings when you want something impressive without extra effort. The magic lies in how these three humble ingredients work together to create deep, bold flavor.


Ingredients (Serves 4)

  • 1.5 pounds (700 g) baby red or yellow potatoes

  • 3 tablespoons soy sauce

  • 5–6 cloves garlic, finely minced

That’s it. Just three simple ingredients.


Why These 3 Ingredients Work So Well

Potatoes are naturally creamy and mild, which makes them the perfect canvas for bold flavors. Baby potatoes are especially great because they hold their shape well and have thin skins that crisp beautifully.

Soy sauce brings saltiness, umami depth, and a rich color. As it caramelizes in the oven or pan, it creates a savory glaze that coats every bite.

Garlic adds warmth and aroma. When roasted or sautéed, it becomes slightly sweet and nutty, infusing the potatoes with irresistible flavor.

Together, these ingredients create a balance of salty, savory, and slightly sweet notes that make it hard to stop at one serving.


Step-by-Step Instructions

Step 1: Prepare the Potatoes

Wash the baby potatoes thoroughly and pat them dry. Cut them in half. If some are larger, cut them into quarters so all pieces are roughly the same size. This ensures even cooking.

Uniform pieces are important because smaller pieces cook faster and crisp better.


Step 2: Parboil for Perfect Texture

Place the cut potatoes in a pot of cold water. Bring to a boil and cook for about 8–10 minutes, or until just fork-tender but not falling apart.

Drain them well and let them sit in the colander for a few minutes. Allowing steam to escape helps the exterior dry out slightly, which leads to better browning.

This step guarantees a creamy interior and crispy edges later.


Step 3: Roast or Pan-Sauté

You have two cooking options:

Option A: Oven Roasting (Best for Crispy Edges)

  1. Preheat your oven to 425°F (220°C).

  2. Spread the drained potatoes on a baking sheet in a single layer.

  3. Roast for 20–25 minutes until golden and slightly crispy.

Once they begin to brown, remove the tray briefly. Toss the potatoes with soy sauce and minced garlic. Return to the oven for another 10–15 minutes, flipping once, until deeply golden and caramelized.

The soy sauce will reduce and cling to the potatoes, creating a glossy, flavorful coating.


Option B: Stovetop Method (Faster and Just as Delicious)

  1. Heat a large skillet over medium heat.

  2. Add the drained potatoes cut-side down in a single layer.

  3. Cook undisturbed for 5–7 minutes until golden.

Flip the potatoes and cook another 5 minutes. Add the soy sauce and minced garlic directly to the pan. Stir gently and let everything cook together for another 3–5 minutes until the sauce thickens and coats the potatoes.

Be careful not to burn the garlic — lower the heat if needed.


The Secret to Maximum Flavor

The key is timing. Adding the soy sauce and garlic after the potatoes have started browning prevents burning and allows the sauce to caramelize properly. Garlic burns quickly, so always introduce it later in the cooking process.

Also, avoid overcrowding. Potatoes need space to crisp. If they’re too close together, they’ll steam instead of brown.


Texture and Taste

When done correctly, these potatoes have:

  • Crispy, golden edges

  • Creamy, fluffy centers

  • Deep savory flavor

  • Slight caramelized sweetness

  • Rich garlic aroma

They are bold enough to stand alone yet versatile enough to complement grilled chicken, steak, fish, or even a simple salad.


Serving Suggestions

Serve these potatoes hot, straight from the oven or skillet. They pair beautifully with:

  • Roasted meats

  • Grilled vegetables

  • Fried eggs for brunch

  • A dollop of sour cream or yogurt (if you’re willing to add a fourth ingredient!)

They also reheat well in a skillet, regaining their crispiness with just a few minutes of heat.


Storage Tips

Store leftovers in an airtight container in the refrigerator for up to 3 days. Reheat in a pan over medium heat to restore texture. Avoid microwaving if possible, as it softens the crisp edges.


Common Mistakes to Avoid

  1. Skipping the parboil: This step ensures the interior cooks perfectly.

  2. Adding garlic too early: It can burn and turn bitter.

  3. Overcrowding the pan: Leads to soggy potatoes instead of crispy ones.

  4. Using too much soy sauce: It should coat, not drown, the potatoes.

It removes kidney stones, dissolves gravel, and relieves urinary tract infections.

Claims that a simple homemade drink can “remove kidney stones, dissolve gravel, and relieve urinary tract infections” are extremely popular online. The idea is appealing: something natural, inexpensive, and easy to prepare that can repair your kidneys while you sleep. However, when it comes to kidney health, it is important to separate hope from medical reality.

Your kidneys are highly sophisticated organs. They filter waste from your blood, balance fluids and electrolytes, regulate blood pressure, and help produce hormones that control red blood cell production and bone health. Because of their complexity, there is no single drink that can magically “repair” them overnight.

Let’s start with kidney stones. Kidney stones form when certain minerals and salts in the urine become concentrated and crystallize. The most common type is made of calcium oxalate, but stones can also contain uric acid, struvite, or cystine. Small stones sometimes pass on their own with adequate hydration. Drinking plenty of water is the most evidence-based recommendation for preventing and helping pass small stones. Increasing fluid intake dilutes urine, making it harder for crystals to form and easier for tiny stones to move through the urinary tract.

Certain dietary measures can also help depending on the type of stone. For example, reducing excessive sodium intake, maintaining normal dietary calcium (not too low), and limiting high-oxalate foods in people prone to calcium oxalate stones may reduce recurrence. Lemon juice or citrus beverages may help some people because citrate can inhibit stone formation. However, this is supportive—not a guaranteed cure. Larger stones often require medical treatment such as medications, shock wave therapy, or surgical procedures.

Now consider the claim that a drink can “dissolve gravel.” The term “gravel” is often used informally to describe tiny crystals or very small stones in the urinary tract. In reality, once a stone has formed, it cannot usually be dissolved by random herbal mixtures. Only specific types of stones, such as certain uric acid stones, may be dissolved with carefully monitored medications that alkalinize the urine. This is done under medical supervision. Drinking a mixture of herbs or spices without knowing the stone type can be ineffective or even harmful.

As for urinary tract infections (UTIs), these are typically caused by bacteria, most commonly Escherichia coli. Symptoms can include burning during urination, frequent urination, pelvic pain, cloudy urine, or fever. While staying well hydrated helps flush bacteria from the urinary tract, hydration alone does not reliably cure an established infection. Most UTIs require appropriate antibiotics prescribed by a healthcare professional. Delaying treatment in favor of home remedies can allow the infection to spread to the kidneys, causing a more serious condition called pyelonephritis.

Some natural ingredients are often mentioned in “kidney repair” drinks. Cranberry, for example, may help reduce the risk of recurrent UTIs in some individuals by preventing bacteria from sticking to the urinary tract lining. However, it does not reliably treat an active infection. Ginger and turmeric have anti-inflammatory properties, but there is no solid evidence that they dissolve kidney stones. Parsley and other herbs are sometimes promoted as “kidney cleansers,” yet scientific support for these claims is limited.

It is also important to recognize that not all natural substances are safe for everyone. People with chronic kidney disease must be especially careful with herbal supplements, as some can worsen kidney function or interact with medications. Even high amounts of vitamin C, often included in health drinks, may increase the risk of kidney stones in susceptible individuals.

That does not mean you are powerless when it comes to protecting your kidneys. There are well-established, evidence-based steps you can take:

First, drink adequate water throughout the day unless your doctor has advised fluid restriction. Clear or pale yellow urine is often a sign of good hydration.

Second, maintain a balanced diet. Limit excess salt, processed foods, and sugary beverages. Eat fruits and vegetables, moderate amounts of protein, and maintain a healthy weight.

Third, manage chronic conditions. High blood pressure and diabetes are leading causes of kidney damage. Keeping blood pressure and blood sugar under control is one of the most powerful ways to protect your kidneys.

Fourth, avoid unnecessary overuse of painkillers such as nonsteroidal anti-inflammatory drugs (NSAIDs), which can strain the kidneys when taken frequently or in high doses.

Finally, seek medical evaluation if you have symptoms of kidney stones or a UTI. Severe back or side pain, blood in the urine, fever, chills, or persistent burning with urination should never be ignored.

The idea of “repairing your kidneys while you sleep” with a single drink is attractive, but it oversimplifies a complex medical issue. While healthy beverages and proper hydration support kidney function, they are not miracle cures. Kidney stones, urinary infections, and other kidney conditions require accurate diagnosis and appropriate treatment.

If you are interested in natural ways to support kidney health, think in terms of overall lifestyle rather than quick fixes. Good hydration, balanced nutrition, and regular medical checkups are far more powerful than any viral recipe. When it comes to your kidneys, science-based care is always the safest path

Apple pie with just 3 apples and in 10 minutes, drives me crazy

There is something deeply comforting about apple pie. The aroma of warm apples, the sweetness of cinnamon, and the soft, golden texture create a dessert that feels like home. But many people avoid making apple pie because they believe it takes too long or requires too many ingredients. This quick apple pie recipe changes everything. With just three apples and about ten minutes of preparation, you can create a dessert that tastes like it took hours. It is simple, fast, and incredibly satisfying.

This recipe is perfect for busy days, unexpected guests, or those moments when you crave something sweet but don’t want to spend all day in the kitchen. It proves that delicious desserts do not need to be complicated. With a few basic pantry ingredients and fresh apples, you can create a warm, comforting treat that will impress everyone.

Why This Recipe Is Special

What makes this apple pie unique is its simplicity. Using only three apples keeps the flavor concentrated and fresh. The natural sweetness and slight tartness of apples shine through, supported by gentle spices and a soft crust or batter. This recipe focuses on enhancing the apples rather than overwhelming them.

Another wonderful feature is the quick preparation time. Most traditional apple pies require peeling many apples, making dough from scratch, and waiting for long baking times. This version simplifies every step. You can prepare everything in about ten minutes, then let the oven do the rest of the work.

This apple pie is also very flexible. You can use different types of apples depending on what you have. Sweet apples create a dessert-like pie, while slightly tart apples add complexity and balance.

Ingredients

For the apple filling:

  • 3 medium apples

  • 2 tablespoons sugar

  • 1 teaspoon cinnamon

  • 1 teaspoon lemon juice

  • 1 teaspoon vanilla extract (optional)

For the quick batter or crust:

  • 1 cup all-purpose flour

  • 1/2 cup sugar

  • 1 teaspoon baking powder

  • 1/4 teaspoon salt

  • 1/2 cup milk

  • 1 egg

  • 2 tablespoons melted butter

Optional toppings:

  • Powdered sugar

  • Extra cinnamon

  • Whipped cream or ice cream

Preparation Steps

Start by preheating your oven to 180°C (350°F). Lightly grease a small baking dish or pie pan to prevent sticking.

Wash and peel the apples. Remove the cores and slice them thinly. Thin slices cook faster and create a soft, tender texture. Place the apple slices in a bowl and add the sugar, cinnamon, lemon juice, and vanilla extract. Mix gently to coat the apples evenly. The lemon juice helps balance the sweetness and keeps the apples fresh.

Arrange the apple slices evenly in the prepared baking dish. Try to spread them in a flat layer so they cook evenly.

In another bowl, prepare the batter. Add the flour, sugar, baking powder, and salt. Mix these dry ingredients first. Then add the milk, egg, and melted butter. Stir until smooth. The batter should be thick but pourable.

Pour the batter evenly over the apples. It may not fully cover every slice, and that is perfectly fine. During baking, the batter will spread and surround the apples.

Place the dish in the oven and bake for about 25 to 30 minutes, or until the top is golden and firm. The smell will be warm, sweet, and inviting.

Once baked, remove the pie from the oven and let it cool slightly. This allows the structure to set and makes serving easier.

Taste and Texture

This quick apple pie has a soft, tender texture with juicy apples inside. The top becomes lightly golden, while the inside remains moist and flavorful. Each bite combines sweetness, warmth, and gentle spice.

Unlike heavy pies, this version feels light and comforting. The apples remain the star, providing natural flavor and freshness.

Serving Suggestions

This apple pie can be enjoyed warm or at room temperature. For an extra special experience, serve it warm with vanilla ice cream. The contrast between warm pie and cold ice cream creates an unforgettable dessert.

You can also sprinkle powdered sugar on top for a beautiful presentation. A drizzle of honey or caramel sauce adds extra sweetness if desired.

This pie is perfect for:

  • Family desserts

  • Afternoon tea

  • Quick weekend treats

  • Unexpected guests

  • Comfort food cravings

Helpful Tips for Best Results

Choose firm apples that hold their shape during baking. Softer apples may become too mushy. If you prefer more sweetness, add an extra tablespoon of sugar. For more spice, add a pinch of nutmeg.

Make sure to slice the apples thinly. Thick slices may take longer to cook and may not soften properly.

Do not overmix the batter. Gentle mixing keeps the texture soft and tender.

Storage and Reheating

You can store this apple pie in the refrigerator for up to three days. Cover it well to keep it fresh.

To reheat, place a slice in the microwave for 15 to 20 seconds. This restores the warmth and softness.

You can also reheat it in the oven at low temperature for a few minutes.

Why You Will Love This Recipe

This recipe is perfect because it removes stress and complexity. It proves that homemade desserts can be easy and fast. You only need a few ingredients and minimal effort.

The smell alone makes the experience worthwhile. As the pie bakes, your kitchen fills with warmth and comfort. It creates a cozy atmosphere that brings joy to everyone nearby.

This apple pie also brings emotional comfort. Apples and cinnamon are classic flavors that remind many people of childhood, family, and happy memories.

Final Thoughts

This quick apple pie with just three apples is a perfect example of how simple ingredients can create something extraordinary. It is fast, easy, and incredibly delicious. You do not need special skills or complicated tools.

In just ten minutes of preparation, you can create a dessert that tastes like love and comfort. Whether you make it for yourself, your family, or your friends, it will always bring smiles.

Banana mousse ready in 5 minutes: the best Italian dessert

If you love quick desserts that taste elegant and indulgent, this Banana Mousse is about to become your new favorite treat. Inspired by the light and creamy texture of classic Italian desserts like Tiramisù and Panna Cotta, this banana mousse delivers silky smoothness with minimal effort. The best part? It comes together in just five minutes with simple ingredients you probably already have at home.

This dessert is perfect for busy weeknights, last-minute guests, or when you’re simply craving something sweet but don’t want to spend hours in the kitchen. It’s naturally sweet from ripe bananas, luxuriously creamy, and can be dressed up beautifully for special occasions.

Let’s dive into this irresistible Italian-style banana mousse recipe.

 Why You’ll Love This Banana Mousse

  • Ready in just 5 minutes

  • No baking required

  • Only a handful of ingredients

  • Light, airy, and creamy texture

  • Perfect for both casual and elegant serving

  • Kid-friendly and crowd-pleasing

This mousse is smooth like classic Italian cream desserts but with a fruity twist that makes it refreshing and naturally flavorful.

 Ingredients

Serves 4

  • 2 large ripe bananas

  • 1 cup cold heavy whipping cream

  • 3 tablespoons powdered sugar (adjust to taste)

  • 1 teaspoon vanilla extract

  • 1 teaspoon lemon juice (prevents browning and enhances flavor)

Optional toppings:

  • Shaved dark chocolate

  • Crushed biscuits

  • Fresh berries

  • Mint leaves

  • A drizzle of caramel or honey

 Step-by-Step Instructions

Step 1: Prepare the Bananas

Peel the ripe bananas and slice them into chunks. Place them in a blender or food processor. Add the lemon juice and blend until completely smooth. The lemon juice not only keeps the bananas from browning but also balances the sweetness.

You want a silky puree with no lumps.

Step 2: Whip the Cream

In a separate bowl, pour in the cold heavy whipping cream. Add powdered sugar and vanilla extract. Using a hand mixer, whip the cream until soft peaks form.

Be careful not to overwhip. The cream should be fluffy and light, not stiff or grainy.

Step 3: Fold Everything Together

Gently fold the banana puree into the whipped cream using a spatula. Do this slowly to keep the mixture airy. The folding process helps maintain that mousse-like texture.

Within seconds, you’ll see the mixture turn into a pale, creamy, cloud-like dessert.

Step 4: Serve Immediately or Chill

You can serve the mousse right away for a soft, creamy texture. Alternatively, chill it in the refrigerator for 20–30 minutes if you prefer a slightly firmer consistency.

Spoon into small glasses, dessert cups, or elegant serving bowls.

 Serving Ideas (Italian-Style Presentation)

To give your banana mousse a true Italian café feel:

  • Layer it with crushed cookies for a tiramisù-style look

  • Add chocolate shavings and espresso powder for sophistication

  • Pipe it neatly using a piping bag

  • Garnish with mint leaves and fresh berries

  • Serve in small espresso cups for a classy touch

Presentation makes this simple dessert feel gourmet.

 Tips for Perfect Banana Mousse

✔ Use very ripe bananas — the sweeter and softer, the better.
✔ Chill your mixing bowl before whipping cream for best results.
✔ Fold gently to keep the mousse airy.
✔ Taste and adjust sweetness depending on banana ripeness.
✔ For a richer version, add 2 tablespoons mascarpone cheese.

 Delicious Variations

1️⃣ Chocolate Banana Mousse

Add 2 tablespoons cocoa powder or melted dark chocolate to the banana puree before folding.

2️⃣ Banana Coffee Mousse

Add 1 teaspoon instant espresso powder for a subtle Italian café flavor.

3️⃣ Honey Banana Mousse

Replace powdered sugar with 2 tablespoons honey for a more natural sweetness.

4️⃣ Banana Coconut Mousse

Add 2 tablespoons coconut cream and top with toasted coconut flakes.

Storage Tips

  • Store in an airtight container in the refrigerator.

  • Best enjoyed within 24 hours.

  • The lemon juice helps prevent browning, but freshness is key.

  • Not recommended for freezing, as texture may change.

 Why This Dessert Feels So Italian

Italian desserts are known for their simplicity, quality ingredients, and elegant presentation. This banana mousse follows that philosophy:

  • Minimal ingredients

  • Natural sweetness

  • Creamy texture

  • Beautiful yet effortless

It’s the kind of dessert you’d imagine enjoying in a small Italian kitchen after a family dinner — simple, comforting, and made with love. Nutritional Note

While indulgent, this mousse is lighter than many traditional cream desserts. Bananas provide natural sweetness, potassium, and fiber. You can reduce sugar or use natural sweeteners to make it even healthier.

Final Thoughts

This 5-minute banana mousse proves that you don’t need complicated techniques or long baking times to create something extraordinary. With just a few ingredients and minimal effort, you can make a dessert that feels elegant, tastes luxurious, and impresses everyone at the table.

Homemade Turtle Candy

Homemade Turtle Candy is one of those timeless treats that never goes out of style. With its perfect combination of crunchy toasted pecans, soft buttery caramel, and smooth melted chocolate, every bite delivers a rich, indulgent experience. These classic candies get their name because the pecans resemble little turtle legs peeking out from under a glossy chocolate shell. Making them at home is surprisingly simple, and the flavor is far better than anything store-bought. Whether you’re preparing them for holidays, gifts, or just to satisfy a sweet craving, this recipe will quickly become a favorite in your kitchen.

Ingredients:

2 cups pecan halves
1 cup soft caramels (about 25 individually wrapped caramels)
2 tablespoons heavy cream
2 cups semi-sweet chocolate chips (or milk chocolate if preferred)
1 tablespoon butter (optional, for extra shine)
Pinch of sea salt (optional)

Instructions:

Begin by preparing a baking sheet. Line it with parchment paper or a silicone baking mat to prevent sticking. Arrange the pecan halves in clusters of three or four, forming small “Y” shapes. These clusters will act as the base of each turtle candy.

Next, lightly toast the pecans to enhance their flavor. Place them in a preheated oven at 350°F (175°C) for about 5–7 minutes. Keep a close eye on them to prevent burning. Toasting deepens their nutty flavor and adds extra crunch. Once done, remove them from the oven and allow them to cool completely.

In a microwave-safe bowl, combine the soft caramels and heavy cream. Heat in 30-second intervals, stirring between each interval, until the caramel is completely melted and smooth. This usually takes about 1–2 minutes total. The heavy cream helps create a softer, smoother caramel texture that spreads easily.

Using a spoon, carefully place about one tablespoon of melted caramel over each pecan cluster. Make sure the caramel covers the center and slightly spreads over the pecans, helping to hold them together. Allow the caramel to set at room temperature for about 20–30 minutes, or place the tray in the refrigerator for faster setting.

While the caramel is firming up, melt the chocolate. Place the chocolate chips in a microwave-safe bowl and heat in 30-second intervals, stirring after each interval until smooth. If desired, stir in one tablespoon of butter for a glossy finish and smoother consistency.

Once the caramel has set, spoon melted chocolate over each cluster, fully covering the caramel layer. You can also dip each cluster into the chocolate using a fork, letting the excess drip off before placing it back on the parchment paper. For an elegant touch, sprinkle a small pinch of sea salt on top while the chocolate is still wet.

Allow the chocolate to set completely at room temperature for about one hour, or refrigerate for 20–30 minutes to speed up the process. Once fully hardened, gently peel the turtle candies off the parchment paper.

These homemade turtle candies can be stored in an airtight container at room temperature for up to one week, or in the refrigerator for up to two weeks. If stacking them, place parchment paper between layers to prevent sticking.

Tips for Perfect Turtle Candy:

Use fresh pecans for the best flavor. Stale nuts can ruin the taste and texture.
Do not overheat the chocolate, as it can become thick or grainy. Slow melting ensures a smooth finish.
If you prefer homemade caramel, you can substitute store-bought caramels with a simple homemade caramel sauce cooked to a thick consistency.
For variety, try using dark chocolate, white chocolate drizzle, or even adding chopped nuts on top.

Homemade turtle candy also makes a wonderful gift. Place a few pieces in decorative boxes or wrap them in cellophane bags tied with ribbon. They are perfect for holidays like Christmas, Thanksgiving, or Valentine’s Day, but they’re equally delightful as an everyday sweet treat.

The beauty of this recipe lies in its simplicity. With just a handful of ingredients and minimal effort, you can create a confection that looks impressive and tastes absolutely luxurious. The contrast between crunchy pecans, chewy caramel, and silky chocolate creates a balance of textures that keeps you reaching for just one more piece.

Making candy at home can feel intimidating, but this recipe is beginner-friendly and forgiving. Even if the chocolate isn’t perfectly smooth or the caramel spreads unevenly, the flavor will still be amazing. Each batch has its own homemade charm.