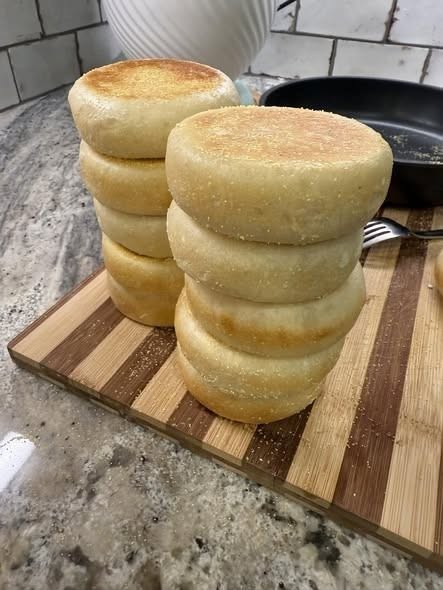
Top 5 Magnesium-Rich Foods to Prevent Leg Cramps in Seniors: Noticeable Results in 7 Days

Leg cramps in older adults are often linked to low magnesium intake, dehydration, and reduced muscle recovery. Magnesium plays a key role in muscle relaxation, nerve function, and electrolyte balance. When levels are low, muscles become more prone to sudden tightening and painful spasms—especially at night. The good news is that dietary changes alone can often make a noticeable difference in as little as 7 days if consistently followed.

Below are the top 5 magnesium-rich foods that can help reduce leg cramps in seniors naturally and support better muscle health.


1. Spinach – The Natural Muscle Relaxer

Spinach is one of the most powerful magnesium-rich foods available. Just one cooked cup provides a significant portion of daily magnesium needs, along with potassium and calcium—both important for muscle contraction and relaxation.

Spinach also contains nitrates that improve blood flow, helping oxygen reach muscles more efficiently, which reduces cramping risk.

How to use it:
Add spinach to soups, omelets, lentils, or lightly sauté it with olive oil and garlic. Seniors can also blend it into smoothies for easier digestion.


2. Almonds – Small But Powerful Cramp Fighters

Almonds are among the most magnesium-dense snacks. A small handful can provide a strong boost to daily magnesium intake. They also contain healthy fats and vitamin E, which support muscle recovery and reduce inflammation.

Regular almond consumption helps maintain stable nerve signaling, reducing sudden muscle contractions that cause cramps.

How to use it:
Eat 8–12 soaked almonds in the morning or as an evening snack. Almond butter on toast is another easy option.


3. Pumpkin Seeds – A Mineral Powerhouse

Pumpkin seeds (also called pepitas) are extremely rich in magnesium, zinc, and iron. Magnesium in pumpkin seeds directly supports muscle relaxation and reduces nighttime cramping.

They are especially helpful for seniors who experience frequent calf cramps due to mineral imbalance.

How to use it:
Sprinkle roasted pumpkin seeds on salads, yogurt, or oatmeal. A small handful daily is enough to make a difference.


4. Bananas – Nature’s Electrolyte Support

Banana are well known for potassium, but they also contain a good amount of magnesium. Potassium and magnesium work together to regulate muscle contractions and prevent spasms.

Bananas are also gentle on digestion, making them ideal for elderly individuals with sensitive stomachs.

How to use it:
Eat one banana daily, preferably in the evening or after light physical activity. It can also be added to milk or yogurt for a calming nighttime snack.


5. Avocado – Healthy Fats with Muscle Benefits

Avocado is another excellent source of magnesium, healthy fats, and potassium. These nutrients help reduce inflammation, improve circulation, and support steady muscle function.

Avocados also help stabilize electrolyte balance, which is crucial in preventing sudden nighttime cramps in seniors.

How to use it:
Add avocado slices to toast, salads, or smoothies. Half an avocado per day is usually enough for noticeable benefits.


7-Day Simple Anti-Cramp Routine

To see noticeable improvement within a week, consistency is key. Here’s a simple daily plan:

Morning:

  • 8–10 soaked almonds
  • 1 banana

Lunch:

  • Spinach-based dish (salad, curry, or soup)
  • Light hydration throughout the meal

Evening:

  • Pumpkin seeds handful

Dinner:

  • Avocado added to meal or salad

Also important:

  • Drink enough water daily
  • Do light stretching before bed
  • Avoid excessive caffeine and processed foods

Final Thoughts

Magnesium-rich foods can significantly reduce leg cramps in seniors when included consistently. The combination of spinach, almonds, pumpkin seeds, bananas, and avocado provides a natural balance of magnesium, potassium, and healthy fats that support muscle relaxation and nerve health.

Within 7 days, many people notice fewer nighttime cramps, improved sleep quality, and reduced muscle stiffness—without relying on medication. The key is regular intake and staying hydrated for best results.

3-Ingredient Ginger Water Recipe (Natural Detox Drink)

Ginger water is one of the simplest yet most powerful natural drinks you can prepare at home. With just three basic ingredients, it becomes a refreshing wellness tonic that may support digestion, immunity, metabolism, and overall hydration. This recipe is especially popular among people looking for a natural morning detox drink or a gentle herbal remedy for bloating and sluggish digestion.

The best part is that it requires no fancy equipment, no expensive ingredients, and no complicated steps. Just fresh ginger, water, and a natural enhancer like lemon or honey (depending on your preference). Below is a complete, detailed guide to making perfect 3-ingredient ginger water at home.


Ingredients (3 Simple Items)

  1. Fresh ginger (2–3 inches root)
    Ginger is the star ingredient. It contains natural compounds like gingerol that give it anti-inflammatory and antioxidant properties.
  2. Water (3–4 cups)
    Preferably filtered or clean drinking water for best taste and purity.
  3. Lemon or honey (optional but recommended)
    Lemon adds vitamin C and freshness, while honey adds natural sweetness and soothing effects. You can choose one or use both in small quantity.

Step-by-Step Preparation Method

Step 1: Wash and Prepare Ginger

Start by thoroughly washing the ginger root to remove dirt. You can peel it if you prefer a milder taste, but keeping the peel is also fine since it contains nutrients. Slice the ginger into thin pieces or grate it for stronger flavor extraction.

Step 2: Boil the Water

Take 3–4 cups of water in a saucepan and bring it to a gentle boil. Once it starts boiling, reduce the heat slightly.

Step 3: Add Ginger

Add the sliced or grated ginger into the boiling water. Let it simmer for about 10–15 minutes. The longer you simmer, the stronger the ginger flavor will become.

Step 4: Strain the Liquid

After simmering, turn off the heat and allow it to cool for a few minutes. Then strain the liquid into a cup or jar to remove ginger pieces.

Step 5: Add Lemon or Honey

Once the drink is warm (not boiling hot), add freshly squeezed lemon juice or a teaspoon of honey. Stir well until fully mixed.


How to Drink Ginger Water

For best results, drink ginger water:

  • In the morning on an empty stomach for detox benefits
  • Before meals to support digestion
  • After heavy meals to reduce bloating
  • Before bedtime (light version) for relaxation

You can also store it in the refrigerator and drink it cold during hot weather.


Health Benefits of Ginger Water

1. Supports Digestion

Ginger is widely known for improving digestion. It helps stimulate digestive enzymes, making it easier for the stomach to break down food. Many people use ginger water to reduce bloating, gas, and indigestion.

2. May Boost Metabolism

Drinking ginger water regularly may slightly increase metabolism. This is why it is often included in weight management routines. It may also help control appetite naturally.

3. Helps with Inflammation

Ginger contains powerful anti-inflammatory compounds. Regular consumption may help reduce internal inflammation, which is linked to many chronic conditions.

4. Supports Immunity

The antioxidants in ginger help strengthen the immune system. Combined with lemon, this drink becomes a natural immunity booster.

5. Improves Hydration

Since ginger water is mostly water-based, it helps keep the body hydrated while providing additional health benefits compared to plain water.


Tips for Best Results

  • Always use fresh ginger instead of powder for maximum benefits.
  • Do not overboil for too long; it may make the taste bitter.
  • Start with a mild quantity if you are new to ginger drinks.
  • Drink consistently for at least 7–10 days to notice effects.
  • Avoid adding too much honey if you are watching sugar intake.

Possible Variations

  • Add mint leaves for a cooling effect
  • Add cinnamon for blood sugar support
  • Add black pepper for stronger metabolism boost
  • Make iced ginger water for summer refreshment

Final Thoughts

3-ingredient ginger water is a simple yet highly effective natural drink that fits easily into daily life. Whether your goal is better digestion, natural detox, or just a healthy beverage alternative, this recipe is a great choice. With consistent use, it can become a refreshing habit that supports your overall wellness journey without any complicated effort.

Keto Bounty Bars (Low-Carb Coconut Chocolate Bars)

Keto Bounty Bars are a low-carb, sugar-free version of the classic coconut chocolate bar, designed for people following a ketogenic or low-carb lifestyle. They taste rich, creamy, and chocolatey on the outside with a soft, sweet coconut filling inside. The best part is that they require no baking, are easy to prepare at home, and use simple keto-friendly ingredients. This recipe gives you a perfect balance of healthy fats, minimal carbs, and satisfying sweetness without spiking blood sugar.


🥥 Ingredients

Coconut Filling:

  • 200 g unsweetened desiccated coconut
  • 100 ml coconut cream (full fat for best texture)
  • 3–4 tbsp powdered erythritol or monk fruit sweetener (adjust to taste)
  • 1 tsp vanilla extract
  • Pinch of salt
  • 2 tbsp melted coconut oil (helps bind and soften texture)

Chocolate Coating:

  • 150 g sugar-free dark chocolate (85–95% cocoa or keto chocolate chips)
  • 1 tbsp coconut oil (for smooth melting and shine)

🥣 Step 1: Prepare the Coconut Filling

Start by placing the desiccated coconut in a mixing bowl. Make sure you use unsweetened coconut because sweetened versions contain sugar, which is not suitable for keto diets.

Add coconut cream to the bowl. This is the key ingredient that gives the bars their creamy texture. If coconut cream is too thick, you can lightly warm it before mixing so it blends easily.

Now add powdered sweetener. Powdered form is important because it dissolves better and prevents graininess. You can adjust sweetness based on your preference. Some people prefer mildly sweet bars, while others like dessert-level sweetness.

Add vanilla extract and a pinch of salt. The salt enhances the chocolate and coconut flavor, making the bars taste richer and more balanced.

Finally, pour in melted coconut oil. Mix everything thoroughly using a spoon or spatula until the mixture becomes thick, sticky, and moldable. If it feels too dry, add a small amount of coconut cream. If it feels too wet, add more desiccated coconut.


🧊 Step 2: Shape the Bars

Line a small tray or container with parchment paper. This prevents sticking and makes removal easier later.

Take small portions of the coconut mixture and shape them into rectangular or oval bars using your hands. You can also press the entire mixture into a tray and cut it later if you prefer uniform pieces.

Make sure the bars are tightly packed so they do not break during dipping. Once shaped, place them in the freezer for about 30–45 minutes. This step is important because it firms up the coconut filling, making it easier to coat with chocolate.


🍫 Step 3: Prepare the Chocolate Coating

While the bars are chilling, prepare the chocolate coating.

Break sugar-free chocolate into small pieces and place it in a heat-safe bowl. Add coconut oil. Melt it using a double boiler method (placing the bowl over hot water) or microwave in short 20–30 second bursts, stirring each time.

Stir until the mixture becomes smooth, glossy, and fully melted. The coconut oil helps make the chocolate thinner, easier to coat, and gives a beautiful shine after setting.


🍬 Step 4: Coat the Bars

Remove the chilled coconut bars from the freezer. Dip each bar into the melted chocolate using a fork or spoon. Make sure each bar is fully coated on all sides.

Let excess chocolate drip off before placing the bar back on the parchment paper.

If you want a thicker chocolate shell, you can dip each bar twice. First coat, freeze for 10 minutes, then dip again.

After coating all bars, place them back into the refrigerator or freezer to set.


❄️ Step 5: Set and Serve

Refrigerate the bars for at least 1 hour or freeze for 20–30 minutes until the chocolate becomes firm and crisp.

Once set, your Keto Bounty Bars are ready to enjoy. Store them in an airtight container in the fridge for up to 7–10 days or in the freezer for up to 2 months.


🍫 Texture & Taste Tips

  • For a softer filling: add more coconut cream
  • For a firmer bite: add more desiccated coconut
  • For extra crunch: mix chopped almonds or chia seeds
  • For stronger chocolate flavor: use 90–95% dark chocolate

🥥 Health Benefits (Keto-Friendly)

These bars are perfect for keto because:

  • They are low in net carbs
  • High in healthy fats from coconut
  • Sugar-free and diabetic-friendly
  • Provide long-lasting energy without sugar crashes

Coconut also contains medium-chain triglycerides (MCTs), which support ketosis and may help boost energy levels.


🍫 Final Thoughts

Keto Bounty Bars are a simple but satisfying homemade dessert that proves you don’t need sugar to enjoy chocolate treats. With just a few ingredients and no baking required, you can create a delicious snack that feels indulgent while still staying aligned with your low-carb goals. Whether you’re following keto strictly or just trying to reduce sugar, these bars are a perfect guilt-free option for cravings.

Dessert is foolproof perfect for the weekend

🧀 Classic Baked Cheesecake (Bakery Style Recipe)

🥧 Biscuit Base

Ingredients:

  • 250 g digestive biscuits
  • 100 g unsalted butter (melted)
  • 2 tbsp sugar
  • Pinch of salt

Method:

  1. Crush biscuits into fine sand-like crumbs.
  2. Mix with melted butter, sugar, and salt.
  3. Press firmly into a lined springform pan.
  4. Slightly raise edges (about 0.5 cm).
  5. Bake at 170°C for 10 minutes, then cool completely.

🍰 Cream Cheese Filling

Ingredients:

  • 600 g full-fat cream cheese (room temperature)
  • 200 g caster sugar
  • 200 ml sour cream (or thick strained yogurt)
  • 3 large eggs (room temperature)
  • 1 tbsp cornflour / plain flour
  • 1 tbsp vanilla extract
  • 2 tbsp lemon juice
  • Zest of 1 lemon
  • 1/4 tsp salt

🥣 Filling Method

Step 1: Smooth Base

Beat cream cheese alone for 3–4 minutes until completely smooth.

Step 2: Sugar Mixing

Add sugar gradually and beat until silky and glossy.

Step 3: Flavor Layer

Add sour cream, vanilla, lemon juice, zest, and salt. Mix gently.

Step 4: Eggs (Critical Step)

Add eggs one by one. Mix only until combined.
Do NOT overmix.

Step 5: Stabilizer

Sift in flour and fold gently with a spatula (no mixer).


💧 Water Bath (Important)

  1. Wrap pan with 3 layers of foil.
  2. Place in roasting tray.
  3. Add hot water halfway up the pan.

This prevents cracks and keeps texture creamy.


🔥 Baking

  • Temperature: 160°C
  • Time: 60–75 minutes
  • Middle rack only

Perfect Texture:

  • Firm edges
  • Soft wobbling center

Do NOT overbake.


❄️ Cooling Process

Stage 1:

Turn oven off → leave door slightly open (1 hour)

Stage 2:

Cool at room temperature (1–2 hours)

Stage 3:

Refrigerate minimum 6–12 hours (best overnight)


🔪 Slicing Tip

  • Dip knife in hot water
  • Wipe clean before every cut
  • Slice for bakery-style results

🍓 Optional Berry Topping

Ingredients:

  • 1 cup berries
  • 3 tbsp sugar
  • 2 tbsp water
  • 1 tsp lemon juice
  • Cornflour slurry

Method:
Cook berries 5–7 minutes → add sugar + lemon → thicken → cool → pour over cheesecake.


⚠️ Common Problems Fix

  • Cracks: overmixing or high heat → use water bath
  • Grainy texture: cold cream cheese → always room temp
  • Soggy base: water leakage → double foil wrap
  • Too soft: underbaked or not chilled → refrigerate longer

Key tips for traveling safely and with good planning in 2026

Traveling in 2026 offers exciting opportunities, but it also requires smarter planning and awareness than ever before. With evolving technology, changing global conditions, and new safety considerations, travelers need to be proactive. Whether you’re planning a short getaway or an international adventure, these key tips will help you travel safely and efficiently while enjoying peace of mind.

1. Plan Ahead, But Stay Flexible

One of the most important travel strategies in 2026 is balancing preparation with flexibility. While it’s essential to book flights, accommodations, and activities in advance, unexpected changes—like weather disruptions or policy updates—can still occur.

Always:

  • Choose tickets that allow free or low-cost changes
  • Keep backup accommodation options
  • Build buffer time between connections

Flexibility reduces stress and helps you adapt quickly when plans shift.

2. Keep Digital and Physical Copies of Documents

Travel documents are your lifeline. Losing them can turn a dream trip into a nightmare. Always carry both digital and physical copies of important documents such as:

  • Passport
  • Visa
  • Travel insurance
  • Flight tickets
  • Hotel reservations

Store digital copies in secure cloud storage and keep printed copies in a separate bag from the originals.

3. Invest in Travel Insurance

Travel insurance is no longer optional—it’s essential. In 2026, policies are more comprehensive and can cover:

  • Medical emergencies
  • Trip cancellations
  • Lost baggage
  • Delays and disruptions

Choose a plan that matches your destination and activities. For example, if you’re planning adventure sports, ensure your policy covers those risks.

4. Stay Updated on Health and Safety Guidelines

Health awareness remains crucial. Before traveling:

  • Check vaccination requirements
  • Research local health advisories
  • Carry a basic medical kit

Include essentials like pain relievers, antiseptic wipes, and any personal medications. Also, stay informed about local emergency numbers and nearby hospitals.

5. Use Smart Technology for Safer Travel

Technology has made traveling safer and more convenient. Use it wisely:

  • Enable location sharing with a trusted contact
  • Use travel apps for navigation and translation
  • Set up mobile alerts for bank transactions

Portable chargers (power banks) are also a must to keep your devices active during long travel days.

6. Pack Light and Smart

Overpacking can slow you down and increase the risk of losing items. Focus on essentials:

  • Versatile clothing suitable for multiple occasions
  • Travel-sized toiletries
  • A compact first aid kit

Use packing cubes to stay organized and make security checks smoother.

7. Stay Aware of Your Surroundings

No matter how safe a destination seems, awareness is key. Avoid distractions like constantly checking your phone in crowded areas. Keep an eye on your belongings, especially in:

  • Public transport
  • Tourist attractions
  • Busy markets

Trust your instincts. If something feels off, leave the area immediately.

8. Secure Your Money and Valuables

Diversify how you carry money:

  • Use a mix of cash and cards
  • Keep small amounts of cash easily accessible
  • Store extra money in a hidden pouch or money belt

Avoid displaying expensive items like jewelry or high-end gadgets, especially in unfamiliar areas.

9. Research Local Culture and Laws

Understanding the local culture helps you avoid misunderstandings and stay respectful. Learn:

  • Basic phrases in the local language
  • Dress codes and social norms
  • Local laws and regulations

For example, some countries have strict rules about photography, public behavior, or dress. Being informed helps you avoid fines or legal issues.

10. Book Accommodations Wisely

Choose accommodations with:

  • Good reviews and ratings
  • Secure entry systems
  • Safe neighborhoods

Check for amenities like 24-hour reception and lockers. It’s also helpful to know the nearest police station or emergency service location.

11. Keep Emergency Contacts Handy

Prepare a list of emergency contacts, including:

  • Local emergency numbers
  • Your country’s embassy or consulate
  • Family or trusted friends

Store this information both digitally and on paper. In emergencies, quick access can make a huge difference.

12. Avoid Sharing Too Much on Social Media

While it’s tempting to share every moment, posting your location in real time can be risky. It can alert strangers that you’re away from your accommodation or traveling alone.

Instead:

  • Share photos after leaving a location
  • Adjust privacy settings on your accounts
  • Avoid tagging exact locations immediately

13. Stay Connected

Reliable communication is essential. Consider:

  • Buying a local SIM card or international roaming plan
  • Using Wi-Fi cautiously (avoid accessing sensitive accounts on public networks)
  • Using VPNs for added security

Being connected ensures you can access maps, contact help, and stay informed.

14. Prepare for Financial Safety

Notify your bank before traveling to avoid card blocks. Also:

  • Enable transaction alerts
  • Use secure ATMs (preferably inside banks)
  • Avoid carrying large sums of cash

Having a backup card stored separately is always a smart move.

15. Trust Reliable Transportation

Use licensed taxis, ride-hailing apps, or hotel-arranged transport. Avoid accepting rides from strangers. Before getting into a vehicle:

  • Verify driver details
  • Check vehicle registration
  • Share ride details with someone you trust

Final Thoughts

Traveling safely in 2026 is all about preparation, awareness, and smart decision-making. By planning ahead, using technology wisely, and staying alert, you can minimize risks and maximize enjoyment. Remember, the goal is not just to reach your destination, but to experience it with confidence and peace of mind.

Top 5 Foods That Heal Brain Cells and Restore Memory While You Sleep

A good night’s sleep does more than simply refresh your body—it plays a vital role in repairing brain cells, strengthening neural connections, and consolidating memory. During deep sleep, your brain clears out toxins, restores damaged cells, and processes everything you learned throughout the day. What you eat before bed can either support or disrupt this process. Certain nutrient-rich foods contain compounds that actively nourish the brain, promote relaxation, and enhance overnight cognitive recovery.

Here are the top five foods that help heal brain cells and restore memory while you sleep, along with a simple “recipe-style” guide on how to incorporate them into your nightly routine.

1. Walnuts – The Brain-Shaped Superfood

Walnuts are often called “brain food” for a reason. Rich in omega-3 fatty acids, antioxidants, and polyphenols, they help reduce inflammation and support the repair of brain cells. Omega-3s are essential for maintaining the structure of neurons and improving communication between brain cells.

How to use:

  • Eat a small handful (about 5–7 walnuts) 30–60 minutes before bed.
  • Pair with a teaspoon of honey for added relaxation benefits.

Why it works:
Walnuts also contain melatonin, a hormone that regulates sleep cycles. Better sleep means more efficient brain repair and memory consolidation overnight.

. Blueberries – Memory-Boosting Antioxidants

Blueberries are packed with flavonoids, particularly anthocyanins, which protect brain cells from oxidative stress. These compounds improve communication between neurons and enhance memory function.

How to use:

  • Mix ½ cup of fresh or frozen blueberries into yogurt.
  • Blend into a nighttime smoothie with milk or almond milk.

Why it works:
Blueberries help reduce brain aging and improve cognitive performance. Consuming them in the evening provides your brain with protective nutrients during its nightly repair process.

3. Pumpkin Seeds – Tiny Seeds, Powerful Minerals

Pumpkin seeds are rich in magnesium, zinc, iron, and tryptophan. Magnesium plays a crucial role in calming the nervous system, while zinc supports nerve signaling and brain development.

How to use:

  • Eat 1–2 tablespoons of raw or lightly roasted pumpkin seeds before bed.
  • Add them to a small bowl of oatmeal or sprinkle over yogurt.

Why it works:
Tryptophan in pumpkin seeds helps produce serotonin, which converts to melatonin—the hormone responsible for sleep. Better sleep enhances brain detoxification and memory restoration.

4. Dark Chocolate – A Sweet Brain Booster

Dark chocolate (70% cocoa or higher) is rich in flavonoids, caffeine (in small amounts), and antioxidants that support brain health. It improves blood flow to the brain and enhances cognitive function.

How to use:

  • Eat 1–2 small squares of dark chocolate in the evening.
  • Combine with nuts for a balanced snack.

Why it works:
The flavonoids in dark chocolate stimulate brain plasticity, which is essential for learning and memory. When consumed in moderation, it can also improve mood and reduce stress, promoting better sleep quality.

5. Bananas – Natural Sleep and Memory Support

Bananas are an excellent source of potassium, magnesium, and vitamin B6. These nutrients help relax muscles, calm the nervous system, and support the production of neurotransmitters like serotonin and dopamine.

How to use:

  • Eat one small banana before bedtime.
  • Slice it into warm milk or oatmeal for a comforting snack.

Why it works:
Vitamin B6 helps convert tryptophan into serotonin, which later becomes melatonin. This chain reaction improves sleep quality and allows the brain to perform its nightly repair functions more effectively.

Nighttime Brain-Healing Snack Recipe

Here’s a simple combination that includes all five brain-boosting foods:

Ingredients:

  • ½ banana (sliced)
  • ¼ cup blueberries
  • 1 tablespoon pumpkin seeds
  • 3–4 walnuts (crushed)
  • 1 square dark chocolate (chopped)
  • ½ cup warm milk or yogurt

Instructions:

  1. In a bowl, add the yogurt or warm milk as a base.
  2. Top with sliced banana and blueberries.
  3. Sprinkle pumpkin seeds and crushed walnuts over the mixture.
  4. Add small pieces of dark chocolate on top.
  5. Enjoy 30–60 minutes before bedtime.

Final Thoughts

Your brain works hardest while you sleep, repairing cells, strengthening memories, and clearing out toxins that accumulate during the day. By choosing the right foods before bed, you can enhance this natural process and wake up feeling sharper, more focused, and mentally refreshed.

Incorporating walnuts, blueberries, pumpkin seeds, dark chocolate, and bananas into your evening routine provides a powerful combination of nutrients that support brain health. Over time, these small dietary changes can lead to improved memory, better sleep quality, and long-term cognitive wellness.

Does drinking water in the morning and after waking up have a beneficial effect on your overall well-being?

Drinking water first thing in the morning is a simple habit that many people overlook, yet it can have a surprisingly powerful impact on overall well-being. After several hours of sleep, your body wakes up slightly dehydrated because it has gone without fluids throughout the night. Rehydrating immediately after waking helps kickstart essential bodily functions and sets a healthy tone for the rest of the day.

One of the most important benefits of morning water intake is improved hydration. During sleep, your body continues to perform vital processes such as breathing, circulation, and cell repair, all of which use water. By drinking a glass or two of water upon waking, you replenish lost fluids and restore balance. Proper hydration supports everything from brain function to joint lubrication, making it a cornerstone of good health.

Another key advantage is boosting metabolism. Studies suggest that drinking water can temporarily increase your metabolic rate, helping your body burn calories more efficiently. When you drink water in the morning, especially on an empty stomach, it may stimulate thermogenesis—a process where your body generates heat and energy. This can be particularly helpful for people trying to manage their weight or improve digestion.

Speaking of digestion, morning hydration plays a crucial role in maintaining a healthy digestive system. Water helps activate the gastrointestinal tract, preparing it for food intake. It can also prevent constipation by softening stools and promoting regular bowel movements. Many people find that drinking warm water in the morning is especially effective in encouraging natural detoxification and smoother digestion.

Drinking water early in the day also supports detoxification. While the term “detox” is often overused, it’s true that your body naturally eliminates waste through organs like the kidneys and liver. Water is essential for this process. By hydrating first thing in the morning, you assist your kidneys in flushing out toxins and waste products more efficiently. This can contribute to clearer skin, better energy levels, and improved overall health.

Brain function and mental clarity also benefit from morning hydration. Even mild dehydration can affect concentration, mood, and cognitive performance. Starting your day with water helps improve alertness and may reduce feelings of fatigue. Instead of reaching immediately for caffeine, giving your body water first can naturally wake you up and enhance focus.

In addition, drinking water in the morning can positively impact your skin. Hydration is closely linked to skin health, and adequate water intake helps maintain elasticity, reduce dryness, and promote a healthy glow. While water alone won’t solve all skin issues, it forms an essential part of a broader skincare and wellness routine.

Another benefit is supporting the immune system. Water helps transport oxygen and nutrients to cells, which is vital for maintaining strong immunity. It also aids in the production of lymph, a fluid that circulates white blood cells and other immune cells throughout the body. By staying hydrated, you help your body defend itself against infections and illnesses more effectively.

For those trying to establish healthy habits, drinking water in the morning can act as a positive trigger for other good behaviors. It’s a simple, achievable step that can lead to better choices throughout the day, such as healthier eating and more consistent hydration. Over time, this small habit can contribute to long-term wellness improvements.

To get the most benefits, aim to drink one to two glasses of water immediately after waking up. Room temperature or warm water is often recommended, as it is gentler on the digestive system. Some people like to add a slice of lemon for flavor and a small boost of vitamin C, though plain water is perfectly effective.

It’s also important to listen to your body. While morning hydration is beneficial, it should be part of a balanced approach to fluid intake throughout the day. Don’t rely solely on morning water—consistent hydration is key to maintaining optimal health.

In conclusion, drinking water after waking up is a simple yet powerful habit that can enhance hydration, boost metabolism, improve digestion, support detoxification, and promote mental clarity. It’s an easy step that requires minimal effort but offers meaningful benefits for your overall well-being. By making it part of your daily routine, you can start each day feeling refreshed, energized, and ready to take on whatever comes your way.

15 Brilliant Baking Soda Tricks Every Woman Should Know

Baking soda is one of the most versatile, affordable, and effective ingredients you can keep at home. While it’s commonly used in baking, this humble white powder offers countless benefits for cleaning, beauty, health, and household hacks. If you’re looking for simple, natural solutions to everyday problems, baking soda is your best friend. Here are 15 brilliant baking soda tricks every woman should know.

1. Natural Deodorant

Baking soda works as a powerful natural deodorant by neutralizing odor-causing bacteria. Simply apply a small amount under your arms or mix it with a bit of coconut oil for a smoother application.

2. Teeth Whitening

Want a brighter smile? Mix baking soda with a little water to form a paste and brush gently. It helps remove stains and leaves your teeth looking whiter. Use it once or twice a week to avoid enamel damage.

3. Deep Clean Your Kitchen

Baking soda is perfect for scrubbing sinks, countertops, and stovetops. Sprinkle it on surfaces and wipe with a damp sponge to remove grease and grime without harsh chemicals.

4. Freshen Your Refrigerator

Place an open box of baking soda in your fridge to absorb unpleasant odors. It works like a natural air purifier and keeps your fridge smelling fresh.

5. Remove Tough Stains

From coffee spills to grease marks, baking soda can tackle stubborn stains. Make a paste with water, apply it to the stain, let it sit, and then scrub gently before rinsing.

6. Soften Laundry Naturally

Add half a cup of baking soda to your laundry to soften clothes and boost detergent performance. It also helps eliminate odors from fabrics.

7. Clean Hair Brushes and Combs

Hair tools collect dirt, oil, and product buildup over time. Soak them in warm water mixed with baking soda to clean and refresh them easily.

8. Exfoliate Your Skin

Baking soda makes a gentle exfoliant. Mix it with water and massage onto your face or body in circular motions. It helps remove dead skin cells and leaves your skin feeling smooth.

9. Relieve Bug Bites and Itching

A paste made from baking soda and water can soothe itchy insect bites or mild skin irritation. Apply it to the affected area for quick relief.

10. Unclog Drains

Skip expensive chemicals. Pour baking soda down the drain, followed by vinegar, and rinse with hot water. This natural reaction helps break down blockages and odors.

11. Clean Fruits and Vegetables

Baking soda helps remove dirt and pesticide residue from produce. Soak fruits and vegetables in water with a teaspoon of baking soda, then rinse thoroughly.

12. Freshen Carpets and Rugs

Sprinkle baking soda over carpets, let it sit for 15–20 minutes, then vacuum. It absorbs odors and leaves your home smelling clean and fresh.

13. Whiten Nails

If your nails look dull or stained, scrub them gently with baking soda and water. This helps restore their natural shine and cleanliness.

14. Polish Silver Jewelry

Bring back the shine to your jewelry by cleaning it with a paste of baking soda and water. Rub gently, rinse, and dry for sparkling results.

15. Foot Soak for Relaxation

After a long day, soak your feet in warm water with a few tablespoons of baking soda. It helps soften skin, eliminate odor, and relax tired feet.

Final Thoughts

Baking soda is truly a powerhouse ingredient that every household should have. From beauty care to deep cleaning, its uses are endless and incredibly effective. The best part is that it’s natural, affordable, and easy to use. By incorporating these simple tricks into your daily routine, you can save money, reduce chemical exposure, and enjoy a cleaner, healthier lifestyle.

15 Brilliant Baking Soda Tricks Every Woman Should Know

Baking soda is one of the most versatile and affordable ingredients you can keep in your home. While it’s commonly used in baking, this humble white powder has dozens of practical uses that go far beyond the kitchen. From cleaning and personal care to beauty and household hacks, baking soda can simplify your daily routine while saving money. Here are 15 brilliant baking soda tricks every woman should know, along with simple “recipes” or methods to use them effectively.

1. Natural Deodorant
Baking soda helps neutralize odor instead of just masking it.
Recipe: Mix 1 tablespoon baking soda with a few drops of water or coconut oil to form a paste. Apply lightly under arms.

2. Teeth Whitening Booster
It gently removes stains from teeth.
Recipe: Dip your toothbrush in baking soda once or twice a week and brush gently. Avoid daily use to protect enamel.

3. Freshen Your Hair
It can act as a dry shampoo alternative.
Recipe: Sprinkle a small amount onto your scalp, massage, and brush out excess oil.

4. Deep Clean for Skin
Baking soda exfoliates and removes dead skin cells.
Recipe: Mix 1 tablespoon baking soda with water to make a paste. Gently scrub your face and rinse.

5. Soothing Bath Soak
It helps relieve itching and irritation.
Recipe: Add ½ cup baking soda to a warm bath and soak for 15–20 minutes.

6. Foot Odor Eliminator
Perfect for tired, sweaty feet.
Recipe: Dissolve 2 tablespoons baking soda in a basin of warm water and soak feet for 15 minutes.

7. Natural Household Cleaner
Cuts grease and removes stains effectively.
Recipe: Mix baking soda with a little water to form a paste and scrub sinks, stovetops, and tiles.

8. Refrigerator Deodorizer
Absorbs unpleasant smells.
Recipe: Place an open box or bowl of baking soda in your fridge and replace monthly.

9. Brighten Laundry Whites
Boosts detergent performance.
Recipe: Add ½ cup baking soda to your laundry load to brighten whites and remove odors.

10. Clean Makeup Brushes
Removes buildup and bacteria.
Recipe: Mix warm water with 1 teaspoon baking soda. Soak brushes briefly, rinse, and air dry.

11. Unclog Drains Naturally
A chemical-free way to clear minor clogs.
Recipe: Pour ½ cup baking soda down the drain, followed by ½ cup vinegar. Let it fizz, then rinse with hot water.

12. Remove Carpet Odors
Perfect for homes with pets or heavy foot traffic.
Recipe: Sprinkle baking soda over carpets, let sit for 15–30 minutes, then vacuum.

13. Polish Silver Jewelry
Restores shine without harsh chemicals.
Recipe: Make a paste with baking soda and water, rub gently onto jewelry, rinse, and dry.

14. Clean Fruits and Vegetables
Helps remove dirt and pesticide residue.
Recipe: Add 1 teaspoon baking soda to a bowl of water, soak produce, then rinse thoroughly.

15. Soothe Insect Bites
Relieves itching and irritation quickly.
Recipe: Mix baking soda with a little water and apply the paste to the affected area.

Why Baking Soda Works So Well

Baking soda (sodium bicarbonate) is mildly alkaline, which makes it excellent for neutralizing acids and odors. Its fine, slightly abrasive texture also makes it ideal for gentle cleaning and exfoliation. Because it’s non-toxic and inexpensive, it’s a safer alternative to many commercial products filled with chemicals.

Tips for Safe Use

While baking soda is incredibly useful, it’s important to use it correctly:

  • Avoid overuse on skin, especially sensitive areas, as it can disrupt natural pH balance.
  • Don’t use it daily on teeth to prevent enamel damage.
  • Always test on a small area before applying to skin or delicate surfaces.
  • Store in a dry place to maintain its effectiveness.

Final Thoughts

Baking soda is truly a household powerhouse. With just one simple ingredient, you can replace multiple cleaning, beauty, and health products. These 15 tricks are easy to follow and require minimal effort, making them perfect for busy lifestyles. Once you start using baking soda in these creative ways, you’ll wonder how you ever lived without it.

If you have visible veins, it means you are

If you have visible veins, it doesn’t automatically mean something is wrong—in fact, in many cases, it’s a completely normal and even healthy sign. However, depending on the context, visible veins can sometimes reflect underlying factors related to body composition, circulation, or lifestyle. Understanding what visible veins mean can help you better interpret your body’s signals and know when to pay closer attention.

Visible veins are typically those that can be easily seen beneath the skin, often appearing bluish or greenish. They are most commonly noticed on the hands, arms, legs, and sometimes the chest. For many people, especially those with lighter or thinner skin, veins are naturally more noticeable. This is because there is less tissue covering them, making them easier to see.

One of the most common reasons for visible veins is low body fat. When your body fat percentage is lower, there is less fat between your skin and your veins, making them stand out more. This is why athletes, bodybuilders, and physically active individuals often have very prominent veins. In this context, visible veins can actually indicate good physical fitness and muscle definition.

Another factor is skin thickness. As people age, their skin tends to become thinner and loses some of its elasticity. This can make veins more visible over time, especially on the hands and arms. While this is a natural part of aging, it doesn’t necessarily indicate poor health.

Genetics also play a major role. Some people are simply born with more visible veins due to inherited traits such as skin tone, vein size, or how close veins are positioned to the surface of the skin. If your parents or family members have visible veins, chances are you might have them too.

Temperature can also affect how visible your veins appear. In warmer conditions, your blood vessels expand (a process called vasodilation) to help regulate body temperature. This expansion can make veins more noticeable. That’s why you might see your veins pop out more after a hot shower or during exercise.

Exercise itself is another major reason for visible veins. When you work out, your muscles require more oxygen and nutrients, which increases blood flow. This causes your veins to expand and become more prominent temporarily. Over time, regular exercise can make veins appear more consistently visible due to improved circulation and muscle growth.

Hydration levels can also influence vein visibility. When you are well-hydrated, your blood volume is optimal, and veins may appear fuller. On the other hand, dehydration can sometimes make veins look more pronounced due to reduced plasma volume, although this effect varies from person to person.

While visible veins are often harmless, there are certain situations where they might indicate a medical concern. For example, if veins suddenly become much more prominent, painful, swollen, or twisted, it could be a sign of conditions like varicose veins or vascular issues. Varicose veins occur when valves inside the veins weaken, causing blood to pool and veins to enlarge. These are more common in the legs and can sometimes cause discomfort or aching.

Another condition to watch for is poor circulation. However, visible veins alone do not mean you have poor circulation. In fact, people with good circulation often have well-functioning veins that may be more visible. Poor circulation usually comes with additional symptoms such as numbness, cold extremities, swelling, or fatigue in the limbs.

Hormonal changes can also influence vein appearance. For example, during pregnancy, increased blood volume and hormonal shifts can make veins more noticeable, especially in the legs and abdomen. This is usually temporary and resolves after childbirth.

If you’re concerned about your visible veins, there are a few simple steps you can take. Maintaining a healthy lifestyle with regular exercise, proper hydration, and a balanced diet supports good vascular health. Avoid prolonged sitting or standing, as this can affect blood flow, especially in the legs. Elevating your legs occasionally and wearing compression stockings (if recommended) can also help improve circulation.

It’s also important to monitor any changes. If your veins become painful, swollen, or change color, or if you notice symptoms like skin ulcers or persistent discomfort, it’s best to consult a healthcare professional. Early evaluation can help rule out any underlying issues and provide peace of mind.

In conclusion, having visible veins usually means your body is functioning normally and can even be a sign of fitness, low body fat, or genetic traits. While they can sometimes be associated with medical conditions, this is typically accompanied by other noticeable symptoms. Paying attention to your overall health and any changes in your body will help you determine whether your visible veins are simply a natural feature—or something that needs further attention.