Gluten-free artisan bread is one of those recipes that feels intimidating, but once you understand the method, it becomes surprisingly achievable at home. This version is designed to give you a true bakery-style loaf: a crisp golden crust, an airy interior, and a rich, slightly chewy texture—without any gluten.
🚀 Make Money Online – Up to $50 Per Day!
Unlike regular wheat bread, gluten-free dough doesn’t rely on gluten for structure, so we use a blend of flours and binders to create elasticity and stability. The result is a loaf that holds its shape beautifully while still staying soft inside.
Why This Recipe Works
This gluten-free artisan bread uses a carefully balanced mix of:
- Gluten-free flour blend (for structure)
- Psyllium husk (for elasticity and chew)
- Yeast (for rise and airiness)
- Olive oil (for moisture and softness)
- Vinegar (for improved texture and lift)
The combination mimics gluten’s binding effect, which is essential for a tall, airy loaf.
Ingredients
Dry Ingredients:
- 2 ½ cups gluten-free bread flour blend (with xanthan gum included or add separately)
- 2 tbsp psyllium husk powder
- 1 tbsp sugar (helps activate yeast)
- 1 tsp salt
- 2 ¼ tsp instant yeast (1 packet)
Wet Ingredients:
- 1 ½ cups warm water (around 110°F / 43°C)
- 2 tbsp olive oil
- 1 tsp apple cider vinegar
Step-by-Step Instructions
1. Activate the Yeast (if needed)
If you’re using active dry yeast, mix it with warm water and sugar. Let it sit for 5–10 minutes until it becomes foamy. If using instant yeast, you can skip this step and mix it directly with dry ingredients.
2. Mix Dry Ingredients
In a large mixing bowl, combine:
- gluten-free flour
- psyllium husk powder
- salt
- yeast
Whisk everything well so the psyllium and yeast are evenly distributed. This step is important because gluten-free dough doesn’t correct itself like wheat dough.
3. Add Wet Ingredients
Slowly pour in:
- warm water
- olive oil
- apple cider vinegar
Mix using a wooden spoon or stand mixer with a paddle attachment. The dough will look sticky and thick—this is exactly what you want. Gluten-free dough is not kneaded like regular bread.
4. Rest the Dough
Cover the bowl with a clean towel or plastic wrap and let it rest for 45–60 minutes in a warm place. During this time:
- psyllium absorbs water
- yeast activates
- dough becomes stretchy and moldable
You should see it expand slightly.
5. Shape the Dough
Lightly dust your hands with gluten-free flour. Shape the dough into a round or oval loaf.
Place it on a parchment-lined baking tray or in a Dutch oven for a more rustic crust.
Smooth the top with wet fingers to prevent cracking.
6. Second Rise
Cover the shaped dough and let it rise for 30–40 minutes. It won’t double like wheat bread, but it should puff up slightly.
Meanwhile, preheat your oven to 425°F (220°C).
If using a Dutch oven, place it inside the oven while preheating for an extra-crispy crust.
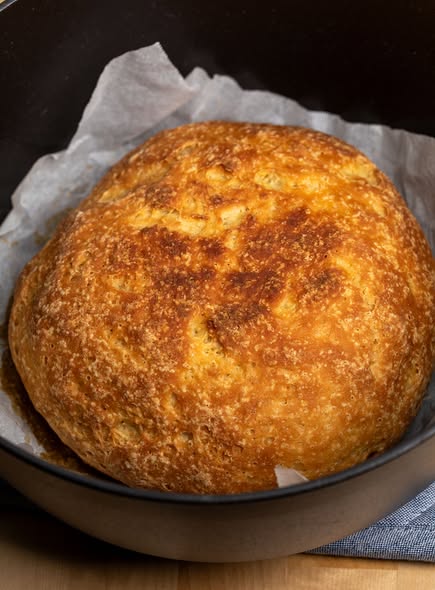
7. Bake the Bread
Bake for:
- 35–45 minutes in a Dutch oven
OR - 40–50 minutes on a baking tray
The bread is done when:
- the crust is deep golden brown
- it sounds hollow when tapped
- internal temperature reaches about 200°F (93°C)
8. Cool Completely
This step is crucial. Let the bread cool on a wire rack for at least 1 hour before slicing.
Gluten-free bread continues to set as it cools. Cutting too early can make it gummy inside.
Tips for Perfect Gluten-Free Artisan Bread
1. Don’t Skip Psyllium Husk
This is what gives the bread elasticity and prevents crumbling. It replaces gluten’s structure.
2. Use a Hot Oven
High heat helps create a strong crust and better rise.
3. Avoid Overmixing or Overhandling
Unlike wheat dough, gluten-free dough should be handled gently.
4. Add Steam for Extra Crust
Place a small pan of water in the oven while baking to create steam. This improves crust texture.
Variations You Can Try
- Garlic & Herb Bread: Add 1 tsp garlic powder + 1 tbsp dried herbs
- Seeded Artisan Bread: Mix in sunflower seeds, flaxseeds, or sesame seeds
- Cheese Bread: Add ½ cup shredded cheddar for a savory version
- Oat Flour Blend: Replace ½ cup flour with oat flour for a nuttier flavor
Storage Instructions
- Room temperature: 2–3 days in an airtight container
- Refrigerator: up to 5 days
- Freezer: slice and freeze for up to 2 months
To reheat, toast slices or warm in the oven for fresh-baked taste.
Final Thoughts
Gluten-free artisan bread is all about technique rather than complexity. Once you understand how psyllium husk and yeast work together, you can create bakery-quality bread at home without special equipment.
The crust is crisp, the inside is soft and airy, and the flavor is rich enough to enjoy on its own or as a base for sandwiches.
This recipe proves that gluten-free baking doesn’t have to feel like a compromise—it can be just as satisfying, rustic, and delicious as traditional bread.
