A decadent, no-bake treat with layers of creamy caramel, buttery crunch, and smooth chocolate.
If you love desserts that combine silky sweetness with a satisfying crunch, these Caramel Chocolate Crunch Bars are going to become your new go-to indulgence. They require no baking, come together with minimal ingredients, and deliver a gourmet flavor that tastes like something from a boutique chocolate shop. Imagine a crisp golden cookie layer, followed by a ribbon of chewy caramel, all capped with velvety chocolate that melts on your tongue. These bars are perfect for parties, holidays, or whenever you need a luxurious dessert without a lot of effort.
Ingredients
Crunch Base
-
3 cups crispy rice cereal (Rice Krispies or similar)
-
1 cup crushed digestive biscuits or graham crackers
-
½ cup melted butter (unsalted)
-
⅓ cup light brown sugar
-
½ cup creamy peanut butter (optional but recommended)
-
1 teaspoon vanilla extract
Caramel Layer
-
1 can (14 oz) sweetened condensed milk
-
½ cup unsalted butter
-
½ cup brown sugar
-
¼ teaspoon sea salt
-
1 teaspoon vanilla
Chocolate Topping
-
2 cups semi-sweet chocolate chips or chopped chocolate
-
1 tablespoon butter or coconut oil (for smooth finish)
Instructions
1. Make the Crunch Layer
Begin by preparing the foundation of your bars. Place the crispy rice cereal in a large mixing bowl. Crush your biscuits until they resemble coarse crumbs—this gives the bars structure and deepens the flavor. In a small saucepan, melt the butter and whisk in the brown sugar until dissolved and lightly bubbly. Remove from heat and stir in the peanut butter and vanilla. Pour this warm mixture over the cereal and biscuit crumbs, stirring until every piece is coated. Press this mixture firmly into the bottom of a lined 9×13-inch pan. The tighter you press, the better your bars will hold. Chill for 15 minutes.
2. Prepare the Caramel Filling
The caramel is where magic happens. In a medium saucepan over medium-low heat, melt the butter. Add the brown sugar and sweetened condensed milk, stirring continuously to prevent scorching. Allow the mixture to gently simmer, stirring until it thickens into a glossy golden caramel (about 8–10 minutes). Add the vanilla and salt, then pour the caramel evenly over your chilled base. Use a spatula to smooth it out. Place the pan back in the refrigerator for at least 20 minutes to set.
3. Top with Chocolate
Place the chocolate and butter (or coconut oil) in a heat-safe bowl and melt using either a microwave in 20–30 second intervals or a double boiler. Stir until silky and smooth. Pour this chocolate layer over the caramel, tilting the pan slightly to ensure full coverage. Chill again until the chocolate is set, about 30 minutes.
Cutting & Serving
When ready to cut, remove the bars from the fridge and let them sit at room temperature for 5–8 minutes. This helps the chocolate soften just enough to slice cleanly. Use a sharp knife and cut into squares or bars.
These bars are wonderfully rich, so small pieces go a long way. Store in an airtight container in the refrigerator for up to 1 week, or freeze for up to 3 months.
Tips for the Best Results
-
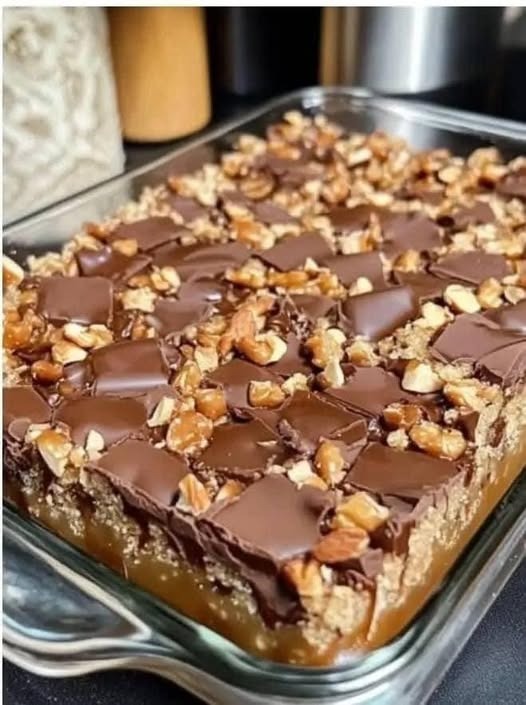
Add texture: For an extra layer of crunch, sprinkle chopped toasted almonds or pecans over the caramel before adding the chocolate.
-
Salt is key: A tiny pinch of sea salt on top of the chocolate creates a perfect sweet-salty balance.
-
Don’t rush chilling: Each layer needs time to firm up so your bars slice beautifully.
-
Customize chocolate: Dark chocolate gives elegance, while milk chocolate makes them extra sweet and dessert-like.
Why These Bars Are Special
There’s something irresistibly comforting about desserts that have multiple textures working in harmony. The crisp cereal layer offers lightness, preventing the bars from feeling heavy. The caramel brings depth and indulgence, rich and buttery with just the right chew. The chocolate sealing the top ties everything together with a luxurious finish. Every bite is balanced—sweet but not overwhelming, soft yet crunchy, simple yet undeniably impressive.
