Stale Bread: When It’s Safe to Eat and When to Toss It

Bread is one of the most common staples found in kitchens around the world. Whether it’s a fresh loaf from the bakery, homemade sourdough, or packaged sandwich bread, it’s normal for bread to lose its freshness over time. But when bread becomes stale, many people wonder: is it still safe to eat, or should it be thrown away? Understanding the difference between stale bread and spoiled bread can help you avoid food waste while also protecting your health.

What Does “Stale” Really Mean?

Stale bread is bread that has lost its moisture and softness. This happens due to a natural process called starch retrogradation. When bread is baked, starch molecules absorb water and swell. As the bread cools and sits over time, those molecules begin to crystallize and release moisture, making the bread dry and firm.

Staleness does not mean the bread is unsafe. In fact, stale bread is still edible as long as it hasn’t developed mold or signs of spoilage. It may not taste as good as fresh bread, but it can still be used in many recipes or revived with simple techniques.

When Stale Bread Is Safe to Eat

Stale bread is generally safe to eat if it meets these conditions:
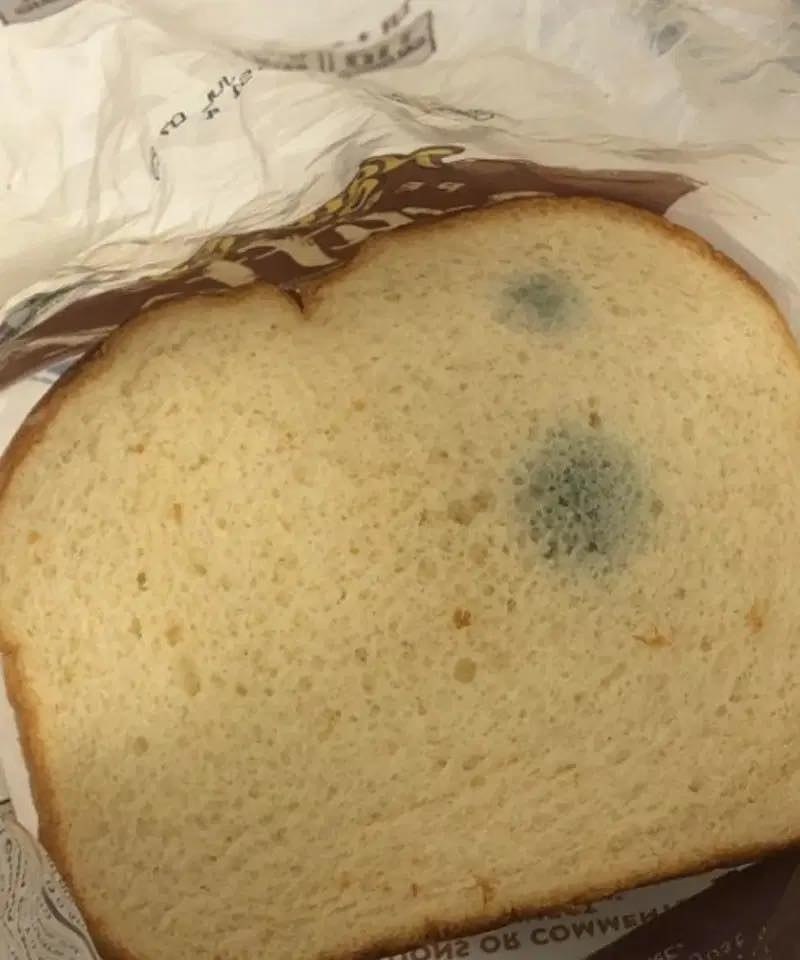
1. No visible mold:
Check the surface carefully. Mold appears as fuzzy spots that may be green, white, black, or blue. If there is no mold, the bread is likely safe.

2. No unusual smell:
Fresh or stale bread has a neutral, slightly yeasty smell. If it smells sour, musty, or unpleasant, it may be spoiled.

3. Dry but not sticky:
Stale bread becomes dry and hard. However, if the bread feels sticky, damp, or slimy, bacteria or mold may be growing.

4. Proper storage history:
Bread that has been stored in a clean, dry place or properly refrigerated or frozen is safer than bread left in warm, humid conditions.

According to the United States Department of Agriculture, dry foods like bread are less likely to support harmful bacteria growth when moisture is low. However, mold can still develop if bread is stored improperly.

When You Should Throw Bread Away

There are certain signs that bread is no longer safe to eat and should be discarded immediately:

1. Visible mold:
Even if mold appears only on one part, the entire loaf should be thrown away. Mold roots can spread invisibly through the bread.

2. Strong sour or rotten smell:
This indicates microbial growth and spoilage.

3. Slimy or wet texture:
This is a sign of bacterial contamination.

4. Unusual discoloration:
Any unexpected color changes beyond normal browning should be treated as a warning sign.

The Centers for Disease Control and Prevention warns that consuming moldy foods can cause allergic reactions, respiratory problems, or digestive discomfort in some individuals.

How Long Does Bread Stay Safe?

The shelf life of bread depends on how it is stored:

  • Room temperature: 3–5 days

  • Refrigerator: Up to 7–10 days (though it may stale faster)

  • Freezer: Up to 3 months or longer

Humidity and heat accelerate mold growth, so keeping bread in a cool, dry place is important.

Can You Eat Bread That’s Hard?

Yes, hard bread is usually safe as long as it’s not moldy. Hardness is simply a result of moisture loss. Many traditional recipes actually rely on stale bread because its dryness helps absorb liquids and flavors better.

How to Revive Stale Bread

If your bread is stale but mold-free, you can restore some of its softness with heat and moisture.

Oven method:

  1. Lightly sprinkle the bread with water.

  2. Wrap it in foil.

  3. Heat in a preheated oven at 180°C (350°F) for 5–10 minutes.

  4. Remove and enjoy while warm.

This method allows the starch molecules to reabsorb moisture, temporarily restoring softness.

Toaster method:
Slices of stale bread toast beautifully and often taste even better than fresh bread when crisped.

Creative Ways to Use Stale Bread

Instead of throwing stale bread away, consider these practical uses:

1. Make breadcrumbs:
Grind dry bread in a food processor for homemade breadcrumbs.

2. Prepare croutons:
Cube stale bread, season with oil and herbs, and bake until crispy.

3. French toast:
Stale bread absorbs the egg mixture better than fresh bread.

4. Bread pudding:
A classic dessert that transforms stale bread into something delicious.

5. Stuffing:
Stale bread is ideal for absorbing broth and seasonings.

These uses reduce waste and allow you to enjoy bread in new ways.

How to Prevent Bread from Going Bad

Proper storage can extend the life of bread:

  • Store bread in a sealed bag or container.

  • Keep it in a cool, dry place.

  • Freeze extra bread if you won’t use it quickly.

  • Avoid storing bread in humid areas.

Freezing is one of the best methods to preserve bread safely without affecting its quality too much.

Understanding Mold Risks

Mold grows in warm, moist environments. Bread provides nutrients that mold needs, especially when exposed to air and humidity. Some molds produce toxins that can cause illness, so it’s always safer to discard moldy bread rather than trying to salvage it.

Never scrape mold off bread and eat the rest. Mold roots may already be present throughout the loaf.

Final Thoughts

Stale bread and spoiled bread are not the same. Stale bread is simply dry and firm due to moisture loss and is usually safe to eat if it shows no signs of mold, unusual smell, or slimy texture. With proper storage and careful inspection, stale bread can still be enjoyed or repurposed into delicious dishes.

However, bread with mold, strange odors, or visible spoilage should always be thrown away to protect your health. By learning to recognize the difference, you can reduce food waste, save money, and enjoy bread safely.

Cheeseburger Pie

If you love the rich, savory flavor of a juicy cheeseburger but crave something warm and oven-baked, this Cheeseburger Pie is about to become your new family favorite. Inspired by the classic American diner cheeseburger and popularized in home kitchens thanks to easy weeknight versions like those shared by brands such as Bisquick, this dish combines seasoned ground beef, melted cheese, and a fluffy, golden crust in one irresistible slice.

Cheeseburger Pie is hearty, budget-friendly, and incredibly simple to prepare. It’s perfect for busy weeknights, potlucks, or whenever you want something satisfying without firing up the grill. Think of it as a cheeseburger meets savory quiche — all baked into a comforting pie dish.

Let’s dive into this delicious, easy-to-follow recipe!

 Ingredients

For the Filling:

  • 1 lb (450g) ground beef

  • 1 small onion, finely chopped

  • 2 cloves garlic, minced

  • 1 teaspoon salt

  • ½ teaspoon black pepper

  • 1 teaspoon Worcestershire sauce

  • ½ teaspoon paprika

  • 1 cup shredded cheddar cheese

For the Pie Batter:

  • ½ cup all-purpose flour

  • 1 cup milk

  • 2 large eggs

  • ½ teaspoon baking powder

  • Pinch of salt

Optional Toppings:

  • Diced tomatoes

  • Pickles

  • Cooked bacon bits

  • Extra shredded cheese

 Instructions

Step 1: Preheat and Prepare

Preheat your oven to 375°F (190°C). Lightly grease a 9-inch pie dish with cooking spray or butter to prevent sticking.

Step 2: Cook the Beef

In a large skillet over medium heat, cook the ground beef and chopped onion until the beef is fully browned and no longer pink. Break it up into small crumbles as it cooks. Drain any excess grease to keep the pie from becoming too oily.

Add garlic, salt, pepper, Worcestershire sauce, and paprika. Stir well and cook for another 1–2 minutes until fragrant. Remove from heat.

Step 3: Assemble the Filling

Spread the cooked beef mixture evenly into the prepared pie dish. Sprinkle the shredded cheddar cheese generously over the top. This layer melts into the meat while baking and creates that classic cheeseburger flavor.

Step 4: Make the Batter

In a medium bowl, whisk together the flour, milk, eggs, baking powder, and a pinch of salt until smooth. The batter will be thin — that’s perfect. It will bake into a soft, golden crust that holds everything together.

Step 5: Pour and Bake

Carefully pour the batter evenly over the beef and cheese layers. It may look like the liquid is pooling, but during baking it rises and forms a light crust around the filling.

Place the pie dish into the preheated oven and bake for 30–35 minutes, or until the top is golden brown and a knife inserted into the center comes out clean.

Step 6: Rest and Serve

Allow the Cheeseburger Pie to cool for about 5–10 minutes before slicing. This helps it set and makes serving easier.

Slice into wedges and serve warm.

 Why This Recipe Works

Cheeseburger Pie is brilliant because it transforms simple pantry ingredients into something that tastes like a full diner-style meal. The eggs and milk create a custard-like structure, similar to a savory breakfast bake, while the flour gives it just enough body to slice cleanly.

The beef mixture delivers that familiar cheeseburger flavor — juicy, savory, slightly smoky from the paprika, and deeply satisfying. The melted cheddar brings creaminess and sharpness that balances perfectly with the seasoned meat.

 Delicious Variations

Want to customize your pie? Try these tasty ideas:

Bacon Cheeseburger Pie:
Add crispy bacon pieces into the beef mixture before baking.

Low-Carb Version:
Skip the flour and replace it with almond flour for a keto-friendly alternative.

Mushroom Swiss Pie:
Swap cheddar for Swiss cheese and sauté mushrooms with the onions.

Spicy Jalapeño Version:
Mix diced jalapeños into the meat and top with pepper jack cheese.

 What to Serve With Cheeseburger Pie

To make it a complete meal, serve with:

  • Fresh green salad

  • Roasted potatoes

  • Coleslaw

  • Steamed vegetables

  • French fries for a true burger-style dinner

You can even top your slice with ketchup, mustard, or burger sauce for that authentic cheeseburger experience.

 Storage & Reheating

Refrigerator:
Store leftovers in an airtight container for up to 4 days.

Freezer:
Wrap slices tightly and freeze for up to 2 months.

Reheating:
Warm in the oven at 350°F (175°C) for 10–15 minutes or microwave individual slices for 1–2 minutes.

 Tips for Perfect Cheeseburger Pie

  • Drain the beef well to avoid excess moisture.

  • Let it rest before slicing so it holds its shape.

  • Use freshly shredded cheese for better melting.

  • Don’t overbake — the center should be set but not dry.

 Final Thoughts

Cheeseburger Pie is the ultimate comfort dish — warm, cheesy, and packed with nostalgic flavor. It’s the kind of recipe that brings everyone to the table quickly and leaves them asking for seconds. With minimal prep and maximum flavor, it’s a reliable go-to for busy families and comfort food lovers alike.

What Really Happens When You Eat a Banana Before Bed: A Science-Based Analysis

Bananas are one of the most popular fruits in the world—affordable, portable, and naturally sweet. But beyond being a convenient snack, many people believe eating a banana before bed can improve sleep, relax the body, and even prevent nighttime muscle cramps. Is there real science behind this claim, or is it just another wellness myth?

Let’s take a closer look at what truly happens in your body when you eat a banana before bedtime.

Nutritional Profile of the Banana

The modern edible banana most people consume comes from the Cavendish banana, a variety known for its mild sweetness and creamy texture. One medium banana (about 7–8 inches long) contains:

  • Around 105 calories

  • 27 grams of carbohydrates

  • 3 grams of fiber

  • About 422 mg of potassium

  • Small amounts of magnesium

  • Vitamin B6

  • Vitamin C

  • Natural sugars (glucose, fructose, sucrose)

This combination of nutrients plays a direct role in how your body responds before sleep.

1. Supports Natural Sleep Hormones

One of the biggest reasons bananas are associated with better sleep is their impact on serotonin and melatonin production.

Bananas contain vitamin B6, which helps convert the amino acid tryptophan into serotonin. Serotonin is a neurotransmitter that stabilizes mood and promotes relaxation. From serotonin, your body produces melatonin—the hormone that regulates your sleep-wake cycle.

While a banana alone won’t act like a sleeping pill, its nutrients support the natural biochemical pathways involved in preparing your body for rest.

2. Promotes Muscle Relaxation

Bananas are rich in potassium and contain modest amounts of magnesium—two minerals essential for muscle function.

Potassium helps regulate muscle contractions and fluid balance. Magnesium plays a role in muscle relaxation and nerve regulation. When levels of these minerals are adequate, your muscles are less likely to cramp or twitch during the night.

If you experience nighttime leg cramps, especially after exercise or dehydration, a banana may contribute to maintaining proper electrolyte balance.

3. Stabilizes Blood Sugar (When Eaten Properly)

Bananas contain natural sugars, which often raises concerns about blood sugar spikes at night. However, they also provide fiber, particularly soluble fiber, which slows digestion and moderates glucose release.

A medium banana has a moderate glycemic index. For most healthy individuals, eating one banana before bed does not cause dramatic blood sugar fluctuations. In fact, the steady release of carbohydrates can prevent late-night drops in blood sugar that may wake you up.

That said, people with diabetes or insulin resistance should monitor their individual response and consider pairing a banana with a small source of protein, such as yogurt or nuts, to further stabilize glucose levels.

4. May Reduce Nighttime Hunger

Going to bed hungry can make falling asleep difficult. A banana provides just enough carbohydrates and fiber to promote satiety without feeling heavy.

Because bananas are relatively low in fat and protein, they digest fairly easily. This makes them a light snack option compared to heavier, high-fat meals that may cause reflux or indigestion.

For people trying to avoid late-night overeating, a banana can serve as a portion-controlled solution.

5. Supports Digestive Health

Bananas contain prebiotic fibers that feed beneficial gut bacteria. A healthy gut microbiome plays a role in overall well-being—including sleep quality.

Interestingly, the gut and brain are closely connected through what researchers call the gut-brain axis. When your digestive system functions smoothly, your nervous system often follows suit.

Unripe bananas contain more resistant starch, which feeds gut bacteria more effectively. Riper bananas are easier to digest but contain more available sugars. Both can be beneficial depending on your needs.

 6. Can Help Manage Stress

Vitamin B6 in bananas assists in neurotransmitter production, including dopamine and serotonin—chemicals linked to mood regulation.

Eating a banana before bed won’t eliminate stress, but its nutrient profile may contribute to a calmer nervous system. The mild sweetness can also provide psychological comfort, which plays a surprisingly strong role in winding down.

7. Weight Gain Myth: Fact or Fiction?

Some believe eating bananas at night leads to weight gain. Scientifically, weight gain occurs when total calorie intake consistently exceeds energy expenditure—not because of the time of day you eat.

A banana contains about 100 calories. If it fits within your daily calorie needs, it will not automatically cause fat gain simply because it’s eaten at night.

However, if a nighttime banana leads to additional snacking beyond hunger cues, that could contribute to excess calorie intake over time.

Who Should Be Cautious?

While bananas are safe for most people, certain individuals should be mindful:

  • Those with advanced kidney disease (due to potassium levels)

  • People with severe blood sugar control issues

  • Individuals prone to acid reflux if they notice symptoms worsen

For the majority of healthy adults, however, a banana before bed is generally safe and potentially beneficial.

The Bottom Line

Eating a banana before bed won’t magically transform your sleep, but it can gently support several biological processes that prepare your body for rest. Its potassium and magnesium help muscles relax. Its vitamin B6 supports serotonin and melatonin production. Its fiber and natural carbohydrates can stabilize blood sugar and reduce nighttime hunger.

In short, a banana is a light, nutrient-dense evening snack that aligns well with the body’s natural sleep chemistry—especially when eaten in moderation.

If you’re looking for a simple, whole-food option to wind down your night, a banana may be a small habit with surprisingly meaningful benefits.

Doctors reveal that peanut consumption causes

Peanuts are one of the most widely consumed legumes in the world, enjoyed roasted, boiled, ground into butter, or blended into sauces and desserts. Despite common myths, doctors and nutrition experts consistently explain that moderate peanut consumption does not “cause” harm for most people. In fact, when eaten in appropriate portions, peanuts can support heart health, weight management, and overall nutrition. However, like any food, they should be consumed wisely.

Below is a detailed look at what doctors reveal about peanut consumption, followed by a healthy peanut-based recipe you can prepare at home.

First, let’s clarify something important: peanuts are technically legumes, not true nuts. They grow underground and belong to the same family as beans and lentils. Because of their nutrient density, they are often grouped with tree nuts in dietary discussions.

Doctors highlight that peanuts are rich in protein. A small handful (about 28 grams) contains roughly 7 grams of protein, making them an excellent plant-based protein source. This makes peanuts especially beneficial for vegetarians and those trying to reduce meat consumption. The protein in peanuts helps maintain muscle mass, repair tissues, and keep you feeling full longer.

Peanuts are also high in healthy fats, particularly monounsaturated and polyunsaturated fats. These are the same heart-friendly fats found in olive oil. Research shows that replacing saturated fats with unsaturated fats can help reduce LDL (“bad”) cholesterol levels. Cardiologists often recommend moderate peanut consumption as part of a heart-healthy eating pattern.

Another benefit doctors mention is their fiber content. Fiber supports digestion, helps regulate blood sugar levels, and promotes a healthy gut microbiome. The combination of fiber, protein, and healthy fats in peanuts slows down digestion, preventing rapid spikes in blood sugar. This can be particularly helpful for individuals managing type 2 diabetes.

However, doctors also warn about portion control. Peanuts are calorie-dense. Because they are easy to snack on mindlessly, overconsumption can contribute to weight gain if not balanced with overall calorie needs. A small handful per day is generally considered a healthy portion.

Another concern is allergies. Peanut allergy is one of the most common food allergies worldwide. For individuals with a peanut allergy, even a tiny amount can cause severe reactions, including anaphylaxis. For these individuals, complete avoidance is essential. Doctors stress that anyone experiencing symptoms such as hives, swelling, difficulty breathing, or dizziness after eating peanuts should seek medical evaluation immediately.

Some people worry that peanuts cause inflammation. Doctors clarify that for most healthy individuals, peanuts do not cause inflammation. In fact, they contain antioxidants such as resveratrol, which may help reduce oxidative stress. Problems usually arise only when peanuts are consumed in highly processed forms, such as heavily salted, sugar-coated, or fried varieties.

Now, let’s move to a healthy peanut-based recipe that allows you to enjoy their benefits in a balanced way.

Healthy Homemade Peanut Butter Energy Balls

This simple recipe uses natural ingredients and requires no baking. It’s perfect as a nutritious snack.

Ingredients:
1 cup natural peanut butter (unsweetened, no added hydrogenated oils)
1/2 cup rolled oats
2 tablespoons honey or maple syrup
1 tablespoon chia seeds (optional)
1 tablespoon ground flaxseed (optional)
1/4 cup dark chocolate chips (optional, 70% cocoa preferred)
1/2 teaspoon vanilla extract

Instructions:

First, choose high-quality natural peanut butter. Check the label and make sure the only ingredients are peanuts and possibly a small amount of salt. Avoid brands with added sugars or hydrogenated oils.

In a medium mixing bowl, combine the peanut butter and honey. Stir until smooth and well blended. If the peanut butter is too thick, you can microwave it for about 10 seconds to soften it slightly.

Next, add the rolled oats. Oats provide additional fiber and help create structure for the energy balls. Stir thoroughly until evenly mixed.

Add chia seeds and ground flaxseed if using. These ingredients increase the fiber and omega-3 fatty acid content, making the snack even more nutritious.

Fold in the dark chocolate chips and vanilla extract. Mix until all ingredients are evenly distributed.

Once the mixture is fully combined, place the bowl in the refrigerator for about 20 to 30 minutes. This helps firm up the mixture and makes it easier to shape.

After chilling, scoop about one tablespoon of the mixture and roll it between your palms to form small balls. Continue until all the mixture is used.

Place the finished energy balls in an airtight container and store them in the refrigerator. They can last up to one week.

Nutritional Benefits:

These peanut butter energy balls offer a balanced combination of protein, healthy fats, and fiber. They can help stabilize blood sugar levels and provide sustained energy. Because they are portion-controlled, they help prevent overeating.

Doctors emphasize moderation. Two energy balls make a reasonable snack. Pair them with fresh fruit or unsweetened tea for a balanced mini-meal.

In conclusion, doctors reveal that peanut consumption does not inherently cause health problems for most people. Instead, peanuts can be a nutritious part of a balanced diet when eaten in moderation and in minimally processed forms. The key is mindful eating, proper portion sizes, and awareness of allergies. By choosing natural peanut products and incorporating them into wholesome recipes like these energy balls, you can enjoy their health benefits safely and deliciously.

Ultimate Baked Meatball and Macaroni Casserole

There is nothing more comforting than a bubbling, golden casserole fresh from the oven, and this Ultimate Baked Meatball and Macaroni Casserole brings together everything people love in one dish: juicy homemade meatballs, tender macaroni, rich tomato sauce, and layers of melted cheese. Inspired by the hearty baked pasta traditions of Italy, this recipe combines classic flavors with simple preparation, making it perfect for family dinners, gatherings, or meal prep.

This casserole is satisfying, filling, and incredibly flavorful. The meatballs are seasoned with herbs and garlic, the pasta absorbs the rich sauce, and the cheese creates a creamy, irresistible finish. Once baked, the top becomes golden and slightly crispy, while the inside stays tender and juicy. Every bite delivers comfort, warmth, and delicious homemade goodness.

Ingredients

For the Meatballs:

  • 500 g (1 lb) ground beef (or half beef, half chicken)

  • 1/2 cup breadcrumbs

  • 1 egg

  • 3 cloves garlic, minced

  • 1/4 cup grated cheese

  • 2 tablespoons chopped parsley

  • 1 teaspoon salt

  • 1/2 teaspoon black pepper

  • 1 teaspoon dried oregano

  • 2 tablespoons milk

For the Pasta:

  • 400 g (14 oz) macaroni

  • 1 tablespoon salt (for boiling water)

For the Sauce:

  • 2 tablespoons olive oil

  • 1 small onion, finely chopped

  • 3 cloves garlic, minced

  • 700 g (24 oz) tomato sauce

  • 1 teaspoon sugar

  • 1 teaspoon dried basil

  • 1/2 teaspoon black pepper

  • 1 teaspoon salt (adjust to taste)

For Assembly:

  • 2 cups shredded mozzarella cheese

  • 1/2 cup grated cheese

  • Fresh parsley for garnish (optional)

Instructions

Step 1: Prepare the Meatballs

In a large bowl, combine ground beef, breadcrumbs, egg, garlic, grated cheese, parsley, salt, pepper, oregano, and milk. Mix gently until just combined. Avoid overmixing, as this can make meatballs tough.

Shape the mixture into small meatballs, about 1 inch in diameter. Place them on a tray.

Heat a pan over medium heat and add a little oil. Cook the meatballs for 5–7 minutes, turning occasionally, until browned on all sides. They do not need to be fully cooked yet, as they will finish cooking in the oven.

Set aside.

Step 2: Cook the Macaroni

Bring a large pot of salted water to a boil. Add macaroni and cook according to package instructions until just al dente. Do not overcook, as the pasta will continue cooking in the oven.

Drain and set aside.

Step 3: Make the Sauce

Heat olive oil in a large pan over medium heat. Add chopped onion and cook for 3–4 minutes until soft and translucent.

Add garlic and cook for 1 minute until fragrant.

Pour in tomato sauce, then add sugar, basil, salt, and pepper. Stir well and simmer for 10 minutes. This allows the flavors to develop and creates a rich, balanced sauce.

Add the browned meatballs to the sauce and simmer for another 5 minutes.

Step 4: Assemble the Casserole

Preheat oven to 180°C (350°F).

In a large baking dish, combine cooked macaroni with the meatball sauce. Mix gently so the pasta and meatballs are evenly distributed.

Sprinkle mozzarella cheese evenly over the top. Add grated cheese for extra flavor.

Step 5: Bake

Place the casserole in the preheated oven and bake for 25–30 minutes, or until the cheese is melted, bubbly, and golden brown.

Remove from the oven and let rest for 5–10 minutes before serving. This helps the casserole set and improves texture.

Garnish with fresh parsley if desired.

Why This Recipe Works

This casserole is successful because it balances textures and flavors perfectly:

  • The meatballs are juicy and flavorful

  • The macaroni is tender but not mushy

  • The sauce is rich and savory

  • The cheese adds creaminess and golden texture

Baking allows all the components to blend together, creating a unified and delicious dish.

Tips for Best Results

1. Use freshly grated cheese: It melts better and tastes richer.

2. Do not overcook pasta: Slightly firm pasta holds its shape during baking.

3. Brown the meatballs first: This adds flavor and improves texture.

4. Let the casserole rest: This makes serving easier and improves consistency.

Variations

You can customize this casserole easily:

Spicy version: Add chili flakes to the sauce.

Creamy version: Mix in 1/2 cup cream or white sauce.

Chicken version: Use ground chicken instead of beef.

Vegetable version: Add mushrooms, bell peppers, or spinach.

Extra cheesy version: Add more mozzarella or cheddar.

Storage and Reheating

Refrigerator: Store in airtight container for up to 4 days.

Freezer: Freeze for up to 2 months.

Reheat: Warm in oven at 160°C (320°F) or microwave until hot.

Serving Suggestions

Serve with:

  • Garlic bread

  • Fresh salad

  • Roasted vegetables

  • Steamed broccoli

This makes a complete and satisfying meal.

Conclusion

The Ultimate Baked Meatball and Macaroni Casserole is the perfect comfort food. It combines tender pasta, juicy meatballs, rich tomato sauce, and melted cheese into one irresistible dish. Easy to prepare and loved by everyone, this casserole is ideal for family dinners, special occasions, or meal prep.

The Powerful Plant That May Support Cancer Treatment: A Closer Look at the Benefits of the Greater Burdock Root

Greater burdock root, scientifically known as Arctium lappa, is a humble root vegetable with a long history in traditional medicine. Native to Europe and Asia and widely used in herbal remedies and cooking, burdock root has attracted modern scientific interest for its potential role in supporting health—including its possible relevance in cancer research. While it is not a cure, this plant contains powerful compounds that may help protect cells, reduce inflammation, and support the body during medical treatments. Understanding its benefits, limitations, and proper use can help individuals make informed decisions about incorporating it into a healthy lifestyle.

What Is Greater Burdock Root?

Greater burdock root is part of the daisy family and has been used for centuries in herbal traditions across Asia and Europe. It is commonly consumed as food, brewed into tea, or taken as an herbal supplement. Nutritionally, burdock root contains fiber, antioxidants, vitamins, and plant compounds that contribute to its health-supporting effects. One of its key components is inulin, a prebiotic fiber that helps nourish beneficial gut bacteria and supports digestive health.

In addition to its nutritional value, burdock root has traditionally been valued as a detoxifying herb, helping to support the liver, blood circulation, and elimination of waste from the body. These traditional uses have encouraged researchers to explore its biological effects in modern laboratory studies.

Antioxidants and Their Role in Cellular Protection

One of the most important properties of burdock root is its high antioxidant content. Antioxidants help protect the body’s cells from damage caused by free radicals—unstable molecules that can contribute to aging, inflammation, and disease. Chronic oxidative stress has been linked to conditions such as heart disease, diabetes, and certain types of cancer.

By neutralizing free radicals, burdock root may help reduce cellular damage and support overall health. This protective effect is especially important for individuals undergoing cancer treatment, as oxidative stress can increase during chemotherapy and radiation therapy.

Anti-Inflammatory Benefits and Cancer Support

Inflammation plays a significant role in the development and progression of many chronic diseases, including cancer. Burdock root contains anti-inflammatory compounds such as flavonoids and phenolic acids that may help reduce inflammation throughout the body. These compounds support immune function and may create a less favorable environment for disease progression.

Reducing inflammation is important not only for cancer prevention but also for supporting recovery and improving overall well-being. Chronic inflammation can weaken the immune system and make the body more vulnerable to illness.

Potential Anti-Cancer Properties: What Research Suggests

One of the most exciting areas of burdock root research focuses on its potential anti-cancer effects. Laboratory studies have found that burdock root extracts may slow the growth of certain cancer cells. For example, research has shown inhibitory effects on pancreatic cancer cells and reduced tumor growth in animal models of melanoma.

Scientists believe these effects may be linked to natural compounds in burdock root, including arctigenin and arctiin. These plant chemicals have shown the ability to interfere with cancer cell growth and survival in laboratory settings. Some research suggests that arctigenin may have tumor-selective activity, meaning it may target cancer cells while leaving healthy cells less affected.

However, it is important to emphasize that most of these findings come from test-tube and animal studies. There is currently not enough human clinical evidence to confirm that burdock root can treat or prevent cancer. Researchers agree that more studies are needed before making medical recommendations.

Supporting the Immune System and Overall Health

Burdock root may also support immune function, which plays a critical role in fighting disease. Its antioxidants, fiber, and anti-inflammatory compounds contribute to a stronger immune system and better overall resilience.

Additionally, burdock root has antibacterial properties and may help protect against harmful microbes. Some research suggests it can inhibit certain bacteria associated with stomach infections and inflammation.

A healthy immune system is essential for people undergoing cancer treatment, as treatments like chemotherapy can weaken immune defenses.

Digestive and Detoxification Support

Burdock root has long been used as a digestive tonic. Its high fiber content promotes healthy digestion, supports beneficial gut bacteria, and helps regulate bowel function.

It also acts as a natural diuretic, helping the body eliminate excess fluids and toxins. This detoxification support may help improve overall metabolic health and reduce stress on organs like the liver and kidneys.

While the concept of “detoxification” is often misunderstood, supporting the body’s natural elimination systems can contribute to better overall health.

Safety, Limitations, and Medical Guidance

Although burdock root is generally considered safe as a food, there are important precautions to consider. Some individuals may experience allergic reactions, especially those sensitive to plants in the same family. Additionally, herbal supplements can interact with medications or medical treatments.

Most importantly, burdock root should never be used as a replacement for professional cancer treatment. It may serve as a complementary support, but it cannot replace chemotherapy, radiation, or other medically approved therapies.

Anyone considering burdock root as part of their wellness routine should consult a qualified healthcare professional, especially if they are undergoing cancer treatment or managing a serious medical condition.

Conclusion: A Promising but Complementary Plant

Greater burdock root is a remarkable plant with a rich history and growing scientific interest. Its antioxidant, anti-inflammatory, and immune-supporting properties make it a valuable addition to a healthy diet and lifestyle. Laboratory research suggests it may have anti-cancer potential, but human studies are still needed to confirm these effects.

Rather than viewing burdock root as a cure, it is best understood as a supportive plant that may help strengthen the body’s natural defenses. Combined with proper medical care, a balanced diet, and healthy lifestyle choices, burdock root may play a beneficial role in promoting overall wellness.

Juicy Steak with Creamy Garlic Sauce

Few meals feel as luxurious and satisfying as a perfectly cooked juicy steak topped with a rich, creamy garlic sauce. This dish combines bold flavors, tender texture, and restaurant-quality elegance in a recipe you can easily master at home. Whether you’re cooking for a special occasion, a romantic dinner, or simply craving something indulgent, this steak recipe delivers exceptional results every time. Inspired by classic steakhouse techniques used by chefs like Gordon Ramsay, this method focuses on proper seasoning, high heat, and finishing with a silky garlic cream sauce that elevates the entire dish.

The secret to a juicy steak lies in choosing the right cut, allowing it to reach room temperature before cooking, and using a hot pan to create a flavorful crust. Combined with a creamy garlic sauce made from butter, fresh garlic, cream, and pan drippings, every bite becomes rich, savory, and unforgettable.

Ingredients

For the Steak:

  • 2 ribeye, sirloin, or filet mignon steaks (about 1 inch thick)

  • 1 teaspoon salt

  • ½ teaspoon black pepper

  • 1 teaspoon garlic powder (optional)

  • 1 tablespoon olive oil

  • 2 tablespoons butter

  • 2 cloves garlic, crushed

  • 1 sprig fresh rosemary or thyme (optional)

For the Creamy Garlic Sauce:

  • 2 tablespoons butter

  • 4 cloves garlic, minced

  • 1 cup heavy cream

  • ½ cup beef broth

  • ½ cup grated Parmesan cheese

  • ½ teaspoon black pepper

  • ¼ teaspoon salt (adjust to taste)

  • 1 teaspoon fresh parsley, chopped (for garnish)

Instructions

Step 1: Prepare the Steak

Remove the steaks from the refrigerator 20–30 minutes before cooking. Allowing the steak to reach room temperature helps it cook evenly and remain juicy. Pat the steaks dry with paper towels to remove excess moisture, which helps create a better crust.

Season both sides generously with salt, black pepper, and garlic powder if using. Press the seasoning gently into the meat so it adheres well.

Step 2: Sear the Steak

Heat a heavy skillet or cast-iron pan over medium-high heat until very hot. Add olive oil and let it heat for about 30 seconds.

Place the steaks in the hot pan without overcrowding. Cook for about 3–4 minutes on one side without moving them. This allows a beautiful golden-brown crust to form.

Flip the steaks and add butter, crushed garlic, and rosemary or thyme. Tilt the pan slightly and spoon the melted butter over the steaks repeatedly for about 2–3 minutes. This process, called basting, adds flavor and helps keep the steak moist.

Cook to your preferred doneness:

  • Rare: 125°F (52°C)

  • Medium rare: 135°F (57°C)

  • Medium: 145°F (63°C)

  • Medium well: 150°F (66°C)

Remove steaks from the pan and let them rest for 5–10 minutes. Resting allows the juices to redistribute throughout the meat.

Step 3: Make the Creamy Garlic Sauce

Using the same pan with the flavorful steak drippings, reduce heat to medium. Add butter and minced garlic. Cook for about 1 minute until fragrant, but do not burn the garlic.

Pour in the beef broth and stir, scraping the bottom of the pan to release all the flavorful bits. Let it simmer for 2–3 minutes.

Add heavy cream and stir well. Allow the sauce to simmer gently for 3–5 minutes until slightly thickened.

Stir in Parmesan cheese, salt, and black pepper. Continue stirring until the sauce becomes smooth, creamy, and rich.

Step 4: Combine and Serve

Return the rested steaks to the pan briefly or pour the creamy garlic sauce over the steaks on a serving plate.

Garnish with fresh parsley for color and freshness.

Serve immediately while hot.

Tips for Perfect Steak

Choose the right cut: Ribeye offers rich flavor due to its marbling, while filet mignon is tender and lean. Sirloin provides a great balance of flavor and affordability.

Use high heat: A hot pan creates a beautiful crust that locks in juices.

Do not overcook: Overcooking makes steak tough and dry. Use a thermometer if possible.

Let it rest: Resting is essential to maintain juiciness.

Use fresh garlic: Fresh garlic provides stronger flavor than garlic powder alone.

Serving Suggestions

This juicy steak with creamy garlic sauce pairs perfectly with:

  • Mashed potatoes

  • Roasted vegetables

  • Steamed broccoli

  • Garlic bread

  • Rice or pasta

The creamy sauce complements both simple and rich side dishes.

Variations

Mushroom Garlic Sauce: Add sautéed mushrooms for deeper flavor.

Spicy Version: Add red chili flakes for heat.

Herb Version: Add thyme, oregano, or basil.

Cheesy Version: Add extra Parmesan or mozzarella.

Storage and Reheating

Store leftovers in an airtight container in the refrigerator for up to 3 days.

Reheat gently in a pan over low heat to prevent drying. Add a splash of cream or broth to refresh the sauce.

Avoid microwaving for best texture.

Why This Recipe Works

This recipe combines proper searing, butter basting, and a rich sauce to create restaurant-quality results. The steak remains juicy and tender, while the creamy garlic sauce enhances flavor without overpowering the meat.

The balance of garlic, cream, butter, and Parmesan creates a luxurious sauce that transforms a simple steak into a gourmet experience.

Conclusion

Juicy steak with creamy garlic sauce is the ultimate comfort meal that feels elegant yet simple to prepare. With proper seasoning, careful cooking, and a rich homemade sauce, you can achieve steakhouse-quality results in your own kitchen. Whether served for guests or enjoyed as a personal treat, this recipe delivers incredible flavor, tenderness, and satisfaction in every bite. Once you try it, it will quickly become one of your favorite go-to steak recipes.

Magic Eraser can be used for almost anything, but here’s what you didn’t know

When most people hear the words “Magic Eraser,” they immediately think of stubborn wall marks and scuffed baseboards. And yes, the original Mr. Clean Magic Eraser is famous for wiping away crayon, fingerprints, and mystery smudges with almost shocking ease. But what many homeowners don’t realize is that this small white sponge is far more versatile than advertised. Thanks to its unique material—made from melamine foam—it works like ultra-fine sandpaper, lifting grime from surfaces you may never have considered.

If you’ve only been using it on walls, you’re missing out. Here’s what you didn’t know your Magic Eraser could do.

First, let’s talk about sneakers. White rubber soles are magnets for dirt. Even after a good wash, those edges can still look gray and tired. A slightly damp Magic Eraser can restore them in minutes. Gently scrub along the rubber trim and watch the grime disappear. It’s one of the fastest ways to make old sneakers look new again without using harsh chemicals.

Another surprising use? Cleaning your oven door. Over time, grease splatters and baked-on residue cloud the glass. Traditional cleaners can require heavy scrubbing and strong fumes. A damp Magic Eraser cuts through that film with minimal effort. The micro-abrasive texture helps break up grease without scratching the glass, leaving it clearer and brighter.

Have stainless steel appliances lost their shine? Fingerprints on refrigerators and dishwashers are constant, especially in busy kitchens. While you should always test a small area first, many people find that lightly wiping with a Magic Eraser removes smudges effectively. Just be gentle—remember, it works by abrasion.

One of the most unexpected places it shines is in the bathroom. Soap scum builds up on shower doors, tubs, and tile. Instead of layering on chemical sprays, try a damp Magic Eraser. It can break through that cloudy film and leave surfaces noticeably cleaner. It’s especially useful around faucets where water spots cling stubbornly.

Did you know it can revive outdoor plastic furniture? Patio chairs often fade and collect grime from dust, pollen, and rain. A Magic Eraser can brighten white plastic and remove surface stains. It’s a quick refresh before guests arrive.

Light switches and door handles are high-touch areas that accumulate oils and fingerprints. These small surfaces are easy to forget during regular cleaning. A quick swipe with a Magic Eraser restores them to a like-new appearance in seconds.

Parents especially love using it on crayon masterpieces that accidentally land somewhere other than paper. Painted walls, desks, and even some laminate surfaces respond well to gentle scrubbing. However, it’s important to avoid flat or matte paint finishes, as the micro-abrasion may dull the surface.

Here’s something many people truly didn’t know: it can clean grout lines. Bathroom and kitchen grout tends to darken over time. While deep stains may require specialized cleaners, a Magic Eraser can dramatically improve the appearance of lightly stained grout with less mess and fewer chemicals.

Car interiors are another hidden opportunity. Scuff marks on plastic panels or door trims often seem permanent. Lightly rubbing the area can reduce or remove marks entirely. Always test first, especially on delicate finishes, to avoid dulling the surface.

You can even use it on keyboard keys and computer mice—carefully and lightly—to remove surface grime. Make sure the device is unplugged and avoid excessive moisture. A barely damp eraser is all you need.

However, there are important things you should never use a Magic Eraser on. Because it acts like fine sandpaper, it can damage glossy finishes, polished stone like marble or granite, nonstick cookware, and high-gloss paint. It can also dull certain plastics if rubbed too aggressively. The key is gentle pressure and testing a hidden spot first.

So what makes it so powerful? Melamine foam hardens when wet, forming a microscopic abrasive structure. Instead of dissolving stains, it physically lifts them away. That’s why it works so well on surface grime but can also remove protective coatings if overused.

To get the best results, dampen the eraser with water and squeeze out excess moisture. You don’t need additional cleaners. Use light pressure and let the foam do the work. When it starts to crumble, that’s normal—it wears down as it lifts dirt.

The real magic isn’t just in what it removes—it’s in the time it saves. Instead of juggling multiple specialized products, one small sponge can tackle dozens of everyday cleaning challenges.

From sneakers to shower doors, grout lines to patio chairs, the humble Magic Eraser has earned its reputation. But once you start thinking beyond walls, you’ll discover it’s one of the most versatile cleaning tools you own.

The magic of lemon juice and activated charcoal: Natural DIY solutions for skin and teeth

In the world of natural beauty remedies, two powerful ingredients continue to stand out: lemon juice and activated charcoal. Simple, affordable, and widely available, these natural elements have been used for centuries in traditional wellness routines. Today, they’re making a strong comeback in DIY skincare and oral care trends.

Lemon juice is packed with vitamin C, antioxidants, and natural acids that brighten and refresh the skin. Activated charcoal, on the other hand, is famous for its detoxifying properties and ability to draw out impurities. When used correctly, these two ingredients can become part of a simple yet effective beauty routine.

Let’s explore how you can use lemon juice and activated charcoal safely for glowing skin and a brighter smile.

Why Lemon Juice Works

Lemons are rich in vitamin C, a powerful antioxidant that helps fight free radicals. Vitamin C supports collagen production, which keeps skin firm and youthful. The natural citric acid in lemon juice also acts as a gentle exfoliant, helping remove dead skin cells and improve skin tone.

Benefits of lemon juice for skin:

  • Brightens dull complexion

  • Reduces the appearance of dark spots

  • Helps control excess oil

  • Provides mild antibacterial effects

However, lemon juice is acidic, so it must always be diluted before applying to the skin. Direct application can cause irritation or sensitivity, especially when exposed to sunlight.

Why Activated Charcoal Works

Activated charcoal is processed to create tiny pores that increase its surface area. This makes it extremely absorbent. In skincare, it acts like a magnet, attracting dirt, oil, and toxins from the pores.

Benefits of activated charcoal:

  • Deep cleans pores

  • Helps reduce blackheads

  • Controls excess oil

  • Detoxifies skin surface

In oral care, activated charcoal is commonly used as a natural teeth whitener. It binds to surface stains, helping to lift discoloration caused by coffee, tea, or certain foods.

DIY Lemon & Charcoal Face Mask

This simple mask combines the brightening effect of lemon juice with the detox power of charcoal.

Ingredients:

  • 1 teaspoon activated charcoal powder

  • 1 teaspoon fresh lemon juice (diluted with 1 teaspoon water)

  • 1 teaspoon plain yogurt or aloe vera gel

Instructions:

  1. Mix all ingredients in a small bowl until smooth.

  2. Apply a thin layer to clean skin, avoiding the eye area.

  3. Leave on for 8–10 minutes.

  4. Rinse with lukewarm water and pat dry.

  5. Apply moisturizer afterward.

Benefits:

  • Leaves skin feeling fresh and clean

  • Reduces oiliness

  • Brightens complexion

  • Helps minimize pores

Use this mask once a week only. Overuse can dry out or irritate the skin.

DIY Natural Teeth Whitening Paste

Activated charcoal is widely used for surface stain removal. Adding a small amount of lemon juice enhances the cleansing effect, but caution is necessary because acidity can weaken enamel.

Ingredients:

  • ½ teaspoon activated charcoal powder

  • A few drops of diluted lemon juice

Instructions:

  1. Mix into a paste.

  2. Dip your toothbrush into the mixture.

  3. Gently brush for 1–2 minutes.

  4. Rinse thoroughly.

  5. Brush again with regular toothpaste afterward.

Important Tip:

Use this whitening method only once every 1–2 weeks. Frequent use can damage enamel due to acidity and abrasion.

Safety Tips You Must Follow

While natural remedies can be helpful, they are not risk-free. Always remember:

  • Do a patch test before applying to your face.

  • Never use lemon juice on broken or sensitive skin.

  • Avoid sun exposure after applying lemon to skin.

  • Do not use charcoal on teeth daily.

  • Consult a dentist if you have sensitive teeth or gum problems.

Natural does not always mean harmless. Moderation is key.

Additional Skin Boost Recipe

For those who prefer a gentler option, try this lemon water toner:

Ingredients:

  • 1 tablespoon lemon juice

  • 3 tablespoons rose water

Mix and apply with a cotton pad. This diluted toner refreshes skin and lightly brightens without being too harsh.

Why This DIY Trend Is Popular

The rise of natural beauty solutions is influenced by holistic wellness movements and growing awareness about chemical-heavy products. Activated charcoal became especially popular after brands like Crest and Colgate introduced charcoal-based toothpaste products. Similarly, natural skincare brands such as Lush promote plant-based ingredients that appeal to health-conscious consumers.

However, dermatologists and dentists often remind users that DIY treatments should not replace professional care.

Final Thoughts

The combination of lemon juice and activated charcoal can be a powerful addition to your natural beauty routine when used responsibly. Lemon brightens and refreshes, while charcoal deeply cleanses and detoxifies. Together, they create simple yet effective DIY solutions for both skin and teeth.

The key is balance. Use these remedies occasionally, protect your skin from the sun, and avoid overuse on teeth. When combined with a healthy lifestyle, hydration, and a balanced diet, these natural ingredients can help enhance your natural glow.

Pour this 1 mixture over raw chicken breasts into a slow cooker for a weeknight dinner that hits different every single time

If you love easy comfort food like Slow Cooker Amish dishes and creamy casseroles, this slow cooker chicken recipe is about to become your new favorite. With just one rich, flavorful mixture poured over raw chicken breasts, you’ll create a tender, juicy, melt-in-your-mouth dinner that tastes like you spent hours in the kitchen — when in reality, the slow cooker does all the work.

This recipe is perfect for busy weeknights, meal prep Sundays, or when you simply want something warm, creamy, and satisfying without the stress. The magic lies in one creamy, savory mixture that transforms plain chicken into something unforgettable.

Let’s dive into this ultra-comforting slow cooker chicken recipe.

Why This Recipe “Hits Different”

What makes this dish so special?

  • The chicken cooks directly in the sauce, absorbing every bit of flavor.

  • It stays incredibly tender and juicy.

  • The creamy mixture thickens naturally as it cooks.

  • It pairs beautifully with rice, mashed potatoes, pasta, or even sandwich rolls.

  • Minimal prep, maximum flavor.

This is the kind of meal that makes people ask for seconds — and the recipe.

Ingredients

For the Chicken:

  • 4 large boneless, skinless chicken breasts

  • 1 teaspoon salt

  • ½ teaspoon black pepper

  • 1 teaspoon garlic powder

  • 1 teaspoon paprika

The Magic Creamy Mixture:

  • 1 (10.5 oz) can cream of chicken soup

  • 1 (10.5 oz) can cream of mushroom soup

  • 1 cup chicken broth

  • 1 packet ranch seasoning mix

  • 4 oz cream cheese, softened

  • 1 tablespoon minced garlic

  • ½ teaspoon dried thyme

  • ½ teaspoon onion powder

Optional Add-Ins:

  • ½ cup shredded cheddar cheese

  • ½ cup cooked, crumbled bacon

  • 1 cup sliced mushrooms

  • ½ cup diced onions

Step-by-Step Instructions

Step 1: Prepare the Chicken

Place the raw chicken breasts directly into the bottom of your slow cooker. Sprinkle evenly with salt, pepper, garlic powder, and paprika. No browning required — this recipe is designed for simplicity.

Step 2: Mix the Sauce

In a medium bowl, combine:

  • Cream of chicken soup

  • Cream of mushroom soup

  • Chicken broth

  • Ranch seasoning

  • Cream cheese

  • Minced garlic

  • Thyme

  • Onion powder

Whisk until smooth and creamy. It may look thick — that’s perfect. The slow cooker will melt and blend everything beautifully.

Step 3: Pour and Cook

Pour the mixture evenly over the chicken breasts, covering them completely.

Cover with the lid and cook:

  • LOW for 6–7 hours
    or

  • HIGH for 3–4 hours

The chicken is ready when it’s fork-tender and easily shreds.

Step 4: Shred or Serve Whole

Once fully cooked, you have two delicious options:

Option 1: Leave the chicken breasts whole and spoon the creamy sauce over the top.

Option 2: Shred the chicken directly in the slow cooker using two forks, then stir it back into the sauce for a creamy shredded chicken mixture.

If using optional cheese or bacon, stir it in during the last 20 minutes of cooking.

Serving Ideas

This creamy slow cooker chicken pairs beautifully with:

  • Fluffy white rice

  • Buttery mashed potatoes

  • Egg noodles

  • Toasted sandwich buns

  • Baked potatoes

  • Steamed vegetables

You can even use it as a filling for wraps, quesadillas, or stuffed baked potatoes.

Storage & Meal Prep

Refrigerator: Store in an airtight container for up to 4 days.

Freezer: Freeze in portions for up to 2 months. Thaw overnight in the refrigerator before reheating.

Reheat: Warm gently on the stovetop or microwave with a splash of chicken broth to loosen the sauce.

This recipe is fantastic for meal prep because the flavors deepen the next day.

Pro Tips for Extra Flavor

  • Add a splash of hot sauce for a mild kick.

  • Stir in fresh spinach during the last 30 minutes for color and nutrition.

  • Add diced potatoes or carrots at the bottom of the slow cooker for a full one-pot meal.

  • Use chicken thighs instead of breasts for even richer flavor.

Why It Works Every Time

The combination of creamy soups, ranch seasoning, and cream cheese creates a perfectly balanced sauce — savory, slightly tangy, and deeply comforting. The slow cooking process allows the chicken to gently absorb all the flavors while staying moist and tender.

It’s the kind of recipe that feels indulgent but requires almost no effort. Just dump, pour, cook, and enjoy.

Final Thoughts

Weeknight dinners don’t have to be boring or complicated. Sometimes all it takes is one powerful mixture poured over raw chicken breasts to create a meal that truly hits different every single time.

This creamy slow cooker chicken recipe is:

  • Easy

  • Family-friendly

  • Budget-conscious

  • Perfect for leftovers

  • Incredibly satisfying

Make it once, and it will quickly become part of your regular rotation.