People Think I Had Plastic Surgery The Natural Method to Smooth Wrinkles and Dark Spots on Hands & Arms Simple Recipe Inside

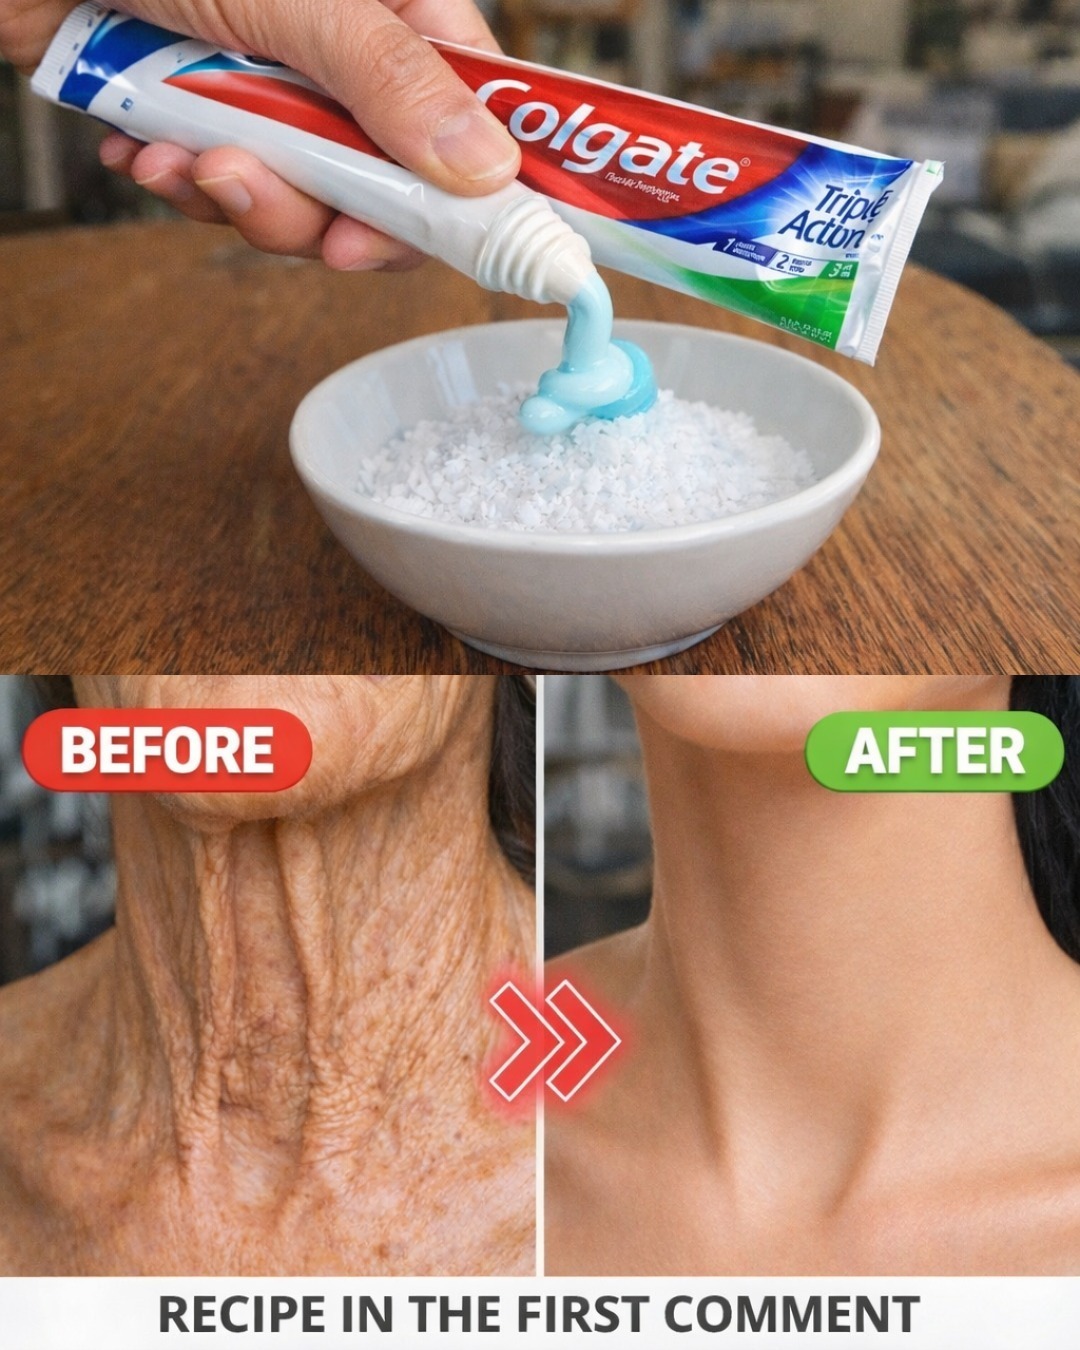
Toothpaste & Salt Neck Mask (DIY Recipe)

Ingredients:

  • 1 tablespoon white toothpaste (plain, non-gel, non-whitening preferred)

  • 1 teaspoon fine salt

  • A few drops of water (optional, for smoother consistency)


Instructions:

  1. Mix the Ingredients
    In a small bowl, combine the toothpaste and salt. Stir until evenly blended. If the mixture feels too thick, add 2–3 drops of water to make it easier to spread.

  2. Cleanse Your Neck First
    Wash your neck with a gentle cleanser and warm water. Pat dry with a clean towel. This helps remove oils and dirt so the mask can sit evenly on the skin.

  3. Apply the Mixture
    Using clean fingers or a soft brush, apply a thin layer of the mixture to the neck area. Avoid broken skin, sensitive spots, or the throat area.

  4. Gentle Massage (Optional)
    Lightly massage in upward circular motions for 1–2 minutes. The salt acts as a mild exfoliant.

  5. Leave On for 10–15 Minutes
    Let the mask sit until it feels slightly tight on the skin. If you experience burning or strong irritation, rinse immediately.

  6. Rinse Thoroughly
    Wash off with lukewarm water and gently pat dry.

  7. Moisturize Immediately
    Apply a rich moisturizer or natural oil (like almond or coconut oil) to prevent dryness.


Why People Use This Remedy

  • Salt is a natural exfoliant. It may help remove dead skin cells and temporarily make skin feel smoother.

  • Toothpaste contains ingredients like baking soda and menthol that can create a tightening sensation, which some people mistake for firming effects.

However, this “tightening” effect is temporary and does not reverse wrinkles permanently.


Important Safety Warnings

Before trying this remedy, consider the following:

  • Toothpaste contains detergents and strong ingredients that can dry out or irritate skin.

  • It may cause redness, peeling, or allergic reactions.

  • The neck skin is thinner and more sensitive than other areas.

If you have sensitive skin, eczema, rosacea, or dry skin, this remedy is not recommended.


Safer Natural Alternative for Neck Tightening

If your goal is smoother, firmer-looking skin, here’s a gentler DIY option:

Egg White & Aloe Firming Mask

Ingredients:

  • 1 egg white

  • 1 tablespoon fresh aloe vera gel

Directions:

  1. Whisk the egg white until frothy.

  2. Mix in aloe vera gel.

  3. Apply to clean neck.

  4. Leave on for 15–20 minutes.

  5. Rinse with lukewarm water and moisturize.

Egg white temporarily tightens the skin, and aloe helps hydrate and soothe — much gentler than toothpaste.


What Actually Helps Reduce Neck Wrinkles

For longer-lasting results, focus on:

  • Daily sunscreen (SPF 30 or higher)

  • Retinol-based creams (if tolerated)

  • Collagen-boosting serums

  • Staying hydrated

  • Avoiding excessive sun exposure

  • Regular moisturizing

  • Gentle exfoliation once or twice weekly

Wrinkles are a natural part of aging. While home remedies may provide temporary smoothing, they don’t replace proper skincare.


Final Thoughts

The toothpaste and salt trick may create a short-term tightening effect due to drying and exfoliation, but it does not permanently remove wrinkles. In some cases, it may even irritate or damage sensitive neck skin.

If you choose to try it, always:

  • Do a patch test first.

  • Use it no more than once weekly.

  • Moisturize well afterward.

  • Stop immediately if irritation occurs.

For best results, consider consistent skincare rather than quick-fix hacks.

Put raw chicken breasts in the crock pot, top with blocks of cream cheese

There is something truly magical about a recipe that requires almost no effort yet delivers rich, comforting, and unforgettable flavor. Crock Pot Cream Cheese Chicken is one of those rare meals that transforms a few simple ingredients into a creamy, tender, and satisfying dish that tastes like it took hours of careful preparation. In reality, your slow cooker does all the work while you go about your day. All you need to do is put raw chicken breasts in the crock pot, top them with blocks of cream cheese, and let time create something extraordinary.

This recipe is perfect for busy families, beginners, or anyone who loves hearty, creamy meals without complicated steps. The slow cooking process allows the chicken to become incredibly tender while the cream cheese melts into a rich, velvety sauce that coats every bite.

Why This Recipe Works So Well

The beauty of this dish lies in its simplicity. Chicken breasts are lean and mild in flavor, making them the perfect base for creamy sauces. When cooked slowly, the chicken absorbs moisture and becomes fork-tender. The cream cheese gradually melts, creating a thick, luxurious sauce without needing heavy cream or complicated ingredients.

Slow cooking also allows flavors to blend naturally. The cream cheese doesn’t just sit on top—it melts down into the chicken juices, creating a smooth, savory sauce that tastes rich and comforting.

Another reason this recipe is so popular is its flexibility. You can serve it over rice, pasta, mashed potatoes, or even inside sandwiches or wraps.

Ingredients

You only need a few simple ingredients:

  • 4 boneless, skinless chicken breasts

  • 2 blocks (8 oz each) cream cheese

  • 1 packet dry ranch seasoning mix (optional but recommended)

  • ½ cup chicken broth or water

  • ½ teaspoon garlic powder

  • ½ teaspoon black pepper

Optional additions:

  • ½ teaspoon onion powder

  • ½ teaspoon paprika

  • Fresh parsley for garnish

Instructions

Step 1: Prepare the Crock Pot

Start by lightly greasing your crock pot with cooking spray or a small amount of oil. This helps prevent sticking and makes cleanup easier.

Step 2: Add the Chicken

Place the raw chicken breasts directly into the crock pot. Spread them out evenly so they cook uniformly.

There is no need to pre-cook or brown the chicken. The slow cooker will handle everything.

Step 3: Add Cream Cheese

Place the blocks of cream cheese directly on top of the chicken breasts. You can leave them whole or cut them into chunks to help them melt faster.

As the chicken cooks, the cream cheese will slowly soften and blend with the juices.

Step 4: Add Seasonings and Liquid

Sprinkle the ranch seasoning, garlic powder, black pepper, and any optional seasonings over the chicken and cream cheese.

Pour the chicken broth or water around the sides. This helps create steam and prevents the chicken from drying out.

Step 5: Slow Cook

Cover the crock pot with the lid.

Cook on:

  • Low for 6–7 hours
    or

  • High for 3–4 hours

Avoid opening the lid too often, as this releases heat and slows cooking.

Step 6: Shred and Mix

Once the chicken is fully cooked and tender, use two forks to shred it directly inside the crock pot.

Stir everything together until the cream cheese forms a smooth, creamy sauce that coats the chicken evenly.

The Final Result

The finished dish is incredibly creamy, tender, and flavorful. The chicken absorbs the rich cream cheese sauce, creating a comforting texture that melts in your mouth.

The sauce becomes thick, smooth, and perfect for spooning over your favorite sides.

Serving Suggestions

This creamy chicken is extremely versatile. You can serve it in many delicious ways:

Over rice:
The rice absorbs the creamy sauce beautifully.

Over pasta:
Turn it into a creamy chicken pasta dinner.

With mashed potatoes:
Perfect comfort food combination.

In sandwiches or buns:
Make creamy chicken sandwiches.

In wraps or tortillas:
Create easy chicken wraps for lunch.

Over vegetables:
Serve with steamed broccoli, carrots, or green beans.

Tips for Best Results

Use full-fat cream cheese
It melts better and creates a richer sauce.

Don’t overcook
Overcooking can dry the chicken slightly. Stick to recommended times.

Shred while hot
Chicken shreds much easier when warm.

Stir well after cooking
This ensures a smooth, creamy sauce.

Delicious Variations

You can easily customize this recipe:

Add vegetables:
Broccoli, mushrooms, or spinach work beautifully.

Add spice:
Red pepper flakes or chili powder add heat.

Add cheese:
Cheddar or mozzarella makes it even richer.

Make it lighter:
Use reduced-fat cream cheese.

Add bacon:
Cooked, crumbled bacon adds amazing flavor.

Storage and Reheating

Refrigerator:
Store in an airtight container for up to 4 days.

Freezer:
Freeze for up to 2 months.

Reheat:
Warm in microwave or stovetop. Add a splash of milk if needed to loosen the sauce.

Why Families Love This Recipe

This dish has become a favorite in many homes because it is:

  • Extremely easy

  • Requires minimal ingredients

  • Rich and satisfying

  • Perfect for busy days

  • Loved by both adults and children

It’s also perfect for meal prep since it reheats beautifully.

Final Thoughts

Crock Pot Cream Cheese Chicken proves that simple ingredients can create incredible meals. By placing raw chicken breasts in the crock pot and topping them with blocks of cream cheese, you allow slow cooking to work its magic. The result is tender, juicy chicken in a rich, creamy sauce that feels comforting and indulgent.

Whether you serve it over rice, pasta, or vegetables, this recipe is guaranteed to become one of your favorite go-to meals. It’s easy, reliable, and always delicious.

A sweet Amish lady at the market shared her trick for these, and I will never make them any other way

I still remember that peaceful morning at the farmers’ market, where the air was filled with the smell of fresh bread, homemade jams, and warm pastries. At one small wooden stand, a sweet Amish lady with a gentle smile was arranging baskets of golden dinner rolls. They were perfectly round, soft, and slightly shiny on top. I bought a dozen, and after tasting just one, I knew they were unlike any rolls I had ever eaten. They were incredibly soft, slightly sweet, and stayed fresh for days.

Curious, I asked her what her secret was. She leaned in kindly and shared a simple trick that completely changed the way I make dinner rolls forever: mashed potatoes. Yes, real mashed potatoes added to the dough. She explained that potatoes add moisture, softness, and help the rolls stay tender longer. Since that day, I’ve never made dinner rolls any other way. This recipe comes from traditions common in Amish communities, especially around Lancaster, where simple ingredients and time-honored techniques create the most comforting foods.

These potato dinner rolls are perfect for family dinners, holidays, or even as sandwich buns. Once you try them, you’ll understand why this Amish trick is so special.

Why Mashed Potatoes Are the Secret

Mashed potatoes might sound unusual in bread, but they make a huge difference. Potatoes hold moisture better than flour alone, which means the rolls stay soft and fluffy longer. They also create a lighter texture and add just a hint of natural sweetness. The starches in potatoes help improve the structure of the dough, resulting in rolls that are tender, airy, and absolutely irresistible.

Ingredients

  • 4 cups all-purpose flour (plus extra for dusting)

  • 1 cup warm mashed potatoes (plain, no butter or seasoning)

  • 2¼ teaspoons active dry yeast (1 packet)

  • ½ cup warm milk

  • ¼ cup warm water

  • ¼ cup granulated sugar

  • ¼ cup unsalted butter, melted

  • 1 large egg

  • 1 teaspoon salt

  • Extra melted butter for brushing

Instructions

Step 1: Activate the Yeast

In a small bowl, combine the warm water, warm milk, sugar, and yeast. Stir gently and let it sit for about 5–10 minutes. The mixture should become foamy, which means the yeast is active and ready to use.

Step 2: Mix the Wet Ingredients

In a large mixing bowl, combine the mashed potatoes, melted butter, egg, and salt. Mix well until smooth. Add the yeast mixture and stir until everything is combined.

Step 3: Add the Flour

Gradually add the flour, one cup at a time, mixing after each addition. Continue until a soft dough forms. The dough should be slightly sticky but easy to handle.

Step 4: Knead the Dough

Transfer the dough onto a lightly floured surface. Knead it for about 8–10 minutes until it becomes smooth and elastic. This step develops the gluten and ensures soft, fluffy rolls.

Step 5: First Rise

Place the dough into a greased bowl and cover it with a clean towel. Let it rise in a warm place for about 1 to 1½ hours, or until it doubles in size.

Step 6: Shape the Rolls

Punch down the risen dough to release air bubbles. Divide the dough into equal portions and shape each into a smooth ball. Place the balls in a greased baking dish, leaving a little space between them.

Step 7: Second Rise

Cover the rolls again and let them rise for another 30–45 minutes. They will puff up and fill the pan.

Step 8: Bake

Preheat your oven to 180°C (350°F). Bake the rolls for 18–22 minutes, or until the tops are golden brown.

Step 9: Brush with Butter

Remove the rolls from the oven and immediately brush the tops with melted butter. This gives them a beautiful shine and adds extra flavor.

Tips for Perfect Amish Potato Rolls

Use plain mashed potatoes: Avoid adding butter, milk, or salt to the potatoes before mixing them into the dough.

Do not over-flour the dough: Slightly sticky dough makes softer rolls.

Let the dough rise fully: Proper rising time ensures light and fluffy texture.

Brush with butter while hot: This keeps the crust soft and flavorful.

Why This Recipe Works So Well

The mashed potatoes help retain moisture, which keeps the rolls soft even the next day. The yeast gives them lift and airiness, while the butter adds richness. The combination creates rolls that are tender, flavorful, and perfect for any meal.

Unlike store-bought rolls, these homemade Amish-style rolls contain no preservatives. Yet they stay soft longer because of the natural potato starch. This simple old-fashioned trick truly makes a difference.

Serving Ideas

These rolls are incredibly versatile. You can serve them with:

  • Roast chicken or beef

  • Soups and stews

  • Holiday dinners

  • Butter and jam for breakfast

  • As sandwich rolls

They are especially delicious warm with a little butter melting inside.

Storage Tips

Store leftover rolls in an airtight container at room temperature for up to 3 days. You can also freeze them for up to 2 months. To reheat, simply warm them in the oven for a few minutes.

A Tradition Worth Keeping

What I love most about this recipe is not just the taste, but the story behind it. That kind Amish lady shared more than a baking tip—she shared a tradition passed down through generations. Her simple secret turned ordinary rolls into something truly special.

This blend will smell so good in your home that your neighbors will want to know the secret

There’s something magical about walking into a home that smells warm, inviting, and comforting. A beautiful scent instantly changes the atmosphere — it makes your space feel cleaner, cozier, and more welcoming. If you’ve ever wondered how to create that luxurious, “What is that amazing smell?” vibe without spending money on expensive candles or artificial sprays, this simple homemade blend is the secret.

This natural simmer blend fills your home with a rich, comforting fragrance that smells like warmth, sweetness, and freshness all at once. It’s the kind of scent that makes guests pause and say, “Your house smells incredible!” And the best part? You probably already have most of the ingredients in your kitchen.

Let’s dive into this simple, powerful recipe that will have your neighbors asking for your secret.

Why This Blend Works

Many store-bought air fresheners only mask odors. They often contain synthetic fragrances that can be overpowering or irritating. This homemade simmer blend, however, gently infuses your home with natural aromas. As the ingredients heat, they release essential oils and subtle sweetness into the air, creating a layered scent that feels clean and comforting.

The combination of citrus, spice, and herbs creates a balanced fragrance — fresh yet warm, sweet yet cozy.

The Ultimate Home Fragrance Simmer Blend

Ingredients:
• 1 orange (sliced into rounds)
• 1 lemon (sliced)
• 2–3 cinnamon sticks
• 1 tablespoon whole cloves
• 2–3 sprigs fresh rosemary (or 1 teaspoon dried rosemary)
• 1 teaspoon vanilla extract
• 4 cups water

Optional Add-Ins:
• Star anise
• Fresh ginger slices
• A few cranberries for a festive touch
• A splash of almond extract for extra warmth

How to Make It

Step 1: Prepare Your Ingredients
Slice the orange and lemon into thin rounds. The thinner the slices, the more surface area is exposed, which helps release more fragrance.

Step 2: Combine Everything
Add all ingredients into a medium saucepan. Pour in about four cups of water — enough to fully cover the fruit and spices.

Step 3: Simmer Gently
Place the pot on the stove over low heat. Bring the water to a gentle simmer — not a rolling boil. Once it starts to simmer, reduce the heat to the lowest setting.

Step 4: Let the Magic Happen
Allow the mixture to simmer for several hours. As the water heats, the aroma will slowly fill your entire home. Keep an eye on the water level and add more as needed to prevent it from drying out.

Within minutes, your kitchen will smell warm and inviting. Soon, the fragrance will drift into every room.

What It Smells Like

The orange and lemon create a bright, clean citrus base. Cinnamon and cloves add warmth and depth, giving that comforting bakery-like note. Rosemary introduces a subtle herbal freshness that balances the sweetness. Vanilla rounds everything out with a soft, creamy finish.

The result is a scent that feels both luxurious and natural — like a high-end boutique or a cozy holiday home.

When to Use This Blend

This simmer blend is perfect for:

• Before guests arrive
• During family gatherings
• After cooking strong-smelling foods
• On rainy days for a cozy atmosphere
• During holidays
• Anytime you want your home to feel refreshed

It’s especially wonderful in cooler months, but honestly, it works year-round.

How to Make It Last Longer

If you want to enjoy the scent again the next day, simply let the mixture cool, cover the pot, and store it in the refrigerator overnight. Reheat and add a little extra water the next day.

You can typically reuse the same blend for 2–3 days before replacing the ingredients.

Alternative Method: Slow Cooker Version

If you prefer a safer, longer-lasting option, transfer everything to a slow cooker. Fill with water and set on the “low” or “warm” setting. This allows the fragrance to gently release throughout the day without constant monitoring.

Why Neighbors Will Notice

Natural scents have a way of drifting subtly through open windows and doorways. Unlike artificial sprays that fade quickly, this blend releases fragrance steadily. If you crack a window slightly, the warm citrus-spice aroma may travel outside — and that’s when curious neighbors start asking questions.

Plus, the scent feels authentic. It doesn’t smell like “perfume” — it smells like comfort, warmth, and care.

Extra Tips for Maximum Impact

• Use fresh ingredients whenever possible.
• Slightly squeeze the citrus slices before adding them to release extra oils.
• Toast the cinnamon sticks lightly in a dry pan before simmering to deepen the aroma.
• Place a small fan nearby to circulate the scent through your home.

Safety Reminder

Always monitor your simmer pot. Never let the water fully evaporate. Keep it away from pets and children. If leaving the house, turn off the stove.

A Simple Secret That Feels Special

Sometimes the smallest rituals make the biggest difference. This simple blend transforms your home into a welcoming sanctuary. It’s affordable, natural, and incredibly effective.

There’s something deeply satisfying about creating a beautiful atmosphere with ingredients from your own kitchen. When someone asks how your home smells so amazing, you can smile and say, “It’s just a little homemade secret.”

I Didn’t Believe This Floor Trick Until I Tried It… Now I’ll Never Go Back

I’ll be honest—I’ve tried dozens of floor-cleaning methods over the years. From expensive commercial cleaners to homemade solutions, nothing seemed to give me that perfect, sparkling finish I wanted. Some products left streaks, others made the floor sticky, and a few even dulled the shine over time. I had almost given up hope of finding a simple, affordable solution. That’s when I discovered this surprisingly effective floor trick using just a few basic ingredients I already had at home. I didn’t believe it would work—but after trying it once, I was completely convinced. Now, I use it every week, and my floors have never looked better.

This method is simple, natural, affordable, and incredibly effective. It removes dirt, grease, dullness, and even lingering odors while leaving your floors shiny, smooth, and fresh.

Why This Floor Trick Works So Well

The secret lies in combining ingredients that each serve a specific purpose. Together, they clean deeply without damaging your floors.

  • One ingredient breaks down grease and grime.

  • Another disinfects and removes odors.

  • The final ingredient adds shine and prevents streaks.

Unlike many commercial cleaners, this method doesn’t leave behind residue. Instead, it restores your floor’s natural beauty.

Ingredients You’ll Need

  • 1 bucket of warm water (about 4–5 liters)

  • 1/2 cup white vinegar

  • 1 tablespoon liquid dish soap

  • Optional: 5–10 drops lemon essential oil (for fragrance)

These ingredients are safe, affordable, and easy to find.Step-by-Step Instructions

Step 1: Prepare the Cleaning Solution

Fill your bucket with warm water. Warm water helps loosen dirt and allows the ingredients to mix more effectively.

Add the white vinegar to the water. Vinegar is excellent at dissolving mineral deposits, grease, and dirt while also disinfecting surfaces.

Next, add the liquid dish soap. Dish soap is designed to cut through grease, making it perfect for removing stubborn grime from floors.

If you want a fresh scent, add a few drops of lemon essential oil. This is optional but makes your home smell clean and refreshing.

Stir the mixture gently to combine.

Step 2: Sweep or Vacuum First

Before mopping, remove loose dust, crumbs, and debris from the floor. This step is important because it prevents dirt from spreading around during mopping.

Sweeping also helps the cleaning solution work more effectively.

Step 3: Mop the Floor

Dip your mop into the cleaning solution and wring it out well. The mop should be damp, not soaking wet.

Start mopping from one corner of the room and work your way across. Use smooth, even motions.

You’ll immediately notice how easily dirt lifts away.

Step 4: Let It Air Dry

One of the best parts of this trick is that you don’t need to rinse afterward. Simply allow the floor to air dry.

As it dries, the vinegar evaporates, leaving behind a clean, streak-free shine.

What Makes This Trick So Effective

1. Removes Grease and Dirt Easily

The dish soap breaks down oils, cooking residue, and sticky buildup. This makes it especially useful for kitchen floors.

2. Eliminates Odors

Vinegar naturally neutralizes unpleasant smells instead of masking them.

3. Restores Shine

Unlike harsh cleaners that dull surfaces, this mixture enhances the natural shine of your floor.

4. Saves Money

This solution costs far less than store-bought cleaners and works just as well—if not better.

Best Floors for This Method

This trick works well on:

  • Tile floors

  • Laminate floors

  • Vinyl floors

  • Sealed hardwood floors

  • Stone floors

Avoid using excessive water on unsealed wood.

Extra Tips for Even Better Results

Use a Microfiber Mop

Microfiber mops pick up more dirt and leave fewer streaks.

Clean Regularly

Cleaning once or twice per week prevents buildup and keeps floors looking new.

Change the Water if It Gets Dirty

If your bucket becomes dirty, replace the solution to avoid spreading grime.

Don’t Use Too Much Soap

A small amount is enough. Too much soap can leave residue.

The First Time I Tried It

When I first used this method, I didn’t expect much. But as soon as the floor dried, I noticed a huge difference. The shine was incredible. The floor felt smoother, cleaner, and fresher than ever before.

Even better, there were no streaks or sticky spots.

My home smelled clean and bright.

That’s when I realized I had finally found the perfect solution.

Why You’ll Never Go Back

After using this trick, many people stop buying expensive cleaners altogether. It’s faster, easier, and more effective.

Benefits include:

  • Cleaner floors

  • Brighter shine

  • No harsh chemicals

  • Lower cost

  • Fresh smell

  • Less effort

It’s a simple change that makes a big difference.

Final Thoughts

Sometimes, the best solutions are the simplest ones. This easy floor-cleaning trick proves that you don’t need expensive products to achieve amazing results. With just warm water, vinegar, and dish soap, you can transform your floors and make your entire home feel cleaner.

What Happens to Your Blood Pressure If You Eat a Banana Every Day?

Bananas are one of the most popular and accessible fruits in the world, and for good reason. They are naturally sweet, convenient, and packed with nutrients that support overall health. But beyond their taste and energy-boosting qualities, bananas are especially known for their impact on heart health—particularly blood pressure. Eating a banana every day may have powerful effects on maintaining healthy blood pressure levels, thanks to its rich potassium content and natural balance of nutrients.

Understanding how bananas influence blood pressure can help you make smarter dietary choices and support your cardiovascular system naturally.

The Powerful Role of Potassium in Blood Pressure Control

One of the main reasons bananas are beneficial for blood pressure is their high potassium content. A medium banana contains around 400–450 mg of potassium, an essential mineral that plays a crucial role in regulating fluid balance, nerve signals, and muscle function—including the heart muscle.

Potassium helps counteract the harmful effects of sodium in the body. Sodium, commonly found in salt and processed foods, can cause the body to retain water. This increases the volume of blood in your vessels, which raises blood pressure. Potassium works by helping the kidneys remove excess sodium through urine, reducing fluid retention and lowering pressure on artery walls.

According to the American Heart Association, increasing potassium intake while reducing sodium can significantly improve blood pressure control. This makes potassium-rich foods like bananas an important part of a heart-healthy diet.

How Daily Banana Consumption Supports Healthy Arteries

Eating a banana every day may improve the flexibility and function of your blood vessels. Healthy arteries need to expand and contract easily to maintain proper blood flow. Potassium helps relax the walls of blood vessels, reducing tension and improving circulation.

When blood vessels are relaxed and open, blood flows more smoothly. This reduces resistance in the arteries, which lowers blood pressure naturally. Over time, maintaining flexible arteries can reduce the risk of hypertension, heart disease, and stroke.

Bananas also contain antioxidants such as dopamine and vitamin C, which help protect blood vessels from oxidative stress. This protection prevents inflammation and damage, both of which can contribute to high blood pressure.

Supporting Heart Function and Rhythm

Your heart depends on proper mineral balance to function correctly. Potassium plays a key role in regulating the electrical signals that control your heartbeat. Low potassium levels can lead to irregular heart rhythms and increased blood pressure.

By eating a banana daily, you help maintain stable potassium levels, which supports consistent heart function and reduces strain on the cardiovascular system.

Additionally, bananas contain magnesium, another important mineral that contributes to healthy blood pressure. Magnesium helps relax blood vessels and supports proper muscle and nerve function.

Long-Term Benefits of Daily Banana Consumption

Consistently eating bananas may contribute to long-term blood pressure improvement. The effects are gradual but meaningful. Over weeks and months, regular potassium intake can help:

  • Reduce systolic blood pressure (top number)

  • Reduce diastolic blood pressure (bottom number)

  • Improve artery flexibility

  • Support kidney function

  • Lower strain on the heart

The World Health Organization emphasizes the importance of potassium-rich foods in reducing the global burden of hypertension and cardiovascular disease.

However, bananas alone are not a cure for high blood pressure. They work best as part of a balanced diet that includes vegetables, fruits, whole grains, lean proteins, and reduced sodium intake.

Who Benefits Most from Eating Bananas Daily?

Certain people may see greater benefits from daily banana consumption, including:

  • Individuals with mild or borderline high blood pressure

  • People who consume high-sodium diets

  • Adults over age 40

  • Those at risk of heart disease

  • Individuals with low potassium intake

Bananas are also beneficial for athletes and physically active people, as they help restore electrolyte balance.

However, people with kidney disease should consult a doctor before increasing potassium intake, as excessive potassium can be harmful when kidney function is impaired.

A Simple Banana Wellness Recipe for Blood Pressure Support

Here is an easy daily banana recipe that supports healthy blood pressure:

Banana Heart-Healthy Smoothie

Ingredients:

  • 1 ripe banana

  • 1 cup low-fat milk or almond milk

  • 1 tablespoon oats

  • 1 teaspoon honey (optional)

  • 2–3 ice cubes

Instructions:
Add all ingredients to a blender and blend until smooth. Drink in the morning or as a healthy snack.

This smoothie provides potassium, fiber, and nutrients that support cardiovascular health.

Additional Health Benefits of Eating Bananas Daily

Besides helping regulate blood pressure, bananas offer many other health advantages:

  • Support digestion due to fiber content

  • Provide steady energy

  • Help prevent muscle cramps

  • Support kidney health

  • Improve mood due to vitamin B6

They are also naturally fat-free and cholesterol-free, making them an excellent heart-friendly food.

How Quickly Can Bananas Affect Blood Pressure?

Some people may notice improvements in blood pressure within a few weeks of increasing potassium intake, especially if they previously consumed low amounts. However, the most significant benefits occur with consistent, long-term healthy eating habits.

Bananas are most effective when combined with:

  • Reduced salt intake

  • Regular physical activity

  • Adequate hydration

  • Healthy weight maintenance

Conclusion

Eating a banana every day can have a positive effect on your blood pressure and overall heart health. Thanks to their rich potassium content, bananas help balance sodium levels, relax blood vessels, and support healthy circulation. Over time, this can contribute to lower blood pressure and reduced cardiovascular risk.

While bananas are not a replacement for medical treatment, they are a simple, natural, and effective addition to a heart-healthy lifestyle. Adding just one banana a day is an easy step toward better blood pressure control, improved heart function, and long-term wellness.

This will make the rats and roaches disappear in just one day

If you’ve ever opened a cabinet and seen a cockroach scatter or heard scratching behind the walls at night, you know how stressful a pest problem can be. Rats and roaches are not only unpleasant — they can also contaminate food, spread bacteria, and damage your home. While severe infestations often require professional help, there’s a simple, affordable method that can dramatically reduce rats and cockroaches in as little as 24 hours when used correctly.

The secret? A powerful combination of baking soda, sugar, and flour — plus a few strategic home-cleaning steps.

Why This Simple Trick Works

Both rats and cockroaches are constantly searching for food. Sugar attracts them quickly because of its strong scent and taste. When mixed with baking soda, something interesting happens.

Baking soda reacts with the acids in a pest’s digestive system and produces gas. Rats and roaches cannot easily expel gas the way humans can. The internal pressure becomes fatal. Flour helps blend the ingredients evenly and makes the mixture more appealing.

This method is inexpensive, chemical-free, and safer than many store-bought poisons when placed properly.


The Powerful DIY Pest Mixture

Ingredients:

  • 1 cup baking soda

  • 1 cup white sugar

  • ½ cup flour

Instructions:

  1. Mix all three ingredients thoroughly in a bowl.

  2. Pour small amounts into shallow lids or small disposable plates.

  3. Place them in areas where you’ve noticed activity.

For cockroaches, place the mixture:

  • Under the sink

  • Behind the refrigerator

  • Inside cabinets

  • Near garbage bins

For rats, place it:

  • Along walls

  • Near holes or suspected entry points

  • Behind appliances

  • In garages or storage rooms

Make sure pets and small children cannot access the mixture.


Why Results Can Appear Within 24 Hours

Cockroaches are highly active at night. Once they consume the mixture, the reaction begins quickly. Rats, being curious feeders, will also test new food sources. In light to moderate infestations, you may notice a sharp decrease in visible pests within one day.

However, consistency is key. Replace the mixture every 24–48 hours for at least one week to ensure all pests have been exposed.


Step 2: Remove What Attracts Them

Even the best bait won’t work if your home still offers easy food access. To speed up results:

  • Seal all food in airtight containers.

  • Wipe kitchen counters nightly.

  • Take out trash before bed.

  • Vacuum crumbs and sweep floors daily.

  • Fix leaking pipes — moisture attracts roaches.

Rats can squeeze through holes as small as a coin. Inspect walls and seal cracks with steel wool and caulk.


Extra Boost for Faster Results

To enhance effectiveness, you can:

  • Add a few drops of vanilla extract to increase attraction.

  • Sprinkle the mixture along baseboards instead of only placing it in dishes.

  • Combine with sticky traps for monitoring activity.

Avoid using strong chemical sprays at the same time, as these can repel pests away from the bait.


Why Not Just Use Store-Bought Poison?

Commercial rodent and roach killers often contain harsh toxins. While effective, they can pose risks to pets and children. They may also leave dead rodents hidden inside walls, causing odor problems.

This natural mixture avoids toxic chemicals and is budget-friendly. Many households already have the ingredients available.


Important Safety Notes

  • Always wear gloves when handling pest areas.

  • Clean surfaces with disinfectant afterward.

  • If you notice droppings, sanitize immediately.

  • For severe infestations, contact a professional exterminator.

This method works best for small to moderate problems. Large infestations may require integrated pest control.


Long-Term Prevention Strategy

Eliminating pests once is good — keeping them away is better. Follow these habits:

  • Store pet food in sealed containers.

  • Keep drains clean.

  • Declutter storage areas.

  • Trim vegetation touching exterior walls.

  • Install door sweeps and window screens.

Pests invade homes looking for three things: food, water, and shelter. Remove those, and they’ll move on.


The Bottom Line

You don’t need expensive chemicals or complicated traps to fight rats and roaches. A simple mixture of baking soda, sugar, and flour can significantly reduce their presence — sometimes in as little as one day.

Consistency, cleanliness, and smart placement are what make the difference. Try this method tonight, and you may wake up to a noticeably quieter, cleaner home.

If the problem persists, don’t hesitate to consult a pest control professional — but for many households, this easy trick is enough to reclaim peace of mind.

Discover the 9 Early Warning Signs of Stroke That Could Appear a Week Before

A stroke often seems sudden and unexpected, but in many cases, the body sends warning signals days before it happens. Recognizing these early signs can mean the difference between life and death. A stroke occurs when blood flow to the brain is blocked (ischemic stroke) or when a blood vessel bursts (hemorrhagic stroke). According to the World Health Organization, stroke is one of the leading causes of death and long-term disability worldwide.

Here are nine early warning signs of stroke that can appear up to a week before a major event.

1. Sudden Weakness or Numbness on One Side of the Body

One of the most common early signs is weakness or numbness affecting one side of the body. This may include the face, arm, or leg. You might notice that one arm feels heavy, or your smile looks uneven in the mirror. Even if the symptom disappears after a few minutes, it should never be ignored. Temporary symptoms could indicate a transient ischemic attack (TIA), often called a “mini-stroke,” which can precede a major stroke.

2. Sudden Confusion or Trouble Speaking

If you suddenly struggle to find words, slur your speech, or have difficulty understanding others, this may be an early stroke warning. You might know what you want to say but be unable to express it clearly. Family members often notice speech changes before the person does.

3. Vision Problems
4

Blurred vision, double vision, or sudden vision loss in one or both eyes can signal reduced blood flow to the brain. Some people describe it as a curtain coming down over their eye. Even brief visual disturbances require urgent medical evaluation.

4. Severe Headache With No Known Cause
4

A sudden, severe headache—often described as the “worst headache of my life”—can indicate a hemorrhagic stroke. If the headache appears out of nowhere and is different from your usual headaches, seek immediate medical attention.

5. Dizziness or Loss of Balance
4

Sudden dizziness, difficulty walking, or loss of coordination can signal a stroke, especially if accompanied by other symptoms. You may feel as if the room is spinning or find it difficult to stand upright.

6. Sudden Fatigue or Weakness

Unusual and unexplained fatigue, especially when combined with other symptoms, may be an early indicator. Some people report feeling overwhelmingly tired or weak days before a stroke occurs. This symptom is more commonly reported in women.

7. Nausea or Vomiting

While nausea can have many causes, unexplained nausea or vomiting alongside dizziness or headache could point to a neurological issue. This is particularly concerning if there is no obvious reason, such as food poisoning or illness.

8. Shortness of Breath or Irregular Heartbeat

An irregular heartbeat, especially in people with atrial fibrillation, significantly increases stroke risk. Sudden shortness of breath or heart palpitations may signal an underlying problem affecting blood flow to the brain.

9. Brief Episodes That Go Away (Transient Ischemic Attack)

Sometimes stroke symptoms appear briefly and then disappear within minutes or hours. This is known as a TIA. Many people ignore these episodes because they feel better afterward. However, a TIA is a serious warning sign that a full stroke may occur soon—sometimes within days.

Remember the FAST Method

Healthcare professionals recommend remembering the acronym FAST:

F – Face drooping

A – Arm weakness

S – Speech difficulty

T – Time to call emergency services

Immediate treatment can reduce brain damage and improve survival rates. Time is critical because brain cells begin to die within minutes when deprived of oxygen.

Who Is at Higher Risk?

Several factors increase stroke risk, including:

High blood pressure

Diabetes

Smoking

High cholesterol

Obesity

Sedentary lifestyle

Family history of stroke

Managing these risk factors through healthy eating, regular exercise, and medical checkups can significantly lower your risk.

What To Do If You Notice Symptoms

If you or someone near you experiences any of these warning signs—even if they disappear—seek emergency medical help immediately. Do not wait to see if the symptoms improve. Early intervention can prevent permanent brain damage and save lives.

Final Thoughts

Stroke is a medical emergency, but it rarely happens without warning. Listening to your body and acting quickly can make all the difference. If you notice weakness, confusion, vision problems, severe headache, or balance issues, take them seriously. Early detection saves lives.

If you found this information helpful, share it with your family and loved ones. Awareness is one of the most powerful tools we have in preventing stroke-related tragedy.

My husband says this is the best meal I have ever made. Just 4 ingredients for a cheesy and creamy dinner

Sometimes the most unforgettable meals are the simplest ones. This cheesy and creamy 4-ingredient dinner is proof that you don’t need a long grocery list or complicated techniques to create something truly special. The first time I made this recipe, I was just trying to put together a quick meal with what I already had in my kitchen. I didn’t expect anything extraordinary—but after one bite, my husband looked at me and said, “This is the best meal you’ve ever made.” That moment alone made this recipe a permanent part of our dinner rotation.

This dish is rich, comforting, and incredibly satisfying. It’s perfect for busy weeknights, cozy weekends, or anytime you want a warm, homemade meal without stress. The creamy texture, combined with the melted cheese and tender main ingredient, creates a combination that feels indulgent but is surprisingly easy to prepare.

What makes this recipe truly magical is how these four simple ingredients come together to create something far greater than the sum of their parts. Each ingredient plays an important role in building flavor, texture, and creaminess.

Ingredients (Serves 4)

  • 2 large chicken breasts (or 500 g boneless chicken)

  • 1 cup heavy cream

  • 1 ½ cups shredded cheese (cheddar, mozzarella, or a mix)

  • 1 packet onion soup mix (or about 2 tablespoons dry onion seasoning)

Why These 4 Ingredients Work So Well

Chicken breasts provide a hearty, protein-rich base. When cooked in cream, they become tender and juicy while absorbing all the delicious flavors.

Heavy cream is the key to the luxurious texture. It thickens naturally as it cooks and creates a smooth, velvety sauce.

Shredded cheese adds richness, flavor, and that irresistible melted texture. As it melts, it blends with the cream to create a perfectly creamy sauce.

Onion soup mix is the secret flavor booster. It contains onions, herbs, and seasonings that instantly enhance the dish without needing extra spices.

Step-by-Step Instructions

Step 1: Prepare the chicken

Preheat your oven to 180°C (350°F). Place the chicken breasts in a baking dish. If they are very thick, you can slice them in half horizontally to help them cook faster and more evenly.

Step 2: Add the seasoning

Sprinkle the onion soup mix evenly over the chicken. Make sure each piece is well coated. This seasoning will infuse the chicken and sauce with incredible flavor.

Step 3: Pour the cream

Slowly pour the heavy cream over the chicken. The cream should surround the chicken, creating the base for the sauce.

Step 4: Add the cheese

Sprinkle the shredded cheese evenly over the top. Don’t worry if it seems like a lot—this is what makes the dish so rich and creamy.

Step 5: Bake to perfection

Place the dish in the oven and bake for 35–45 minutes, or until the chicken is fully cooked and the cheese is melted and golden. The sauce will thicken as it cooks.

Step 6: Rest and serve

Let the dish rest for about 5 minutes before serving. This helps the sauce thicken even more.

The Result

When you remove the dish from the oven, you’ll see tender chicken covered in a creamy, cheesy sauce. The top will be slightly golden, and the aroma will fill your kitchen with warmth and comfort.

Each bite is rich, creamy, and full of flavor. The chicken is juicy, the sauce is smooth, and the cheese adds the perfect finishing touch.

Serving Suggestions

This creamy cheesy dinner pairs beautifully with many sides, such as:

  • Rice (perfect for soaking up the sauce)

  • Pasta

  • Mashed potatoes

  • Steamed vegetables

  • Garlic bread

  • Roasted potatoes

You can also serve it on its own for a low-carb option.

Tips for Success

Use freshly shredded cheese for the best melting and texture. Pre-shredded cheese contains anti-caking agents that can affect creaminess.

Don’t overcook the chicken, or it may become dry. Check for doneness at around 35 minutes.

Let it rest before serving, which allows the sauce to thicken properly.

Use a good baking dish that holds heat evenly for consistent cooking.

Easy Variations

You can customize this recipe in many ways while keeping it simple:

Add mushrooms for an earthy flavor
Add spinach for color and nutrition
Use different cheeses like parmesan or gouda
Replace chicken with pasta for a vegetarian version
Add cooked broccoli for extra texture

Storage and Reheating

Store leftovers in an airtight container in the refrigerator for up to 3 days.

To reheat, place in the microwave or warm in a pan over low heat. You can add a splash of cream or milk to restore the creamy texture.

This dish also freezes well for up to 2 months.

Why Everyone Loves This Recipe

This recipe has become a favorite in many homes because it is:

  • Quick and easy

  • Budget-friendly

  • Made with simple ingredients

  • Rich and comforting

  • Perfect for beginners

It’s the kind of meal that feels special without requiring hours in the kitchen.

Final Thoughts

This cheesy and creamy 4-ingredient dinner proves that you don’t need complicated recipes to create something unforgettable. With minimal effort, you can serve a meal that tastes like it came from a restaurant.

It’s warm, comforting, and deeply satisfying—the kind of meal that brings smiles to the table and makes people ask for seconds.

How to Clean the Floors in Your Home with Just 3 Ingredients: They’ve Never Looked Better

Clean, shiny floors can transform the entire atmosphere of your home. They reflect light, make rooms feel fresher, and create a welcoming environment for family and guests. Many commercial floor cleaners promise sparkling results, but they often contain harsh chemicals, artificial fragrances, and unnecessary additives. Fortunately, you don’t need expensive products to achieve beautifully clean floors. With just three simple ingredients—water, white vinegar, and dish soap—you can create an effective, natural cleaning solution that removes dirt, grease, and bacteria while leaving your floors fresh and spotless.

This simple homemade floor cleaner is affordable, safe, and suitable for most floor types. It’s easy to prepare, gentle on surfaces, and powerful enough to tackle everyday messes.

Why This 3-Ingredient Cleaner Works

Each ingredient plays an important role in cleaning and restoring your floors:

Water acts as the base of the solution. It helps dilute the other ingredients and allows the cleaner to spread evenly across the floor surface.

White vinegar is a natural disinfectant and deodorizer. Its mild acidity helps break down grease, grime, and mineral buildup while eliminating odors. Vinegar also leaves floors streak-free and shiny.

Dish soap helps loosen stubborn dirt and grease. Even a small amount can lift debris from the floor, making it easier to wipe away.

Together, these three ingredients create a balanced cleaning solution that is effective yet gentle.

Ingredients

  • 4 liters (1 gallon) warm water

  • 1 cup white vinegar

  • 1 teaspoon liquid dish soap

That’s all you need—just three simple, affordable ingredients commonly found in most homes.

Equipment Needed

  • Mop or microfiber mop

  • Bucket

  • Measuring cup and spoon

  • Optional: spray bottle for spot cleaning

Step-by-Step Instructions

Step 1: Prepare the Cleaning Solution

Fill a bucket with 4 liters (1 gallon) of warm water. Warm water works better than cold water because it helps dissolve grease and activate the cleaning power of the vinegar and dish soap.

Add 1 cup of white vinegar to the water. Stir gently.

Next, add 1 teaspoon of dish soap. Be careful not to add too much, as excess soap can leave residue on the floor.

Mix the solution gently until combined.

Step 2: Remove Loose Dirt First

Before mopping, sweep or vacuum the floor to remove dust, crumbs, and debris. This prevents dirt from spreading and ensures better cleaning results.

This step is especially important for tile, hardwood, and laminate floors.

Step 3: Mop the Floor

Dip your mop into the cleaning solution and wring out excess liquid. The mop should be damp, not soaking wet.

Start mopping from one corner of the room and work your way toward the exit. Use gentle, even strokes.

Pay extra attention to high-traffic areas such as hallways, kitchens, and entrances.

Step 4: Allow the Floor to Air Dry

One of the best features of this solution is that it dries quickly and leaves minimal residue.

Allow the floor to air dry naturally. There is no need to rinse unless you used too much soap.

As it dries, you’ll notice a clean shine and fresh smell.

Benefits of This Homemade Floor Cleaner

1. Cost-Effective

This solution costs much less than commercial cleaners. Vinegar and dish soap are inexpensive and last a long time.

2. Chemical-Free

Unlike many store-bought cleaners, this solution contains no harsh chemicals, making it safer for children and pets.

3. Removes Odors

Vinegar neutralizes unpleasant smells, leaving your home smelling fresh and clean.

4. Leaves Floors Shiny

This mixture cleans without leaving streaks or dull residue.

5. Multi-Surface Use

This cleaner works well on many floor types, including:

  • Tile

  • Laminate

  • Vinyl

  • Sealed hardwood

  • Linoleum

Spot Cleaning Method

For sticky spots or stains, you can pour the same mixture into a spray bottle.

Spray directly on the stain and wipe with a cloth or mop.

This method works especially well for kitchen spills and footprints.

Important Tips for Best Results

  • Always use warm water, not hot water, to protect delicate floor finishes.

  • Do not use too much dish soap, as it can leave a slippery residue.

  • Change the cleaning solution if it becomes dirty.

  • Use a microfiber mop for better dirt removal.

  • Clean floors regularly to prevent buildup.

Safety Note for Hardwood Floors

This cleaner is safe for sealed hardwood floors, but avoid excessive moisture.

Always wring the mop thoroughly and never leave standing water on wood floors.

If unsure, test the solution on a small hidden area first.

Optional Enhancements

Although the basic recipe contains only three ingredients, you can enhance the scent naturally if desired.

For example, adding a few drops of lemon juice can provide a fresh smell and extra grease-cutting power. However, this step is optional.

How Often Should You Clean Your Floors?

For best results:

  • High-traffic areas: 2–3 times per week

  • Kitchens: 2–3 times per week

  • Bedrooms: once per week

  • Whole house: once per week

Regular cleaning prevents buildup and keeps floors looking new.

Why Homemade Cleaners Are a Smart Choice

Homemade cleaning solutions are becoming increasingly popular because they are safer, cheaper, and environmentally friendly.

They reduce exposure to harsh chemicals and minimize waste from plastic cleaning product bottles.

This simple solution proves that effective cleaning does not require complicated or expensive products.

Final Thoughts

Clean floors can make your home feel brighter, healthier, and more comfortable. With just water, white vinegar, and dish soap, you can create a powerful cleaning solution that removes dirt, eliminates odors, and restores shine.