3 tricks to polish burnt pans and make them look like new again

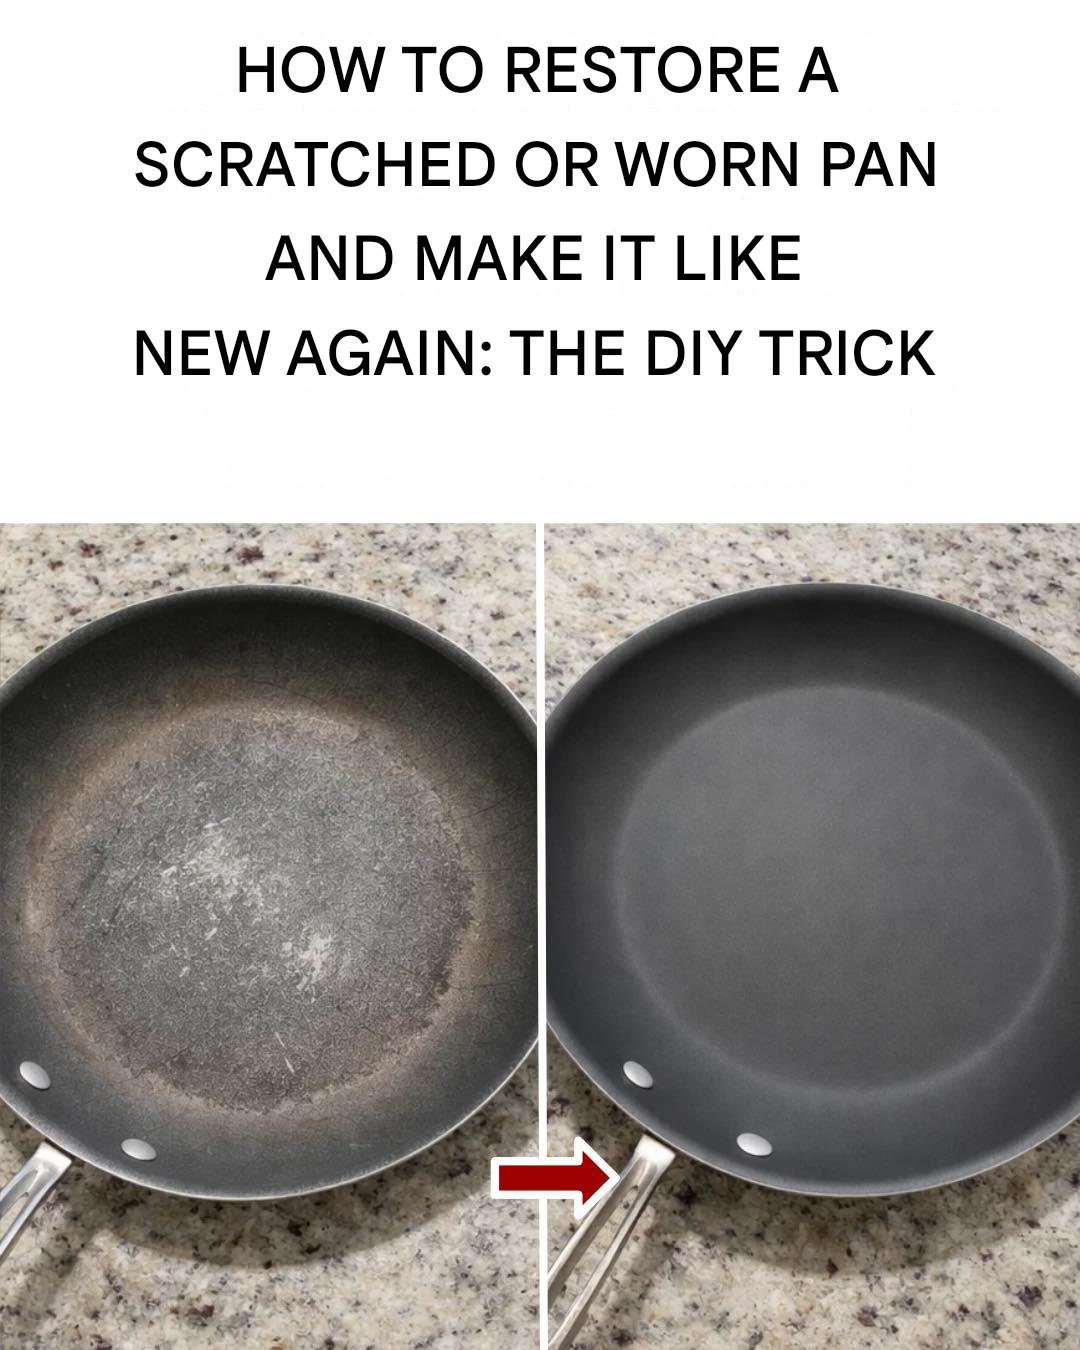
Burnt pans happen to everyone. Whether you left rice on the stove a little too long or forgot about a simmering sauce, those blackened stains can feel impossible to remove. The good news? You don’t need harsh chemicals or expensive cleaners. With a few simple household ingredients and the right technique, you can restore your cookware and make it shine again.

Here are three powerful tricks to polish burnt pans and make them look like new again.

1. Baking Soda and Vinegar Deep-Clean Method
4

This classic combination works wonders because baking soda is mildly abrasive while vinegar helps break down stubborn grease and burnt residue.

What You’ll Need:

1 cup white vinegar

2–3 tablespoons baking soda

Water

Non-scratch sponge or scrubber

Step-by-Step Instructions:

Add Vinegar and Water
Pour equal parts vinegar and water into the burnt pan until the stained area is fully covered.

Bring to a Boil
Place the pan on the stove and bring the mixture to a gentle boil. Let it simmer for 5–10 minutes. This helps loosen burnt food.

Remove from Heat and Add Baking Soda
Turn off the heat and carefully add baking soda. It will fizz — that’s normal and helps lift grime.

Let It Sit
Allow the pan to cool for 10–15 minutes.

Scrub Gently
Use a sponge to scrub away the loosened residue. Most of the burnt layer should come off easily.

Rinse and Dry
Wash with dish soap, rinse thoroughly, and dry immediately to prevent water spots.

This method works especially well on stainless steel and aluminum pans.

2. The Salt and Lemon Polishing Trick
4

If your pan has light burn marks or dull discoloration, this natural polishing trick is perfect. Lemon’s acidity cuts through grease, while salt acts as a gentle scrub.

What You’ll Need:

1 fresh lemon

2 tablespoons coarse salt

Warm water

Soft cloth

Step-by-Step Instructions:

Sprinkle Salt Generously
Cover the burnt area with coarse salt.

Cut the Lemon in Half
Use one half as a scrubber.

Scrub in Circular Motions
Press firmly and scrub over the salt. The lemon juice will mix with the salt to create a natural abrasive paste.

Let It Rest
Allow the mixture to sit for 5–10 minutes to break down stains.

Rinse and Polish
Rinse with warm water and wipe dry with a soft cloth for a polished finish.

This trick not only removes stains but also leaves your pan smelling fresh and looking brighter.

3. Cream of Tartar and Water Paste
4

Cream of tartar may not be the first thing you think of for cleaning, but it’s incredibly effective for removing burnt spots and restoring shine.

What You’ll Need:

2 tablespoons cream of tartar

A few drops of water

Soft sponge or cloth

Step-by-Step Instructions:

Create a Thick Paste
Mix cream of tartar with a small amount of water until you get a paste-like consistency.

Apply to Burnt Areas
Spread the paste evenly over the stained sections.

Let It Sit Overnight
For tough burns, allow the paste to sit for several hours or overnight.

Scrub Gently
Use a soft sponge to scrub away the loosened residue.

Rinse and Buff
Wash thoroughly and buff dry for a renewed shine.

This method works beautifully for stainless steel and enamel cookware.

Extra Tips to Keep Your Pans Looking New

Avoid Steel Wool on Non-Stick Pans
It can damage the coating permanently.

Dry Immediately After Washing
Water spots and mineral deposits can dull shine.

Use Medium Heat When Cooking
High heat is a common cause of burnt buildup.

Clean Soon After Use
The longer burnt food sits, the harder it is to remove.

Final Thoughts

Burnt pans don’t have to mean ruined cookware. With baking soda and vinegar for deep cleaning, lemon and salt for natural polishing, and cream of tartar for stubborn stains, you can bring even heavily scorched pans back to life.

The best part? These methods use simple, affordable ingredients you probably already have at home. A little patience and gentle scrubbing can transform your dull, blackened pan into something that looks almost brand new.

What to Eat to Reduce Nail Ridges A Nutrition Guide for Healthier Nails

Nail ridges are common, especially as we age. Vertical ridges (running from cuticle to tip) are usually harmless and often linked to aging or mild nutrient deficiencies. Horizontal ridges (also called Beau’s lines) may signal illness, stress, or more serious nutritional gaps. While nail texture can’t change overnight, the right diet can significantly improve nail strength, smoothness, and overall appearance over time.

If you’ve noticed rough, brittle, or ridged nails, here’s a detailed nutrition guide — plus a nourishing recipe — to help support healthier nails naturally.


Key Nutrients That Help Reduce Nail Ridges

1. Biotin (Vitamin B7)

Biotin supports keratin production — the protein that makes up your nails. Low biotin levels can lead to brittle, ridged nails.

Best food sources:

  • Eggs (especially yolks)

  • Almonds

  • Walnuts

  • Sweet potatoes

  • Spinach


2. Iron

Iron deficiency is one of the most common causes of nail abnormalities, including ridges and spoon-shaped nails.

Best food sources:

  • Lean red meat

  • Lentils

  • Chickpeas

  • Spinach

  • Pumpkin seeds

Pair iron-rich foods with vitamin C (like lemon or oranges) to improve absorption.


3. Zinc

Zinc supports nail growth and repair. Deficiency may cause white spots and ridging.

Best food sources:

  • Pumpkin seeds

  • Cashews

  • Chickpeas

  • Yogurt

  • Whole grains


4. Protein

Since nails are made of keratin, adequate protein intake is essential.

Best sources:

  • Chicken

  • Fish

  • Eggs

  • Greek yogurt

  • Beans and legumes


5. Omega-3 Fatty Acids

Omega-3s help keep nails hydrated and reduce brittleness.

Best food sources:

  • Fatty fish like salmon

  • Chia seeds

  • Flaxseeds

  • Walnuts


6. Vitamin A & Vitamin E

These vitamins support healthy nail growth and protect against dryness and damage.

Sources:

  • Carrots

  • Sweet potatoes

  • Avocados

  • Sunflower seeds

  • Almonds


Hydration Matters Too

Dehydration can make nail ridges appear worse. Aim for at least 6–8 glasses of water daily. Herbal teas and water-rich fruits like cucumber and watermelon also help.


Nail-Strengthening Power Bowl Recipe

This balanced meal includes biotin, iron, zinc, protein, and omega-3s — everything your nails need to thrive.

https://img.taste.com.au/geuYvSY5/taste/2016/11/quinoa-salad-with-salmon-63050-1.jpeg
https://cdn.prod.website-files.com/677ee1765e5a55f75e3c211b/67eadc79c6de090132700781_salmon-avocado-power-bowl.jpeg
https://cdn.foodaciously.com/static/recipes/a84dbe23-7e22-4784-b019-86db5bfd541b/roasted-pumpkin-quinoa-salad-recipe-1-73e8bf94442653719323d732dd50f8dc.jpg
4

Salmon & Spinach Nail-Strength Power Bowl

Ingredients (Serves 2)

  • 1 cup cooked quinoa

  • 2 salmon fillets (grilled or baked)

  • 1 cup fresh spinach

  • ½ avocado, sliced

  • 1 tablespoon pumpkin seeds

  • 1 tablespoon chia seeds

  • ½ cup roasted sweet potatoes

  • ¼ cup chickpeas (cooked)

  • Juice of ½ lemon

  • 1 tablespoon olive oil

  • Salt and black pepper to taste


Instructions

Step 1: Cook the quinoa
Rinse quinoa thoroughly. Cook according to package instructions (usually 1 cup quinoa to 2 cups water). Fluff and let cool slightly.

Step 2: Prepare the salmon
Season salmon with salt, pepper, and a drizzle of olive oil. Bake at 180°C (350°F) for 12–15 minutes or grill until cooked through.

Step 3: Roast the sweet potatoes
Dice sweet potatoes, toss with olive oil, and roast at 200°C (400°F) for 20–25 minutes until tender.

Step 4: Assemble the bowl
Divide quinoa into two bowls. Top with spinach, roasted sweet potatoes, chickpeas, avocado slices, and salmon.

Step 5: Add the finishing touch
Sprinkle pumpkin seeds and chia seeds on top. Drizzle with olive oil and fresh lemon juice.

Serve immediately and enjoy!


Why This Recipe Works for Nail Health

  • Salmon provides omega-3s and high-quality protein.

  • Spinach and chickpeas deliver iron and zinc.

  • Pumpkin seeds are rich in zinc and magnesium.

  • Chia seeds offer omega-3s and fiber.

  • Avocado and olive oil provide vitamin E and healthy fats.

  • Quinoa contains protein and biotin-supporting B vitamins.

Eating meals like this 3–4 times a week can gradually improve nail texture and strength.


Additional Daily Snack Ideas for Smooth Nails

  • Greek yogurt with almonds

  • Boiled eggs with a sprinkle of salt

  • A handful of walnuts

  • Apple slices with peanut butter

  • Carrot sticks with hummus


When to See a Doctor

If your nail ridges are deep, sudden, or accompanied by hair loss, fatigue, or pale skin, consult a healthcare professional. Blood tests can identify deficiencies such as iron-deficiency anemia or thyroid issues.


Final Thoughts

Nail ridges are often a sign that your body needs better nourishment. By focusing on biotin, iron, zinc, protein, omega-3s, and proper hydration, you can support smoother, stronger nails from within.

Consistency is key. Healthy nails grow slowly — about 3 millimeters per month — so give your body at least 2–3 months of improved nutrition to see visible results.

Why Do We Dream of Those Who Have Passed Away

Dreams have fascinated humanity for centuries, especially those in which we see loved ones who have passed away. These dreams can feel incredibly real—so vivid that we wake up emotional, comforted, or sometimes unsettled. But why do we dream of people who are no longer alive? While there isn’t a single explanation, psychology, neuroscience, and even cultural beliefs offer meaningful insights into this deeply personal experience.

1. Dreams as a Part of the Grieving Process

One of the most common reasons we dream about deceased loved ones is grief. When someone important to us dies, our brain doesn’t instantly adjust to their absence. During sleep—particularly in the REM (Rapid Eye Movement) stage—our brain processes emotions and memories.

Dreaming about someone who has passed can be part of the natural healing process. These dreams may:

  • Help us cope with loss

  • Allow us to “reconnect” emotionally

  • Provide a sense of closure

  • Reduce feelings of guilt or regret

Sometimes the dream feels like a final goodbye we never had. Other times, it feels like reassurance that the bond we shared still exists in some way.

2. Memory and Emotional Processing

Our brains are constantly organizing and storing memories. When someone significant dies, the emotional intensity connected to that person remains strong. Because dreams often draw from emotionally charged memories, it’s natural for deceased loved ones to appear in them.

Interestingly, the brain doesn’t clearly distinguish between “past” and “present” relationships during dreams. It simply reactivates neural patterns linked to that person—how they looked, spoke, or made us feel. That’s why dream encounters can seem incredibly realistic.

You may notice these dreams occur:

  • On anniversaries of their death

  • Around birthdays or holidays

  • During stressful periods

  • When facing major life changes

Your mind may be revisiting that person because they once played a guiding or supportive role in your life.

3. Unresolved Feelings

Not all dreams about the deceased are peaceful. Some may involve arguments, unfinished conversations, or confusing emotions. This often reflects unresolved feelings.

Perhaps there were things left unsaid. Maybe you’re still struggling with guilt, anger, or longing. Dreams create a safe psychological space to explore those emotions. Your subconscious mind may be working through unfinished emotional business.

In many cases, once these feelings are processed, the dreams become less frequent or more comforting.

4. Comfort and Attachment

Humans form deep attachments. When someone we love dies, that attachment doesn’t instantly disappear. Dreams can serve as a temporary continuation of that bond.

Research suggests that many bereaved individuals report “visitation dreams,” which feel especially vivid and peaceful. In these dreams, the deceased may appear healthy, smiling, or offering reassurance. Whether viewed scientifically or spiritually, these dreams often bring comfort rather than fear.

The emotional tone of the dream matters more than the specific details. If you wake feeling calm or supported, your brain may be helping you maintain a healthy internal connection with that person.

5. Cultural and Spiritual Interpretations

Across cultures, dreams of the deceased carry special meaning. Some traditions believe these dreams are spiritual visits, messages, or signs. Others see them as reflections of the soul’s ongoing journey.

While science explains dreams as neurological activity, cultural beliefs shape how we interpret them. What matters most is how the dream feels to you. If it brings peace, many find comfort in viewing it as meaningful—regardless of the explanation.

6. Stress and Life Transitions

Sometimes we dream of those who have passed during challenging times. If you’re facing a difficult decision, experiencing loneliness, or navigating change, your mind may “call upon” the memory of someone who once provided strength or wisdom.

For example:

  • Starting a new job

  • Moving to a new home

  • Becoming a parent

  • Experiencing illness

  • Feeling overwhelmed

In these moments, your brain may symbolically bring back someone who represented stability, love, or guidance.

7. Are These Dreams Normal?

Yes—completely normal.

Studies show that a large percentage of people experience dreams of deceased loved ones at some point in their lives. These dreams are not signs of mental illness or something “wrong.” They are a common part of being human and having loved deeply.

If the dreams are distressing or cause ongoing anxiety, speaking with a counselor can help. But in most cases, they are a healthy expression of memory and emotion.

8. Why They Feel So Real

Dreams of deceased loved ones often feel more vivid than ordinary dreams. This is because strong emotions activate the amygdala, the brain’s emotional center, during REM sleep. When emotional intensity is high, dream imagery becomes sharper and more memorable.

That’s why you may remember these dreams years later—the emotional imprint is powerful.

9. What Should You Do After Such a Dream?

There’s no “right” response, but many people find it helpful to:

  • Write the dream down

  • Reflect on the emotions it triggered

  • Talk about it with someone you trust

  • Consider what the person represented in your life

Rather than focusing on whether the dream was literal or symbolic, focus on what it meant to you emotionally.

Final Thoughts

Dreaming of someone who has passed away is one of the most profound experiences we can have during sleep. These dreams often reflect love, memory, attachment, and the deep imprint certain people leave on our lives.

They remind us that while physical presence may be gone, emotional connections remain woven into who we are. Whether you interpret these dreams as psychological processing, spiritual connection, or simply the mind’s natural activity, they are a testament to the powerful bonds we form.

The Ultimate Air Fryer Cheese Toast: Crispy, Gooey, & Effortless

There’s something timeless and deeply comforting about cheese on toast. It’s simple, nostalgic, and endlessly satisfying. But when you make it in an air fryer, it transforms into something truly next-level—perfectly crisp on the outside, irresistibly gooey on the inside, and ready in minutes with almost no effort. The air fryer circulates hot air evenly around the bread, creating a golden crust while melting the cheese into a bubbly, stretchy layer of goodness. No flipping, no soggy bottoms, no complicated steps. Just pure comfort food done right.

Whether you need a quick breakfast, an afternoon snack, or a late-night bite, this Ultimate Air Fryer Cheese Toast recipe will become your go-to. It’s budget-friendly, customizable, and absolutely foolproof.

Why You’ll Love This Recipe

  • Crispy texture without burning the edges

  • Perfectly melted cheese every time

  • Ready in under 10 minutes

  • Minimal ingredients

  • Easy to customize with your favorite toppings

The air fryer gives you that bakery-style crunch with less mess and faster cooking than a traditional oven or stovetop method.

Ingredients

  • 2 slices thick-cut bread (white, sourdough, or whole wheat)

  • 1–2 tablespoons softened butter

  • 1 cup shredded cheese (cheddar, mozzarella, or a blend)

  • Pinch of salt (optional)

  • Pinch of black pepper (optional)

  • Dried oregano or chili flakes (optional)

Choosing the Right Ingredients

Bread

Thicker slices work best because they hold up to the cheese and heat without becoming too crisp too quickly. Sourdough adds tangy flavor, while white bread gives you that classic soft crunch contrast.

Cheese

Sharp cheddar delivers bold flavor. Mozzarella gives you that irresistible stretch. A mix of both creates the perfect balance of taste and texture. You can also experiment with gouda, Monterey Jack, or even a touch of Parmesan for extra depth.

Step-by-Step Instructions

Step 1: Preheat the Air Fryer

Set your air fryer to 180°C (350°F) and preheat for about 2–3 minutes. This ensures even cooking from the start.

Step 2: Butter the Bread

Spread a thin, even layer of softened butter on one side of each slice of bread. The butter helps create that golden, crispy texture.

Place the bread butter-side down on a clean surface.

Step 3: Add the Cheese

Generously sprinkle shredded cheese over the top side of each slice. Make sure to cover the surface evenly, all the way to the edges. This ensures full coverage and maximum melt.

Add optional seasonings like black pepper, oregano, or chili flakes if you like a little extra flavor.

Step 4: Air Fry

Place the slices in the air fryer basket in a single layer. Avoid overlapping.

Cook at 180°C (350°F) for 4–6 minutes, or until the cheese is fully melted and bubbling, and the edges of the bread are golden brown.

Check around the 4-minute mark to prevent over-browning.

Step 5: Serve Immediately

Carefully remove the toast using tongs. Let it cool for 1 minute (the cheese will be very hot), then slice and enjoy.

Tips for Perfect Cheese Toast

  • Don’t overload the cheese or it may slide off while melting.

  • Secure lightweight cheese slices with a toothpick if your air fryer fan is strong.

  • Add toppings halfway through cooking if they are delicate.

  • Use parchment paper with holes (air fryer-safe) to prevent sticking while still allowing airflow.

Delicious Variations

Garlic Cheese Toast

Mix a little minced garlic into the butter before spreading it on the bread for a bold flavor upgrade.

Tomato Melt

Add thin slices of tomato on top of the cheese. Sprinkle lightly with salt and cook as usual.

Spicy Jalapeño Toast

Top with sliced jalapeños and a dash of chili flakes for a spicy kick.

Breakfast Cheese Toast

Crack a small egg into a slight indent in the cheese and air fry carefully for a protein-packed breakfast version.

Pizza-Style Toast

Spread a thin layer of marinara sauce before adding cheese. Top with olives or pepperoni for a mini pizza vibe.

Storage & Reheating

Cheese toast is best enjoyed fresh, but if you have leftovers:

  • Store in an airtight container in the fridge for up to 2 days.

  • Reheat in the air fryer at 160°C (320°F) for 2–3 minutes to restore crispness.

  • Avoid microwaving, as it can make the bread soggy.

Why the Air Fryer Method Works

Unlike a pan, which only heats from below, the air fryer circulates hot air around the entire slice. This means:

  • Even browning

  • Faster melting

  • Crispier edges

  • No flipping required

It gives you oven-quality results in half the time and with less energy use.

Nutritional Insight (Approximate Per Slice)

  • Calories: 220–300 (depending on cheese and bread)

  • Protein: 8–12g

  • Carbohydrates: 20–25g

  • Fat: 12–18g

You can lighten it up by using reduced-fat cheese or whole-grain bread.

Final Thoughts

The Ultimate Air Fryer Cheese Toast proves that simple recipes can still feel special. With just a few everyday ingredients and a few minutes of cooking time, you get a snack that’s crispy, gooey, comforting, and endlessly customizable.

Mix Bananas, Honey and Water: Cough and Bronchitis Will Disappear

When cold weather hits or seasonal viruses start circulating, coughs and chest congestion quickly follow. Many people look for natural remedies before reaching for over-the-counter syrups. One simple and comforting option combines three humble ingredients: bananas, honey, and water. While this mixture is not a miracle cure and does not replace medical treatment, it can help soothe throat irritation, calm coughing, and provide gentle relief during mild respiratory discomfort.

Let’s explore why this mixture works, how to prepare it properly, and when to seek medical advice.

Why Bananas, Honey, and Water?

1. Bananas: Gentle and Soothing

Bananas are soft, easy to digest, and rich in nutrients like potassium and vitamin B6. When mashed and warmed, bananas create a smooth texture that coats the throat. This can reduce irritation that triggers coughing. Their natural sweetness also makes the remedy pleasant, especially for children (over one year old).

Bananas don’t “cure” bronchitis, but their soothing consistency may help reduce throat discomfort associated with coughing fits.

2. Honey: Nature’s Traditional Cough Soother

Honey has long been used in traditional medicine for coughs. Modern research supports its ability to soothe the throat and reduce nighttime coughing in children and adults. Honey has natural antimicrobial properties and creates a protective layer over irritated throat tissue.

The World Health Organization and other health authorities recognize honey as a simple home remedy for mild cough relief. However, honey must never be given to infants under one year old due to the risk of botulism.

3. Warm Water: Hydration and Mucus Support

Staying hydrated is one of the most important steps when dealing with cough or bronchitis. Warm water helps thin mucus, making it easier to clear from the chest. When combined with banana and honey, it forms a comforting drink that supports hydration and throat relief at the same time.

Banana-Honey Cough Remedy Recipe

Ingredients:

  • 2 ripe bananas

  • 2 tablespoons raw honey

  • 1 cup hot (not boiling) water

Instructions:

  1. Peel the bananas and mash them thoroughly with a fork until smooth. Avoid using metal if possible, as some believe it may affect the banana’s nutrients (though this is not scientifically proven).

  2. Heat water until hot but not boiling. Boiling water may reduce some of honey’s beneficial properties.

  3. Pour the hot water over the mashed bananas and stir well.

  4. Let the mixture sit for about 10 minutes to soften further.

  5. Add honey and mix thoroughly.

  6. Strain if desired for a smoother drink, or enjoy as is.

How to Use:

Drink warm, 2–3 times daily, especially before bedtime to help reduce nighttime coughing.

Can It Help Bronchitis?

Bronchitis is inflammation of the bronchial tubes, often caused by viruses. It can produce persistent coughing, mucus production, chest discomfort, and fatigue. While bananas and honey cannot eliminate bronchitis, they can help manage symptoms such as throat irritation and dry cough.

If bronchitis is bacterial, a doctor may prescribe antibiotics. Viral bronchitis typically improves with rest, fluids, and supportive care. The banana-honey mixture may serve as a complementary comfort remedy during recovery.

Additional Tips for Managing Cough and Bronchitis

  • Drink plenty of fluids throughout the day.

  • Use a humidifier to keep air moist.

  • Rest as much as possible.

  • Avoid smoke and strong odors.

  • Consider warm soups and herbal teas for added comfort.

If symptoms last longer than three weeks, include high fever, shortness of breath, chest pain, or coughing up blood, consult a healthcare professional immediately.

Important Safety Notes

  • Do not give honey to babies under one year old.

  • Diabetics should monitor honey intake carefully.

  • Persistent or worsening cough requires medical evaluation.

  • This remedy supports comfort but does not replace medical treatment.

Final Thoughts

The combination of bananas, honey, and warm water is simple, affordable, and comforting. While it will not magically make cough or bronchitis “disappear,” it may provide soothing relief for irritated throats and mild cough symptoms. Natural remedies work best when combined with proper hydration, rest, and medical guidance when needed.

10 Foods That You Should Eat Daily For Clean Arteries

Heart health begins with your diet. Arteries clogged with plaque can lead to heart disease, stroke, and other cardiovascular problems. The good news is that nature has provided powerful foods that can naturally clean your arteries, reduce inflammation, and improve blood flow. Incorporating these into your daily meals can make a huge difference. Here’s a guide to 10 artery-friendly foods and simple ways to enjoy them daily.


1. Oats

Oats are packed with soluble fiber, which helps lower bad cholesterol (LDL) and prevent plaque buildup in arteries.

Daily Tip:

  • Breakfast recipe: Cook ½ cup of oats in water or low-fat milk. Top with berries and a teaspoon of flaxseeds.

  • Health boost: Soluble fiber binds cholesterol in the digestive system and flushes it from your body.


2. Fatty Fish (Salmon, Mackerel, Sardines)

Rich in omega-3 fatty acids, fatty fish help reduce triglycerides, prevent blood clots, and improve arterial flexibility.

Daily Tip:

  • Lunch recipe: Grill 150g of salmon with lemon, garlic, and a sprinkle of herbs. Serve with steamed vegetables.

  • Health boost: Omega-3s fight inflammation, a key factor in arterial plaque formation.


3. Garlic

Garlic contains allicin, a compound that helps relax blood vessels, reduce blood pressure, and prevent plaque buildup.

Daily Tip:

  • Snack recipe: Add 1-2 crushed garlic cloves to olive oil and drizzle over roasted vegetables.

  • Health boost: Garlic’s antioxidant properties help prevent oxidation of LDL cholesterol, keeping arteries cleaner.


4. Berries (Blueberries, Strawberries, Raspberries)

Berries are rich in antioxidants called flavonoids that improve blood vessel function and reduce arterial inflammation.

Daily Tip:

  • Breakfast snack: Add a handful of mixed berries to yogurt or oatmeal.

  • Health boost: The antioxidants prevent damage to the inner walls of arteries, reducing atherosclerosis risk.


5. Nuts (Almonds, Walnuts, Pistachios)

Nuts are a powerhouse of healthy fats, fiber, and vitamin E, which support heart health and prevent cholesterol buildup.

Daily Tip:

  • Snack recipe: Eat a small handful (about 30g) of unsalted nuts with your morning tea.

  • Health boost: Walnuts are particularly rich in omega-3s, which reduce inflammation and plaque formation.


6. Leafy Greens (Spinach, Kale, Swiss Chard)

Leafy greens are high in nitrates, vitamins, and antioxidants that improve arterial flexibility and lower blood pressure.

Daily Tip:

  • Salad recipe: Mix 2 cups of fresh spinach, cherry tomatoes, cucumbers, and a drizzle of olive oil.

  • Health boost: The nitrates in greens convert to nitric oxide in the body, which relaxes blood vessels and enhances circulation.


7. Olive Oil

Olive oil is rich in monounsaturated fats and antioxidants that help reduce LDL cholesterol and inflammation.

Daily Tip:

  • Cooking tip: Use 1–2 tablespoons of extra virgin olive oil for cooking or salad dressings daily.

  • Health boost: Olive oil’s antioxidants help maintain arterial elasticity and prevent plaque buildup.


8. Tomatoes

Tomatoes are a great source of lycopene, a powerful antioxidant that reduces arterial stiffness and improves blood vessel health.

Daily Tip:

  • Lunch recipe: Add chopped fresh tomatoes to sandwiches, salads, or make a simple tomato soup.

  • Health boost: Lycopene prevents the oxidation of LDL cholesterol, a primary cause of plaque accumulation.


9. Green Tea

Green tea contains catechins and polyphenols, which lower cholesterol, reduce inflammation, and improve blood vessel function.

Daily Tip:

  • Morning beverage: Replace coffee with a cup of unsweetened green tea.

  • Health boost: Regular consumption enhances arterial health and reduces the risk of cardiovascular diseases.


10. Avocados

Avocados are rich in monounsaturated fats and potassium, which help maintain healthy cholesterol levels and blood pressure.

Daily Tip:

  • Snack recipe: Mash half an avocado on whole-grain toast and sprinkle with lemon juice and black pepper.

  • Health boost: Avocados increase good cholesterol (HDL) and reduce harmful cholesterol (LDL), keeping arteries clean.


Simple Daily Meal Plan for Clean Arteries

To get the maximum benefit from these foods, you can follow this simple daily routine:

  • Breakfast: Oatmeal topped with berries, flaxseeds, and a few nuts.

  • Snack: Green tea with a handful of almonds or walnuts.

  • Lunch: Grilled salmon with a side salad of spinach, tomatoes, and olive oil.

  • Snack: Avocado toast or a few fresh garlic cloves added to roasted vegetables.

  • Dinner: Stir-fried leafy greens with garlic, served with brown rice or quinoa and a small portion of fatty fish.

By consistently including these 10 foods in your daily diet, you help reduce cholesterol, prevent arterial plaque, and maintain overall cardiovascular health.

Bonus Tip: Stay hydrated, exercise regularly, and avoid processed foods and excessive sugar for a holistic approach to clean arteries.

Dubbed a miracle drink coconut water offers numerous health benefits but not everyone should consume it

Coconut water has been called a “miracle drink” for good reason. Naturally refreshing and packed with nutrients, it’s more than just a thirst-quencher. But like anything, it’s not suitable for everyone. Here’s a deep dive into the benefits, potential risks, and a simple recipe to enjoy it at home.

What Is Coconut Water?

Coconut water is the clear liquid found inside young, green coconuts. Unlike coconut milk, which is creamy and derived from the grated meat of mature coconuts, coconut water is low in calories, naturally sweet, and full of electrolytes. Its composition makes it an ideal natural drink for hydration.

Nutritional Profile

A single cup (240 ml) of coconut water contains approximately:

  • Calories: 45

  • Carbohydrates: 9 grams

  • Sugars: 6 grams

  • Fiber: 2 grams

  • Protein: 2 grams

  • Potassium: 600 mg (more than a banana)

  • Sodium: 250 mg

  • Magnesium: 60 mg

  • Calcium: 58 mg

The high potassium content makes it excellent for maintaining healthy blood pressure, while magnesium and calcium support muscle and bone function.

Health Benefits of Coconut Water

  1. Hydration Boost
    Coconut water is packed with electrolytes like potassium, sodium, and magnesium, making it a natural way to rehydrate after exercise or heat exposure. It’s often considered a healthier alternative to commercial sports drinks because it’s free from artificial additives.

  2. Supports Heart Health
    Regular consumption may help regulate blood pressure due to its high potassium content. Potassium helps counteract sodium’s effect, reducing tension in blood vessels and promoting better cardiovascular function.

  3. Aids Digestion
    Coconut water contains bioactive enzymes like acid phosphatase, catalase, and peroxidase, which may aid digestion and metabolism. Drinking it regularly can help prevent bloating and improve overall gut health.

  4. Promotes Kidney Health
    Its natural diuretic properties help flush out toxins, reducing the risk of kidney stones. Some studies suggest that coconut water can help prevent crystal formation in the urinary tract.

  5. Low in Calories
    Unlike sugary soft drinks or fruit juices, coconut water is low in calories and fats, making it a smart option for those looking to manage weight.

Who Should Avoid Coconut Water

Despite its benefits, coconut water isn’t for everyone. Here’s who should be cautious:

  • People with Kidney Disorders: High potassium levels can be risky for individuals with kidney disease, as their kidneys may struggle to excrete excess potassium.

  • Individuals on Certain Medications: Some heart or blood pressure medications can interact with potassium-rich foods, leading to hyperkalemia (too much potassium in the blood).

  • Diabetics: While natural, coconut water contains sugars that can affect blood sugar levels. Moderation is key.

How to Choose Coconut Water

When buying coconut water, keep these tips in mind:

  • Look for Natural and Unsweetened Options: Avoid added sugars or flavors.

  • Check for Preservatives: Fresh coconut water is best; tetra-packed versions may contain additives.

  • Opt for Young, Green Coconuts: The water in young coconuts is sweeter and richer in nutrients than mature ones.

Refreshing Coconut Water Recipe

Here’s a simple way to enjoy coconut water with a twist:

Ingredients:

  • 1 cup fresh coconut water

  • ½ teaspoon fresh lime juice

  • A few fresh mint leaves

  • Ice cubes (optional)

  • ½ teaspoon honey (optional, for sweetness)

Instructions:

  1. Chill the Coconut Water: Pour the coconut water into a jug and refrigerate for 30 minutes.

  2. Add Lime and Mint: Squeeze fresh lime juice into the coconut water. Tear mint leaves slightly to release aroma and add them.

  3. Optional Sweetener: If you prefer, stir in a small amount of honey.

  4. Serve Cold: Pour over ice cubes and enjoy as a refreshing, natural electrolyte drink.

Tips for Maximum Benefits

  • Drink in Moderation: 1–2 cups per day is usually sufficient.

  • Post-Workout Hydration: Use it after light exercise; for intense workouts, pairing with a small snack may help replenish glycogen.

  • Enhance Flavor Naturally: Add fruits like pineapple or berries to enhance taste without processed sugars.

Conclusion

Coconut water truly earns its “miracle drink” title with its hydration, heart, and digestive benefits. However, like all things health-related, it’s not a one-size-fits-all solution. People with kidney issues, certain medications, or diabetes should consume it cautiously.

By choosing fresh, natural coconut water and enjoying it with a hint of lime and mint, you can savor a delicious and healthy drink that supports your well-being. Remember, moderation and awareness of your health status are key to truly benefiting from this natural elixir.

Sad news for drivers over 70, they will soon no longer be able to

If you are a driver over 70, recent news has raised concerns across the country. Authorities are planning stricter regulations that could affect your ability to stay behind the wheel. While this may feel alarming, understanding the details can help you navigate these changes safely and proactively.

Step 1: Understanding the New Regulations

The government has announced new rules targeting senior drivers, especially those over the age of 70. The primary goal is safety. Statistics show that reaction times, vision, and cognitive abilities tend to decline with age, which can increase the risk of accidents.

Under the proposed regulations:

  • Drivers over 70 may need to renew their licenses more frequently.

  • Medical and vision checks will become mandatory at each renewal.

  • Some states may require road tests or driving assessments to ensure seniors can safely operate a vehicle.

Tip: Keep all your medical records updated and consult your doctor about any conditions that might affect driving, such as vision impairment, hearing loss, or mobility issues.

Step 2: Preparing Your Health

Driving safely at any age requires good health. For senior drivers, this is even more critical. Here’s how to ensure your body is ready:

  1. Vision and Hearing: Schedule regular eye exams and hearing tests. Corrective lenses or hearing aids can make a significant difference.

  2. Medications: Some prescription drugs can cause drowsiness or dizziness. Check with your doctor to ensure your medications don’t impair driving ability.

  3. Physical Fitness: Strength and flexibility exercises help with steering, braking, and reacting quickly. Simple routines like stretching, yoga, or light resistance training can improve mobility.

Tip: Keep a small kit in your car with glasses, hearing aids, or any device you need for optimal driving.

Step 3: Adjusting Your Driving Habits

Even if you pass all tests, adjusting driving habits can make a huge difference:

  • Avoid Night Driving: Reduced visibility at night can be risky.

  • Limit Highways: High-speed roads can be more dangerous for senior drivers.

  • Plan Routes Carefully: Choose familiar roads and avoid areas with heavy traffic or complex intersections.

  • Take Breaks: Long drives can be exhausting; regular breaks improve alertness.

Tip: Consider apps or devices that help you navigate traffic and provide lane guidance to reduce stress.

Step 4: Alternatives to Traditional Driving

For seniors facing stricter regulations, it’s wise to explore alternatives to driving:

  1. Public Transportation: Buses, trains, and subways offer convenient options in most cities.

  2. Ridesharing Services: Uber, Lyft, or local taxi services provide flexible, safe alternatives.

  3. Community Shuttles: Many local governments offer free or low-cost shuttle services for seniors.

  4. Carpooling: Coordinate with family, friends, or neighbors for shared rides.

Tip: Keep a backup plan for transportation to avoid feeling isolated or dependent.

Step 5: Staying Informed

The regulations are still evolving, so staying updated is crucial. Here’s how to do it:

  • Visit your local Department of Motor Vehicles (DMV) website for updates.

  • Join senior driver associations or online forums to learn about new policies.

  • Attend workshops or seminars on senior driving safety.

Tip: Knowledge is your best defense. Early preparation can prevent sudden license restrictions.

Step 6: Mental Preparation

For many seniors, driving is tied to independence. Facing restrictions can feel like a loss of freedom. Preparing mentally can ease the transition:

  • Accept Change: Recognize that limiting driving can enhance safety.

  • Explore New Hobbies: Walking, cycling, or social activities can replace time spent driving.

  • Stay Connected: Use technology to maintain connections with family and friends.

Tip: Talking to peers who have faced similar changes can provide reassurance and practical advice.

Step 7: Legal Considerations

In some regions, failing a mandatory assessment could result in temporary or permanent license suspension. Knowing your rights and responsibilities is essential:

  • Ask about appeal processes if you disagree with a medical or road test result.

  • Ensure all documentation, such as medical certificates, is complete and accurate.

  • Seek guidance from a lawyer or senior advocacy group if needed.

Tip: Don’t ignore notices from the DMV; timely response can prevent complications.

Step 8: Final Thoughts

While the new rules may feel discouraging, they are designed to keep both seniors and the public safe. Proactive health management, adjusted driving habits, and exploring alternatives can help maintain mobility without compromising safety.

Driving after 70 may require more effort and awareness, but it doesn’t have to mean giving up independence entirely. By staying informed, prepared, and flexible, seniors can navigate this new era of driving safely and confidently.


Serving Suggestion: Treat this guide as a checklist—review each step regularly, keep your health in top condition, and stay connected to your community. Your safety, independence, and peace of mind depend on preparation and adaptability.

Homemade floor cleaner, with this mixture it will be like new

Homemade floor cleaner recipes have become increasingly popular, and for good reason. Many store-bought cleaners contain harsh chemicals, strong artificial fragrances, and unnecessary additives. With a simple homemade mixture, you can restore shine, remove dirt, and leave your floors smelling fresh—without damaging delicate surfaces. The best part? Most ingredients are already in your kitchen.

If your floors look dull, sticky, or tired, this easy mixture can make them look like new again. It works beautifully on tile, ceramic, vinyl, laminate, and even sealed hardwood floors (with slight adjustments).

Let’s break it down.

Why Make Your Own Floor Cleaner?

There are several benefits to switching to a homemade solution:

  • Cost-effective – No need to buy expensive specialty cleaners.

  • Safer for families and pets – Fewer harsh chemicals.

  • Customizable scent – You control the fragrance.

  • Eco-friendly – Fewer plastic bottles and toxic residues.

Commercial cleaners often leave behind residue that builds up over time, causing floors to lose their shine. A natural solution cleans without that sticky film.

The Powerful 4-Ingredient Floor Cleaner

Ingredients:

  • 1 cup white vinegar

  • 1 tablespoon baking soda

  • 1 tablespoon dish soap (mild, non-bleach)

  • 2 liters warm water

Optional:

  • 10–15 drops essential oil (lemon, lavender, eucalyptus, or peppermint)

How It Works

White vinegar acts as a natural disinfectant and cuts through grease.
Baking soda helps lift grime and neutralize odors.
Dish soap breaks down oils and sticky residues.
Warm water helps dissolve everything and enhances cleaning power.

When combined properly, these ingredients create a powerful yet gentle floor cleaner.

Step-by-Step Instructions

  1. Fill a large bucket with 2 liters of warm water.

  2. Slowly add 1 tablespoon baking soda.

  3. Add 1 cup white vinegar (it will fizz slightly—that’s normal).

  4. Stir gently.

  5. Add 1 tablespoon dish soap.

  6. If desired, add essential oils for fragrance.

  7. Mix carefully to avoid too much foam.

Your cleaner is ready to use immediately.

How to Use It Properly

  1. Sweep or vacuum floors first to remove dust and debris.

  2. Dip your mop into the mixture and wring it out well.

  3. Mop in sections.

  4. Avoid soaking the floor—especially wood or laminate.

  5. Allow to air dry.

For extra shine, go over the floor once more with clean warm water.

Surface-Specific Tips

Tile & Ceramic

This mixture works perfectly. It removes grime from grout lines and restores shine.

Vinyl & Linoleum

Use as directed, but make sure the mop is only damp, not dripping.

Sealed Hardwood

Reduce vinegar to ½ cup and skip baking soda if preferred. Too much moisture can damage wood, so wring out the mop very well.

Laminate

Use a lightly damp mop only. Avoid excessive water.

Extra Shine Boost Option

If your floors look extremely dull, add:

  • 1 tablespoon rubbing alcohol

This helps speed drying and adds extra shine, especially on tile and laminate.

Deep Cleaning Version (For Heavy Dirt)

For floors that haven’t been cleaned in a while:

  • 1 cup vinegar

  • 1 tablespoon dish soap

  • 1 tablespoon baking soda

  • 1 tablespoon rubbing alcohol

  • 2 liters warm water

Let the solution sit on tough spots for 2–3 minutes before mopping over them.

What NOT to Mix

Avoid mixing vinegar with:

  • Bleach

  • Hydrogen peroxide

These combinations can create harmful fumes.

Also avoid using vinegar on:

  • Natural stone (marble, granite, travertine)
    It can dull and damage the surface.

How Often Should You Use It?

  • High-traffic areas: 2–3 times per week

  • Low-traffic areas: Once per week

Regular cleaning prevents buildup and keeps floors looking polished.

Natural Fragrance Ideas

Instead of artificial scents, try:

  • Lemon essential oil for freshness

  • Lavender for a calming scent

  • Eucalyptus for a spa-like feel

  • Peppermint for a crisp, clean aroma

Just 10–15 drops is enough for a bucket.

Why Floors Lose Their Shine

Over time, residue from:

  • Shoes

  • Cooking grease

  • Cleaning products

  • Hard water

can build up. This layer dulls the surface and makes floors appear worn. A simple acidic solution like vinegar breaks down that residue naturally.

Budget Breakdown

Store-bought cleaners can cost significantly over time. This homemade version costs only a fraction per batch and can clean your entire home.

Safety Tips

  • Always test in a small hidden area first.

  • Keep out of reach of small children.

  • Do not store in sealed bottles if baking soda and vinegar are still reacting.

  • Label your mixture clearly if storing short-term.

Final Thoughts

With just vinegar, baking soda, dish soap, and water, you can transform dull floors into sparkling surfaces again. This simple homemade cleaner cuts grease, removes residue, neutralizes odors, and leaves your home smelling fresh—all without harsh chemicals.

5 Vegetables That Pull Sugar Out of Your Blood

Maintaining balanced blood sugar is essential for steady energy, a healthy metabolism, and long-term wellness. While no vegetable can literally “pull sugar” out of your bloodstream, many are rich in fiber, antioxidants, and plant compounds that help your body regulate glucose more effectively. Adding the right vegetables to your daily meals can make a noticeable difference over time.

Here are five powerful vegetables that support healthy blood sugar levels — plus simple, delicious recipes you can prepare at home.


1. Bitter Melon (Karela)

https://png.pngtree.com/png-clipart/20250206/original/pngtree-a-whole-and-sliced-bitter-melon-bitter-gourd-on-png-image_20341952.png
https://www.greendna.in/cdn/shop/products/bittergourdsliced_500x.webp?v=1670848361
https://images.picxy.com/cache/2020/9/9/a7d9c0efc4893d80a607ce2d4495f2a8.jpg
4

Bitter melon is widely used in Asian cuisine and traditional wellness practices. It contains plant compounds such as charantin and polypeptide-p, which are known to support insulin function and glucose metabolism. Its naturally bitter taste reflects its potent bioactive profile.

Simple Bitter Melon Stir-Fry Recipe

Ingredients:

  • 2 medium bitter melons, thinly sliced

  • 1 small onion, sliced

  • 2 cloves garlic, minced

  • 1 tablespoon olive oil

  • ½ teaspoon turmeric

  • Salt to taste

  • Juice of half a lemon

Instructions:

  1. Wash and slice the bitter melon. Remove seeds if desired.

  2. Heat olive oil in a pan over medium heat.

  3. Add garlic and onion; sauté until fragrant.

  4. Add bitter melon and turmeric. Stir-fry for 8–10 minutes until tender.

  5. Add salt and lemon juice before serving.

Serve warm with whole-grain roti or brown rice for a balanced meal.


2. Spinach

https://cdn.britannica.com/30/82530-050-79911DD4/Spinach-leaves-vitamins-source-person.jpg
https://www.avera.org/app/files/public/79618/bowl-of-spinach-on-wooden-table.jpg
https://www.foodandwine.com/thmb/abuHi7DZZhqK7dJUML5bP_loqHg%3D/1500x0/filters%3Ano_upscale%28%29%3Amax_bytes%28150000%29%3Astrip_icc%28%29/201501-xl-sauteed-spinach-with-lemon-and-garlic-olive-oil-b73e81f0ffc84b9da91e4e359c8a4d93.jpg
4

Spinach is low in carbohydrates and high in magnesium — a mineral linked to improved insulin sensitivity. Its fiber slows the absorption of sugar into the bloodstream, preventing sudden spikes after meals.

Garlic Spinach Sauté

Ingredients:

  • 4 cups fresh spinach

  • 1 tablespoon olive oil

  • 2 cloves garlic, sliced

  • Pinch of black pepper

  • Pinch of sea salt

Instructions:

  1. Heat olive oil in a skillet.

  2. Add garlic and cook lightly until golden.

  3. Add spinach and sauté until wilted (about 3–4 minutes).

  4. Season with salt and pepper.

Enjoy as a side dish or add to omelets, soups, or smoothies.


3. Broccoli

https://www.agatavalentina.com/Assets/ProductImages/20000007019-02.jpg
https://www.eatingwell.com/thmb/X2037g5NRLYolhTjQSLs0ExhRro%3D/1500x0/filters%3Ano_upscale%28%29%3Amax_bytes%28150000%29%3Astrip_icc%28%29/cut-broccoli-1-62ef32bb6b524d5781429df20ee14a70.jpg
https://assets.epicurious.com/photos/5761cfc58accf290434553a9/16%3A9/w_1280%2Cc_limit/steamed-broccoli-with-olive-oil-garlic-and-lemon.jpg
4

Broccoli contains sulforaphane, a powerful antioxidant that may help reduce inflammation and support glucose regulation. Its high fiber content promotes slower carbohydrate digestion.

Roasted Garlic Broccoli

Ingredients:

  • 2 cups broccoli florets

  • 1 tablespoon olive oil

  • 2 cloves garlic, minced

  • ½ teaspoon paprika

  • Salt to taste

Instructions:

  1. Preheat oven to 200°C (400°F).

  2. Toss broccoli with olive oil, garlic, paprika, and salt.

  3. Spread evenly on a baking tray.

  4. Roast for 20–25 minutes until slightly crisp.

This recipe makes a satisfying, low-carb side dish perfect for lunch or dinner.


4. Okra (Lady’s Finger)

https://www.nutrition-and-you.com/image-files/okra-pods.jpg
https://png.pngtree.com/background/20250722/original/pngtree-freshly-sliced-okra-with-visible-seeds-and-pods-close-up-picture-image_16728165.jpg
https://ichef.bbci.co.uk/food/ic/food_16x9_1600/recipes/okra_curry_68708_16x9.jpg
4

Okra contains soluble fiber that forms a gel-like substance during digestion. This slows sugar absorption and supports stable blood glucose levels. It’s commonly used in Middle Eastern and South Asian cooking.

Light Okra Tomato Curry

Ingredients:

  • 2 cups chopped okra

  • 1 large tomato, diced

  • 1 small onion, chopped

  • 1 tablespoon olive oil

  • ½ teaspoon cumin

  • ½ teaspoon coriander powder

  • Salt to taste

Instructions:

  1. Heat oil in a pan and sauté onion until translucent.

  2. Add tomatoes and cook until soft.

  3. Add okra and spices.

  4. Cook on low heat for 12–15 minutes until tender.

Serve with whole grains for a balanced meal.


5. Cabbage

https://www.thespruceeats.com/thmb/IpMoMgZn7v-lJTN-HBCW6_N6Acg%3D/1500x0/filters%3Ano_upscale%28%29%3Amax_bytes%28150000%29%3Astrip_icc%28%29/greencabbageDianaMiller-750a13ed901b46cd807bee7ed0ed8586.jpg
https://data.thefeedfeed.com/static/2020/08/31/15988938965f4d2f482b801.jpg
https://www.allrecipes.com/thmb/sZYDK79iulyYe2PdFOveUXv9sTg%3D/1500x0/filters%3Ano_upscale%28%29%3Amax_bytes%28150000%29%3Astrip_icc%28%29/174210-super-easy-stir-fried-cabbage-DDMFS-4x3-a02887785a6645a98f1f966dd3b59d55.jpg
4

Cabbage is low in calories and carbohydrates yet rich in fiber and antioxidants. It supports digestion and helps maintain steady blood sugar when included regularly in meals.

Quick Cabbage Stir-Fry

Ingredients:

  • 3 cups shredded cabbage

  • 1 carrot, grated

  • 1 tablespoon olive oil

  • 1 teaspoon sesame seeds (optional)

  • Salt and pepper to taste

Instructions:

  1. Heat oil in a large pan.

  2. Add cabbage and carrot; stir-fry for 5–7 minutes.

  3. Season lightly and sprinkle sesame seeds before serving.

This dish pairs beautifully with grilled protein or legumes.


Final Thoughts

Adding fiber-rich vegetables like bitter melon, spinach, broccoli, okra, and cabbage to your daily routine can naturally support balanced blood sugar levels. These vegetables work best as part of a wholesome diet that includes lean protein, healthy fats, and whole grains.

For best results:

  • Avoid deep frying vegetables.

  • Limit refined sugars and processed foods.

  • Stay active daily.

  • Drink plenty of water.

If you have diabetes or any medical condition, consult your healthcare provider before making significant dietary changes.